Love retro gaming but not sure where the best games are found? Looking for some retro gaming gold? Then why not take a look at Amibian, the Raspbian-based Amiga emulator for the Raspberry Pi?
Emulating the Commodore Amiga has never been easier or more satisfying than this.
Amiga: One of the Most Loved Home Computers Ever
Amazing graphics, unique physical design, and the antonym of the bland IBM/PC compatible market. No, I’m not talking about an Apple computer, but the Commodore Amiga. Capable of audio, graphics, video, standard office tasks, and an awesome video gaming platform, the Amiga dominated home computing in the USA and Europe between 1985 and its final appearance in 1994.

(In the UK and Europe in particular, the decline of the Amiga lead to the rise of game consoles and home-based PCs.)
However, the Amiga is not dead. Remnants of the Amiga’s legacy can be found on modern platforms, such as Android and iOS, although only a few games have been re-released on mobile.
You can even buy old Amigas online, although you should know that they’re surprisingly expensive. Most also require new capacitors, as the originals have probably leaked, or are yet to do so. This means an additional expense that you might prefer to avoid.
Meanwhile, some fan projects are attempting to revive the Amiga as a device. But why pay for a device that boots into an emulator if you can just emulate it yourself on the Raspberry Pi you already own?
Here’s what you need to know and how to do it.
What You Need to Emulate an Amiga on Raspberry Pi
If you want to turn your Raspberry Pi into an Amiga, you will need:
- Any Raspberry Pi: original model B, Zero, or Pi 3 and later (what’s the difference?)
- Blank microSD card at least 2GB
- Etcher image writing app
- A copy of the Amibian operating system, from the Amibian website
- Amiga Kickstart ROM files
- Games, applications, Workbench ROMs (The best Amiga games to emulate!)
- Keyboard and mouse
- Joystick (or other game controller)
- TV or monitor
Put this lot together with the right Kickstart ROM, and you’ve got the closest thing to an original Amiga!
Finding Amiga Kickstart ROMs

To use Amibian, you’ll need to first get hold of a Kickstart ROM for your preferred Amiga model (or all of them). The easiest option here is to purchase Kickstart from Cloanto via amigaforever.com.
However you get hold of the ROM, you’ll need to add it to a USB flash drive, along with the game or application ROMs you plan to use.
With all of these things gathered together, you’ll be ready to start your trip into the past. Ready to revisit the golden age of 16-bit gaming? Here’s what you need to do.
Installing Amibian OS on Your Raspberry Pi
To get started, begin with a freshly formatted microSD card. You should have downloaded and installed Etcher, and the Amibian operating system. This archive should be unpacked, so you have the IMG file ready to use.
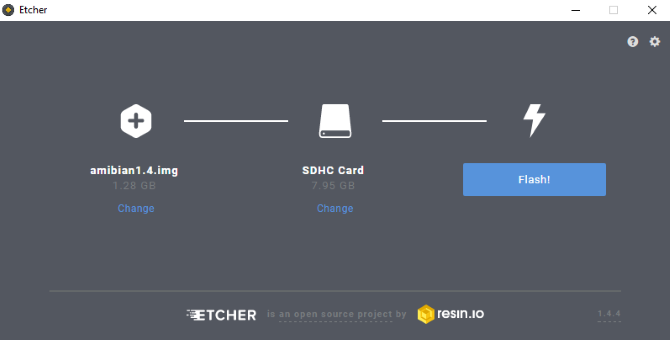
Insert the microSD card into your card reader and launch Etcher. Click Select Image to browse to the Amibian IMG file.
Check the middle panel of the app, where the microSD card should be detected. Confirm this is the correct card (check the drive letter in your file manager), then click Flash to proceed with writing the image.
Wait while this completes; Etcher will inform you when the writing has completed, so close the app.
Booting and Configuring the Amibian System
At this stage you should ensure that all of the peripherals are connected to the Raspberry Pi, including the display. Safely remove the microSD card from your PC, and insert it into your Raspberry Pi, then connect the power cable to boot up.
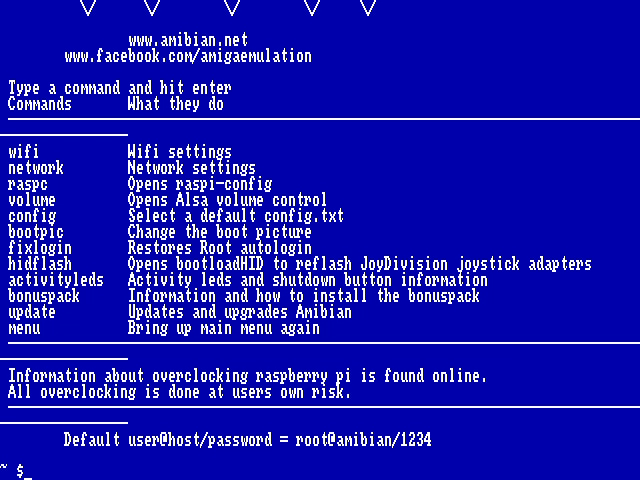
The main user interface will appear, which offers a tantalizing collection of menus and options; however, you cannot use your Amibian system yet. Instead, you’ll need to make some configuration changes. Quit the UI, and in the command line menu, enter:
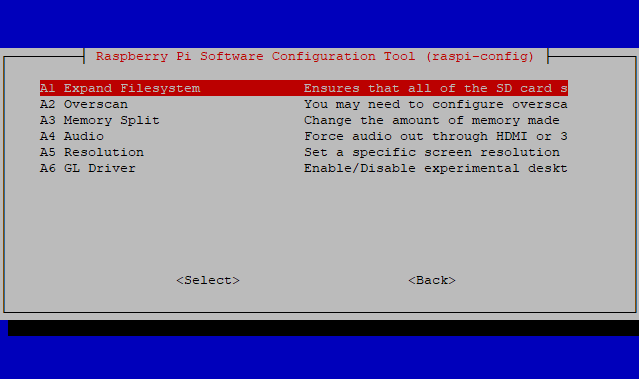
raspc
This will open the Raspberry Pi’s familiar raspi-config screen. Here, use the arrow keys to select Expand filesystem, then select OK, and Finish. You might also change the computer’s Localization Options while you’re using raspi-config.
Choose Yes when prompted to reboot. You now have the full capacity of the microSD card available for your Amiga ROMs!
Copying Amiga ROMs and Data to Raspberry Pi
When your Pi reboots, insert the USB flash drive.
In the menu, again select Quit, then find Midnight Commander in the command line menu. This tool is a file manager, and you can use it to access the files. Launch this using the command
mc
Here, use the arrow keys to select the USB drive in the left hand pane, and in the right hand pane, browse to /root/amiga/kickstarts. Select the Kickstart ROM(s) here, and press F5 to copy to the kickstart subdirectory.
Once this is done, browse to /root/amiga/floppies in the right pane, and copy your Amiga games, again using F5.
Everything is now in place to emulate an Amiga on your Raspberry Pi!
Launching Amiga Software in Amibian
To use Amiga software, you need to first tell the emulator where the Kickstart ROM is, select a configuration (several versions of the Amiga were released), and load up the virtual floppy disk (the game ROM).
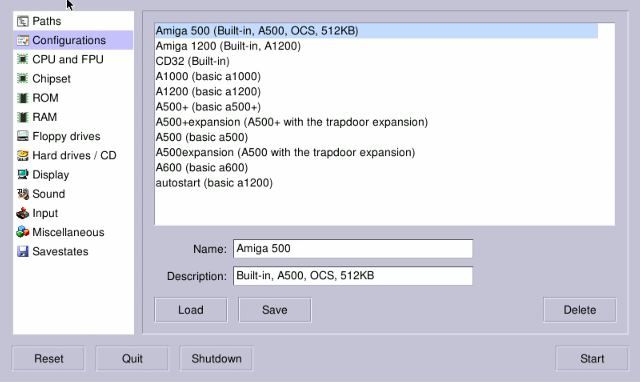
Do this by tapping 3 from the main Amibian menu to Start Amiga, and selecting one of the Configurations. This will depend on which Kickstart ROM you have (you’ll need to check online for the specifics), but for instance if you’re using Kickstart 1.3, you’ll need to choose one of the basic A500 configurations. Select this, then click the ROM tab, and browse for the correct Kickstart version (in our example, this would be Kickstart 1.3).
Next, go to the RAM tab, where you’ll find the option to set a 1MB RAM chip. This would emulate the expansion card that shipped with many Amiga 500’s 1989-92, upgrading the basic 512kB RAM to a full megabyte (gasp!).

With this done, go to the Floppies tab, and browse for the game ROM you want to use. Amiga ROMs are in ADF format; the initial disk is labelled DF0:, so use this for single disk applications and games. If your game has multiple disks, simple load them into each virtual drive in order.
Click Save to remember the configuration (giving it a name and description), then Start. Moments later, your emulated Amiga will boot your chosen ROM file. Time to game like it’s 1990!
Enjoy Classic Amiga Software on Your Raspberry Pi
It’s remarkable how straightforward it is to use your Raspberry Pi as an Amiga. Better still, you can still use Linux, as it provides the underlying code for running your computer.
To turn your Raspberry Pi into an Amiga, all you need to do is:
- Connect a USB keyboard and mouse to your Raspberry PI
- Install the Amibian distro to your SD card
- Copy the Kickstart ROM and game ROMs to a USB flash drive
- Boot up your Raspberry Pi
- Expand the filesystem
- Copy the ROMs to the correct directories in Amibian
- Tell the configuration tool where to find Kickstart
- Load up your game ROM, click Start, and enjoy!
Better still, this project is particularly suited to older models of the Raspberry Pi. Didn’t find anything useful in our list of great ways to use an old Raspberry Pi? This might be just what you’re looking for!
Read the full article: How to Emulate the Commodore Amiga on a Raspberry Pi Using Amibian
Read Full Article
No comments:
Post a Comment