08 July 2018

07 July 2018
Netflix Is Killing Off Its User Reviews

For Netflix, user reviews are a thing of the past. The streaming service is deleting all previously written user reviews and preventing users from writing new reviews. Whatever the reason, it’s clear that Netflix no longer cares what you think.
In March 2017, Netflix ditched its five-star ratings in favor of a simple thumbs-up/thumbs-down system. Instead of scoring a movie or TV show out of five you have the binary choice of saying whether you like it or not. And now Netflix is ditching user reviews.
Reviewing Netflix’ Decision to Ditch Reviews
As first reported by CNET, Netflix recently emailed users to inform them user reviews are going away. Users who have contributed a review within the past year have been notified that “this feature will be retired on July 30th due to declining usage.”
User reviews will be available until July 30th, at which point they will all be scrubbed. Along with users’ ability to leave new reviews. While this won’t bother the majority of Netflix users, those who regularly wrote reviews are rather annoyed by it all.
Hey @netflix, no need to go all alternative facts on this. You eliminated bylines and star ratings, and emphasized your own recommendations. So yeah, usage declined. Own it. It's ok; there are other sources for movie reviews.
Just don't blame your users. pic.twitter.com/D0arnJ264T
— James Belcher (@Satorical) July 2, 2018
Regular reviewers have taken issue with the explanation that this was all down to “declining usage”. User reviews for content were difficult to find and limited to the desktop version of Netflix. So it’s no wonder hardly anyone bothered.
One explanation for this change is negative reviews being written about Netflix Originals. Because while shows like Stranger Things and The Crown have enjoyed critical acclaim, other Netflix Originals have garnered mixed reviews. Including Netflix’ Marvel shows.
Your Opinions No Longer Matter to Netflix
Netflix is in the fortunate position of not actually having to worry about ratings. As long as people are choosing to pay for Netflix every month the company can keep on experimenting with a range of content. And in that context, your opinions don’t matter.
Thankfully, even without the benefit of user reviews we can help you find the Netflix Originals that match your tastes. And that includes these brilliant original Netflix movies and these awesome Netflix Originals you’ve probably never heard of.
Image Credit: Jenny Cestnik/Flickr
Read the full article: Netflix Is Killing Off Its User Reviews
Read Full Article
5 Ways to Find Free or Cheap Hotels, Homestays, and Hostels

You probably already know about Booking.com, Google’s hotel finder, and the other great hotel search engines out there. But the deals you find on those aren’t always the best price. So before you book your next travel night, check out these tools.
Service for Hotels (Web): Get Discounts Post-Booking
When you book a hotel, it’s available at a certain price. But often, hotels will discount the same type of room after you’ve already booked. Service tracks such discounts and ensures you get the same deal saving you money in the process.
You don’t have to do anything to get these discounts. Service tracks the booking automatically and re-books your room at the new price. It’s the simplest way to save money even after you have already booked, ensuring you get the best price or something even better.
Service also does this for airlines, saving you money on canceled or delayed flights. Yup, you can finally make the airline pay you for that inconvenience. Service charges 30% of all the money it saves for you, which is a pretty good deal since it’s making you money anyway.
Worldpackers (Web): Work in Exchange for Free Accommodation

Worldpackers is the best way to get free accommodation during your travels. In exchange, you will be doing some small jobs to help out the people giving you a room. Simple, eh?
Go to the site and search for the city you are visiting. You’ll get a list of all the types of jobs and accommodation available, based on the types of skills you want to use, like labor, teaching English, etc. Each listing clearly states how many hours a day or week you will be working and what your duties are. The listing will also state the kind of free stay you get, and any bonuses like free meals, days off, transport, and other perks.
Apply for the jobs you like and cross your fingers. You might soon be staying for free and even getting your meals while touring the new city in your non-work hours.
Worldpackers also lets you work with NGOs and other outfits with a social cause, again giving you free stay in return. So not only do you get free stay, but you’ll also be doing things for a good cause.
Student Universe (Web): Extra Discounts for Students

You can get a lot of free and discounted stuff with a .edu email address or a student ID card, so why should hotels and hostels be any different? Student Universe shows you places with an extra discount for students aged 26 or less.
While the site is best known for great flight deals, it also has partners in the hotel industry who offer discounts to students. For all you know, you might get a decent room at the same price as a bed in a hostel’s dormitory. And sure, you also get to see hostel options along with the hotel partner deals.
The site is best used by registering for an account with your school’s email address. In case you don’t have any .edu email address, you might not be able to get many of the benefits of their partner programs.
All The Rooms (Web): Search AirBnB and Hotels in the Same Site

Most hotel and hostel search engines don’t include AirBnB listings in their results. That’s a bit silly because you can get some major benefits from booking AirBnB over hotels. All The Rooms is the best search engine to look for hotels alongside AirBnB listings.
This is an aggregator site, searching for results from Booking.com, Expedia, Hotwire, Priceline, HomeAway, Hostelworld, VRBO, and AirBnB. So you get accommodation options of all sorts, from a bed in a dormitory to a lovely homestay. Using the site is as simple as any other, where you only need to add your travel dates and destination. You can filter the results to add essential features and sort the listings.
You don’t actually make any bookings through All The Rooms, which is the only inconvenience of the site. You’ll usually have to visit the original booking for that. That’s why I wouldn’t advise making an account at All The Rooms, it’s quite pointless.
Gopher (Chrome): Price Comparison to Find Better Deals
One of the best ways to save money on a hotel deal is to book it directly from the hotel’s own website, and request a discount if possible. Gopher, an extension for Google Chrome, does that automatically for you in the background through its price comparison engine.
When you see the final price before booking your hotel on a site like Booking.com, Gopher will jump into action and check that hotel’s own website. If there’s a better deal on the original site (and there often is), you will get an alert and be taken there directly. You can end up saving quite a bit of money in the process.
To get an idea of the savings, go to Gopher’s deals page to see recent bookings made with the app. Gopher also has a cashback reward program, but only use it if you don’t plan on using the cash back rewards of any other loyalty program you belong to. You can’t double dip.
Staying in Hotels? Protect Your Data
Just as you should be a little vigilant about your luggage and valuables in a hotel, you also need to be vigilant about your data’s security. In fact, hotels have a lot of information about you and can easily leak that and more if you aren’t careful. Here are the potential risks to your personal data when you’re staying at a hotel, and what you can do about it.Read Full Article
Twitter’s efforts to suspend fake accounts have doubled since last year
Bots, your days of tweeting politically divisive nonsense might be numbered. The Washington Post reported Friday that in the last few months the company has aggressively suspended accounts in an effort to stem the spread of disinformation running rampant on its platform.
The Washington Post reports that Twitter suspended as many as 70 million accounts between May and June of this year, with no signs of slowing down in July. According to data obtained by the Post, the platform suspended 13 million accounts during a weeklong spike of bot banning activity in mid-May.
Sources tell the Post that the uptick in suspensions is tied to the company’s efforts to comply with scrutiny from the Congressional investigation into Russian disinformation on social platforms. The report adds that Twitter investigates bots and other fake accounts through an internal project known as “Operation Megaphone” through which it buys suspicious accounts and then investigates their connections.
Twitter declined to provide additional information about the Washington Post report but pointed us to a blog post from last week in which it disclosed other numbers related to its bot hunting efforts. In May of 2018, Twitter identified more than 9.9 million suspicious accounts — triple its efforts in late 2017.

Chart via Twitter
When Twitter identifies an account that it deems suspicious it then “challenges” that account, giving legitimate Twitter users an opportunity to prove their sentience by confirming a phone number. When an account fails this test it gets the boot, while accounts that pass are reinstated.
As Twitter noted in its recent blog post, bots can make users look good by artificially inflating follower counts.
“As a result of these improvements, some people may notice their own account metrics change more regularly,” Twitter warned. The company noted that cracking down on fake accounts means that “malicious actors” won’t be able to promote their own content and accounts as easily by inflating their own numbers. Kicking users off a platform, fake or not, is a risk for a company that regularly reports its monthly active users, though only a temporary one.
As the report notes, at least one insider expects Twitter’s Q2 active user numbers to dip, reflecting its shift in enforcement. Still, any temporary user number setback would prove nominal for a platform that should focus on healthy user growth. Facebook is facing a similar reckoning as a result of the Russian bot scandal, as the company anticipates user engagement stats to dip as it moves to emphasize quality user experiences over juiced up quarterly numbers. In both cases, it’s a worthy tradeoff.
Read Full Article
How to Program Your Raspberry Pi to Control LED Lights

Starting out with the Raspberry Pi can be an exciting experience. It’s never been easier for a beginner to get started with both coding and DIY electronics.
One easy project is to make a simple circuit with two LEDs and control one of them using code. Here’s how to do it!
Required Components

Before starting, you’ll need to make sure you have an operating system on your Pi. Installing Raspbian via NOOBS is by far the quickest way to get going.
Boot up your Pi, and attach it to a screen, mouse, and keyboard like a regular desktop computer. Alternatively, you can connect to your Pi via SSH to save the clutter of extra wires. We will cover how to control LEDs whichever method you choose.
Once you are sure the Raspberry Pi is booting up correctly, turn it off again while you build your circuit, to avoid damaging your Pi.
Along with your Raspberry Pi, you will need:
- A breadboard
- 2 x LEDs
- 2 x resistors (anything from 220 Ohm to 1 kOhm)
- Hookup cables
If you got your Raspberry Pi with a starter kit, you will likely already have everything on this list. Now let’s build our circuit.
A Simple LED Circuit
Set up your components as shown in this Fritzing diagram:
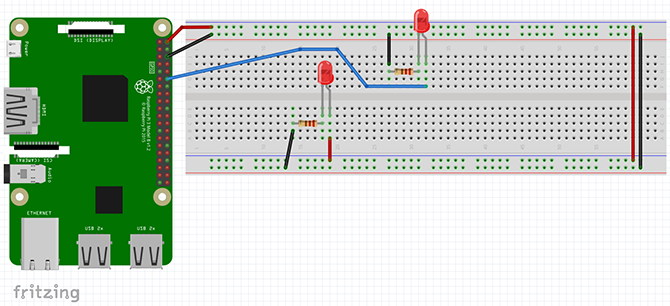
This circuit does two things. The 5v and GND pins of the Pi attach to the Power Rails of the breadboard.
Note: To get a better idea of what the breadboard is and how it works, take a look at our breadboard crash course.
The two power rails are linked at the end, and a line runs from the positive power rail into the positive (anode) side of the bottom LED. The negative side of the LED is attached to a resistor, which is connected back to the GND power line.
The top LED is wired up differently. A line runs from pin 12 (GPIO18) of the Raspberry Pi into the positive side of the LED, which runs through the resistor and back into the GND rail. Pin 12 is also GPIO18, as confusing as that sounds, our guide to Raspberry Pi GPIO pins will help clear things up!
It isn’t important which way round you set up the resistors, but it is essential to get the LEDs the right way round. Luckily, it is easy to tell which side is which:

Once you have everything set up it should look something like this:

Note that I am using an external Wi-Fi dongle here, it’s only needed if you suffer from the curse of the weak Wi-Fi!
Make sure everything is set up correctly, then boot up your Raspberry Pi. The LED attached directly to the 5v pin should turn on immediately. The other LED is the one you will control from code.
Method 1: Python via IDLE
If you are using your Raspberry Pi in desktop mode, open the applications menu in the top left of your screen, and navigate to Programming > Python 3 (IDLE). This will open the Python shell. If you are using SSH mode, instructions are provided later in the article.
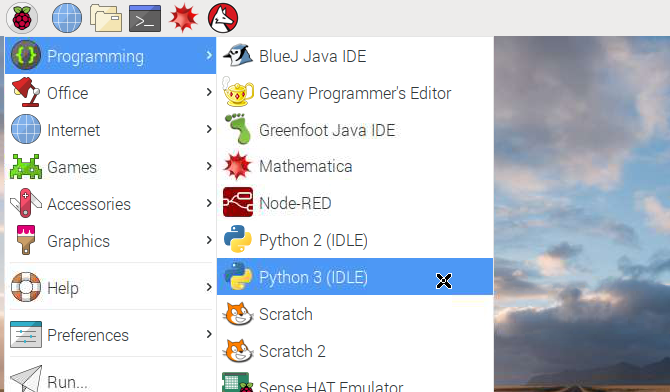
The Raspbian operating system comes with Python already installed. Python is a perfect programming language for beginners, and there are many great websites out there to help you get started. We will create a short Python together, though if you’d rather grab the finished script you can copy the code from Pastebin.
You could program directly into the shell, but it would be nice to create a program you can save and use again. Open a new file by clicking File > New File.
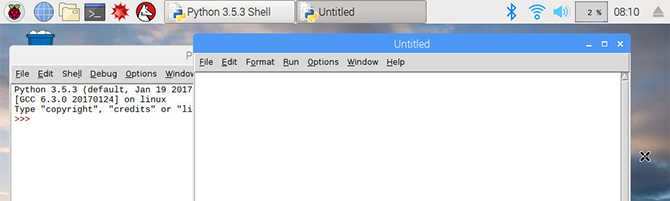
You are going to create a simple blink sketch which will turn the LED on and off. To begin, you need to import the RPi.GPIO and time modules.
import RPi.GPIO as GPIO
import time
Importing as GPIO saves you from typing RPi.GPIO every time, and you will need the time module for the delays between the LED turning on and off. Now, set up the GPIO pin.
GPIO.setmode(GPIO.BOARD)
GPIO.setwarnings(False)

ledPin = 12

GPIO.setup(ledPin, GPIO.OUT)
Set up the GPIO pins to use BOARD numbering and set GPIO warnings to false. Don’t worry if you do not understand this at this stage! Next, set your ledPin to be pin 12 (GPIO18) of your Pi. Finally, set up the ledPin to OUTPUT. Now the pin is ready to control the LED.
Making the LED Light Flash
By creating a for loop, you can control the number of times the LED flashes. Enter the following code, making sure to indent it the same way.
for i in range(5):
        print("LED turning on.")
        GPIO.output(ledPin, GPIO.HIGH)
        time.sleep(0.5)
        print("LED turning off.")
        GPIO.output(ledPin, GPIO.LOW)
        time.sleep(0.5)
This for loop runs five times, and each time it will print to the Python Shell what it is doing, before changing pin 12 to HIGH, turning the LED on, then LOW, turning the pin off. The program then quits automatically.
Save your program, and then select Run > Run Module from the editor menu. Your LED should flash five times!

Congratulations! You have created your first GPIO program!
Method 2: Python via SSH and Nano
If you have connected to your Raspberry Pi via SSH, you can create this program from the command line. Create a new script in Nano by typing:
sudo nano blink.py
This will open up a new file in the Nano editor called blink.py. Enter the same code as above, making sure to indent everything correctly, and save the program by pressing Ctrl-X. This triggers a save prompt at the bottom of the screen.
Type y to save it, and enter to confirm the filename. This will bring you back to the command line. You can run your program using the Python command:
python blink.py
You should see the LED flash and the print function on the screen.

Dive Deeper With More Raspberry Pi Projects
Learning how to control LEDs using code is an important first step in your DIY education. This level of coding is all that you need for many Raspberry Pi beginner projects.
As well as being great for homemade electronics, the Raspberry Pi is capable of a vast array of different things, and working through our awesome Raspberry Pi guide will help you get to grips with the many uses of these tiny computers.
Read the full article: How to Program Your Raspberry Pi to Control LED Lights
Read Full Article
06 July 2018

Your next summer DIY project is an AI-powered doodle camera
With long summer evenings comes the perfect opportunity to dust off your old boxes of circuits and wires and start to build something. If you’re short on inspiration, you might be interested in artist and engineer Dan Macnish’s how-to guide on building an AI-powered doodle camera using a thermal printer, Raspberry pi, a dash of Python and Google’s Quick Draw data set.
“Playing with neural networks for object recognition one day, I wondered if I could take the concept of a Polaroid one step further, and ask the camera to re-interpret the image, printing out a cartoon instead of a faithful photograph.” Macnish wrote on his blog about the project, called Draw This.
To make this work, Macnish drew on Google’s object recognition neural network and the data set created for the game Google Quick, Draw! Tying the two systems together with some python code, Macnish was able to have his creation recognize real images and print out the best corresponding doodle in the Quick, Draw! data set
But since output doodles are limited to the data set, there can be some discrepancy between what the camera “sees” and what it generates for the photo.
“You point and shoot – and out pops a cartoon; the camera’s best interpretation of what it saw,” Macnish writes. “The result is always a surprise. A food selfie of a healthy salad might turn into an enormous hot dog.”
If you want to give this a go for yourself, Macnish has uploaded the instructions and code needed to build this project on GitHub.
Read Full Article
Buckyballs are back
Years ago – six years ago, to be exact – a toy called Buckyballs came under attack by government officials intent on destroying fun. The Consumer Product Safety Commission banned the toys, which we noted were tiny rare earth magnets that were good for play but bad for a snack, because a few overzealous children swallowed one or two and found themselves in gastrointestinal distress.
The lawsuit against ZenMagnets, creators of Buckyballs, began as a “recall prior to record of injury,” something unprecedented in this space. That meant the company had to stop selling its magnets before anyone was actually injured, an odd position for a small company to be in.
Now, after six years of battle, Buckyballs are back. The company is now able to sell its biggest set, the Mandala and notes that the sets are not toys. They could cause intestinal pinching, writes the ZenMagnets team, and they recommend not leaving them around animals or small children. However, these odd and wonderful little toys are finally available for purchase. The kit now even comes inside a lockable box to ensure little hands can’t accidentally grab and eat them.
“We remain willing to work with the CPSC to develop the magnet safety standards for which we’ve already petitioned, and which will be more effective and reasonable than the all-ages, nationwide ban we succeeded in vacating in the Tenth Circuit,” wrote founder Shihan Qu. “As we’ve already been doing, Zen Magnets looks forward to providing not just the highest quality magnet spheres on the market, but also the safest in terms of sales methods and warnings. Now that the war on magnets is over, hopefully we can all focus towards the war on magnet misuse.”
“Magnets must be respected, but need not be feared,” he said. Truer words – besides these – were never spoken.
Read Full Article
5 Most Common BitDefender Issues and How to Solve Them

BitDefender is one of the best online security suites on the market, but that doesn’t mean it isn’t without issues. Given the vast number of applications and uses it has to contend with, there’s bound to be a few problems here and there.
Fortunately, these problems can all be solved. Here are some of the most common BitDefender issues you might run into and what you can do about them.
1. SSL Scanning Breaks Secure Sites and Apps
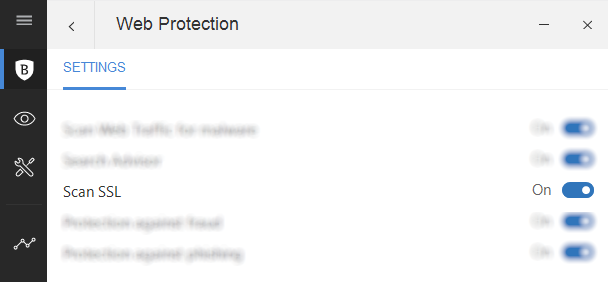
One common BitDefender problem appears to be a conflict with Microsoft Outlook, the popular email and time management tool. But upon closer inspection, it seems that the issue here is less about the application itself and more to do with SSL certificates.
This particular issue can also crop up with websites and even some online games.
If you’re having a problem with SSL certificates that cannot be verified (usually due to them being unsigned, but it might also be a problem with the clock on the web server or even your local machine), the best solution is to disable BitDefender’s Scan SSL feature.
Open BitDefender, then click Features > Web Protection > Settings > Scan SSL. (On older versions, use Settings > Privacy Control > Antiphishing and disable Scan SSL.)
It’s that simple. But should you do this? Is it a safe workaround?
Your course of action here should be to do nothing more than check if the workaround has the desired effect, before reporting the problem to BitDefender and the service in question.
You can find full details, and the opportunity to open a support ticket, at BitDefender’s support page on the topic.
2. PC Won’t Boot After Installing BitDefender
You’ve installed your newly purchased BitDefender online security tool. But now your PC won’t boot. What can you do about it?
Typically, two issues can be considered responsible for this, and both involve the incomplete removal of a previous security suite (including old versions of BitDefender).
To fix the problem, restart your computer in Safe Mode, then browse to bitdefender.com/uninstall and download the uninstall tool.
Run it with administrator privileges, and wait until it has tidied up. If you were using a different security solution, check the publisher’s website for its own uninstall tool, and run that as well.
When you’re done, restart your computer, and try installing again. Note that should the above solution fail, you’ll need to use Windows System Restore to rewind to a date before you installed the security software.
3. BitDefender Won’t Scan Your PC
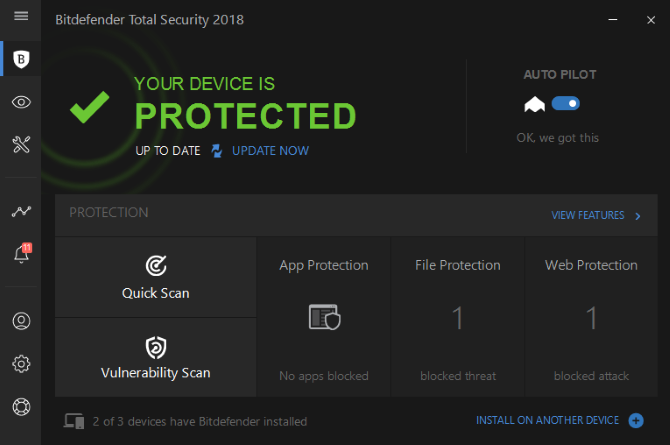
Antivirus software should scan your computer, but what happens when it won’t?
Usually, this is caused by a faulty installation or the remains of a prior one. It might also be due to a conflict with another security tool on your PC, such as Windows Defender.
For the first cause, follow the steps in the previous section to uninstall BitDefender, then reinstall it.
If you suspect the second cause (especially if scanning worked previously), your best bet is to disable the other security tool, then try scanning again. If it works, you probably don’t need the other security software, so uninstall it.
4. BitDefender Blocks File Creation (e.g. Game Saves)
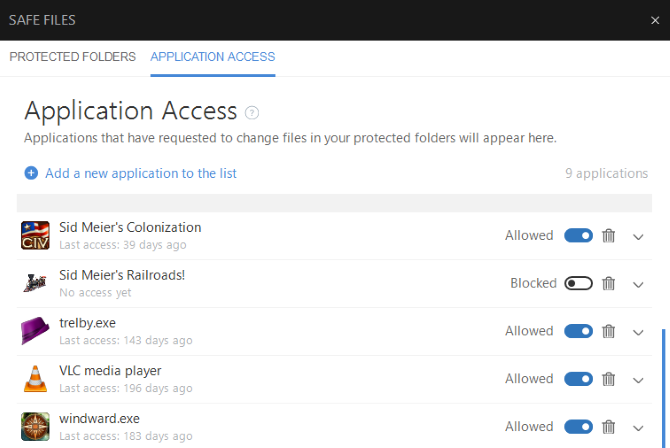
Having trouble with game saves? Apps blocked from creating or saving files on your PC by BitDefender is a pain, but what can you do about it?
Well, crazy as it might seem, this is actually a security feature. Some types of malware infections take advantage of your user account by saving themselves to your Documents folder and sub-folders.
One particularly dangerous malware type that attempts to access these files is ransomware.
By blocking permission, BitDefender is protecting your data from unauthorized access. Furtonately, this setting is configurable, meaning you can grant permission to apps and games to save to your PC.
Often, you’re alerted to this with an Application access blocked dialog box, from where you can easily allow access. This doesn’t always happen, however, which means you need to make the change manually.
Do this by opening BitDefender and checking the Notifications screen. Listed here, you should find an Application access blocked item. You’ll find all the information you need (i.e. the name of the application and the protected folder) to make a decision here.
This is important, as you wouldn’t want to unintentionally allow malware permission to this directory!
To allow the software or game access to the folder, click View application, then find the app in the list. Where it shows as Blocked, click the slider to Allowed, and close the BitDefender window. Note that it is possible to do this while the software concerned is running.
Once permission is given, you might simply Alt-Tab back into the app or game and complete the save.
5. Trouble Activating BitDefender Firewall
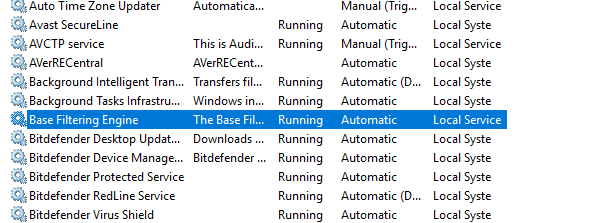
BitDefender includes a strong firewall, but in some cases it cannot be enabled. This is almost always due to a missing service in Windows, Base Filtering Engine (BFE), which controls the Windows Filtering Platform. This is needed for most firewall products on Windows.
To fix BFE, right-click on Computer/This PC in File Explorer and select Manage. Here, open Services and Applications > Services and find Base Filtering Engine.
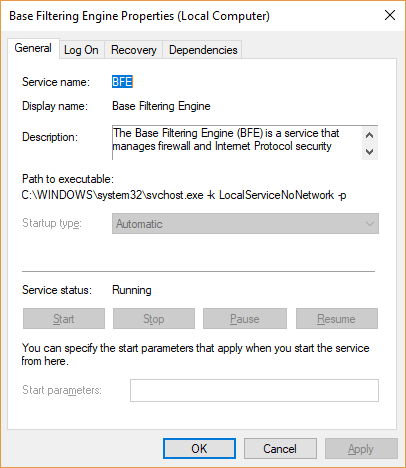
Double-click to open, then check its status; the Startup type should be Automatic, and the Service status should be Running. If this is not the case, set the options as shown, then click Start. Once this is done, restart Windows.
If you see an Access Denied error, you’ll need to fix the permissions for BFE. Do this by pressing WIN+R and entering regedit in the run box. In the registry editor, find HKEY_LOCAL_MACHINE\SYSTEM\CurrentControlSet\services\BFE\ and right-click on BFE Key to view its Permissions.
Here, click Add, enter Everyone, then OK. On the Everyone list, ensure that the Allow Full Control box is checked. Click OK to confirm, and reboot. Once Windows is back up and running, return to the Computer Management screen to check the status of BFE.
Should this fail, use the BFE repair tool instead. Once downloaded, unzip the contents, and run the BFE_repair file. Click OK /Merge to accept the repair file’s changes on your system registry. Finish by rebooting, and checking the BFE status again.
Download: BFE Repair Tool
Fix Your BitDefender Issues and Stay Protected
As with any popular software, BitDefender has some issues and some quirks. Often, problems can come from not understanding features correctly. On the other hand, serious issues need to be dealt with by the publisher.
None of this stops BitDefender from being the most reliable, and complete, paid security suite available. If it’s not working out for you, however, then perhaps consider one of these nag-free internet security app alternatives.
Image Credit: alphaspirit/Depositphotos
Read the full article: 5 Most Common BitDefender Issues and How to Solve Them
Read Full Article
6 Helpful Machine Learning Tutorials and Courses to Grasp the Essentials

Machine learning is the future of automation. Millions of tasks performed by humans on a daily basis will be eventually replaced by neural networks trained. Even now, machine learning algorithms shape your life.
The job market is shifting to accommodate this new technology, and those who are capable of programming their own networks (or integrating with existing ones) are in high demand.
There has never been a better time to dive into machine learning. Here are six useful tutorials and resources to help you learn about machine learning.
1. The Coding Train
Anyone familiar with Daniel Shiffman’s YouTube channel will know about his excellent tutorials on both processing and p5.js. His fun style of real-time teaching has helped countless people learn the basics of coding.
As well as his many coding challenge videos covering single topics, Shiffman also has an incredibly thorough machine learning playlist.
These videos are especially useful to those wishing to learn Java or JavaScript as their primary language. Happily, the concepts covered in the series apply to any language of your choosing.
The Nature of Code, Shiffman’s much-loved book, devoted its final chapter to neural networks. It stands alone as an excellent introduction to the field. The work has been continued both on The Coding Train YouTube channel and his personal GitHub page.
The great strength of learning this way is Daniel Shiffman himself. A natural teacher, he gives clear examples of how code interacts with machine learning algorithms.
2. Machine Learning Crash Course
Google are big players in machine learning. Their Tensorflow open source platform is designed to open the subject to everybody in a variety of programming languages.
Google also have their own free Machine Learning Crash Course designed to teach both the fundamentals of machine learning, and how to use Tensorflow through APIs.
Each chapter of the course has video lectures along with the full text to support the content. As expected, it is an incredibly detailed curriculum. The course also offers interactive “Programming Challenge” pages where the code is presented dynamically in the browser where it can be both run and modified, before providing coding challenges to help you understand the module.
The curriculum also features “Playground Exercises” and chances to “Check Your Understanding”, comprising interactive visualizations of machine learning principles and questions based on the current topic.
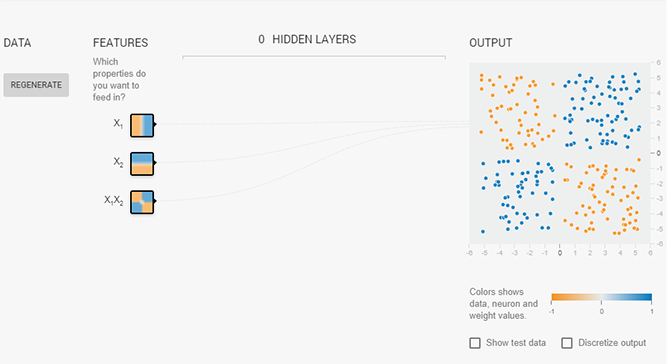
It is hardly surprising that Google is a leader in this field, and for a free course, this one covers a lot of ground!
3. Siraj Raval
While there are many great YouTube teachers out there, few get the balance of excellent presentation, clear explanation of topics, and most importantly memes, quite as well as Siraj Raval.
His YouTube channel concentrates mostly on the Python programming language along with many principles essential for modern data science and machine learning. Siraj has a playlist of easy-to-follow videos on the subject of neural networks and machine learning. The variation between fast-paced single subject videos, and the longer live stream style project work cover both fundamentals, and how to apply them to data.
Siraj’s channel is especially useful for those already learning Python, and if you are looking to learn the language, these basic Python examples will help you pick up the fundamentals.
4. Neural Networks and Deep Learning
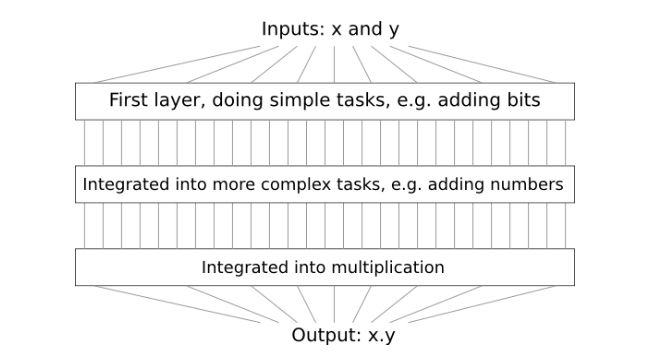
While video tutorials are a great way to learn, some folks prefer to learn from a book. Neural Networks and Deep Learning by Michael Nielsen doesn’t quite qualify as a print book as it uses embedded examples designed for the browser. It is, however, the clearest written explanation of not only the history of machine learning, but also how to learn the mathematics behind neural networks, that you’ll find.
The book follows a character recognition project from start to finish. Its pacing allows the reader to understand both how and why the network learns, along with the decisions and challenges they will face in putting together a functioning neural network.
Once again, the language of choice is Python, though the fundamentals are so thoroughly covered here that it is recommended reading for anyone with interest in machine learning.
5. Udacity Nanodegrees for Machine Learning
There are several in-depth “Nanodegrees” available on Udacity for machine learning. The highly recommended Become a Machine Learning Engineer course is an in-depth course which takes the student through machine learning principles via project work.
Each project is designed to emulate something an engineer would face in their work. Students enrolled in the course get access to Amazon Web Services (AWS) to deploy their projects.
The course costs $899 won’t be cheap by many people’s standards, but the benefit of having a relationship with your tutors along with the tools provided by the course will be invaluable to many.
6. Create a Mixed Curriculum
While everything on this list so far is perfect for advanced learning, many people will find even the fundamentals difficult. In this instance, creating a mixed curriculum of your own can be a great way to fill in all the gaps and ensure a robust knowledge base moving forward.
Reddit user pk7677 replied to a post on /r/MachineLearning with some sage advice:

The full post goes on to recommend creating your own personal projects. You should also keep an eye on new and developing areas of the field.
Deep Learning for Machine Learning
Whichever method you take with machine learning, be prepared for a long journey. The subject is by nature incredibly dense.
The popularity of machine learning has skyrocketed, and it’s due to improvements in processing power and computer science. There are no easy routes into the theory behind it. Now is the time to get to grips with future-proofed programming languages.
If you are a novice, choose a beginner-friendly programming language before diving into machine learning. You should also consider brushing up on your maths skills. Keep on learning, and good luck!
Read the full article: 6 Helpful Machine Learning Tutorials and Courses to Grasp the Essentials
Read Full Article
Sonos files to raise up to $100M in IPO
Smart speaker maker Sonos has filed to go public.
In the filing, the company says it’s aiming to raise up to $100 million in the IPO. However, that number may simply be a placeholder, or it could change as the IPO approaches.
Sonos says that as of March 31, it’s sold a total of 19 million products to 6.9 million households, with customers listening to 70 hours of content each month.
Revenue is growing — in the six months ending on March 31, the company brought in $655.7 million, up 18 percent year-over-year. In its most recent full fiscal year (2017), it brought in $992.5 million in revenue, an increase of 10 percent from 2016, while its net loss shrank from $30.9 million to $15.6 million.
Looking at the broader landscape, Sonos emphasizes its role as an independent player that can work with music streaming services like Apple Music, Pandora, Spotify and TuneIn.
It also points to the opportunity presented by growing interest in voice assistants — Sonos released its first voice-enabled speaker, the Sonos One, last year, but rather than building its own assistant, it integrates with Amazon Alexa and has plans to add support for Apple’s Siri (via Airplay 2) and Google Home this year.
“Our system is not — and never will be — an entry gate into a walled garden,” writes CEO Patrick Spence. “We’re deeply committed to keeping Sonos open to every voice assistant, streaming service and company that wants to build on our platform. This approach is unique in our industry, and it requires substantial investment and long-term thinking.”
In terms of risk factors, the company points to its history of losses, the unpredictability of its revenue growth and the fact that it operates in “highly competitive markets” and is “dependent on partners who offer products that compete with our own.”
Read Full Article
How to Analyze and Improve Your Wi-Fi Network With Your Mac

You can use your Mac to diagnose your network problems. Even better, it’s possible to improve wireless performance throughout your house, for all your devices, with a simple free tool.
You don’t have to be a network engineer in order to create a solid network. Whether you’re using an old free router or a pricey new mesh router system, you can speed everything up by fine-tuning your network to your surroundings.
Since macOS comes with everything you need, you don’t even have to install additional software.
Your Mac’s Hidden Network Tool
Today we’ll use the Wireless Diagnostics app to analyze and improve wireless performance. You can access it by searching with Spotlight or looking in Applications > Utilities. Another way is to hold Option while you click on the Wi-Fi icon in the menu bar, then choose Open Wireless Diagnostics.
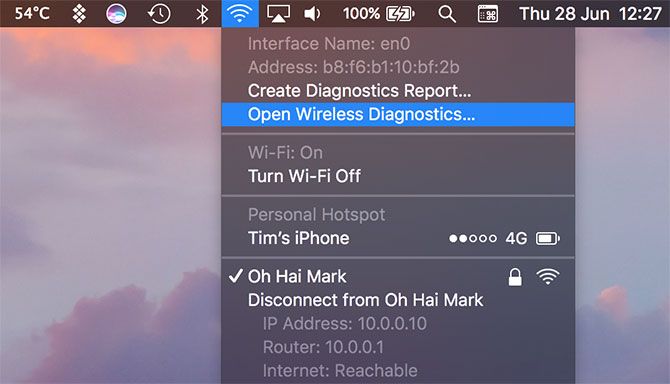
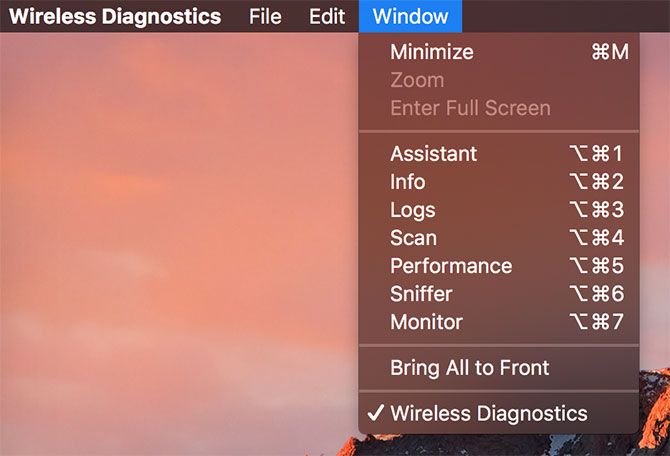
You’ll first see an assistant for diagnosing Wi-Fi issues. This assistant can be useful when experiencing network problems like frequent dropouts, but we won’t use it today. Instead, take a look at the menu bar options at the top of the screen, specifically under the Window menu.
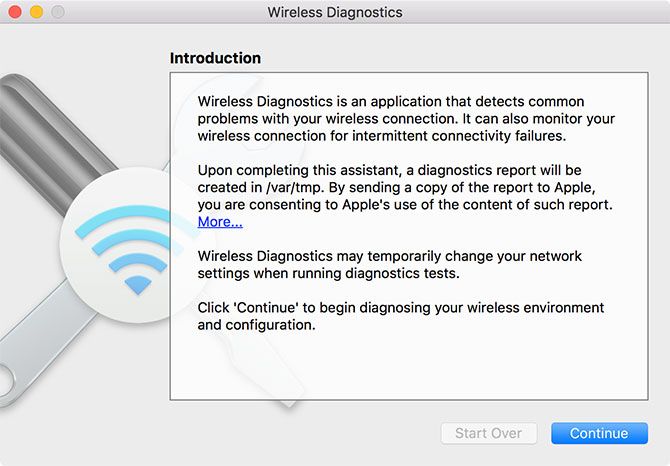
These are the many tools built into Apple’s Wireless Diagnostics utility. They’re all related to your local wireless network, and have no bearing on internet speed, connectivity, or external IP address.
Today we’re interested in the Performance and Scan windows, but it’s worth mentioning the others quickly:
- Assistant is the helper that you see when you first launch the utility.
- Info provides a long list of network information, including security, channel, and transfer rate.
- Logs allows you to enable background logging of network traffic, which is saved in a LOG file in the /var/tmp directory.
- Sniffer lets you capture Wi-Fi traffic transmitted on a specific channel, ideal for diagnosing issues that you can consistently reproduce.
- Monitor places an overlay on your screen with basic but handy information, which helps you diagnose issues while performing other tasks.
Optimize Wi-Fi Channel to Reduce Congestion
Optimizing your network channel is probably the single best way to improve wireless performance, save for standing right next to your router all day. The idea is to use a different channel than your nearest neighbors to cut down on congestion and channel overlap.
If your router is old, you’re probably using a 2.4GHz band. Newer routers come with dual-band radios, offering both 2.4GHz and 5GHz bands. Generally speaking, 2.4GHz offers better obstacle penetration, whereas 5GHz offers greater speeds and less channel overlap.
Open Wireless Diagnostics and head to Window > Scan, or use Option + Cmd + 4. Hit Scan Now to perform a scan of all nearby wireless networks. Once complete you’ll see all nearby competing access points, including any hidden ones that don’t normally show up.
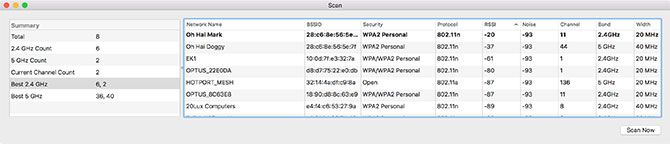
Note: The scan reveals a lot of information. Be aware that you may need to scroll the window horizontally, or drag and resize the window, in order to see it.
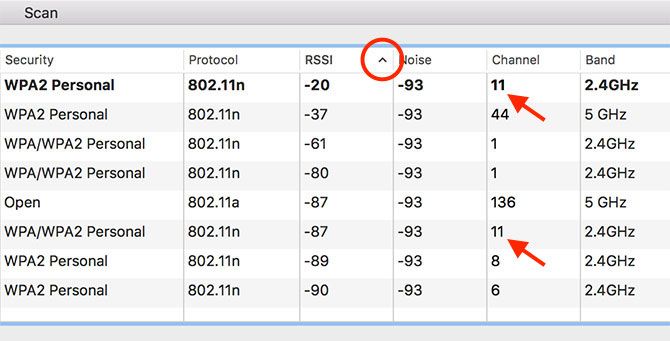
Arrange the scan results by signal strength by clicking on RSSI to sort by ascending. Your own router (in bold) should now be at the top of the list. If you have a dual-band router, you’ll see both bands represented as separate networks.
Optimize the 2.4GHz Band
The 2.4GHz band only has a few “good” channels that aren’t subject to overlapping: 1, 6, and 11. It’s highly likely that all the 2.4GHz network devices in the area are using one of these three. The key is to make sure your nearest neighbors are using different channels from yours.
Take a look at the 2.4GHz network nearest to your own, which is the item below yours in the list. Note its channel, and cross-reference it with your own. If you’re in a particularly congested area, observe what your other neighbors are using.
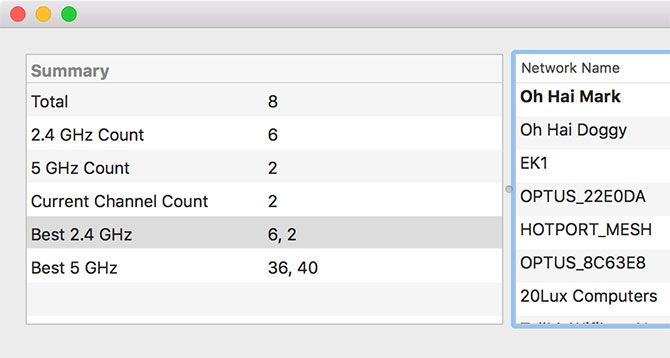
Pick a channel from 1, 6, and 11 that your neighbors are using the least. Take a look at the “Best” suggested 2.4GHz channel under the Scan window for a second opinion.
Optimize the 5GHz Band
The 5GHz band is much easier, since the channels do not overlap. In this instance you can sort through nearby neighbor networks at your own pace, or you can simply consult the “Best” 5GHz channel recommendation provided by the Scan window on the left.
Improve Wi-Fi Quality by Monitoring Signal-to-Noise
Make sure Wireless Diagnostics is running, then head to the menu bar at the top of the screen and click Window > Performance. You can also use the keyboard shortcut Option + Cmd + 5.
This reveals three graphs, which will populate with data as you leave the window open. The top graph refers to the network transfer rate—or how fast data reaches you from the router, and vice versa. The second is the overall quality of your connection, which is the signal-to-noise ratio over time.
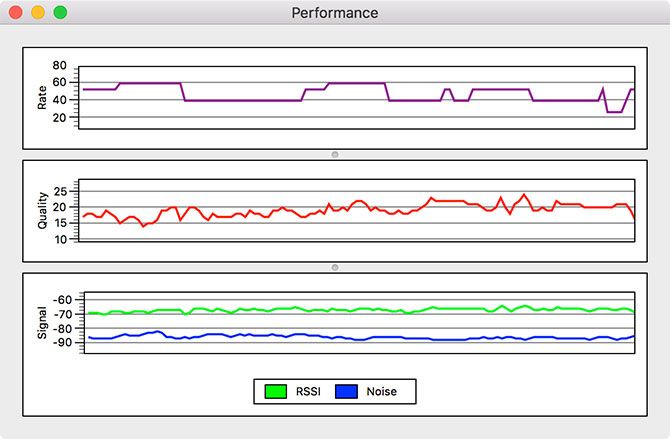
Finally the third, and the one we’re most interested in, shows your signal strength (green) to noise (blue). Ideally, you want a large gap between the two. If your signal is too low, and the noise is too high, this will cause slow network speeds and complete dropouts.
Assuming you’re using a MacBook, move around your house and take note of how the signal and noise graphs interact. You can use this tool to isolate signal dead zones in your house, as well as sources of interference. Observe how the signal and noise changes as I move closer to my access point:
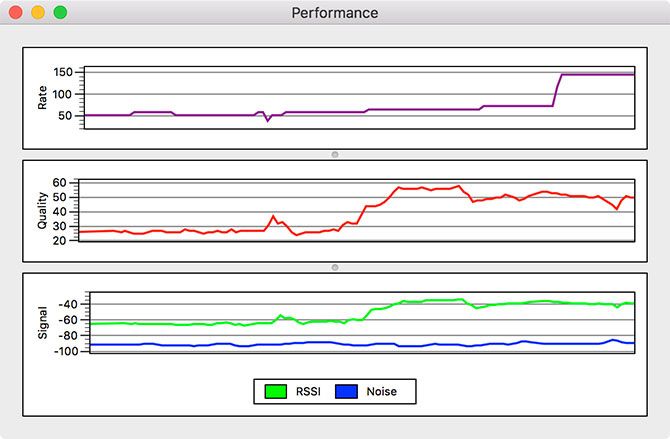
If you’re setting up a mesh router system, this can help you establish the best locations for you network hubs. If you’re using a regular router, it can help you to better position your network equipment for more even coverage. You can also isolate areas that may benefit from a Wi-Fi range extender.
Try making adjustments to the position of your wireless access point to better serve your needs. This might mean repositioning your router to better serve the kitchen and office, rather than your bedroom or living room. It may also help you decide whether a range extender or upgrading to a superior mesh Wi-Fi network is actually worth it.
Sometimes the Best Tools Are Free
A myriad of Wi-Fi analyzer tools are available for macOS, but you don’t really need them. The best way to improve your wireless connection is to improve your network equipment. A powerful modern router or multi-part mesh Wi-Fi network will provide far more relief from network issues than a few Mac apps.
The more devices you have connected to your router, the more interference and problems you are likely to have. Home routers are not designed to deal with lots of devices. They get hot, they crash, and much of the time they only last a few years before they need replacing.
You can diagnose and fix slow Wi-Fi issues, but you’ll never match the speed and reliability of a wired Ethernet connection. That’s just the trade-off we have to live with for the convenience of fast internet anywhere.
Read the full article: How to Analyze and Improve Your Wi-Fi Network With Your Mac
Read Full Article
xVideoServiceThief Is the Ultimate Download Manager for Online Videos

Have you ever stumbled across an online video you’d love to download and add to your collection? Perhaps it’s a video of your favorite recipe, a clip of a particularly daft dog doing something silly, or a how-to guide for a tech issue you’ve been struggling with.
Whatever the reason, it’s easy to grab a copy for all eternity if you use one simple tool: xVideoServiceThief.
The open-source video downloader has been around for many years. With versions available for Windows, Mac, and Linux, it’s the only downloader you need.
Where to Download xVideoServiceThief
You can download a copy of xVideoServiceThief from a few different places depending on your operating system and usage requirements. Use the links below to grab the correct version for your needs.
Note: The downloads will begin as soon as you click.
- Windows (Installer)
- Windows (Portable by WinPenPack)
- Mac (DMG package, requires macOS 10.5 or later)
- Linux (64-bit compressed package, requires Qt 5)
- Linux (Ubuntu version, no longer maintained by the developer)
Sadly, there is no 32-bit version of xVideoServiceThief for Linux. For an alternative, you might try using Xtreme Download Manager instead.
What Can xVideoServiceThief Do?
As of this writing, the app can download content from 93 different sites, and that number is steadily increasing. All the major players—YouTube, Vimeo, Dailymotion, and LiveLeak—are supported, as are some less well-known niche sites.
The app also offers several additional features to help make downloading easier: in-app video searching, the ability to schedule downloads, and a way to convert files to AVI, MPEG1, MPEG2, WMV, MP4, 3GP, and MP3 video formats.
How to Download a Video With xVideoServiceThief
To begin, grab a free copy of the app and install it on your system. Thankfully, there are no other apps bundled in the installer you need to watch out for.
Before you download a video, make sure you set your download location at the bottom of the app window. When you’re ready, click Add Video in the top left-hand corner.
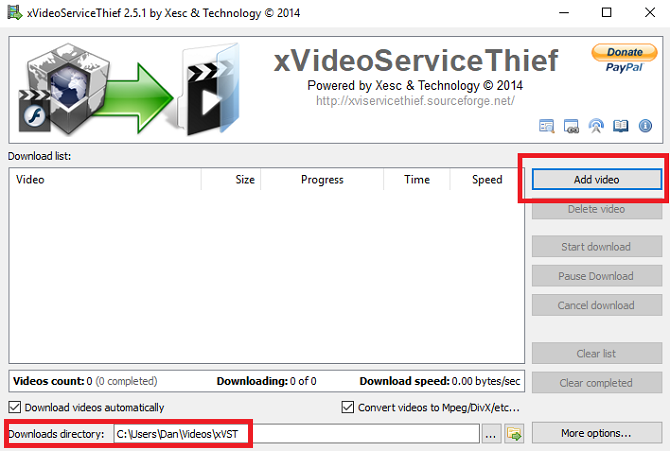
On the next pop-up window, enter the URL of the video you want. In my example, I’m going to download a review of Apple Airpods from the official MakeUseOf YouTube channel. xVideoServiceThief will immediately recognize the host site. If the site is not supported, you’ll see an error message.
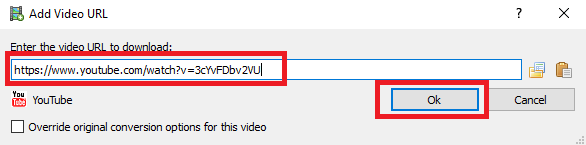
Click OK and the video will automatically start to download. If you don’t want the video to download immediately, untick the checkbox next to Download Videos Automatically.
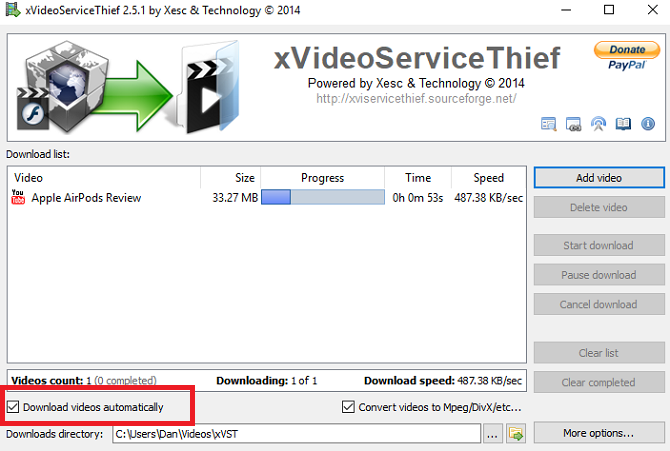
When the process has finished, you’ll see a toast notification in the bottom right-hand corner of your screen. Head to your download location to find and watch it.

The process is simple and straightforward, but issues can always arise. If you’re struggling to use the software, reach out in the comments below and we will try to help.
Note that when you do use tools like this, you should also use a VPN like CyberGhost or ExpressVPN.
Read the full article: xVideoServiceThief Is the Ultimate Download Manager for Online Videos
Read Full Article