08 June 2018

Google at NAACL


This week, New Orleans, LA hosted the North American Association of Computational Linguistics (NAACL) conference, a venue for the latest research on computational approaches to understanding natural language. Google once again had a strong presence, presenting our research on a diverse set of topics, including dialog, summarization, machine translation, and linguistic analysis. In addition to contributing publications, Googlers were also involved as committee members, workshop organizers, panelists and presented one of the conference keynotes. We also provided telepresence robots, which enabled researchers who couldn’t attend in person to present their work remotely at the Widening Natural Language Processing Workshop (WiNLP).
Googler Margaret Mitchell and a researcher using our telepresence robots to remotely present their work at the WiNLP workshop.
This year NAACL also introduced a new Test of Time Award recognizing influential papers published between 2002 and 2012. We are happy and honored to recognize that all three papers receiving the award (listed below with a shot summary) were co-authored by researchers who are now at Google (in blue):

BLEU: a Method for Automatic Evaluation of Machine Translation (2002)
Kishore Papineni, Salim Roukos, Todd Ward, Wei-Jing Zhu
Before the introduction of the BLEU metric, comparing Machine Translation (MT) models required expensive human evaluation. While human evaluation is still the gold standard, the strong correlation of BLEU with human judgment has permitted much faster experiment cycles. BLEU has been a reliable measure of progress, persisting through multiple paradigm shifts in MT.

Discriminative Training Methods for Hidden Markov Models: Theory and Experiments with Perceptron Algorithms (2002)
Michael Collins
The structured perceptron is a generalization of the classical perceptron to structured prediction problems, where the number of possible "labels" for each input is a very large set, and each label has rich internal structure. Canonical examples are speech recognition, machine translation, and syntactic parsing. The structured perceptron was one of the first algorithms proposed for structured prediction, and has been shown to be effective in spite of its simplicity.

Thumbs up?: Sentiment Classification using Machine Learning Techniques (2002)
Bo Pang, Lillian Lee, Shivakumar Vaithyanathan
This paper is amongst the first works in sentiment analysis and helped define the subfield of sentiment and opinion analysis and review mining. The paper introduced a new way to look at document classification, developed the first solutions to it using supervised machine learning methods, and discussed insights and challenges. This paper also had significant data impact -- the movie review dataset has supported much of the early work in this area and is still one of the commonly used benchmark evaluation datasets.

If you attended NAACL 2018, we hope that you stopped by the booth to check out some demos, meet our researchers and discuss projects and opportunities at Google that go into solving interesting problems for billions of people. You can learn more about Google research presented at NAACL 2018 below (Googlers highlighted in blue), and visit the Google AI Language Team page.

Keynote
Google Assistant or My Assistant? Towards Personalized Situated Conversational Agents
Dilek Hakkani-Tür

Publications
Bootstrapping a Neural Conversational Agent with Dialogue Self-Play, Crowdsourcing and On-Line Reinforcement Learning
Pararth Shah, Dilek Hakkani-Tür, Bing Liu, Gokhan Tür

SHAPED: Shared-Private Encoder-Decoder for Text Style Adaptation
Ye Zhang, Nan Ding, Radu Soricut

Olive Oil is Made of Olives, Baby Oil is Made for Babies: Interpreting Noun Compounds Using Paraphrases in a Neural Model
Vered Schwartz, Chris Waterson

Are All Languages Equally Hard to Language-Model?
Ryan Cotterell, Sebastian J. Mielke, Jason Eisner, Brian Roark

Self-Attention with Relative Position Representations
Peter Shaw, Jakob Uszkoreit, Ashish Vaswani

Dialogue Learning with Human Teaching and Feedback in End-to-End Trainable Task-Oriented Dialogue Systems
Bing Liu, Gokhan Tür, Dilek Hakkani-Tür, Parath Shah, Larry Heck

Workshops
Subword & Character Level Models in NLP
Organizers: Manaal Faruqui, Hinrich Schütze, Isabel Trancoso, Yulia Tsvetkov, Yadollah Yaghoobzadeh

Storytelling Workshop
Organizers: Margaret Mitchell, Ishan Misra, Ting-Hao 'Kenneth' Huang, Frank Ferraro

Ethics in NLP
Organizers: Michael Strube, Dirk Hovy, Margaret Mitchell, Mark Alfano

NAACL HLT Panels
Careers in Industry
Participants: Philip Resnik (moderator), Jason Baldridge, Laura Chiticariu, Marie Mateer, Dan Roth

Ethics in NLP
Participants: Dirk Hovy (moderator), Margaret Mitchell, Vinodkumar Prabhakaran, Mark Yatskar, Barbara Plank


What’s New in iOS 12? 9 Changes and Features Coming in Fall 2018

The ODROID Model Comparison Guide: Which One Is Right for You?

Beyond Trello Basics: 8 Handy Tips and Tricks for a Faster Workflow


trello-tricks

Once you have figured out the basics of using Trello, it’s time to level up! Your favorite digital Kanban tool hides quite a few useful tricks up its sleeve, and in this article we’re going to explore a few of them and how you can make use of them.

1. Turn Any Webpage Into a Trello Card

send-to-trello-bookmarklet

Find yourself creating many cards while browsing the web for inspiration or research?

You don’t have to interrupt your workflow by switching to a Trello board every time you want to create a card. With this Trello bookmarklet, you can turn webpages into cards on the fly.

Once you drag the Send to Trello bookmarklet to your Bookmarks, you’re all set. The next time you’re on a webpage that you would like to convert to a card, click on this bookmark in your browser’s bookmarks bar.

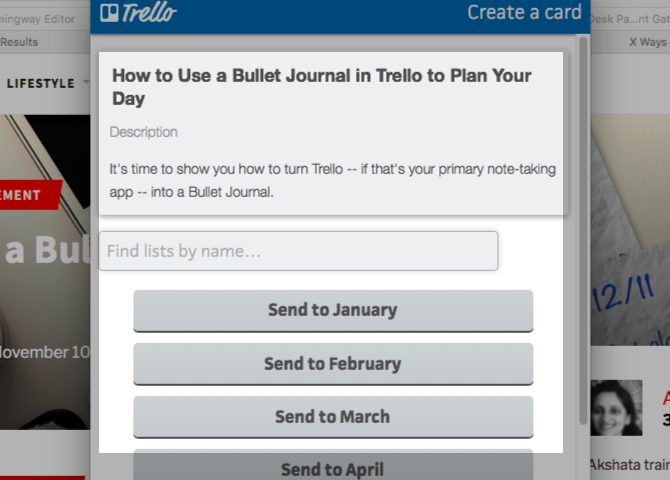
You’ll then get a popup in which you can select the board and list where the new card should go. If you change your mind midway and don’t want to create the card after all, hit the Never Mind button in the popup.

2. Use Markdown in Trello

markdown-formatting-trello

Markdown is everywhere, and with good reason. It makes writing for the web faster and intuitive. You can now use Markdown in your Trello workflow.

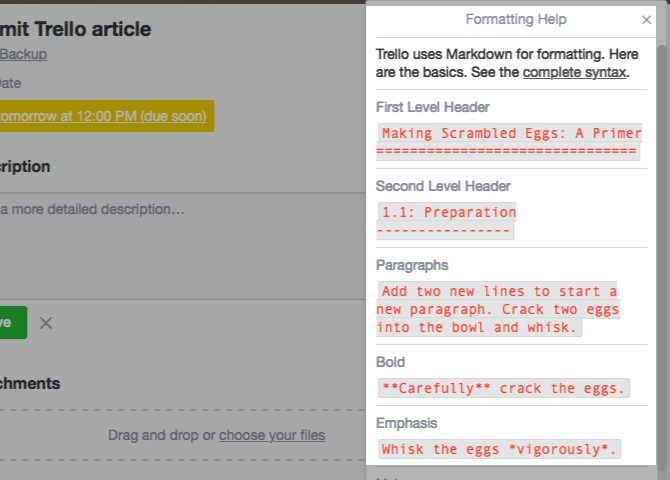
Basic formatting like emphasis, italics, and links follows standard Markdown syntax. Trello does have a few formatting restrictions in place. For example, certain syntax works only with card descriptions and comments, while some of it works in checklist items as well. It’s a pity you can’t use Markdown in card titles.

Read the official help page to learn how to format your text the Trello way. Want a quicker solution? Click on the Formatting Help link when you’re viewing the back of a card. Trello will then display its basic Markdown formatting rules in a popup on the right.

3. Clone Public Boards

copy-public-board-trello

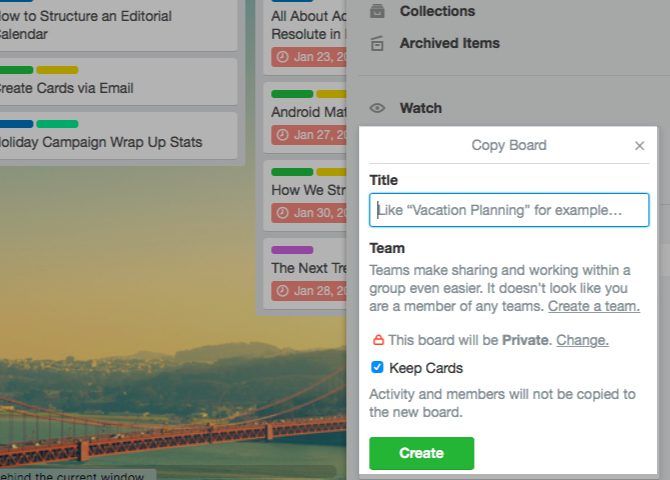
Cloning boards with the Copy Board option in the Show Menu sidebar is one of those essential Trello productivity tips we recommend to all users. But don’t stop at your own boards!

With a bit of effort, you’ll find plenty of useful public boards to copy and repurpose. Trello itself has a roundup of handy public boards to inspire you.

Any public board you copy to your account is automatically classified as Private. Also, while copying the board you get the option to rename the copy and discard the cards if you would rather have only the lists in place.

4. Enable Trello Power-Ups

power-ups-trello

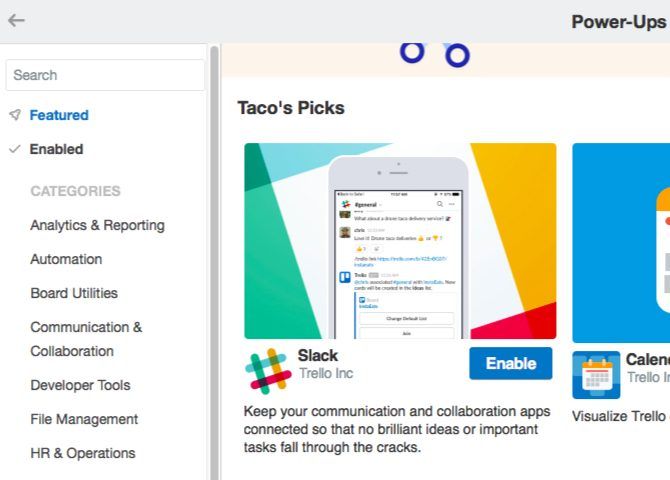
The power of Trello’s Power-Ups allows you to integrate custom fields plus data from various apps into your Trello boards.

For example, you can set reminders with the Card Repeater Power-Up, or build your own forms with the JotForm Power-Up.

This feature alone might be enough to tempt you to upgrade your Trello account to Business Class. (Each board in the free tier has a limit of one Power-Up.)

To enable a Power-Up for a board, first click on the Show Menu button in the top right section. In the fly-out sidebar that appears, click on the Power-Ups option to reveal Trello’s library of versatile add-ons. Hit the Enable button for any of them to integrate the Power-Up into the active board.

5. Automate Trello Card Creation

card-repeater-power-up-trello

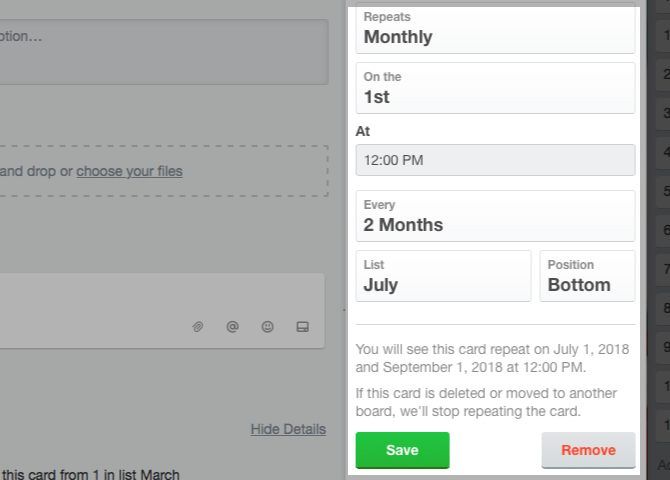
Take the pain out of creating recurring cards by hand with a tool or two. One way to do that is with the Card Repeater Power-Up that we mentioned in the above section.

Once you enable the Power-Up, you’ll see a Repeat button appear under Power-Ups in the sidebar on the card back. Click on that button to schedule card creation. You get to pick the list, position, day of the week, time, and the frequency for recurring cards. After you tweak the available options, hit the Save button.

You can also fall back on the trusty IFTTT for some Trello automation. This IFTTT recipe creates cards out of emails in Gmail.

The Butler and Zapier Power-Ups can also automate the card creation process for you.

6. Cut, Copy, and Paste Trello Cards

While you’re used to the universal cut-copy-paste shortcut trio of Ctrl + X, Ctrl + C, Ctrl + V, you probably don’t expect it to work on cards. But it does! The best part is that it works across boards.

Hover over any card and cut or copy it. Next, hover over the Add a card button in any list on any board and hit the keyboard shortcut to paste.

Of course, you’ll have to replace the Ctrl key in the shortcuts with the Cmd key if you’re a macOS user.

7. Change Due Dates With Drag-and-Drop

calendar-view-trello

Want to reassign due dates for several cards? Sure, you can do it one at a time as usual. But you don’t have to!

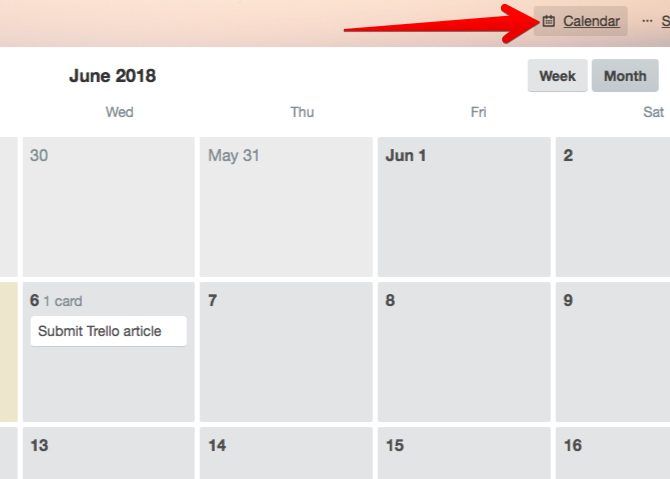
If you enable the Calendar Power-Up, you can reschedule cards by dragging and dropping them onto the right date in the calendar view. This view shows up when you click on the Calendar button to the left of the Show Menu button.

Keep in mind that the Calendar button shows up only after you enable the Power-Up.

8. Insert New Lists Between Existing Lists

insert-list-trello

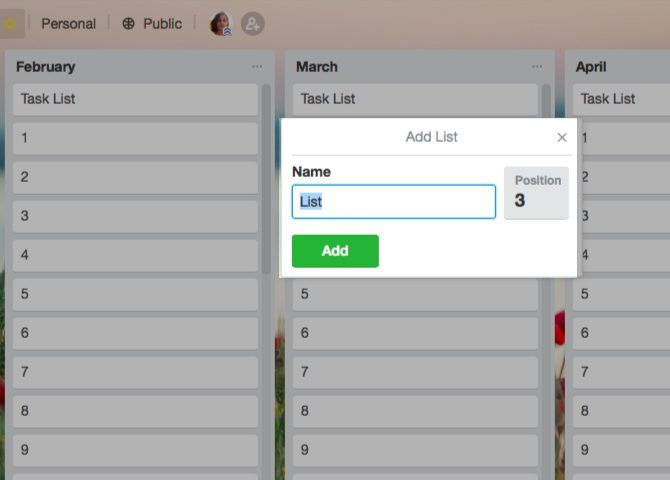
Clicking on the Add a List button after the last list on a board is how you create lists. If you want the new list to appear in a different position, you have to drag and drop it to the right location.

Want a quicker way to do that?

There is one. To insert a new list between two existing lists, double-click on the empty space between them. You’ll then see an option to create a new list right there.

If you double-click in the space below any list, you can create a new one to show up right after that list.

Add More Power to Trello With Third-Party Tools

Wish Trello could do this or that? It probably can, once you power it up with smart third-party tools. Start by getting a few browser extensions for Trello. They allow you to add card numbers, advanced sort options, list hiding, and so on. Next, move on to a few essential Trello integrations that will make your job easier.

Trello is as versatile as your ideas are. Once you become familiar with its various nooks and crannies, Trello can keep every bit of your day-to-day life on track. Now, are you ready to explore a few unique ways to use Trello?

Read the full article: Beyond Trello Basics: 8 Handy Tips and Tricks for a Faster Workflow


Read Full Article

The Beginner’s Guide to Apple AirPlay Mirroring on Mac and iOS


airplay-guide

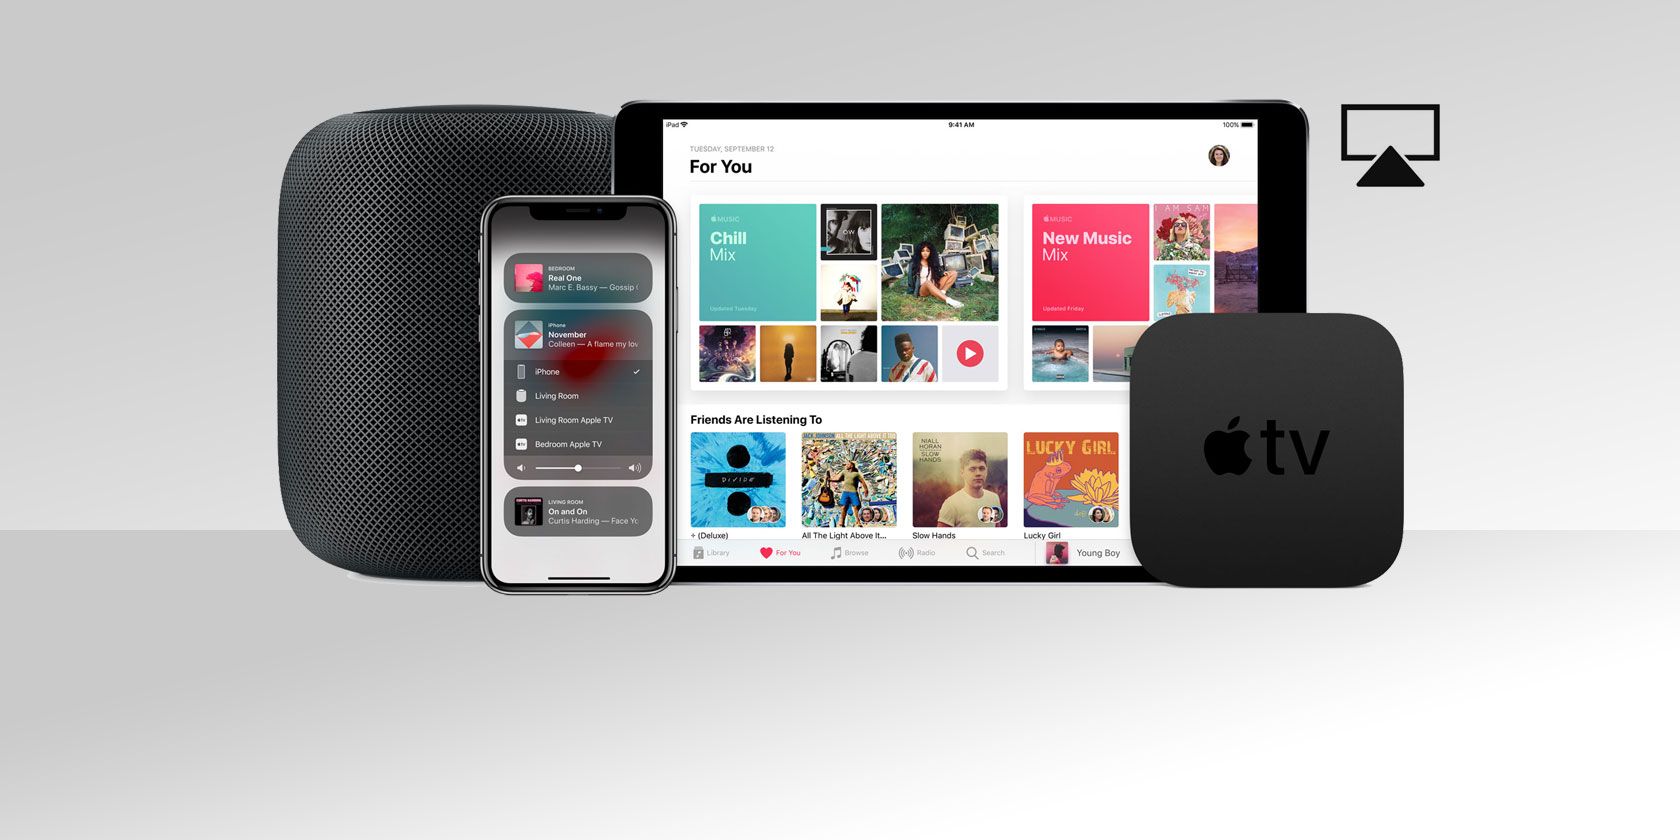
Many people buy an Apple TV solely to send video or audio wirelessly from their Mac and iOS devices to the big screen in their living room via AirPlay. It’s a handy feature, with a huge number of applications, and it generally works quite well.

Both macOS and iOS handle AirPlay in their own ways. Whether you want to share family photos, give a presentation, or extend your Mac desktop beyond the confines of your laptop, it’s a powerful tool and one you should learn how to use.

Today we’re going to look at AirPlay and how you can get the most out of it.

What Is Apple AirPlay?

AirPlay is Apple’s proprietary wireless streaming protocol. It allows you to send video or audio from your Mac or iOS device to an AirPlay receiver, like an Apple TV. Apple first introduced AirPlay as AirTunes for iTunes in 2004.

Back then you could only stream wireless audio, but in 2010 the feature made its way onto iOS with support for video streaming too. The following year, the company introduced AirPlay mirroring, and in May 2018 Apple introduced its successor, AirPlay 2.
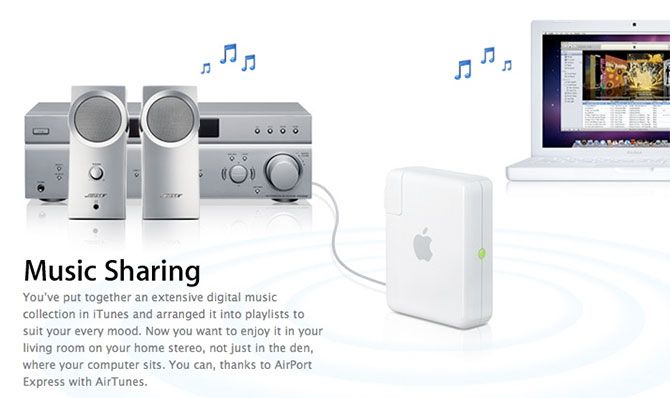
AirTunes Promo

What Is AirPlay Mirroring?

AirPlay mirroring is the ability to mirror your current display on an AirPlay receiver. The feature exists on both iOS devices like the iPhone and iPad, as well as Mac computers and laptops.

While mirroring sends both video and audio, some content is restricted due to potential copyright violation. If you try to mirror your Mac’s display while playing protected iTunes content, like Apple Music videos, you’ll see a grey box where the video should be.

What Is AirPlay 2?

AirPlay 2 was announced by Apple at WWDC 2017 and was due to launch with iOS 11 in the fall of that year. In May 2018, AirPlay 2 finally released, enabling multi-room audio for the first time. You can now stream music to multiple devices around your house, which was previously only possible using iTunes on a Mac or PC.

AirPlay 2 also plays a part in enabling full stereo playback (where available) on multiple HomePod smart speakers (our Apple HomePod review). The second version of Apple’s wireless streaming protocol is included in the iOS 11.4 update, enabling any device that can run iOS 11 to make use of the technology.

Apple HomePod

Apple TV units that update to tvOS 11.4 can also use AirPlay 2. Apple’s HomePod should update itself automatically. Follow our HomePod troubleshooting guide if it doesn’t. Older third-party devices may not be updated to include support for the refreshed protocol, so if you own any old receivers it’s worth checking with the manufacturer if they’re compatible.

How to Use AirPlay to Stream or Mirror

You can either use AirPlay to stream content to a receiver (audio or video), or to mirror your current device’s screen to a receiver (including audio). In order to use AirPlay, make sure Bluetooth and Wi-Fi are both enabled, and that Airplane Mode is disabled on your device.

The easiest way to use AirPlay is to look for the AirPlay logo, which looks like a square with a triangle in front of it (pictured below). Any time you see this symbol, click or tap it and select your destination receiver from the list that pops up. Your media will then stream wirelessly.

Apple AirPlay

How to AirPlay From iPhone/iPad to Apple TV

To stream audio or video to an AirPlay receiver from an iPhone or iPad:

  1. Swipe up from the bottom of the screen (non-iPhone X) to reveal Control Center. iPhone X users should swipe down from the top-right corner.
  2. 3D Touch the Now Playing box to the right of the screen.
  3. Tap on the wireless icon (three circles and a triangle) next to the playback controls.
  4. Wait for the AirPlay receiver to appear in the list.
  5. Tap on your chosen receiver and play some media.
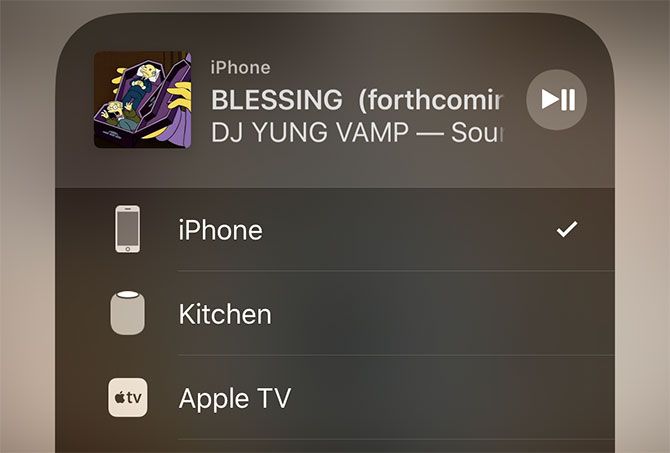
AirPlay on iOS

To stop streaming via AirPlay, repeat the process and choose iPhone or iPad in step five.

To mirror your iPhone or iPad screen:

  1. Swipe up from the bottom of the screen (non-iPhone X) to reveal Control Center. iPhone X users, swipe down from the top-right corner.
  2. Tap Screen Mirroring on the left-hand side of the screen.
  3. Wait for any nearby AirPlay devices to appear.
  4. Tap the receiver on which you would like to mirror your screen.
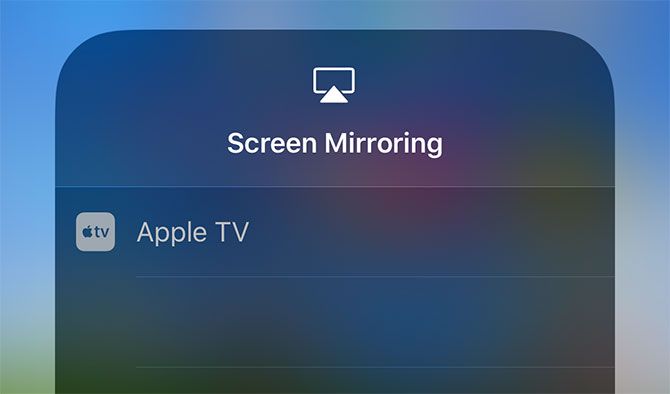
AirPlay Mirroring

To stop mirroring, repeat the process and tap Stop Mirroring in step four.

How to AirPlay From Mac to Apple TV

To connect your Mac to an Apple TV, look for the AirPlay icon in apps like iTunes and QuickTime. You can also use System Preferences > Displays to specify an AirPlay Display, which behaves like a wireless monitor connected to your Mac. This allows you to stream from a Mac to an Apple TV.
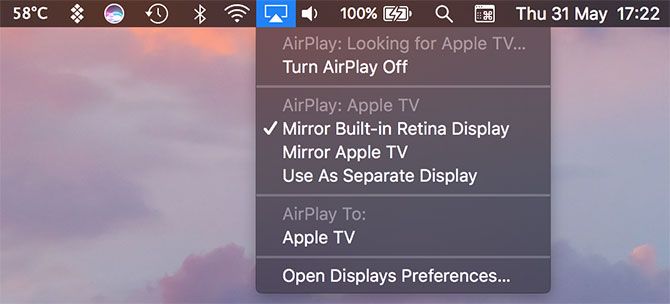
AirPlay on Mac

The easiest way to mirror your Mac to an Apple TV is via the menu bar shortcut. Click on the AirPlay logo in the top-right corner of the screen, then click on the receiver of your choice. Once connected you can choose:

  • Mirror Built-in Display: Match the size of your Mac’s screen, mirrored on an Apple TV.
  • Mirror Apple TV: Match the size of your TV, optimizing your Mac’s screen.
  • Use as Separate Display: Disable mirroring entirely, and use your Apple TV like an external monitor.

How to AirPlay From iPhone/iPad to Mac or Windows

Apple doesn’t allow a Mac (or Windows) computer to act as an AirPlay receiver, despite many users valuing the feature. Fortunately you can add this functionality with some third-party software. You currently have two good options:

  • AirServer ($20): The gold standard for AirPlay receiver emulation, available for Mac and Windows. Also works with Google Cast and Miracast for an all-around casting solution. There’s a 14-day free trial available.
  • Reflector ($15): A slightly cheaper alternative to AirServer, with support for Google Cast and Miracast. You can try it free for seven days.

You can try both of these solutions before you buy, and it’s probably worth doing so to ensure performance is adequate. Personal experience has led me to believe these software solutions are never quite as good as a genuine Apple TV, but your mileage may vary.

Troubleshooting and Settings for AirPlay

Sometimes, AirPlay doesn’t work as expected. Often, these issues are caused by external factors, but it’s always worth restarting your equipment before trying anything drastic.

Streaming, Quality, and Other AirPlay Playback Issues

Much of the time, problems streaming video or audio wirelessly is due to Wi-Fi congestion. Too many competing Wi-Fi signals, on similar channels to your receiver, can reduce the quality of the signal that reaches the Apple TV.

Older devices that feature slower wireless speeds can also struggle. There’s not much you can do about that beyond getting as close to the receiver as possible, or using a newer iOS device.

How to Change Your Apple TV’s AirPlay Name
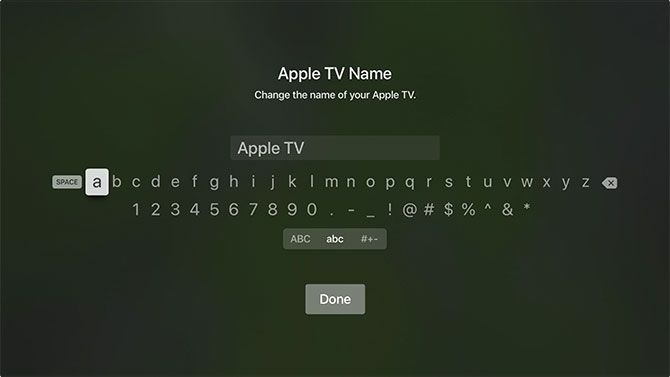
Rename Apple TV's AirPlay name

If you have multiple Apple TV units in one house, or your neighbor’s Apple TV is constantly showing up in the list, you can differentiate receivers by giving them unique names. To rename your Apple TV, head to Settings > General > About > Name.

How to Turn On/Off AirPlay on Your Apple TV
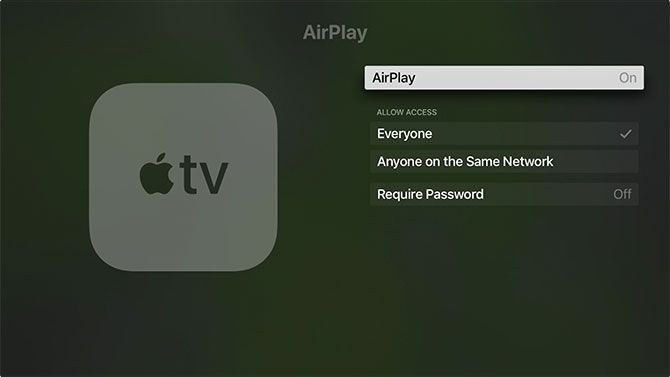
Turn AirPlay On or Off on Apple TV

You can turn AirPlay off entirely, or restrict who can use AirPlay under Settings > AirPlay on your Apple TV. Options include:

  • Allowing anyone to stream via AirPlay.
  • Restricting AirPlay to devices that are on the same network as your Apple TV.
  • Turning AirPlay off altogether.
  • Setting a password which other users must first enter before they can use AirPlay on that device.

Apple TV Doesn’t Show Up on Mac or iOS

If you can’t find your Apple TV (or other receiver) on your Mac, first make sure your Wi-Fi and Bluetooth are both on. Next make sure your Apple TV is on, and connected to power and a TV via HDMI.

The Apple TV should automatically wake up when it detects a new AirPlay connection, but sometimes clicking the remote and waking it manually can resolve the issue. If you still can’t see your Apple TV on your Mac or iPhone, try restarting it.

To restart an Apple TV, head to Settings > System > Restart. The process should take around 30 seconds, and you’ll need to wake the remote by pressing a button once it’s complete. If the Apple TV has crashed, you can simply pull the cord out of the back and wait 10 seconds, then power it back up.
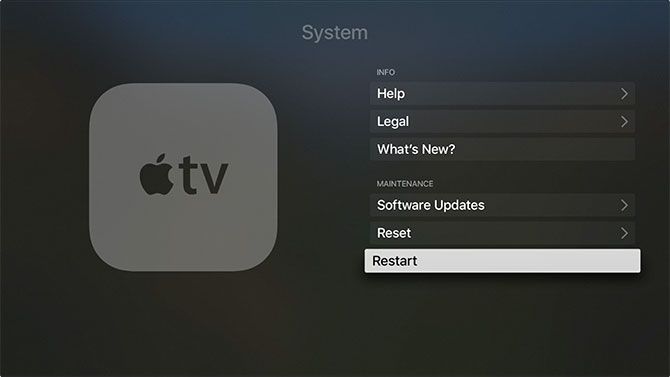
Restart Apple TV

If none of that works, the next step is to restart your source device. That might be your Mac, iPhone, or iPad. Next try restarting your network equipment. If you’re still having trouble, try a different Mac or iOS device to isolate the problem further.

You can also restore your Apple TV to factory settings, which is a final resort for most but worth a try if nothing else works. Head to Settings > System > Reset and follow the prompts. You’ll need to set up your Apple TV from scratch once the reset completes.
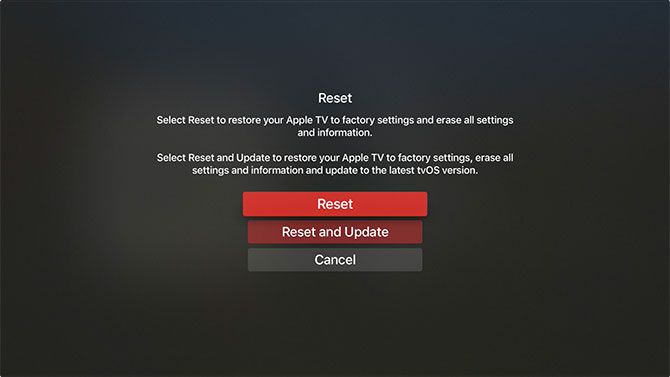
Factory Reset Apple TV

AirPlay Is the Future of Wireless Home Media

The presence of AirPlay signifies that Apple is still serious about cutting the cord. As Wi-Fi performance improves, so too will the speed, quality, and reliability of AirPlay as a protocol.

Apple is betting big on other wireless technologies, too. In the last few years we’ve seen wireless earphones like the AirPods and BeatsX, an Apple Watch with integrated cellular, and wireless charging added to both the iPhone 8 and X. Who knows what will come next?

Read the full article: The Beginner’s Guide to Apple AirPlay Mirroring on Mac and iOS


Read Full Article

How to Stop Auto-Playing Videos in YouTube’s Home Feed

How to Customize App Borders and Shadows on Windows 10


windows-apps-enhance

On Windows, you’ve been able to change how apps look for almost the entire history of the operating system’s life.

However, Insider Preview builds of Redstone 5 (the next Windows update to be released in Fall 2018) suggest that Windows will automatically change the color of all app borders to gray. The theory is that it will match the new shadows better.

Thankfully, you will still be able to override those default settings and change the color. You can even turn the shadows on and off at your pleasure. Let’s take a closer look.

How to Customize App Borders and Shadows

Firstly, we will explain how to change the color of the app borders, and then we’ll look at how to turn the shadow on and off. To change the colors, follow the steps below:

  1. Open the Settings app.
  2. Click on Personalize.
  3. On the menu in the left-hand panel, select Colors.
  4. You can choose one of the default colors, or you can click on Custom color and enter your own RBG or hex code.
  5. Scroll down to Show the accent color on the following surfaces.
  6. Mark the checkbox next to Title bars.

If you would like to add shadows to your app windows, follow these steps:

  1. Go to Control Panel > System and Security > System > Advanced System Settings.
  2. Open the Advanced tab.
  3. In the Performance section, click on Settings.
  4. Click on the Visual Effects tab.
  5. Mark the checkbox next to Custom.
  6. Mark or unmark the checkbox next to Show shadows under windows as preferred.
  7. Click on Apply
  8. Finish by clicking on OK.

Remember one of the best ways to customize the operating is to use your own theme. You can choose a light theme for Windows or a dark theme for Windows.

Read the full article: How to Customize App Borders and Shadows on Windows 10


Read Full Article

How to Make Web Pages Load Faster With a VPN (Yes, It Really Works)


vpn-protocols-explained

As you’ve probably seen from the dozens of emails in your inbox, the European Union’s General Data Protection Regulation (GDPR) law has gone into effect. This has forced companies to change how they store your data, be more transparent about what data they have, and allow you to delete it if you want.

While this law doesn’t have much effect on those outside of the EU, those outside the EU can actually use it to their advantage. Indeed, thanks to the GDPR, most users can now enjoy faster web loading speeds.

The VPN Trick That Makes Websites Load Faster

The GDPR restricts websites from using common forms of tracking on the web, including ad servers, Google’s various analytics, and social media sharing buttons. Every time you open a website that uses these elements, your browser has to load them, which takes time.

GPDR-compliant websites strip away most of these elements, making each page load much faster. Of course, websites still want to collect information on users from other countries if they can. But no matter where you live, you can enjoy these same speed increases by using a VPN!

VPN-Connect-to-UK

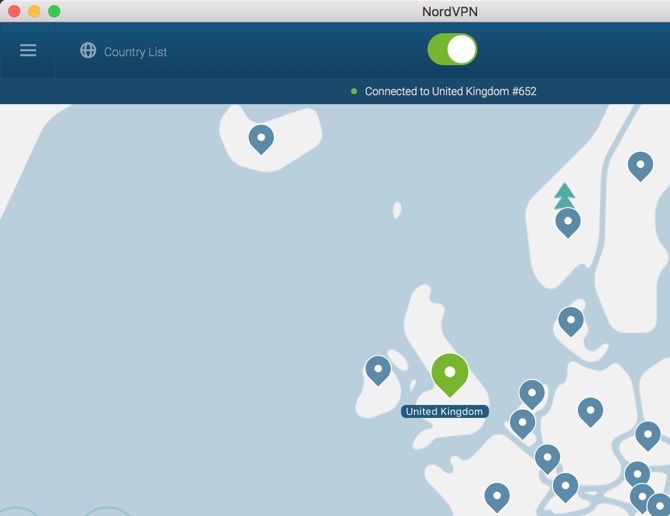
If you didn’t know, VPNs disguise your browsing by making it look like your traffic comes from another location. With a reputable VPN service, you can simply connect to a server from the UK or another country in the EU and access the benefits of GPDR.

Web developers have found this makes a huge difference in both speed and amount of extra junk loaded onto websites.

When using this method, note that some websites block EU users because their site isn’t GDPR-compliant yet (or will never be). Also, keep in mind the dangers of using a free VPN. We recommend a reputable service like ExpressVPN, which won’t sell your browsing data or inject ads.

Read the full article: How to Make Web Pages Load Faster With a VPN (Yes, It Really Works)


Read Full Article

07 June 2018

Realtime tSNE Visualizations with TensorFlow.js


In recent years, the t-distributed Stochastic Neighbor Embedding (tSNE) algorithm has become one of the most used and insightful techniques for exploratory data analysis of high-dimensional data. Used to interpret deep neural network outputs in tools such as the TensorFlow Embedding Projector and TensorBoard, a powerful feature of tSNE is that it reveals clusters of high-dimensional data points at different scales while requiring only minimal tuning of its parameters. Despite these advantages, the computational complexity of the tSNE algorithm limits its application to relatively small datasets. While several evolutions of tSNE have been developed to address this issue (mainly focusing on the scalability of the similarity computations between data points), they have so far not been enough to provide a truly interactive experience when visualizing the evolution of the tSNE embedding for large datasets.

In “Linear tSNE Optimization for the Web”, we present a novel approach to tSNE that heavily relies on modern graphics hardware. Given the linear complexity of the new approach, our method generates embeddings faster than comparable techniques and can even be executed on the client side in a web browser by leveraging GPU capabilities through WebGL. The combination of these two factors allows for real-time interactive visualization of large, high dimensional datasets. Furthermore, we are releasing this work as an open source library in the TensorFlow.js family in the hopes that the broader research community finds it useful.
Real-time evolution of the tSNE embedding for the complete MNIST dataset with our technique. The dataset contains images of 60,000 handwritten digits. You can find a live demo here.
The aim of tSNE is to cluster small “neighborhoods” of similar data points while also reducing the overall dimensionality of the data so it is more easily visualized. In other words, the tSNE objective function measures how well these neighborhoods of similar data are preserved in the 2 or 3-dimensional space, and arranges them into clusters accordingly.

In previous work, the minimization of the tSNE objective was performed as a N-body simulation problem, in which points are randomly placed in the embedding space and two different types of forces are applied on each point. Attractive forces bring the points closer to the points that are most similar in the high-dimensional space, while repulsive forces push them away from all the neighbors in the embedding.

While the attractive forces are acting on a small subset of points (i.e., similar neighbors), repulsive forces are in effect from all pairs of points. Due to this, tSNE requires significant computation and many iterations of the objective function, which limits the possible dataset size to just a few hundred data points. To improve over a brute force solution, the Barnes-Hut algorithm was used to approximate the repulsive forces and the gradient of the objective function. This allows scaling of the computation to tens of thousand data points, but it requires more than 15 minutes to compute the MNIST embedding in a C++ implementation.

In our paper, we propose a solution to this scaling problem by approximating the gradient of the objective function using textures that are generated in WebGL. Our technique draws a “repulsive field” at every minimization iteration using a three channel texture, with the 3 components treated as colors and drawn in the RGB channels. The repulsive field is obtained for every point to represent both the horizontal and vertical repulsive force created by the point, and a third component used for normalization. Intuitively, the normalization term ensures that the magnitude of the shifts matches the similarity measure in the high-dimensional space. In addition, the resolution of the texture is adaptively changed to keep the number of pixels drawn constant.
Rendering of the three functions used to approximate the repulsive effect created by a single point. In the above figure the repulsive forces show a point in a blue area is pushed to the left/bottom, while a point in the red area is pushed to the right/top while a point in the white region will not move.
The contribution of every point is then added on the GPU, resulting in a texture similar to those presented in the GIF below, that approximate the repulsive fields. This innovative repulsive field approach turns out to be much more GPU friendly than more commonly used calculation of point-to-point interactions. This is because repulsion for multiple points can be computed at once and in a very fast way in the GPU. In addition, we implemented the computation of the attraction between points in the GPU.
This animation shows the evolution of the tSNE embedding (upper left) and of the scalar fields used to approximate its gradient with normalization term (upper right), horizontal shift (bottom left) and vertical shift (bottom right).
We additionally revised the update of the embedding from an ad-hoc implementation to a series of standard tensor operations that are computed in TensorFlow.js, a JavaScript library to perform tensor computations in the web browser. Our approach, which is released as an open source library in the TensorFlow.js family, allows us to compute the evolution of the tSNE embedding entirely on the GPU while having better computational complexity.

With this implementation, what used to take 15 minutes to calculate (on the MNIST dataset) can now be visualized in real-time and in the web browser. Furthermore this allows real-time visualizations of much larger datasets, a feature that is particularly useful when deep neural output is analyzed. One main limitation of our work is that this technique currently only works for 2D embeddings. However, 2D visualizations are often preferred over 3D ones as they require more interaction to effectively understand cluster results.

Future Work
We believe that having a fast and interactive tSNE implementation that runs in the browser will empower developers of data analytics systems. We are particularly interested in exploring how our implementation can be used for the interpretation of deep neural networks. Additionally, our implementation shows how lateral thinking in using GPU computations (approximating the gradient using RGB texture) can be used to significantly speed up algorithmic computations. In the future we will be exploring how this kind of gradient approximation can be applied not only to speed-up other dimensionality reduction algorithms, but also to implement other N-body simulations in the web browser using TensorFlow.js.

Acknowledgements
We would like to thank Alexander Mordvintsev, Yannick Assogba, Matt Sharifi, Anna Vilanova, Elmar Eisemann, Nikhil Thorat, Daniel Smilkov, Martin Wattenberg, Fernanda Viegas, Alessio Bazzica, Boudewijn Lelieveldt, Thomas Höllt, Baldur van Lew, Julian Thijssen and Marvin Ritter.

Google Cloud announces the Beta of single tenant instances


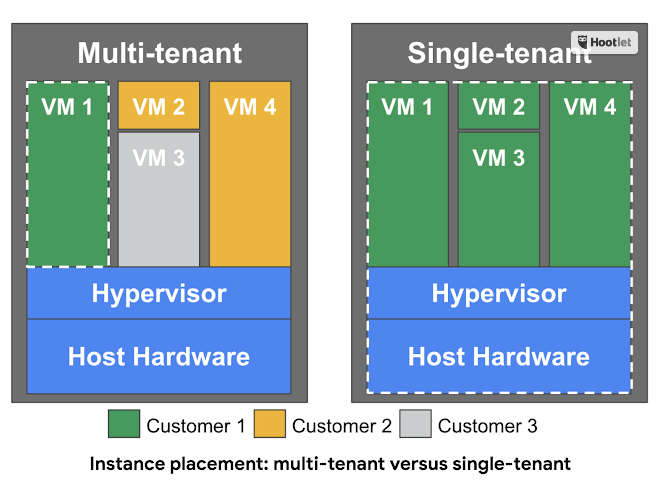
One of the characteristics of cloud computing is that when you launch a virtual machine, it gets distributed wherever it makes the most sense for the cloud provider. That usually means sharing servers with other customers in what is known as a multi-tenant environment. But what about times when you want a physical server dedicated just to you?

To help meet those kinds of demands, Google announced the Beta of Google Compute Engine Sole-tenant nodes, which have been designed for use cases such a regulatory or compliance where you require full control of the underlying physical machine, and sharing is not desirable.

“Normally, VM instances run on physical hosts that may be shared by many customers. With sole-tenant nodes, you have the host all to yourself,” Google wrote in a blog post announcing the new offering.

Diagram: Google

Google has tried to be as flexible as possible, letting the customer choose exactly what configuration they want in terms CPU and memory. Customers can also let Google choose the dedicated server that’s best at any particular moment, or you can manually select the server if you want that level of control. In both cases, you will be assigned a dedicated machine.

If you want to play with this, there is a free tier and then various pricing tiers for a variety of computing requirements. Regardless of your choice, you will be charged on a per-second basis with a one-minute minimum charge, according to Google.

Since this feature is still in Beta, it’s worth noting that it is not covered under any SLA. Microsoft and Amazon have similar offerings.


Read Full Article

Women’s Safety XPRIZE $1M winner is a smart, simple panic button


Devices like smartphones ought to help people feel safer, but if you’re in real danger the last thing you want to do is pull out your phone, go to your recent contacts, and type out a message asking a friend for help. The Women’s Safety XPRIZE just awarded its $1 million prize to one of dozens of companies attempting to make a safety wearable that’s simple and affordable.

The official challenge was to create a device costing less than $40 that can “autonomously and inconspicuously trigger an emergency alert while transmitting information to a network of community responders, all within 90 seconds.”

Anu and Naveen Jain, the entrepreneurs who funded the competition, emphasized the international and very present danger of sexual assault in particular.

“Women’s safety is not just a third world problem; we face it every day in our own country and on our college campuses,” said Naveen Jain in the press release announcing the winner. “It’s not a red state problem or a blue state problem but a national problem.”

“Safety is a fundamental human right and shouldn’t be considered a luxury for women. It is the foundation in achieving gender equality,” added Anu Jain.

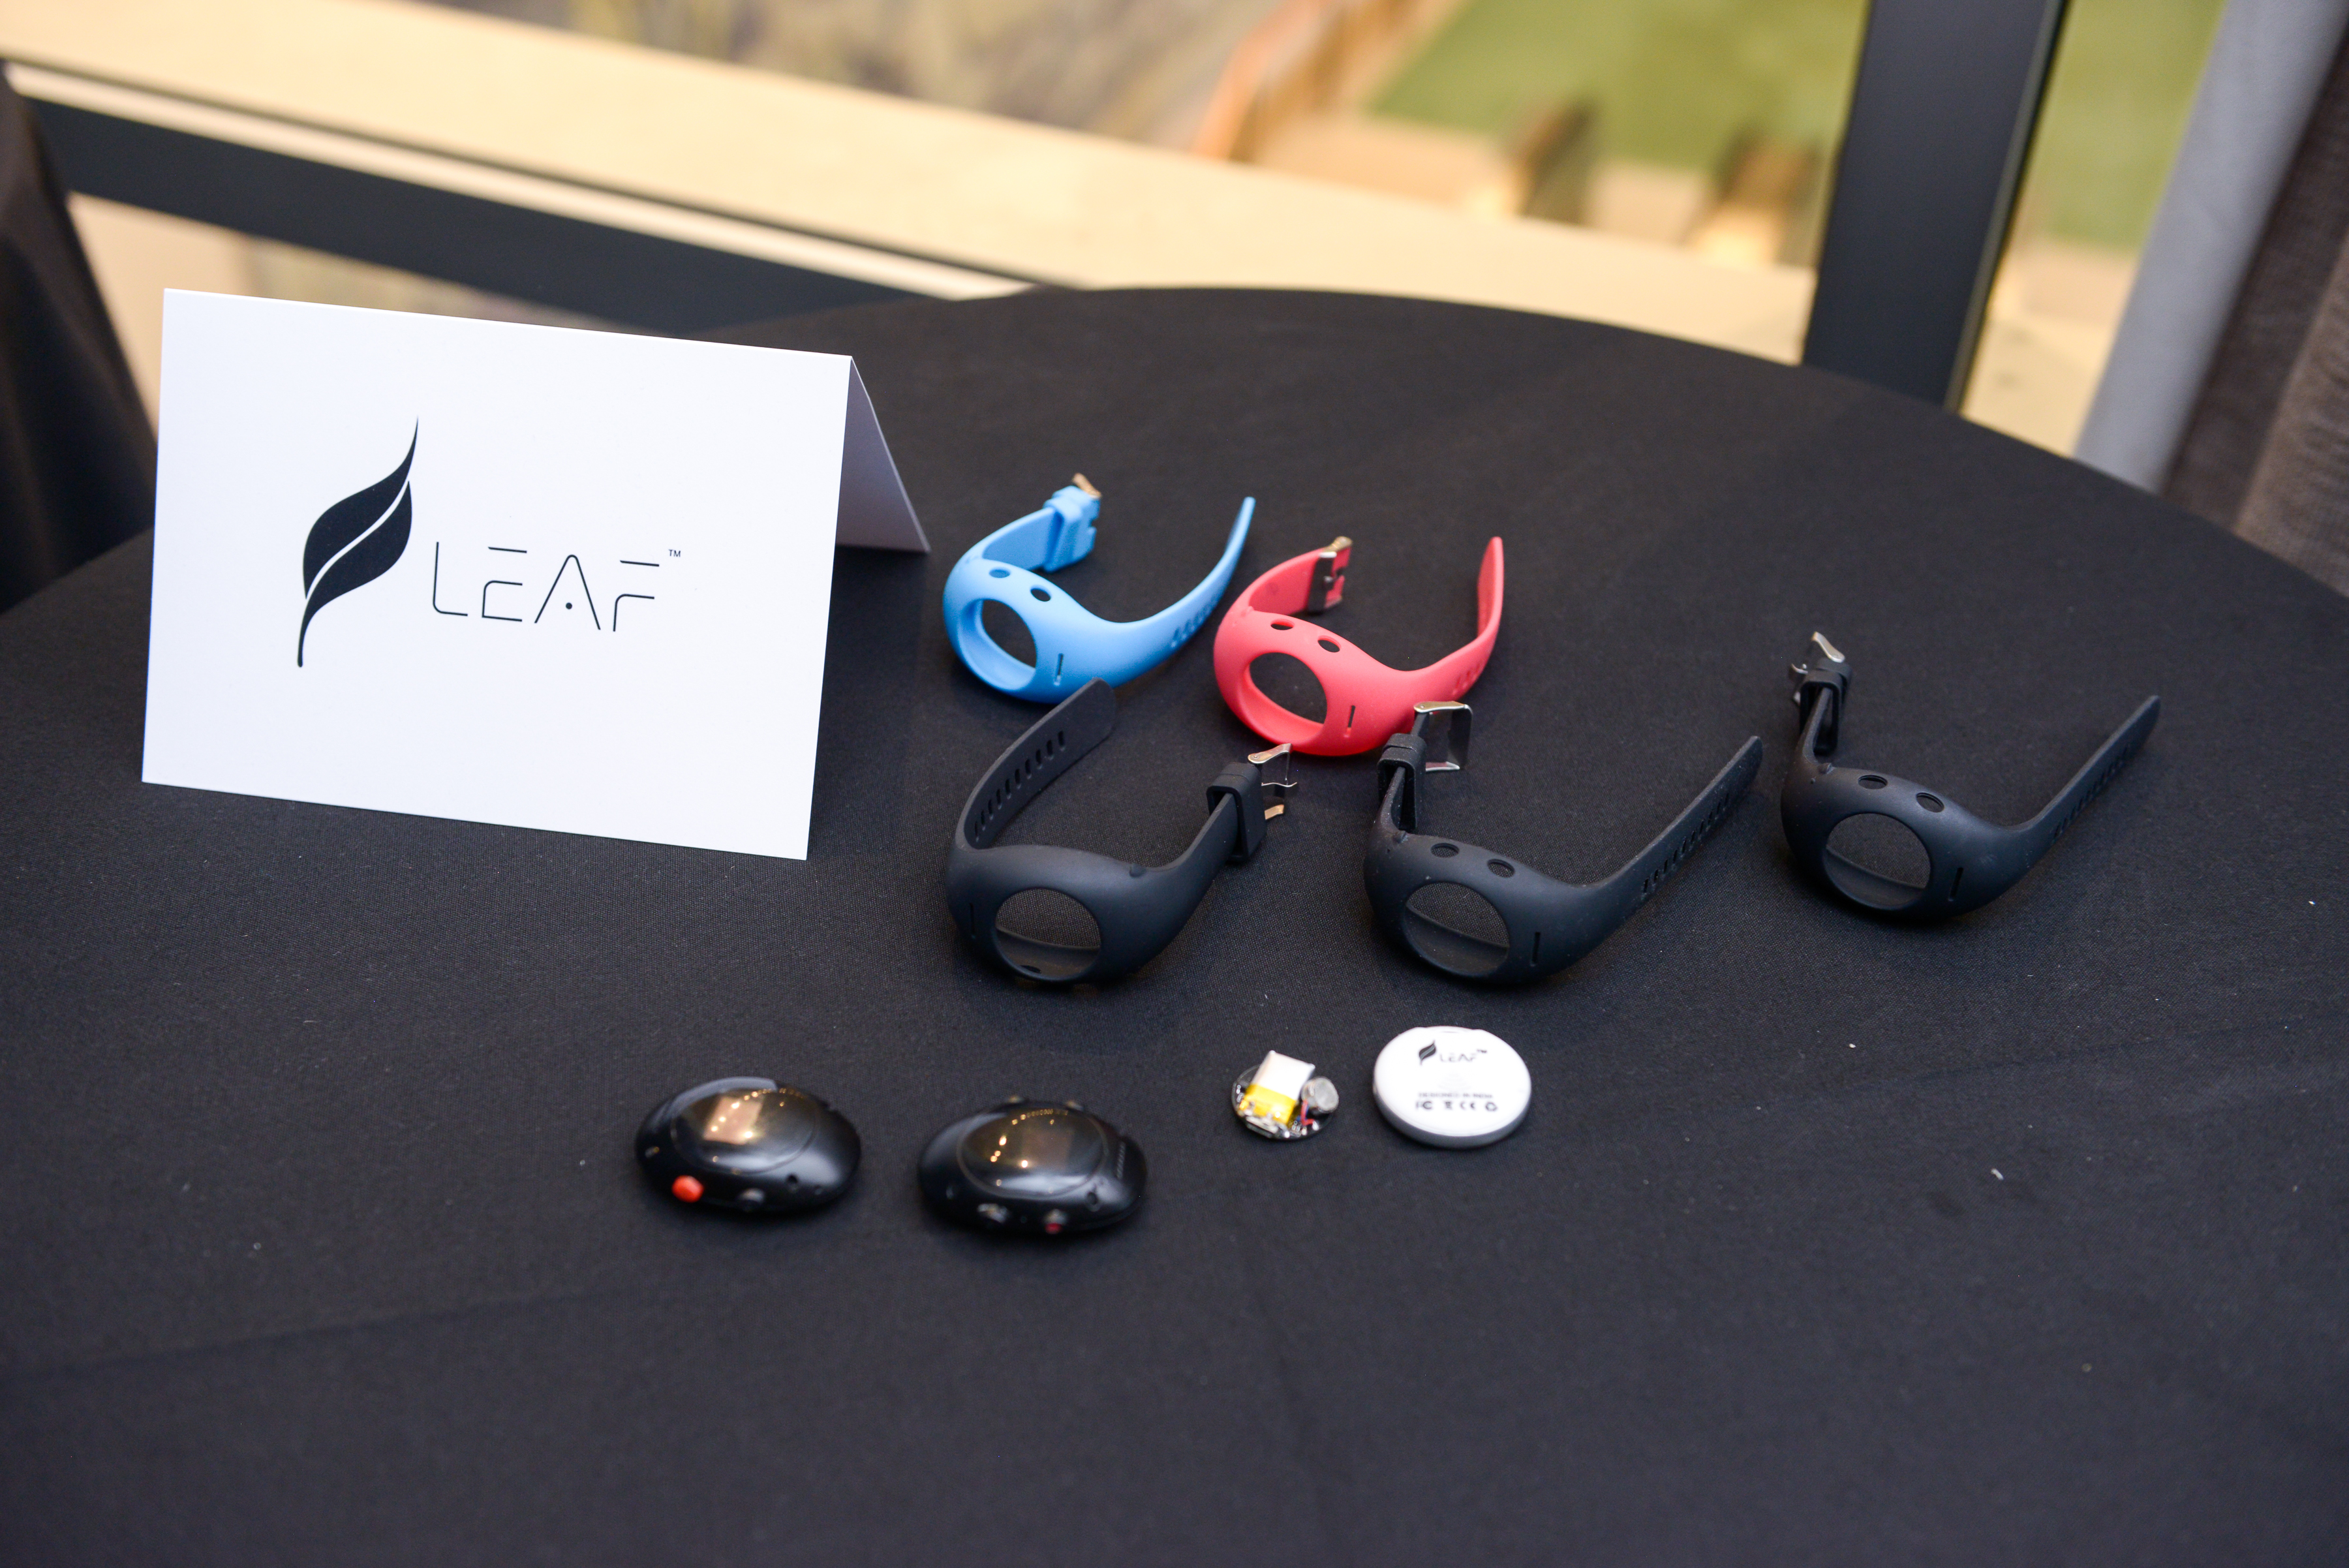
Out of dozens of teams that entered, five finalists were chosen in April: Artemis, Leaf Wearables, Nimb & SafeTrek, Saffron, and Soterra. All had some variation on a device that either detected or was manually activated during an attack or stressful situation, alerting friends to one’s location.

The winner was Leaf, which had the advantage of having already shipped a product along these lines, the Safer pendant. Like any other Bluetooth accessory, it keeps in touch with your smartphone wirelessly and when you press the button twice your emergency contacts are alerted to your location and need for help. It also records audio, possibly providing evidence later or a deterrent to harassers who might fear being identified.

It’s not that it’s an original idea — we’ve had various versions of this for some time, and even covered one of the other finalists last year. But they haven’t been quantitatively evaluated or given a platform like this.

“These devices were tested in many conditions by the judges to ensure that they will work in real-life cases where women face dangers today. They were tested in no-connectivity areas, on public transit, in basements of buildings, among other environments,” explained Anu Jain to TechCrunch. “Having the capability to record audio after sending the alert was one of the main differentiators for Leaf Wearables. Their chip design and software was also easy to be integrated into other accessories.”

Hopefully the million dollars and the visibility from winning the prize will help Leaf get its product out to people who need it. The runners up don’t seem likely to give up on the problem, either. And it seems like the devices will only get better and cheaper — not that this will change the world on its own.

“Prices will come down as the sensor prices drop. In many countries it will require community support to be built,” continued Jain. “These technologies can act as a deterrent but in the long term culture of violence again women must change.”


Read Full Article
SeatGeek brings ticket buying into Snapchat


You can now buy game and concert tickets from teams and musicians within Snapchat, thanks to an integration with SeatGeek.

While Snapchat has started testing e-commerce features in the past few months, SeatGeek says this is the first ticket-buying experience built into the Snapchat app.

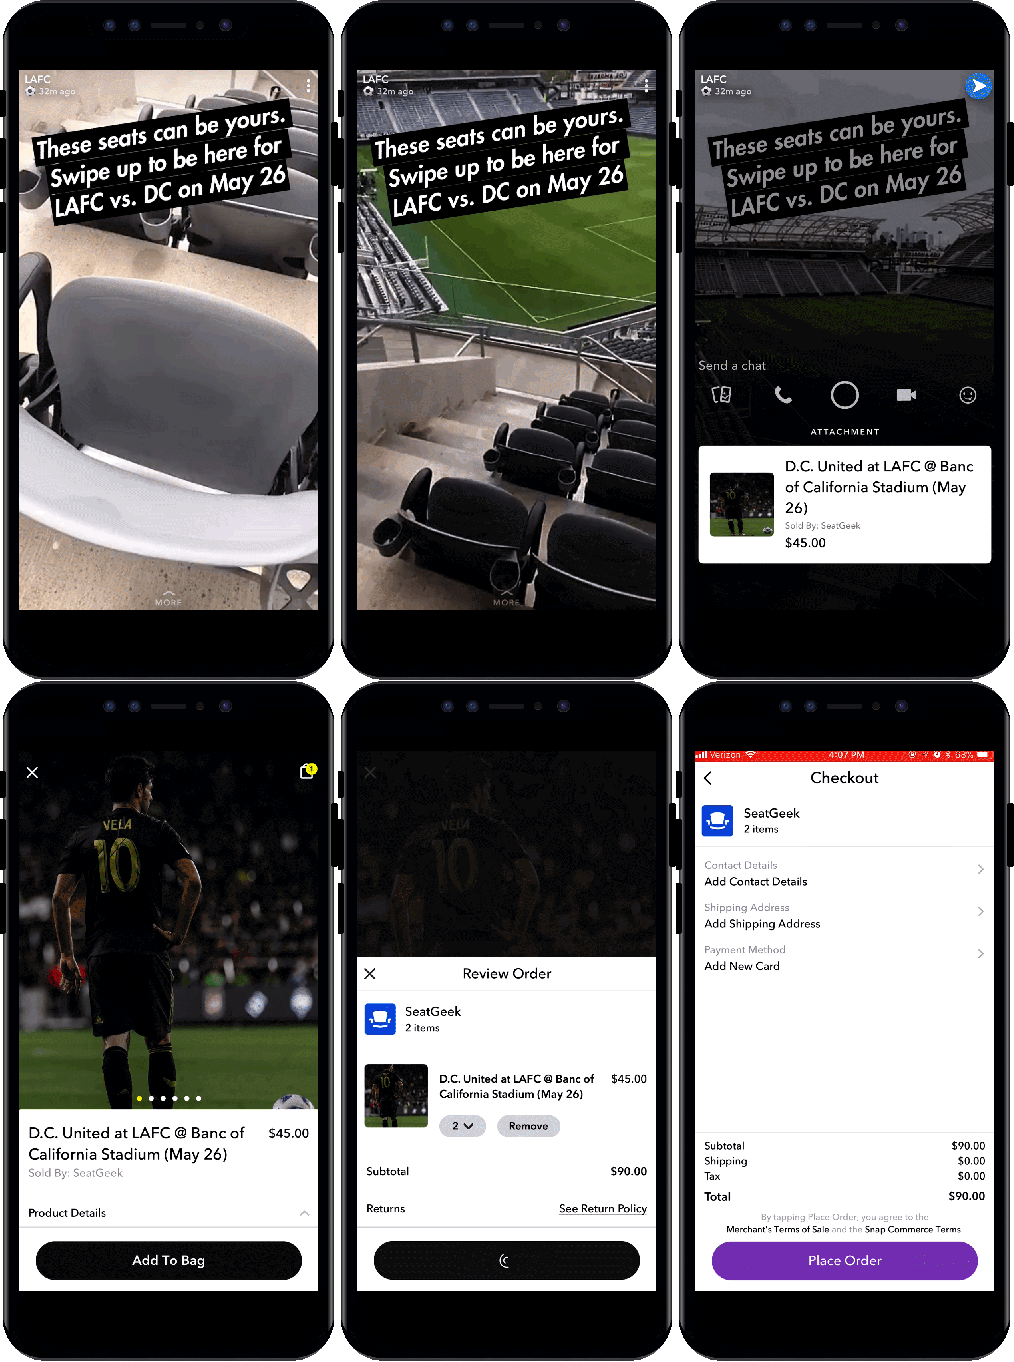
The Los Angeles Football Club was the first team to sell tickets through this integration, by posting a Snapchat Story (and a Snapcode on the team website) that allowed users to swipe up to buy tickets to the May 26 game. The full purchase experience takes place without leaving the app.

“We’re always looking to reach our fans in innovative ways, and selling tickets directly to our followers on Snapchat gives us an incredible opportunity to connect with our most dedicated supporters,” said Los Angeles Football Club President and co-owner Tom Penn in the announcement.

SeatGeek Snapchat

SeatGeek co-founder Russ D’Souza said that as “the pipe gets solidified,” you’ll start seeing more Snapchat/SeatGeek ticket sales. He added that this the kind of integration he was hoping for when the company launched the SeatGeek Open platform a couple years ago, allowing teams, musicians and other rightsholders to sell tickets directly through SeatGeek. (The platform also supports ticket sales through Facebook.)

“For too long, the legacy ticketing approach has been to make it difficult for teams to sell tickets in lots of places,” D’Souza said. “Teams should want to sell their tickets in as many places as possible.”

And it sounds there are additional deals in the works: “What we’re excited about over the next few months is beating the drumbeat of openness with new partnerships … We want to drive the whole industry forward and create more tangible results that cause the industry to open up.”


Read Full Article
SeatGeek brings ticket buying into Snapchat


You can now buy game and concert tickets from teams and musicians within Snapchat, thanks to an integration with SeatGeek.

While Snapchat has started testing e-commerce features in the past few months, SeatGeek says this is the first ticket-buying experience built into the Snapchat app.

The Los Angeles Football Club was the first team to sell tickets through this integration, by posting a Snapchat Story (and a Snapcode on the team website) that allowed users to swipe up to buy tickets to the May 26 game. The full purchase experience takes place without leaving the app.

“We’re always looking to reach our fans in innovative ways, and selling tickets directly to our followers on Snapchat gives us an incredible opportunity to connect with our most dedicated supporters,” said Los Angeles Football Club President and co-owner Tom Penn in the announcement.

SeatGeek Snapchat

SeatGeek co-founder Russ D’Souza said that as “the pipe gets solidified,” you’ll start seeing more Snapchat/SeatGeek ticket sales. He added that this the kind of integration he was hoping for when the company launched the SeatGeek Open platform a couple years ago, allowing teams, musicians and other rightsholders to sell tickets directly through SeatGeek. (The platform also supports ticket sales through Facebook.)

“For too long, the legacy ticketing approach has been to make it difficult for teams to sell tickets in lots of places,” D’Souza said. “Teams should want to sell their tickets in as many places as possible.”

And it sounds there are additional deals in the works: “What we’re excited about over the next few months is beating the drumbeat of openness with new partnerships … We want to drive the whole industry forward and create more tangible results that cause the industry to open up.”


Read Full Article
Here’s the sequel to the surprisingly nice BlackBerry KeyOne


TCL just dropped the sequel to the KeyOne, the company’s surprisingly good keyboard-sporting BlackBerry handset. We reviewed it roughly this time last year, and it was almost enough to restore our faith in the possibilities of BlackBerry as a brand. Almost. Of course, that had much more to do with TCL’s ability to create solid hardware than any residual BB legacy.


The Key2 builds on the promise of its predecessor, bringing back the physical keyboard and familiar BlackBerry-styled design, constructed around a 4.5-inch touchscreen and aluminum frame. The phone, naturally, runs Android (8.1 to start), loaded up with your standard suite of BlackBerry software, including DTEK. The security app has been updated with an new Proactive Health feature, which offers a full system scan.

As TCL proudly notes, this is the first BlackBerry/BlackBerry-branded device to feature dual rear-facing cameras, so that’s something. The pair of 12-megapixel cameras help deliver the device into 2018 with features like Portait Mode, Optical Super Zoom and Google Lens.

There’s a chunky 3,500mAH battery and a middling Snapdragon 660, coupled with a generous 6GB of RAM and either 64- or 128GB of storage. Not too shabby, but all of that comes with a $649 price tag, which marks a $100 premium over the KeyOne, which should make this a bit of a tougher pill to swallow for what to many no doubt still feels like a bit of a novelty in the smartphone category.

The Key2 starts shipping this month, and TCL tells me that it plans to keep selling the KeyOne as well, for the time being.


Read Full Article

Google says over 8 million people use its free WiFi service at railway stations in India


Back in 2015, Google launched an initiative to bring free WiFi to India’s railway stations and today the U.S. tech giant announced that the program has passed its target of reaching 400 stations, attracting a base of eight million users in the process.

The milestone was hit today when Dibrugarh station in northeastern state Assam went online.

Google gave some insight into the scale of the program’s reach when it revealed that over eight million people use the railway-based WiFi each month. On average, the firm said, users consume 350MB in data per session with half going online via the WiFi program at least twice per day.

In another sign of scale, Google began to monetize the initiative earlier this year by offering high-speed connections for a price. The standard option includes ads to develop revenue for Google and its partners, which include Indian Railways and RailTel.

Reaching million users and over 400 stations is hugely impressive but Google said that its journey “remains unfinished.” Beyond connecting stations, the firm wants to add free WiFi to other connection points across India.

“India has the second largest population of internet users in the world, but there are still almost a billion Indians who aren’t online. There are millions of other life-changing journeys that still haven’t been taken. We realize that not everyone in India lives or works near a train station,” Caesar Sengupta, VP of Google’s Next Billion team, wrote in a blog post.

The program is also taking roots overseas. Google has already expanded it to Indonesia and Mexico and Sengupta said that it will make its way to “even more countries soon.”

Google isn’t the only tech giant pioneering a free Wi-Fi model. Facebook’s successor to Internet.org — the program that was banned in India for violating net neutrality regulationslaunched in India last year. The company hasn’t said much about it, but it isn’t likely to have anything like the same scale as Google’s.

Free Wi-Fi isn’t the only India-specific strategy from Google. The U.S. firm has launched a series of local services in India, including data-friendly versions of its top apps, a mobile payment network called Teza food delivery service and — most recently — a social network for local communities.


Read Full Article

Evernote is spinning out its Chinese business and it plans to take it public


Here’s a unique approach to Western companies doing business in China. Today, Evernote — the U.S. note-making service — span out its China-based unit into an independent entity with “full autonomy” over its business and services.

Evernote introduced its Yinxiang Biji China-based service in 2012, but now it is transitioning to a minority shareholder with the Chinese management team taking day-to-day control. As part of its move to independence, Yinxiang Biji has raised an undisclosed Series A round from the Sequoia CBC Cross-border Digital Industry Fund.

The terms are not disclosed, but Raymond Tang, CEO of Yinxiang Biji, said ownership of the business is split roughly equally between Evernote, the Chinese investors and the startup’s management team — while Yinxiang Biji itself has raised “several hundred million RMB.” (For comparison, 100 million RMB is roughly $15 million.)

Evernote and Yinxiang Biji have inked a two-year deal that will see them cross-license IP, and Tang and Evernote CMO Andrew Malcolm told TechCrunch in an interview that the duo will continue to work closely. The IP deal could also be extended, according to Malcolm, who added that the spin-out has been a move that he and Tang have discussed since they both joined Evernote in 2015.

Yinxiang Biji claims to have more than 20 million registered users who have created over one billion notes. Tang said that note creation in China per user is 50 percent higher than Evernote’s other customer base, while the business has grown at a 60-percent rate annually.

More broadly, Malcolm said the China entity accounts for some 10 percent of Evernote’s global revenue but he acknowledged that, despite adopting a local strategy since it launched, Yinxiang Biji will have the freedom to push its business harder as an independent entity. That chiefly includes building out features that apply more directly in China, such as social integrations and more.

“Even without having done some of the basics that [Chinese] users would expect, we’ve found product-market fit. How much more impactful could we be if we allowed the Chinese market team to think about their brand, technology and innovation?” he said.

The company has arguably been one of the most successful U.S. tech companies to venture into China — Linkedin, which is mired in some controversy, might be another. Yet still a change is needed since the existing approach “doesn’t satisfy what we have learned about how Chinese users want to use Evernote versus those in the rest of the world,” Malcolm summarized.

That sentiment was echoed by Eric Xu, partner of the Sequoia fund.

“I am convinced that Yinxiang Biji will further unleash its potential and pick up development after the spin-off, as technical and decision-making autonomy is gained and fully localized operations are on the way. Moreover, its business model is a frame of reference for future cross-border Internet partnerships,” Xu said in a supplied statement.

Beyond impact on the service, there is a major business reason, too. The move frees Yinxiang Biji up for a potential listing, which Malcolm and Tang both acknowledged is part of the plan since Chinese financial regulations are strict, including clauses such as two years of profitability. Part of that planned approach includes the new management structure, which makes Yinxiang Biji majority-Chinese owned thus satisfying another regulatory requirement.

“We are very much aware of how far ahead you need to be thinking” in order to go public in China, Malcolm said. “It’s top of our minds when we speak.”

Tang, meanwhile, suggested that the company might look to tap exchanges in Shanghai or Shenzhen, but there’s no immediate timeframe for that at this point. Both executives pointed out that the Chinese market requires a unique approach and, in this case for certain, Evernote is adopting one.

Evernote, once valued at over $1 billion, has been in a period of transition over the last few years after the exit of co-founder and CEO Phil Libin in the summer of 2015. A slew of over executives followed Libin, a ‘changing of the guard’ as perhaps might be expected when a founding member departs. Since then, the company has quietly solidified its business in the years since then under the helm of CEO Chris O’Neill, who previously spent a decade with Google.

Under that context, the Chinese move makes plenty of sense since it happened under the previous Evernote management regime, but it also raises questions about Evernote’s own immediate future, and a potential IPO. The company isn’t saying anything on that now, but it would be quite something if the business unit it set up in China went public before the mothership.


Read Full Article

Photos on social media can predict the health of neighborhoods


The images that appear on social media – happy people eating, cultural happenings, and smiling dogs – can actually predict the likelihood that a neighborhood is “healthy” as well as its level of gentrification.

From the report:

So says a groundbreaking study published in Frontiers in Physics, in which researchers used social media images of cultural events in London and New York City to create a model that can predict neighborhoods where residents enjoy a high level of wellbeing — and even anticipate gentrification by 5 years. With more than half of the world’s population living in cities, the model could help policymakers ensure human wellbeing in dense urban settings.

The idea is based on the concept of “cultural capital” – the more there is, the better the neighborhood becomes. For example, if there are many pictures of fun events in a certain spot you can expect a higher level of well-being in that area’s denizens. The research also suggests that investing in arts and culture will actively improve a neighborhood.

“Culture has many benefits to an individual: it opens our minds to new emotional experiences and enriches our lives,” said Dr. Daniele Quercia. “We’ve known for decades that this ‘cultural capital’ plays a huge role in a person’s success. Our new model shows the same correlation for neighborhoods and cities, with those neighborhoods experiencing the greatest growth having high cultural capital. So, for every city or school district debating whether to invest in arts programs or technology centers, the answer should be a resounding ‘Yes!'”

The Cambridge-based team looked at “millions of Flickr images” taken at cultural events in New York and London and overlaid them on maps of these cities. The findings, as we can imagine, were obvious.

“We were able to see that the presence of culture is directly tied to the growth of certain neighborhoods, rising home values and median income. Our model can even predict gentrification within five years,” said Quercia. “This could help city planners and councils think through interventions to prevent people from being displaced as a result of gentrification.”

The team expects to be able to assess the health of citizens using the same method, overlaying pictures of food on maps in order to find food deserts and spots where cafes and croissants are on the rise. Just imagine: all those Instagrammed photos of your favorite sandwiches will some day help researchers build happier cities.


Read Full Article