
If you’re looking to record your screen or stream online, OBS Studio (formerly Open Broadcaster Software) is a great option. This tool makes it simple to capture screencasts, record your gameplay, stream to Twitch, and much more.
But if you’ve never used it before, OBS Studio might seem a little daunting at first. In this article, we’ll walk you through how to set up OBS Studio, what you need to start recording and streaming, and tips for getting the best results.
Download OBS Studio
To get started, you’ll want to download OBS Studio for Windows, macOS, or Linux. We’ll use the Windows version for this tutorial, but it’s similar on all platforms.
OBS Studio is truly free, so you don’t have to pay for any features. It’s also open source software, meaning anyone can take a look at the code and improve it.
Step through the standard installer. Once it completes, OBS Studio will offer to walk you through an auto-configuration wizard. You can do this if you like; we’ll review related settings below.
The OBS Studio Interface
The main OBS Studio interface allows you to set up everything you need to start streaming or recording. At the bottom of the screen, you’ll see several control elements.
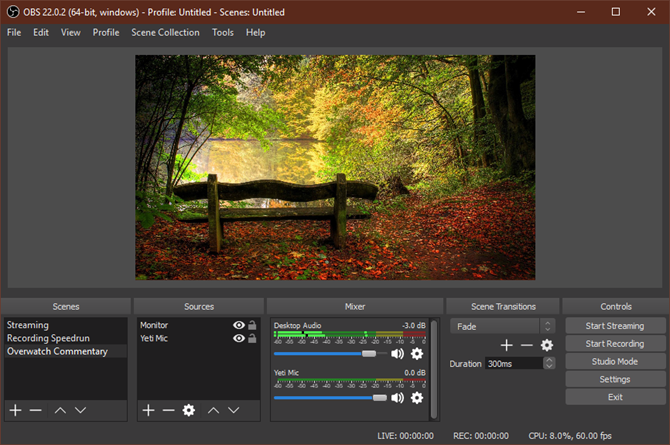
Scenes
A Scene in OBS Studio allows you to collect and arrange certain Source elements in a specific way. You can have multiple scenes and switch between them at will.
This will make a bit more sense as we move on. For now, you can click the Plus button to create a new scene. Call it Default or something similar (you can change it later).
After you’ve added some elements, you can click on them in the preview to adjust as you wish. Click the Eye icon to hide an element, or the Lock to prevent accidental movement.
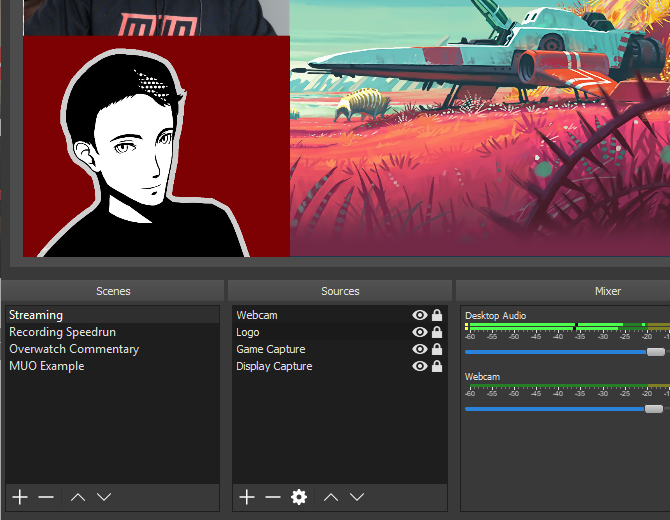
Sources
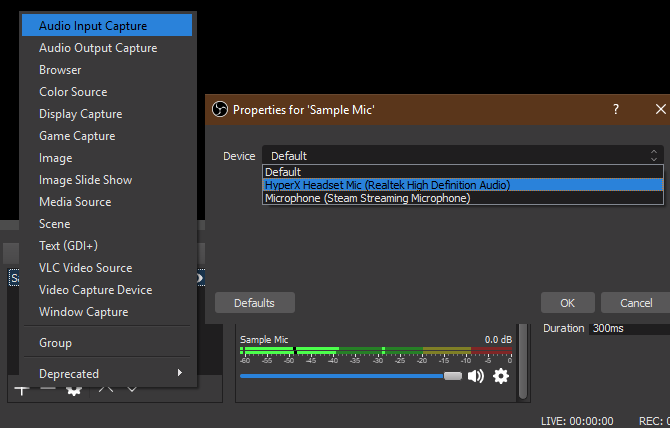
Sources are the video and audio inputs that you feed into OBS Studio. Click the Plus button to add a new one, and you’ll see several categories. Some of the most important ones include:
- Audio Input Capture: Record sound from a microphone or similar. (See the best budget microphones if you need one.)
- Audio Output Capture: Capture the sound coming out of your computer, so your recording/stream includes game or desktop audio.
- Display Capture: Allows you to capture an entire monitor, no matter what’s showing on it.
- Game Capture: Choose a specific game to record.
- Image: Display a static image.
- Video Capture Device: Records footage from a webcam or similar. (We’ve listed the best budget webcams if you don’t have one already.)
- Window Capture: Record a specific program window. Like Game Capture, but works for any program.
Once you select an option, you can choose Create new or Add Existing. Since you just started, you’ll need to add a new item that you can reuse later. After you click OK, OBS Studio displays options depending on the source you chose.
As an example, click Audio Input Capture. Let’s say you’re going to use a headset microphone to record audio. Enter a descriptive name for the source (like Headset Mic) and click OK. On the resulting screen, pick your headset mic from the Device dropdown and click OK.
Now you have that input registered with OBS Studio and can easily add it again in the future. You’ll need to repeat this step to add your webcam, screen capture, and similar.
Mixer
Once you’ve added all your sources, the Mixer tab lets you adjust the volume balance between them. The bars move in real-time to reflect levels. Drag the slider to adjust the mix, or click the speaker icon to mute a source.
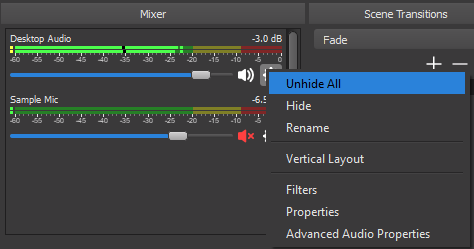
Play around with these ahead of time, as different sources can have vastly different volume levels. You wouldn’t want to complete a recording only to find out that the game audio overpowers your mic.
Scene Transitions
This simple section allows you to choose what happens when you swap between scenes. Choose between Fade and Cut in the dropdown, or hit Plus to pick another option. You can choose how long the transition lasts using the Duration box.
Controls
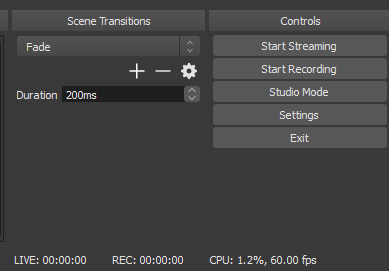
Here, the Start Streaming and Start Recording buttons will let you start capturing with OBS Studio. You can see the current FPS and CPU usage below.
It also lets you enable Studio Mode for making changes to scenes on the fly, plus access to the many Settings of OBS Studio.
Tweaking OBS Studio Settings
Before your first recording or stream, you should tweak a few options. Click Settings in the Controls section of the interface to access them.
OBS Studio offers other options than what we explore here, but you shouldn’t need to worry about those until you’re more experienced with it.
Video Settings
First, head to the Video tab. Here, check the Base (Canvas) Resolution and Output (Scaled) Resolution) options.
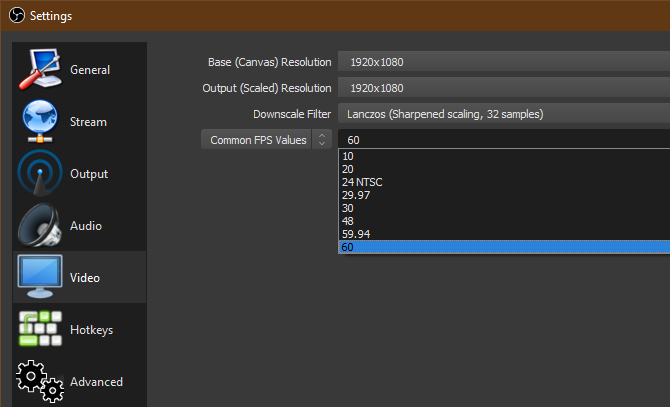
The first should match your screen resolution, while the second lets you choose the resolution of the final video. Leave Output the same as the above for a full-quality recording, or lower it to something like 1280×720 for a lower file size. Leave the Downscale Filter as Lanczos if you’re downscaling.
Lastly here, you’ll need to choose the FPS (frames per second) of the recording. For a smooth picture, choose 60. But if you desire a smaller file size or are recording something simple, 30 is suitable.
It’s also a good idea to open the Advanced tab and set Process Priority to High in order to give OBS Studio the most resources to create the best recording.
Recording Settings
Switch to the Output tab to access options to screen recording.
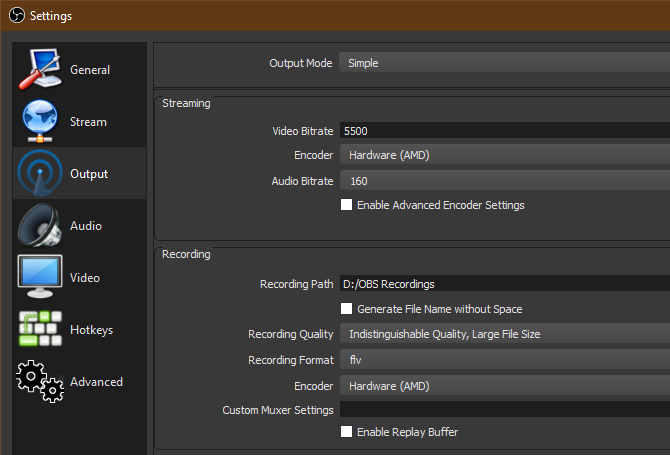
At the top, you can set the Output Mode to Simple or Advanced. If you want a quick and solid preset, pick Simple and set the following under Recording:
- Recording Quality to Indistinguishable Quality
- Recording format to FLV, or MKV if you prefer
- Encoder to Hardware (AMD) or Hardware (Nvidia) if you have a powerful graphics card, or Software (x264) if not (see below for more details).
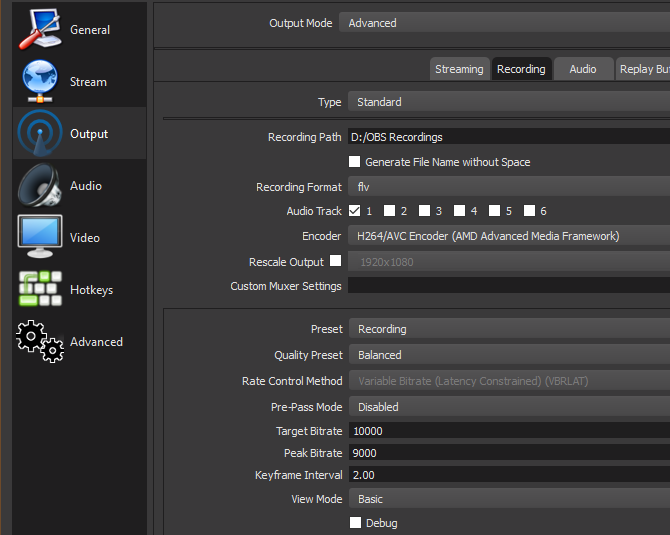
Of course, Advanced gives you more options. Choose Advanced and swap to the Recording tab below to see them.
Choose where you’d like your completed video to save using the Recording Path field.
Under Recoding Format, you can choose the video filetype to save in. The default is FLV, which is a fine default. While MP4 is a popular format, using it is risky because you’ll lose the whole file if OBS Studio can’t finalize it. Thus, a Blue Screen or power outage would destroy an MP4 recording but merely cut off an FLV.
Below this, you’ll need to choose an Encoder. The default is x264, which uses your CPU. If you have a powerful dedicated graphics card (not integrated graphics), you can change this to H264 (for AMD cards) or NVENC (for Nvidia cards). Doing so will likely provide better results when recording, as it won’t put as much strain on your CPU.
Feel free to try both and see which is best for you.
Bitrate
Perhaps the most important part of your recording options is the Bitrate field. Essentially, a higher bitrate results in better-quality videos with larger file sizes. Setting bitrate too low will result in pixelated video, while setting it too high will generate a massive file.
If you’re using x264, choose CBR (constant bitrate) and enter a value for bitrate below. 50,000 is a good starting point for 1080p recordings at 60FPS. The CPU Usage Preset lets you tweak how much of the CPU the software uses to encode video. The default is veryfast, but you can up this to superfast if you get a High CPU Usage Warning while recording or streaming.

Those using a graphics card encoder can choose a Preset, or set the bitrate values below similarly to above.
Try different values here with a few test recordings to find the best balance of video quality and file size for your purposes. Record around a minute of typical footage and you can use that to estimate how large of a file you’ll end up with.
Streaming Settings
You’ll find Streaming on the Output tab as well. In Simple mode, you’ll simply need to specify a bitrate, choose between software or hardware encoding, and set the Audio bitrate.
Twitch recommends some streaming bitrates depending on quality. 1080p at 60FPS should use a bitrate of at least 4,500, while 720p at 30fps can use something around 2,500. For the audio bitrate, 160 is a good baseline. You can increase this to 192 for better quality, or 320 if you need top-notch audio.
In the Advanced mode, you’ll find very similar options on the Streaming tab as discussed above. You may wish to lower the bitrate (as well as downscaling the resolution and lowering the FPS) slightly for streaming, as a stable stream that everyone can enjoy is better than streaming in maximum quality that few can enjoy.
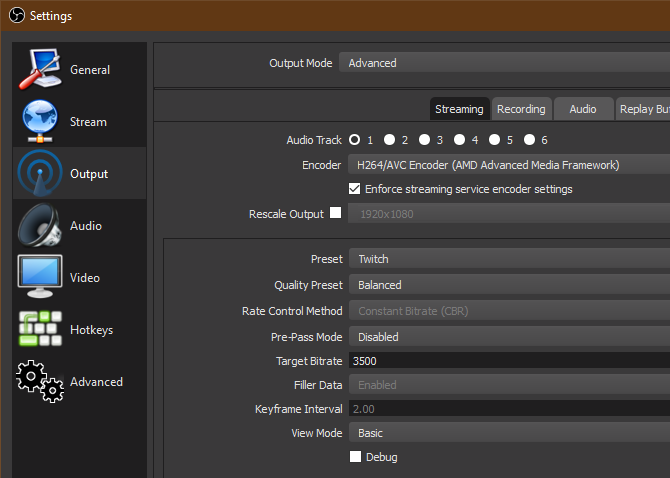
The tips for fixing poor FPS in games apply too. Check out Twitch’s broadcast requirements page for more info.
How to Record Your Screen With OBS Studio
To begin screen recording, all you have to do is click Start Recording on the main OBS Studio page. The software will immediately start recording based on the current Scene. You can swap Scenes at any time, so make sure you’ve set them up beforehand.
When you click Stop Recording, OBS Studio will save your file to the directory you specified in Settings. As mentioned earlier, we recommend performing a short test recording first to make sure everything looks and sounds acceptable.
How to Stream Using OBS Studio
To stream with OBS Studio, you’ll first need to authorize OBS Studio with your streaming account. Do this by opening Settings and switching to the Stream tab. Under Service, choose your preferred service. You’ll find Twitch, YouTube Gaming, Mixer, and more.
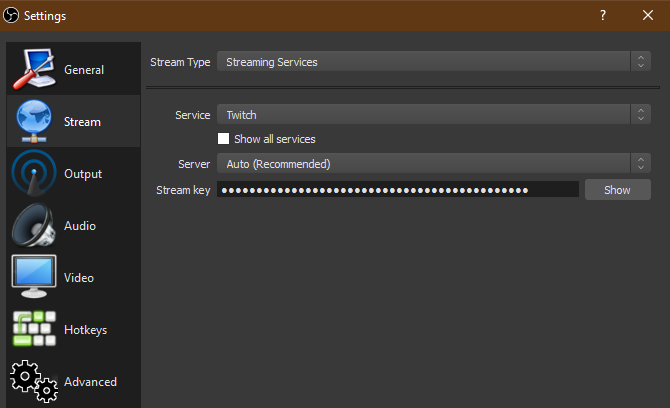
Next, you’ll need to generate a streaming key for the service. To do this for Twitch, head to the Stream Key page in Twitch’s Settings (Settings > Channel) while logged in. Click Copy and paste this into the Stream key field in OBS Studio.
For YouTube Gaming, open the Live Streaming > Stream now tab in YouTube’s Creator Studio. At the bottom of the page in the Encoder Setup section, reveal and copy your Stream name/key.
Warning: Never give this stream key to anyone or show it on a stream! Anyone with access to this can stream to your account. If you accidentally share it, click Reset to generate a new one.
You’re All Set With OBS Studio
Now you have a basic understanding of how to use OBS Studio. You can customize it a lot more to suit your own personal needs, but this article is designed to prepare you to record gameplay locally or run your first stream.
Now you can focus on building an audience for your streams.
Read the full article: How to Record or Stream Your Computer Screen Using OBS Studio
Read Full Article
No comments:
Post a Comment