Bloatware is a scourge for technology owners. Manufacturers fill your shiny new laptop, phone, or tablet with pre-installed applications to put an extra dollar in their pocket. You are left with bundles of oft-useless programs taking up the already limited storage space.
Microsoft is no stranger to bloatware. Windows 10 might look the part, but behind the scenes, there are a plethora of programs you simply don’t need. Luckily, you can rid yourself of the bloatware. Let’s look at how to ease the pressure on that awful bloating.
How to Remove Windows 10 Bloatware
Windows 10 does come with a reasonably large amount of bloatware. In most cases, it is easy to remove. There are also a few different removal options, too: using the traditional uninstall, using PowerShell commands, and third-party installers.
Bloatware doesn’t feature within the System > Apps & Features list you would normally use to uninstall a program. Why would it? Microsoft and other manufacturers who deliver products with bloatware stand to profit from your using them, so making it easy to uninstall isn’t in their best interest.
Uninstall Windows 10 Bloatware Apps
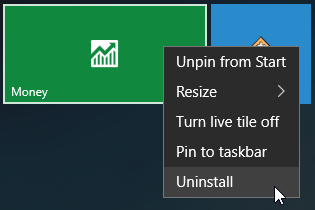
Some of the Windows 10 bloatware is easy to remove using a regular uninstall. This appears to work for several apps included in the Windows 10 installation package, such as Money, News, Sports, and a few others clogging up your Start menu. (Here are some more Windows programs you should consider uninstalling!)
Find the application you want to remove, right-click, and select Uninstall.
Microsoft has made it simple to remove the more cosmetic items within Windows 10. But you will quickly realize that Microsoft doesn’t consider all apps equal. Indeed, those apps that Microsoft considers part of the core Windows 10 experience require you to use PowerShell commands to hide or remove, or third-party uninstaller (more on both of these below). Others, such as Cortana, simply cannot be 100% removed from your system.
Using PowerShell to Remove Bloatware
PowerShell is an important part of Windows system management. While some compare PowerShell to the Command Prompt, at their core they are different beasts. However, PowerShell is a command and scripting language that gives you greater control over your Windows installation. In this instance, you can use a series of PowerShell commands to either hide or remove Windows 10 bloatware.
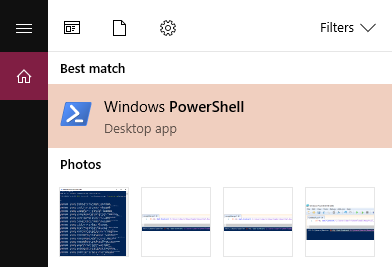
First, open the PowerShell command line. Type PowerShell into your Start menu search bar. The best match should be Windows PowerShell. Right-click and select Run as Administrator. This ensures you have control over the entire system.
Next, you need to decide what to remove. The PowerShell commands can remove any packages ranging from the Zune Music Player to Bing Health and Fitness, to the Microsoft Windows Calculator.
Hide Apps Using the “Remove-AppxPackage” Command
Entering the following code into the PowerShell will hide each application you enter.
Get-AppxPackage -name "Microsoft.ZuneMusic" | Remove-AppxPackage
Get-AppxPackage -name "Microsoft.Music.Preview" | Remove-AppxPackage
Get-AppxPackage -name "Microsoft.XboxGameCallableUI" | Remove-AppxPackage
Get-AppxPackage -name "Microsoft.XboxIdentityProvider" | Remove-AppxPackage
Get-AppxPackage -name "Microsoft.BingTravel" | Remove-AppxPackage
Get-AppxPackage -name "Microsoft.BingHealthAndFitness" | Remove-AppxPackage
Get-AppxPackage -name "Microsoft.BingFoodAndDrink" | Remove-AppxPackage
Get-AppxPackage -name "Microsoft.People" | Remove-AppxPackage
Get-AppxPackage -name "Microsoft.BingFinance" | Remove-AppxPackage
Get-AppxPackage -name "Microsoft.3DBuilder" | Remove-AppxPackage
Get-AppxPackage -name "Microsoft.WindowsCalculator" | Remove-AppxPackage
Get-AppxPackage -name "Microsoft.BingNews" | Remove-AppxPackage
Get-AppxPackage -name "Microsoft.XboxApp" | Remove-AppxPackage
Get-AppxPackage -name "Microsoft.BingSports" | Remove-AppxPackage
Get-AppxPackage -name "Microsoft.WindowsCamera" | Remove-AppxPackage
Get-AppxPackage -name "Microsoft.Getstarted" | Remove-AppxPackage
Get-AppxPackage -name "Microsoft.Office.OneNote" | Remove-AppxPackage
Get-AppxPackage -name "Microsoft.WindowsMaps" | Remove-AppxPackage
Get-AppxPackage -name "Microsoft.MicrosoftSolitaireCollection" | Remove-AppxPackage
Get-AppxPackage -name "Microsoft.MicrosoftOfficeHub" | Remove-AppxPackage
Get-AppxPackage -name "Microsoft.BingWeather" | Remove-AppxPackage
Get-AppxPackage -name "Microsoft.BioEnrollment" | Remove-AppxPackage
Get-AppxPackage -name "Microsoft.WindowsStore" | Remove-AppxPackage
Get-AppxPackage -name "Microsoft.Windows.Photos" | Remove-AppxPackage
Get-AppxPackage -name "Microsoft.WindowsPhone" | Remove-AppxPackage
Hiding a pre-installed app has the advantage of obscuring it from your view without actually deleting it from your system. If at a later date you realize that you do require the app, you can relocate it.
Deleting Windows 10 Bloatware With DISM
Want to truly obliterate every piece of bloatware from your system using PowerShell? There’s a different command line tool for that: DISM. DISM stands for Deployment Imaging Service and Management. The DISM command is relatively powerful and can be used to service a Windows system in many different ways. In this case, we’ll use it to remove the additional apps from your system.
Deleting the apps works a little differently to hiding. First, check to see the entire spectrum of system bloatware using the following command:
DISM /Online /Get-ProvisionedAppxPackages | select-string Packagename
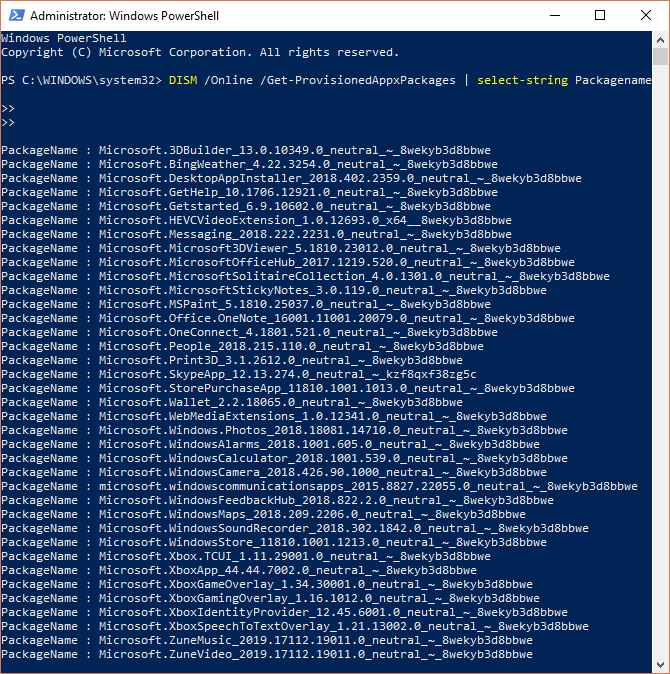
You should now see a complete list of installed apps. We can now use the package names in the list to begin removing them. To remove them, use the following command:
DISM /Online /Remove-ProvisionedAppxPackage /PackageName:PACKAGENAME
Where PACKAGENAME is taken from the list we previously generated. As you can see in the below image, I’ve chosen to remove the Microsoft Zune Video package. Once the operation completes successfully, you’ll need to restart your machine for the code to take full effect.

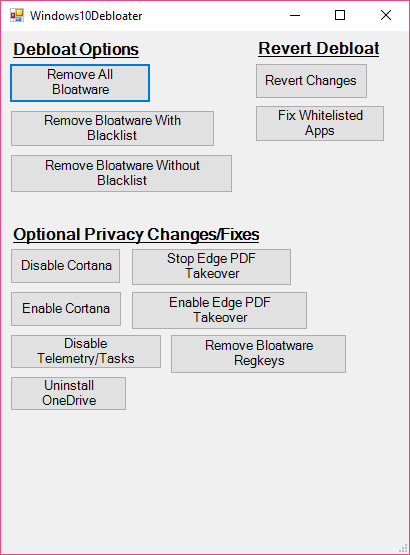
Delete Using Windows10Debloater PowerShell Script
Of course, it wouldn’t be a MakeUseOf article if you didn’t learn how to automate the process. The Windows10Debloater is a PowerShell script developed by Sycnex. It removes almost every additional Windows 10 package from the operating system, stripping it bare. Within that, however, it also removes apps you might find useful, such as TuneInRadio, PowerBI, or the Windows Netflix app.
You can find the Windows10Debloater here (along with the full list of apps for deletion).
On the GitHub page, head to the top-right corner and select Clone or download. Select Download ZIP from the drop-down menu. When the archive downloads, right-click and use your favorite tool to extract the folders.
There are two versions of the main script:
- Windows10Debloater: This version is silent and gets on with business.
- Windows10DebloaterGUI: This version has a basic GUI with a few removal options, as well as the Revert Changes options.
The PowerShell script automates the process you went through in the previous section. As a bonus, it also removes the associated Windows Registry entries for the bloatware apps after removal.
Regarding the removal of apps you want to keep, you have two options. One is to head back to the prior section and manually remove the bloatware. The other is to re-enable and install any apps after running the script. Either way is slightly time-consuming, so it really is a personal preference.
Why Delete Windows 10 Bloatware Apps?
While the Windows 10 bloatware doesn’t take up much physical space, it is more about exercising control over your system. Many consider the default apps included in the installation to be “garbage” and while this author would agree in some cases, there are some others I cannot see the point of removing.
Whichever way you feel, you now have the tools to remove each piece of bloatware yourself. Happy obliterating. And if you want to get rid of OneDrive, we’ve figured that out for you, too.
Read the full article: How to Easily Remove Bloatware From Windows 10
Read Full Article
No comments:
Post a Comment