There is data on your hard drive that you want to get rid of. Perhaps the computer is about to be sold or donated to charity; maybe you just want to ensure the data on the drive is totally erased before you use it yourself.
Whatever the case, you can delete the drive in Windows using native or third-party tools.
Why Do You Need to Erase Your Hard Drive?
There are various reasons why you might wish to completely erase your hard disk drive.
You may be concerned about others seeing the data on the drive if you’re planning to
- Sell the hard drive
- Give it away
- Donate the PC to charity, church, or a school
However, you might not be planning to part with the device. Wiping the disk might be necessary to:
- Remove a virus or ransomware
- Overwrite sensitive personal data
- Start using a second-hand disk drive that the previous owner has not wiped
You might have your own reasons for wiping your computer’s disk drive. Whatever the case, Windows users have two options:
- Native Windows 10 tools
- Third party tools like DBAN
Let’s look at each option in turn.
The Easy Way to Wipe a Hard Disk Drive in Windows 10
Although some good third-party tools are available, you might be in a bit of a rush. As such, going to the trouble of finding, downloading, and installing software isn’t what you want to do.
Fortunately, you don’t need to worry. Windows 10 has a dedicated command for wiping your hard disk.
Before proceeding, however, ensure you know the correct drive letter for the disk you wish to erase. You’ll find this in Windows Explorer, so make a note of the drive letter. Note that you won’t be able to wipe the Windows C drive from within Windows (see the next section for a solution to that problem).
Start by right-clicking Start, then selecting Windows PowerShell (Admin). This opens the Windows PowerShell environment with administrator privileges. This is a command line tool, into which you can input text-based instruction.
The command you’re going to use follows this syntax:
Format volume /P:passes
Here, “volume” refers to the drive letter, while /P is the format command. “Passes” refers to the number of times you want each sector of the disk to be overwritten.
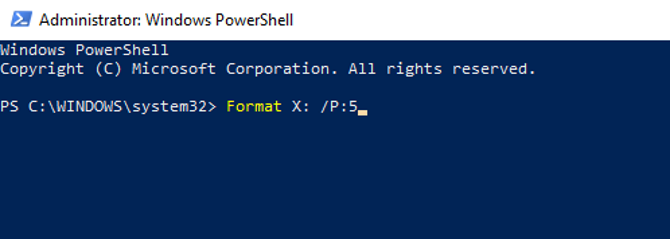
So, if your drive letter was X, and you wanted five passes of formatting, you would use
Format X: /P:5
It’s as simple as that. Wait while the device is wiped, then reuse it as needed.
Wiping a Hard Drive in Windows 7 and Windows 8
Need to wipe a hard disk drive while using Windows 7 or Windows 8?
You’re in luck! The same instructions for Windows 10 will work with earlier versions of Windows, back to and including Vista.
How to Totally Wipe a Hard Drive With DBAN
What if you want to destroy the data on your C: drive? This is typically the disk drive that Windows is installed on and cannot be wiped using Windows’ built in formatting tool.
Several third-party tools are available, but perhaps the best is Darik’s Boot and Nuke (DBAN). Designed specifically for the task of destroying data in bulk, DBAN will run in your computer’s memory, much like a recovery disk, or a Linux live disk.
Two versions of DBAN are available: the free, personal use disk erasure tool, and the premium Blanco Drive Eraser. You can ignore the paid version (unless you’re a business or organization) as the free DBAN will effortlessly delete your HDD.
The free DBAN features permanent data erasure, with six erasure standards, and supports ATA, SATA, and SCSI connectors. This should cover all type of hard disk drive. But what does this mean? Well, if you need to wipe a hard drive inside your PC tower or laptop, DBAN can handle it.
1. Back Up Valuable Data
Before you wipe your Windows computer, it’s important to make sure that the data on the drive is 100% useless. If there is anything you wish to keep, it should be backed up immediately. Recovery tools will be useless if you accidentally delete data you want to keep. Your data will be irretrievable after using DBAN.
Our downloadable guide for backing up Windows data should answer any questions you might have.
2. Download and Burn DBAN to Disc
Available in ISO format, DBAN must be downloaded to your computer then written to an optical disc.
You’ll find it by visiting the DBAN download page on Sourceforge. The 17MB downloaded ISO file should then be written to a blank optical disc using Windows’ built-in tool.
Insert a blank disc into your optical read/write drive, then browse to the downloaded ISO file. Right-click dban-2.3.0_i586.iso and select Burn disc image. Work through the image burning wizard and wait as the disc is created.
When it’s done, remember to label the disk. You might want to use it again and wouldn’t want to load it up accidentally.
3. Identify Your Hard Drive
While all of that is happening, it’s time to ensure you can identify your hard disk drive. The easy way to do this is to open Windows Explorer and check the C: drive. As long the device is labeled something like OS C: or Windows C: then you’re in the right area.
However, problems can arise if the C: drive is one of several and they’re all partitions on the same physical disk. This could result in inadvertently overwriting data on all partitions, not just the C: drive.
Right-click the drive letter and select Properties > Hardware to find the hardware name of the device. This will help you to identify the drive in DBAN.
4. Boot Into DBAN
To use DBAN, you’ll need to insert the disc into the drive and restart your PC, choosing the option to boot from the CD or DVD drive. However, this might be easier said than done.
In most cases, your computer will simply boot from the hard drive as usual, so you’ll need to persuade it to look for a different boot device. This can be done by reordering the boot devices in the BIOS (software that lets you change how your computer runs), or by tapping a key (typically DEL or F12) to prompt the boot selection screen.
Note, however, that this key differs between manufacturers. Check your PC or laptop’s documentation for assistance. With the right boot device selected, DBAN should boot up, ready for you to start deleting hard disk drives.
Our guide on how to change the boot order on your PC should help you with any problems.
5. Wipe Your Hard Drive With Darik’s Boot and Nuke
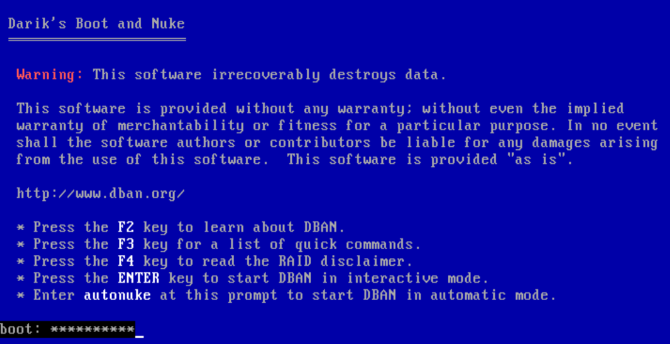
Several options are available on the DBAN screen:
- F2 to learn about DBAN
- F3 for a list of commands
- F4 for troubleshooting
- Tap Enter to use DBAN in interactive mode
- Enter the phrase autonuke to let DBAN automatically wipe every drive on your computer
You probably don’t want to use the last option. Instead, tap Enter to use the interactive, guided mode to wipe your drive.
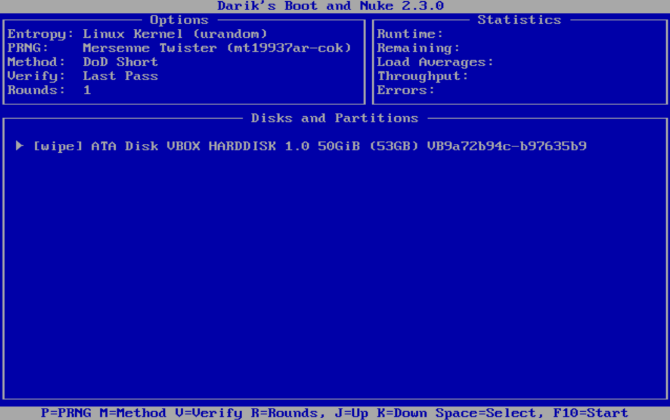
Use the arrow keys to select the device that matches the name you found earlier. Tap Space to flag the drive with the [wipe] flag, then when ready tap F10. This will commence the wipe process.
If you want to make some changes to the default wipe process, check the shortcut keys at the bottom of the screen.
You can use P to change which random number generator is used to destroy your data.
R is also useful, enabling you to change the number of passes for each sector. This multiplies the default passes for each available wipe method. For example, the default DoD Short has three passes by default, so using R lets you change this to nine passes by specifying a value of 3.
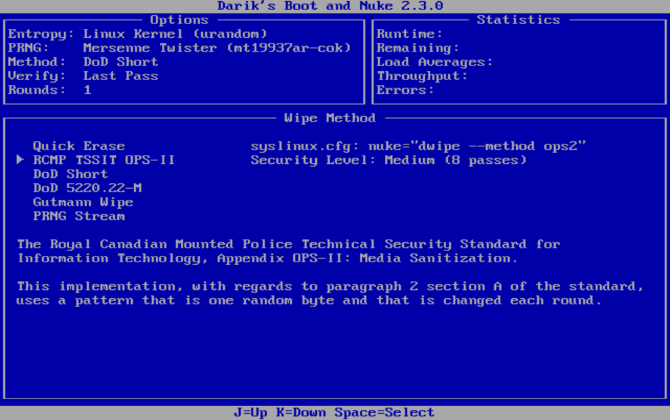
M, meanwhile, gives you a choice of six erasure methods, among them DoD Short, DoD 5220.22-M (“DoD” being the standard abbreviation for Department of Defense), and Gutmann Wipe.
A verification mode (V) can also be enabled, although this lengthens the wipe process.
Keep an eye on the timer in the top-right pane of the DBAN tool, displaying the duration of the wipe process. Eventually, a new screen should appear with “pass” highlighted in green next to the disk drive name. You’re free to reuse the drive.
If the word “fail” appears instead, try using DBAN again. If this happens repeatedly, consider physical destruction (see below).
What Can You Do With a Wiped Hard Drive?
Once your hard disk drive is wiped, it can be safely sold or reused.
For example, you might sell it on eBay to raise some quick funds, or you could use it to build a PC for a relative.
The most important thing to note is that the data is almost impossible to retrieve. You can do anything with the disk without the data being uncovered. Want to make doubly sure? Employ some physical destruction to the device, perhaps by drilling through the drive places.
Alternatively, open the disk and hammer the platters, the magnetic disks where your data is stored.
Safely Wipe a Windows Computer With DBAN
While other tools (including some built-in options) can remove the data on your Windows hard drive, the safest option is to wipe with DBAN or a similar tool.
DBAN is very easy to use. Indeed, without due care and attention, you could accidentally delete the wrong disk drive. Using DBAN successfully requires you to:
- Write the ISO file to DVD
- Identify your hard drive
- Boot into DBAN
- Wipe your Windows hard drive
Once that’s done, the drive can be reused, or safely disposed of. If the drive is struggling with poor performance before you wipe it, you might prefer to recycle your old hard drive.
Read the full article: How to Completely Wipe a Hard Drive
Read Full Article
No comments:
Post a Comment