
Despite significant improvements over the last couple of years, Windows is still prone to throwing out the occasional error code.
We’ve previously looked at how to fix the critical process died stop code (error code 0x000000EF); now it’s time to investigate error code 0x800F081F. Keep reading to find out what causes it and how you can resolve the issue.
What Causes Error Code 0x800F081F?
Error code 0x800F081F is one of four possible error codes that all point to the same underlying issue. The other three are error code 0x800F0906, error code 0x800F0907, and error code 0x800F0922.
Microsoft .NET Framework 3.5 incompatibilities cause all the error codes. Typically, they will occur when you enable the .NET Framework using either the installation wizard, the Deployment Image Servicing and Management (DISM) tool, or Windows PowerShell commands.
You will only see the codes on Windows 10, Windows Server 2016, Windows Server version 1709, Windows 8.1, Windows Server 2012 R2, Windows 8, and Windows Server 2012. On those operating systems, Microsoft .NET Framework 3.5 is a “Feature on Demand” (i.e. it is not enabled by default).
When you turn on the feature, Windows Update tries to grab .NET binaries along with other necessary files. If your computer is not correctly configured, you might see the codes.
- 0x800F081F: Windows could not find the .NET source files for the installation to proceed.
- 0x800F0906: Windows either could not download the .NET source files, could not connect to the internet, or could not install a role, role service, or feature.
- 0x800F0907: Either the DISM tool failed, or your network policy settings prevented Windows from connecting to the web.
- 0x800F0922: The processing of .NET advanced installers or generic commands failed.
How to Fix Error Codes 0x800F081F, 0x800F0906, 0x800F0907, or 0x800F0922 on Windows 10
Thankfully, the methodology for fixing the first three error codes is the same. There are two approaches you can try. For error code 0x800F0922, you need to jump straight to method two.
Method 1: Configure Your Group Policy
It’s possible that your group policy is affecting Windows ability to activate the installation.
Note: Natively, the Group Policy Editor is only available in Windows 10 Pro, Enterprise, and Education. Thankfully, there’s a workaround. You can follow our guide to accessing the Group Policy Editor on Windows 10 Home.
To start, press Windows + R to bring up the Run dialogue. Next, type gpedit.msc and hit Enter. The command will open the Group Policy Editor window.
Once the editor is on your screen, use the left-hand panel to navigate to Computer Configuration > Administrative Templates > System.
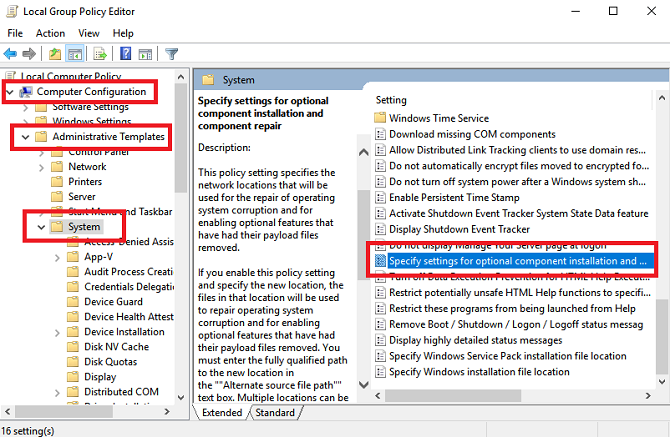
Move your attention to the right-hand panel. Scroll down until you find the entry labeled Specify settings for optional component installation and component repair. You will find it underneath the folders you see at the top of the list.
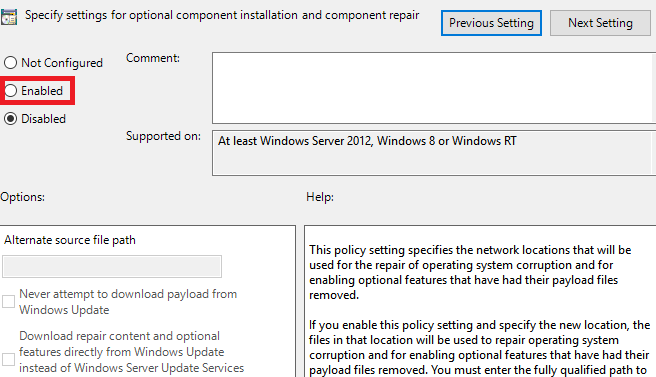
Double link on the entry to open the Settings window. Finally, in the top left-hand corner, mark the checkbox next to Enabled and click OK.
If you’d like to learn more, check out our list of other interesting ways the Group Policy Editor can make your PC better.
Method 2: Enable the .NET Framework Using a DISM Command
Note: This is the only method that will fix error code 0x800F0922.
The second approach requires you to use a DISM command to enable the .NET Framework. Don’t worry; it’s not as complicated as it sounds. Follow our guide, and you will be fine.
Before starting on the main process, you will first need to make sure you have an ISO image of Windows 10 handy. The ISO’s version must exactly match your current operating system.
You can create an ISO image using Microsoft’s official Media Creation Tool, which you can download from Microsoft’s website.
Once the download has finished, run the tool and click on Create installation media for another PC. On the next screen, choose your language and system architecture, then select ISO file to begin the creation process. Burn the ISO file onto a DVD before continuing.
Ready? Now we can begin to fix the error code.
To start, you need to mount your freshly created ISO image. Open File Explorer and double-click on the file. It should mount automatically. Alternatively, you can right-click on the file and select Mount from the context menu.
If the process was successful, you will see the ISO in a virtual drive in the left-hand panel of the window. Make a note of the drive’s letter.
Note: To unmount the image, right-click on the virtual drive in This PC and choose Eject.
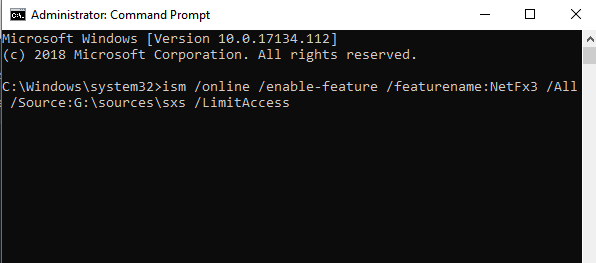
Once the image is mounted, open the Start menu and type cmd. When you see the list of results, right-click on Command Prompt and select Run as administrator.
On the command line, type ism /online /enable-feature /featurename:NetFx3 /All /Source:[Drive]:\sources\sxs /LimitAccess. Replace [Drive] with the drive letter you made a note of previously, and make sure you leave spaces in the correct places. When you’re ready, press Enter.
Try to Reinstall Microsoft .NET Framework 3.5
After you’ve successfully navigated the instructions, it’s time to install .NET Framework 3.5 and see the error code 0x800F081F (or one of its associated error codes) has gone away.
Open the Settings app and go to Apps > Apps and Features. Scroll down to Related Settings and click on Programs and Features. Next, in the new window, click on Turn Windows features on or off in the upper left-hand corner.
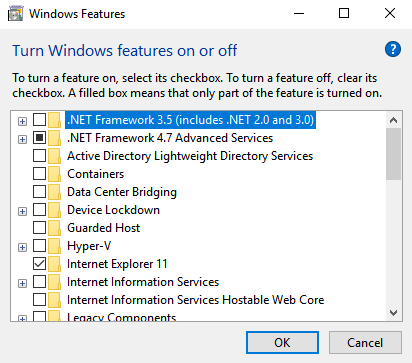
Finally, mark the checkbox next to .NET Framework 3.5 (includes .NET 2.0 and 3.0) and click on OK. The installation process will take a few minutes to complete, depending on the speed of your connection.
Did it work? Great, you’ve beaten error code 0x800F081F.
How to Fix Error Code 0x800F081F: A Summary
To fix error code 0x800F0922 on Windows 10:
- Open the Group Policy Editor.
- Go to Computer Configuration > Administrative Templates > System.
- Double-Click on Specify settings for optional component installation and component repair.
- Select Enable.
If that doesn’t work, follow these instructions instead.
- Create and mount a Windows 10 ISO image.
- Open Command Prompt as an administrator.
- Type ism /online /enable-feature /featurename:NetFx3 /All /Source:[Drive]:\sources\sxs /LimitAccess (replacing [Drive] with the appropriate letter).
- Press Enter
If you’d like to learn more about error codes, read our article about some of Windows 10’s most common error codes and how to fix them.
Read the full article: How to Fix Error Code 0x800F081F in Windows 10
Read Full Article
No comments:
Post a Comment