Virtualization is a super useful feature available on nearly every modern computer. It allows you to create additional virtual environments that run on your actual hardware, so you can test out new operating systems, run old apps, and more.
Sometimes, though, virtualization won’t work right. If you’re tried to set up VirtualBox or another virtualization program and receive an error like “VT-x hardware acceleration is not available on your system,” try these steps to get it working properly.
1. Enable Virtualization in Your BIOS
In most cases, virtualization won’t work because it’s disabled in your computer’s BIOS or UEFI. Though most modern computers support the feature, it’s often disabled by default. Thus, you should take a look to make sure the proper feature is enabled on your system.
You’ll need to enter the BIOS or UEFI first. The key to hit after starting your PC depends on its model; F2, F12, and Delete are common choices. If your computer boots too quickly for you to hit the key, try entering your UEFI/BIOS using the restart option in Windows 10.
Once inside, look for an option named something like Intel VT-x, Intel Virtualization Technology, AMD-V, Vanderpool, or similar. You may find it under a Processor or Chipset, category, which can in turn hide under an Advanced tab.
Save your configuration and reboot. Once you’re back into Windows, you should have access to virtualization.
2. Don’t See It? Update Your BIOS
If you don’t see an option for virtualization in your BIOS, there’s a chance that the manufacturer has provided an update that adds this functionality. This probably isn’t the case for most machines, but it never hurts to try.
To find a BIOS update, you can use the manufacturer app included with your PC. For example, Lenovo System Update will check for BIOS and drivers updates on Lenovo systems.
If you don’t have an app like this, you’ll need to manually update your BIOS. A Google search for the name of your motherboard should bring you to its manufacturer’s website, where you can usually find new BIOS versions under the Support or Downloads sections.
Follow the instructions in the above article to update your BIOS, then try entering it again and looking for a virtualization option. If you don’t see one, chances are that your PC doesn’t support the feature.
3. Disable Hyper-V (on Windows)
Professional editions of Windows include a Microsoft program known as Hyper-V. This is Microsoft’s own virtualization software, similar to VirtualBox or VMware. Unfortunately, Hyper-V can hijack your computer’s virtualization privileges, blocking you from using another app.
You don’t need Hyper-V unless you want to use it, so removing it from your computer will let your virtualization app of choice work properly. To do so, open the Control Panel by searching for it in the Windows Start Menu. Change the View by option in the top-right from Category to Small or Large icons. Then, choose the Programs and Features entry.
Here, click Turn Windows features on or off on the left side. You’ll see Hyper-V in the list. Uncheck it, then choose OK. Windows will take a moment to remove Hyper-V, then you’ll have to restart to complete the process.
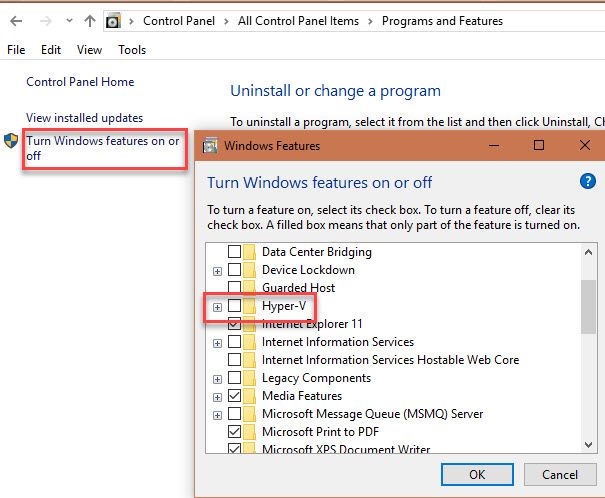
Once you’ve rebooted, you should be able to use VirtualBox or similar apps properly, as Hyper-V won’t be around to hog virtualization features anymore.
4. Confirm Your PC Supports Virtualization
If you’ve tried all the above steps and virtualization still won’t work, chances are that your machine doesn’t support it. It’s worth confirming this before you give up, though.
Microsoft once offered a tool that quickly checked this, but it doesn’t work on anything newer than Windows 7. Thus, you’ll need to use a tool from either Intel or AMD instead, depending on your processor.
Press Ctrl + Shift + Esc, or right-click the Taskbar and choose Task Manager to open that utility. Click More details to expand it if needed, then open the Performance tab. Click CPU and you’ll see the name of your CPU above the graph.
If you have an Intel CPU, download the Intel Processor Identification Utility. Those with AMD processors should download the equivalent AMD tool instead.
Install the appropriate tool, then open it via searching on the Start Menu if it doesn’t open automatically. On Intel’s utility, switch to the CPU Technologies tab and look for Intel Virtualization Technology. If it says Yes, then your CPU supports virtualization. AMD’s utility should simply pop up with a window letting you know if you can use virtualization or not.

If your CPU doesn’t support virtualization, you’re unfortunately out of luck.
5. I’ve Enabled Virtualization, But…
Maybe you’ve gotten virtualization to work after following the advice above, but still have issues with performance or just getting a VM started. Here are a few other tricks to try if virtualization isn’t working right:
- Remember you can’t run a 64-bit virtual machine on a 32-bit computer. If your processor isn’t 64-bit, make sure you download the 32-bit version of the OS you want to run in a virtual machine to avoid compatibility issues.
- Make sure you have enough free disk space. If you create a dynamically allocated virtual disk and it expands, your host computer could run low on space. This can cause performance problems.
- Ensure you have enough RAM to dedicated to the VM. Your VM must use some of your computer’s RAM to run. If you don’t have enough, your VM will likely chug. However, take care not to share too much, or your host computer might run into trouble.
Get Virtualization Working Right on Your PC
Hopefully, one of these tips fixed the issue hindering you from enjoying virtualization on your PC. In most cases, you’ll need to enable virtualization in your BIOS and disable Hyper-V for it to work. If that doesn’t let you at least get a virtual machine started, your PC doesn’t support the feature—you’ll need to upgrade to take advantage of the feature.
Now that you can dive into virtualization, check out our guide to getting started in VirtualBox for a complete walkthrough.
Read Full Article
No comments:
Post a Comment