07 July 2020

The 10 Best Idea Generators to Brainstorm Story and Business Ideas


idea-generators

What do you do when you want to come up with a fresh idea? Whether it’s for a short story, a piece of artwork, an informative article, or even a business startup, it’s not always easy. Instead of racking your brain and struggling for that perfect concept or thought, get a little help from the web.

These awesome idea generators can assist you when brainstorming for any purpose. Keep them handy, bookmark them, and visit them whenever you need to spark an idea.

Plot and Story Ideas

Whether you are a current author or seeking to become one, there can be times when you are stuck for ideas. You might feel like it’s all been done before or just cannot seem to connect the dots of your own thoughts. These sites for creative writers can help stimulate ideas for stories, characters, locations, and more.

1. Plot Generator

plot generator menu

When you land on the Plot Generator website, you will see a variety of options, from short stories and movie scripts to genre-specific blurbs. If you already have an idea for a story, but need help moving it along, click on one of the genres. You can pick from categories like fantasy, romance, crime, or horror.

The great thing about the genre-specific generators is that you can receive a number of ideas to assist you. Maybe you need a character name, interesting weapon, or enemy species. Just click the Suggest button next to the item for a random answer. Or click the button at the top to fill out the entire form automatically for a host of ideas.

If you prefer a list of ideas, click on Story Ideas at the top. Then specify the number you would like to receive and the type of ending you want for the story. Hit the Write me a list of story ideas button and you’ll be on your way.

2. The Writer’s Plot Idea Generator

writer's plot idea generator

For completely random plot ideas, The Writer’s Plot Idea Generator is a handy site. Just click the button on the main page to generate a plot. The idea will display right below that and you can click again and again if needed.

As a bonus, the site offers more generators on the left side. You can get ideas for plot twists, character names, locations, and first lines. If you don’t need an entire story idea and just pieces, this is a terrific resource.

Creative Concepts

When you are looking for general concepts to further your creativity, handy tools are just a click away. For names, locations, descriptions, and article ideas, these websites are ideal for artists, writers, authors, songwriters, and poets.

3. Fantasy Name Generators

fantasy name generator

Do not be fooled by the name; Fantasy Name Generators offers much more than names for the fantasy genre. For names of people, places, and objects along with ideas for pop culture, art concepts, and business slogans, this site is one to hold onto. When you move your mouse over the category choices at the top, you will immediately see tons of subcategories to choose from.

You can get ideas for everything from aliens and hobbits to story locations and business names. You can also check out the description generators. Fantasy Name Generators has battlefields, back stories, poetry, prayers, and everything else you could want. You will not leave this site without an idea.

4. Portent’s Content Idea Generator

portent's content idea generator

Portent’s Content Idea Generator is a wonderful tool for article writers and bloggers in search of ideas. Enter a word or phrase into the subject box and hit your Enter key. You will then see a title that hopefully prompts an idea for you. If you do not like the option shown, click the refresh button for something new.

For example, if enter the word “iPhone,” you may see a title such as, “How Twitter Can Teach You About iPhones.” Or you might enter the word “Projects” and see the title “How Projects Can Keep You Out of Trouble.” Remember that the ideas generated are random, so some may seem silly or not make sense. But an idea you see here might be just what you need.

5. Idea Generator

idea generator words and images

Maybe you like to keep your idea generation process simple. Sometimes seeing one or more random words or images is enough, and that is exactly what the Idea Generator website does. Use the buttons at the top to generate random words or images. You can also use the buttons to refresh the options or clear the page and start again.

Say you generate a list of words or images and only like a couple. Just double-click the ones you don’t like to replace them. Idea Generator provides an easy way to spark your creativity with the click of a button.

Business and Service Ideas

Entrepreneurs and freelancers often know what type of business or service they would like to offer right away. But there are others who look for an opportunity outside of their comfort zone or as a second income. If you are mulling over new business ideas, these are the sites for you.

6. KopywritingKourse’s Business Idea Generator

business idea generator kopywritingkourse

The Business Idea Generator from KopywritingKourse offers four different business idea types. You can check out general business, consulting, physical store, or economy-sharing concepts. Just click the button for the type you want and view random ideas. Here are a few examples:

  • General Business: An SEO business for banks or a software business for restaurants.
  • Consulting: A dollar amount to do research or teach how to use a drone in a certain time frame.
  • Brick and Mortar Store: Start an RV store, gym, or used car lot.
  • Economy-Sharing: Become a babysitter on UrbanSitter or personal shopper for Favor.

KopywritingKourse’s idea generator provides great business suggestions and you may find one that’s right up your alley.

7. Business News Daily’s Business Ideas

business ideas business news daily

For new business ideas alongside information on business plans, startup funding, and franchising, take a look at Business News Daily’s idea generator. The site provides a variety of business type ideas with articles that walk you through that interest.

Maybe you would like to start an Etsy shop or sell on Amazon. Or maybe you would prefer to browse concepts by category like sports, fashion, or art. You can check out slideshows and in-depth articles that give you the basics to get started when the perfect idea hits.

Get Ideas on the Go

For those times when you can’t sit down with websites for ideas, get them to go! These mobile apps are handy for idea generation from anywhere. On your lunch break, sitting in the park, laying on the beach, or riding public transport, get an idea with a tap.

  • 8. Idea Generator for Android (Free)
  • 9. Idea Spark: Stimulate Your Creativity for iOS ($1.99)
  • 10. The Brainstormer for iOS ($1.99)

Fuel Your Creativity With Idea Generators

Each of the websites and apps is here to help stimulate ideas. Maybe you need a unique art concept, unusual character name, or winning business startup idea. When thoughts are not coming to you, don’t despair or get aggravated—just head to the web.

And make sure you have the right tool for holding onto ideas when they come to you. This helpful article shows you how to capture ideas instantly with IFTTT.

Image Credit: vexworldwide/Shutterstock

Read the full article: The 10 Best Idea Generators to Brainstorm Story and Business Ideas


Read Full Article

Binary vs. Source Packages: Which Should You Use?


Regardless of the package manager you use, there are two broad ways of installing programs on Linux. You either use a pre-built package, or you compile the program yourself. These days, the former usually wins out by default, but there are times when you may want to consider compiling from the source coude.

What Are Binary Packages?

deb package format

Installing programs on Linux is usually quite different from the traditional way of installing software on Windows. Rather than downloading an installer off a vendor’s website, the files come from a repository of programs that is usually tailored to your Linux distribution. You access this repository using a Linux package manager or a Linux app store.

The files that make up the programs in these repositories come in an archive format. This bundles everything into a single file for easy access and distribution. Debian, for example, uses the DEB format to store and distribute programs. These bundles are called binary packages.

You need a special program to extract these files and install them onto your computer, typically your package manager or app store. These tools also perform other useful functions, such as keeping track of what files you have installed, and managing software updates.

Where Do Packages Come From?

All software consists of lines of text known as source code, written in specific programming languages, such as C or C++. You generally can’t just bundle this source code into an archive and call it a package. These lines need to be translated into a language your computer can understand and execute.

This process is called compiling, the end result creating binaries that your computer can run. The difference between packages and software is that software binaries are stored together inside a package, along with other things such as configuration files.

What Is Installing “From Source”?

emacs makefile

Installing a program “from source” means installing a program without using a package manager. You compile the source code and copy the binaries to your computer instead.

Most of the time, you can download a project’s source code from hosting services such as GitHub, GitLab, or Bitbucket. Larger programs might even host source code on a personal website. The code will usually be zipped up in an archive format (also known as a source package).

A special set of tools help automate the building process. On Linux desktops, this often comes in the form of a command line program called make. Source code written in different languages need specific compilers and commands to change them into binaries. The make program automates this process.

For this automation to work, programs provide make with a makefile that tells it what to do and compile. These days, it’s usually automatically generated by special software such as CMake. This is where you come in. From here, you can specify exactly what features you want compiled into your software.

Building “From Source” Example

For example, the command below generates a configuration file for the Calligra Office Suite using CMake. The file created tells the make program to only compile the Writer component of Calligra.

cmake -DPRODUCTSET=WORDS -DCMAKE_INSTALL_PREFIX=$HOME/kde/inst5 $HOME/kde/src/calligra

Having done this, all a person has to do is run the make tool to compile and copy the results onto their computer. This is done in the following way:

make
make install

While this is the general pattern for compiling programs, there are many other ways to install source packages. Gentoo Linux, for example, has a built-in way of handling this, making the process much faster and easier. But building binary packages takes a few more steps than just the above commands.

Benefits of Using Binary Packages

If you’re using Linux, someone more than likely pre-compiled the software you have installed. This has become much more common than using source packages. But why?

Binary Versions are Easier to Manage

deb package format

Binary packages contain much more than just compiled installation files. They also store information that makes it easy for your package manager to keep track of all your programs. For example, DEB files (the package format for Debian and Debian derivatives) also contain important information such as what other software the program needs to run, and its current version.

This makes packages much easier to install, as you don’t need to worry about what other files you need to successfully make a program run. Your package manager can read that information from the package itself and downloads all the necessary dependencies automatically.

When installing programs from source, unless you compile the code into a binary package of its own, you will be in charge of managing that software. You will need to keep in mind what other programs you need to make it work, and install them yourself.

Binary Versions Have Improved Stability

The people who maintain repositories for your package manager tend to test binaries for problems and do their best to fix those that appear. This can lead to improved stability of programs, something a person who installed from source might miss out on.

Plus packages usually must adhere to a strict set of rules to help ensure they will run on your system. Both Debian and Ubuntu have a policy manual for example, as do many other Linux distributions.

Some programs also rely on different versions of the same software dependency to run. Package repositories do their best to resolve these conflicts so you don’t have to worry about this.

Benefits of Compiling Source Packages

Installing programs from source isn’t something that everyone needs to do, as it’s generally easier to maintain your PC if you stick with binary packages. Even so, there are still some advantages to using this slightly more involved way of installing programs.

Source Code Offers Latest Software

One disadvantage of making programs more reliable is that it takes time to improve and fix. As a result, this can lead to you using older versions of software. For people who want the latest and greatest, they might even prefer a bit of instability in exchange for it.

While there are Linux operating systems which cater for this need without compiling programs, they do have a few drawbacks. For example, software that doesn’t frequently release set package versions is harder to keep up to date in a repository, than installing from source.

This is because binary packages are usually made from official releases of programs. As such, changes between these versions are usually not taken into account. By compiling your own software from source, you can benefit immediately from these changes.

It’s also possible that your Linux operating system doesn’t have the software you want pre-made for you. If that’s the case, installing it from source is your only option.

You Can Pick and Choose

ffmpeg features

Another benefit to using source packages is that you gain more control over the programs that you install. When installing from a binary repository, you’re restricted in the ways you can customize your packages.

For example, look at FFmpeg, the command-line-based audio and video converter. By default, it comes with a huge number of features, some of which you might never even touch. For instance, JACK audio support is available in FFmpeg, even though this software is usually used in production environments only.

Compiling FFmpeg allows you to remove the things you don’t want from it, leaving it lighter and tailored to your needs. And the same applies to other heavyweight programs.

When resources are scarce, removing features can be a great way of lightening the load. It’s no wonder that Chrome OS, found on many low-end computers, is based off Gentoo Linux. Gentoo, being source-based, compiles a lot of its software, potentially making these systems run much lighter.

Why Not Install With Both?

While you probably won’t want to compile packages on a daily basis, it’s something useful to keep in mind. That said, with new universal package formats available from sites such as the Snap Store and Flathub, you’re less likely to need to build from source to get the latest software.

Read the full article: Binary vs. Source Packages: Which Should You Use?


The 10 Best Idea Generators to Brainstorm Story and Business Ideas


idea-generators

What do you do when you want to come up with a fresh idea? Whether it’s for a short story, a piece of artwork, an informative article, or even a business startup, it’s not always easy. Instead of racking your brain and struggling for that perfect concept or thought, get a little help from the web.

These awesome idea generators can assist you when brainstorming for any purpose. Keep them handy, bookmark them, and visit them whenever you need to spark an idea.

Plot and Story Ideas

Whether you are a current author or seeking to become one, there can be times when you are stuck for ideas. You might feel like it’s all been done before or just cannot seem to connect the dots of your own thoughts. These sites for creative writers can help stimulate ideas for stories, characters, locations, and more.

1. Plot Generator

plot generator menu

When you land on the Plot Generator website, you will see a variety of options, from short stories and movie scripts to genre-specific blurbs. If you already have an idea for a story, but need help moving it along, click on one of the genres. You can pick from categories like fantasy, romance, crime, or horror.

The great thing about the genre-specific generators is that you can receive a number of ideas to assist you. Maybe you need a character name, interesting weapon, or enemy species. Just click the Suggest button next to the item for a random answer. Or click the button at the top to fill out the entire form automatically for a host of ideas.

If you prefer a list of ideas, click on Story Ideas at the top. Then specify the number you would like to receive and the type of ending you want for the story. Hit the Write me a list of story ideas button and you’ll be on your way.

2. The Writer’s Plot Idea Generator

writer's plot idea generator

For completely random plot ideas, The Writer’s Plot Idea Generator is a handy site. Just click the button on the main page to generate a plot. The idea will display right below that and you can click again and again if needed.

As a bonus, the site offers more generators on the left side. You can get ideas for plot twists, character names, locations, and first lines. If you don’t need an entire story idea and just pieces, this is a terrific resource.

Creative Concepts

When you are looking for general concepts to further your creativity, handy tools are just a click away. For names, locations, descriptions, and article ideas, these websites are ideal for artists, writers, authors, songwriters, and poets.

3. Fantasy Name Generators

fantasy name generator

Do not be fooled by the name; Fantasy Name Generators offers much more than names for the fantasy genre. For names of people, places, and objects along with ideas for pop culture, art concepts, and business slogans, this site is one to hold onto. When you move your mouse over the category choices at the top, you will immediately see tons of subcategories to choose from.

You can get ideas for everything from aliens and hobbits to story locations and business names. You can also check out the description generators. Fantasy Name Generators has battlefields, back stories, poetry, prayers, and everything else you could want. You will not leave this site without an idea.

4. Portent’s Content Idea Generator

portent's content idea generator

Portent’s Content Idea Generator is a wonderful tool for article writers and bloggers in search of ideas. Enter a word or phrase into the subject box and hit your Enter key. You will then see a title that hopefully prompts an idea for you. If you do not like the option shown, click the refresh button for something new.

For example, if enter the word “iPhone,” you may see a title such as, “How Twitter Can Teach You About iPhones.” Or you might enter the word “Projects” and see the title “How Projects Can Keep You Out of Trouble.” Remember that the ideas generated are random, so some may seem silly or not make sense. But an idea you see here might be just what you need.

5. Idea Generator

idea generator words and images

Maybe you like to keep your idea generation process simple. Sometimes seeing one or more random words or images is enough, and that is exactly what the Idea Generator website does. Use the buttons at the top to generate random words or images. You can also use the buttons to refresh the options or clear the page and start again.

Say you generate a list of words or images and only like a couple. Just double-click the ones you don’t like to replace them. Idea Generator provides an easy way to spark your creativity with the click of a button.

Business and Service Ideas

Entrepreneurs and freelancers often know what type of business or service they would like to offer right away. But there are others who look for an opportunity outside of their comfort zone or as a second income. If you are mulling over new business ideas, these are the sites for you.

6. KopywritingKourse’s Business Idea Generator

business idea generator kopywritingkourse

The Business Idea Generator from KopywritingKourse offers four different business idea types. You can check out general business, consulting, physical store, or economy-sharing concepts. Just click the button for the type you want and view random ideas. Here are a few examples:

  • General Business: An SEO business for banks or a software business for restaurants.
  • Consulting: A dollar amount to do research or teach how to use a drone in a certain time frame.
  • Brick and Mortar Store: Start an RV store, gym, or used car lot.
  • Economy-Sharing: Become a babysitter on UrbanSitter or personal shopper for Favor.

KopywritingKourse’s idea generator provides great business suggestions and you may find one that’s right up your alley.

7. Business News Daily’s Business Ideas

business ideas business news daily

For new business ideas alongside information on business plans, startup funding, and franchising, take a look at Business News Daily’s idea generator. The site provides a variety of business type ideas with articles that walk you through that interest.

Maybe you would like to start an Etsy shop or sell on Amazon. Or maybe you would prefer to browse concepts by category like sports, fashion, or art. You can check out slideshows and in-depth articles that give you the basics to get started when the perfect idea hits.

Get Ideas on the Go

For those times when you can’t sit down with websites for ideas, get them to go! These mobile apps are handy for idea generation from anywhere. On your lunch break, sitting in the park, laying on the beach, or riding public transport, get an idea with a tap.

  • 8. Idea Generator for Android (Free)
  • 9. Idea Spark: Stimulate Your Creativity for iOS ($1.99)
  • 10. The Brainstormer for iOS ($1.99)

Fuel Your Creativity With Idea Generators

Each of the websites and apps is here to help stimulate ideas. Maybe you need a unique art concept, unusual character name, or winning business startup idea. When thoughts are not coming to you, don’t despair or get aggravated—just head to the web.

And make sure you have the right tool for holding onto ideas when they come to you. This helpful article shows you how to capture ideas instantly with IFTTT.

Image Credit: vexworldwide/Shutterstock

Read the full article: The 10 Best Idea Generators to Brainstorm Story and Business Ideas


Universal Rating Scale


Universal Rating Scale

06 July 2020

8 Essential Email Security Tips You Should Know by Now


email-security

Online security is something you probably know is important, but might not give it the proper attention. Unfortunately, negligence in this area can result in huge problems, and your email is one of the most sensitive areas.

Having your email account compromised will allow an intruder to break into any account you’ve used it to sign into. That’s why you need to keep your email as secure as possible. Here are some simple yet important email security tips you should put in practice.

1. Use Separate Email Accounts

Most people have one central email account for all their personal activity. This means that all of your social media notifications, website registrations, newsletters, receipts, messages, password resets, and more get sent to the same email box.

Having everything in one place means that if that place fails, you’ll lose everything associated with it. If someone breaks into it, they’d be able to access all of the above kinds of media. And remember that when you reset a password on most sites, the link to reset it goes to your email. This could allow someone to lock you out of all your own accounts.

To combat this, it’s a smart idea to use separate email accounts for different purposes. This will help boost your security by limiting the damage someone could do by breaking into one account. It’s even better if you use secure email services for your most important accounts.

Plus, doing so can also boost your productivity. You could consolidate all your work emails into a single work account, friends and family communication with your personal account, have a recreational account for various websites, then a throwaway account for potential spam links.

This way, if someone hacks your work account, all of your personal emails are still safe.

2. Set a Unique, Strong Password

A login screen representing what information a cookie stores
Image Credit: mishoo/Depositphotos

No matter if you stick with one email account or use multiple as above, it’s vital to protect each one with a strong password. Reusing the same password on multiple accounts is a major vulnerability. If an attacker breaks a password, they’ll certainly try it on other accounts using your email address.

While it seems simple, many people don’t follow this basic advice. The best way to improve your security in this area is to start using a password manager. These let you create strong and unique passwords for every account that you don’t have to remember.

3. Enable Two-Factor Authentication

Gmail Two Step Authentication

Along with a strong password, you’ve probably heard the advice about using two-factor authentication (2FA) before. And while using it is a little inconvenient, it drastically increases the security of your account. In addition to your password, 2FA requires a secondary code (usually from your phone) to log in.

As mentioned above, because your email is the key to every other account, you should at least use 2FA there even if you don’t enable it anywhere else.

Follow our guide to setting up 2FA on major accounts for information on how to do it. For best results, we recommend using an authenticator app like Authy. This generates offline codes that you use to approve new account logins after entering your password.

4. Beware of Phishing Scams

Legitimate companies will not ask you for your password or other sensitive information over email. While you might be able to spot blatant attempts to steal your information, scammers have gotten better at creating convincing phishing messages.

Typically, phishing emails claim to come from a legitimate entity (like Amazon, Apple, PayPal, or similar) and tell you that something is wrong with your account. They prompt you to click a link that leads to a fake website. If you enter your credentials there to “confirm” the information, you’re actually handing the data over to thieves.

You should know how to spot a phishing email to avoid falling for these common schemes.

5. Never Click Links In Emails

The widespread nature of phishing means that it’s wise to follow a general rule: when in doubt, never click links inside emails. While you can hover your mouse over a link to preview the destination URL, this isn’t foolproof. Most email fraud relies on you clicking a link that takes you to a phony website, so clicking links is always a risk.

At best, clicking a link will let the scammer know that your email is active and that you’re willing to click on links. At worst, it could bring you to a site that tries to install malware on your computer or wants to steal your information.

If you get an email claiming to come from your bank or any other service that asks you to sign in, always visit the website manually to see what’s going on. The only exceptions are when you’re explicitly expecting a particular email, such as a forum registration link or game account activation email.

6. Don’t Open Unsolicited Attachments

Phishing Fake Ad

Most of the time, you should treat attachments in emails like links. If you’re expecting something from a friend, then you’re probably fine to open the attachment. However, if the email is unsolicited, you shouldn’t open any of its attachments.

Even if the file looks innocent, it could be a hidden danger. It’s trivial to spoof filenames and extensions to make a nasty EXE look like a JPG, for example. A lot of ransomware distributes through email attachments, so opening one could begin the encryption process on your system.

Follow our guide to spotting unsafe email attachments so you don’t make a costly mistake.

7. Scan for Infections Regularly

If you read an email, open an attachment, or visit a linked website that seems suspicious in any way, it’s not a bad idea to run a malware scan. Of course, not every spam email will infect your machine, and it’s probably overkill to run a scan every time you open a fishy message.

It’s better to be safe, though. Make sure you have a reliable antivirus suite installed (Windows Defender is fine for Windows 10) and consider installing Malwarebytes for a second opinion. If you unknowingly enabled a keylogger, you’d rather know sooner than later.

8. Be Careful on Public Networks and Computers

You probably know that public Wi-Fi isn’t as secure a connection as your home network. And while you’ll probably be OK checking your email on airport or cafe Wi-Fi, you should still take caution when using such networks.

Thanks to widespread use of HTTPS, your activity on most websites will be safe from prying eyes elsewhere on the network. However, if you don’t own the network, you can’t be certain of how it’s set up. The network could be a spoofed point, or have malicious software installed to allow for man-in-the-middle attacks.

The same goes for logging into your email on public computers, like those in libraries and hotels. Someone could install a keylogger on those machines to steal your credentials, so it’s best to stick with trusted devices like your phone when at all possible.

Safe Use of Email Is Essential

While the web has become more secure over time thanks to widespread use of HTTPS, stronger encryption protocols, and better automated detection from email providers, a lot of your personal security still lies with your decisions. Take some time to lock down your email accounts and your online safety will become a lot stronger because of it.

In short, don’t click anything from an email that you weren’t expecting, and make use of the various account security options email providers offer. Doing so will make your account much safer to use. If you’re not convinced, find out what scammers could do with access to your email account.

Read the full article: 8 Essential Email Security Tips You Should Know by Now


Read Full Article

MATE vs. GNOME Shell vs. Unity vs. Cinnamon Desktop Environments Explained


gnome

When GNOME 3.0 launched with a new interface, parts of the Linux community scrambled to find a new desktop environment that was right for them.

Some forked GNOME 2 into MATE or modified it into Cinnamon and Unity. Others flocked completely away from anything GNOME-related to other desktop environments entirely.

But there was more to GNOME than the interface, which left many hesitant to leave the ecosystem behind. That’s why many of the most popular alternatives are, ultimately, still based on GNOME. Here’s what sets them apart.

GNOME

GNOME is a desktop environment that has been around since 1998. The name originally stood for GNU Network Object Model Environment and is commonly pronounced with a hard G, the same as gnu (Guh-nome).

GNOME utilizes the GTK toolkit. These days the GNOME Project maintains GTK, but the coding language began as the toolkit for the GNU Image Manipulation Program, better known as GIMP. Many desktop Linux apps utilize GTK.

A desktop environment is more than an interface. GNOME also includes a suite of apps, a set of technologies, and the community of people that has grown around this software.

GNOME Shell

GNOME desktop environment on Linux

The early versions of GNOME had a traditional desktop paradigm similar to older versions of Microsoft Windows and Apple Mac OS. With version 3.0, the GNOME team decided to go a different way and introduced a new design known as the GNOME Shell.

GNOME Shell contains an Activities Overview that shows your open windows, contains an app launcher, and makes virtual desktops a core part of the experience. Virtual desktops became so essential that the GNOME team did away with the minimize button, instead encouraging people to organize windows across their virtual desktops.

GNOME Shell also places a heavy emphasis on search. You can open or install apps, locate files, look up the weather, see the time, and perform many other tasks by typing directly in Activities Overview.

With this change, GNOME 3.0 introduced or adopted ways of using a computer that have since also become prominent in commercial desktop operating systems as well. But many people did not want to change the way they used their computer so drastically or simply have a preference for the traditional desktop workflow.

Despite this, GNOME remains the most widely-embraced Linux desktop environment. Ubuntu, the most popular desktop Linux distro, uses a modified version of GNOME by default. Fedora, the community-run companion to Red Hat Enterprise Linux, provides perhaps the purist GNOME experience.

Linux manufacturers such as System76 and Purism ship their own Linux distros that come with GNOME. Linux Laptops from Dell and Lenovo also run GNOME out of the box.

GNOME Classic

GNOME Classic desktop environment

If you like the classic GNOME experience but want to keep much of the modern look and feel, you don’t have to switch to a separate desktop environment. Simply log out and, at the login screen, select the gear icon to change from GNOME to GNOME Classic.

This is not an exact copy of GNOME 2, and it doesn’t have lower system requirements than GNOME Shell, but it may be just what you’re looking for.

Unity

Ubuntu Unity 20.04 desktop
Image Credit: Ubuntu Unity

With Ubuntu’s popularity, it was a big deal when Canonical chose not to throw its weight behind GNOME 3.0. Instead, the company continued to develop its own Unity interface that utilized a dock on the left-hand side of the screen and featured an even heavier emphasis on searching than GNOME. Not only could you launch apps that way, but a feature known as HUD (Heads Up Display) also allowed you to navigate menu bars by typing. If you wanted to navigate an app menu with your mouse, you would find it at the top of the screen.

While Unity was free software, the broader community shied away from Canonical’s efforts. Part of this stemmed from Ubuntu’s use of patched versions of GTK to deliver Unity, which increased the work needed to port the interface to other distros.

In 2017, Canonical discontinued Unity and made GNOME Ubuntu’s default desktop again. The community picked up from where Canonical left off. The UBPorts developers have continued work on Unity8, which never appeared in Ubuntu as anything more than a demo. As for Unity7, the software many people had grown to love, that interface made a resurgence in the new Ubuntu Unity distro that launched alongside Ubuntu 20.04.

MATE

Ubuntu MATE desktop

MATE is a continuation of the GNOME 2 series. Most MATE desktops default to a layout with two panels, one at the top and one at the bottom. You can launch apps, open the file manager, and navigate system settings via the options in the top left. System tray icons and the cloud sit in the top right.

Across the bottom you find a list of your open windows, as you would find in older versions of Windows. Your virtual desktops appear in the bottom right.

While MATE developers have been hard at work, the desktop looks largely the same as the GNOME 2 did over a decade ago. That’s because MATE is primarily a conservation project, with work going toward making sure the existing interface can continue to work with modern technologies and apps. New features appear, but they expand rather than change the established way of doing things.

MATE has lower system requirements than modern versions of GNOME, so it feels snappier on older or underpowered machines.

You can install MATE on most Linux distros. Ubuntu MATE is an Ubuntu flavor that comes with MATE as the default interface. Fedora has a MATE spin. There’s also nothing stopping you from using MATE on Debian, openSUSE, or Arch Linux.

Cinnamon

Cinnamon Linux desktop environment

When GNOME 3.0 launched, the transition wasn’t solely about a new interface. GTK 2 also gave way to GTK 3. While MATE kept GNOME 2 alive and well, that initially meant sticking with GTK 2. Cinnamon came about as a way to keep a traditional interface while still adopting GTK 3. Before becoming a separate desktop environment, Cinnamon was a set of GNOME extensions.

Cinnamon was not an effort to emulate GNOME 2. Instead, Cinnamon embraced a design language more akin to Windows. There’s an app menu in the bottom left, a system tray in the bottom right, and a window list in between.

While the design is by no means a pixel-by-pixel copy of Windows, the experience is often familiar enough for people switching to Linux for the first time.

Many consider Cinnamon as perhaps the simplest version of Linux. The Linux Mint team created Cinnamon, and they remain the primary developers. That said, you can run Cinnamon on Ubuntu or Fedora or Arch Linux, and the list goes on.

Pantheon

elementary OS comes with a suite of default apps

Pantheon is the desktop environment found in elementary OS, which first launched in 2011. The design is deliberately minimalist. There’s an app menu for opening software, a dock for managing open apps, and system icons in the top right. Like GNOME, there isn’t a minimize button, though a maximize one is still present. In elementary OS, the focus is on the apps.

Pantheon does not contain many customization options and is even less configurable than GNOME, due to its lack of extensions. But thanks to the elementary team’s commitment to design, Pantheon is one of the more polished and accessible free desktops around.

You can find Pantheon in other distros, such as Fedora or Arch Linux, but the desktop environment is designed with elementary OS in mind.

Budgie

Budgie system settings

Unlike the other GNOME-based desktops, Budgie did not come about during the GNOME 3.0 transition. Instead, the project began in 2013 as an effort to create a simple interface not unlike that of a Chromebook.

But Budgie is not a ChromeOS clone. This is a fully-featured Linux desktop environment.

While MATE and Cinnamon are both GTK-based desktops, they both exercise some distance from GNOME’s current direction. That’s less so with Budgie, which is actively dependent on core parts of GNOME and utilizes some of the same tools, like GNOME’s tool for managing system settings. The app design is also similar, doing away with traditional title bars (where app names and tool bars are separate) for many apps.

Budgie is closely affiliated with Solus, a distro formerly known as EvolveOS. Solus continues to steer Budgie’s development, but it’s not the only one invested. Ubuntu Budgie is the most well-known alternative, but as with MATE and Cinnamon, you can download Budgie on most Linux distros.

GNOME Desktop Environments, Summarized

GNOME 3.0 came with a controversial design that many people have since come to love, despite discarding some user interface elements that have become standard. Microsoft Windows, Apple macOS, and Google’s Chrome OS all have minimize and maximize buttons. They all have a taskbar or dock. It’s no surprise that many people want to keep those things around.

But if you don’t want to swap out GNOME for another desktop environment, you can still get many of these features using GNOME extensions.

Read the full article: MATE vs. GNOME Shell vs. Unity vs. Cinnamon Desktop Environments Explained


Read Full Article

How to Add, Remove, and Delay Startup Items on Your Mac


mac-startup-items

Every time you turn on your Mac, various apps and services launch automatically in the background. These macOS startup apps, often referred to as login items, can be quite useful.

But having too many of them can increase your device’s boot time and decrease its performance. That’s why it’s necessary to manage the startup applications on your Mac. Let’s explore how to do that below.

How to Add Startup Apps on Your Mac

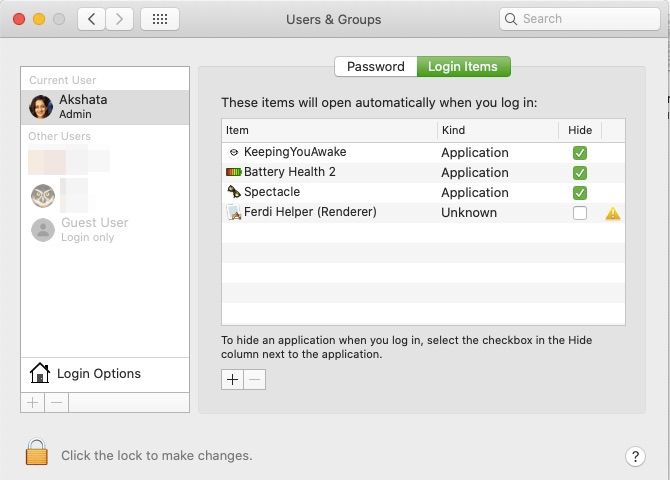
List of login items in System Preferences on macOS

If you deal with specific apps on a daily basis, setting such apps to launch automatically can help you save some time. Here’s how to do it:

  1. Open System Preferencesand click on Users & Groups.
  2. Click on the Login Items tab in the right pane.
  3. Click on the + (Plus) button below this pane, and in the Finder dialog box that shows up, select the app that you want to start automatically when you log in.
  4. Repeat the above to add more apps as necessary.

In some cases, you might want to ensure that an app’s window stays hidden when the app launches—meaning the window does not appear in the foreground right away. To make this happen, click on the Hide checkbox next to the app in the Login Items list.

Note: A quick look at the left-side pane reveals that you’re editing the startup items for the current user account by default. If you have admin privileges, you can control startup items for a different user by clicking on the relevant username in the list. If the settings are grayed out, you’ll need to enter an admin’s credentials first by clicking on the padlock icon at the bottom of the settings pane.

How to Disable Startup Apps on Your Mac Temporarily

It’s possible to prevent startup apps on your Mac from running automatically on a temporary per-login basis. This can be quite helpful when you need to login quickly—say, when you’re troubleshooting your Mac to fix startup problems.

To disable app launches when you’re logging in, after you enter your credentials on the login screen, hold down the Shift key before you click on the login (right-facing arrow) button. Release the key when the Dock appears. macOS will now start without launching any startup programs.

If you don’t see the login screen, restart your Mac and hold down the Shift key when you see the progress bar.

How to Delete Startup Apps on Your Mac

If your Mac boots up slowly, it’s a possible indicator that you need to optimize your Mac’s startup programs. This is easy to do. Here’s how:

  1. Visit System Preferences > Users & Groups.
  2. Switch to the Login Items tab to reveal the list of items that are set to launch automatically when your Mac starts. (Apps that were set to open at startup before you uninstalled them have a yellow warning icon displayed next to the Hide checkbox.)
  3. To remove an app from this list, select the app and click on the (Minus) button below the list.

When installed, certain apps set themselves up to launch at login without your explicit permission. That’s why it’s necessary to review startup apps on a regular basis to optimize the performance of your Mac.

How to Delay the Launch of Mac Startup Apps

Delay Start Mac app screen

Does your Mac have several indispensable startup items left over even after you’ve cleaned up everything? You could disable them, but then it’d be tiresome to launch each app manually. Here’s a better workaround: Delay Start.

This simple macOS utility lets you spread out the timing of your launch items in order to reduce the load on your Mac. To use Delay Start:

  1. Remove existing launch items from System Preferences > Users & Groups > Login Items. To do so, select all the apps in the list and click on the (Minus) button.
  2. Click on the + (Plus) button and add the Delay Start app to the list.
  3. Now launch Delay Start. In the app, click on the + (Plus) button to add the apps that you want to open automatically at login.
  4. Enter the time (in seconds) in the Time Setting box. macOS will delay the launch of that particular app by the time set above.

Repeat the last two steps to configure the delay time for as many apps as you like.

How to Detect Malicious Startup Items on Your Mac

Scan results for login items in KnockKnock Mac app

Contrary to popular belief, Macs can get infected with malware, too. To counter that threat, we recommend installing KnockKnock. It’s a free Mac app that gives you an overview of all startup items on your Mac and also scans those items for potential malware using VirusTotal.

To see KnockKnock in action, launch the app and click on the Start Scan button at the top. The scan should complete in a minute or two, after which the results appear on the screen.

The scan results are categorized into various sections. For instance, the Launch Items category displays all the apps that auto-start with your Mac. Kernel Extensions show installed modules that are possibly kernel loaded, and so on.

Once you select a category, you’ll see its information from VirusTotal on the right side. If it finds that a launch item is infected, you can click on the Show button at the far right to locate the file in Finder and delete it.

KnockKnock can also help you determine whether a particular launch item belongs to Apple or is from a third-party software vendor. A green padlock next to an item indicates an item signed by Apple, while a closed black padlock denotes an item signed by third parties. Unsigned items show up with an open orange padlock.

An open padlock doesn’t necessarily mean that the item is malicious, but you should still be wary of it.

Keep in mind that there are native methods to remove hidden launch components from your Mac. KnockKnock just makes the process easier.

Take Complete Charge of Your Mac’s Startup Programs

Use KnockKnock to detect any malicious startup items your Mac might have. Delete any infected apps immediately. Then, you can set useful apps to autorun and remove pesky programs that add themselves automatically. Better yet, you can delay the launch of apps to reduce the strain on your Mac’s resources.

With a combination of the tips we’ve outlined above, you can make your Mac start up faster. And if you want the boot process to feel snappier than ever, familiarize yourself with these macOS boot modes and startup key combinations.

Read the full article: How to Add, Remove, and Delay Startup Items on Your Mac


Read Full Article

7 Fixes for an iPhone Stuck in Headphone Mode


iphone-headphones-mode

If you’re lucky enough to still have a headphone port on your iPhone, you might find that problems with it cause your iPhone to get stuck in headphone mode. When this happens, no sound plays from your iPhone speakers, even though you don’t have headphones plugged in anymore.

This also happens with newer iPhones after using headphones that connect to the Lightning port or via Bluetooth. Whether you have an iPhone 6 or an iPhone 11, if it’s stuck in headphone mode, you can use the steps below to fix it.

Find Out If Your iPhone Is Stuck in Headphone Mode First

You might think your iPhone is stuck in headphone mode because it stopped playing sound from the speakers, but lots of other issues cause this problem as well. For instance, a fault with your speakers can make the sound stop working, without having anything to do with your headphones.

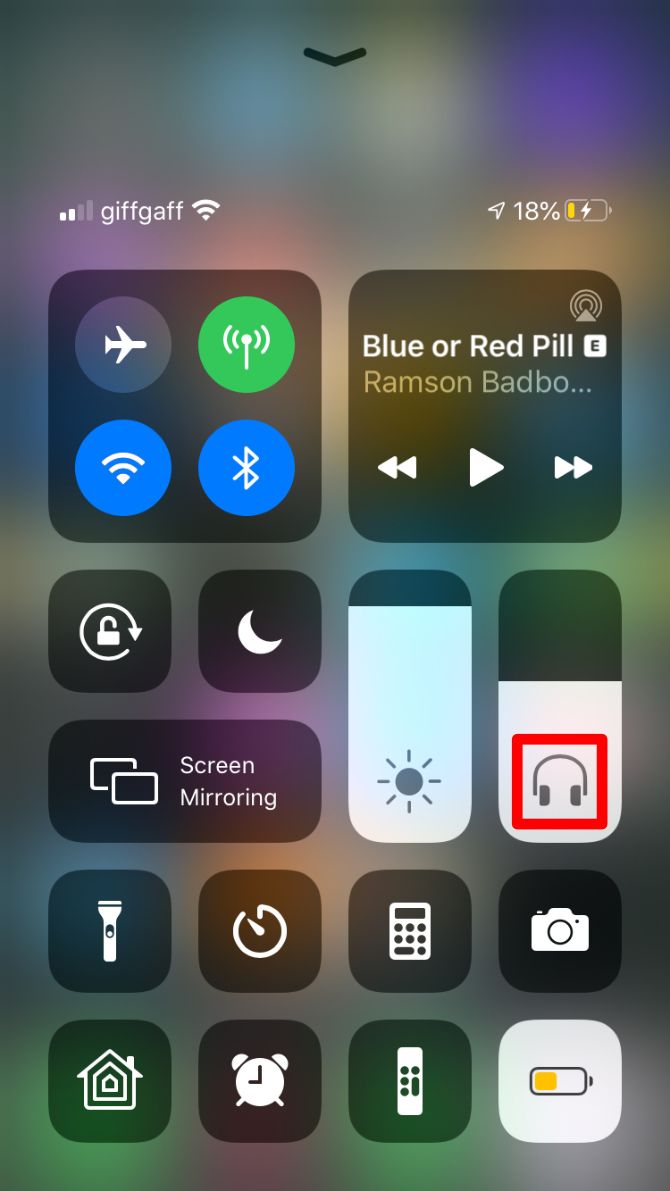
Make sure your iPhone is stuck in headphone mode by opening Control Center. To do so, swipe down from the top-right corner of your iPhone (or swipe up from the bottom if you have an iPhone with a Home button).

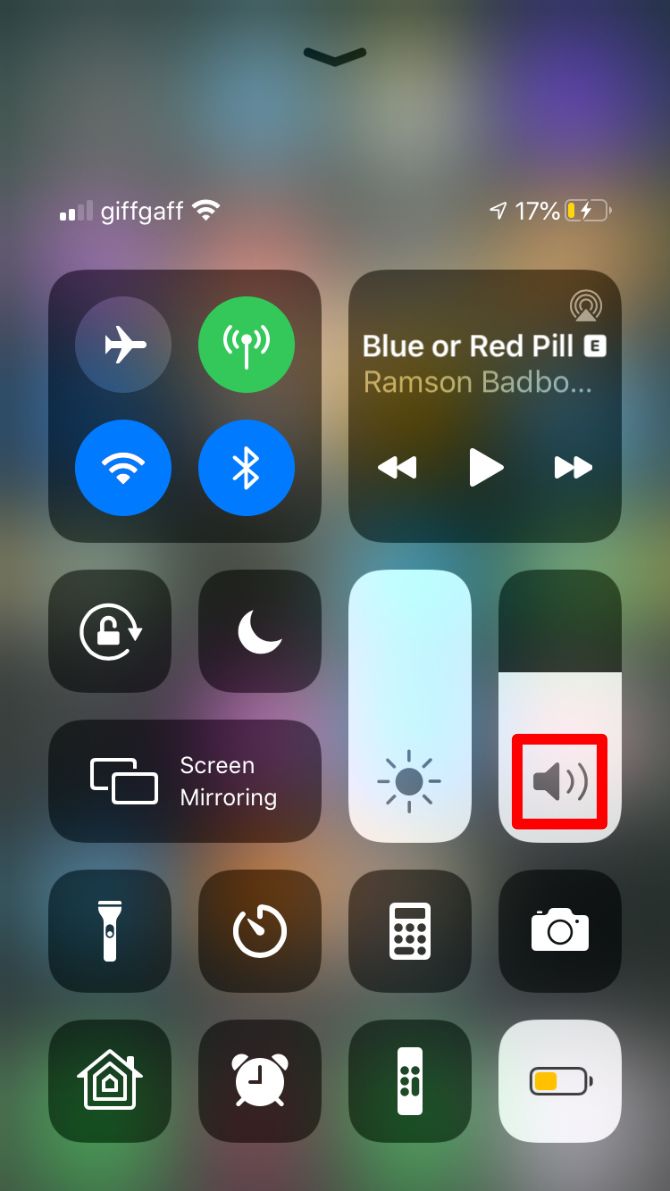
The volume slider in Control Center shows a headphone icon when your iPhone thinks your headphones are plugged in. If connected to AirPods, you should see an AirPods icon instead.

If the Control Center shows a normal volume speaker icon, your iPhone is not stuck in headphone mode. The steps below won’t fix your issue in that case; use our guide for troubleshooting iPhone speaker problems to find a solution instead.

However, if your iPhone is stuck in headphone mode, the tips below can help fix it.

1. Restart Your iPhone

Your iPhone is stuck in headphone mode because of either a hardware problem or a software problem. If it’s a software problem, your iPhone should switch back to speaker mode after you restart it.

To do this, press and hold the Side button with either Volume button (or just hold the Side button if your iPhone has a Home button). When prompted, slide to power off and wait 30 seconds for your iPhone to fully power off. Then press the Side button again to restart it.

Slide to power off prompt on iphone

After restarting, open Control Center to find out if your iPhone is still stuck in headphone mode or not. If it is, there must be a physical problem with your device. Skip the next two steps, which are software-based, to find out how to fix it.

If your iPhone switched back to speaker mode, then you’re dealing with a software problem. You can keep restarting your iPhone every time it gets stuck, or use the next two steps to eliminate the problem for good.

2. Update iOS

If your iPhone got stuck in headphone mode because of a software problem, you should make sure you’re running the latest version of iOS. Apple frequently updates iOS to introduce new features and to fix software bugs.

Go to Settings > General > Software Update to check for new updates. If any are available, download and install them as soon as possible.

Checking for iOS Software Updates in iPhone Settings

3. Erase and Reinstall iOS

Corrupt system files on your iPhone might cause it to keep getting stuck in headphone mode even after you update to the latest version of iOS. If you’ve already ruled out physical problems by restarting your device, you might be able to find a permanent solution by reinstalling iOS.

If you use a computer to do this, it erases and rewrites every line of code on your iPhone, eliminating any software bugs that crept into the system. When you do this, it also deletes all the data on your iPhone, so be sure to make a backup of your iPhone first.

Follow the instructions in our guide to factory resetting your iPhone. Make sure you choose to restore using a computer to reinstall iOS completely. Since this is such an extreme step to take, we only suggest you reset your iPhone if a software update didn’t fix your issue.

4. Reconnect and Disconnect Your Headphones

If your iPhone is still stuck in headphone mode after restarting, there must be a physical problem with the device. Usually, it’s as simple as dirt buildup in the headphone port, which tricks the sensors into thinking something is still plugged in.

Reconnect your headphones then disconnect them again. Repeat this three or four times to loosen any dirt within the port. Then gently shake your iPhone to let loose debris fall out.

remove broken headphone jack

If you have Bluetooth headphones, connect and disconnect your headphones by going to Settings > Bluetooth. When you disconnect your headphones, your iPhone should automatically switch back to using the normal speakers.

5. Clear Out the Headphone Port

It’s possible there’s more dirt packed into your headphone port causing this problem. You need to be careful when clearing it out, because it’s possible to damage your iPhone while doing this.

It’s best to turn off your iPhone before inserting anything into the headphone or Lightning port, to avoid causing a short circuit or introducing a static charge to the electronics.

Don’t insert any metal objects—like a straightened paperclip—into your ports. Instead, use the following tools to safely clear out dirt and debris safely:

  • Compressed air
  • Cotton swabs
  • Interdental brush

Compressed air, cotton bud, and intradental brush

If none of that works, you might be able to remove obstructions from the headphone port on an iPhone 6S or earlier using the inner tube of a pen. The open end of these tubes is often the same diameter as your headphone port, allowing you to carefully insert it and twist to loosen any dirt inside.

Be careful you don’t let any ink leak into your iPhone.

Inner tube of a pen

For a Lightning port, squash the end of a plastic straw to make it oblong, then insert it into the Lightning port to loosen dirt stuck at the bottom. Follow our guide to cleaning your iPhone if you need further help.

6. Check for Water Damage

If you can’t find any debris in the ports but your iPhone is still stuck in headphone mode, it might be an indication of water damage inside your device. This could happen from something as obvious as dropping your iPhone in the toilet or something as subtle as sweat dripping down your headphone cable.

Unfortunately, if your iPhone is water damaged, there’s little you can do to repair it except replace the device entirely.

You can use the liquid indicators on your iPhone to get a better idea of whether it has suffered water damage or not. Open the SIM card tray and look for a small white tab inside; this turns red, pink, or orange when it comes into contact with liquid.

On the iPhone 4S and earlier, you’ll find the liquid indicator tab inside the headphone port itself.

Liquid indicators on iPhone 4S and iPhone 6

Don’t use rice to dry your iPhone if it’s liquid damaged. This runs the risk of making matters worse by leaving harmful residue behind or further blocking the ports. Instead, take a look at our guide on how to fix a water-damaged iPhone.

7. Temporary Software Workarounds

Even if your iPhone needs a repair to fix a hardware problem with your headphone port, you can still use the workarounds below to trick it out of headphone mode whenever it gets stuck.

None of these tips offers a permanent solution, but they could be the quick fix you need if you can’t afford a repair.

Toggle Airplane Mode On and Off

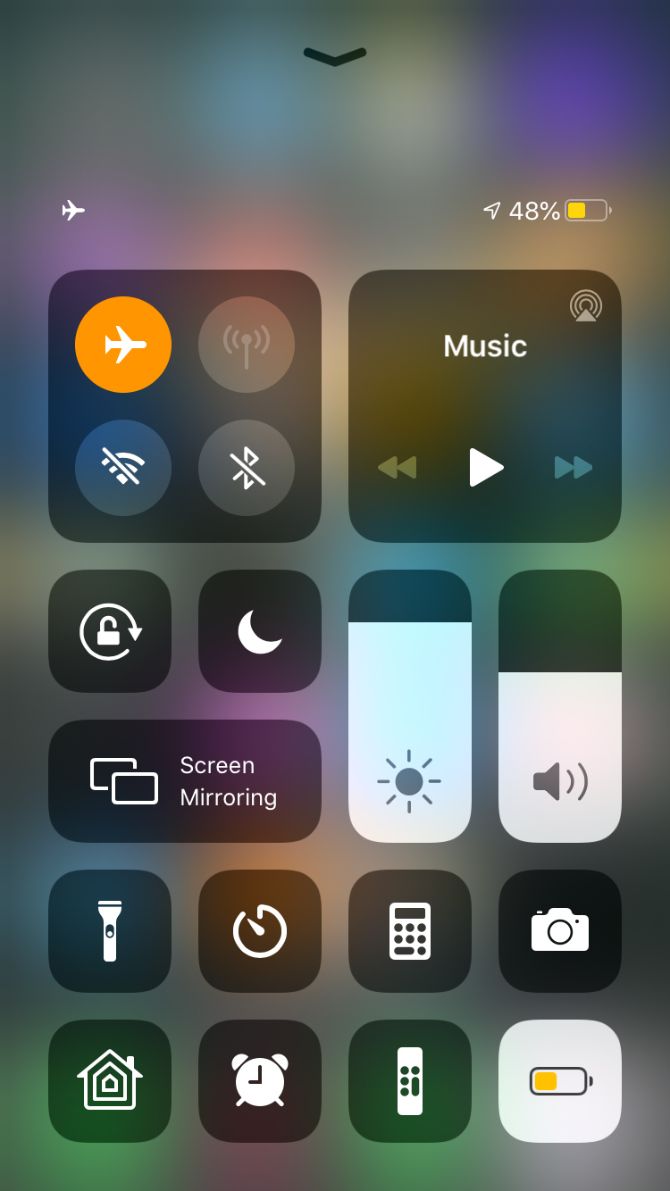
Open Control Center and tap the airplane icon to turn Airplane Mode on and off. This disconnects any Bluetooth headphones or speakers your iPhone thought it was still connected to.

Change the Audio Output

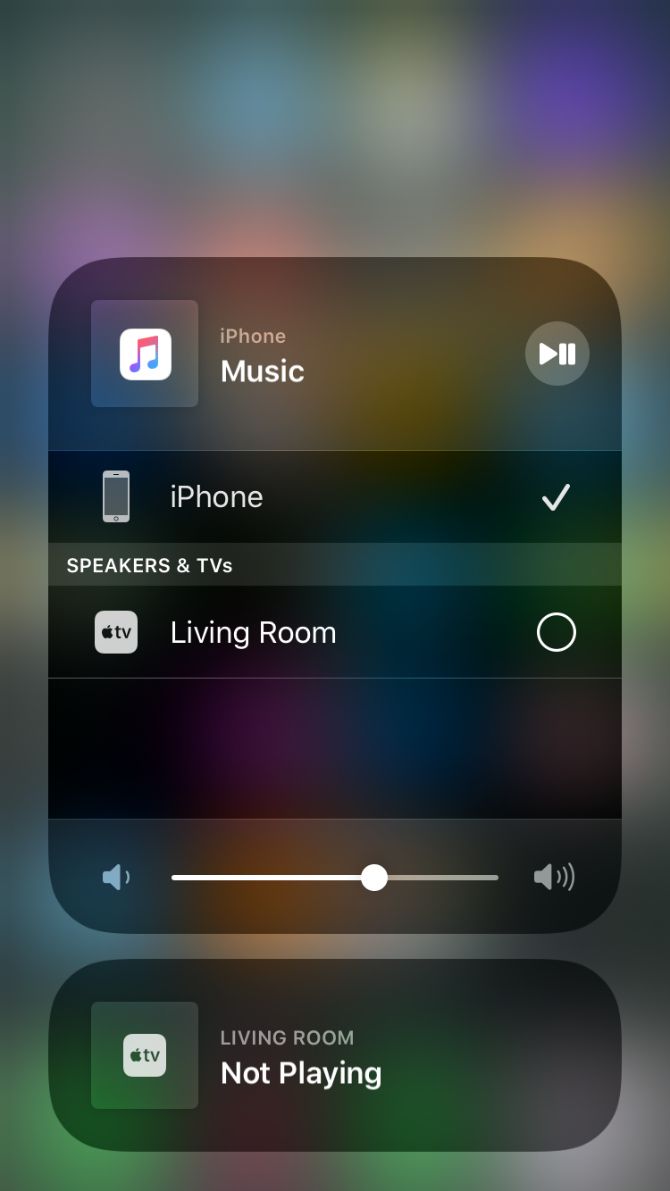
When listening to music or watching videos, your iPhone lets you choose between different audio outputs. Open Control Center, then tap and hold the playback controls in the top-right corner. Select the AirPlay icon to reveal all your output options and select iPhone from the list.

Change Your Ringer Volume

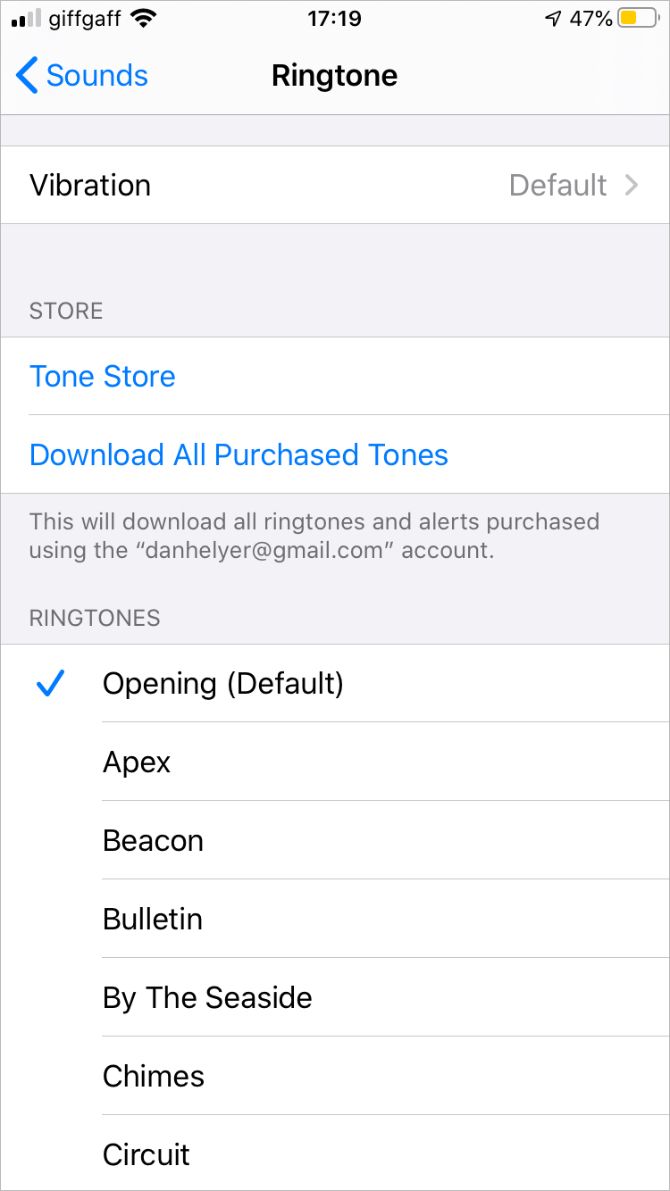
Open the Settings and go to Sounds & Haptics. Tap the Ringtone option, then tap any ringtone to make it play through your iPhone speakers even if it’s stuck in headphone mode. Use the Volume buttons while the ringtone is playing to make your iPhone switch back to speaker mode.

Find Out How to Fix Your Headphone Port

When your iPhone is stuck in headphone mode because of a hardware problem, you should speak to Apple’s support team to find out if it’s fixable under warranty. Unfortunately, Apple won’t just fix your headphone port; support will replace the entire device. This makes it an expensive “repair” if you aren’t covered by warranty.

If that’s the case, look into finding a replacement headphone port and repairing the iPhone yourself. This isn’t easy to do, but it might be the best option if you can’t afford a new phone.

There are plenty of websites that show you how to fix your own gadgets, many of which sell all the tools you need to repair your iPhone’s headphone port. If you think something snapped off inside, look into removing a broken headphone plug from your phone.

Read the full article: 7 Fixes for an iPhone Stuck in Headphone Mode


Read Full Article