26 May 2020

10 Tips for Managing Shared Files on Google Drive


manage-shared-files-drive

Sharing documents on Google Drive isn’t novel anymore. And it has only got better as remote work touches all corners of the globe. It’s good news for us as a simple Google Drive shared folder opens up so many collaborative ideas across diverse domains.

Are you still getting the hang of it? These ten tips should help you manage shared files just a bit better from today.

Unlock the "Essential Google Drive Keyboard Shortcuts" cheat sheet now!

This will sign you up to our newsletter

Enter your Email

The Basics of Google Drive Sharing

You can share any file or folder. But you have to pay attention to the people you are sharing with and the level of sharing permissions you allow on Google Drive.

The two-minute video sums up the process.

As the owner, you can give others complete ownership of a file, or some level of viewing and editing access.

  • Can edit: The collaborative spreadsheet you are working on with your team.
  • Can comment: The book draft you are writing. Others can view and add comments to the file, but can’t edit it. Folders don’t have comments.
  • Can view: The weekend party invitation you just made with Presentation.

Here’s a chart that compares the access for a viewer, commenter, editor, or owner:
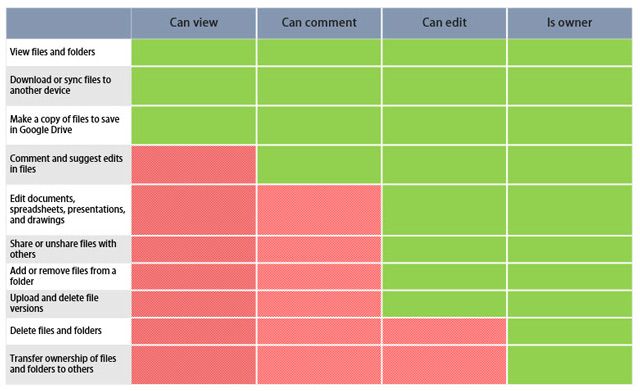
Comparison sheet for Google Drive sharing & access

Source: Google Support

1. How to Disable Copy, Download, and Print Shared Files?

You can disallow downloading, printing, and copying of shared files. The advanced information rights management feature removes these options from the menu of the viewer. This is another layer of control over your documents.

Open Google Drive. Select the shared file and click the Share icon on the top right.

On the Share with people and groups dialog box, add the name of the collaborators. Set the permission level of your collaborators from the dropdown next to the name field. Google Drive’s sharing permissions are Editor, Viewer, Commenter.

Google Drive Permissions Dialog

Sending a notification and a personal message is optional. Now, you may want to disable download, printing, or the copy of the shared file. Click the Gear icon to display two more permissions you can uncheck to strengthen the privacy of your document.

Come back to the previous dialog with a click on the arrow and then send the file to your collaborator.

Google Drive Disable Download Print Copy

Viewers will see the Export options disabled notification at the top of the File and Edit menus. Make a copy, Print, and Download options are also greyed out for the specific documents, spreadsheets, and presentations.

Google Drive Export Options Disabled

Do note that those with “edit” permissions will still be able to download, print, and copy your file, even if this setting is on.

2. Share a Folder with Non-Google Users

Your friends and colleagues don’t need a Google account to view a Google Drive folder or document. You can send an invite to their email address. Or use a shareable link.

Non-Google account users and collaborators can only view the file irrespective of the permission you set.

Sharing a Google Doc with a non-Google user

Sharing via a public link is a security risk for sensitive documents because anyone with the link can access the file. So use it in a public chat, email, or social media only if the document can be viewed by anyone.

3. Download a Shared Google Drive Folder

Google Drive lets you download the entire contents of a shared folder as a ZIP archive. This is useful for saving local copies of shared documents. The folder structure with any sub-folders is retained in the archive.

Go to Shared with me On your Google Drive. Right-click on the folder and choose Download.

Download Shared Folder in Google Drive

You can also use the triple dots icon in the toolbar to download the folder.

If you download a Google Doc, Sheet, or Slide, it will download as an Office document. All other files will download in their native format.

4. Transfer Ownership of Files to Someone Else

There are many reasons for transferring the ownership of documents to someone else. Maybe someone else is taking over a project. Maybe someone fired you. On a better note, you are going on a vacation and just want to hand over responsibility for the shared documents. The process to digitally “hand over” Google Drive documents and folders is easy.

Shared folder in Google Drive

Open Google Drive. Select the shared folder or file in Docs, Sheets, or Slides and click the Share icon on the top right. When the presumptive owner does not have share access…invite by typing the email address in the “Share with people and group” field. Then Save.

Click the drop-down menu next to the name of the person you want to own the file or folder. Select Make Owner.

Your role is swapped from an owner to an editor after you transfer ownership. A message pop-up alerts you that “The new owner will be notified and could remove you. You also might lose the ability to change share settings.”

Do Note: You can’t transfer ownership of a synced or uploaded file (like a PDF or an image file).

5. How to Request Access to Shared Files?

When you try to access a file via a shared link, you might see a message that says “You need access.”

Google Drive Access

Sometimes, owners share a link before they have set the permissions. Also, you might want to open the file with an alternate Google ID. It is easy to request access with a single click.

On the desktop:

  • Open a link to the file.
  • Click Request access.

On Mobile:

With the Drive for Android or iOS app, you can request access with a single tap when the “Unable to access document” message pops up. Requesting permission will send an email to the owner from inside the app. File owners immediately get a notification on Android and iOS.

Download: Google Drive for Android | iOS (Free)

6. Search for a Collaborator

Sharing a document with 10 members is easy. Sharing it with 50 calls for more planning. Managing shared files also means tracking which collaborator is working on which document.

Go to View Details (Click the “I” icon on the toolbar). Browse the Activity tab to quickly see which files you have shared, recently.

Check Activity on Google Drive

Click on Shared with Me on the left sidebar of Google Drive. You’ll get a list of all the documents you share access to.

Use Google Drive Search and its advanced filters. The productivity benefits won’t come as a surprise for those acquainted with Gmail filters.

Google Drive Search and Filters

Use the search box at the top of Google Drive. Google Drive’s search also searches the body of the document for words you want it to search for.

You can search the first 100 pages of any text documents or text-based PDFs that you’ve uploaded. You can also search for text found on the first 10 pages of any image PDFs. Instead of digging through folders use this powerful feature to quickly get to a file.

While in Google Drive press the forward slash key to place your cursor right in the search box. Click the little dropdown arrow on the search box to reveal the basic search filters. Learning a few manual parameters can save you time.

For example: To find documents you shared with someone use to:bob@gmail.com.

Google Help has the complete list under the section “Advanced search in Google Drive”.

7. Simplify sharing by Creating Contact Groups

With email contacts, you don’t have to set individual document permissions for your team members. You can just create Labels that are a collection of contacts in specific email groups.

Log into Google Contacts. On the left sidebar, click Create label.

Creating a label in Google Contacts

Give it a descriptive name according to the team project. Or anything else which makes them easy to remember. You can name labels by permissions to make them easy to remember. Any contact can be a part of multiple labels.

For example: Project.view or Project.edit

Enter the labels in the file or folder sharing settings field on Google Drive.

Entering Google Contacts labels in Google Drive share settings

8. See The View Count of a Shared Document

Google maintains a version history, but there is no way to see how many times a shared document has been viewed. I got the answer to this question from an old Stack Exchange discussion.

Submit your document link to the http://goo.gl URL shortening service and share that URL only. This service provides information on how many times that link was clicked, which is about as close as you can currently get to know how many times your document was accessed.

Google has shut down support for its own URL shortener. You can use Bitly instead. This is useful in cases where you might want to share a document publicly and check the response. Note that public docs and files show up in search results.

Bitly dashboard

Some ideas for sharing publicly:

  • Upload and share an eBook.
  • Test the initial response to a creative product.
  • Release a Slides presentation for public viewing (like SlideShare).
  • Find open educational content.

Tip: You can use a simple Google Site Search to search for public documents. E.g. keyword site:drive.google.com

9. Share with Slack

If you aren’t working with Slack yet, it’s time to introduce it to your team. There are many ways to make your favorite services work with Slack. Google Drive integration is among the popular ones.

Slack lets you import Google Drive files and share them via Slack. All imported Google Drive files are also indexed by Slack for easy searching and reference. The files are not stored on Slack—they continue to remain in your Google Drive folders. Slack acts as a conduit.

Slack and Google Drive

A small example: Paste a link to a Google document in the Slack chatroom. Slack displays a snippet of content from the file below the link once it is integrated. This is more helpful than just sharing blind links.

Slack Help Center shows how you can connect your Google Drive to Slack in two easy ways.

10. Share Google Docs from Microsoft Office

Google Drive vs Microsoft Word might be a daily bout of two office suites, but the two powerhouses are finally playing nice. You can upload Word, Excel, and PowerPoint files to Google Drive and work on them in the cloud as you would in any other Google Drive shared file.

All updates are saved to the files in their original format. Office documents stored on the Drive are also version controlled. You can track previous versions of an Office file, or go back to an older version.

If you want to use specific Google Drive tools like an add-on or translations, then just convert the Microsoft file to a Google Document. Otherwise, you don’t have to bother changing one format to the other.

Sharing Files on Google Drive Is Easy

It has also got simpler. There are a few more Google Drive settings you can change to make your workflow smoother. Spend some time with the collaborative features of Google Drive as the harmony of teamwork depends on it.

As a collaboration bridge, Google Drive should be part of your remote work setup in a home office or anywhere else in the world.

Image Credit: jigsaw puzzle by Rido via Shutterstock

Read the full article: 10 Tips for Managing Shared Files on Google Drive


Read Full Article

What Is GeForce Experience? Key Features and Benefits Explained


If you’re a PC gamer with an Nvidia graphics card, there is a strong chance you use either the Nvidia Control Panel or Nvidia’s GeForce Experience. Users often confuse the two programs, wondering which is the best tool for controlling your graphics settings.

The truth is you can use both the Nvidia Control Panel and GeForce Experience to control and modify different graphics settings, as well as update drivers and other performance tweaks. But is Nvidia GeForce Experience better than the Nvidia Control Panel?

In this article, we explain what GeForce Experience is and what it does, and explore whether it’s better than the Nvidia Control Panel.

What Is GeForce Experience?

In a nutshell, GeForce Experience is a software suite for Nvidia GPUs.

nvidia geforce experience

The GeForce Experience features a host of performance and configuration tweaks for games, automatic driver updates for your GPU, Nvidia Shadowplay for live streaming, integrated game filters (like Instagram filters but for your PC games), and many more powerful options.

Nvidia’s GeForce Experience has carried a mixed reputation in the past. Some saw it as an unnecessary addition to a gaming PC. Others contend that it uses additional system resources. But in its latest iterations, GeForce Experience has become a versatile GPU management tool for Nvidia GPU owners.

GeForce Experience vs. Nvidia Control Panel

nvidia control panel

Hold on. Doesn’t the Nvidia Control Panel come with the same range of options as the Nvidia GeForce Experience?

The fact that Nvidia installs two separate tools to configure and manage your GPU settings is a little confusing. But they are different tools that offer users a different range of GPU options.

Nvidia’s Control Panel primarily deals with universal GPU settings but also features settings for individual games.

For example, you can manage your Nvidia GPU’s 3D settings across your entire system, force a specific screen resolution, adjust your desktop color display, set up multiple displays, and more. If you are using a laptop with an Nvidia GPU, you can use the Nvidia Control Panel to specify when to use the laptop’s onboard graphics and when to switch to the GPU, saving your laptop battery life.

Although the Nvidia Control Panel focuses on universal settings, you can also create custom settings for individual programs. These GPU settings override the general settings for that specific program. You could force a game to use a specific type of anisotropic filtering, force V-Sync to remain on, or define a power management mode for your GPU.

Forcing these 3D settings on a game or program can have unintended consequences. You won’t destroy your computer or GPU, but you could cause your games and programs to crash without warning.

What Does GeForce Experience Do?

So, if Nvidia GeForce Experience doesn’t control color displays or screen resolution, what does it do?

The Nvidia GeForce Experience packs in a different range of features, including:

  • Automatic game optimization
  • Record and create automatic gameplay highlights using Nvidia ShadowPlay
  • Broadcast gameplay live from GeForce Experience to Facebook, Twitch, and YouTube
  • Capture and filter screenshots
  • Update Nvidia GPU drivers automatically
  • Stream games to Nvidia Shield devices

Let’s take a look at these GeForce Experience features in a little more detail…

1. Automatic Game Optimization

Nvidia geforce experience automatic game optimization

Modern PC games are graphical wonders. Some games attempt to bring photorealistic graphics to gamers, creating more depth and immersion than ever before.

With those incredible graphics come an equally incredible range of in-game graphics options. There is often an easy-to-use graphics toggle, allowing you to set the graphics to Low, Medium, High, Ultra, and so on. Most games detect your system hardware specifications automatically and attempt to provide the optimal graphics level.

The Nvidia GeForce Experience will optimize those graphics settings further, using Nvidia’s vast cloud data center and the countless other PC hardware configurations in its data set. The Nvidia game optimization supports hundreds of titles and can help fine-tune in-game performance.

Nvidia’s game optimization is set to manual. This means you must check the optimization settings for each game. The screenshot in the games panel changes as you change settings, allowing you to see the differences in quality before launching the game.

However, you can switch to automatic optimization if you want. Click your Nvidia username in the top-right, then head to Account > Games, and check the box to Automatically optimize newly added games.

If you’re using Windows 10, GeForce Experience isn’t the only place you can make performance tweaks. Check out how to optimize Windows 10 for gaming.

2. Record and Stream Video Using Nvidia ShadowPlay

nvidia geforce experience broadcast options

Nvidia ShadowPlay is a video-recording feature that allows you to record or stream your gameplay. ShadowPlay has several recording and game capture options, including live broadcasting and instant replay capture.

Please note that Nvidia ShadowPlay is now known as Nvidia Share, as per the gaming overlay optimized for sharing content. However, Nvidia continues to refer to ShadowPlay in official branding as well as its GeForce Experience release notes. As such, this article will continue to refer to Nvidia ShadowPlay.

Over the years, ShadowPlay has grown in capabilities. With Nvidia GeForce Experience open, you can use ShadowPlay to record your gameplay. Press ALT + F9 while in-game, and ShadowPlay will begin recording. You can record with Low, Medium, High, or custom settings. The recording will continue until you press ALT + F9 again.

Adding to the standard recording option is the Instant Replay. Instant Replay allows you to capture a short period of gameplay using a predefined length of time, from 15-seconds up to 20-minutes. Press ALT + F10 while in-game, and ShadowPlay will capture your gameplay for the specified time.

The Instant Replay option records using the same settings as the standard recording. Furthermore, when you switch Instant Replay on, it is always recording. However, it only saves the recording if you press ALT + F10. Otherwise, it discards your recording in segments according to your settings.

You can also use ShadowPlay to broadcast live to Facebook, YouTube, and Twitch. You can customize the quality of your live broadcast, as well as upload your custom branding overlays before streaming. Press ALT + F8 to begin live broadcasting your game using Nvidia ShadowPlay.

Another nice ShadowPlay feature for streamers is the customizable HUD (Heads-up Display). You can add a webcam input, a recording status indicator, your in-game FPS, viewer count, and a comment stream to your broadcast using the Nvidia ShadowPlay overlay. You can position each option in one of the four corners of your screen, changing the size of certain options.

3. Capture and Filter Screenshots with Nvidia Ansel

Capturing screenshots isn’t a crazy impressive feature. But the extra power and functionality that Nvidia Ansel delivers is worth mentioning.

Nvidia Ansel creates a special in-game camera that lets you take screenshots from almost any position. You can then use Ansel’s range of post-processing filters to tweak and style your screenshot. Ansel also allows you to capture HDR images in 4K, take massive screenshots that exceed your monitor resolution, and even create 360-degree panoramic screenshots.

So, while Nvidia Ansel is a screenshot tool, it offers a surprisingly powerful method of capturing your gameplay moments. You can see some amazing Nvidia Ansel screenshot examples on Shot With GeForce. Nvidia periodically runs screenshot competitions, too, so make sure to check it out.

To use Nvidia Ansel in-game, press ALT + F2 when you want to take a screenshot. The Nvidia Ansel overlay will open, and you can begin customizing your screenshot.

Unfortunately, Nvidia Ansel doesn’t work with every game. Nvidia maintains a list of Ansel-supported games. Select Ansel from the dropdown menu and check for your game. As you’ll see, there are a lot of games with partial Ansel support.

4. Update Nvidia GPU Drivers Automatically

nvidia geforce experience update drivers

Are you forever forgetting to update your GPU drivers? Nvidia GeForce Experience takes care of that. By default, GeForce Experience will prompt you if there is a new GeForce Game Ready Driver available for your GPU.

Keeping your GPU driver up to date really is worthwhile. New graphics drivers often bring noticeable improvements in performance in many games—particularly in new games. It’s not uncommon to see graphics driver change logs with 20 percent improvements to particular new games on certain hardware.

You can set GeForce Experience to download the driver update automatically (but you still choose when to install). Click your Nvidia username in the top-right, then head to Account > General. Under Downloads, check the box to Automatically download driver updates and let me choose when to install.

Included in the Nvidia GPU drivers are individual game profiles. The Nvidia game profiles can give you a little extra performance as Nvidia tweaks your GPU settings. It might not transform your game, but reaching optimal performance for your hardware means a better overall experience.

Furthermore, for those with the latest Nvidia RTX GPUs, the drivers can introduce a massive performance boost as well as new RTX-specific features.

5. Stream Games to Nvidia Shield Devices Using GameStream

Nvidia GeForce Experience is a game streaming hub for those with an Nvidia Shield Tablet or an Nvidia Shield TV box. You can see a detailed tutorial on connecting GeForce Experience to a Nvidia Shield TV box below.

Nvidia Shield gives you up to 4K streaming with HDR, built-in Google Assistant, and, most importantly, access to your entire gaming catalog across multiple devices.

Nvidia Shield is just one game streaming service. There are plenty of alternatives—even from Nvidia. Check out our comparison of Nvidia GeForce Now and Google Stadia to see which suits your gaming setup.

What Are the Best GeForce Experience Features?

GeForce Experience is an excellent GPU management tool for Nvidia users. The best Nvidia GeForce Experience features lie in the integrated game recording and streaming options, as well as the in-game filters and other advanced tweaks.

However, many Nvidia users avoid GeForce Experience like the plague. In the past, GeForce Experience carried a poor reputation as a clunky, needless piece of software. However, that perception is now changing, so we recommend taking a fresh look at GeForce Experience.

Are you looking to get into PC gaming but need a new GPU? Then we recommend you check out our list of the best budget graphics cards for gaming.

Image Credit: Carles Reig/Flickr

Read the full article: What Is GeForce Experience? Key Features and Benefits Explained


Read Full Article

Is the Apple Watch for Kids? The Best Kids Smart Watches


kids-smart-watches

The Apple Watch is one of the most popular smartwatches on the market. Despite its high price tag, the wrist-worn device is a firm favorite thanks to its seamless integration with its other hardware.

It makes sense, after all, to buy an Apple Watch if you already own an iPhone or MacBook. This popularity has led to some parents investing in an Apple Watch for their children, too. However, there are many factors to consider.

So, let’s take a look at whether the Apple Watch is suitable for kids and a few alternative smartwatches.

What Is the Apple Watch?

Apple Watch Series 5 Apple Watch Series 5 Buy Now On Amazon $329.00

The Apple Watch is a wrist-worn smartwatch produced by the technology company, Apple. It is one of many smartwatches currently available but is among the most popular and easy to use. The Apple Watch is currently only compatible with iPhones.

You could choose to wear the device as a standard digital wrist-watch. However, many of the features wouldn’t function. The main reason to wear the Apple Watch is because of its integration with your iPhone. You can send messages, interact with notifications, and view turn-by-turn navigation.

It is also a viable alternative to a wrist-worn fitness tracker. Again, it is the integration with Apple’s software that makes it so compelling. Health data captured by the Apple Watch is synced to your iPhone and can be viewed using the Health app.

The Benefits of an Apple Watch for Kids

Apple Watch Health Alerts

The primary benefit of the Apple Watch is the promotion of healthy living. The watch encourages you to achieve three health goals each day; standing for one minute per hour at least 12 times a day, exercising for 30 minutes, and burning a personalized amount of calories.

The watchOS software makes these goals achievable for kids by turning them into a game. You can compete with others in exercise challenges, which adds a fun, competitive edge to the program.

The combined use of an iPhone and Apple Watch means that your child’s devices can be connected to Apple’s Find My Friends feature. If your child’s Apple account is listed as part of your Apple Family Sharing account, you’ll be able to locate them remotely. However, as with all tracking devices, you should discuss this with your child before enabling it.

Beginning with watchOS 5, Apple introduced a walkie-talkie feature on Apple Watch. This makes it easier to communicate with your child, assuming they have their iPhone nearby. With the walkie-talkie feature, contacting your kids is as simple as pushing a button on your watch.

You can also buy a cellular model of the Apple Watch, where the device has its own mobile internet connection. Although the initial investment is higher for a cellular model, it means you can use some of the watch’s features without always having your iPhone nearby. This improves the usefulness of features like the Walkie-Talkie app.

Is the Apple Watch Suitable for Kids?

Apple Watch App Store

Despite these perks, you may still be uncertain whether to buy an Apple Watch for your kids. Notably, to get the benefits of the watch, your child will also need an iPhone. Depending on their age, you may not feel comfortable introducing them to a personal mobile device just yet.

The combined price of the iPhone and Apple Watch could be around $1000—a substantial amount of money. This is a high initial outlay, but it could also be an issue should the devices be damaged, lost, or stolen. Although you can locate and format them remotely, it’s all too easy for young ones to misplace or damage their expensive gadgets.

It’s also worth considering the policies of your child’s school. Many educational establishments limit the use of technology. Whether that’s to promote focus or to minimize the risk of internet-based test cheating, there may be specific rules that limit products like the Apple Watch.

Finally, the Apple Watch will need to be recharged from time to time. The device offers one of the best performing batteries, lasting around 18 hours with typical use. However, that does mean it’ll need recharging every day, which could quickly turn the watch from a novelty to an inconvenience.

Apple Watch Alternatives for Kids

Apple’s wearable device has become the market leader for a reason; long battery life, attractive design, and ease of use make it ideal for most users. That said, it isn’t your only option. There are other smartwatches suitable for kids that you may want to consider, too.

1. VTech Kidizoom DX2

VTech Kidizoom DX2 VTech Kidizoom DX2 Buy Now On Amazon $59.99

VTech is one of the most prominent children’s technology brands. The company makes devices for children of all ages, providing an affordable way to get your kids started with wearable gadgets. The VTech Kidizoom DX2 smartwatch is the best budget alternative to the Apple Watch, but that doesn’t mean it isn’t feature-packed.

Unlike the Apple Watch, which is a gadget suitable for children, this watch is designed specifically for them. The durable splash-proof design makes it ideal for young children’s adventures while still offering a touch screen interface. The watch includes 256MB of internal memory, two selfie cameras, and built-in exercise challenges and games.

While it lacks many of the communication and personal safety features of the Apple Watch, it is an ideal introduction to the world of smartwatches and wearable tech. Should something happen to the Kidizoom DX2, the low-price makes it less of a financial concern.

2. Vowor 4G Kids Smartwatch

Vowor 4G Kids Smartwatch Vowor 4G Kids Smartwatch Buy Now On Amazon $86.99

The Vowor 4G Kids Smartwatch costs more than the Kidizoom DX2, but there’s a reason for the increased price; this smartwatch is compatible with 4G networks. Place a SIM card into the Vowor watch, and it’ll connect to a 4G cell network.

One of the primary reasons parents invest in phones and smartwatches for their children is to stay in touch. This cell connection enables features like voice and video calling, GPS location tracking, and an SOS alert mode.

For additional safety, there is a geofencing feature. Once you’ve set the desired area, you’ll get a notification if your child steps outside the boundary. The strap is made of silicone, so it is comfortable to wear. The company will even replace broken straps or cables for free during the one-year warranty period.

3. Fitbit Versa 2

Fitbit Versa 2 Fitbit Versa 2 Buy Now On Amazon $199.95

Fitbit’s fitness tracking devices are responsible for motivating people worldwide to achieve their 10,000 steps per day. The Fitbit Versa 2 is one of the company’s best offerings, combining the top features of a fitness tracker with smartwatch technology.

The Versa 2 runs Fitbit OS and supports both Android and iOS devices. This makes it an ideal alternative to the Apple Watch if you aren’t already invested in Apple’s ecosystem. The smartwatch can track your steps, record fitness activities, set challenges, and motivate you towards your health goals.

Using the watch, you can view notifications on your wrist and monitor your heart rate. The Versa 2 also comes with six-day battery life, so you won’t have to charge it every day. There’s even integration with Alexa to top it off, giving you access to Amazon’s digital assistant wherever you are.

The Right Smartwatch for Your Kids

There’s a lot to consider before investing in a smartwatch for your child. The Apple Watch is undoubtedly a popular device, but its high price and reliance on other Apple hardware make it a challenging choice.

That said, as with all Apple products, the ease of use, family-friendly design, and integration with the company’s software make it straightforward for adults and young children alike.

Although we’ve listed some great Apple Watch alternatives for kids, there’s a vast range of wearable devices out there. If you’re after more options before investing, consider one of the best phone watches for kids.

Read the full article: Is the Apple Watch for Kids? The Best Kids Smart Watches


Read Full Article

nano vs. Vim: The Best Terminal Text Editors, Compared


linux-terminal-shutdown

You may be surprised to learn that many aspects of your Linux desktop are not hidden behind complex code. Numerous programs and system settings are tucked away in text files.

You can open these with your default text editor such as Gedit or Kate, but the terminal is often faster, especially when you need administrator permissions.

For terminal-based text editing, two of the top choices are GNU nano and Vim. Which is better? I’m not going to wade into that question, but there are core differences that set these two text editors apart.

A Brief History of GNU nano and Vim

The GNU nano (more commonly referred to as “nano”) project was created in 1999 in order to emulate and improve upon the Pico text editor. Developers claimed GNU nano to be 2/3 to 1/8 the size of the Pico binary, which made it very lean and usable on even the weakest systems.

Vim, originally developed in 1991, is based on the original Vi text editor that was developed in 1976. Like GNU nano, Vim began as an effort to improve an earlier project.

GNU nano

Nano Linux terminal text editor

GNU nano has a reputation for being relatively user-friendly. If you’ve never used nano before, there’s a good chance you can fumble your way through without help.

To get started, you can open or create a file by typing:

nano /home/user/HelloWorld.txt

This will show you a recognizable user interface. The title of your text file appears at the top and the text contained within the file appears in the middle. The actions you can perform line the bottom. You complete these actions by pressing Ctrl plus the indicated key.

For example, you exit and save a file using Ctrl + X. Admittedly, I was very concerned about how to save my file the first time I used nano, as the text editor only lists this command as “Exit”. But when you try to edit, Nano asks if you want to save.

As the bottom of the screen shows, nano contains much of the functionality you would expect from a graphical application. You can cut and paste, find and replace words, and much more.

GNU nano’s features include:

  • Autoconf support
  • Goto-line# command w/o flag
  • Case sensitive search function
  • Interactive search and replace
  • Slang and ncurses support
  • Autoindent ability
  • Displayed tab width option
  • Regular expression search and replace
  • Toggles for cmdline flags via meta keys
  • Tab completion when reading/writing files
  • Soft text wrapping (text doesn’t wrap as in full-fledged document editors, with continuations indicated with $)

Overall, nano is a great option for newcomers to terminal text editing. You can get to try your hand at opening files from the command line and navigating using primarily a keyboard without having to throw out much of what you know about text editors.

On a DEB-based system such as Debian or Ubuntu, you can install GNU nano using:

sudo apt install nano

On Fedora, a RPM-based system, you can install using:

sudo dnf install nano

Since nano is a command-line program you likely won’t find it in GNOME Software or alternative Linux app stores. But you can install it using traditional package managers, such as Synaptic.

Vim

Vim Linux terminal text editor

Vim, by contrast, isn’t quite so welcoming to newcomers. When you open a text file you see just the contents of the file and no indication of how to use Vim itself.

Getting started is straightforward though. You open a file using the following command:

vim /home/user/HelloWorld.txt

At this point, you’re left having to read the documentation, search online, or mash buttons and hope for the best. If you do opt for the last option, there are some safeguards in place. You can’t do any real editing without pressing I to enter “Insert” mode. After you’ve made your edits, you then press Esc to exit the mode (at least you could probably guess that).

To perform other functions, when not in Insert mode, press the : (colon) key. Then type the key or keys that correspond with what you want to do and press Enter.

For example, to save the changes you’ve made to your text file, type :w and hit Enter. This will “write” changes to your file. See, the w is intuitive when you think in terms of read and write rather than open and save.

When you’re done, you can then type :q and hit Enter to quit the program. Again, rather intuitive.

Once you learn the behavior, there’s a certain beauty to Vim’s minimal aesthetic. You don’t have clutter floating inside your terminal window. All you see on screen is the text inside your text file. If you’re comfortable with typing (and you very well may be, considering you’re in the command line), Vim’s interface can feel rather natural.

There’s another reason to make the effort. Vim has the advantage of being more powerful than GNU nano. Not only does Vim contain more features from the get-go, you can also customize the program with plugins and scripts.

Vim’s features include:

  • Automatic commands
  • Completion commands
  • Digraph input
  • Higher memory limits than vanilla vi
  • Split screen
  • Session recovery
  • Tab expansion
  • Tag system
  • Syntax coloring

After you’ve taken the time to add in your desired plugins, Vim becomes a capable alternative to full-featured graphical text editors such as Sublime Text or Visual Studio Code. If you’re not into coding, that doesn’t mean it’s time to give Vim a pass. With a markdown plugin available, Vim is also a capable option for writers.

Is Vim harder to grasp than nano? For sure. But with the ability to add features from other text editors, you can really make Vim your own.

On Debian or Ubuntu, you can install Vim using:

sudo apt install vim

On Fedora, use:

sudo dnf install vim

GNU nano vs. Vim: Which Do You Prefer?

If you can live with with a steeper learning curve, then you may find yourself falling in love with Vim. It’s simple and rather attractive in its own way.

But if you want an option that’s straightforward and gets the job done, there’s little reason not to pick GNU nano. It doesn’t have the mystery that Vim has. You don’t have to read a manual to use the program, which in general is a hallmark of good design.

At the end of the day, both are equally capable of editing the same text files. And when you find yourself falling in love with either program, here are ways to integrate plain text files into how you use your computer.

Read the full article: nano vs. Vim: The Best Terminal Text Editors, Compared


5 Free Homeschooling Websites to Teach and Educate Children at Home


Homeschooling Websites

With the internet, education comes to your home as you can teach kids through online classes. Where do you start? Try these best free websites and apps for homeschooling children.

If homeschooling is a permanent plan for you, you’ll likely want to spend on premium apps and websites that offer robust packages. But if you are temporarily homeschooling or trying it out for the first time, the internet makes it easy to do it for free.

1. TED-Ed@Home (Web): TED-Ed’s Free Homeschooling Newsletter and Activities

TedEd@Home issues a daily newsletter for easier homeschooling, and hosts a daily new speaker on Instagram

The makers of TED Talks launched a new program to encourage learning for students without going to school. The TED-Ed@Home initiative is a daily newsletter with free lessons, activities, and challenges to support students of all age groups, and parents and teachers too.

The newsletter includes new lessons daily for elementary, middle school, high school, and university. A single click will take you to TED-Ed’s archive of educational videos appropriate for that age group. The lessons cover the arts, literature, language, math, science, technology, and more.

You can also browse all TED-Ed lessons, which you can filter by subject, student level, content type, date uploaded, and popularity.

Also, check out the new TED Challenges on the @TEDEducation Instagram page. Every weekday, a new TED speaker will take over the account for a brief educational talk, and a family-oriented challenge that students can do at home.

Remember, TED isn’t the only platform of its type. You should check out the best TED Talks alternatives and see if their lessons are better suited for your children.

2. Things to Do Indoors (Web): Free Resources From Roald Dahl’s Official Website

Roald Dahl's Things to Do Indoors has a variety of free learning resources for children

The books of Roald Dahl are ever-popular among children. The official website now has a mini-page called Things to Do Indoors, which collects free resources to entertain and educate kids at home.

It’s a mix of fun activities and educational pieces. For example, teachers can browse the “Lickswishy Lesson Plans” to find interactive ways to teach language skills. Or take drawing classes to learn how to draw some of Dahl’s famous characters like Matilda.

There are quizzes, puzzles, arts and crafts, and much more for children to browse directly, as well as adults to teach their kids.

Dahl’s website tries to be as inclusive as possible. The video storytelling section, for example, tells some of his classics in sign language. Also, download the giant activity pack from the Create and Learn page, which has quizzes, activity sheets, dress-up ideas, and more.

3. Techie Home School Mom (Web): Beginner Homeschooling Advice and Curriculum Directory

Techie Home School Mom has an easy to browse directory of home learning courses and curriculum

Beth decided to homeschool her kids, and share all the tips and tricks she learns along the way. Despite the name of her blog, you don’t need to be adept at technology to use it. Beth’s articles are accessible for any level of tech expertise.

The first thing to check out at Techie HomeSchool Mom (THSM) is the online homeschool curriculum directory. Beth has scoured the best free online homeschooling courses to make them easy for you to browse.

Filter by subject, grade, or type, and you’ll find a brief description of each course, the class format, grade levels, and categories it applies to.

Throughout the website, Beth shares to-the-point articles about what you’ll need to successfully homeschool children. It’s a lot of thoughtful things that you wouldn’t have considered, like the equipment you’ll need, or specific homeschooling advice for children struggling with certain subjects.

4. Scholastic Learn at Home (Web): Free 4-Week Homeschool Courses

Scholastic teaches children at home through free four-week courses

Educational books giant Scholastic released some of its library to make four-week-long educational courses. You need to sign up to use it as a teacher, parent, or student, and then it’s completely free, no strings attached.

First, choose a grade group: PreK and Kindergarten, Grades 1 and 2, Grades 3 to 5, or Grades 6 to 9. Each course has four weeks divided into a normal 5-day week. Every day has four activities or educational elements.

Scholastic draws upon its vast repository of educational materials to mix up the lessons for well-rounded learning.

Generally, the kids will have to read an article or watch a video, and then have a follow-up activity like writing an essay based on what they learned. By finishing the daily activities, kids earn a “daily reading quest” for enjoyable comprehension.

Scholastic has also made BookFlix free till the end of the school year. BookFlix is its interactive story-telling app that teaches children to learn to read. Check out the Resources for Families section to learn how to use BookFlix free, and get other free downloadables.

5. GoNoodle Good Energy at Home (Web): Free PE and Exercise Games for Kids

GoNoodle's Good Energy at Home has free weekly physical education and exercise activities for kids

Homeschooling needs to be well-rounded like the system a real school would provide. Your child needs physical activity, and GoNoodle’s Good Energy at Home is the answer. Get free movement, yoga, and mindfulness videos for kids in a variety of activities.

The website has new activities every week, where kids learn different exercises with a bit of fun to them. For example, an NFL player taught children some coordination and agility training exercises. Dance instructors teach kids to shake a leg while getting some cardio. And there are other printables, videos, and activities to find something new each day of the week. Plus, you can always go back through the archives for more.

GoNoodle also works on Apple TV, Amazon Fire TV devices, and Roku, for a big-screen activity experience. Several parents reviewing the app say it’s a great compromise. Kids are happy to get a little extra “screen time”, and parents are happy that the child is active and moving. Plus, it also recommends a few off-screen activities to give those eyes some rest.

Download Free Homeschool Printables

Scholastic doesn’t do what GoNoodle does, and GoNoodle has none of the activities from Roald Dahl’s free site. Ideally, you should mix and match the above recommendations to create your own schedule. And you’ll need to print that out for the child to stick to it.

Much like at the school, homeschooling often requires good old paper and pen. But the good news is that you don’t need to draw up those charts, report cards, and schedules. We’ve got your back with a collection of the best free homeschool printables and templates you can download.

Read the full article: 5 Free Homeschooling Websites to Teach and Educate Children at Home


Confidence Interval


Confidence Interval

How to Use Family Sharing to Monitor Your Child’s iPhone


monitor-child-iphone

You might not realize it, but there are lots of parental control options on an iPhone or iPad. They make it easy to keep your children safe and monitor how they use their devices. Most of these controls link with Family Sharing, which means you can use your own iPhone or iPad to edit restrictions or allow purchases for your child.

Here’s a complete guide to setting up and monitoring parental controls on your child’s iPhone or iPad using Family Sharing from your own device.

Create a Family Sharing Group

Before you set up any parental controls, it’s best to create a Family Sharing group with you and your children in it. Family Sharing lets you share iTunes and App Store purchases, iCloud storage, and Apple Music or TV channel subscriptions.

But you can also use Family Sharing to approve or deny your children’s purchases, monitor their screen time, restrict adult content, or track their location. What’s particularly great about Family Sharing is that you can do all of this remotely from your own iPhone, iPad, or Mac.

To create a Family Sharing group:

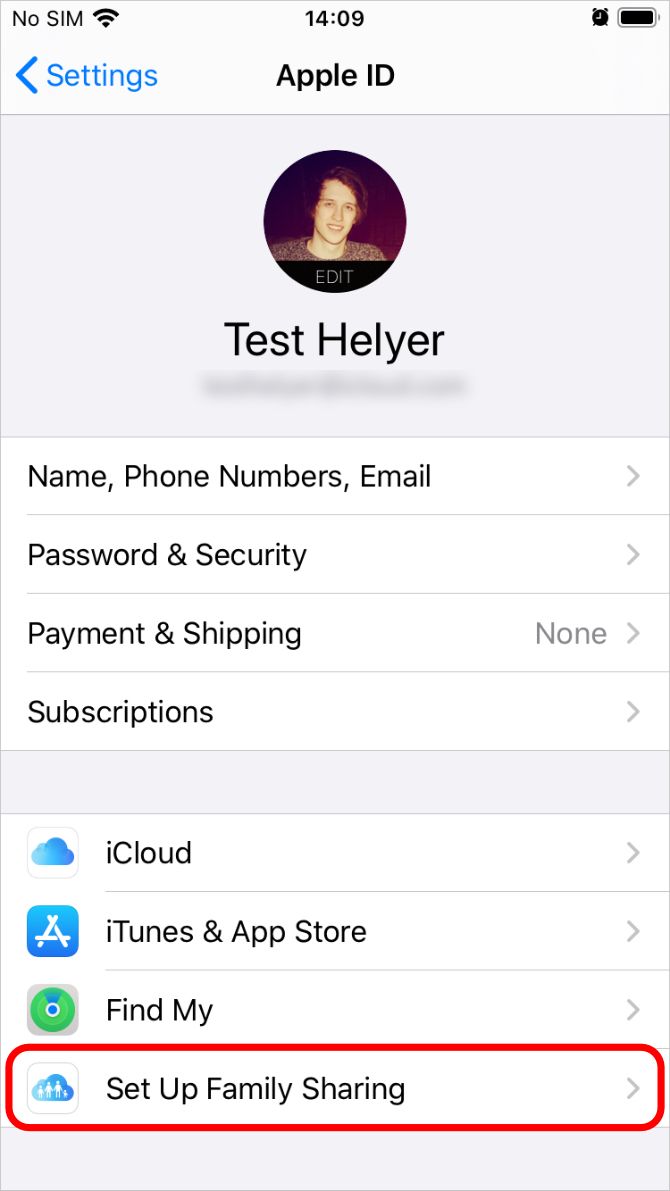
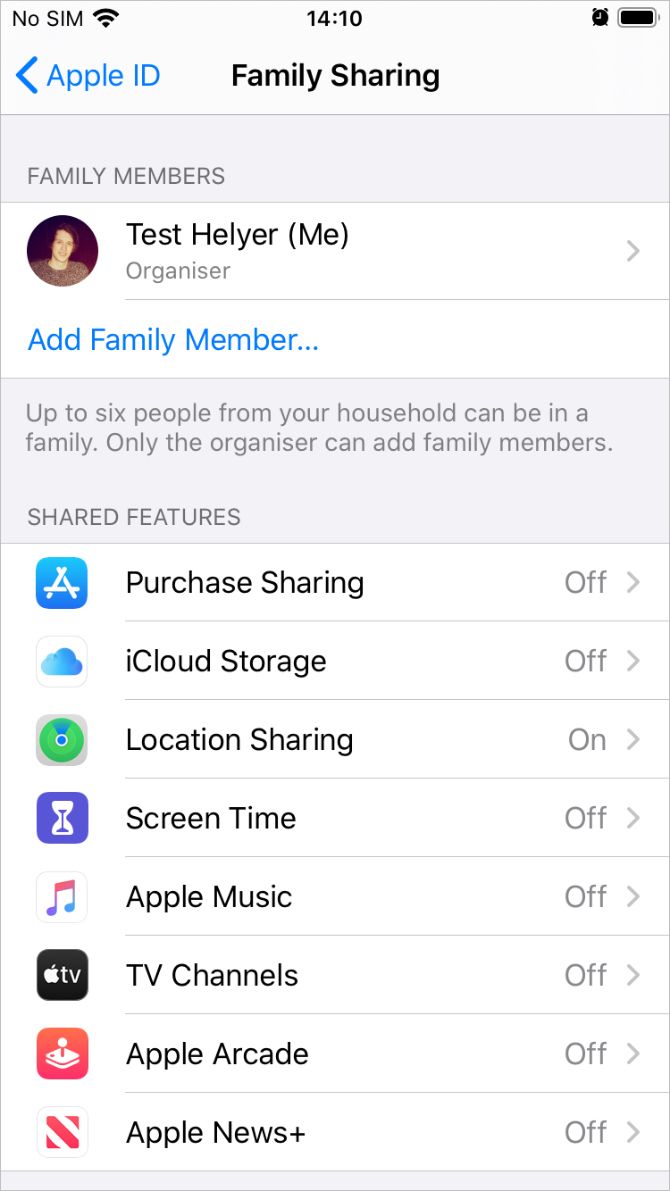
  1. Open the Settings app on your iPhone or iPad and tap [Your Name] at the top of the screen. Choose to Set Up Family Sharing if you haven’t already.
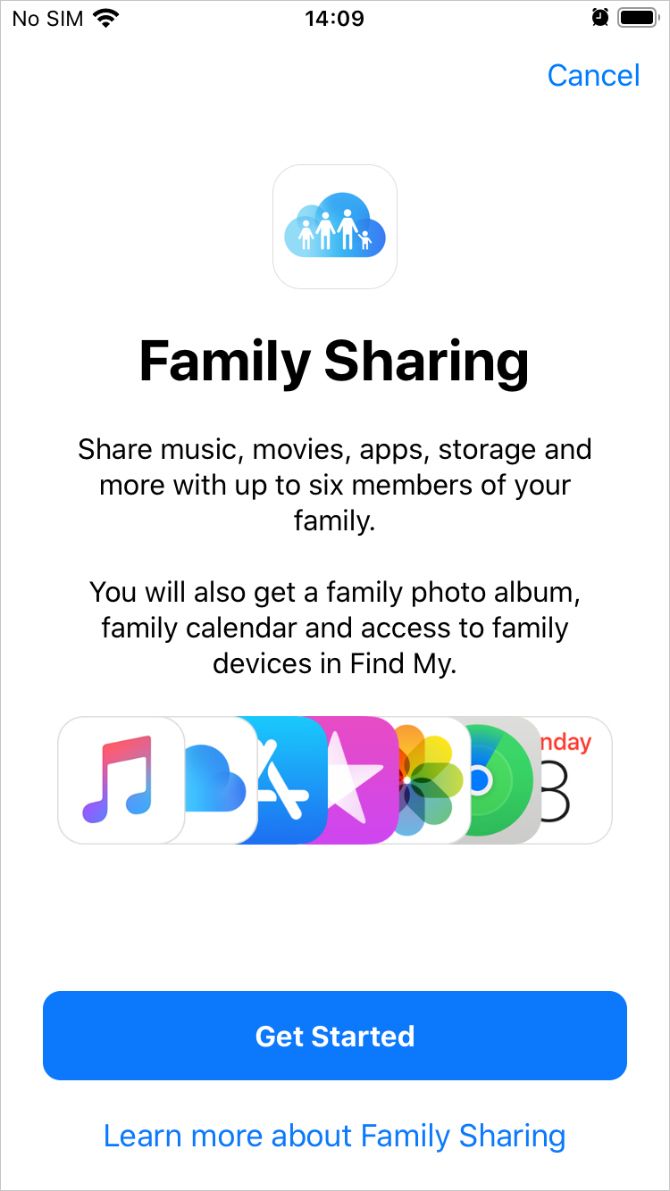
  2. Follow the onscreen prompts to add a payment method, invite family members, and enable Family Sharing features.
  3. After creating the group, tap Add Family Member to invite more people to your Family Sharing group, up to a total of six people.
  4. Alternatively, ask the Family Organizer of an existing Family Sharing group to add you to their group.

Creating a Child Account

Family members can only join your Family Sharing group if they have an Apple ID. If your child is under 13 years old, you will need to create a Child account for them to use, since Apple doesn’t let them make their own.

A Child account must be linked to a Family Sharing group until the child reaches 13 years old, at which point they can choose to leave the group.

To create a Child account for Family Sharing:

  1. Open the Settings app on your iPhone or iPad and go to [Your Name] > Family Sharing.
  2. Tap Add Family Member and choose to Create a Child Account. Then follow the onscreen prompts to create an Apple ID for your child.
  3. After creating the account, use the email address and password you created to sign in to that account on your child’s iPhone or iPad.

Create a Child Account for Family Sharing on iPhone

Assigning Parents or Guardians

If there are multiple adults (over 18 years old) in your Family Sharing group, you may want to assign some of them to act as Parents/Guardians for any children in the group.

A Parent/Guardian can monitor Screen Time, adjust Content & Privacy Restrictions, and approve or deny App Store and iTunes purchases for your child’s device.

To make someone a Parent/Guardian in your Family Sharing group:

  1. Open the Settings app on your iPhone or iPad and go to [Your Name] > Family Sharing.
  2. Tap an adult family member’s name and turn on the Parent/Guardian option.

Parent:Guardian toggle in Family Sharing settings

Approve Downloads With Ask to Buy

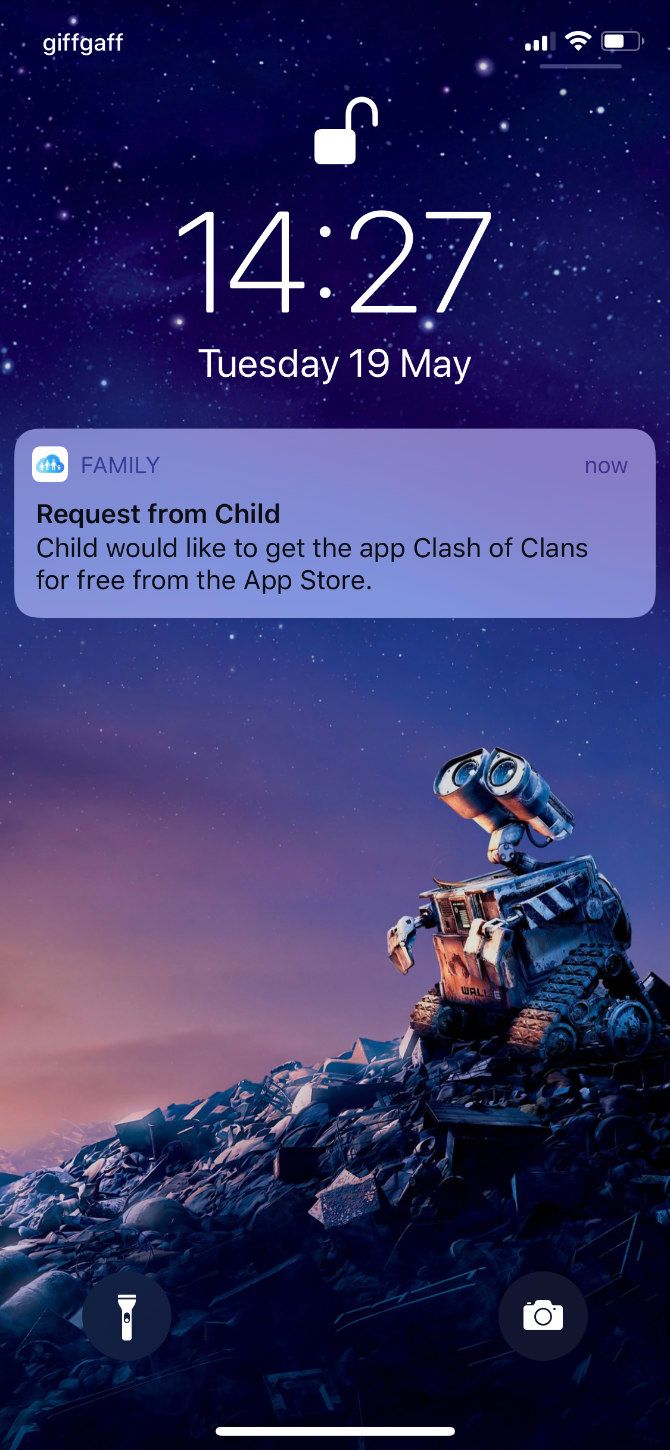
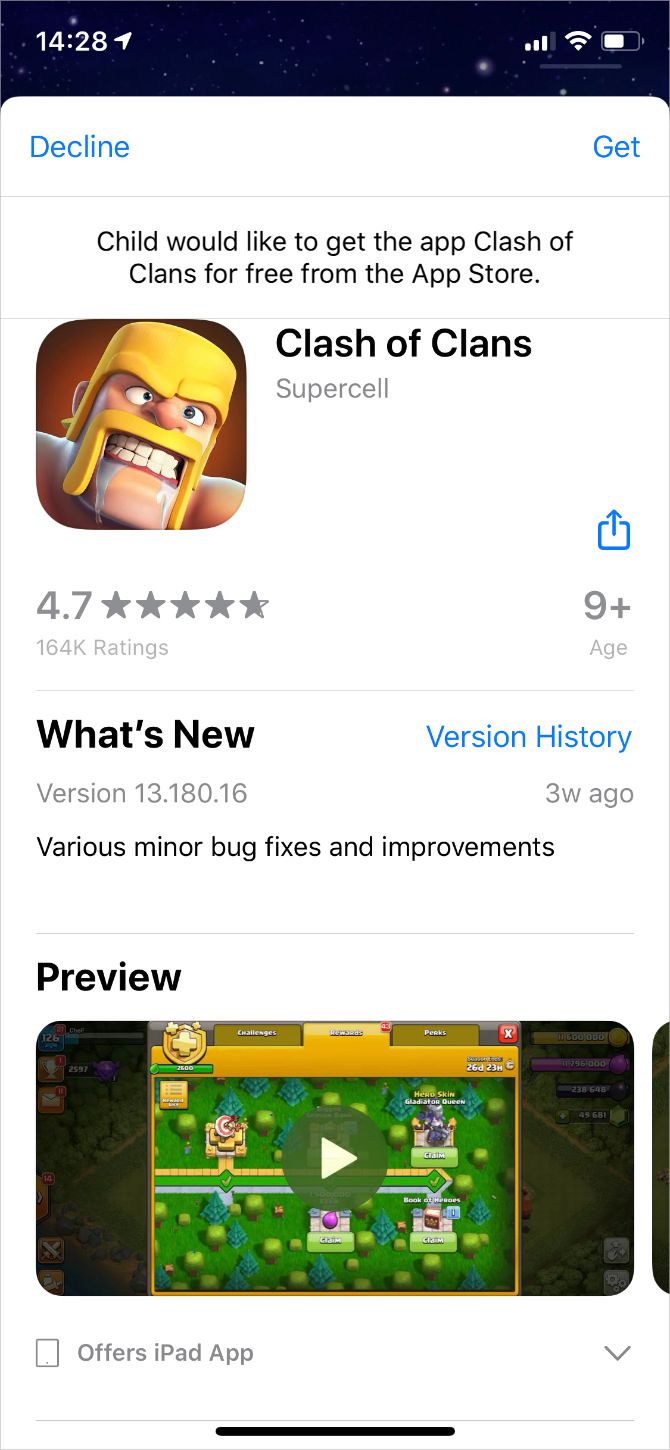
Ask to Buy sends a notification to all your Apple devices whenever your child tries to download content from iTunes or the App Store. You can then tap Get or Decline in this notification to choose whether to let them download the media or not.

This is a good way to avoid unexpected iTunes bills—since any purchases they do make come off the Family Organizer’s payment method. It’s also an easy way to avoid letting your children download apps, songs, movies, TV shows, or books you don’t want them to have, since they need to request permission first.

Ask to Buy applies to free downloads as well as paid purchases. So your child always needs your permission before grabbing a new app.

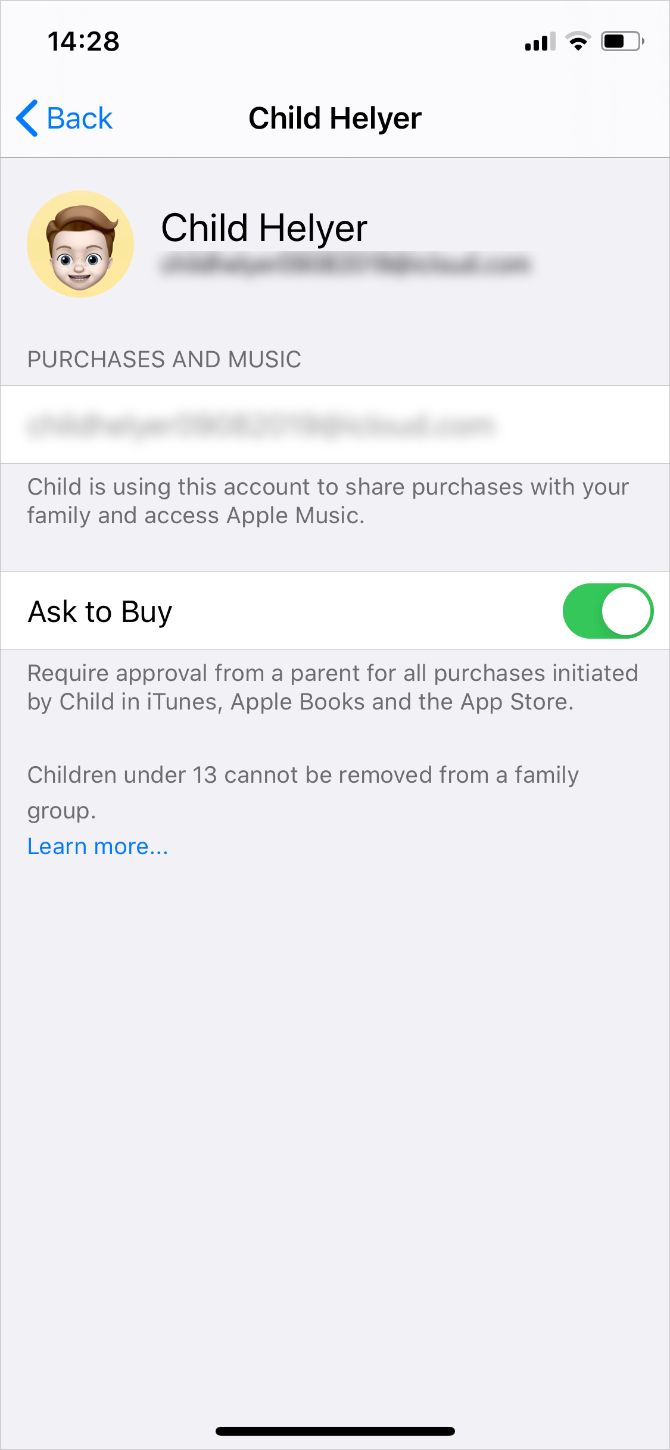
Apple enables Ask to Buy automatically when you create a Child account. But you can also turn it on or off for anyone under 18 in your Family Sharing settings:

  1. Open the Settings app and go to [Your Name] > Family Sharing.
  2. Tap a family member’s name and toggle the Ask to Buy option.
  3. When you receive a request notification, tap it to view the app or media your child wants to download.

Add Gift Card Balance to Your Child’s Account

When you approve purchases for your child, Apple takes payment from the Family Organizer’s primary payment method. If you don’t want this to be the case, you should buy an iTunes or App Store gift card and add that balance to your child’s account.

Any future purchases you approve will come off your child’s Apple ID balance. When it’s all used up, payment reverts to the Family Organizer’s payment method again.

Monitor Your Child’s Screen Time

Screen Time collects a range of data to show how much someone has used their Apple device, along with which apps they spend their time on. With Family Sharing, you can remotely monitor your children’s Screen Time and impose limits to keep them from spending too long on their iPhone or iPad.

To enable Screen Time for your child’s device:

  1. Open Settings on your iPhone or iPad and go to [Your Name] > Family Sharing.
  2. Tap Screen Time, then tap your child’s name and choose to Turn On Screen Time.

When you turn on Screen Time for your child, it prompts you to set Downtime, App Limits, and a Screen Time passcode straight away. You can edit these settings at any time using the Screen Time passcode you create; keep this passcode secret from your child so they can’t edit the settings themselves.

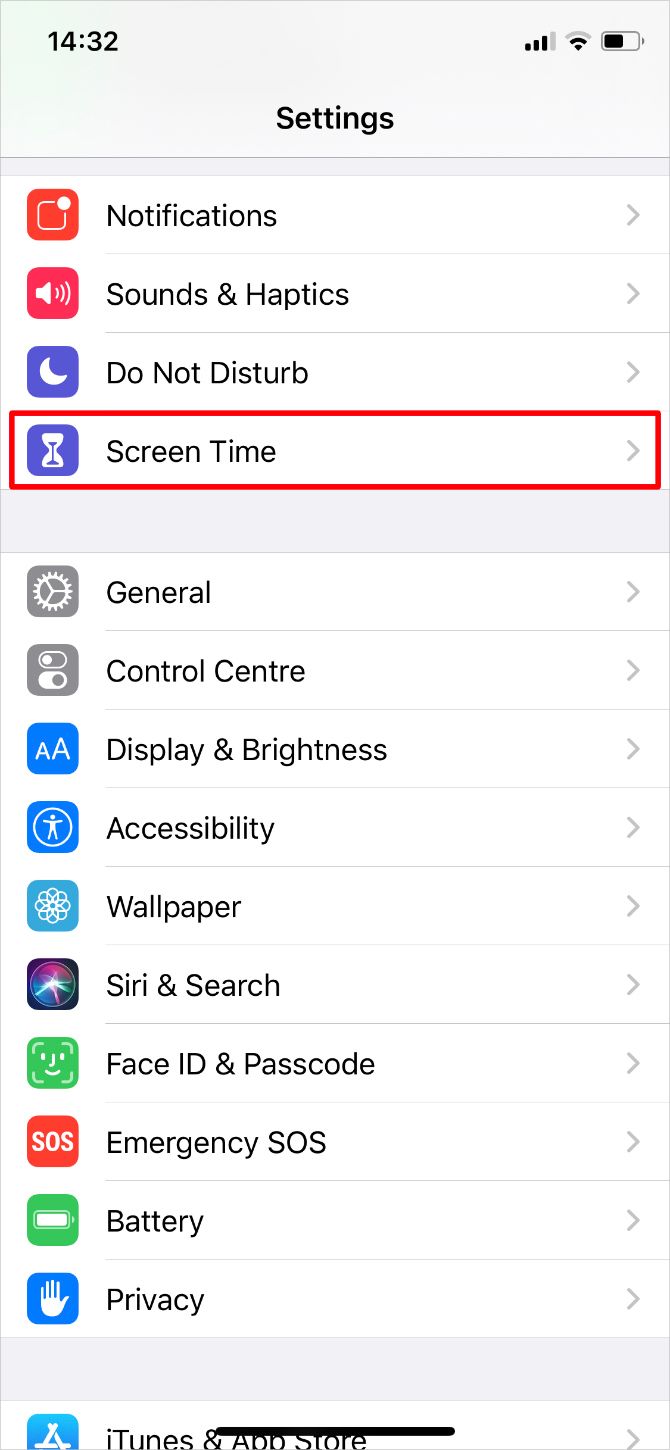
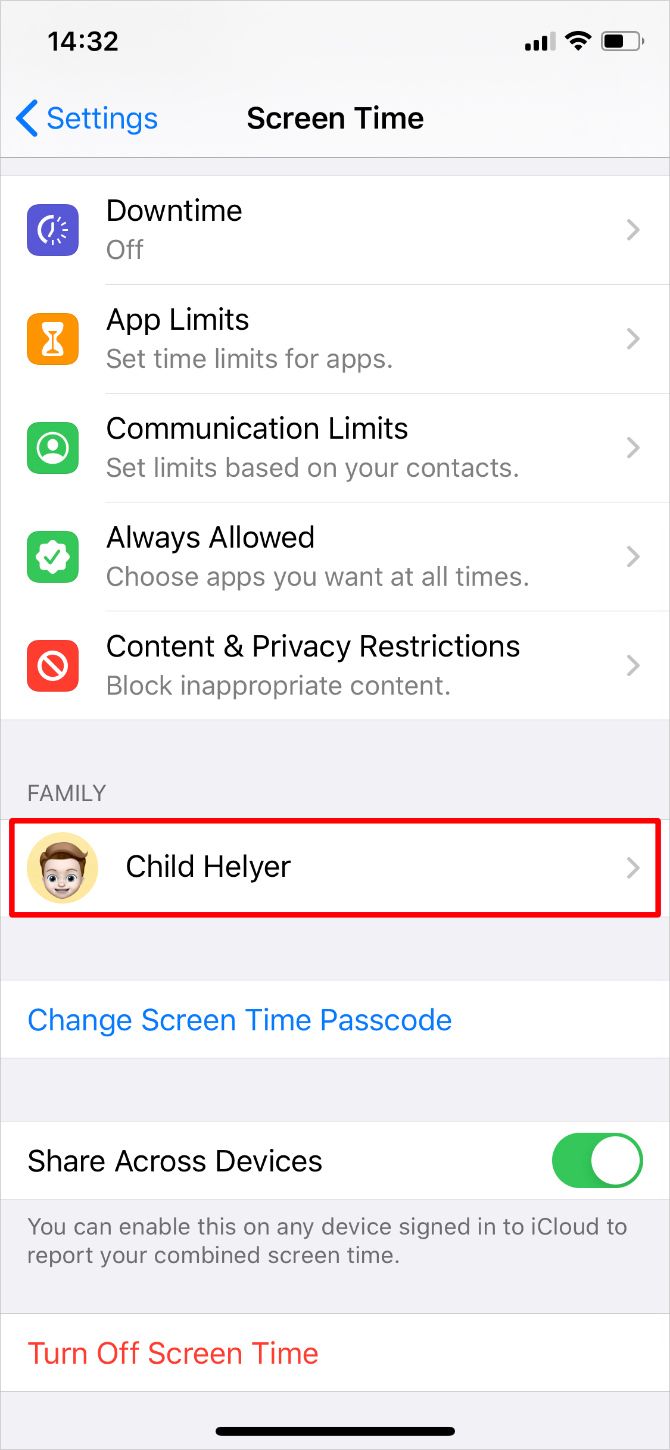
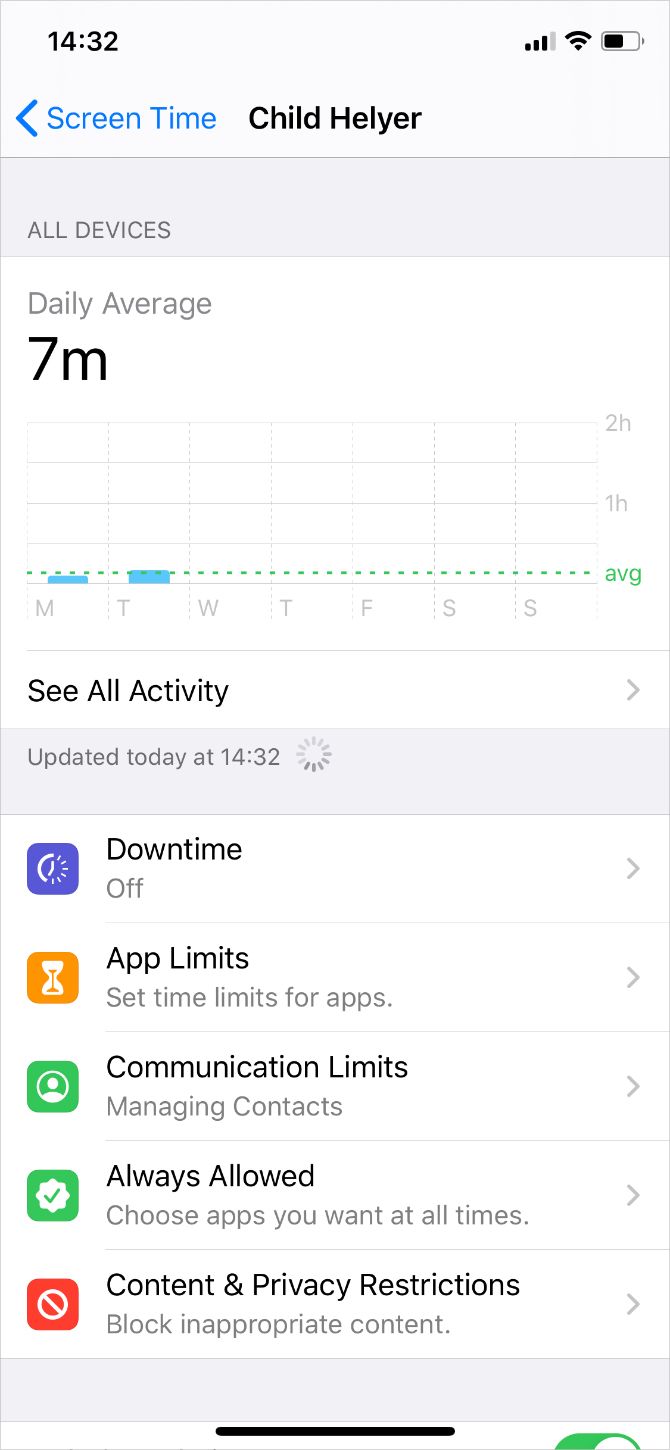
To view your child’s Screen Time usage or edit their settings, open the Settings and go to Screen Time. Then tap your child’s name beneath the Family heading.

You should see a usage report at the top of the screen. Tap See All Activity for a breakdown of how long your child spent on each app or each category of apps. If you enable Include Website Data, you can also see how long they spent on particular websites in Safari.

Take a look at our breakdown of all Screen Time features to see how you can limit your child’s device usage. Your child can also send requests to you for more time when they reach their limits, which you can approve or deny from your own device.

Enable Content & Privacy Restrictions

The best parental controls on an iPhone or iPad are in the Content & Privacy Restrictions, which you can find within the Screen Time settings. Thanks to Family Sharing, you can edit the restrictions on your child’s device remotely.

  1. Go to Settings > Screen Time on your iPhone or iPad.
  2. Beneath the Family section, tap your child’s name to view their Screen Time settings.
  3. Then go to Content & Privacy Restrictions and turn them on using the toggle at the top of the screen.

Most of the Content & Privacy Restrictions are fairly self-explanatory, but we’ve detailed each of the sections below for full clarity.

iTunes & App Store Purchases

Choose whether you want to allow your child to install or delete apps on their device, and if you want to allow them to make in-app purchases. If Ask to Buy is turned on, your child still needs your permission before they can install or purchase anything.

If you allow your child to install apps without using Ask to Buy, you should make sure iTunes and App Store purchases Always Require an Apple ID password. Otherwise, your child can download media themselves for a short period after you enter the password.

iTunes & App Store purchases snippet

Allowed Apps

With this setting, you can choose to make iPhone or iPad apps disappear from your child’s device entirely. To do so, turn off the button next to the app you don’t want to allow. This is a great way to avoid all temptation and protect your child from potentially harmful apps.

Allowed apps snippet in Content & Privacy Restrictions

Content Restrictions

Regardless of your child’s actual age, you can choose the age ratings and content restrictions for iTunes, the App Store, web content, Siri, and Game Center. It might take a while to work through each of these options, but you can configure them however you feel comfortable.

Content Restrictions snippet

Privacy

This option can be misleading. Choosing to allow Share My Location lets your child make changes to their location settings. If you choose not to allow Share My Location, then your child can’t make changes to their location settings.

Keep in mind that choosing not to allow Share My Location doesn’t turn off Location Sharing on your child’s device. It only stops your child from being able to change those settings on their own.

Privacy Share My Location option in Content & Privacy Restrictions

Allow Changes

The Allow Changes section lets you lock particular settings on your child’s device, such as the passcode, accounts, and mobile data settings. You might want to set these options to Don’t Allow to keep your child from logging out of their Child account and creating an adult’s account to use instead.

Allow Changes settings in Content & Privacy Restrictions

Track Your Child’s Location

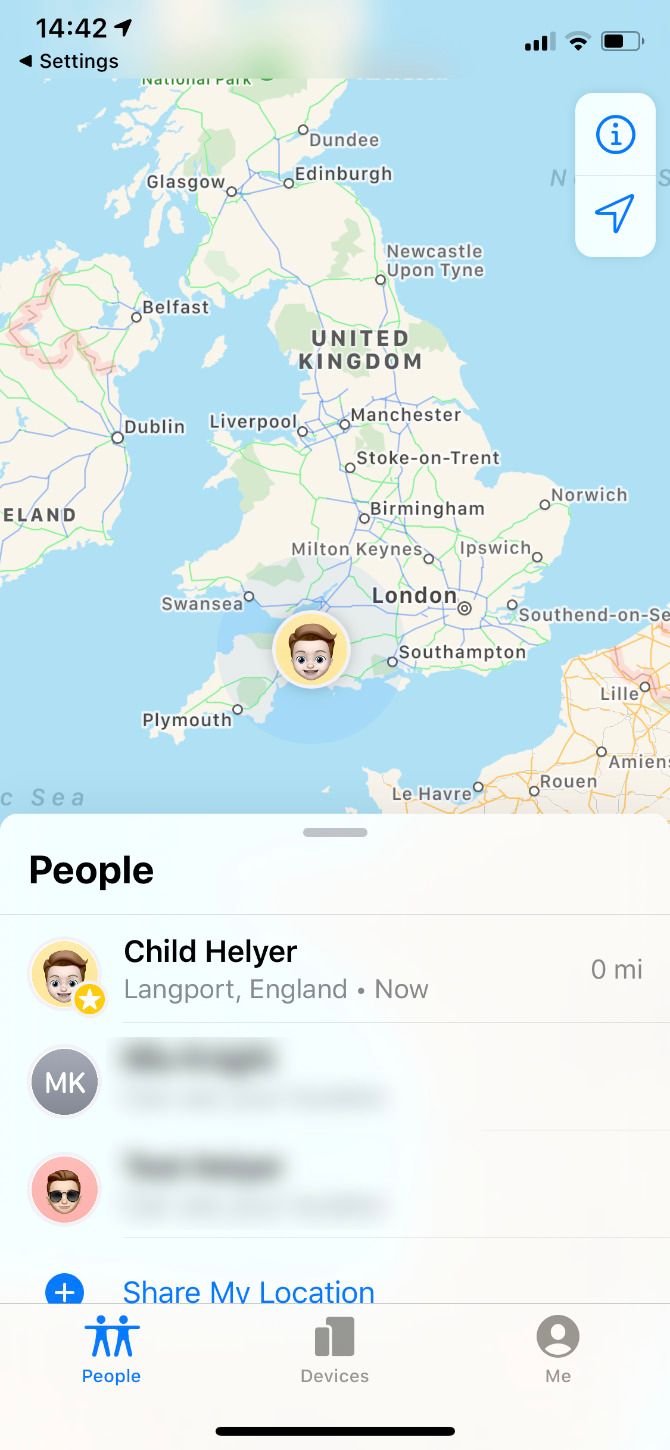
Keep tabs on your children’s whereabouts with the Location Sharing option in Family Sharing. If your child’s device is set up to share its location with you, then you can always find out where they are using the Find My app.

This time, it’s easiest to set up Location Sharing directly on your child’s device:

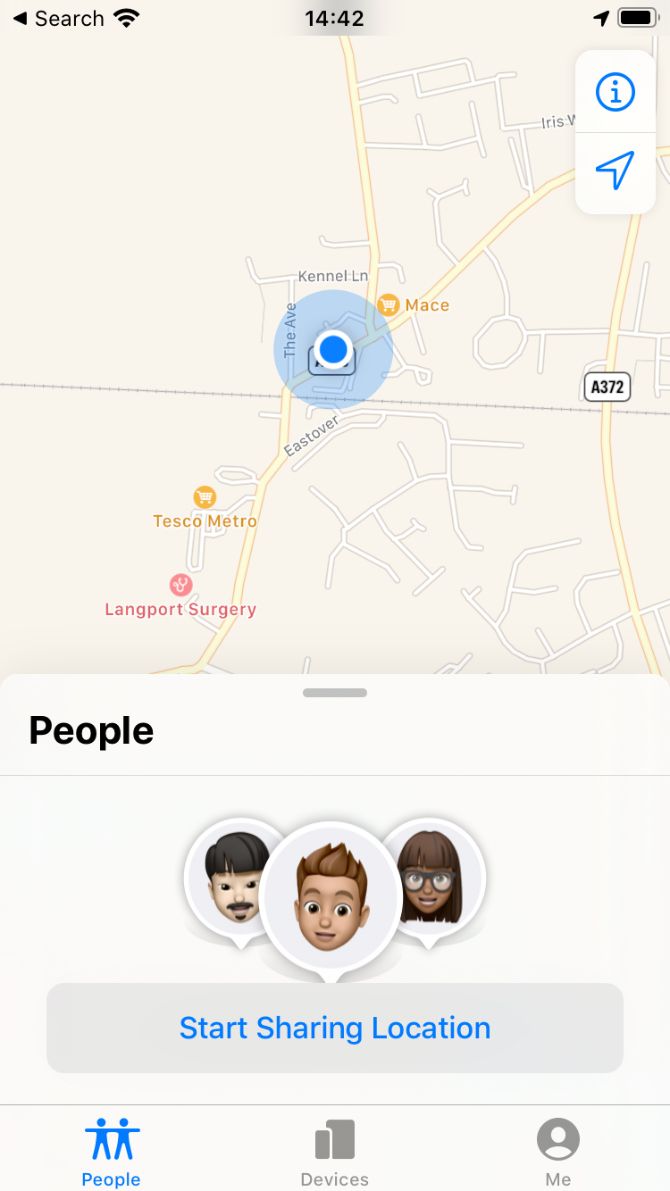
  1. Open the Find My app on your child’s iPhone or iPad and go to the People tab.
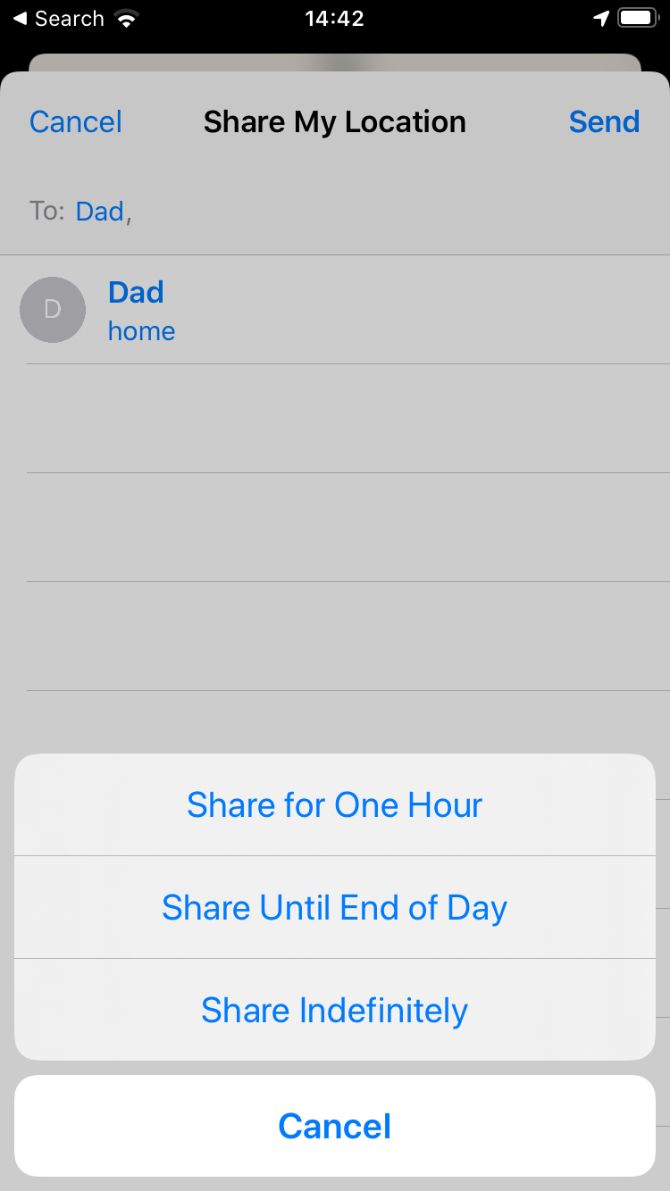
  2. Tap Share My Location and enter your Apple ID account to send an invitation to yourself. Choose to Share Indefinitely.
  3. You should now be able to see your child’s location in the Find My app on your own device. You can choose to share your location with them if you wish to.

To keep your child from hiding their location in the future, return to the Content & Privacy Restrictions above and choose Don’t Allow for the Share My Location option. This stops your child from editing the Location Sharing settings on their device.

Set Up Parental Controls on All Your Children’s Devices

Apple makes it particularly easy to edit your child’s parental controls using Family Sharing from your own device. But every company offers its own way of managing these settings, and they aren’t always easy to find.

Take a look at our complete guide to parental controls to find out how to enforce necessary restrictions across all your children’s devices.

Read the full article: How to Use Family Sharing to Monitor Your Child’s iPhone


Read Full Article

How to Create and Boot From a Linux USB Drive on Mac


Linux has long been synonymous with bootable flash drives, whether it’s to fix some sort of problem with your primary operating system, or for trying various distros.
There are a few ways to create an Ubuntu (or other Linux) bootable USB drive for Mac. You can go the freeware route for an easy option, or put a little bit of time into creating the drive yourself using Terminal. Let’s look at both methods.

First: Prepare Your USB Drive

When you’re looking to create a bootable Linux USB drive on a Mac, the first step is to make sure you’ve got the right USB drive for the job, and that it’s formatted correctly to avoid any problems.

Some Linux variants may require larger volumes, so pay attention to the requirements when downloading. Generally speaking, anything above 4GB will do the job. Others don’t have any strict requirements, but formatting to FAT beforehand is a good idea regardless.

Warning: Everything on your drive will be erased when you do this!

  1. Insert your USB drive into your Mac and launch Disk Utility (under Applications > Utilities, or search for it using Spotlight with Cmd + Space).
  2. Select your USB device in the menu on the left, then click Erase.
  3. Give it a name and choose MS-DOS (FAT) under Format and GUID Partition Map under Scheme.
  4. Hit Erase to apply the changes. If it fails, try again—sometimes the system doesn’t unmount the volume in time and the process will be unable to complete.

Mac Disk Utility format

If you have persistent problems, try another USB drive. Now download a Linux distro to install on your USB stick, and you’re ready to get started.

Make a Bootable Linux USB Drive With Etcher

balenaEtcher is a free open source tool for burning disc images onto USB and SD drives. It makes creating bootable devices completely foolproof:

  1. Grab your desired Linux image, then download Etcher and install it.
  2. Insert your USB stick, then launch Etcher.
  3. Click Select image and find the Linux image you downloaded—Etcher supports IMG, ISO, and ZIP, among others.
  4. Ensure the correct USB device is selected—hit Change to see a list of connected devices.
  5. Finalize the process by clicking Flash and wait for the process to complete.

etcher bootable linux usb drive

You’ll likely see an error message warning that your USB drive isn’t compatible with your Mac. That’s normal—simply eject and go. Your bootable Linux USB drive is now ready; you can now skip to the Booting Your USB Drive section below.

Create a Live USB Using the Terminal

If for some reason you don’t want to use Etcher (maybe you’re on an incompatible version of macOS), you can accomplish this task using the command line. It’s possible using Terminal, your Mac’s built-in command line interface.

While this method requires a little more thought and patience, it’s actually pretty straightforward. You might even learn something new, plus you’ll feel smart afterwards. Assuming you’ve formatted your drive per the earlier instructions, here’s how it works:

1. Convert Your ISO

Launch Terminal and take note of where your Linux disc image is stored in Finder. Convert your image (usually an ISO) to an IMG file using the hdiutil convert command:

hdiutil convert [/path/to/downloaded.iso] -format UDRW -o [/path/to/newimage]

Replace [/path/to/downloaded.iso] with the location of your own ISO (you can drag and drop directly into the Terminal window if you want) and [/path/to/newimage] to wherever you want the new image file to be created.

convert iso to dmg

Note: Modern versions of macOS will automatically create a .DMG file. If your version doesn’t do this, try appending IMG to the end of your new image file name, such as [/path/to/newimage.img]

2. Write the Image to USB

Next, you’ll need to identify your drive’s mounted location so you can tell the Mac which drive to use. With Terminal open, use the following command to list all connected drives:

diskutil list

set up external drive

You’ll likely be able to identify the drive by its name, format, and size using a process of elimination. Take a note of the listing under the IDENTIFIER column, then unmount the drive using the following command:

diskutil unmountDisk /dev/[diskX]

You’ll need to replace [diskX] with the corresponding number, like disk3—if successful, Terminal will report that the disk was unmounted. If you’re having trouble unmounting a drive, you can launch Disk Utility, right-click on a drive, then choose Unmount (don’t eject the drive, though).

unmount drive mac

The final step is to write the image to your USB stick, using the dd command:

sudo dd if=[/path/to/newimage.dmg] of=/dev/[diskN] bs=1m

Replace [/path/to/newimage.dmg] with the path to the file created in the first step (again, drag and drop works best), and [diskN] with the location identified earlier. You’ll need to authorize with your administrator password immediately afterwards, since you used the sudo command.

install linux on usb drive mac

You’re now done, and your drive is ready for booting.

Booting Your USB Drive

Assuming all went well, you’ll now have a USB drive that will let you boot into Linux. Plug it into the Mac you want to use it on, then shut down the computer.

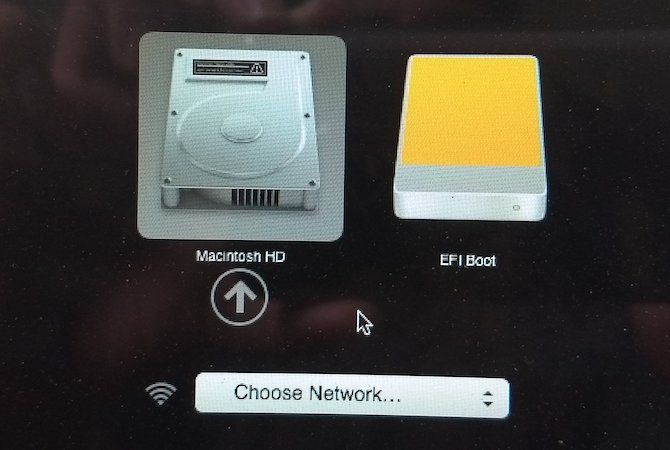
In order to access your Mac’s boot menu, you’ll need to hold the Option (Alt) key while it boots. The best way to do this is to shut down, hold the Option key, start your Mac, and wait. If you did it correctly, you’ll see a few options including your built-in hard drive and the USB device created earlier, titled EFI Boot.

Mac choose boot disk

To boot into Linux, select the USB device and click the arrow (or double-click it). Depending on what you’re using, you may get another menu which acts as a bootloader for your particular flavor of Linux.

Linux boot menu

If you have problems, or your USB drive won’t show up, try running the process again, using an alternative method above, running off a different USB stick or port, or consulting your respective distro’s help documentation.

The Best Way to Try Linux on Your Mac

Assuming all went well, you now have Linux running on your Mac and you can test it out or install it outright if you’re tired of macOS. You still have an Apple recovery partition which is accessible by holding Cmd + R while your machine boots. This can help you reinstall macOS (or apply other fixes) if you decide to go back.

Ubuntu running on a MacBook Air

There are other tools that claim to help you do this, but not all of them work, and some cost money. Unetbootin is still a popular choice for Linux and Windows users, but is not as good as Etcher on a Mac (and has some issues on newer versions of macOS).

There’s also our old favorite Mac Linux USB Loader, which is open source and actively maintained. It’ll cost you $5 for a pre-compiled binary, assuming you don’t want to download Xcode and compile it yourself. This low entry fee helps keep the project maintained, but it’s hard to justify paying for something when there are perfectly good free alternatives.

For more, check out how to install macOS from a USB flash drive. And if you’d prefer to install Linux on your internal drive, our guide on how to dual-boot Linux on your Mac is your essential next read.

Read the full article: How to Create and Boot From a Linux USB Drive on Mac