Got 100% disk usage in Windows 10? So your computer is hanging and freezing. Same old Windows, right? Except you’re using a brand-new Windows 10 device; you’ve only had it a few days. So just what is going on?
Investigating, you discover that your system drive is running at 100%. Surely this can’t be, right? Sadly, it is. The latest versions of Windows have a problem with the drives being overworked, which slows down the operating system. This issue affects both hard disk drives (HDDs) and solid-state drives (SSDs).
Several fixes are available for this. But first, you need to trace the problem.
100% Disk Usage in Windows 10: Fixed!
When the error was first discovered, only a few culprits were found. But as time passes, despite the 100% disk usage error being reported to Microsoft, more causes of this bug are discovered, not fewer.
- Check disk performance with chkdisk
- Check your anti-virus software
- Disable Windows search
- Disable SysMain service
- Time to disable Flash
- Change web browser
- Check Skype impact on disk usage
- Fix the PCI-Express firmware bug
- Stop Steam maxing out your PC
- Check diagnostic tracking
- Is Windows Update causing 100% disk usage?
- Reset your Virtual Memory
- Enable High Performance mode
- Install the latest SATA drivers
- Replace your PC’s power supply
Click the link above for each possible cause of the bug to see how to fix it.
Once you’ve established that there is a problem, you have several options available. Check the following steps one at a time, checking the disk usage in the Task Manager after each.
Note that even if you find a solution, a Windows Update could reset the changes you’ve made. Bookmarking this page will help you find it in the future and run through the fixes again.
1. Slow Performance? Run Disk Check
This performance issue is most obvious when attempting to use Windows Search to find a file or program, and anything else that requires the drive to do some work (perhaps copying and pasting a group of files).
To establish whether it is a problem that is affecting you, when your computer next slows down press Ctrl+Alt+Del and select Task Manager.
(Alternatively, right-click the Taskbar and select Task Manager.) Note that this may take some time to open with the drive being under strain.
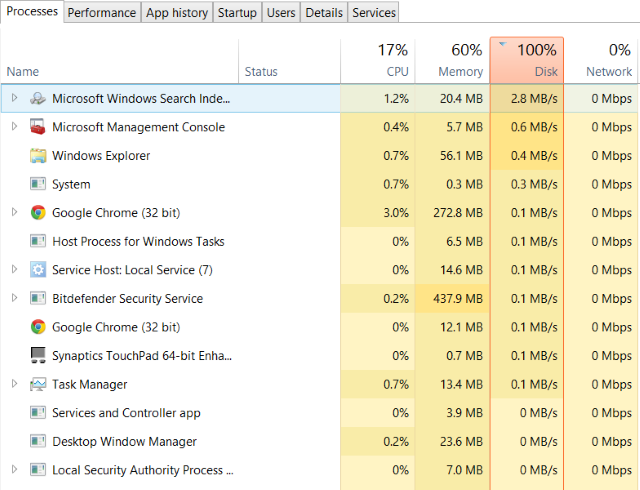
On the first tab, Processes, look for the Disk column. If you’re having problems with drive performance, this should be at 100%, and shaded red to indicate whether you have a problem or not.
Problematic sectors on your HDD can cause the 100% disk usage issue in Windows 10. However, using Windows’ built-in disk check can fix this.
Open Windows Explorer and select This PC, then identify your hard drive. Right-click on C: and select Properties. Here, find the Tools tab, and under Error checking click on Check.
In the resulting window, click Scan drive. Wait while the system scans the drive; a reboot may be required for a full disk repair. This should deal with the error.
2. Update Your Anti-Virus if Windows 10 Disk Is Running at 100%
As with any such performance issue, the first thing to do is confirm that your computer hasn’t been infected with malware. Your security software should be able to deal with this, whether it’s a free app or a paid suite.
At the very least, tools such as Malwarebytes Anti-Malware should be able to scan your system drive and detect any problems, although with a heavy load on your drive already this may take a while.
If threats are found, use the software’s recommendations to discard them and reboot. Next, check your drive’s performance further. Hopefully, you’ve resolved the issue; if not, then malware wasn’t to blame, so read on.
3. Disable Windows Search for Improved Disk Performance
The next thing to check is whether the 100% disk usage error has anything to do with Windows Search.
A bug in Windows 10 results in a “search loop” that causes an increased load on the system drive.
To stop this and prevent it from happening during your current session (until Windows is rebooted) open Windows PowerShell (Admin). You’ll find this by right clicking the Windows 10 Start menu.
Enter:
net.exe stop "Windows search"To permanently disable Windows Search or Indexing, press WIN+R, enter services.msc, and hit Enter. In the Services window that opens find the Windows Search entry and double-click it to open the Windows Search Properties window.

Under Startup type, select Disabled. Here you can click Stop to abort the service. Click OK to save your changes.
A few moments after disabling Windows Search, your Windows 10 performance should improve considerably. If not, move on…
4. Disable SysMain to Fix 100% Disk Usage in Windows 10
Another Windows 10 feature identified as a potential cause of the 100% disk usage issue is the superfetch service. Since Windows 10 1809 (the 2018 Windows 10 October Update) this has been renamed to “SysMain.”
To prevent this service from causing the disk usage issue, open another Windows PowerShell (Admin) and enter:
net.exe stop sysmain
Again, wait a few moments to check whether this has had any effect on your computer’s performance. You should also run Check Disk:
chkdsk.exe /f /rYou’ll be informed that your PC must be rebooted for Check Disk to complete, so make sure you have closed all your applications first.
If this doesn’t work, it is likely that you’re experiencing a frustrating iteration of this issue that is simple to resolve.
5. Is Flash Causing the 100% Disk Usage Bug?
Flash remains one of the most vulnerable aspects of modern computing and should be disabled. Adobe plans to kill off its multimedia plugin in 2020, so there’s little reason to keep using it.
Flash also seems to be one of the most common culprits for the 100% hard disk usage in Windows 10 if you’re using the Google Chrome browser.
Open Menu > Settings > Privacy and security and click the section marked Site Settings. Here, find Flash and set the toggle to Block sites from running Flash, then click Back.

Restart the browser and check your HDD performance.
6. Disk Usage at 100%? Switch Web Browsers
It may not be Flash that is impacting on your browser performance.
Another cause could be the browser itself, particularly if you’re using Google Chrome.
The obvious option is to choose a different browser. Windows 10 already has two browsers built in. You probably don’t want to use Internet Explorer, but Microsoft Edge is an adequate replacement for Chrome.
Several browsers are available, some better than others. See our guide to the best web browsers for Windows to find an alternative.
7. Is Skype Eating Disk Resources?
Another widely-used application could also be causing your 100% HDD usage: Skype.
To find out—and disable its OTT resource requirement, begin by checking that the software is not running. You can do this by looking in the Task Manager, or checking the System Tray, the area on your desktop around the clock. If Skype is running here, right-click the icon and select Quit.
Next, press WIN+R and paste this address into the box:
C:\Program Files (x86)\Skype\Phone\Click OK to find the Skype.exe file and right-click this and select Properties. In the Security tab click Edit, then select ALL APPLICATION PACKAGES.
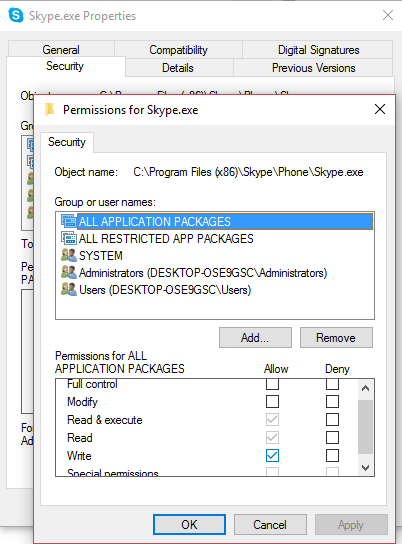
Put a check next to Write in the Allow column and finish off by clicking Apply, then OK. Head back to the Task Manager to see the change. You may also consider finding a Skype alternative.
No difference? Keep reading…
8. Resolve PCI-Express Firmware Bug
Some drivers don’t run quite as they should in Windows 10. One that has been discovered to be causing 100% HDD use is the StorAHCI.sys driver, which has a firmware bug. StorAHCI.sys intended for storage devices connected to the PC or laptop motherboard via Advanced Host Controller Interface PCI-Express.
If you’ve made it this far with no success, this could be the problem.
Open the Device Manager (use Windows 10 search, or right-click This PC in Windows Explorer, then Properties > Device Manager) and expand IDE ATA/ATAPI Controllers. If an AHCI Controller entry is listed, double-click, then open the Driver tab and select Driver Details.
Is the driver listed as C:\Windows\system32\DRIVERS\storahci.sys? If so, you could be affected by this bug.
Close the driver details box and switch to the Details tab, selecting Device instance path from the drop-down menu. Where the Value is listed, right-click, and select Copy. Launch your text editor (like Notepad) and Paste the contents in.
Next, press WIN+R and type regedit, followed by the OK button. Navigate to this address: HKEY_LOCAL_MACHINE\System\CurrentControlSet\Enum\PCI\ and use the pasted string above to open the correct AHCI Controller, followed by the random number.
Here, expand Device Parameters\Interrupt Management\MessageSignaledInterruptProperties and you should see MSISupported listed in the right-hand pane. Double-click this, then change the Value data: to 0. Click OK to confirm and follow the instructions to restart Windows.
9. Is Steam Maxing Out Your HDD?
Enjoy gaming and have Steam installed? There’s a good chance this digital delivery system is causing 100% disk usage.
Usually this is due to update delivery, causing the background downloader to get caught in a loop. Clear the Steam cache to fix this.
First, make sure you have exited Steam. Where Steam is a likely cause of the 100% disk usage error, it may hang when you try to exit. In this case, use the Windows 10 Task Manager to close the software.
Next, open the WIN+R run box and enter
steam://flushconfigYou’ll see a dialogue box, informing you that content will be deleted.

Click OK to proceed.
Note that games and saves will be retained, so there is no risk of them being deleted.
10. Disable Diagnostic Tracking in Windows 10
Finally, it’s worth considering the impact of diagnostic tracking in Windows 10. A feature that you might have otherwise disabled for privacy reasons, it has been blamed for 100% HDD use on many PCs.
When it comes to reducing your hard disk drive usage, it’s quicker to simply disable the DiagTrack service. If this is the source of the 100% disk usage error in Windows 10, you can stop the service launching.
However, to do this you’ll need to access Command Prompt in administrator mode.
Do this by clicking Start and typing cmd in the search box. Wait for the results and right-click Command Prompt, selecting Run as administrator.
Input these commands to disable and stop DiagTrack:
sc config "DiagTrack" start= disabled

sc stop "DiagTrack"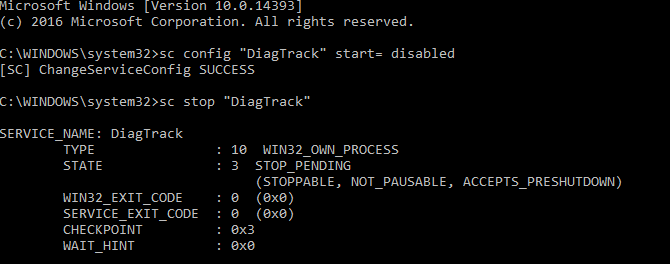
In addition, you might also head to Settings > System > Notification & actions and disable Get tips, tricks and suggestions as you use Windows. Doing so has been shown to improve things.
11. Windows Update Can Cause 100% Disk Usage
As well as affecting changes you make to your PC when fixing the 100% disk use problem, Windows Update can also be a cause.
This usually only happens when Windows Update has a problem (which is typically due to a file refusing to download). You have two options here:
- Leave your computer alone—shut all your open applications and wait. Eventually, the files will download, but depending on how Windows Update is scheduled on your computer, it may require a reboot.
- Shutdown your computer—once you’ve done that, restart and wait for Windows Update to resolve the problem.
Once the update has finished downloading, it’s wise to run it as soon as possible. Remember to check any previous fixes for 100% disk usage before proceeding; as noted above, Windows Update can reverse these fixes.
12. Reset Your Virtual Memory
Virtual memory is a combination of RAM and hard disk space and can be responsible for overuse of your HDD. If there isn’t enough RAM to perform a task, the HDD is used to supplement the RAM. Data moved to the HDD is then returned to RAM when required.
If you’ve made it this far and you’ve yet to solve the 100% disk usage issue, it could be worth resetting your virtual memory.
Open the System screen with Windows+Break/Pause, then Advanced System Settings on the left. In the resulting box, select the Advanced tab, then under Performance click Settings.
Here you’ll find another Advanced tab, which has a section labeled Virtual memory. Click Change and clear the checkbox for Automatically manage paging file size for all drives.
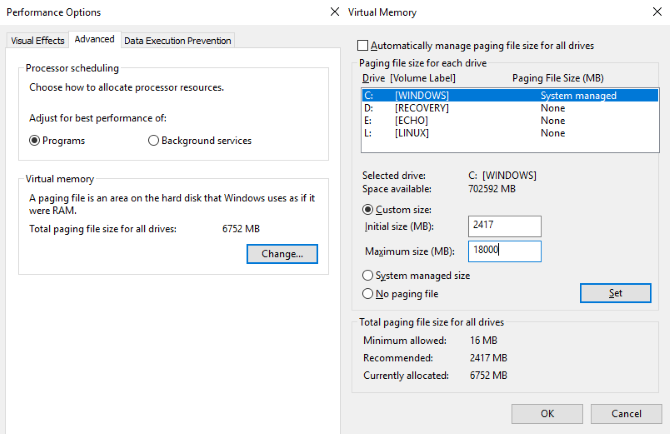
Staying on this screen, select your Windows drive (usually C:) and then Custom size. Here, add an Initial size and a Maximum size; note both are measured in MB rather than GB.
These numbers can be confusing, so with the first value, rely on the recommended option. For the maximum value, aim for a figure no more than 1.5 times your system RAM.
For instance, a computer with 4GB of RAM should have no more than 6.5GB (6144MB).
With the values input, click Set, then OK to continue. You now need to clear the temporary files that have been used in the previous virtual memory allocation.
Do this by opening the Run box (WIN+R) then entering “temp”. When the temp directory opens, select all files (Ctrl+A) and tap Delete on your keyboard.
13. Activate High Performance Mode
One final thing to try is altering your Windows power settings. Standard power modes are more prone to the 100% disk usage bug but switching to high performance often overcomes the problem.
The downside, of course, is that your computer will use more power. Thanks to modern processor design this shouldn’t be a massive issue. However, notebooks and desktop replacement laptops may take a hit on battery life.
To change to high performance, open the Power & sleep screen with WIN+X > Power Options.
Here, click Additional power settings, select High performance, then OK.
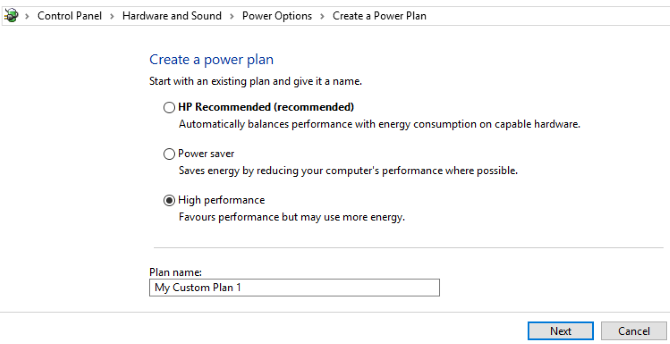
If this isn’t a displayed option, you’ll need to create your own custom power plan. Click Create a power plan, then choose High performance. Give the plan a name, tweak any personal settings you need then select it as a power plan to use.
In a moment or two, the 100% disk usage issue should drop down to less than 10%.
14. Install the Latest SATA Drivers
Could a storage device driver be resulting in the 100% disk usage error?
Your Windows 10 computer almost certainly uses SATA connections for hard drives, SSDs, and optical drives. If the drivers aren’t up to date, the disk usage error can occur.
Avoid this by upgrading to the latest SATA drivers.
Open the Power User menu with WIN+X and select Device Manager. From here, expand Storage controllers, then identify the correct controller for your SATA devices. If you can’t do this, don’t worry—simply update both.
To update, right-click on each controller and select Update driver.

Select the Browse my computer for driver software option, then Let me pick from a list of available drivers on my computer. Here, choose Standard AHCI Controller and see how this impacts performance.
You may need to reboot Windows for this to take effect. Note that if it doesn’t work, you can still try this by checking the manufacturer’s website for a new driver. This can be installed using the instructions that accompany it.
15. Replace Your PC’s Power Supply (PSU)

There is a chance that your computer’s hardware is causing the 100% disk usage issue in Windows: specifically, the PSU.
If disk usage issues can be attributed to excessive disk activity, then it follows there might be a power-related cause.
100% disk usage has been spotted on Windows 10 laptops running on the battery. Once plugged into the power adaptor, the issue resolves. Similarly, the problem has been shown to alleviate once a new PSU is installed in a desktop PC.
Check our guide to new PC power supply units to help you choose a replacement.
Disk Usage Should Rarely Be 100%
Put simply, there is little reason for your disk load to be anything close to 100%, certainly not under normal usage. A slow computer is one with a problem, and if you cannot fix it by disabling a browser plugin, stopping services, or running your antivirus software, then the problem may well be hardware related.
Perhaps your drive is getting old; it may be defective, or the cables may need replacing. Alternatively, there is a chance that the problem is connected to the Windows defrag tool.
If your computer is attempting to defrag your drive, but your HDD is actually an SSD, then serious problems can occur. Deal with this by opening the Task Scheduler (WIN+Q, enter “task scheduler”) and disable any scheduled disk defrag tasks.
Try these fixes the next time your Windows computer slows down. Be sure to check your Windows Experience Index periodically to identify performance issues in need of immediate resolution. And add these fixes to your skillset for solving annoying Windows issues.
Read the full article: 100% Disk Usage in Windows 10 Fixed With 15 Tricks
Read Full Article
No comments:
Post a Comment