
System Restore is a key computer recovery tool. If you’re experiencing a problem with your Windows computer, System Restore can help you roll back system files, program files, and registry information to a previous state. If these files have been corrupted or damaged, System Restore will replace them with good ones, solving your problem.
System Restore is an excellent tool for many of those unexpected issues. But what about those times when System Restore itself throws up an error message or doesn’t actually fix anything? With a little prior planning, you can ensure System Restore will always have your back in times of need.
1. Try an Alternative System Restore Point
First, try another System Restore point. Something may have corrupted the default restore point during the store process and, as such, won’t boot. Using an alternative point works for a wide range of restore issues.
Type recovery in the Start Menu search bar and select the best match. Select Open System Restore. As you can see in the image below, I only have one System Restore point, meaning I could run into some trouble if this one throws up any issues.

However, if your System Restore window has more than one point to choose from, select one before the most recent. You may have to click Show more restore points (not shown above) to see all of your backups. After selecting a restore point, press Next, and follow the on-screen instructions.
Ideally, this will solve your problem. However, if you see an error message, or if System Restore performs a restore operation that doesn’t solve your problem, please continue reading the next section.
2. Run System Restore From Safe Mode
Your first port of call should be Safe Mode. Safe Mode is a lifesaver in many situations. Unlike the regular boot process, Safe Mode loads a limited range of drivers and files. Problems encountered while running System Restore are usually alleviated by trying again in Safe Mode.
Booting Into Safe Mode in Windows 8, 8.1, and 10
First, we need to boot into Safe Mode on Windows 10. There are three easy ways to do this:
- Head to Settings > Update & security > Recovery. Under Advanced start-up, select Restart now. This will reboot your system into the Advanced Start-up settings menu. From there, select Troubleshoot > Advanced options > Startup Settings > Restart. On restart, you’ll see a list of options. Select 4 or F4 to boot your PC into Safe Mode (choose 5 or F5 for Safe Mode with Networking).
- Press Windows Key + R to open Run. Type msconfig and press Enter. Open the Boot tab. Check the box alongside Safe Mode. If you require Networking, select it from beneath. Once you hit Apply, and close the System Configuration window, you’ll receive a prompt to Restart your system. (Note that your system will continually boot into Safe Mode unless you uncheck the System Configuration option. Repeat the same process within Safe Mode once you’re sure you’ve fixed the issue.)
- Restart your PC. Press F8 during the boot process to enter Safe Mode. This is a tried and tested method. However, if you use Windows Fast Startup feature, spamming F8 will not work.
Once you’re in Safe Mode, go ahead and type recovery into the Start Menu search bar. Select Recovery from the list, then Open System Restore from the Advanced recovery tools menu.
Booting Into Safe Mode in Windows 7
The Windows 7 Safe Mode boot process is very similar to the latest version of the operating system. That is, with some slight differences.
- Press Windows Key + R to open Run. Type msconfig and press Enter. Open the Boot tab. Check the box alongside Safe Mode. If you require Networking, select it from beneath. Once you hit Apply and close the System Configuration window, you’ll receive a prompt to Restart your system. (Note that your system will continually boot into Safe Mode unless you uncheck the System Configuration option. Repeat the same process within Safe Mode once you’re sure you’ve fixed the issue.)
- Restart your PC. Press F8 during the boot process to open the Windows Advanced Boot Options menu. Select Safe Mode or an alternative Safe Mode configuration such as with Networking or with Command Prompt.
After Booting Into Safe Mode
If System Restore works in Safe Mode, it is a clear indicator that something, likely a program or service, is impeding it during a regular boot. Antivirus settings can at times cause System Restore to misbehave (for instance, Norton’s Product Tamper Protection is a well-known culprit).
Alternatively, a virus or malware infection could be creating an issue. In this case, you’ll need to scan your system using an up-to-date antivirus program.
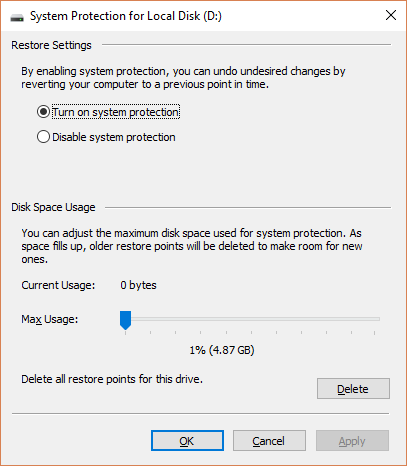
3. Configure System Restore Disk Space Usage
If you still cannot get System Restore to run properly, try adjusting the hard disk space allocation. It might have run out without informing you (a classic Windows move).
I would recommend allocating at least 4 GB. Some will say that is overkill. However, I would contend that each major Windows 10 update weighs in at around 4 GB (major update in this case meaning the October 2018 Update, rather than the regular cumulative updates). On the other hand, you might not want System Restore to take up too much space, especially if you’re already limited.
Configuring Disk Space in Windows 8, 8.1, and 10
Let’s check what is going on with your System Restore allocation. Type system protection into the Start Menu search bar, and select Create a system restore point. Select Configure. Check your Disk Space Usage, and increase if it is less than or equal to 300 MB.
Configuring Disk Space in Windows 7
Windows 7 takes us on a slightly longer route. Open your Start Menu, right-click Computer and select Properties. Select System Properties from the left-hand column. Under Protection Settings, select Configure.

Check your current restore point storage allocation. Windows 7 doesn’t need as much disk space as Windows 8, 8.1, or 10. But if you have the space to spare, as many modern hard drives do, consider increasing from the default 3 percent to over 5 percent.
Clearing Out Old System Restore Points
You can delete old System Restore points. Ultimately, System Restore updates your System Restore points as it goes, replacing the oldest one each time. (This is why some people allocate lots of space to System Restore.) That said, if you do want to delete your System Restore points, I’ll show you how to do it without wrecking everything.
Windows 8, 8.1, and 10 users should type disk clean into the Start Menu search bar. Right-click the best match, and select Run as administrator. Select C: as the drive you’d like to clean, then press OK. Disk Clean-up will calculate the amount of space available for cleaning.
Open the More Options tab. Under System Restore and Shadow Copies, select Clean-up. You’ll meet the following message:

Press Delete if you want to proceed. This method keeps your last System Restore point in place, whereas hitting Delete on the System Protection panel will eliminate all of them.
Windows 7 users should type disk clean into the Start Menu search bar and select the first option. In the Disk Cleanup panel, select Clean up system files. This adds a new More Options tab (after a moment or two). Select Clean up… under System Restore and Shadow Copies.

This will delete all but your last System Restore point. Press Delete if you’d like to proceed.
4. Ensure System Restore Points Are Being Created
This won’t entirely help solve your current issue, but will absolutely help you next time. Are System Restore Points turned on? Are they being regularly and automatically created?
Windows 8, 8.1, and 10
Type rstrui in the Start Menu search bar and select the corresponding entry. Press Next when prompted, and you’ll see a list of your current System Restore points.

Nothing there? You’ll need to head back to the System Protection options we used earlier. Type system protection into the Start Menu search bar and select Create a system restore point. Select Configure. Under Restore Settings, make sure Turn on system protection is checked.

Windows 7
The Windows 7 version is minutely different. Head to Computer > System Protection. On the System Protection tab, select Configure. Make sure Restore system settings and previous versions of files is checked. Apply and OK.

5. Reinstall, Reset, or Repair Windows 7, 8, 8.1, or 10
This is where the options between Windows 7 and modern Windows versions diverge. Windows 8, 8.1, and 10 users can either Refresh or Reset their installation files. This process usually clears any lingering issues relating to system files. Furthermore, with additional options as to what files are refreshed or reset, you do not lose any important data. (But back up any important files first!)
Windows 8, 8.1, and 10
Windows 8, 8.1, and 10 users can choose to either Refresh or Reset their operating system.
- Refresh (Windows 8): reinstalls Windows, keeping personal files and settings intact.
- Reset: reinstalls Windows but deletes files, settings, and apps, except for those that came with your PC.
- Reset with Keep My Files (Windows 10): reinstalls Windows from the Recovery Drive, keeping files, settings, and apps intact
Windows 8 Refresh featured evolved into Windows 10 Reset with Keep My Files. They perform the same restoration process.

Press Windows Key + I and head to Update & security > Recovery. Under Reset this PC, hit Get started. Select either Keep my files or Remove everything. As we just want to refresh your system, select the former.
Note that this process resets your Settings and will remove your Windows apps. (Here’s exactly what will happen when you hit the Reset button!)
Click Reset when prompted, and the actual process can take a few minutes to complete.
Windows 7
Windows 7 users are limited to reinstalling or repairing.
Press F8 during the boot process to enter the Advanced Boot Options menu. Select Repair Your Computer from the top of the list. Follow the on-screen instructions.

If the Advanced Boot Menu repair option fails (or isn’t there), revert to your Windows 7 installation media, or a system repair disc.
If you have installation media or a system repair disc, insert the disc or USB drive into your PC. Start your system, and select Press any key to boot from CD. If you’re using a USB drive, there is a chance you’ll have to specifically choose to boot from a USB drive. Some manufacturers have a specific function key to enter a quick boot option menu, while others require you to enter the BIOS. Check your manufacturer specifications. (Also, here’s how to create bootable Windows installation media.)
When you arrive at the Welcome to Startup screen, select Repair Install, and follow the on-screen instructions.

How to Fix System Restore and Recover Your System
It can be an excruciating moment when System Restore fails. Don’t panic. One of the methods listed above will coax System Restore back into life, and with it, the rest of your ailing system. Remember:
- Try an alternative System Restore point.
- Run System Restore from Safe Mode.
- Configure your disk space usage.
- Ensure Windows creates System Restore points when it should.
- Use Reset, Refresh, or Repair to revive your system files.
Do you routinely prepare system backups? Regularly backing up your system is incredibly important. There is a reason everyone asks if you’ve backed up your data.
Read the full article: 5 Things to Check When System Restore Isn’t Working
Read Full Article
No comments:
Post a Comment