Virtual private networks (VPNs) are one of the best ways to make your internet connection more private and secure. They keep people from snooping on your connection and stop potentially disastrous hacks.
But pulling up the VPN app every time you get on the internet is a pain. And PC- or phone-based apps won’t protect your other devices, like your smart TV or gaming console. The answer is to set up a VPN on your router.
Do I Need a VPN Router?
Installing a VPN is a great idea. You never have to remember to activate your VPN. It protects all the devices connected to your wireless network, even if they belong to someone else. In short, it solves most of the annoyances of using a VPN. The only drawback is that your connection speed may take a hit.
Fortunately, you don’t need any special equipment to set up a VPN on your router. You can buy special VPN routers that are already set up with everything you need.
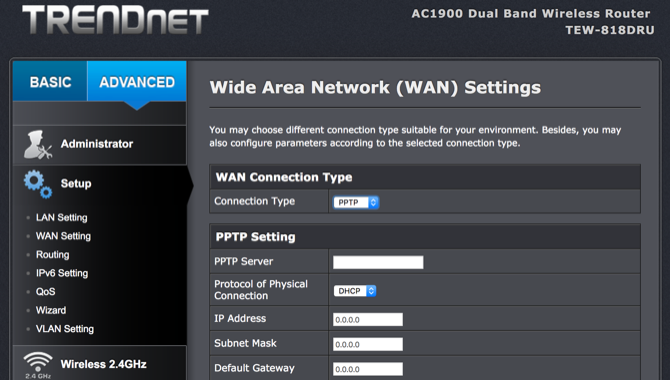
In many cases, you can set it up yourself; some routers come with VPN compatibility built in. Some TRENDnet routers, for example, let you set up a VPN with the standard firmware (though you’re limited to older protocols).
For most VPNs, you’ll need to install new firmware. DD-WRT (our DD-WRT review) and Tomato are two of the most popular options for aftermarket firmware. Both will allow you to install a VPN on your router.
How Do I Put a VPN on My Router?
However, not all routers work with DD-WRT or Tomato, and neither do all VPNs. You’ll need to check the compatibility list of the firmware and installation instructions for your VPN subscription:
Flashing new router firmware is relatively easy. Rather not go through the process of setting it up yourself? Then consider a reliable VPN router.
If you’ve decided to install new firmware on your own router, follow these steps to install a VPN. (If you buy a pre-flashed VPN router, skip to step 3.)
Step 1: Set up a VPN Router With New Firmware
Check the compatibility lists of DD-WRT and Tomato to see if either is supported on your router. If not, it’s worth noting that there alternative router firmwares are available.
If your router is supported, follow the instructions to install the firmware.
The exact method you’ll use for flashing the firmware depends on which firmware you choose and your router model. As such, we’ll avoid discussing specifics here.
For more information on flashing DD-WRT and Tomato, check out these pages:
- DD-WRT Installation Instructions
- How to Install Linux / DD-WRT Firmware on Your Router
- Tomato Installation and Configuration
- EasyTomato Installation Guide
They should provide enough information to get the firmware that will let you set up a VPN on your router.
Step 2: Get Your VPN’s Server Information
Before you dig into the new firmware of your router, you’ll need to get some specific information on your VPN.
Your best bet here is to run a search for “set up [your VPN] [your firmware].” So you might search for something like “set up IPVanish DD-WRT.”
Most big-name VPNs will have tutorials for getting their VPN installed on several different types of routers. For example, ExpressVPN has a whole section on manual router configurations:

You’ll find that the configuration is a bunch of numbers and URLs. This, for example, is the information provided by NordVPN for installing their VPN on DD-WRT:
- Server IP/Name = us936.nordvpn.com
- Port = 1194
- Tunnel Device = TUN
- Tunnel Protocol = UDP
- Encryption Cipher = AES-256-CBC
- Hash Algorithm = SHA-512 (Note: Older NordVPN servers use SHA-1 instead. If SHA-512 does not work, select SHA-1.)
- User Pass Authentication = Enable
- Username, Password = [Your NordVPN credentials]
- Advanced Options = Enable (this will enable additional options)
- TLS Cipher = None
- LZO Compression = Yes
- NAT = Enable
At the very least, you’ll need the server URL or IP address and your user credentials. Most of the time, you’ll be able to get all the information you need from your VPN provider’s website.
You might also be able to download a VPN configuration file that contains the settings you’ll need. This will make the process a bit easier.
Step 3: Configure Your VPN Router
After you’ve found the information you need to activate the VPN, access your router firmware to set it up.
In DD-WRT, open Services > VPN and switch Start OpenVPN Client to Enable.
In Tomato, find VPN Tunneling in the left sidebar, and select OpenVPN Client under it. Find everything you need in the Basic tab under Client 1.
Enter the information that you gathered in step 2. If your VPN provider requires further credentials or activation, add these where appropriate.
For example, ExpressVPN tells you to enter specific information into Tomato’s custom configuration box:
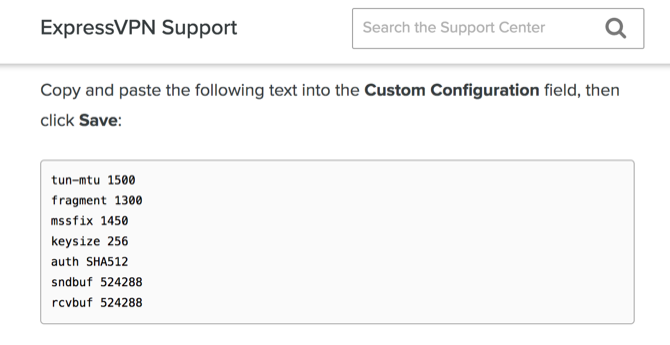
That’s why it’s so important to find instructions from your VPN provider on how to set up their VPN.
Once you’ve copied all the information into your router’s firmware, you should be connected! Use an IP address-checking tool to make sure that your IP address is protected from DNS leak.
Is Setting Up a VPN on a Router Worth the Effort?
If you’ve read this far, you might be wondering if it’s worth setting up a VPN on a router. It seems like hard work, but once you find a walkthrough for your VPN, it shouldn’t take very long.
And you’ll only need to do it once.
After setting up your VPN on your router, you’ll never need to worry about signing in again. All devices on your home network will be protected. That’s great for your peace of mind.
So, in the end, yes, it’s absolutely worth setting up a VPN on your router. Not sure which VPN to use? Check our guide to the best VPNs to find one that suits your requirements.
Read the full article: How to Set Up a VPN on Your Router
Read Full Article
No comments:
Post a Comment