If your Windows 10 display is constantly flickering, it’s likely because you have a troublesome application installed or an unsuitable display driver. It’s time for you to resolve that annoying screen flash.
The problem often begins when upgrading to Windows 10 from a previous version of the operating system, but it can occur at any time. We’re going to show you various methods to fix a Windows 10 flashing screen.
Try This Screen Flickering Fix First
First, you need to establish what might be causing the flickering screen. To do this, open Task Manager by pressing Ctrl + Shift + Esc simultaneously.
Alternatively, right-click your taskbar and select Task Manager. You don’t actually need to use Task Manager, but you do need it open.

Now, watch your screen to see if Task Manager flickers. If it does, along with everything else on the screen, it’s probably a display driver that’s causing the problem. On the other hand, if everything except Task Manager flickers, the issue is likely due to an application.
With that in mind, skip to the relevant section that you need below. However, if the advice there doesn’t work, check the advice in the other sections too, just in case it solves the problem.
1. Flashing Caused by an Application
Three applications have been identified by Microsoft to cause screen flashing: Norton AntiVirus, iCloud, and IDT Audio. Also, think about whether you installed any new software before the screen flickering began.
In the case of Norton AntiVirus, the problem is acknowledged by Symantec and they’ve released a specific fix for it. If you’re running Norton, head to their official support page and follow the steps (which involves downloading an executable) to resolve the issue. It should work, but keep reading if not.
Across all three applications, make sure you’re running the latest versions. Either update within the app itself or head to the respective official websites and download the most up-to-date release. You may find that this issue has now been officially patched within the app.
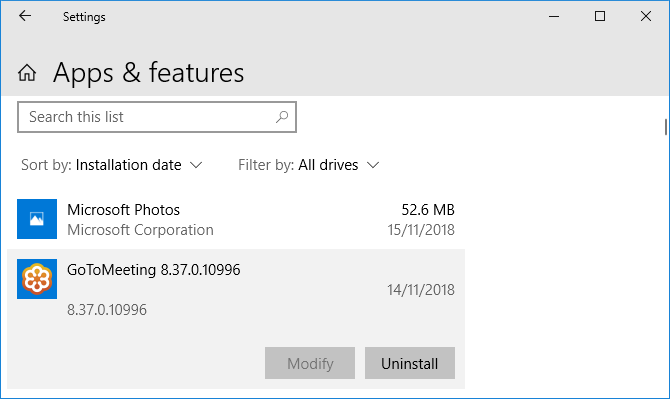
If this doesn’t work, uninstall the program. To do so, press Windows Key + I to open Settings. From here, click Apps to be presented with a list of all the apps on your system. Find the offending app, left-click it and then click Uninstall. You may need to restart your system for the changes to fully take effect.
2. Flashing Caused by a Display Driver
The screen flashing could be caused by your display driver. Let’s make sure you are running the right version.
Remove the Driver
First, boot into Safe Mode. To do so, press Windows Key + I to open Settings. Select Update & Security > Recovery. Underneath Advanced start-up, click Restart now.

When your system restarts, select Troubleshoot > Advanced options > Startup settings > Restart. Again, once restarted, select option 5 to launch your PC into Safe Mode with Networking.
Next, press Win Key + X and click Device Manager. Click the arrow next to Display drivers to expand the category. Right-click your graphics card, click Uninstall device, check Delete the driver for this device and then click OK. Restart your system again.

Alternatively, you can use a third-party software called Display Driver Uninstaller, which will completely wipe any traces of the driver from your system. I use this and think it’s great, but feel free to use the built-in Windows method if you’re more comfortable with that.
Install a New Driver
You now want to install the latest driver for your system. Windows Update will provide the latest driver it thinks is compatible with your system. To do this, press Windows Key + I and go to Update & Security > Windows Update > Check for updates.

Download the driver, install it, and see if the problem has ceased.
Roll Back to an Older Driver
If the problem continues, it might be that the newest driver hasn’t patched the problem. If the screen flickering occurred after a driver update, try rolling back to an older version. Follow the steps above to uninstall the driver, then head to the old driver page for either AMD, NVIDIA, or Intel. This might be a bit of trial and error, but try selecting one that released when your screen wasn’t flickering.
Disable Automatic Windows 10 Driver Update
Because Windows 10 has mandatory updates, you now need to head to Microsoft’s support page to download a tool to stop the system automatically updating your driver—you can disable this when you know that the newest driver has patched the screen flicker problem.
Create a New Windows User Profile
Many Windows 10 problems can often be solved by creating a new user profile. This is one of them.

To do so, press Windows Key + I and go to Accounts > Family & other people > Add someone else to this PC and follow the wizard.
For advice on transferring your files over, see our guide on fixing issues with a new user account.
Windows 10 Screen Flickers… No More!
Eventually, all the software and driver developers should offer in-built fixes to this flickering screen problem. Until then, hopefully, the advice above will sort it out so that you can actually use your system with ease.
Screen flickering isn’t the only serious display issue you might encounter. Be sure to read more with our advice on how to fix a stuck pixel on your computer screen.
Read the full article: How to Fix the Windows 10 Screen Flashing Problem
Read Full Article
No comments:
Post a Comment