Few computer issues are quite as frustrating as a PC that refuses to boot up. When your system can’t even initialize, it’s difficult to make any headway in locating the source of the problem.
Of course, there’s no reason to despair. Even if things look bleak for your PC, you can try plenty of fixes before it’s truly beyond repair. Windows 10 offers several methods of sorting out the boot process, and there are a few easy techniques you can carry out for yourself.
With any luck, this guide should help find the culprit behind your computer’s unwillingness to boot.
1. Try Windows Safe Mode
The most bizarre fix for Windows 10 boot problems is Safe Mode. It is an alternative boot scheme that starts your computer with a minimum of software. The modified boot process can bypass driver and software problems. The weird thing is, sometimes starting the computer in Safe Mode can fix boot problems. It’s not clear to me what processes run in Safe Mode, but experience has taught me it’s an effective and easy fix.
If your computer won’t boot, however, you might have problems entering Safe Mode. There are two relatively easy ways to get into it.
Method 1: Enter Safe Mode From the Windows Recovery
Most unbootable computers “hang” (or not progress beyond) the Windows splash screen. (For other Windows issues, please consult our guide to Windows troubleshooting.)
From here, you can force the computer to enter Safe Mode by interrupting the boot process three times in a row, which automatically triggers the Windows Recovery. From the Choose an option recovery window, choose Troubleshoot, then Advanced options, and then Startup Settings.
From Startup Settings, you can reboot the computer into Safe mode, either with the internet enabled or disabled. Either option should work.
Method 2: Safe Mode with a Windows 10 Recovery Drive
If you cannot enter Safe mode, you need to create a Windows 10 USB recovery drive. The recovery drive contains the Windows 10 recovery environment—which used to be accessible by tapping F8 on boot. Unfortunately, Microsoft decided to eliminate this feature.
Creating a recovery drive requires that you have another Windows 10 computer and a USB drive with at least 512MB of storage. If you want to create a system backup (you’ll see an option to back up system files to the recovery drive), you’ll need 16GB of storage.
Launch Control Panel > Create a recovery drive.
Then follow the guided instructions.
After creating the recovery drive, you can boot your computer from it only if you’ve turned on USB drives as bootable from the POST environment, also known as UEFI or BIOS. After enabling USB drives as bootable, insert the drive into your computer and restart (this may require hitting the reset button or holding the power button down for a few seconds).
2. Unplug All Your USB Devices
A serious issue with Windows 10 updates is that sometimes your computer won’t boot because of a conflict with a USB device. You can solve this problem by unplugging all USB devices (and any other unneeded peripherals) and restarting the computer.
If your computer stays on the same loading screen, removing all USB devices automatically solves the problem. Other times, you may need to restart the computer.
3. Turn Off Fast Boot
There’s a setting inside of your BIOS or UEFI called Fast Boot that allows Windows 8 and newer operating systems to boot very rapidly by preloading drivers. Unfortunately, Windows updates can break Fast Boot compatibility. Fortunately, Fast Boot can be toggled on and off through your BIOS.
The method to enter the BIOS/UEFI screen differs between computers. For instructions on how to find the correct way for your computer, please consult our guide to finding a computer’s UEFI/BIOS. For most people, tapping the Delete key while booting should trigger the POST environment. Two other common keys that might work are F2 and Escape.
After entering the BIOS or UEFI, the Fast Boot option normally is part of the Advanced options, although it can be anywhere.
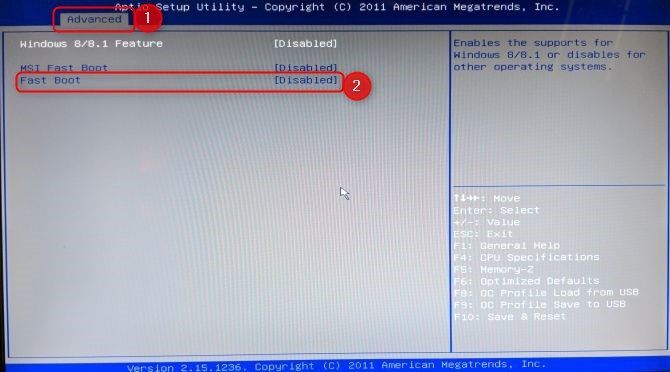
If you don’t see any Fast Boot entry, your computer was made before 2013 as they did not include a Fast Boot option.
4. Try a Malware Scan
Malware is a major cause of an unbootable computer. The common method of dealing with malware that causes boot problems is an anti-malware program that can boot from a USB or DVD drive. Some companies provide this software for free, such as BitDefender’s rescue CD. One of my favorites is AVG Rescue CD (it can be installed onto a USB drive, despite the name).
After imaging the CD onto a USB drive, you can then boot the afflicted computer up with the drive inserted. If you’ve set the computer to boot from the rescue drive, it will start in the AVG rescue environment. Then perform the malware scan.
Download: AVG Rescue CD (Free)
5. Check Your Battery
If you’re using a laptop, battery issues could well be the source of your system’s inability to boot properly. It’s worth testing an alternate charger cable to see if it solves the problem. Confirm that the cable is working by trying it out on another laptop. Next, remove your system’s battery and plug the device into a power source.
Removing the battery will help you discover if a hardware problem is to blame. The key here is to ensure that you’re only testing one element at any given time. If power issues interfere with the startup, it’s crucial that you know whether the battery, the charging cable, or another component requires replacement.
6. Boot to the Command Prompt Interface
When your computer can’t boot properly, it really can’t do much at all. However, it might still be possible to boot directly to the Command Prompt to expand its range of abilities. Using this interface, you can perform more troubleshooting procedures, and perhaps even fix your problem. You’ll need to have Windows 10 on a bootable disk or USB drive to carry out the procedure, so use another computer to set that up before you get started.
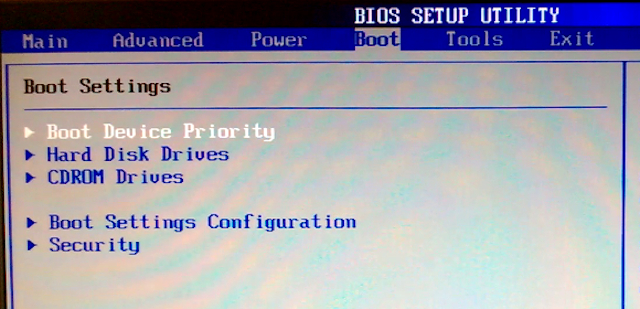
To boot to the Command prompt, start up your system. While it’s initializing, watch out for details of a combination of keys that will allow you to enter the BIOS. This information is typically delivered alongside the vendor logo.
Navigate to the Boot tab and make either the USB or DVD drive the first bootable device. Your choice here will depend on where your copy of Windows 10 is located. Again, the specifics of this process may vary from one system to another, so consult the on-screen instructions.
Next, insert the disk or drive containing Windows 10 into your system, save your configuration, and restart your PC.
When prompted, use your keyboard to specify that you want to boot using the disk or drive. Enter the requested language, currency, and input preferences, then select Repair your computer on the next screen. Next, select Troubleshoot > Advanced Options > Command Prompt, you should then see a window to enter commands.
7. Use System Restore or Startup Repair
If you’re already booting Windows 10 from a disk or drive, it’s well worth utilizing a couple of utilities that are available as part of the process. Once you’ve booted from the drive as detailed above, you’ll get access to options that can get your PC back on track. Look out for links to System Restore and Startup Repair on the Advanced Options screen.
System Restore is a utility that allows you to return to a previous Restore Point when your computer was working normally. It can remedy boot problems that were caused by a change you made, rather than a hardware failure.
Startup Repair is a general-purpose troubleshooter for issues that prevent Windows from starting up. If you’re struggling to find the source of your boot issues, it’s a good idea to run the utility in case it can find a solution.
8. Reassign Your Drive Letter
A system with more than one drive installed can cause boot issues for Windows 10 users if their operating system (OS) volume has its drive letter unintentionally unassigned. However, you can fix this problem with a minimum of fuss by booting to the command prompt interface.
Boot to a command prompt window as explained above, then enter the following to run the disk partition utility:
diskpart
Once this is done, input list volume to print details of all the volumes currently hooked up to your system.
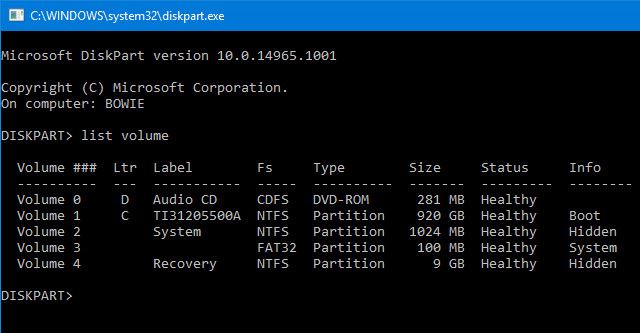
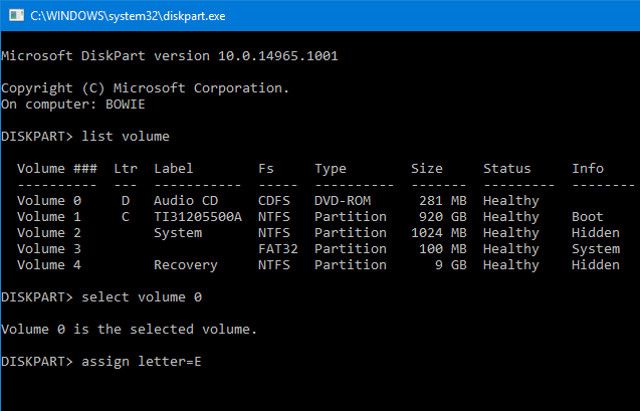
From here, you can use the select and assign letter commands to reassign the correct letter to an unassigned volume. For instance, if I wanted to assign the letter E to the Audio CD volume in the above image, I would first input “select volume 0” and then input “assign letter=E” to complete the process.
As ever, be very careful when making changes in the command prompt. Making mistakes here can quickly cause further problems from your PC.
9. Dodge the Windows 10 Bootloader
If you run into problems while trying to make a fresh installation of Windows 10, you may encounter the new version of the bootloader utility. This can sometimes interfere with attempts to reach an existing OS installation that’s present on another drive.
Fortunately, there’s a relatively straightforward way to remedy this situation. Boot to the command prompt interface and enter the following:
bcdedit /set {default} bootmenupolicy legacy
Restart your computer, and you should find that the legacy bootloader interface has replaced the Windows 10 iteration. You should have no further problems entering Windows 10 Safe Mode or accessing your existing OS installation.
10. Try a Third-Party Utility
Figuring out what exactly is the cause of the problem is the most challenging part of remedying boot issues. When your system can’t even boot, it’s difficult to diagnose the problem. However, a third-party utility called Boot Repair Disk might have more success.
Boot Repair Disk is an open-source rescue disk that you can use to automatically find and fix issues preventing your PC from booting up. It’s very easy to use—you only have to select whether you’re using a 32-bit or 64-bit version of Windows. The test and any fixes are carried out automatically, although there are options that allow for more close control.
It makes no guarantees to fix your PC, but it may well be able to pinpoint hidden problems.
11. Factory Reset
We’re getting into the more difficult and destructive repair options at this point. Aside from a factory reset, the more difficult options include restoring and refreshing your computer. Each has its own advantages and weaknesses. If you’ve tried all the other options, you’re probably frustrated.
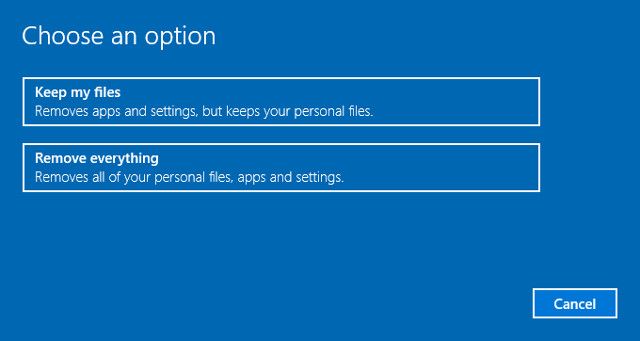
Go for a factory reset. You’ll lose some apps and other data, but you can opt to keep some of your files. A Windows 10 factory reset (Microsoft refers to this process as just “reset”) restores the computer to its default operating state.
12. Repair Update (“In-Place Upgrade”)
The repair installation is similar to a factory reset, except in one big way: it completely reinstalls your computer. Unfortunately, it requires downloading the entire Windows operating system and you’ll need a functional Windows computer with an internet connection.
This method requires that you have a functional computer, a DVD or USB drive, and an internet connection. More or less, you must download and run the Windows USB/DVD Download Tool and use it to create a bootable installer.
This method is fairly complex, but I can recommend a video:
Windows 10 Boot Problems: Fixed!
Solving Windows 10 boot problems is worse than in Windows 7, thanks to the removal of an easy-to-access Safe Mode. (Yes, you read me right, Microsoft removed the F8 option for booting in Safe Mode to give us 2-second faster booting.) That’s why it’s extra important that you use a 16GB flash drive to create a system recovery drive.
Your boot problems might not end there. Next, it could be the turn to solve slow boot issues in Windows 10.
Read the full article: Windows 10 Won’t Boot? Try These 12 Fixes to Get Your PC Running Again
Read Full Article
No comments:
Post a Comment