15 June 2020

WhatsApp finally launches payments, starting in Brazil


After months of talks and trials, WhatsApp has finally pulled the trigger on payments in its app. Today the Facebook-owned messaging service announced that users in Brazil would be the first to be able to send and receive money by way of its messaging app, using Facebook Pay, the payments service WhatsApp owner Facebook launched last year.

WhatsApp says in its blog post that the payments service — which currently is free for consumers to use (that is, no commission fee taken) but businesses pay a processing fee to receive payments — will work by way of a six-digit PIN or fingerprint to complete transactions.

You use it by linking up your WhatsApp account to your credit or debit card, with initial local partners including Banco do Brasil, Nubank, and Sicredi. Cielo, a payments processor, is also working with WhatsApp to complete transactions. “We have built an open model to welcome more partners in the future,” it noted.

The news comes a little bit as a surprise: the company has been testing this payments service among users in India for months, so many assumed that the world’s second largest internet market would be the debut region for the service. But Facebook remains stuck in a regulatory maze in India that has prevented it from expanding the payments service in what is otherwise its biggest market. (And indeed, it would have an interesting position there because of that: while there are a number of other digital payments services, including Google Pay and PayTM’s service, there are no clear, large and popular competitors offering payments within a messaging app in the country.)

WhatsApp had been adopted informally for commercial purposes almost from the very start: small business owners have used WhatsApp to exchange messages with users around the sale of goods, what is in stock and so on. But under the wing of Facebook — which acquired the company in 2014 for $19 billion — the company started in earnest the big task of bringing in a more formal set of business services.

That’s included the launch of WhatsApp Business, which lets SMBs post catalogues and stock links within the app; advertisers on Facebook also can create links through to their WhatsApp accounts.

But now with payments, WhatsApp, which has amassed over 2 billion users, is finally taking a more comprehensive commercial plunge, giving people not just a place to chat about a product, or even send payment details, but now to actually transact.

And that, in turn, gives WhatsApp and Facebook another shot at building a revenue stream based on its vast scale, one which does not turn the app over to monetising its users through ads and the data that is amassed around them.

“Payments on WhatsApp are beginning to roll out to people across Brazil beginning today and we look forward to bringing it to everyone as we go forward,” the company said.

Users in Brazil will be able to use the payments service on WhatsApp to make purchases from local businesses without leaving their chat, the Facebook-owned service said.

“The over 10 million small and micro businesses are the heartbeat of Brazil’s communities. It’s become second nature to send a zap to a business to get questions answered. Now in addition to viewing a store’s catalog, customers will be able to send payments for products as well,” the company wrote in a blog post.

Although WhatsApp has in theory been working on payments for years, from what we understand there were a lot of delays in part due to how Facebook wanted WhatsApp to implement it. Now that it’s launching with Facebook Pay, it seems that we know how that struggle landed.

As for subsequent regions for launching the service, we’ve reached out to Facebook and WhatsApp to ask for more specific details. Given the link with Facebook Pay, one obvious guess might be that we’ll see it rolled out in markets where that service is now live, which include the US and UK.

More to follow…


Read Full Article

ByteDance to shut down Vigo apps in India


Chinese internet giant ByteDance has announced plans to discontinue two of its apps in India, its biggest overseas market, and urged its users to move to TikTok.

Vigo Video and Vigo Lite, two apps that allow users to create and share short-form sketches and lip-syncing to Bollywood songs, posted a message early Monday (local time) to announce that they would be discontinued at the end of October this year.

In their message, titled “a farewell letter,” ByteDance said it was saddened to shut down the apps but did not offer an explanation for the decision. Indian news outlet Entrackr first spotted the letter.

Unlike TikTok, ByteDance’s most popular app, Vigo Video and Vigo Lite have struggled to make inroads in the world’s second largest internet market. While TikTok has more than 200 million users in India, Vigo Video had about 4 million monthly active users last month and Vigo Lite could only amass 1.5 million users, according to one of the top mobile insight firms — data of which an industry executive shared with TechCrunch.

While Vigo Video gained fewer than 1 million users in a year, Vigo Lite shredded just as many during the same period, the data showed.

Both the apps counted India as their biggest market but have been available in several other markets, including neighboring nation Bangladesh, for instance. It’s unclear whether ByteDance is discontinuing the app in every market. The company did not immediately respond to a request for comment.

The move, despite the apps’ poor reception in India, comes as a surprise. Recruitment posts submitted by ByteDance as late as last month described Vigo as one of the company’s biggest businesses in India.

Other posts reveal that the company is looking to hire executives to aggressively explore ways to monetize its services in the country. ByteDance’s TikTok app has been scrutinized in India in recent weeks for failing to actively remove videos that promoted violence, animal cruelty, racism, child abuse, and objectification of women.

In its message to users on Vigo apps today, ByteDance said it will help them migrate their videos to TikTok. On TikTok, “you will be able to show your talent to a larger group of friends. We are eager to see you [there]!” the message reads.


Read Full Article

14 June 2020

Keyboard Shortcuts for Pages, Numbers, and Keynote on Mac


MacBook displaying Pages document

iWork, the office suite that ships with every Mac, has three easy-to-use apps—Pages (for documents), Numbers (for spreadsheets), and Keynote (for presentations.) They make a strong case for choosing iWork over Microsoft Office.

If you use any or all of the iWork apps, we have a quick tip to help you transform your workflow: adopt keyboard shortcuts.

You can discover many useful shortcuts for Pages, Numbers, and Keynote with the comprehensive cheat sheet below. (The three apps have quite a few shortcuts in common, which means fewer shortcuts to learn!)

The cheat sheet contains keyboard shortcuts for navigation, tool selection, file management, text editing, object manipulation, and more.

FREE DOWNLOAD: This cheat sheet is available as a downloadable PDF from our distribution partner, TradePub. You will have to complete a short form to access it for the first time only. Download Keyboard Shortcuts for Pages, Numbers, and Keynote on macOS.

Keyboard Shortcuts for Pages, Numbers, and Keynote on macOS

Shortcut Action
File and Window Management
Cmd + N Open template/theme chooser
Esc Close template/theme chooser
Cmd + O Open file
Cmd + S Save current file
Shift + Cmd + S Duplicate current file
Option + Shift + Cmd + S Save current file as
Cmd + P Print
Shift + Cmd + P Open Page Setup dialog box
Fn + Up Arrow Scroll up one page
Fn + Down Arrow Scroll down one page
Cmd + W Close current window
Option + Cmd + W Close all windows
Cmd + M Minimize current window
Option + Cmd + M Minimize all windows
Control + Cmd + F Switch to Full Screen mode
Control + Tab Switch to next tab
Shift + Control + Tab Switch to previous tab
Control + Cmd + = Zoom current window
Option + Control + Cmd + = Zoom all windows
Cmd + H Hide current app
Option + Cmd + H Hide other apps
Cmd + , Open app settings
Cmd + ? Open Help window
Cmd + Q Quit app
Option + Cmd + Q Quit app and keep windows open
Tool and Panel Display
Shift + Cmd + ; Show Spelling and Grammar window
Control + Cmd + Space Show Character Viewer (Emoji & Symbols window)
Option + Cmd + E Show Edit Equation dialog box
Cmd + T Show Fonts window
Option + Cmd + I Toggle Inspector sidebar
Control + ` (Grave) Switch to next tab in Inspector
Shift + Control + ` (Grave) Switch to previous tab in Inspector
Cmd + R Toggle ruler(s)
Shift + Cmd + C Show Colors window
Option + Cmd + T Toggle primary toolbar
Cmd + drag toolbar item Move item around in toolbar
Cmd + drag item away from toolbar Remove item from toolbar
Edit and Find
Cmd + Z Undo last action
Shift + Cmd + Z Redo last action
Cmd + A Select all content
Shift + Cmd + A Deselect all content
Cmd + X Cut selection
Cmd + C Copy selection
Cmd + V Paste cut/copied content
Option + Shift + Cmd + V Paste and match style of destination
Option + Cmd + C Copy style of selection
Option + Cmd + V Paste copied style to selection
Delete Delete selection OR
Clear contents of selected cell(s) in table
Cmd + D Duplicate selection
Cmd + F Open Find & Replace dialog
Cmd + G Find next match (when Find & Replace dialog is active)
Shift + Cmd + G Find previous match (when Find & Replace dialog is active)
Cmd + E Find using selected text
Cmd + J Show selected text or object in window
Shift + Cmd + . (Period) Zoom in on file content
Shift + Cmd + , (Comma) Zoom out of file content
Cmd + 0 Return file content to actual size
Objects, Groups, and Layers
Arrow Key Move selected object one point or one screen pixel in specified direction
Shift + Arrow Key Move selected object ten points or ten screen pixels in specified direction
Shift + Cmd + B Send selected object to back
Option + Shift + Cmd + B Send selected object one layer back
Shift + Cmd + F Bring selected object to front
Option + Shift + Cmd + F Bring selected object one layer forward
Option + Cmd + G Group selected objects
Option + Shift + Cmd + G Ungroup selected objects
Cmd + L Lock selected objects
Option + Cmd + L Unlock selected objects
Shift + Cmd + M Edit image mask
Cmd + Return Exit text editing and select its object
Shift + Cmd + V Show Choose dialog box for inserting object
Control + Option + Cmd + T Define selected text as placeholder text
Control + Option + Cmd + I Define selected image or movie as placeholder media
Option + Shift + Cmd + P Draw custom shape with Pen tool
Text Manipulation
¹Fn (twice) Start dictation
Shift + Right Arrow Extend selection one character to right
Shift + Left Arrow Extend selection one character to left
²Option + Shift + Right Arrow Extend selection to end of current word
²Option + Shift + Left Arrow Extend selection to beginning of current word
Shift + Cmd + Right Arrow Extend selection to end of current line
Shift + Cmd + Left Arrow Extend selection to beginning of current line
Shift + Up Arrow Extend selection to line above
Shift + Down Arrow Extend selection to line below
Option + Shift + Up Arrow Extend selection to beginning of current paragraph
Option + Shift + Down Arrow Extend selection to end of current paragraph
Shift + Cmd + Up Arrow Extend selection to beginning of text
Shift + Cmd + Down Arrow Extend selection to end of text
Cmd + B Emphasize or embolden selected text
Cmd + I Italicize selected text
Cmd + U Underline selected text
Option + Delete Delete word before cursor
Option + Fn + Delete Delete word after cursor
Cmd + + Increase size of selected text
Cmd + - Decrease size of selected text
Option + Cmd + [ Decrease space between selected characters
Option + Cmd + ] Increase space between selected characters
Control + Shift + Cmd + + Make selected text (or word at cursor) superscript
Control + Cmd + - Make selected text (or word at cursor) subscript
Cmd + Shift + [ Align selected text flush left
Cmd + Shift + \ Center selected text
Cmd + Shift + ] Align selected text flush right
Option + Cmd + Shift + \ Justify selected text
Cmd + [ Decrease indent level of block of text or list item where cursor is placed
Cmd + ] Increase indent level of block of text or list item where cursor is placed
Cmd + K Turn selected text into hyperlink
Option + Space Insert non-breaking space
Shift + Return Insert line break (soft return)
Return Insert paragraph break
Control + O Insert new line after cursor, without moving cursor
Fn + Cmd + Return Insert page break
Control + T Swap characters on either side of cursor
Control + Cmd + D Look up selected word
Option + Esc Display list of words to complete selected word
Cmd + ; Check spelling and grammar
Comments
Shift + Cmd + K Insert new comment box for selected text, object, or cell
Cmd + Return Save current comment
³Option + Cmd + K Show next comment
³Option + Shift + Cmd + K Show previous comment
Charts and Tables
Shift + Cmd + D Toggle Chart Data editor
Return Complete cell entry and select cell below
Shift + Return Complete cell entry and select cell above
Tab Complete cell entry and select cell on right
Shift + Tab Complete cell entry and select cell on left
Arrow Key (when chart legend is selected) Move chart legend one point
Shift + Arrow Key (when chart legend is selected) Move chart legend ten points
Option + Up Arrow Add row above selected cells
Option + Down Arrow Add row below selected cells
Option + Right Arrow Add column to right of selected cells
Option + Left Arrow Add column to left of selected cells
Option + Cmd + Return Select all rows that intersect current selection
Control + Cmd + Return Select all columns that intersect current selection
Shift + Up Arrow Select row/cell above selected row/cell
Shift + Down Arrow Select row/cell below selected row/cell
Shift + Right Arrow Select column/cell to right of selected column/cell
Shift + Left Arrow Select column/cell to left of selected column/cell
Return (when cell is selected) Begin editing cell
Option + Cmd + U Auto-align cell content
Cmd + Return Stop editing cell and select it
Cmd + Return (twice) Stop editing cell and select its table
Arrow Key (when table is selected) Move selected table one point or one screen pixel in specified direction
Shift + Arrow Key (when table is selected) Move selected table ten points or ten screen pixels in specified direction
Arrow Key (when cell is selected) Select next cell in specified direction
Shift + Arrow Key (when cell is selected) Extend cell selection by one cell in specified direction
Control + Return Insert line break (soft return) when editing text in cell
Return Insert paragraph break (hard return) when editing text in cell
= Open formula editor for selected non-formula cell
Control + = Edit cell formula
Option + Cmd + Left Arrow Select first populated cell in current row
Option + Cmd + Right Arrow Select last populated cell in current row
Option + Cmd + Up Arrow Select first populated cell in current column
Option + Cmd + Down Arrow Select last populated cell in current column
Option + Cmd + Delete Delete selected rows
Control + Cmd + Delete Delete selected columns
Control + Cmd + M Merge selected cells
Control + Shift + Cmd + M Unmerge selected cells
Option + Shift + Cmd + Left Arrow Expand current selection to include first populated cell in current row
Option + Shift + Cmd + Right Arrow Expand current selection to include last populated cell in current row
Option + Shift + Cmd + Up Arrow Expand current selection to include first populated cell in current column
Option + Shift + Cmd + Down Arrow Expand current selection to include last populated cell in current column
Control + Option + Cmd + Up Arrow Toggle top border of selected cell(s)
Control + Option + Cmd + Down Arrow Toggle bottom border of selected cell(s)
Control + Option + Cmd + Right Arrow Toggle right border of selected cell(s)
Control + Option + Cmd + Left Arrow Toggle left border of selected cell(s)
Cmd + \ Enable Autofill mode
Option + Cmd + \ Autofill from row above
Control + Cmd + \ Autofill from column before
Pages-Specific Shortcuts
⁴Shift + Cmd + H Highlight selected text
⁴Tab Increase indent level of list item
⁴Shift + Tab Decrease indent level of list item
Option + Shift + Cmd + E Add an EndNote bibliography
Option + Cmd + A Accept change (when change tracking is on)
Option + Cmd + R Reject change (when change tracking is on)
⁵Option + Cmd + B Add bookmark
Shift + Cmd + L Toggle layout
Shift + Cmd + I Toggle invisibles
Shift + Cmd + T Toggle comments pane
Shift + Cmd + W Toggle word count
Control + Cmd + G Open dialog box for switching to specific page
Numbers-Specific Shortcuts
Cmd + Return Select table from cell selection
Shift + Cmd + \ Show Tab Overview
Shift + Cmd + [ Switch to previous sheet
Shift + Cmd + ] Switch to next sheet
Option + Shift + Cmd + [ Switch to first sheet
Option + Shift + Cmd + ] Switch to last sheet
Control + Shift + Cmd + D Insert current date in selected cell
Control + Shift + Cmd + T Insert current time in selected cell
Shift + Cmd + R Apply sorting rules
Option + Cmd + F Enable filters
Cmd + 8 Collapse selected groups
Option + Cmd + 8 Collapse peer groups
Option + Shift + Cmd + 8 Collapse all groups
Cmd + 9 Expand selected groups
Option + Cmd + 9 Expand peer groups
Option + Shift + Cmd + 9 Expand all groups
Keynote-Specific Shortcuts
Cmd + A Select all object types in object list
Shift + Cmd + A Deselect all object types in object list
Cmd + Return Select table from cell selection
Shift + Cmd + N Insert new slide OR
Add new master slide from Master Slides view
Shift + Cmd + H Skip selected slide
Shift + Cmd + E Toggle Master Slides view
Shift + Cmd + P Toggle presenter nodes
Shift + Cmd + L Toggle object list
Shift + Cmd + 0 Zoom to selection
Option + Cmd + 0 Zoom to fit slide
Option + Shift + Cmd + 0 Zoom to fit content (including objects on extended canvas)
Option + Cmd + P Play slideshow
Space Play video during presentation
K Pause or resume video
J Rewind video one frame at a time when paused
L Fast-forward video one frame at a time when paused
I Jump to beginning of video
O Jump to end of video
¹Shortcut is available only when the dictation feature is enabled under System Preferences > Keyboard > Dictation.

²Use shortcut multiple times to select more words.

³Shortcut also works with changes in Pages when change tracking is enabled.

⁴Shortcut does not work in table cells.

⁵Shortcut is not available for Page Layout documents.

Going Beyond the Basics in iWork Apps

Want more ways to improve your iWork experience? Explore these advanced tips for Pages, Numbers, and Keynote.

Image Credit: Bram Naus on Unsplash

Read the full article: Keyboard Shortcuts for Pages, Numbers, and Keynote on Mac


Read Full Article

13 June 2020

This Week in Apps: Android 11 beta, Snapchat’s makeover, Apple’s WWDC20 plans


Welcome back to This Week in Apps, the Extra Crunch series that recaps the latest OS news, the applications they support and the money that flows through it all.

The app industry is as hot as ever, with a record 204 billion downloads and $120 billion in consumer spending in 2019. People are now spending three hours and 40 minutes per day using apps, rivaling TV. Apps aren’t just a way to pass idle hours — they’re a big business. In 2019, mobile-first companies had a combined $544 billion valuation, 6.5x higher than those without a mobile focus.

In this Extra Crunch series, we help you keep up with the latest news from the world of apps, delivered on a weekly basis.

This week, we’re looking at the mobile news from the events that didn’t happen this year because of the coronavirus pandemic. That includes the launch of Android 11 beta, which would have normally arrived during Google I/O, along with all the new Android developer tools. Snap also held its partner summit this week, where it announced a number of new Snapchat features, new partner relationships, and its plans for its AR ecosystem.

Not to be left out, Apple stole a little attention this week with its reveal of the WWDC20 schedule. Like many others, Apple’s conference is going virtual for the first time. It’s even redesigning its forums to aid with Apple engineer-developer interactions.

This week in app trends, we examine data from new reports on COVID’s impact on home improvement apps and hypercasual gaming.

Headlines

Android 11 beta launches along with new developer tools

After a series of delays and the cancellation of Google I/O, the Android 11 beta finally launched this week. This next major version of the Android OS is focused around three themes, says Google: People, Controls and Privacy.

On the People side, Android 11 gives conversation notifications a dedicated section at the top of the shade, offers a Bubbles API for messaging apps, improves Voice Access, adds new emoji and more. New consolidated keyboard suggestions allow Autofill apps and Input Method Editors (e.g., password managers and third-party keyboards), to now securely offer context-specific entries in the suggestion strip.


New device controls make it easier for users to access and control connected/smart home devices with a long press of the power button or access payment options. New media controls in an upcoming beta release will make it easier to switch the output device for audio or video content.


Read Full Article

5 Intermittent Fasting Apps and Guides to Lose Weight Without Diet Restrictions


Intermittent Fasting Apps and Guides to Lose Weight

Intermittent fasting is often seen as an easy way to diet since you don’t have restrictions on what you can eat. Instead, you restrict when you can eat. Learn, track, and fulfill the promise of the diet with these best intermittent fasting apps and websites.

The idea that you have to fast for some time, and then eat for some time, is much easier to follow than the rules of other diets. The most popular form of intermittent fasting (IF) is the 16:8 diet, also called Leangains.

Science says the Leangains diet works to help you lose weight. These apps will tell you which IF diet is right for you, explain the basics, and help you track your progress.

1. Do Fasting (Web): Calculate a Preview of Intermittent Fasting

How much weight will you lose by intermittent fasting? Find out with Do Fasting’s web-based calculator, which lets you calculate a preview of effects on your body before downloading anything.

The 12-step questionnaire asks basic questions like your meal times, normal physical activity, and your mindset towards the diet. Of course, you also need to add your height, current weight, and target weight.

Based on your answers, Do Fasting calculates how long it will take to reach your desired weight. It also shows graphs of where you’re likely to lose weight on your body, how much you’ll lose after the first week, and so on.

Do Fasting doesn’t give you an IF plan along with it; for that, you’ll need to download the app and pay for a subscription plan. But the free web app is a great way to understand and estimate how much weight you will lose by intermittent fasting, and how fast you will lose it.

2. 21 Day Hero (Web): Beginner’s Guide to Intermittent Fasting

21 Day Hero's beginner's guide to intermittent fasting is the best introduction and set of guidelines for free

This free article details everything you might want to learn about intermittent fasting. While 21 Day Hero is a paid app for IF meal plans and challenges, blog posts like this are free and offer great advice.

The beginner’s guide goes through all the steps. It explains the science behind intermittent fasting for weight loss, and how to do it safely and healthily.

You will learn about the different types of IF plans, like 16/8, 5-2, OMAD, Eat Stop Eat, and others. And there’s a clear list of what you can and can’t eat or drink while you’re fasting. The 21 Day Hero Beginner’s Guide also offers a seven-day preview of what its three-week plan looks like, and the advice is solid.

Getting on an IF diet is all about changing your mindset and retraining your body. The first week is about slowly ramping up to the 16-8 diet by small changes to your eating times, ingredients, and cooking habits. It’s a must-read before you start any IF plan.

3. Fasting App (Android): The Best Free Intermittent Fasting Tracker App

Fasting App is the most gorgeous and completely free intermittent fasting tracker app for Android today. Unfortunately, there is no iOS version at the moment. But it does so many little things right that it’s worth mentioning.

The app guides all types of IF users (beginner to advanced) to pick the right IF plan for them. You can then track your fasting hours, set reminders to begin and end the fast, and record all activity to see it in charts and graphs. It also syncs with Google Fit to track your weight loss and physical activity.

Fasting App is especially great for newcomers to IF. You’ll get a quick explanation of what your body is going through at any stage, corresponding to how many hours you have been fasting. The “Learn” tab has further information you might want to know about IF, with frequently asked questions like what you can and can’t eat. You’re getting it all in your app, without having to go search for it on the internet.

No features are behind a paywall in this app. However, it is ad-supported and those ads can get annoying after a while. If you like the app, it’ll be worth the $4 to stop the ads.

Download: Fasting for Android (Free)

4. Zero (Android, iOS): Most Popular App to Track Intermittent Fasting

Zero is the most popular app for intermittent fasting on the internet. It includes most of the features in the aforementioned Fasting App and has a smooth interface that’s easy for newcomers to get into. With badges and Google Fit data, Zero adds more gamification to the experience of intermittent fasting.

Apart from those features, Zero includes a journal to track how you’re feeling while on the diet. Mood tracking has shown to be an effective way to deal with retraining your mind, which is an integral part of intermittent fasting. You can simply track mood with emojis, or add notes to track deeper thoughts.

The app also has a robust “Learn” section where it regularly adds new videos made by its team of in-house medical officers. But many of these are behind a paywall, as are other features of the app. For example, you can’t set a custom IF plan in the free version. Get Zero if you plan to soon pay and upgrade to Zero Plus, but otherwise, Fasting App is a better tracker.

Download: Zero for Android | iOS (Free)

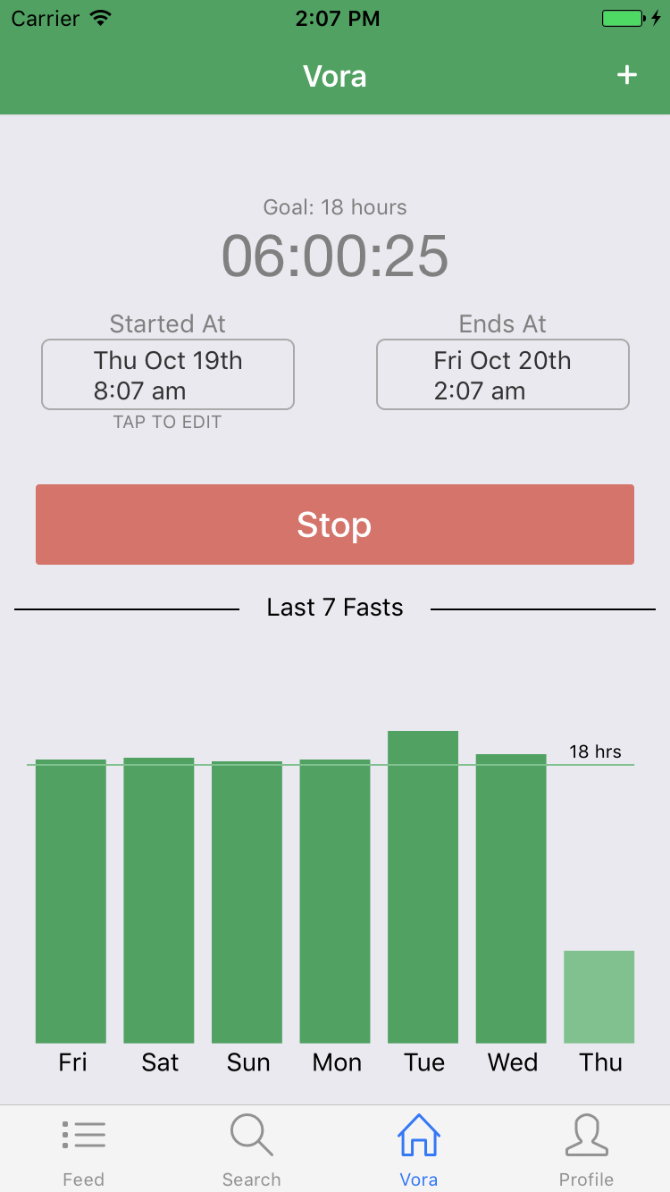
5. Vora (Android, iOS): Intermittent Fasting With Friends

Studies show that intermittent fasting is easier to stick to if you partner up with a buddy. You can motivate each other when the going gets tough, find someone who empathizes, and bond over your progress. Vora is an intermittent fasting tracker with a social component.

Sign up and connect with your friends who use the app, available on both Android and iPhone. Track your fasts like you would normally do with any of the other fasting trackers. And then share your data on the feed so that others can “like” your accomplishments. It’s a simple way to share your progress.

Vora is a barebones tracker and social feed, which is what a lot of people are looking for. It’ll keep records of your daily activity, weekly hours, and weight loss journey. You can also export all that data to a spreadsheet for free.

Download: Vora for Android | iOS (Free)

Mix Diet With Exercise

You will see results with intermittent fasting, no matter which of the diets you pick up. Maintain the basic idea that calories consumed should be less than calories expended. But weight loss isn’t the only path to being healthy.

It’s vital to balance your diet with exercise to ensure all-round health. If you’re wondering what’s quicker, read our article on diets vs. exercise.

Read the full article: 5 Intermittent Fasting Apps and Guides to Lose Weight Without Diet Restrictions


How to Squad Stream Together on Twitch


squad-stream

You can now stream with other people on Twitch thanks to a feature called Squad Stream. This allows up to four Twitch streamers to broadcast live together. Streamers get to collaborate, and viewers get to see multiple angles of the games being played.

How Twitch’s Squad Stream Feature Works

Squad Stream lets Twitch streamers go live together for the first time. Up to four streamers can broadcast live together in one window, sharing their viewers. Streamers can either start a Squad Stream or join an existing one from the Twitch dashboard.

Squad Stream has several benefits. It will help streamers foster new communities who all enjoy watching the same Twitch creators, enable popular streamers to help smaller streamers find an audience, and add an extra element (or three) for viewers.

How to Use Squad Stream on Twitch

If you’re a Twitch streamer keen to start a Squad Stream, go to your Creator Dashboard and open your Stream Manager. Then click the Quick Actions panel and find Squad Stream. You’ll see My Squad (to start a Squad Stream) and Invites (to accept an invite to one).

To start a Squad Stream, click Add a Channel and type the name of the Twitch channel you would like to invite. You can invite between one and three other channels. Once all of the channels have accepted your invites, click Start Squad Stream to begin.

If you’re a Twitch viewer keen to watch a Squad Stream, you just need to look for the “Squad Stream” tag when browsing. Once you find one, you can watch a Squad Stream, and click on each channel in turn to place them in the primary slot.

Why Squad Stream Is Only Available to Twitch Partners

Squad Stream is currently only available to Partners. However, Twitch plans to offer the feature to Affiliates and then all streamers over time. This is due to “the need for video quality options,” which only Partners currently receive by default.

In a nutshell, video quality options (or transcodes) enable Twitch to adjust the streams in certain slots. Without this option, Twitch would try to deliver four 720p+ streams at once. Twitch goes into more detail in a post on the Twitch Blog all about Squad Stream.

Hosting and Raiding Are So Passe

Twitch already offers a couple of ways for streamers to help each other out. There’s Host mode, which allows one Twitch streamer to host another channel’s live broadcast. And Raids, which allows one Twitch streamer to send their viewers to another channel.

Twitch streamers have actually been collaborating in this way for a while now using tools like MultiTwitch. However, Squad Stream should make the practice more popular. In the meantime, you should read our tips for building a live streaming audience.

Read the full article: How to Squad Stream Together on Twitch


Read Full Article

5 Intermittent Fasting Apps and Guides to Lose Weight Without Diet Restrictions


Intermittent Fasting Apps and Guides to Lose Weight

Intermittent fasting is often seen as an easy way to diet since you don’t have restrictions on what you can eat. Instead, you restrict when you can eat. Learn, track, and fulfill the promise of the diet with these best intermittent fasting apps and websites.

The idea that you have to fast for some time, and then eat for some time, is much easier to follow than the rules of other diets. The most popular form of intermittent fasting (IF) is the 16:8 diet, also called Leangains.

Science says the Leangains diet works to help you lose weight. These apps will tell you which IF diet is right for you, explain the basics, and help you track your progress.

1. Do Fasting (Web): Calculate a Preview of Intermittent Fasting

How much weight will you lose by intermittent fasting? Find out with Do Fasting’s web-based calculator, which lets you calculate a preview of effects on your body before downloading anything.

The 12-step questionnaire asks basic questions like your meal times, normal physical activity, and your mindset towards the diet. Of course, you also need to add your height, current weight, and target weight.

Based on your answers, Do Fasting calculates how long it will take to reach your desired weight. It also shows graphs of where you’re likely to lose weight on your body, how much you’ll lose after the first week, and so on.

Do Fasting doesn’t give you an IF plan along with it; for that, you’ll need to download the app and pay for a subscription plan. But the free web app is a great way to understand and estimate how much weight you will lose by intermittent fasting, and how fast you will lose it.

2. 21 Day Hero (Web): Beginner’s Guide to Intermittent Fasting

21 Day Hero's beginner's guide to intermittent fasting is the best introduction and set of guidelines for free

This free article details everything you might want to learn about intermittent fasting. While 21 Day Hero is a paid app for IF meal plans and challenges, blog posts like this are free and offer great advice.

The beginner’s guide goes through all the steps. It explains the science behind intermittent fasting for weight loss, and how to do it safely and healthily.

You will learn about the different types of IF plans, like 16/8, 5-2, OMAD, Eat Stop Eat, and others. And there’s a clear list of what you can and can’t eat or drink while you’re fasting. The 21 Day Hero Beginner’s Guide also offers a seven-day preview of what its three-week plan looks like, and the advice is solid.

Getting on an IF diet is all about changing your mindset and retraining your body. The first week is about slowly ramping up to the 16-8 diet by small changes to your eating times, ingredients, and cooking habits. It’s a must-read before you start any IF plan.

3. Fasting App (Android): The Best Free Intermittent Fasting Tracker App

Fasting App is the most gorgeous and completely free intermittent fasting tracker app for Android today. Unfortunately, there is no iOS version at the moment. But it does so many little things right that it’s worth mentioning.

The app guides all types of IF users (beginner to advanced) to pick the right IF plan for them. You can then track your fasting hours, set reminders to begin and end the fast, and record all activity to see it in charts and graphs. It also syncs with Google Fit to track your weight loss and physical activity.

Fasting App is especially great for newcomers to IF. You’ll get a quick explanation of what your body is going through at any stage, corresponding to how many hours you have been fasting. The “Learn” tab has further information you might want to know about IF, with frequently asked questions like what you can and can’t eat. You’re getting it all in your app, without having to go search for it on the internet.

No features are behind a paywall in this app. However, it is ad-supported and those ads can get annoying after a while. If you like the app, it’ll be worth the $4 to stop the ads.

Download: Fasting for Android (Free)

4. Zero (Android, iOS): Most Popular App to Track Intermittent Fasting

Zero is the most popular app for intermittent fasting on the internet. It includes most of the features in the aforementioned Fasting App and has a smooth interface that’s easy for newcomers to get into. With badges and Google Fit data, Zero adds more gamification to the experience of intermittent fasting.

Apart from those features, Zero includes a journal to track how you’re feeling while on the diet. Mood tracking has shown to be an effective way to deal with retraining your mind, which is an integral part of intermittent fasting. You can simply track mood with emojis, or add notes to track deeper thoughts.

The app also has a robust “Learn” section where it regularly adds new videos made by its team of in-house medical officers. But many of these are behind a paywall, as are other features of the app. For example, you can’t set a custom IF plan in the free version. Get Zero if you plan to soon pay and upgrade to Zero Plus, but otherwise, Fasting App is a better tracker.

Download: Zero for Android | iOS (Free)

5. Vora (Android, iOS): Intermittent Fasting With Friends

Studies show that intermittent fasting is easier to stick to if you partner up with a buddy. You can motivate each other when the going gets tough, find someone who empathizes, and bond over your progress. Vora is an intermittent fasting tracker with a social component.

Sign up and connect with your friends who use the app, available on both Android and iPhone. Track your fasts like you would normally do with any of the other fasting trackers. And then share your data on the feed so that others can “like” your accomplishments. It’s a simple way to share your progress.

Vora is a barebones tracker and social feed, which is what a lot of people are looking for. It’ll keep records of your daily activity, weekly hours, and weight loss journey. You can also export all that data to a spreadsheet for free.

Download: Vora for Android | iOS (Free)

Mix Diet With Exercise

You will see results with intermittent fasting, no matter which of the diets you pick up. Maintain the basic idea that calories consumed should be less than calories expended. But weight loss isn’t the only path to being healthy.

It’s vital to balance your diet with exercise to ensure all-round health. If you’re wondering what’s quicker, read our article on diets vs. exercise.

Read the full article: 5 Intermittent Fasting Apps and Guides to Lose Weight Without Diet Restrictions


Read Full Article

The 8 Best Sites for Quality HTML Coding Examples


The very first thing to learn when studying web development is how to code with HTML. More importantly, being able to code in HTML5 using all the latest techniques.

Everything you see on a website is built with HTML and CSS (with some JavaScript sprinkled in). There is a lot to learn, so what are the best resources to get started?

There are some awesome websites that offer well-designed HTML coding examples and tutorials that can show you the most effective ways to code.

Here are eight sites that offer good HTML code examples and help you become an HTML expert.

1. HTML Dog

HTML Sandbox for HTML Coding Example

HTML Dog has an offering of tutorials, techniques, references, and examples of HTML code. They also offer CSS and JavaScript, which is an added bonus if you’re a web developer. HTML Dog uses HTML5 so you’re getting up to date information.

Their HTML examples cover all kinds of syntax with demonstrations for each.

Clicking on any of the elements will open an interactive coding page. HTML Dog provides examples in code boxes that you can copy and paste into your own HTML code. It’s a good way to merge learning and working.

You can see the live HTML output of the sample code on the pane on the right. It’s a neat sandbox to play around with all kinds of code.

2. W3Schools

W3Schools HTML Code Example

W3Schools is widely regarded as a top resource for web developers, boasting coding examples, from PHP to JavaScript (what is JavaScript?) You’ll also find a section with basic HTML coding examples.

Just like HTML Dog, they’ve incorporated a split-screen tool to try coding in. You can test out the HTML you learn in each lesson and experiment with different pieces of code. Code your HTML, click Run, and you’ll see how the code would look on a real HTML page.

3. Mozilla MDN

MDN HTML Guide With Examples

The Mozilla Developer Network (MDN) has documentation for web developers. There is a comprehensive list of HTML tutorials and code examples to try. Most of examples are built into their tutorials, so working through their path will give you lots of opportunities to learn.

MDN is highly regarded by developers for its detail. They cover web development in great detail, which works to your advantage as their sections tie into each other. You’ll learn good behavior so that when you start coding CSS or JavaScript everything runs smoothly.

The detail can be a little daunting at first. The sections are very thorough, but you’ll get the hang of it! This is a great resource to keep around as you get more advanced, you’ll never really outgrow the tutorials.

4. freeCodeCamp

freeCodeCamp HTML Coding Examples

freeCodeCamp is known for its online courses and training guides for coders. They have a great section of HTML examples as well. The pictured tutorial covers code examples from beginner elements like headers to advanced concepts like semantic markup.

Each section has examples of HTML so you can see the element in action. It’s a great resource to come back to as you learn to code.

5. Codecademy

HTML web page code sample

One of the most well-known websites for learning programming is Codecademy. When it comes to learning HTML, Codecademy doesn’t disappoint with an HTML training course.

The course is around nine hours of content and covers most of the language. Four sections are covered in-depth: elements, tables, forms, and semantic HTML.

The course work area is quite advanced and gives you the flexibility to play around in the sandbox. You can also switch it to full screen to see what your website looks like in a full browser window.

The nice thing about this course is that it also incorporates learning about using CSS to format your pages. This is helpful since HTML and CSS work hand-in-hand to create web apps.

6. HTML.com

HTML.com Coding Examples

HTML.com is a website dedicated to all things HTML. Opening the site you will see a beginner’s guide to learning the language from ground zero. It’s worth a read before diving into the syntax.

Once you’re ready to learn HTML.com has many tutorials for various subjects. Tutorials like HTML document structure, using links in HTML, and working with images. Their tutorials are good reads with lots of code examples throughout to keep you sharp. You will also find an alphabetized list of HTML elements if you want to choose one to learn more about.

7. BitDegree

HTML Coding Examples on BitDegree

BitDegree focuses on interactive code learning so it’s very valuable as an HTML guide. You can read guides on every HTML element. Each guide explains what the element does and shows you a piece of code using it.

Each piece of code can be opened in their sandbox to try out. It’s a dictionary for HTML elements! You can spend plenty of time here experimenting with a quick reference for what everything does.

8. Tutorials Point

Tutorials point HTML Coding Examples

Tutorials Point is a no-frills HTML resource. It’s easy to navigate and pinpoint HTML elements for coding examples. Much like the rest of these examples, it’s a good choice to bookmark and have on hand when you’re writing code.

More HTML Code Examples and Resources

There is nothing quite as exhilarating as spending some time coding your own website and revealing your masterpiece to the world. If you study HTML you’re on your way to joining the ranks of web developers who have built their own apps. These 8 sources of HTML coding examples are all nice to save for when you need them.

If you want to dive further into HTML check out 17 simple HTML code pieces you can learn in minutes. Learning the basics of HTML is a great place to start writing web apps. Once you get far enough with the language it can do some amazing things.

Check out our guide to understanding the basics of HTML code, it goes hand in hand with a lot of these examples.

Read the full article: The 8 Best Sites for Quality HTML Coding Examples


How to Use SSH in Windows: 5 Easy Ways


SSH (Secure Shell) is an encrypted network protocol used for connecting to devices over a network or the internet. Linux computers come with a preinstalled SSH tool that can be accessed with a terminal command, but what about Windows?

Several SSH options are available for Windows, including a built-in SSH tool. Here’s how to use SSH in Windows using native and third-party apps.

Why Do You Need SSH on Windows?

SSH is the de facto solution for securely accessing remote terminals on Linux and other UNIX-like systems. If you have a remote SSH server you want to access, you need an SSH client. SSH can be used for anything from remotely accessing a computer on your network to managing and backing up a website.

While Windows has long included the Telnet client, it is extremely insecure— so you should only use it between directly connected devices. For safe, secure, encrypted SSH, you need better software. Five tools are available for SSH in Windows:

  1. PuTTY
  2. Windows PowerShell
  3. Secure Shell for Google Chrome
  4. OpenSSH for Cygwin Terminal
  5. FileZilla’s SSH FTP Feature

Keep reading to find out how to use SSH Windows with each of these utilities.

1. PuTTY for Windows Desktop

SSH in Windows using PuTTY

PuTTY is the most popular app for connecting to SSH servers on Windows. PuTTY’s interface may seem a bit intimidating and complicated at first, but it’s fairly simple once you start using it.

To use PuTTY, all you really need to do is launch putty.exe. Here, enter the hostname (or IP address) of the remote server, ensure the port is correct, and click Open. PuTTY will connect to the server and prompt you for a username and password.

You can also save this session information if you like. Click the Default Settings option then click on Save and PuTTY will use your saved settings every time it opens.

Alternatively, set a different profile for each connection, input a name in the Saved Sessions field and click Save.

Learn how to use SSH on Windows 10 with PuTTY

Download: PuTTY (Free)

2. Use Windows PowerShell for SSH

Use Windows PowerShell as an SSH client

If you want a Microsoft-built Windows command line SSH tool that is built into the operating system, you’re in luck.

Windows PowerShell has slowly been taking over from the Windows Command Prompt app since it was introduced in Windows 7. More recently, support for OpenSSH has been added, which you can incorporate in PowerShell as follows:

  1. Press WIN + I to open Settings.
  2. Open Apps > Apps & features
  3. Click Optional features
  4. Click +Add a feature
  5. Browse the list to find OpenSSH Client
  6. Select and click Install
  7. When this has completed reboot Windows 10

With OpenSSH added, you can use it by opening Windows PowerShell (right-click Start > PowerShell) and typing a connection command. For example:

ssh username@192.1.1.10

You’ll be prompted for your password, so enter this and agree to the security certificate.

3. Secure Shell for Google Chrome

Google provides an SSH client called Secure Shell App, that can be added to the Chrome browser. Just install the Secure Shell app from the Chrome Web store. Although it runs in the Chrome browser, it runs completely offline so you don’t need internet access to use it. So it works as well with devices on your local network as it does with remote servers.

Secure Shell App opens as a browser tab. Simply enter your credentials and the hostname (IP address) of the remote SSH server. You can also append additional SSH command-line arguments, if necessary.

As with other Chrome web apps, the Secure Shell App can open in a dedicated window to separate it from your main browser.

As Secure Shell is a Chrome web app, it’s also available for macOS, Linux, and even Chrome OS.

Download: Secure Shell App for Google Chrome

4. OpenSSH for Cygwin Terminal

If you’re routinely using the standard SSH command on Linux, macOS, and other UNIX-like systems, Cygwin features SSH support.

If you’re new to SSH, you’ll probably want to use a graphical option like PuTTY. However, if you’re experienced with command line activity, you’ll find Cygwin’s OpenSSH implantation works as it does on other platforms.

Cygwin is a large installation package so you may prefer to install just OpenSSH.

To do this, run the downloaded installer and when you’re prompted to Select Packages, search for OpenSSH. Expand Net and in the New column, click Skip so it displays the version to download.

Click Next to proceed, review the packages to be installed, then Next again.

After the installation process finishes, launch Cygwin’s Terminal application from the Start menu. To start an SSH connection, use the same ssh command that you’d run on Linux and other UNIX-like operating systems.

While a good solution, Cygwin can be difficult to set up.

Download: Cygwin (Free)

5. SSH Over FTP With FileZilla

SSH Over FTP With FileZilla

Often the main reason to use SSH to communicate to a remote device is to upload files. Commonly, this is because you’re managing a web server and want to upload a web application (e.g. WordPress).

FileZilla is an open source FTP (File Transfer Protocol) tool that has support for SFTP or SSH File Transfer Protocol. Obviously, this makes FTP transfers far more secure.

To use SSH in FileZilla:,

  • Open File > Site Manager to create a new connection
  • Add a New site
  • Select SFTP as the Protocol
  • Input the server IP address or hostname
  • Add the username and password
  • Click Connect

File transfers will now be made over SSH.

Download: FileZilla (Free)

Which Windows SSH Client Should You Use?

So which SSH client is the best? Well, that depends on what you’re looking for:

  • If you like the idea of an SSH client that runs in your browser, grab Secure Shell for Chrome. Bear in mind that Secure Shell for Chrome is the most limited option, and it won’t let you perform SSH tunneling.
  • If you want a powerful SSH application with a graphical interface that allows you to configure settings and save session information, use PuTTY. It’s the most popular Windows SSH client for a reason and it’s fairly simple to learn the basics.
  • For a reliable SSH command line experience, use Windows PowerShell or Cygwin.

If we had to recommend one, we’d say most users should go with PuTTY.

Still not sure? Here’s a closer look at SSH in PowerShell compared with PuTTY.

Read the full article: How to Use SSH in Windows: 5 Easy Ways


How to Turn Off Automatic App Updates in Windows 10


windows-10-auto-updates

Most of the time, automatic app updates are convenient. Not having to check for new versions regularly saves you time and keeps your apps secure.

However, sometimes you might want to stop apps from auto-updating. Maybe the latest version is bugged, or you need an older version for a specific reason. We’ll show you how to stop the auto-update feature in apps on Windows 10, where possible.

How to Stop Auto-Update of Store Apps in Windows 10

While it’s probably not your main source for downloading software, the Microsoft Store is home to lots of apps. Check out the differences between desktop and Store apps if you’re not familiar.

Since the Microsoft Store provides a centralized place for downloading apps, turning off auto-update for it is simple. Type Microsoft Store into the Start Menu to launch it. Once it’s open, click the three-dot Menu button at the top-right and choose Settings.

On the Settings page, disable the Update apps automatically slider. That’s all you have to do—now Store apps won’t update in the background.

Microsoft Store Automatic App Updates

To update apps manually in the future, open the Menu again, and select Downloads and updates. There, you’ll see any pending updates and can install them one-by-one or all at once with the Update all link.

How to Stop Auto-Update in Windows Desktop Apps

While the process for Store apps is pretty simple, you might want to disable auto-updates for traditional desktop software too. Unfortunately, this isn’t consistent across programs, so you’ll have to do a bit of digging for your particular app.

Some desktop apps have a toggle to disable automatic updates in their Settings panel. For example, Visual Studio Code has a checkbox to disable background updates in its Settings, plus a dropdown box to choose how it delivers updates.

Visual Studio Code Updates

Unfortunately, many apps (such as Dropbox, Spotify, and Slack) don’t have an easy toggle to disable updates. Because they receive updates regularly, their apps check for and install new versions when you launch the app.

In some cases, you can block the apps from updating by changing the permissions in their app data folders or through Command Prompt commands, but we wouldn’t recommend this unless you absolutely have to. These are hacky workarounds that could stop working in the future, and it’s safer to install the new versions anyway.

If you must disable auto-update for an app like this, searching Google for specific instructions for that app is your best bet, since it varies so much.

If you really want to block updates for a particular program, you can use Windows Firewall to prevent it from getting online. However, this is only suitable for apps that don’t require network access to function. Follow the first method in our guide to blocking Internet Explorer from accessing the internet for help with this.

How to Turn Off Automatic Windows Updates

Windows 10 Windows Update Paused

As you probably know, Windows 10 automatically updates itself all the time. If you want to prevent this, we’ve shown some ways to turn off Windows update.

Most of them are temporary; if you do have to turn off Windows Update, you should turn it back on again before long to make sure you have the latest security updates. This will help if you don’t want your system to restart from updates or need to keep a buggy update away for a bit, though.

If You’re Having Problems With an App

Chances are that if you’re looking to disable automatic updates, you probably have an issue with the latest version of the app. If that’s the case, you may be able to fix the issue without disabling updates.

First, reboot your PC if you haven’t already. This simple step can help clear up issues, even if only one app is having a problem.

After that, try fully uninstalling and reinstalling the program. This could clear up any corrupted files that are causing it to crash or perform poorly. You should also try temporarily disabling your antivirus software, which can interfere with proper app performance.

It’s also worth running a Windows system file checker (SFC) scan to look for any OS file issues. To do so, right-click on the Start button (or press Win + X) and click Command Prompt (Admin) or Windows PowerShell (Admin) from the list. Then enter this command:

sfc /scannow

This will take some time but if it finds problems SFC will attempt to fix them automatically.

In case you’re having problems with a Store app, see our Windows 10 Store app troubleshooting guide. Otherwise, consider trying some free Windows tools that help fix issues.

Keep Your Software Up-to-Date

Keep in mind that we’ve shown you how to stop programs from updating for troubleshooting purposes. In most cases, you should let apps update automatically, as this protects your system. Running outdated copies of software exposes you to security holes in previous versions.

Thus, after you’re done turning off automatic updates for troubleshooting purposes, make sure you know how to update everything on your Windows 10 PC.

Read the full article: How to Turn Off Automatic App Updates in Windows 10


How to Use SSH in Windows: 5 Easy Ways


SSH (Secure Shell) is an encrypted network protocol used for connecting to devices over a network or the internet. Linux computers come with a preinstalled SSH tool that can be accessed with a terminal command, but what about Windows?

Several SSH options are available for Windows, including a built-in SSH tool. Here’s how to use SSH in Windows using native and third-party apps.

Why Do You Need SSH on Windows?

SSH is the de facto solution for securely accessing remote terminals on Linux and other UNIX-like systems. If you have a remote SSH server you want to access, you need an SSH client. SSH can be used for anything from remotely accessing a computer on your network to managing and backing up a website.

While Windows has long included the Telnet client, it is extremely insecure— so you should only use it between directly connected devices. For safe, secure, encrypted SSH, you need better software. Five tools are available for SSH in Windows:

  1. PuTTY
  2. Windows PowerShell
  3. Secure Shell for Google Chrome
  4. OpenSSH for Cygwin Terminal
  5. FileZilla’s SSH FTP Feature

Keep reading to find out how to use SSH Windows with each of these utilities.

1. PuTTY for Windows Desktop

SSH in Windows using PuTTY

PuTTY is the most popular app for connecting to SSH servers on Windows. PuTTY’s interface may seem a bit intimidating and complicated at first, but it’s fairly simple once you start using it.

To use PuTTY, all you really need to do is launch putty.exe. Here, enter the hostname (or IP address) of the remote server, ensure the port is correct, and click Open. PuTTY will connect to the server and prompt you for a username and password.

You can also save this session information if you like. Click the Default Settings option then click on Save and PuTTY will use your saved settings every time it opens.

Alternatively, set a different profile for each connection, input a name in the Saved Sessions field and click Save.

Learn how to use SSH on Windows 10 with PuTTY

Download: PuTTY (Free)

2. Use Windows PowerShell for SSH

Use Windows PowerShell as an SSH client

If you want a Microsoft-built Windows command line SSH tool that is built into the operating system, you’re in luck.

Windows PowerShell has slowly been taking over from the Windows Command Prompt app since it was introduced in Windows 7. More recently, support for OpenSSH has been added, which you can incorporate in PowerShell as follows:

  1. Press WIN + I to open Settings.
  2. Open Apps > Apps & features
  3. Click Optional features
  4. Click +Add a feature
  5. Browse the list to find OpenSSH Client
  6. Select and click Install
  7. When this has completed reboot Windows 10

With OpenSSH added, you can use it by opening Windows PowerShell (right-click Start > PowerShell) and typing a connection command. For example:

ssh username@192.1.1.10

You’ll be prompted for your password, so enter this and agree to the security certificate.

3. Secure Shell for Google Chrome

Google provides an SSH client called Secure Shell App, that can be added to the Chrome browser. Just install the Secure Shell app from the Chrome Web store. Although it runs in the Chrome browser, it runs completely offline so you don’t need internet access to use it. So it works as well with devices on your local network as it does with remote servers.

Secure Shell App opens as a browser tab. Simply enter your credentials and the hostname (IP address) of the remote SSH server. You can also append additional SSH command-line arguments, if necessary.

As with other Chrome web apps, the Secure Shell App can open in a dedicated window to separate it from your main browser.

As Secure Shell is a Chrome web app, it’s also available for macOS, Linux, and even Chrome OS.

Download: Secure Shell App for Google Chrome

4. OpenSSH for Cygwin Terminal

If you’re routinely using the standard SSH command on Linux, macOS, and other UNIX-like systems, Cygwin features SSH support.

If you’re new to SSH, you’ll probably want to use a graphical option like PuTTY. However, if you’re experienced with command line activity, you’ll find Cygwin’s OpenSSH implantation works as it does on other platforms.

Cygwin is a large installation package so you may prefer to install just OpenSSH.

To do this, run the downloaded installer and when you’re prompted to Select Packages, search for OpenSSH. Expand Net and in the New column, click Skip so it displays the version to download.

Click Next to proceed, review the packages to be installed, then Next again.

After the installation process finishes, launch Cygwin’s Terminal application from the Start menu. To start an SSH connection, use the same ssh command that you’d run on Linux and other UNIX-like operating systems.

While a good solution, Cygwin can be difficult to set up.

Download: Cygwin (Free)

5. SSH Over FTP With FileZilla

SSH Over FTP With FileZilla

Often the main reason to use SSH to communicate to a remote device is to upload files. Commonly, this is because you’re managing a web server and want to upload a web application (e.g. WordPress).

FileZilla is an open source FTP (File Transfer Protocol) tool that has support for SFTP or SSH File Transfer Protocol. Obviously, this makes FTP transfers far more secure.

To use SSH in FileZilla:,

  • Open File > Site Manager to create a new connection
  • Add a New site
  • Select SFTP as the Protocol
  • Input the server IP address or hostname
  • Add the username and password
  • Click Connect

File transfers will now be made over SSH.

Download: FileZilla (Free)

Which Windows SSH Client Should You Use?

So which SSH client is the best? Well, that depends on what you’re looking for:

  • If you like the idea of an SSH client that runs in your browser, grab Secure Shell for Chrome. Bear in mind that Secure Shell for Chrome is the most limited option, and it won’t let you perform SSH tunneling.
  • If you want a powerful SSH application with a graphical interface that allows you to configure settings and save session information, use PuTTY. It’s the most popular Windows SSH client for a reason and it’s fairly simple to learn the basics.
  • For a reliable SSH command line experience, use Windows PowerShell or Cygwin.

If we had to recommend one, we’d say most users should go with PuTTY.

Still not sure? Here’s a closer look at SSH in PowerShell compared with PuTTY.

Read the full article: How to Use SSH in Windows: 5 Easy Ways


Read Full Article