23 May 2020

First major GDPR decisions looming on Twitter and Facebook


The lead data regulator for much of big tech in Europe is moving inexorably towards issuing its first major cross-border GDPR decision — saying today it’s submitted a draft decision related to Twitter’s business to its fellow EU watchdogs for review.

“The draft decision focusses on whether Twitter International Company has complied with Articles 33(1) and 33(5) of the GDPR,” said the Irish Data Protection Commission (DPC) in a statement.

Europe’s General Data Protection Regulation came into application two years ago, as an update to the European Union’s long-standing data protection framework which bakes in supersized fines for compliance violations. More interestingly, regulators have the power to order that violating data processing cease. While, in many EU countries, third parties such as consumer rights groups can file complaints on behalf of individuals.

Since GDPR begun being applied, there have been thousands of complaints filed across the bloc, targeting companies large and small — alongside a rising clamour around a lack of enforcement in major cross-border cases pertaining to big tech.

So the timing of the DPC’s announcement on reaching a draft decision in its Twitter probe is likely no accident. (GDPR’s actual anniversary of application is May 25.)

The draft decision relates to an inquiry the regulator instigated itself, in November 2018, after the social network had reported a data breach — as data controllers are required to do promptly under GDPR, risking penalties should they fail to do so.

Other interested EU watchdogs (all of them in this case) will now have one month to consider the decision — and lodge “reasoned and relevant objections” should they disagree with the DPC’s reasoning, per the GDPR’s one-stop-shop mechanism which enables EU regulators to liaise on cross-border inquiries.

In instances where there is disagreement between DPAs on a decision the regulation contains a dispute resolution mechanism (Article 65) — which loops in the European Data Protection Board (EDPB) to make a final decision on a majority basis.

On the Twitter decision, the DPC told us it’s hopeful this can be finalized in July.

Commissioner Helen Dixon has previously said the first cross border decisions would be coming “early” in 2020. However the complexity of working through new processes — such as the one-stop-shop — appear to have taken EU regulators longer than hoped.

The DPC is also dealing with a massive case load at this point, with more than 20 cross border investigations related to complaints and/or inquiries still pending decisions — with active probes into the data processing habits of a large number of tech giants; including Apple, Facebook, Google, Instagram, LinkedIn, Tinder, Verizon (TechCrunch’s parent company) and WhatsApp — in addition to its domestic caseload (operating with a budget that’s considerably less than it requested from the Irish government).

The scope of some of these major cross-border inquiries may also have bogged Ireland’s regulator down.

But — two years in — there are signs of momentum picking up, with the DPC’s deputy commissioner, Graham Doyle, pointing today to developments on four additional investigations from the cross-border pile — all of which concern Facebook owned platforms.

The furthest along of these is a probe into the level of transparency the tech giant provides about how user data is shared between its WhatsApp and Facebook services.

“We have this week sent a preliminary draft decision to WhatsApp Ireland Limited for their submissions which will be taken in to account by the DPC before preparing a draft decision in that matter also for Article 60 purposes,” said Doyle in a statement on that. “The inquiry into WhatsApp Ireland examines its compliance with Articles 12 to 14 of the GDPR in terms of transparency including in relation to transparency around what information is shared with Facebook.”

The other three cases the DPC said it’s making progress on relate to GDPR consent complaints filed back in May 2018 by the EU privacy rights not-for-profit, noyb.

noyb argues that Facebook uses a strategy of “forced consent” to continue processing individuals’ personal data — when the standard required by EU law is for users to be given a free choice unless consent is strictly necessary for provision of the service. (And noyb argues that microtargeted ads are not core to the provision of a social networking service; contextual ads could instead be served, for example.)

Back in January 2019, Google was fined $57M by France’s data watchdog, CNIL, over a similar complaint.

Per its statement today, the DPC said it has now completed the investigation phase of this complaint-based inquiry which it said is focused on “Facebook Ireland’s obligations to establish a lawful basis for personal data processing”.

“This inquiry is now in the decision-making phase at the DPC,” it added.

In further related developments it said it’s sent draft inquiry reports to the complainants and companies concerned for the same set of complaints for (Facebook owned) Instagram and WhatsApp. 

Doyle declined to give any firm timeline for when any of these additional inquiries might yield final decisions. But a summer date would, presumably, be the very earliest timeframe possible.

The regulator’s hope looks to be that once the first cross-border decision has made it through the GDPR’s one-stop-shop mechanism — and yielded something all DPAs can sign up to — it will grease the tracks for the next tranche of decisions.

That said, not all inquiries and decisions are equal clearly. And what exactly the DPC decides in such high profile probes will be key to whether or not there’s disagreement from other data protection agencies. Different EU DPAs can take a harder or softer line on applying the bloc’s rules, with some considerably more ‘business friendly‘ than others. Albeit, the GDPR was intended to try to shrink differences of application.

If there is disagreement among regulators on major cross border cases, such as the Facebook ones, the GDPR’s one-stop-shop mechanism will require more time to work through to find consensus. So critics of the regulation are likely to have plenty of attack area still.

Some of the inquiries the DPC is leading are also likely to set standards which could have major implications for many platforms and digital businesses so there will be vested interests seeking to influence outcomes on all sides. But with GDPR hitting its second birthday — and still hardly any decision-shaped lumps taken out of big tech — the regional pressure for enforcements to get flowing is massive.

Given the blistering pace of tech developments — and the market muscle of big tech being applied to steamroller individual rights — EU regulators have to be able to close the gap between investigation and enforcement or watch their flagship framework derided as a paper tiger…

Schrems II

Summer is also shaping up to be an interesting time for privacy watchers for another reason, with a landmark decision due from Europe’s top court on July 16 on the so called ‘Schrems II’ case (named for the Austrian lawyer, privacy rights campaigner and noyb founder, Max Schrems, who lodged the original complaint) — which relates to the legality of Standard Contractual Clauses (SCC) as a mechanism for personal data transfers out of the EU.

The DPC’s statement today makes a point of flagging this looming decision, with the regulator writing: “The case concerns proceedings initiated and pursued in the Irish High Court by the DPC which raised a number of significant questions about the regulation of international data transfers under EU data protection law. The judgement from the CJEU on foot of the reference made arising from these proceedings is anticipated to bring much needed clarity to aspects of the law and to represent a milestone in the law on international transfers.”

A legal opinion issued at the end of last year by an influential advisor to the court emphasized that EU data protection authorities have an obligation to step in and suspend data transfers by SCC if they are being used to send citizens’ data to a place where their information cannot be adequately protected.

Should the court hold to that view, all EU DPAs will have an obligation to consider the legality of SCC transfers to the US “on a case-by-case basis”, per Doyle.

“It will be in every single case you’d have to go and look at the set of circumstances in every single case to make a judgement whether to instruct them to cease doing it. There won’t be just a one size fits all,” he told TechCrunch. “It’s an extremely significant ruling.”

(If you’re curious about ‘Schrems I’, read this from 2015.)


Read Full Article

22 May 2020

Actionable solutions to support the mental health of US veterans | Charles P. Smith

Actionable solutions to support the mental health of US veterans | Charles P. Smith

Veterans in the United States take their own lives at an alarming rate. Suggesting new ways to prioritize mental health in the military, veterans advocate Charles P. Smith offers a data-driven plan to help prevent suicide and ensure service members get proper care before, during and after active duty.

Click the above link to download the TED talk.

Apple’s handling of Siri snippets back in the frame after letter of complaint to EU privacy regulators


Apple is facing fresh questions from its lead data protection regulator in Europe following a public complaint by a former contractor who revealed last year that workers doing quality grading for Siri were routinely overhearing sensitive user data.

Earlier this week the former Apple contractor, Thomas le Bonniec, sent a letter to European regulators laying out his concern at the lack of enforcement on the issue — in which he wrote: “I am extremely concerned that big tech companies are basically wiretapping entire populations despite European citizens being told the EU has one of the strongest data protection laws in the world. Passing a law is not good enough: it needs to be enforced upon privacy offenders.”

The timing of the letter comes as Europe’s updated data protection framework, the GDPR, reaches its two-year anniversary — facing ongoing questions around the lack of enforcement related to a string of cross-border complaints.

Ireland’s Data Protection Commission (DPC) has been taking the brunt of criticism over whether the General Data Protection Regulation is functioning as intended — as a result of how many tech giants locate their regional headquarters on its soil (Apple included).

Responding to the latest Apple complaint from le Bonniec, the DPC’s deputy commissioner, Graham Doyle, told TechCrunch: “The DPC engaged with Apple on this issue when it first arose last summer and Apple has since made some changes. However, we have followed up again with Apple following the release of this public statement and await responses.”

At the time of writing Apple had not responded to a request for comment.

The Irish DPC is currently handling with more than 20 major cross-border cases, as lead data protection agency — probing the data processing activities of companies including Apple, Facebook, Google and Twitter. So le Bonniec’s letter adds to the pile of pressure on commissioner Helen Dixon to begin issuing decisions vis-a-vis cross-border GDPR complaints. (Some of which are now a full two years’ old.)

Last year Dixon said the first decisions for these cross-border cases would be coming “early” in 2020.

At issue is that if Europe’s recently updated flagship data protection regime isn’t seen to be functioning well two years in — and is still saddled with a bottleneck of high profile cases, rather than having a string of major decisions to its name — it will be increasingly difficult for the region’s lawmakers to sell it as a success.

At the same time the existence of a pan-EU data protection regime — and the attention paid to contravention, by both media and regulators — has had a tangible impact on certain practices.

Apple suspended human review of Siri snippets globally last August, after The Guardian had reported that contractors it employed to review audio recordings of users of its voice assistant tech — for quality grading purposes — regularly listened in to sensitive content such as medical information and even recordings of couples having sex.

Later the same month it made changes to the grading program, switching audio review to an explicitly opt-in process. It also brought the work in house — meaning only Apple employees have since been reviewing Siri users’ opt-in audio.

The tech giant also apologized. But did not appear to face any specific regulatory sanction for practices that do look to have been incompatible with Europe’s laws — owing to the lack of transparency and explicit consent around the human review program. Hence le Bonniec’s letter of complaint now.

A number of other tech giants also made changes to their own human grading programs around the same time.

Doyle also pointed out that guidance for EU regulators on voice AI tech is in the works, saying: “It should be noted that the European Data Protection Board is working on the production of guidance in the area of voice assistant technologies.”

We’ve reached out to the European Data Protection Board for comment.


Read Full Article

New non-profit from Google Maps co-creator offers temporary ‘safe’ passes to aid COVID-19 reopening effort


There are a number of different technologies both proposed and in development to help smooth the reopening of parts of the economy even as the threat of the global COVID-19 pandemic continues. One such tech solution launching today comes from Brian McClendon, co-founder of Keyhole, the company that Google purchased in 2004 that would form the basis of Google Earth and Google Maps. McClendon’s new CVKey Project is a registered non-profit that is launching with an app for symptom self-assessment that generates a temporary QR code which will work with participating community facilities as a kind of health ‘pass’ on an opt-in basis.

Ultimately, CVKey Project hopes to launch an entire suite of apps dedicated to making it easier to reopen public spaces safely, including apps for things like exposure notification, which is what Apple and Google have partnered to deliver a framework for that works across both of their mobile operating systems. CVKey is also going to be providing information about what types of facilities are open under current government guidelines, as well as what those places are doing in terms of their own policies to prevent the spread of COVID-19 as much as possible.

The core element of CVKey Project’s approach, however, is use of a QR code generated by its app that essentially acts as a verification that you’re ‘safe’ to enter one of these shared spaces. The system is designed with user privacy in mind, according to McClendon – any identify or health data exists only on a user’s individual device, and they’re never uploaded to a cloud server or shared without a user’s consent and information provided about what that sharing entails. All users only voluntarily offer their own health info, and the app never asks for location information. Most of what it does can be done without an internet connection at all, in fact, McClendon explains.

When you generate a QR code for use at places that have opted in to participate in the system, they scan it and receive a simple binary indicator of whether or not you’re cleared to pass, based on the policies they’ve set. They don’t see any specifics about your health information – the code transmits all the particulars of whether you have shown symptoms, which ones and how recently, for instance, and then that is matched against the policy set for the particular public space and they provide a go/no-go response.

McClendon created CVKey Project together with Manik Gupt and Waleed Kadous, who he worked with previously at Google Earth, Google Maps and Uber, as well as Dr. Marci Nielsen, a public health specialist with a long history of leadership at both public and private institutions.

The apps created by CVKey Project will be available soon, and the non-profit is looking for potential partners to participate in its program. Like just about everything else designed to address the COVID-19 crisis, it’s not a simple fix, but it could form part of a larger strategy that provides a path forward for dealing with the pandemic.


Read Full Article
How to Find Your IP Address on Windows 10


Simply put, you can think of your computer’s IP address as a virtual residential address—one that can be changed if necessary. In real terms, an IP address serves two primary purposes: network interface identification and location addressing.

For example, maybe you need to know your computer’s IP address because you’re having internet connectivity issues or you’re trying to set up a home theater app like Plex.

There are two ways to see your IP address on Windows. You can either use the Settings app or go poking around in the Command Prompt. Keep reading to find out how to find your IP address on Windows.

Find Your IP Address Using the Settings App

ip address windows 10

The easiest way to find your IP address on Windows 10 involves firing up the Settings app:

  1. Go to Start > Settings.
  2. Click on Network and internet.
  3. In the left-hand panel, choose either Wi-Fi or Ethernet, depending on what type of connection you use.
  4. Click on your network or connection name.
  5. Scroll down to Properties.
  6. Find the IPv4 address listing.
  7. The number you see is your IP address.

How to Check Your IP Address Using Command Prompt

ip address via the command prompt in windows 10

If you want to know how to find the IP address on Windows 10 using Command Prompt, follow these instructions instead:

  1. Click on the Start Menu.
  2. Type cmd and click on Command Prompt.
  3. Type ipconfig and press Enter.
  4. Locate either Autoconfiguration IPv4 Address (Ethernet) or IPv4 Address (Wi-Fi).
  5. The number you see is your IP address.

Which method do you prefer? You can let us know in the comments section below. And to learn more about IP addresses, check our article on how to find the IP address of your printer.

Read the full article: How to Find Your IP Address on Windows 10


Civilization VI Is Now Free on the Epic Games Store


You can now get Civilization VI for free from the Epic Games Store. One week after Epic gave GTA V away for free, Civilization VI is available. However, as with all of the free games Epic gives away on the Games Store, it’s only available for a limited time.

Since launch, Epic has given away dozens of games on the Games Store. However, the quality of titles in recent weeks has taken an uplift. And while Civilization VI may not be the cultural phenomenon that GTA V is, it’s still well worth playing.

How to Get Civilization VI for Free

To get your copy of Civilization VI for free, head to the Civilization VI page on the Epic Games Store and sign into your account. If you haven’t got an account yet, you can sign up for one for free. Civilization VI is free until May 28, 2020.

Civilization VI is a turn-based strategy 4X game. The idea is to expand your empire across the map, advance your culture, and build a civilization that will be remembered. There’s also several multiplayer modes allowing you to go up against your friends.

Civilization VI was released on Windows in 2016, and has since been released on PS4, Xbox One, and Nintendo Switch. However, despite its age, Civilization VI has aged well. And it’s still receiving new content, with a season pass available for some extra money.

If you’re new to the Epic Games Store, please be aware that you may need to enable two-factor authentication on your account in order to download free games. However, as you should enable 2FA on all of your online accounts, this is a positive thing.

Is Civilization VI the Best Version?

As you may have guessed from the number in the title, Civilization VI is just the latest game in the Civilization series. And while some people may think it’s the best version, others prefer the older titles. So, here’s every version of Civilization, compared.

Read the full article: Civilization VI Is Now Free on the Epic Games Store


Read Full Article

How to Find Your IP Address on Windows 10


Simply put, you can think of your computer’s IP address as a virtual residential address—one that can be changed if necessary. In real terms, an IP address serves two primary purposes: network interface identification and location addressing.

For example, maybe you need to know your computer’s IP address because you’re having internet connectivity issues or you’re trying to set up a home theater app like Plex.

There are two ways to see your IP address on Windows. You can either use the Settings app or go poking around in the Command Prompt. Keep reading to find out how to find your IP address on Windows.

Find Your IP Address Using the Settings App

ip address windows 10

The easiest way to find your IP address on Windows 10 involves firing up the Settings app:

  1. Go to Start > Settings.
  2. Click on Network and internet.
  3. In the left-hand panel, choose either Wi-Fi or Ethernet, depending on what type of connection you use.
  4. Click on your network or connection name.
  5. Scroll down to Properties.
  6. Find the IPv4 address listing.
  7. The number you see is your IP address.

How to Check Your IP Address Using Command Prompt

ip address via the command prompt in windows 10

If you want to know how to find the IP address on Windows 10 using Command Prompt, follow these instructions instead:

  1. Click on the Start Menu.
  2. Type cmd and click on Command Prompt.
  3. Type ipconfig and press Enter.
  4. Locate either Autoconfiguration IPv4 Address (Ethernet) or IPv4 Address (Wi-Fi).
  5. The number you see is your IP address.

Which method do you prefer? You can let us know in the comments section below. And to learn more about IP addresses, check our article on how to find the IP address of your printer.

Read the full article: How to Find Your IP Address on Windows 10


Read Full Article
Use the “Make a Copy” Trick When Sharing Google Drive Documents


create-beautiful-google-docs

It’s easy to make a copy of any document within your own Google Drive account. But what if you want your collaborators to automatically make a copy of a Google Doc when they receive a share link?

Try these tips which utilize a small tweak to the shared URL.

Unlock the "Essential Google Drive Keyboard Shortcuts" cheat sheet now!

This will sign you up to our newsletter

Enter your Email

The utility of this neat Google Drive hack isn’t quite clear from the title but try it out once and you will see the immediate benefit when collaborating with others on Google Drive.

This method is handy when you want to preserve the original document while giving others the space to edit a copy of the document in their own Drive folder.

It will save them a trip to the File > Make a Copy command and share a copy of a Google Doc in the usual way. Here’s how it works.

Share a Copy of a Google Doc Automatically

A typical case is a Google Doc that needs to be filled out individually by each respondent. Collaborators can enter the details in their own copy of the document without corrupting the original.

You won’t have to ask them to make a copy. Simply follow these steps and the copy will be made automatically for them.

This hack works on Google Docs, Google Sheets, and Google Slides.

  1. Open the Google Drive document you want to share.
  2. Click the blue Share button on the top-right of the document.Google Drive Share Button
  3. In the Share with people and groups dialog, click anywhere on the Get link box as indicated by the prompt.Google Drive Share Dialog Settings
  4. Grab the document link with a click on Copy link. You can send this link to anyone via email or any other medium and then can view, comment, or edit the document. You can set the access by choosing between Viewer, Commenter, or Editor with a click on the little downward arrow on the right.Copy Google Docs Link
  5. Copy-paste the shared link in an email. Now, delete everything after the forward-slash in the link and insert “copy”. Edit this little part of the entire link only part. If you make any other edits, it will show up as an error page for your recipient.Copied Google Drive URL in email

    This is how the new link looks now:
    Add "Copy" at the end of a Google Doc sharing URL
  6. Send the email and your work is done. When the recipient clicks on the link, it takes them to their Google Drive screen that prompts them to make a copy of your document.Make a Copy in Google Docs

When they click Make a copy, a local copy of the document is saved on their Google Drive. Also, the copy is received without the comments if any in the original. If you want to send a file with the comments, read the next tip below.

Other Google URL Tricks You Can Use to Share a Google Document

There are a few more variations you can force on the shared links depending on what you want your collaborator to do with it. Let’s go through these four URL tweaks.

1. Share a Copy of Google Docs That Includes Comments

Google Dive Sharing URL Example

Sometimes you want your comments to carry over to the copy so that your team members can use it to work on their version. You can do it in two ways:

  • Replace /edit with /copy?copyComments=true in the file URL.
  • Replace /edit with includeResolvedCommentsOnCopy=false to avoid copying resolved comments.

2. Share a Google Docs Copy as a Preview

Google Dive Sharing URL Example

The Preview mode is different than the View option because it displays the document in an uncluttered interface without menu bars and buttons. For instance, you can share a Sheet or a Slide presentation to anyone outside your collaborating team.

Use the Preview mode by replacing /edit in the Google Drive file URL with /preview.

Do note that a Preview link removes menus. So recipients will not be able to use the File > Make a Copy option to add a copy to their own Google Drive.

To bypass that restriction, recipients can go to the address bar in their browser and replace /preview with /edit again to make a copy for their own drive.

3. Share a Google Document as a Template

Google Dive Sharing URL Example

You can share a Google document as a template. The recipient gets a clutter-free copy of your document minus the Google Drive menus. They can also make a copy of the document for their drive with a click on the blue Use Template button.

Replace /edit with /template/preview

This method combines the Preview option with the choice to “Make a Copy”.

4. Share a Google Docs Copy as a Direct Download Links

Google Dive Sharing URL Example

A direct download link works as it says. Your team member just has to click the link and the file will be downloaded to their desktop.

Replace /edit with /export?format=FORMAT

Add the file format (like PDF or CSV) that the document should be saved as, and your download link is ready. The PDF or CSV option is ideal because it is a universal format and the recipient does not need a Google account to open and view the file.

Also, the receiver gets a print-ready file they can instantly send to the printer. This works with Google Docs and Google Sheets, but not Google Slides.

Keep an Eye on Google Drive’s Sharing Settings

Google Drive is built around collaboration. But it’s always a good idea to track who you are sharing your files with. It’s easy to lose track when you are working in a large team.

The above examples show that it is easy to tweak the shared URLs and access the files if your sharing permissions are not set with security in mind. Spend some time in managing your shared files in Google Drive and you won’t have to worry about files falling into the wrong hands.

Read the full article: Use the “Make a Copy” Trick When Sharing Google Drive Documents


Read Full Article
How to Recover Deleted or Missing WhatsApp Messages


whatsapp-apps-android

Do you need to recover deleted or missing WhatsApp messages? It’s certainly possible, and in this article we explain how to do it.

Instead of archiving a WhatsApp chat, you might have accidentally deleted it. What’s the difference? Archived chats are easy to recover from within WhatsApp, whereas recovering deleted messages isn’t so easy. But rest assured that you CAN do it.

In this tutorial, we’ll show you how to recover deleted WhatsApp messages on your iPhone or Android. We’ll then teach you how to set up an advanced WhatsApp backup plan to ensure you never lose any of your WhatsApp messages again.

Understanding WhatsApp Chat Backups

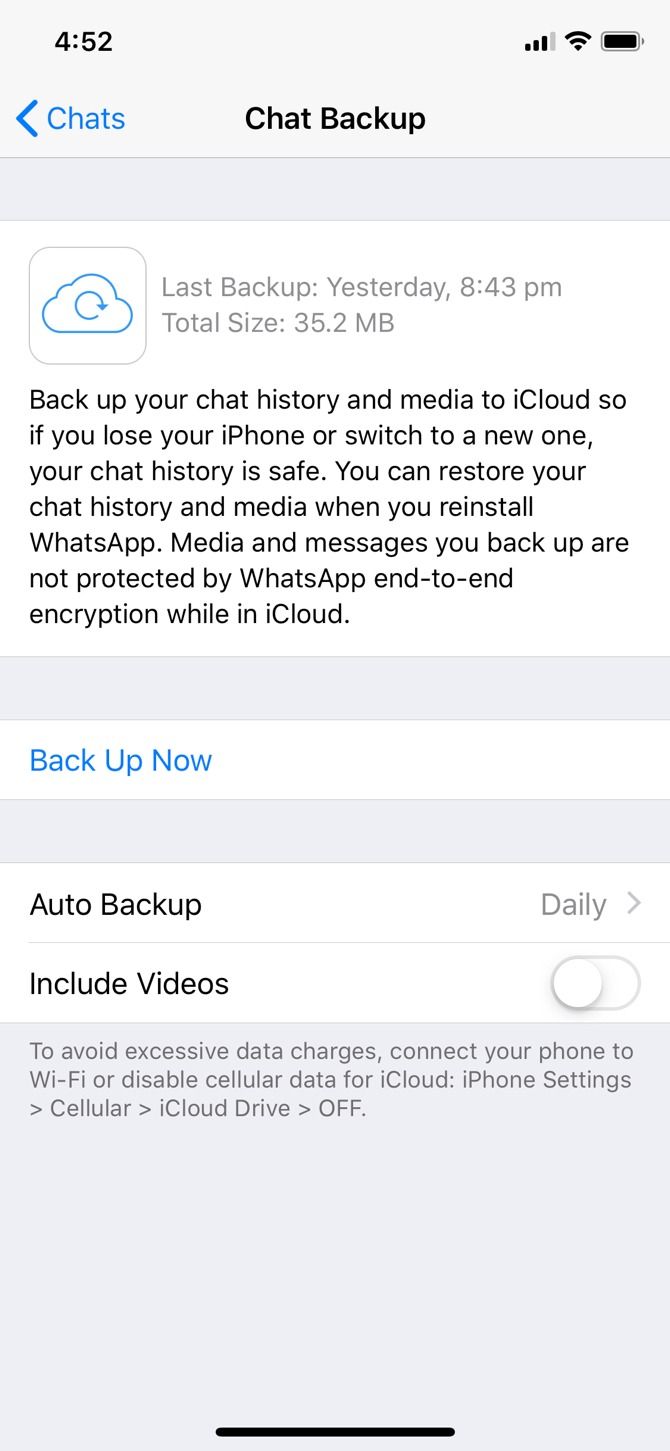
In order to retrieve deleted WhatsApp messages, you need to have enabled Chat Backup in the app’s settings. To reach this, just tap the Settings tab at the bottom on iOS, or open the three-dot menu at the top-right and choose Settings on Android.

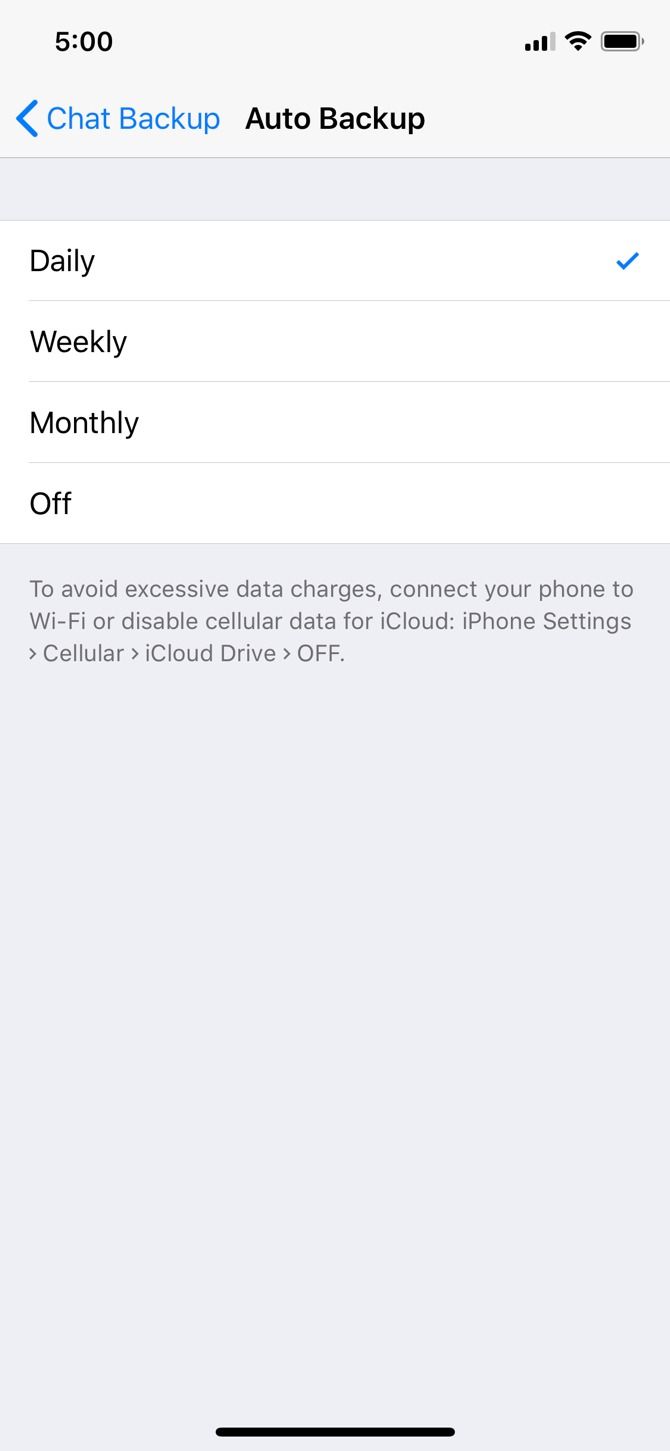
From there, head to Chats > Chat backup. Here (under Auto Backup on iOS and Back up to Google Drive on Android), WhatsApp offers several backup frequencies:

  • Daily
  • Weekly
  • Monthly
  • Off

On Android, WhatsApp makes a local backup every night, but this won’t help you if you lose your phone. Which is why cloud backups are vital.

WhatsApp deletes older backup files as you create new ones. The iPhone app only keeps the latest backup file, while the Android version keeps “up to the last seven days’ worth” of backup files. Keep that in mind as you choose the right backup frequency for your needs.

By having daily auto backups, you’ll be able to easily recover messages soon after deleting them. On the other hand, weekly auto backups will allow you to go further back in time to recover deleted WhatsApp messages, at the expense of losing recent chat messages.

For a more advanced backup plan for Android devices, please scroll down to the “Advanced WhatsApp Backup Strategy on Android” section below.

How to Restore Archived WhatsApp Chats

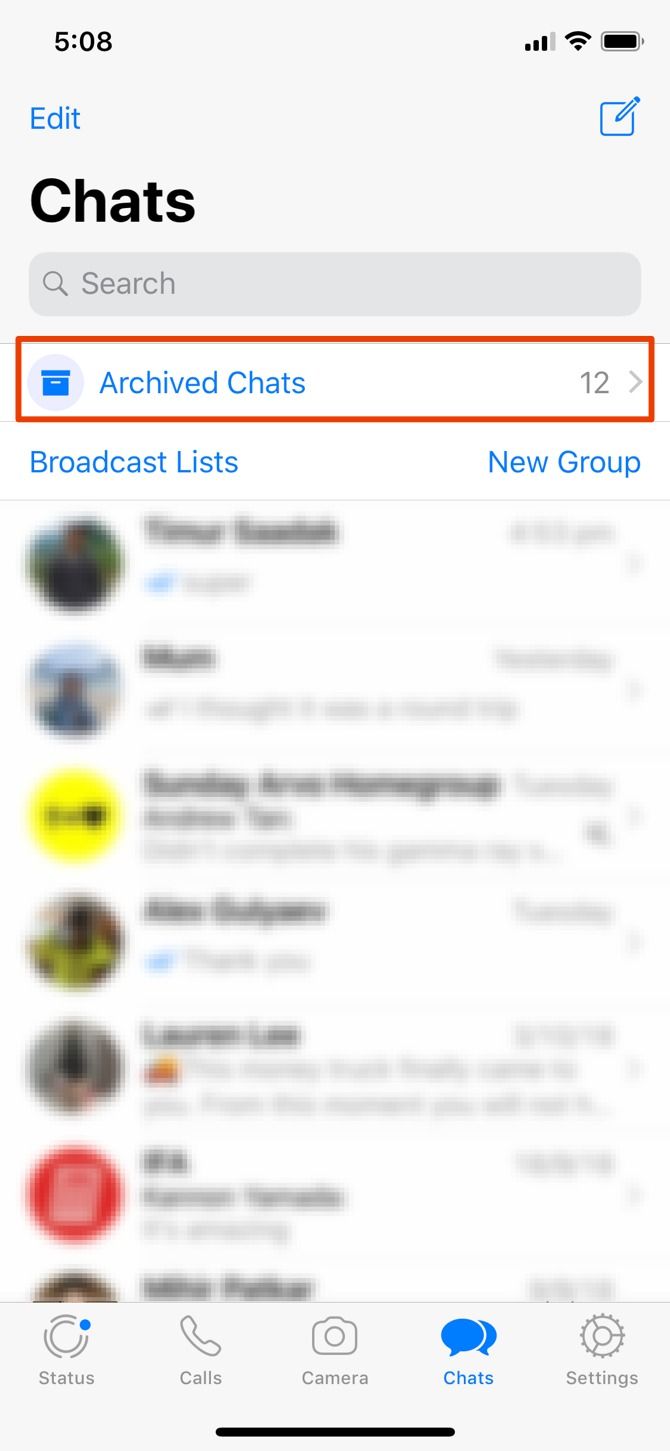
On iPhone, if you archive an old chat, you can reverse the archival by shaking your iPhone and choosing Undo to recover the archived chat.

To unarchive a chat later:

  1. Scroll up in the chat list until Archived Chats appears.
  2. Tap on it, then swipe left on the chat you want to restore.
  3. Hit the Unarchive button that appears.

To unarchive a chat on Android:

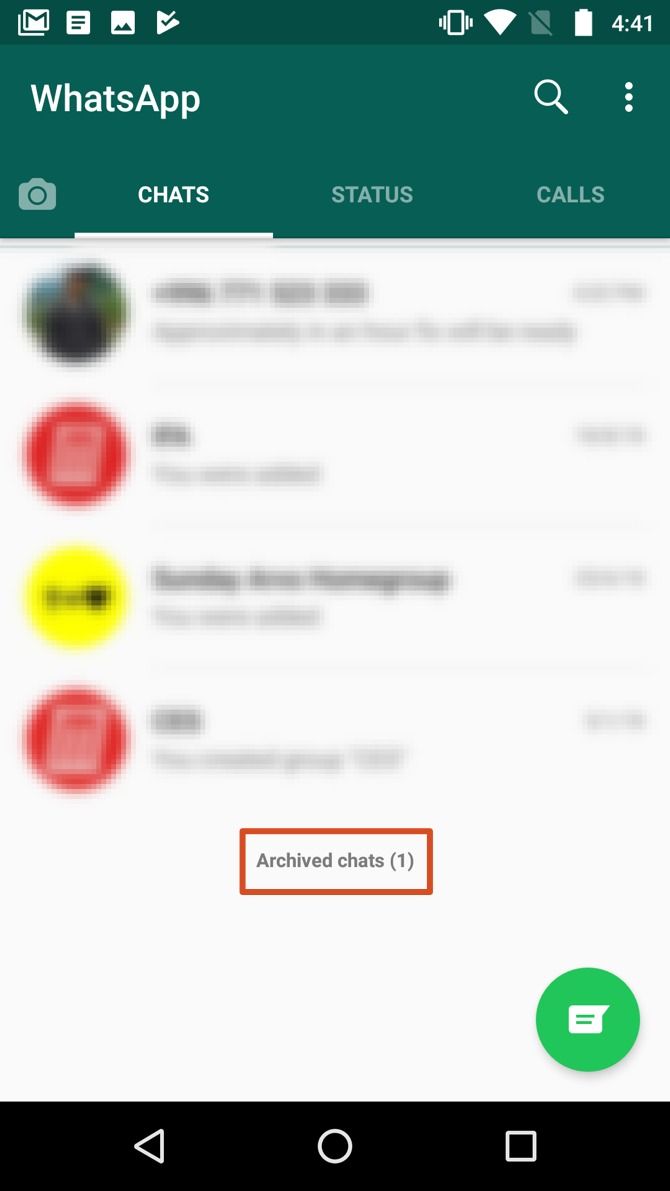
  1. Scroll to the bottom of the chat list and tap Archived (X).
  2. Press and hold on the chat you want to recover.
  3. Tap the unarchive icon, which looks like a box with an upward-facing arrow.

How to Retrieve Deleted WhatsApp Messages

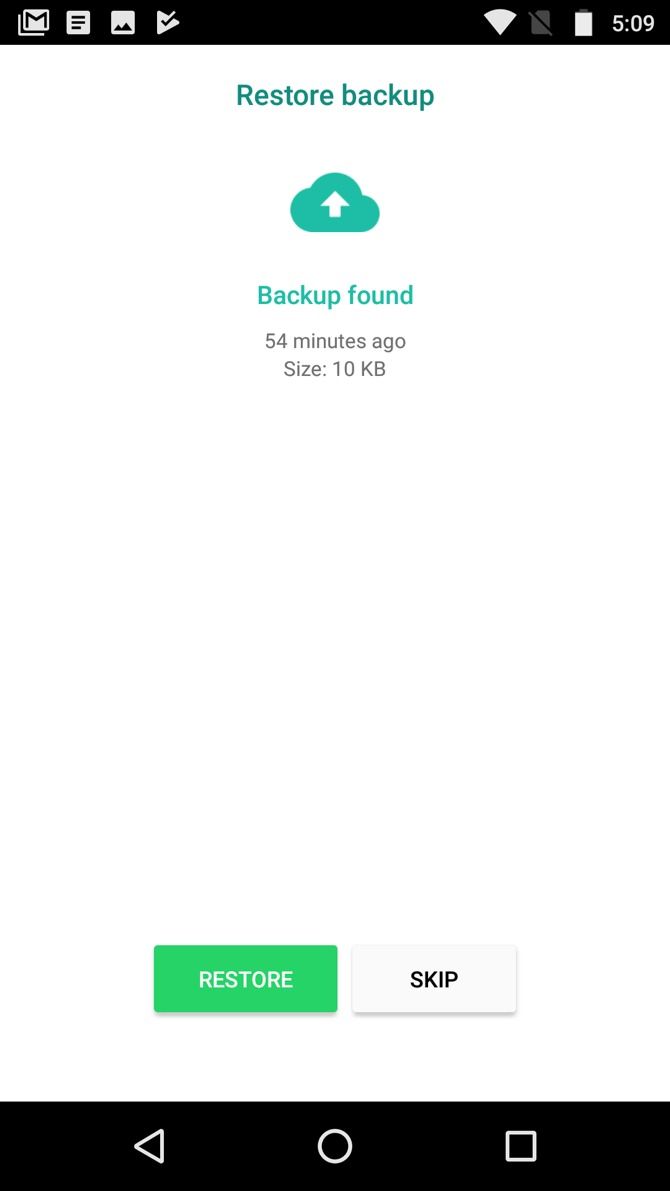
Wondering how to get back deleted WhatsApp messages after backing them up? Simply uninstall and reinstall WhatsApp on your device. When you reinstall the app, you will be prompted to restore your message history from the backup file. Tap Restore and you’ll retrieve everything from the latest backup.

This method of recovering deleted WhatsApp messages works on both Android and iOS as long as you have a backup. Keep in mind that it has to be within your selected auto-backup frequency, however. For instance, if you’ve set the app to back up daily, you can recover any deleted chats before the next daily backup occurs.

Recovering Deleted Media on WhatsApp

Hopefully, restoring your backup file allowed you to retrieve any deleted media from your chats. If that didn’t work, however, read our guide to recovering deleted photos from WhatsApp.

On Android, you can simply open a file explorer app and navigate to /WhatsApp/Media. From there, simply sift through the folders until you find the deleted files to want to recover. Check the above guide for additional methods.

How to Recover Older Deleted Chats in WhatsApp

Getting deleted messages back after a new backup has run is slightly more difficult. Your success will depend on your selected auto-backup frequency. Note that this process only works on Android devices, since it lets you access the local backup files.

Before we dive into the process, here’s an overview:

  1. Open a file explorer app on your device.
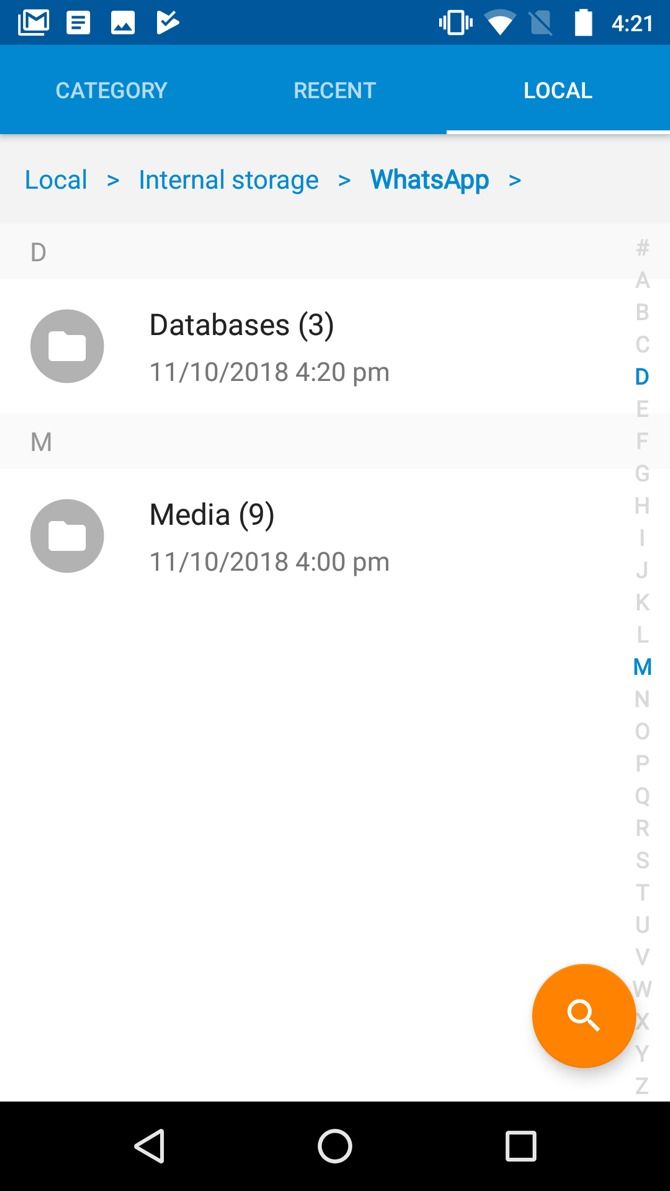
  2. Navigate to /WhatsApp/Databases.
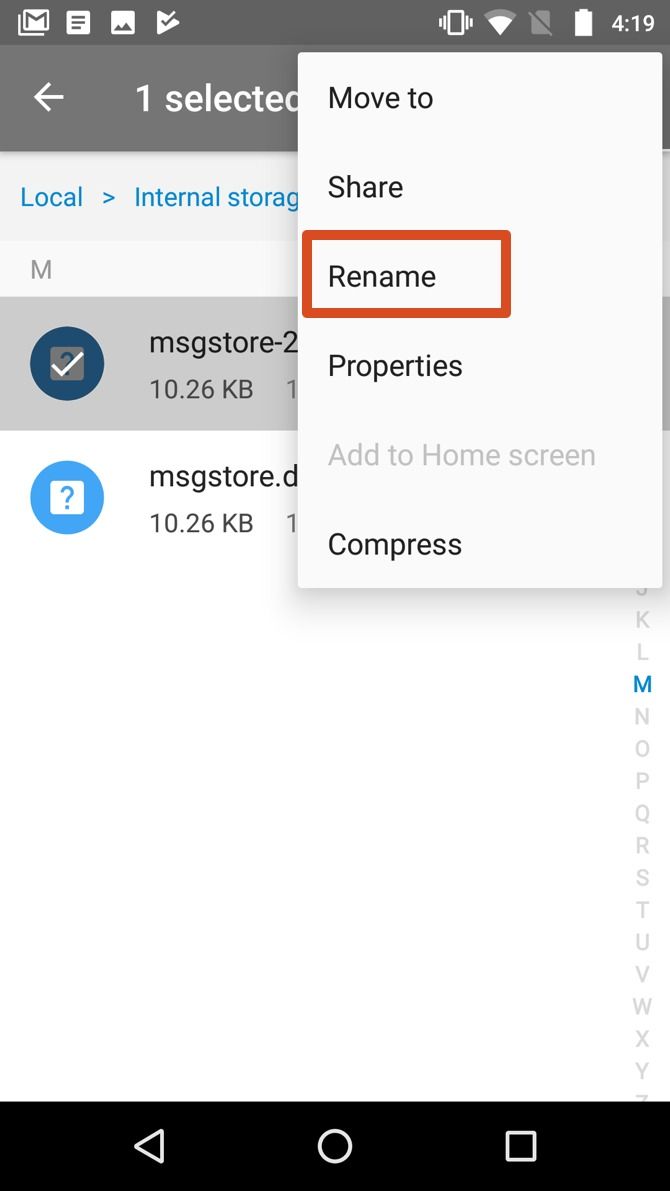
  3. Rename msgstore.db.crypt12 to msgstore-latest.db.crypt12.
  4. Rename msgstore-YYYY-MM-DD.1.db.crypt12 to msgstore.db.crypt12.
  5. Uninstall WhatsApp.
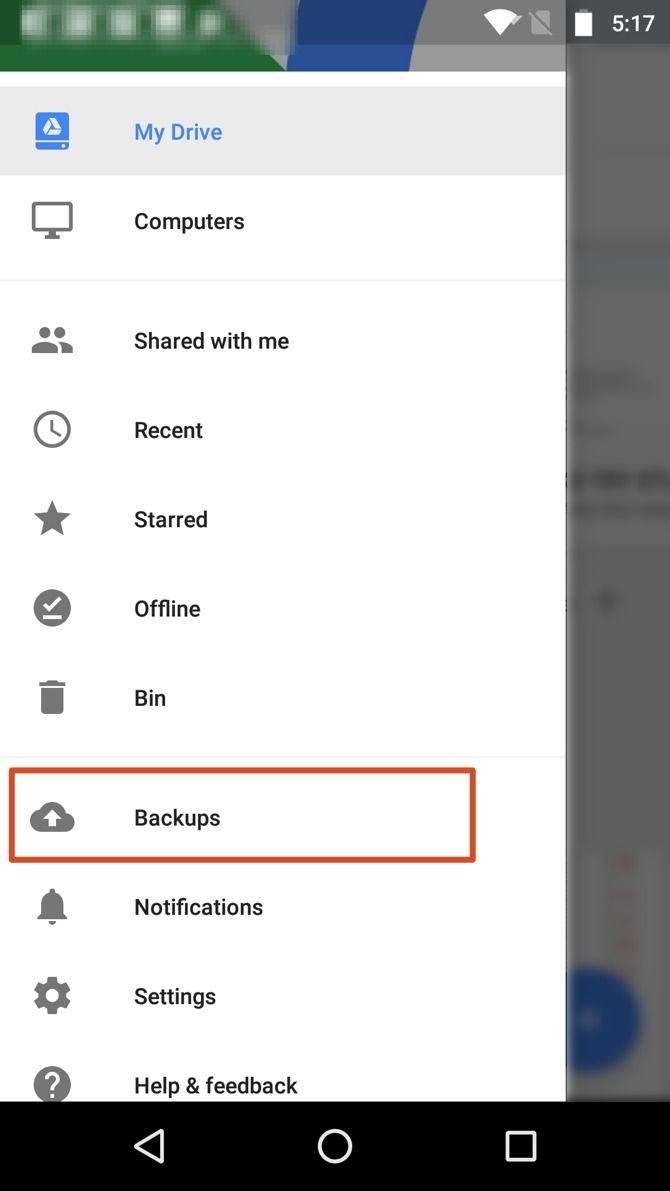
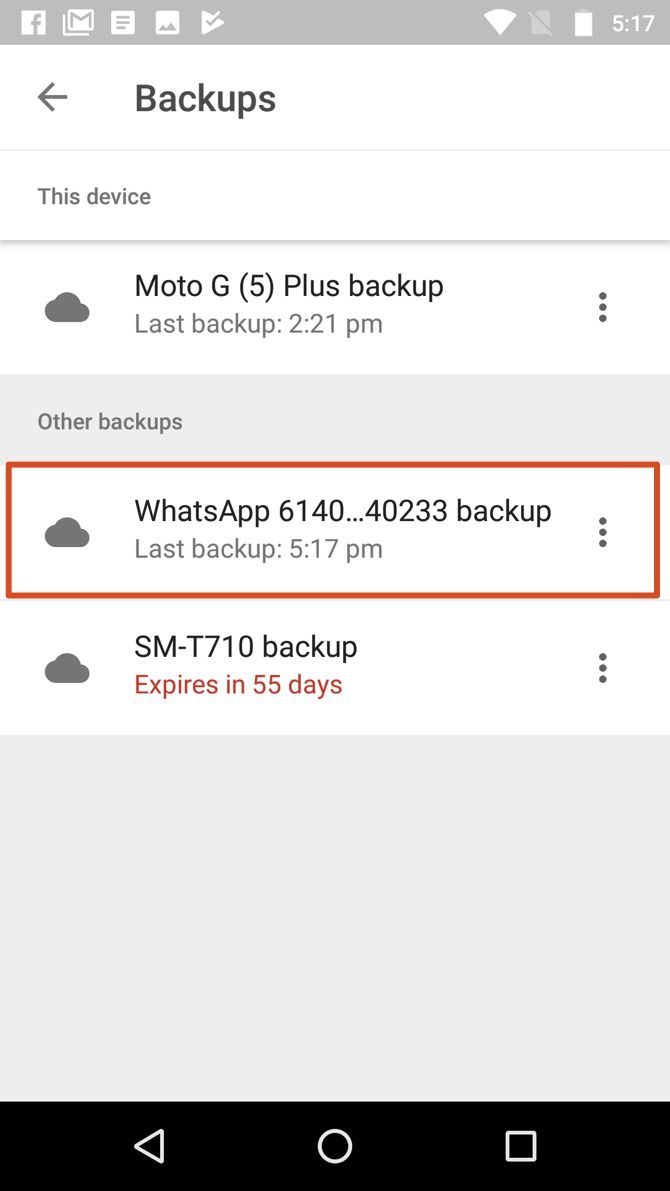
  6. If Google Drive backups are enabled, open Google Drive, slide out the left menu, tap Backups, and delete the WhatsApp backup file.
  7. Reinstall WhatsApp.
  8. When prompted, restore from the backup file.

How to Recover Older Deleted WhatsApp Chats on Android

As mentioned before, WhatsApp retains several days of chat backup files. One is, of course, the latest chat backup. The others, depending on your auto-backup frequency, could be one day or many days old. In addition to the Google Drive cloud backup, WhatsApp stores these backups on your device’s local storage.

Open your device’s file explorer app (Files by Google is a good option if you don’t have one installed), and navigate to /WhatsApp/Databases. Depending on your device, the WhatsApp folder may appear under /sdcard/, /storage/, or similar.

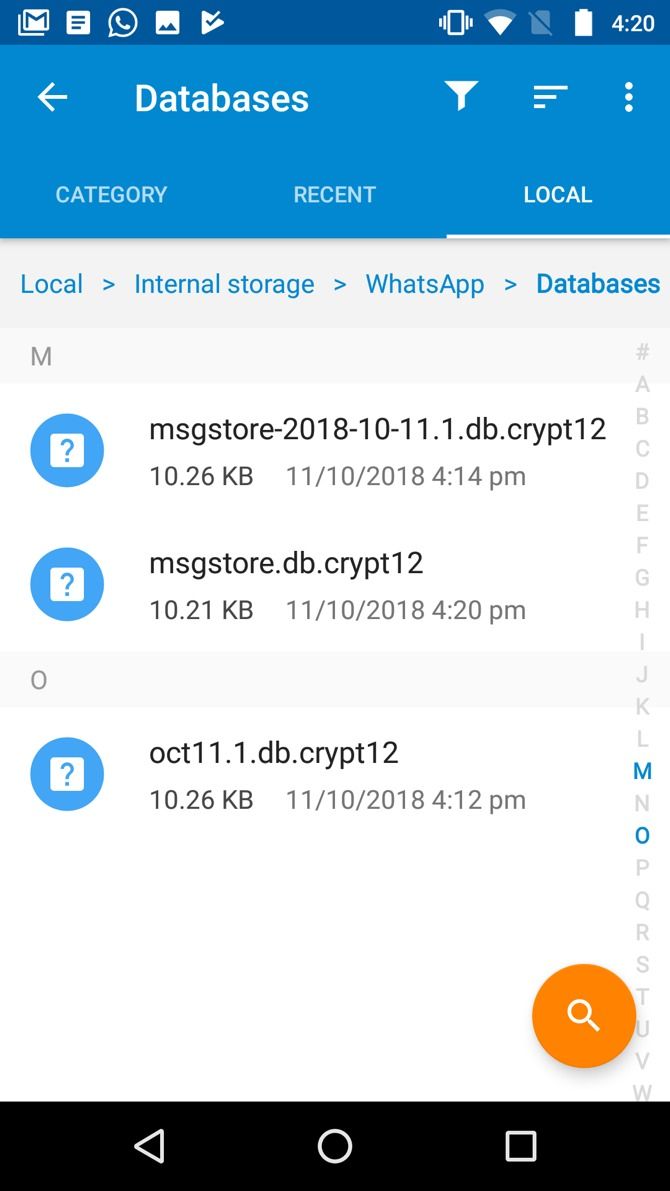
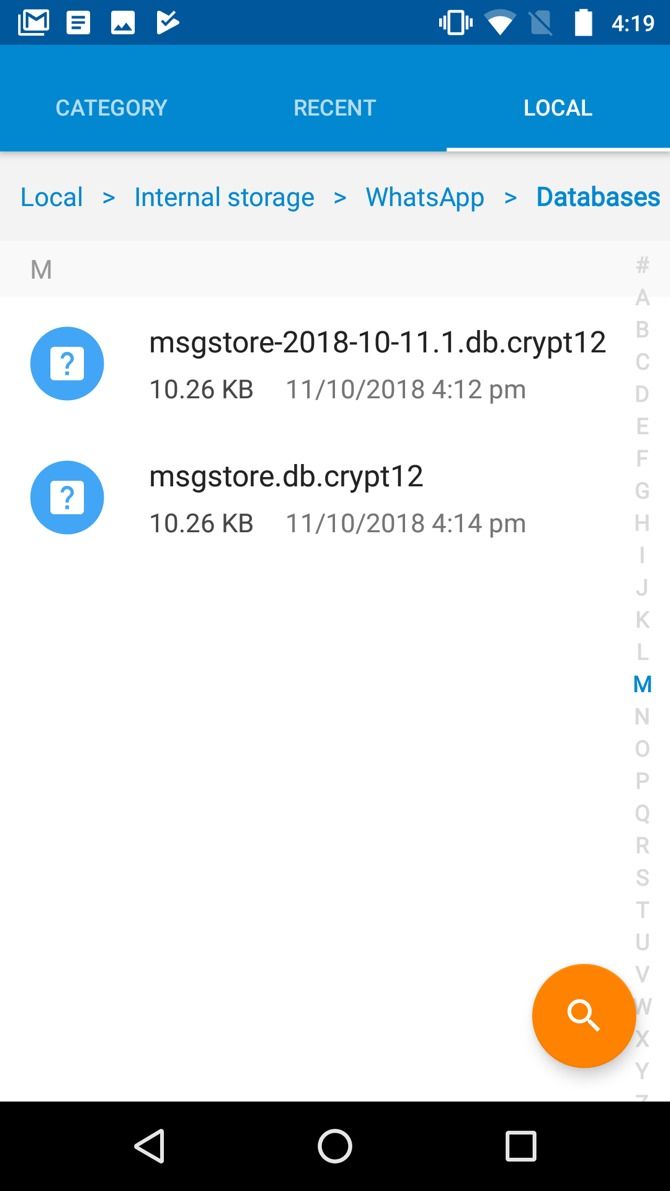
Within that folder, you’ll find the various chat backup files. The latest one is named msgstore.db.crypt12, while the others look like msgstore-YYYY-MM-DD.1.db.crypt12. As you’d expect, YYYY-MM-DD represents the year, month, and date, respectively.

To retrieve WhatsApp messages deleted sometime between two backups, simply do the following:

  • Rename msgstore.db.crypt12 to msgstore-latest.db.crypt12. This changes the latest backup file, since you’re about to give an older backup its name.
  • Next, rename the msgstore-YYYY-MM-DD.1.db.crypt12 file that you want to restore to msgstore.db.crypt12.

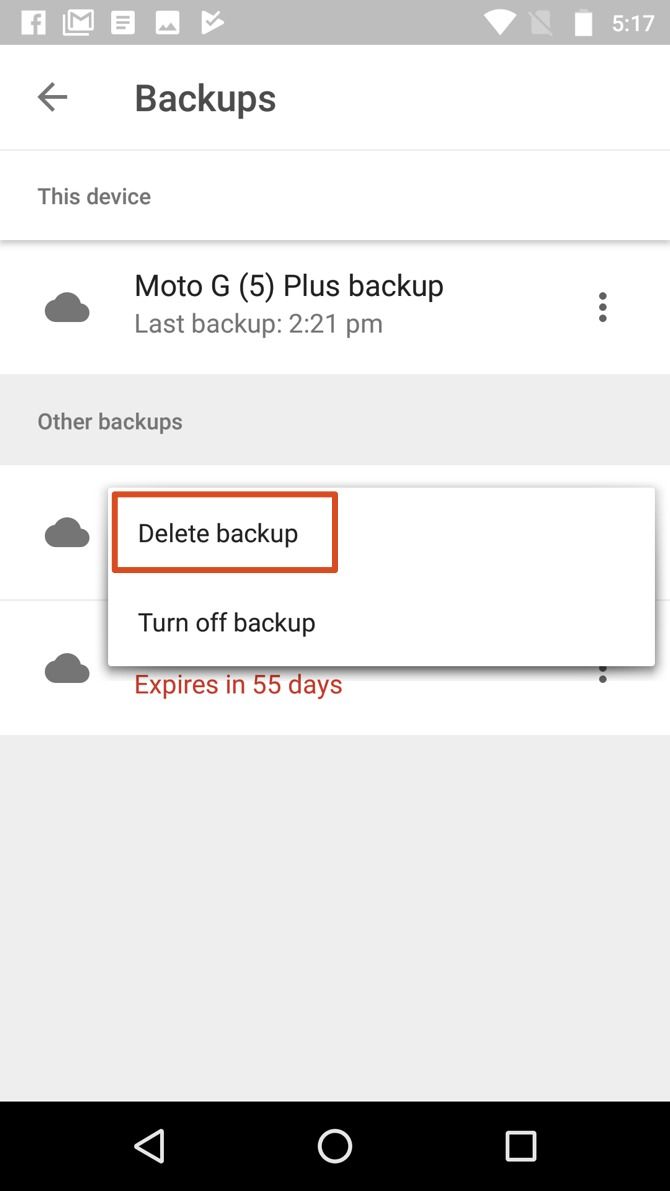
After that, uninstall WhatsApp. If you’ve enabled Google Drive cloud backups, open the Google Drive app, slide out the left menu, and select Backups. You’ll see a WhatsApp backup file with your phone number in it. Tap the three-dot Menu to the right of this and choose Delete backup to erase it.

Doing this prevents WhatsApp from using the backup file from Google Drive instead of the local file you want to restore.

Now, reinstall WhatsApp. During the setup process, you’ll be prompted to restore from the backup file you’ve just edited—it will show as X days old instead of the most recent backup file.

That’s all you have to do in order to retrieve deleted WhatsApp messages from older backups. Once you restore those messages, feel free to start using WhatsApp as normal again.

Export Retrieved Messages and Return to the Latest Backup

If you only walked through the above process to restore a few messages, and don’t want to lose the latest messages, you can export the retrieved chat messages and then restore WhatsApp to the latest backup. You’ll have to run through the entire process again, but it’s not difficult.

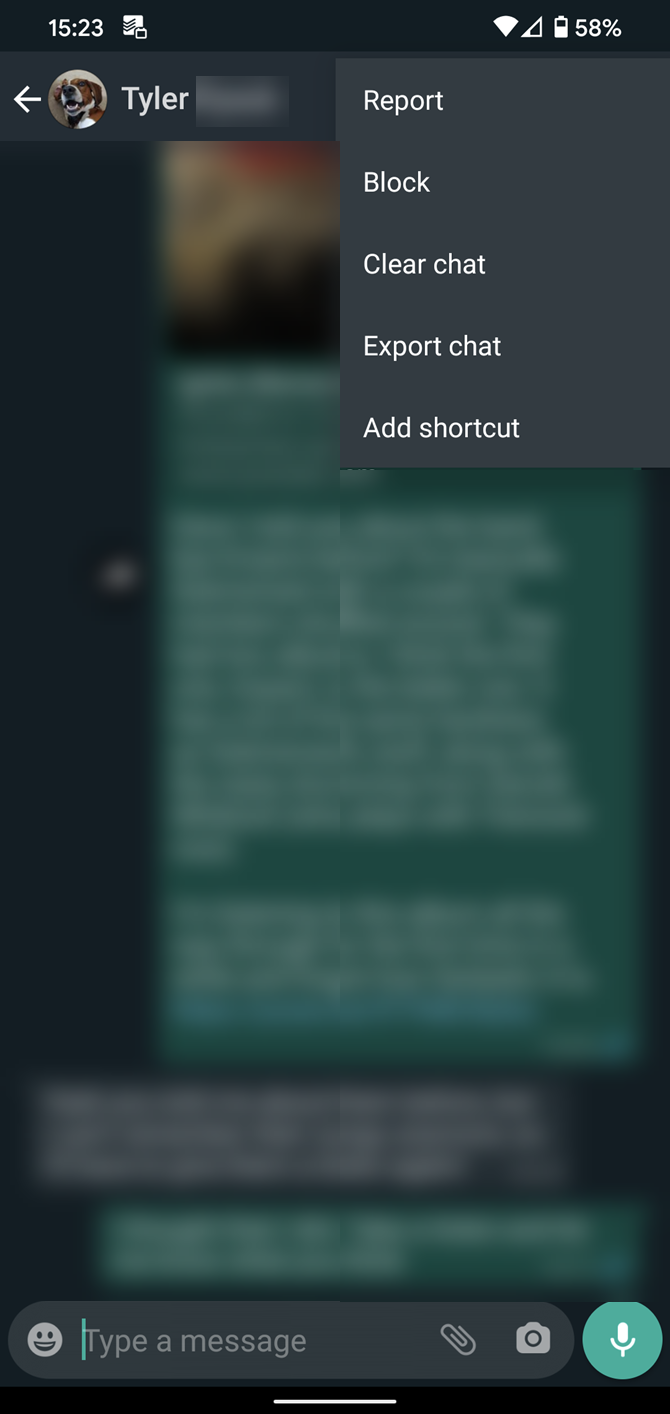
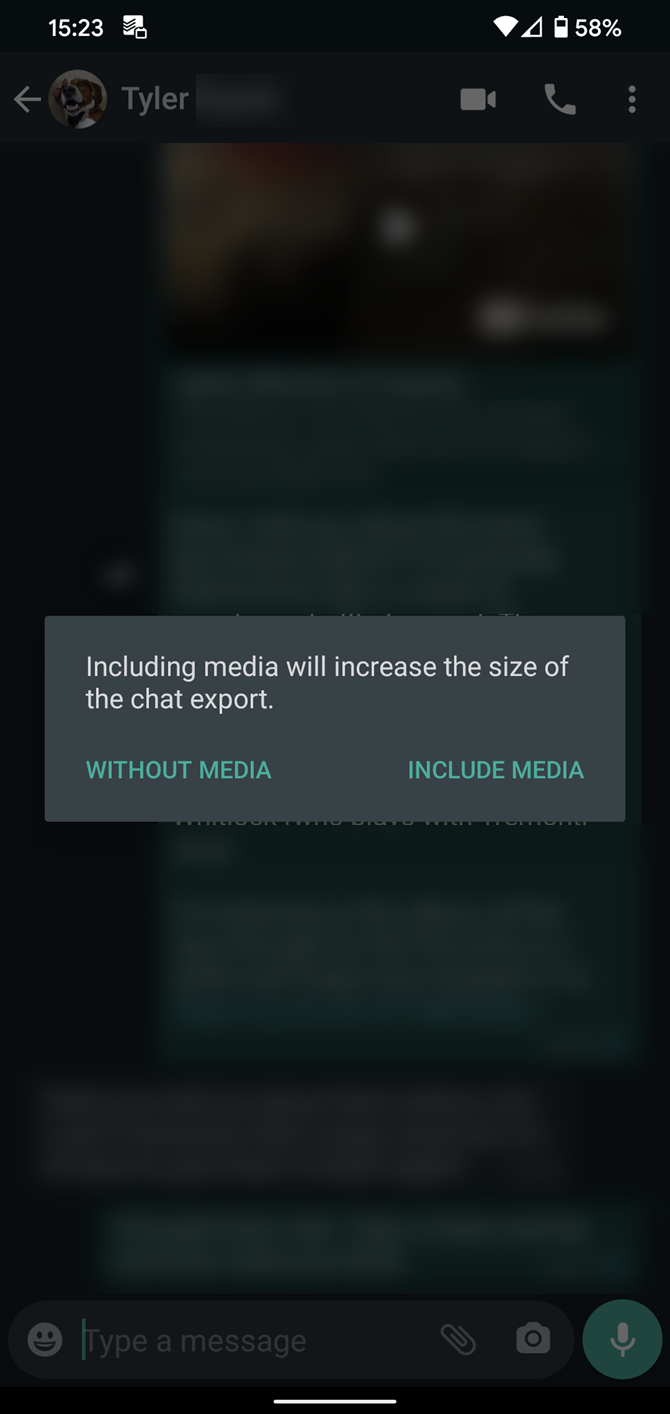
To export messages, open the chat containing the messages you want to save. Tap the three-dot Menu button at the top-right, followed by More > Export chat. If the chat has media, you’ll see an option to export Without media or to Include media.

Including media will add all recent images as attachments, which obviously increases the size of the export file. You can export up to 10,000 messages with media, or 40,000 messages without media.

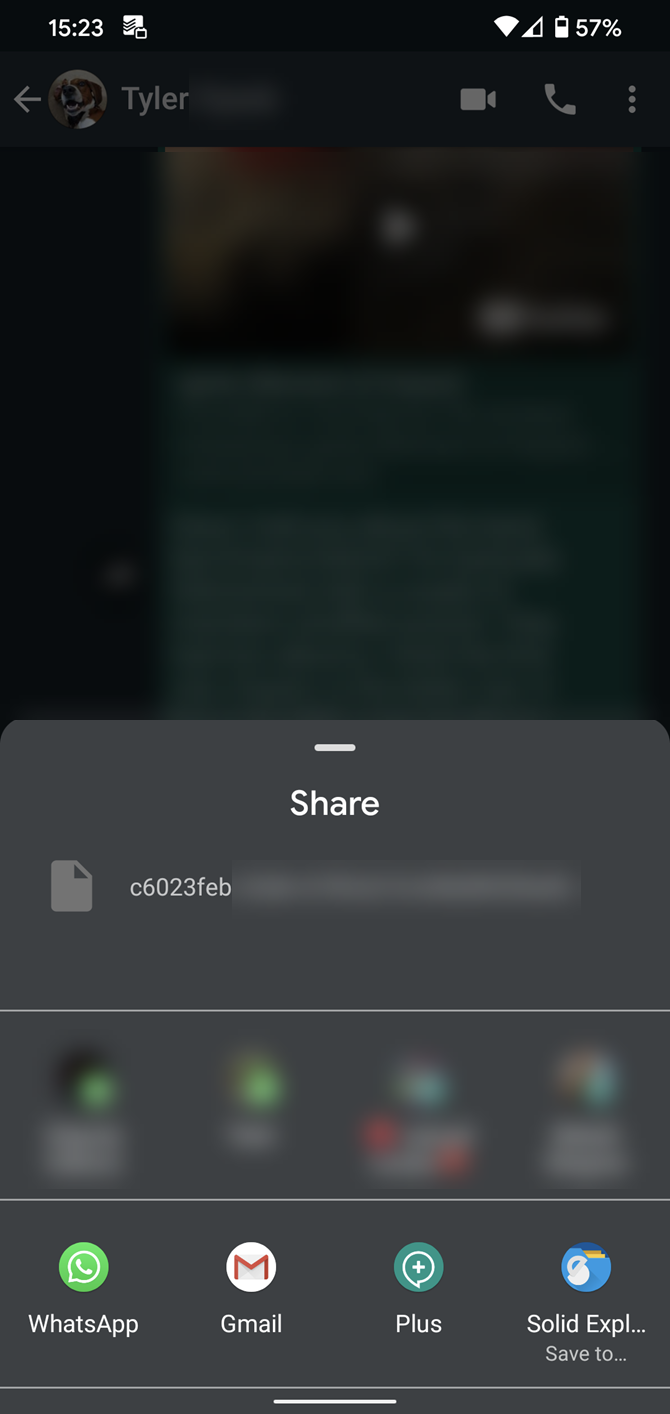
After you make your choice, choose an app on your phone to share the text file (and attachments, if applicable) containing your messages. You can email this to yourself, add it to cloud storage, or similar.

Repeat this for any other chats with messages you want to save. Once that’s done, follow the steps in the above section again. When you come to renaming the backup files, reverse the process:

  • Rename the existing msgstore.db.crypt12 (which contains the messages you retrieved) to msgstore-YYYY-MM-DD.1.db.crypt12, using today’s date.
  • Then rename msgstore-latest.db.crypt12 (the latest backup created when you started) back to msgstore.db.crypt12.

Uninstall WhatsApp, delete your Google Drive backup if needed, reinstall the app and restore from backup, and your latest chats will reappear.

Advanced WhatsApp Backup Strategy on Android

Because you can easily view and edit WhatsApp chat backup files on Android, it’s easy to manipulate them if you like. Renaming them allows you to keep as many backup files as you want.

All you need to do is rename a backup in the msgstore-YYYY-MM-DD.1.db.crypt12 format to something else, such as oct11.db.crypt12. Because this file doesn’t use WhatsApp’s naming convention, it’s now protected from being overwritten by WhatsApp.

Consider creating your own backup file in this way once every month or so. That way, you won’t lose tons of messages if you have to restore one of them. For even more safety, copy your backup files to cloud storage or your computer so that they’re safe in case your phone stops working.

Recover WhatsApp Messages to Preserve Memories

As you can see, it’s fairly easy to recover deleted WhatsApp messages. However, this is only the case if you’ve backed up your messages ahead of time. This is why the advanced backup strategy is worth setting up if you’re an Android user.

Now that you’ve set up a full backup for WhatsApp and know that you won’t lose any messages, it’s a good idea to learn more about how WhatsApp works. Check out our rundown of the best new WhatsApp features you might have missed.

Read the full article: How to Recover Deleted or Missing WhatsApp Messages


Read Full Article
How to Set Up SSH on Linux and Test Your Setup: A Beginner’s Guide


linux-ssh-secure

One of the most important ways of using Linux is via SSH. This remote access command line tool lets you do everything from installing software to configuring Linux as a web server. SSH can save time, make you more productive, and help you unlock the power of your Linux distro.

But how do you set up SSH, on both the client and server sides? Learn how to install and configure SSH software at both ends and remotely control your Linux computer.

What Is SSH?

SSH stands for Secure Shell and allows you to remotely control a Linux computer or server from another device. It works across local area networks and the internet, meaning that it can be used to manage a Linux-powered media server in your house, or a Linux web server on a different continent.

While SSH doesn’t give you access to the remote computer’s desktop environment, it lets you use the terminal. Once connected to the remote computer you can use it as if it was right in front of you. Just be sure to have root access.
Note that other remote access solutions are available for Linux. For example, Ubuntu users can rely on the VNC-compatible remote desktop tool Remmina.

To use SSH, you’ll need to ensure that the remote computer (server) has SSH set up. Additionally, your local device (the client) will need an SSH app installing.

Client-Side Installation

Installing and setting up SSH on a client is simple. In some cases you don’t even need any additional software:

  • Linux users should find a SSH client built into the terminal
  • macOS computers also have SSH preinstalled in the terminal
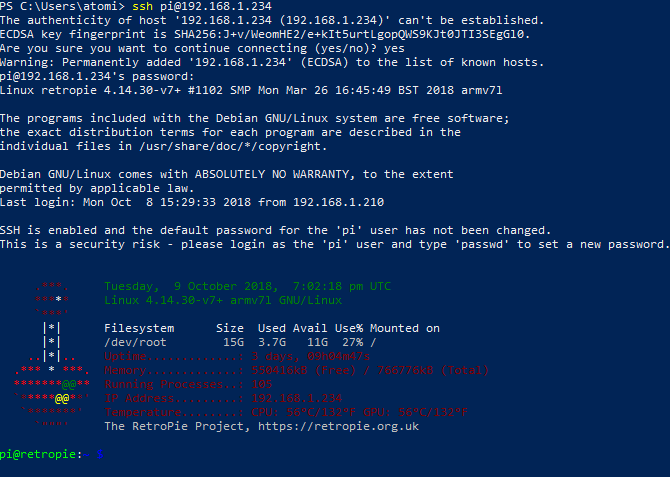
  • Windows PCs will need to use the PowerShell command line tool, or install PuTTY

Connect to a device using SSH in Windows PowerShell

  • To connect to Linux over SSH from iPhone and iPad try iTerminal ($4.99)
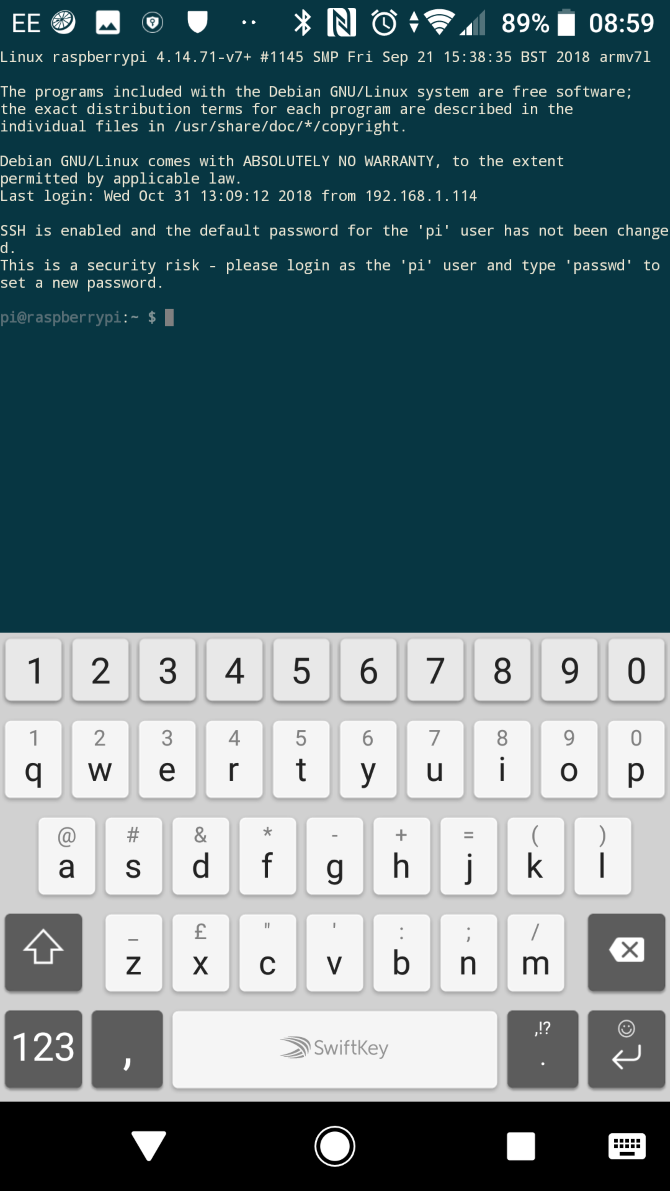
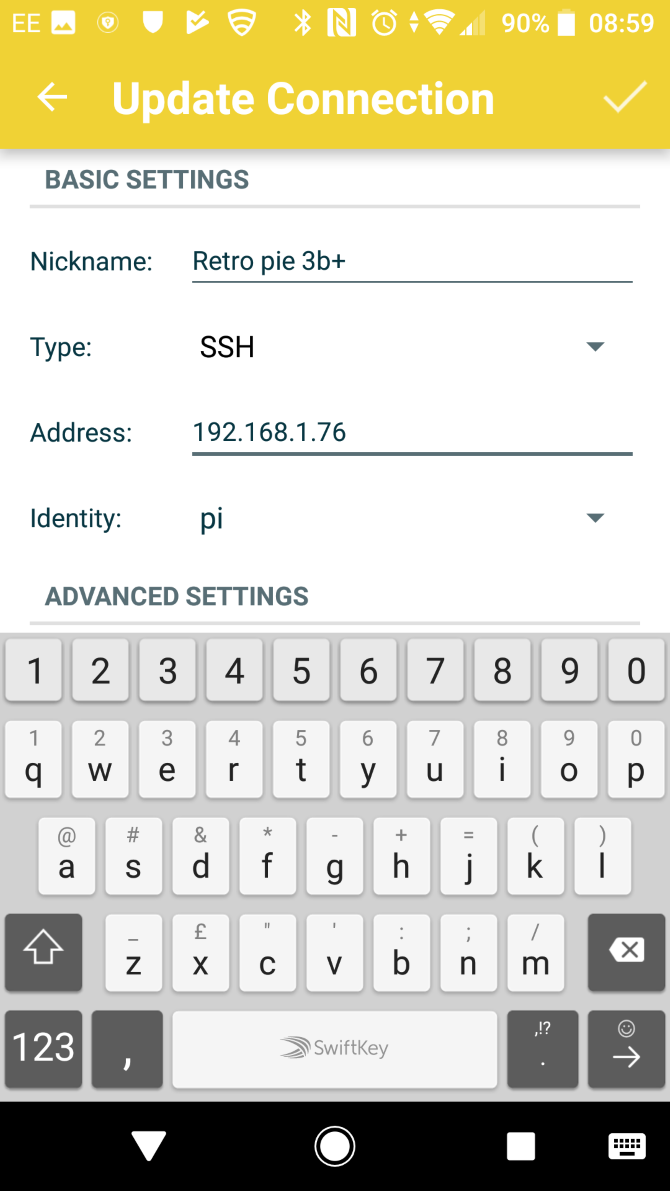
  • If you’re using Android for SSH, try JuiceSSH (Free)

SSH not installed on your Linux system? Add by updating packages and upgrading, then installing:

sudo apt update && sudo apt upgrade

sudo apt install openssh-client

Used to using SSH on Windows but have switched to a Linux desktop? You might miss the PuTTY desktop SSH app with its easy mouse interface. Fortunately, it can be installed on a Linux desktop:

sudo apt install putty

With your SSH client software installed, you’re ready to set up a connection to your remote computer or server.

As a general rule for all desktop and mobile clients, all you need is an IP address or host name, and appropriate login details. While the look of the apps may differ, and the port name may need entering manually, SSH clients are mostly indistinguishable.

Server-Side Installation and Configuration

Before establishing a connection, install the server-side software to host your SSH connection. This requires someone to be present to install or enable SSH. You might already be present to do this—otherwise, a colleague or support engineer at the server end will set up SSH.

Note that if you’re using a web hosting package, SSH should be enabled by default. Speak to your web host to set up SSH if not.

If SSH is not enabled on the remote computer or server, install it with

sudo apt install openssh-server

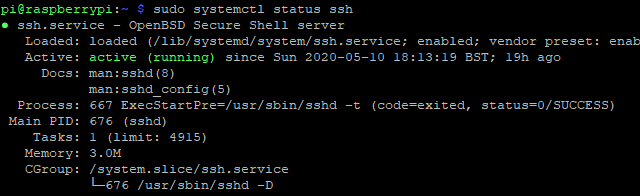
Check this worked with

sudo systemctl status ssh

The command should illicit a response of “active.”

Check the status to confirm SSH is set up correctly

In some cases the Ubuntu firewall ufw may block SSH. To ensure this doesn’t happen, use

sudo ufw allow ssh

In some cases you’ll need to also enable SSH on the remote device. This is a security precaution that can be tweaked using

sudo systemctl enable ssh

Other options are available (stop, start, and disable) for configuring the SSH service.

Determine IP Address

To connect to the remote device over SSH, you’ll need to know the IP address of the machine. You have two easy ways to find this:

  • Run a terminal command
  • Check the router

To display the IP address of the remote system, logon and run

ip address

This will return the device’s IP address, so take a note of it. On older Linux versions ifconfig may provide better results.

You can also check your router to see connected devices. The Linux PC or server will be listed, typically by operating system or device name. This should make it simple to identify.

To display the public IP address, login to the server and open whatsmyip.org.

The IP address you use should be the one suitable for the connection. So, if the device is on the same network as the client, use the local IP address. For connections across the internet, use the public IP address. If the computer is located on a different network, make sure that port 22 is forwarded to the computer.

Connecting to Linux via SSH

Along with the correct IP address you should also have a username and password to gain access to the remote machine.

For command line SSH tools, use

ssh username@REMOTE.IP.ADDRESS.HERE

Be sure to replace username with the actual username and REMOTE.IP.ADDRESS.HERE with the remote device’s IP address. Hit Enter, and you’ll be prompted for the password.

With a correct password, you’ll get a functioning terminal prompt—you’re now logged into the remote computer.

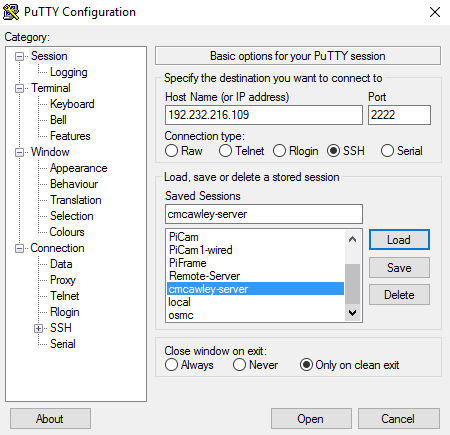
Using a desktop SSH client like PuTTY?

Configure SSH on Windows with PuTTY

Input the Host Name or IP address, select the SSH connection type, then Open. When prompted for your username and password, enter them in the command line window to complete the connection and gain remote access.

Can’t Connect? Troubleshoot Your SSH Set Up

If you are having SSH connection issues, these are the possible causes:

  • SSH software isn’t installed on either computer
  • Your username or password is incorrect
  • The IP address is wrong
  • A firewall is blocking the connection, or port 22 is not being forwarded

Double-check each point and you should be able to connect. If not, the problem might be more complex.

Using Linux Remotely With SSH

SSH is a useful tool for managing one or more Linux computers.

It lets you can work on any machine from just one system. You can input almost any Linux terminal command over SSH.

Key examples include:

  • Update: sudo apt update && sudo apt upgrade
  • Check status: uptime
  • Running processes: ps
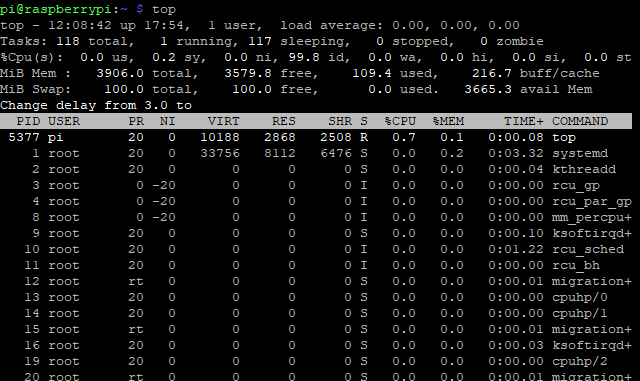
  • Running processes by CPU: top

Setup SSH on a Linux server to run commands remotely

Check our list of SSH commands for managing a Linux server for more.

Setup SSH and Make Linux More Powerful

With SSH, Linux becomes considerably more flexible and powerful. You can literally remotely access a computer using a smartphone thanks to SSH.

If SSH is set up correctly, with client and server-side software enabled and configured, remote command line access is possible. Need something more? Here’s how to remotely control a Linux desktop from Windows.

Read the full article: How to Set Up SSH on Linux and Test Your Setup: A Beginner’s Guide


Read Full Article