Google announced on Twitter today that it was canceling its annual I/O developer conference out of concern for the health and safety of all involved. It will not be holding any online conference in its place either.
“Out of concern for the health and safety of our developers, employees, and local communities — and in line with recent “shelter in place” orders by the local Bay Area counties — we sadly will not be holding I/O in any capacity this year,” the company tweeted.
This is not a small deal as Google uses this, and the Google Cloud Next conference, which it has also canceled, to let developers, customers, partners and other interested parties know about what new features, products and services they will be introducing in the coming year.
Without a major venue to announce these new tools, it will be harder for the company to get the word out about them or gain the power of human networking that these conferences provide. All of that is taking a backseat this year over concerns about the virus.
The company made clear that it does not intend to reschedule these events in person or in a virtual capacity at all this year, and will look for other ways to inform the community of changes, updates and new services in the coming months.
“Right now, the most important thing all of us can do is focus our attention on helping people with the new challenges we all face. Please know that we remain committed to finding other ways to share platform updates with you through our developer blogs and community forums,” the company wrote.
One of the obstacles to accurately estimating the prevalence of sickness in the general population is that most of our data comes from hospitals, not the 99.9 percent of the world that isn’t hospitals. FluSense is an autonomous, privacy-respecting system that counts the people and coughs in public spaces to keep health authorities informed.
Every year has a flu and cold season, of course, though this year’s is of course far more dire. But it’s like an ordinary flu season in that the main way anyone estimates how many people are sick is by analyzing stats from hospitals and clinics. Patients reporting “influenza-like illness” or certain symptoms get aggregated and tracked centrally. But what about the many folks who just stay home, or go to work sick?
We don’t know what we don’t know here, and that makes estimates of sickness trends — which inform things like vaccine production and hospital staffing — less reliable than they could be. Not only that, but it likely produces biases: Who is less likely to go to a hospital, and more likely to have to work sick? Folks with low incomes and no healthcare.
Researchers at the University of Massachusetts Amherst are attempting to alleviate this data problem with an automated system they call FluSense, which monitors public spaces, counting the people in them and listening for coughing. A few of these strategically placed in a city could give a great deal of valuable data and insight into flu-like illness in the general population.
Tauhidur Rahman and Forsad Al Hossain describe the system in a recent paper published in an ACM journal. FluSense basically consists of a thermal camera, a microphone, and a compact computing system loaded with a machine learning model trained to detect people and the sounds of coughing.
To be clear at the outset, this isn’t recording or recognizing individual faces; Like a camera doing face detection in order to set focus, this system only sees that a face and body exists and uses that to create a count of people in view. The number of coughs detected is compared to the number of people, and a few other metrics like sneezes and amount of speech, to produce a sort of sickness index — think of it as coughs per person per minute.
A sample setup, above, the FluSense prototype hardware, center, and sample output from the thermal camera with individuals being counted and outlined.
Sure, it’s a relatively simple measurement, but there’s nothing like this out there, even in places like clinic waiting rooms where sick people congregate; Admissions staff aren’t keeping a running tally of coughs for daily reporting. One can imagine not only characterizing the types of coughs, but visual markers like how closely packed people are, and location information like sickness indicators in one part of a city versus another.
“We believe that FluSense has the potential to expand the arsenal of health surveillance tools used to forecast seasonal flu and other viral respiratory outbreaks, such as the COVID-19 pandemic or SARS,” Rahman told TechCrunch. “By understanding the ebb and flow of the symptoms dynamics across different locations, we can have a better understanding of the severity of a novel infectious disease and that way we can enforce targeted public health intervention such as social distancing or vaccination.”
Obviously privacy is an important consideration with something like this, and Rahman explained that was partly why they decided to build their own hardware, since as some may have realized already, this is a system that’s possible (though not trivial) to integrate into existing camera systems.
“The researchers canvassed opinions from clinical care staff and the university ethical review committee to ensure the sensor platform was acceptable and well-aligned with patient protection considerations,” he said. “All persons discussed major hesitations about collection any high-resolution visual imagery in patient areas.”
Similarly, the speech classifier was built specifically to not retain any speech data beyond that someone spoke — can’t leak sensitive data if you never collect any.
The plan for now is to deploy FluSense “in several large public spaces,” one presumes on the UMass campus in order to diversify their data. “We are also looking for funding to run a large-scale multi-city trial,” Rahman said.
In time this could be integrated with other first- and second-hand metrics used in forecasting flu cases. It may not be in time to help much with controlling COVID-19, but it could very well help health authorities plan better for the next flu season, something that could potentially save lives.
If your Mac is running low on disk space or you’ve seen that scary “startup disk is full” message, you know it can be frustrating to free up storage. To deal with this problem, many people resort to external drives and juggle their files continuously between the disks.
While you can manually track available storage space, we’ll show you how to check disk space on a Mac using some disk analyzer apps. They offer unique visual experiences and let you take actionable steps to free up valuable disk space.
How to Check Hard Drive Space on Mac
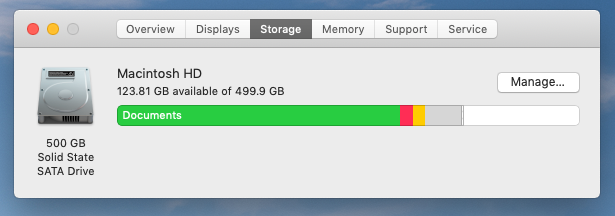
There are multiple ways to check the storage space on your Mac. Choose Apple menu > About This Mac and click Storage for the most basic one. Hover your pointer over the colored blocks to see what kind of content is using disk space.
For more info, open Disk Utility by searching for it with Spotlight (Cmd + Space). Select your startup volume from the left panel to check the amount of used space in the volume.
Then, click the Info button in the toolbar to show more details like Purgeable space and Available space (Purgeable + Free).
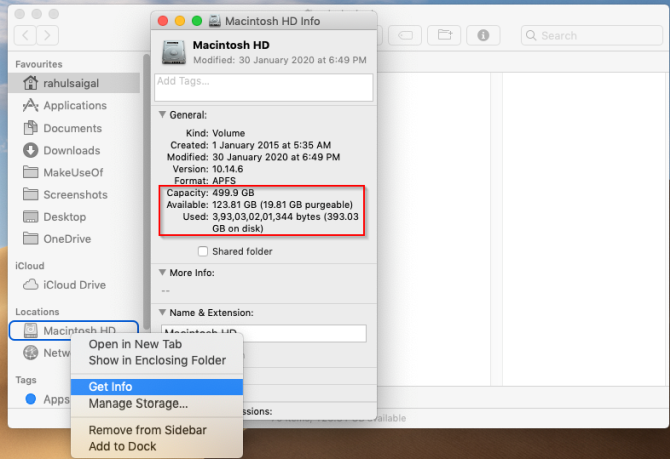
For another method, right-click the Macintosh HD disk icon on the left sidebar in Finder and select Get Info. You’ll get details on Used versus Available capacity, along with the space macOS considers purgeable.
What Is “Other” in Mac Storage?
On some Macs, you’ll notice that the Other storage category takes up a lot of disk space. This includes macOS system files, user Library folders, cache folders, and more. The majority of these folders are not normally visible.
If you mess with these directories, it could result in an unstable system, loss of data, or even prevent your Mac from booting up. Find out more about macOS folders you shouldn’t touch and how to handle them if they use a lot of space.
Why You Should Use a Mac Disk Space Analyzer
Why would you use a third-party app when there are multiple built-in ways to check the disk space on your Mac? Here are some reasons:
Finder might incorrectly interpret hard links as another copy of the file. Although hard links take no actual disk space, Finder counts them (at least) twice as distinct files, resulting in inaccurate estimation of folder sizes.
Your Mac’s file system, APFS, uses space-efficient clones while copying a file within the same volume. Instead of duplicating the data, it updates the metadata, and the on-disk data gets shared. Finder does not understand this mechanism and wrongly estimates free and used disk space.
The APFS snapshot feature works differently. When Time Machine creates local snapshots, the file system is aware of the changes. But neither Finder or About This Mac shows the space taken by snapshots. As a result, it may show the System category taking a lot of space.
In APFS, every disk is a container that can hold multiple volumes and shares the same pool of free space. If your startup disk consists of at least four separate volumes, you might notice a reduction in space available to Macintosh HD.
Now that you know why we recommend you use third-party apps, let’s explore the best Mac disk space analyzers to inspect and analyze disk space.
1. GrandPerspective
GrandPerspective is a utility app that uses a treemap structure for visualizing disk space. Upon launch, it asks you to select a folder or drive you want to analyze. A view window shows the contents in colorful rectangle blocks.
Hover your mouse pointer over a block to display the file name and size at the bottom of the view window. You can move the selection from a file to one of the folders and vice-versa by changing the focus. Press Cmd + [ and Cmd + ] to move up and down in the file hierarchy.
Click a block to lock the selection. Then, you can take action directly on that item. Press Space to take a quick look and click the Reveal button to show the selected file/folder in Finder.
What Makes GrandPerspective Unique?
You can change the sorting criteria by creation date, extension, file type, or folder and even choose a different color palette.
Select from the list of recently scanned folders to save time. Or select Load Scan Data to create a new view with older scanned data.
Create new filters for refining the view and perform filter tests to mix them in different ways. You can choose from audio, hard-links, images, app package contents, and more.
The app lets you rescan a folder with different settings. Afterward, open those results in a separate window to compare with the last results.
OmniDiskSweeper is another disk space analyzer for Mac. Upon launch, select a drive from the list and click Sweep Selected Drive. A new window opens with folders and files displayed in a column view. Once the scanning process completes, click on a folder and navigate to any file that takes up significant disk space.
The app uses different colors to group files by size and to show the status of an item. File sizes marked in green are the smallest files. As the size gets larger, this changes to dark green, dark purple, and light purple for huge files. Double-click on an item to open it in Finder.
What Does OmniDiskSweeper Offer?
It lets you sweep external and disk drives located on your network. If you share a folder located on a PC, the app can even scan that folder.
The bottom window provides you detailed information of a file, its size, and packages it belongs to in the file system. You should focus on files that are not part of packages.
Disk Inventory X is a utility app that gives you an overview of the space taken by different file types. Open the File menu and select any drive or a folder you would like to analyze. Once the scanning process finishes, the app creates a graphical treemap for visualizing storage space.
The left panel helps you sort the file list based on the colors associated with a particular file type, size, number of files, and file format. Click on any element in the graph to help you identify and locate the biggest files.
Unique Features of Disk Inventory X:
Any selection you make in the treemap graph gets synchronized with the finder-like view. This helps you find the major culprits, no matter where they are on the disk.
The app sorts file types in descending order. Each file type has a color used in the treemap graph and throughout all open folders.
You can view package contents, zoom into folders, and hide free space to analyze disk space in different ways.
DaisyDisk is a beautifully designed disk analyzer that uses a sunburst map to show you a disk overview. Upon launch, it displays all mounted volumes with different color styles. Green means that at least half of your disk is empty, while red denotes that it’s time to take action.
Click the Scan button, and within a few seconds, you’ll see the map with a brief overview on the sidebar. Place your mouse over any segment to see its contents on the sidebar. When you want to navigate to the parent folder, click in the center of the disk map.
Key Features of DaisyDisk
The sunburst map helps you separate the huge files from smaller ones. Drill down and find out which items are consuming the most disk space.
If you scan the disk as an administrator, it can reveal more data about files hidden on other volumes, space taken by local snapshots, and details on purgeable space.
You can preview any file from the sidebar, send them to a collector panel, then delete them at your convenience.
NCDU is a command line disk analyzer with a ncurses interface. It’s based on the du command, but it’s much faster and easy to use on your Mac and remote servers. To get started, you’ll need to install the app through Homebrew. To do this, see how to install Mac apps using Homebrew.
Once installed, open Terminal and type in ncdu / to start scanning your drive. Use the arrow keys to navigate across items. Then, press i to view the details of the selected item.
Unique Features of NCDU
You can use different options to enhance the disk-related information. Navigate to the NCDU man page for more details.
It’s easy to export all the information to an output file. You can then use file comparison apps to better analyze your disk usage.
Getting accurate details about free and used space on your Macis tricky. While there are many built-in techniques, most of them are unreliable for detailed use. Use Disk Utility and these apps to inspect and analyze your storage space in detail.
During these uncertain times, it’s important to look toward the future.
Despite the world-wide disruption, HMD Global—the company behind the recent Nokia revival—has unveiled a series of 5G capable Android smartphones that are designed to operate on 5G network bands across the world.
Here’s what we’ve got to look forward to.
Nokia 8.3 5G
The Nokia 8.3 5G is the flagship device of the recent announcement. According to HMD Global, the smartphone is designed to be future-proof. To that end, the Nokia 8.3 5G should be able to support most 5G networks around the world, regardless of the cell network’s operating band.
Previously, devices purchased in, say, the US don’t typically support European LTE or 4G networks, and vice versa. Not only does this mean that your device is region-locked when you purchase it, but it complicates international travel, too.
The Nokia 8.3 5G will be the first smartphone to use the new Qualcomm 5G RF Front-end module and helps the device to combine 40 different radio-frequency components onto a single electronics module.
Alongside this development, the phone is equipped with a PureView quad-lens camera with ZEISS optics. Combined with the ZEUSS Cinema feature, this will allow you to film high-quality video even in poor or low-light environments. In a nod to their Finnish roots, the phone comes in a Polar Night color, inspired by the arctic sky.
Nokia 5.3
The Nokia 5.3 is designed with value in mind. It is intended as a continuation of Nokia’s entry-level smartphones, which have gained a well-deserved reputation for value. This phone will be powered by the Snapdragon 665 CPU, helping it achieve an almost two-day battery life.
The quad-lens setup enables high-quality captures, especially when combined with a software-based AI to optimize the image. This should even be true in low-light thanks to the phone’s Night Mode. The phone has a 6.55-inch screen and is expected to ship with Android 10.
Nokia 5310
If this name sounds familiar, that’s because it is. The Nokia 5310 is a 2020 redesign of the original 5310 device, first launched in 2007. This is part of HMD Global’s Originals lineup, which also includes the famed Nokia 3310.
This is not a smartphone, though. However, the feature phone does come with some modern updates. There’s a built-in MP3 player and FM radio, as well as dual front-facing speakings for music wherever you are. The design makes nods to the original while also bringing it into Nokia’s current visual aesthetic.
5G Smartphones Are Coming
Nokia isn’t the first to announce their latest 5G smartphones, but they are among the most affordable. The Nokia 8.3 5G also looks set to be one of the most interesting of the current releases as it is future-proof and practical, especially for international users.
However, if you’re after more choice for the upcoming 5G upgrade, here are the best 5G smartphones available today.
Why is iMessage not delivering? There are few problems as annoying as when an iMessage doesn’t say Delivered. Often, it fails to show the Not Delivered message either. This can affect multiple contacts or one specific person.
It’s more infuriating when the message says Delivered but the recipient didn’t actually receive it. Here are a few tricks to try when your iMessage is not being delivered properly.
What Does “Delivered” Mean on iMessage?
We need to first differentiate between Delivered and Read.
Delivered means the other person received the message on their device. Read means the recipient has tapped on it. Of course, this doesn’t mean they’ve actually read it—it only means the message has been opened. Don’t panic if you don’t hear back immediately; they might have selected it but subsequently got distracted.
You can toggle read receipts for yourself by going to Settings > Messages > Send Read Receipts. In fact, this subsection of Settings will prove essential if you have any issues with iMessage.
Why Does iMessage Read “Delivered” When It’s Not?
Sometimes, a message will say it’s been received, but the recipient will insist they never got it. You shouldn’t automatically think they’re lying: there are numerous reasons this might happen.
It could be a quirk of iMessages, but equally, it could be that the message was delivered to another device. If your contact has an iPhone, iPad, and Mac all signed in with the same Apple ID, your message could’ve appeared on one of these other devices, not their smartphone.
In theory, this shouldn’t cause a problem—your message should show across all devices. However, as we’ll see, iMessage is far from perfect in this regard.
Not everyone keeps their phone turned on all the time, especially around bedtime.
If an iMessage doesn’t say Delivered, the recipient might have simply turned their phone off. Your message will arrive when they turn on their device again. Be patient.
Even if you think the person is unlikely to turn off their phone, they might have activated Airplane Mode. This cuts off all connections, so they won’t receive iMessages, SMS, or calls.
If you normally receive read receipts from your contact, or it shows Delivered but you don’t have a reply, there’s another possibility. Their device might be set to Do Not Disturb, which silences alerts.
If it’s an emergency, you can call them instead. At first, you won’t get a response. But call again within three minutes and, if your contact hasn’t changed the default settings, your repeated call will bypass Do Not Disturb mode.
iMessage Won’t Deliver: Troubleshooting
It’s tough to narrow down why iMessages won’t deliver without some trial and error. One of the following solutions should work; you may have to try them all to get to the bottom of the problem.
Do You Have internet Access?
The obvious reason your message won’t deliver is because the recipient has no service. iMessage relies on an internet connection, so if no Wi-Fi or cellular data is available, it won’t appear until their phone gets a connection. This is a particular concern in rural or underground areas without free online access, or if the recipient is abroad on vacation.
If your iPhone says Not Delivered, you’re probably the one without an internet connection. Check this by going to Settings > Wi-Fi where you can see any networks you’ve joined. You can turn this off and on again (then rejoin networks) to clear potential issues. Review the options at Settings > Cellular if you’re relying on mobile data.
If you do have service, you’ll simply have to wait until the recipient connects too.
Do You Have iMessage Turned On?
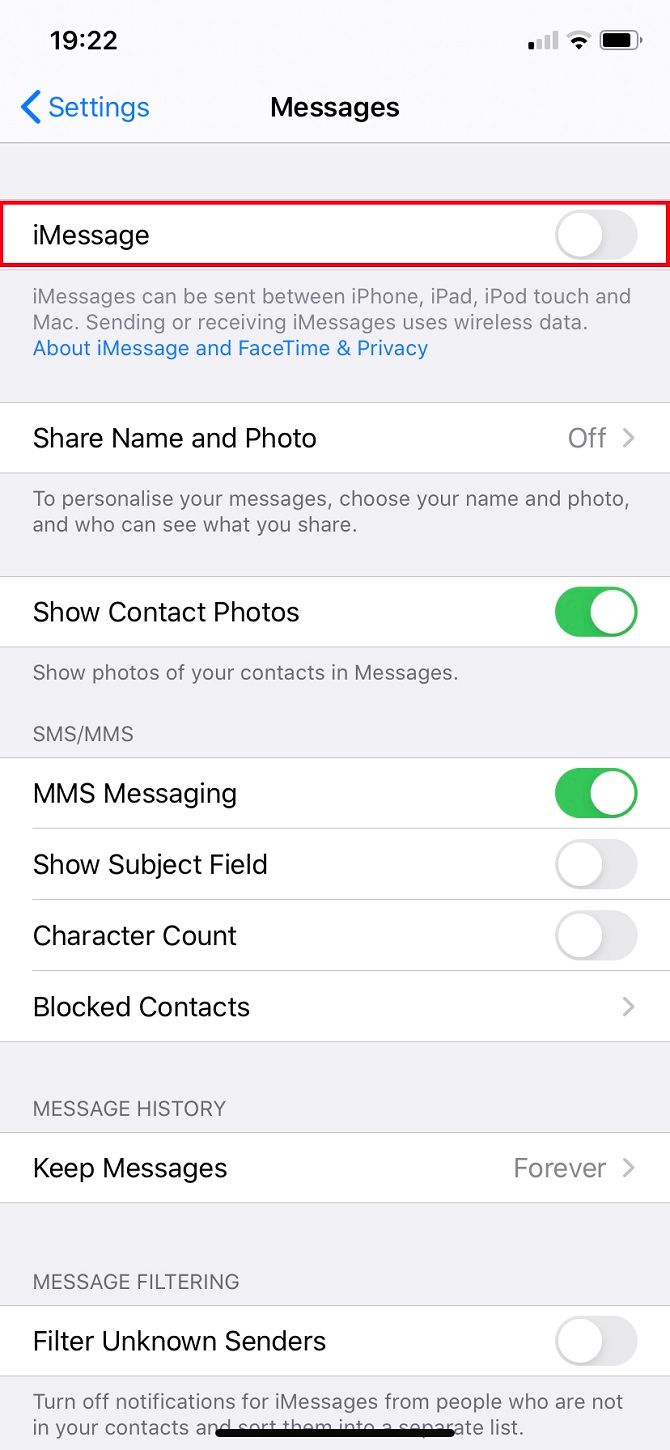
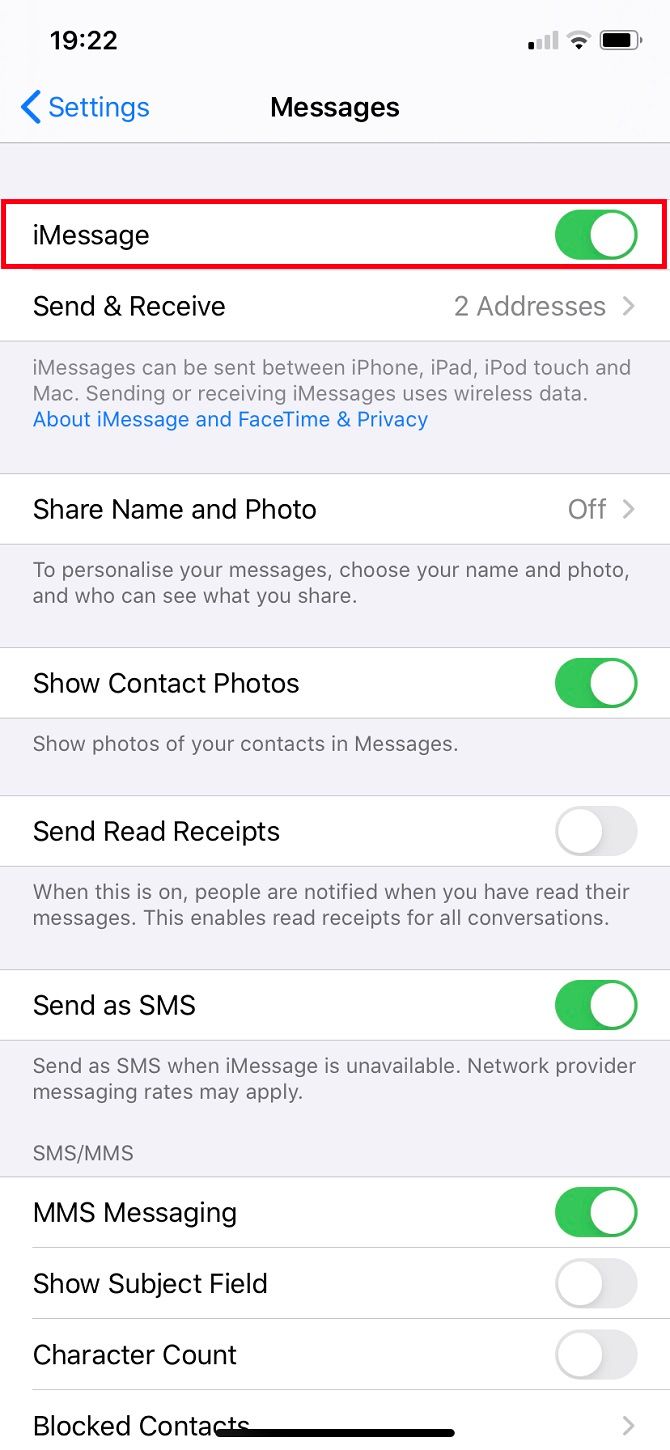
This could be a quick fix to your problem that’s easy to overlook. Navigate to Settings > Messages. iMessage should already be turned on; if not, do so now.
Even if iMessage is already on, it’s worth toggling off then back on again. You’ll need to wait a few moments while it reactivates.
Send as Text Message Instead of iMessage
If the person you’re contacting doesn’t have an Apple product, iMessage won’t work. You need to rely on SMS to send to Android devices, for example. In these instances, your messages will read Sent as Text Message, not Delivered, and appears as green bubbles.
But texts aren’t just useful when sending between different operating systems. You can revert iMessages to SMS if your internet connection is weak. Go to Settings > Messages > Send as SMS to enable this.
iPhones default to iMessage when chatting between Apple devices. Messages will only send as traditional texts if there’s no internet. You can’t disable iMessage on cellular data while keeping it enabled for Wi-Fi connections, so it’s an all-or-nothing service. However, iMessage may fail to send if you’ve exceeded your mobile data limit.
You can resend a message via SMS if it reads Not Delivered by tapping the exclamation point by the message. Alternatively, switch to another popular messaging app. Major options like WhatsApp and Telegram work on all platforms and offer secure messaging.
Try a Force Restart
This is an important step in all sorts of troubleshooting. A forced restart reboots your iPhone, stopping any problematic processes running in the background. Crucially, it doesn’t delete any data.
See how to force-restart your iPhone for full instructions. No matter which model you have, the screen will turn black until the Apple logo appears. You can let go of the buttons at this point and your iPhone will power on as usual.
Is iOS Up-To-Date?
Apple regularly issues patches to minor issues through iOS updates. This could include problems with iMessage.
Check whether you’re running the latest version of iOS by going to Settings > General > Software Update. This will automatically check if your software is updated and, if not, suggest installation.
You won’t lose any photos or messages, although some apps may ask you to log in again after updating.
Apple ID: Sign Out and Back In
This is one of the most common fixes for iMessage trouble: you just need to sign out of your Apple ID and back in again.
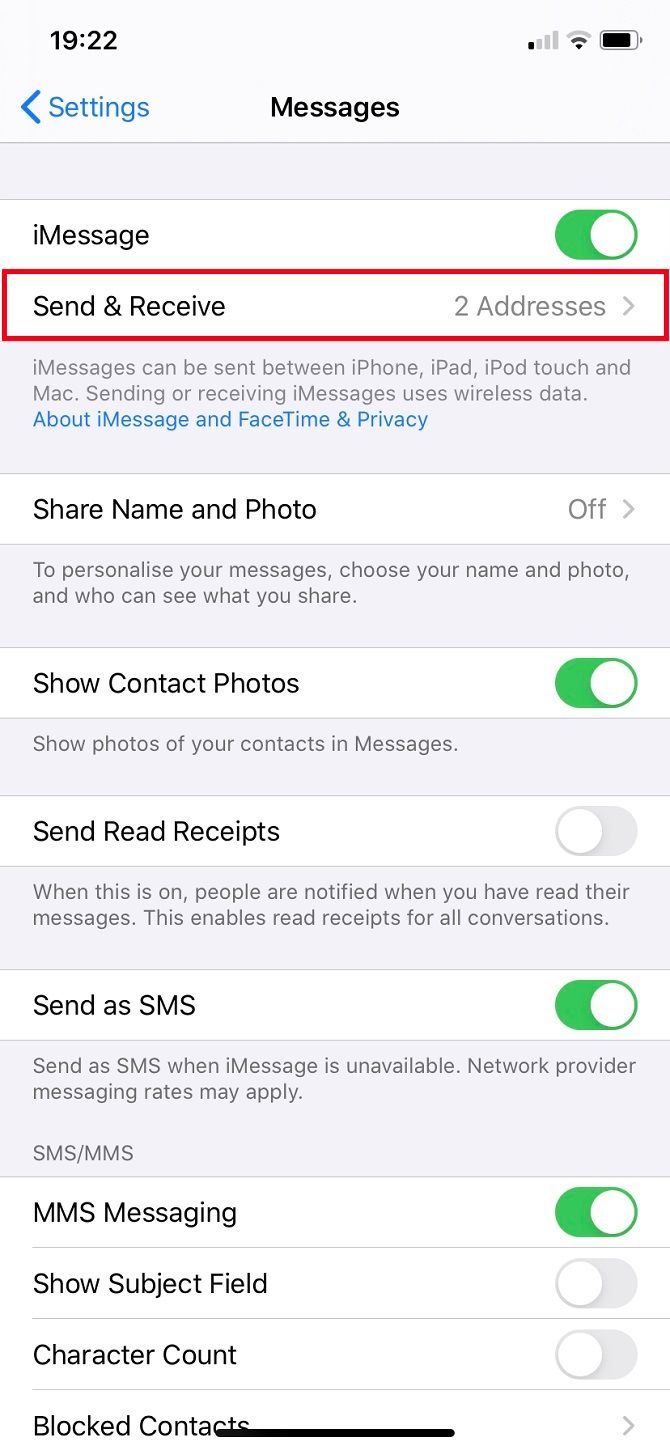
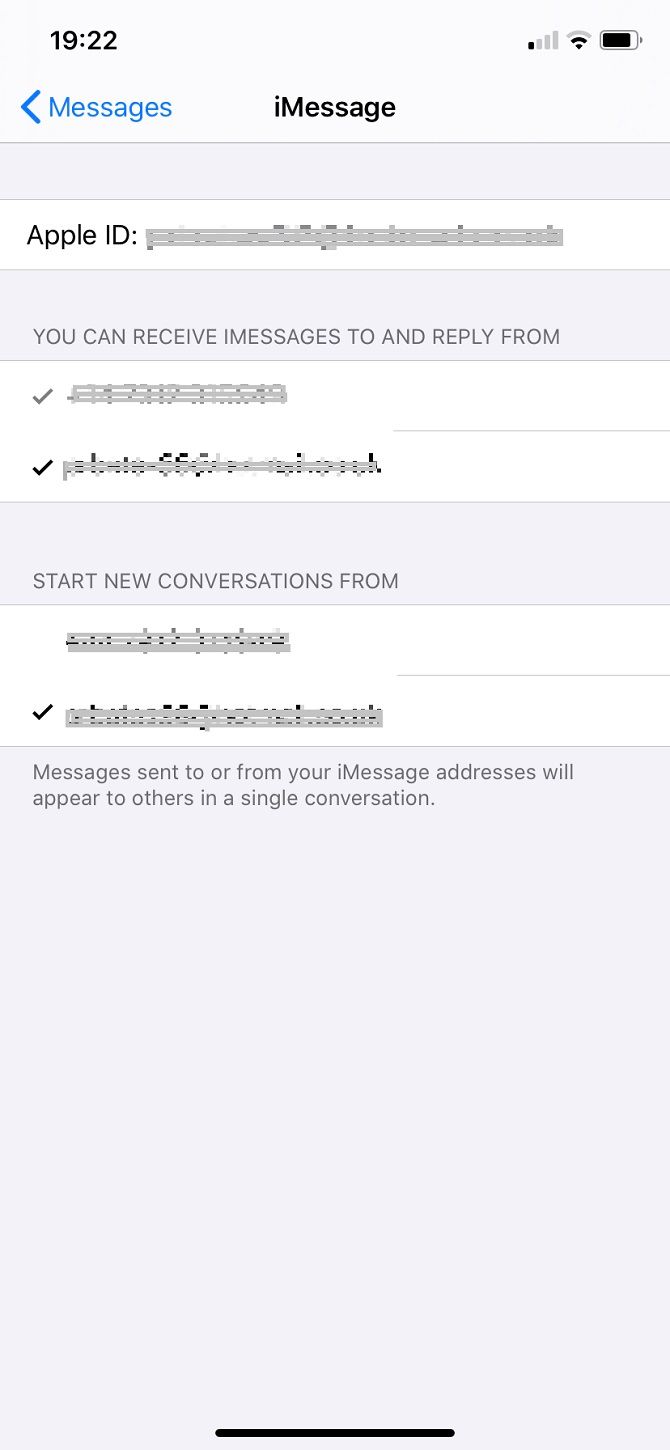
Go to Settings > Messages > Send & Receive and tap your ID. You should then Sign Out, after which all your details except the phone number will disappear. Select Use your Apple ID for iMessage and sign back in. This may take a few moments.
You can send iMessage via both phone numbers and email addresses. If there’s only one person you’re having trouble sending to, check which email address you have listed for them.
Do you have any details listed for their contact? Perhaps their Apple ID use a different address? Ask them in person or via another messaging service if possible.
To add an email address, go to Contacts, select a name, and choose Edit.
Should You Delete Previous Messages?
Have you ever tried sending an email that was too large? It stays in your outbox, attempting to send again and again. Eventually, you have to give up and delete it.
That’s what you should try here too.
This primarily applies when iMessages won’t deliver to only one or two contacts. You can delete a whole conversation and start again by swiping left on it and choosing Delete. That’s the nuclear option, and one you likely won’t want to take. But you shouldn’t need to.
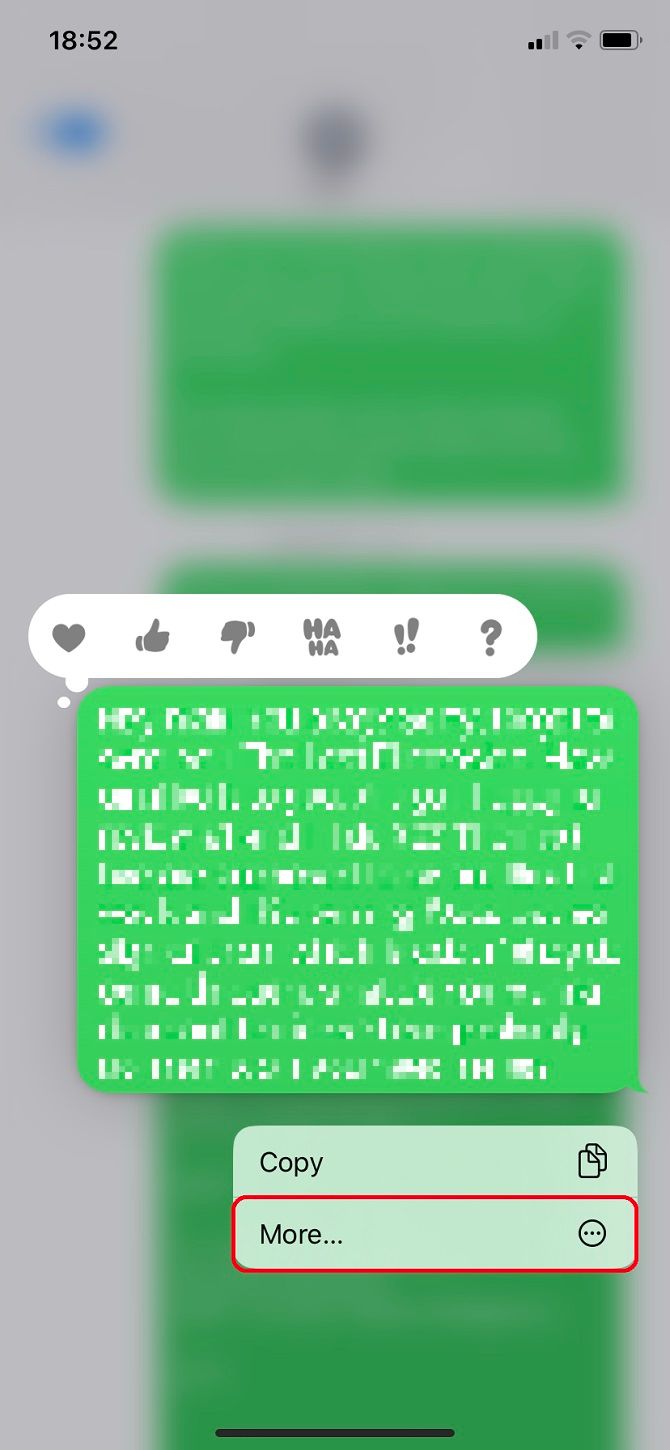
Go to the conversation with the person you’re struggling to keep in touch with. Hold your most recent message (Copy it into Notes or Pages if you don’t want to completely lose your text). Then click More and select all the messages you’ve sent since the problem occurred—anything since they stopped responding—then hit the Trash symbol at the bottom-left.
There could be just one message causing the issue, so this clears the backlog and lets you try again.
Swap Your SIM Card
SIM cards are often fickle, and it’s possible yours has decided it doesn’t like a particular number.
Head to the store of your service provider if you’ve exhausted the above steps. You’ll likely have to assure the staff that you’ve performed the above troubleshooting. Talk to them about swapping to a new SIM card. If you’re on a contract, they should do this for free. You’ll still use the same device, and shouldn’t lose any data.
They’ll activate a new SIM and you’ll have to wait until your old one has no service before swapping to the new card. Transferring between SIMs can take up to 24 hours. Fortunately, it rarely takes longer than an hour before carrier settings are restored.
Reset All Settings
This should really be your last resort because you’ll need to sign into accounts and set up network settings like Wi-Fi and VPNs again. Most importantly, this does not delete your data.
Go to Settings > General > Reset > Reset All Settings—careful you don’t select anything else, as there’s also the option to erase everything. You may need to sign back into your Apple ID afterwards.
This should patch any settings-related glitches, so it’s worth remembering in case you have further issues with your iPhone.
iMessages Won’t Deliver: Is My Phone Number Blocked?
Don’t immediately think this that someone blocked you. In most situations, your number won’t be blocked. However, it is a possibility.
If you have been blocked, iMessage could still say Delivered. Nonetheless, it won’t actually appear on the recipient’s device.
This thought will trouble you, but if you can contact that person elsewhere—on Facebook, Twitter, or Snapchat, for example—then they’re unlikely to have blocked your phone number.
Why Is My iMessage Still Not Delivering?
If you’ve tried everything above and iMessage still won’t deliver, there are further possibilities to entertain. The first is that there’s nothing wrong with your phone; the problem is with the recipient’s device.
This is likely if messages to your other contacts deliver correctly, although that’s not always the case. You should advise them to take the same steps you already have by sending them this guide. Another possibility is that they’ve switched numbers and haven’t alerted you yet.
You might think your MacBook or MacBook Air is overheating if it sounds like a hairdryer and feels like a grill. Usually, the fans are working hard to stop your Mac from getting too hot. But if they fail, your computer might shut down unexpectedly.
There are lots of tricks you can use to stop your MacBook Air from overheating. For our purposes, “overheating” means being very hot to touch, but still operational. That way, you don’t need to wait for your MacBook to turn itself off before you use the suggestions below to fix it.
Why Is My MacBook Air So Hot?
All sorts of problems might cause your MacBook Air to heat up, ranging from a buildup of dust to a load of browser tabs. These are issues that every computer contends with, but MacBooks seem to struggle more than most.
The MacBook Air from 2019 appears to be particularly prone to overheating problems. It’s likely that this problem is down to the compact design with only a single vent—at the hinge of the screen—to aid heat dispersal.
Intensive processing tasks like rendering video, playing games, or opening too many browser tabs take their toll on your Mac’s logic board and processor. The board generates heat as it works, and that heat only has one route of escape. Apple simply didn’t design the MacBook Air for processor-intensive tasks, which is why it frequently gets so hot.
Still, if your MacBook fans are whirring loudly and it’s heating up to a worrying temperature, you can follow the suggestions below to help cool it down.
1. Change Your Environment
Despite the name, the best place to use a laptop is not on your lap. Aim to use your MacBook on a hard and flat surface, such as a desk, to offer the best ventilation without blocking the fan.
Soft furnishings, like a pillow or a couch, store more heat and introduce dust. Both of these can reduce your MacBook Air’s ability to cool itself down.
You should also avoid using your Mac in direct sunlight for the same reason. Apple says the ideal ambient temperature for your MacBook Air is 50-95 degrees F (or 10-35 degrees C). There’s a lot more to learn about PC operating temperatures as well, if you’re interested.
2. Drop the Demanding Software
If your physical environment seems fine, there’s a good chance your MacBook Air is heating up because it’s trying to do too many tasks at once. Find out exactly what processes are causing your Mac to work overtime by launching the Activity Monitor app from your Utilities folder (or search for it using Spotlight with Cmd + Space).
In Activity Monitor, go to the CPU tab and click the % CPU column to sort every process in descending order, based on the percentage of available processing power it’s using.
This is likely to reveal particular apps or processes using excessive amounts of CPU (think 90 percent and above) for no reason. Sometimes this happens when an app crashes and fails to shut down properly. You can fix that by selecting the process and forcing it to quit with the Stop (X) button in the top-left corner.
You should also reduce the number of login items that start up when you log into your Mac. Open the Apple menu and go to System Preferences > Users & Groups, then select your profile and open the Login Items tab to remove apps.
3. Update macOS and Reset the SMC
Even if there aren’t any particular apps causing your MacBook to overheat, you might still be suffering from a software-related problem. This could come down to a bug in the operating system. Usually, all you need to do is update to the latest version of macOS to fix these issues.
Open the Apple menu and go to System Preferences > Software Update to check for new macOS updates. Be sure to download and install any that are available for your Mac.
There’s a chance Apple is still working on a patch for the particular bug you’re facing. You should thus turn on the option to Automatically keep my Mac up to date or keep checking for updates yourself.
It’s also a good idea to reset the SMC on your Mac which stands for System Management Controller. An issue with it might explain why your MacBook Air isn’t using the fans to cool itself down properly.
4. Run Diagnostics on Your Fans
If your problems are more pronounced and your MacBook Air is regularly cutting out, you may need to test your fans. Sometimes, you can obviously hear a problem with your fan if it stutters and grinds audibly. But not all fan failures are this clear.
Fortunately, you can test the fans on your MacBook using built-in diagnostic software. If your MacBook Air was made before June 2013, it’ll use the Apple Hardware Test. More recent models use Apple Diagnostics.
Don’t worry: both diagnostics tests are quite similar, and you access them in the same way:
Shut down your Mac and connect the power cable.
Press the Power button to restart your Mac, then press and hold the D key.
Select a language (if prompted), then follow the on-screen diagnostics instructions.
On newer Macs, Apple Diagnostics should start testing automatically. Older Macs using the Apple Hardware Test give you the option of a Basic or a Thorough test. The basic test should be enough to detect fan problems.
After the diagnostics are complete, make a note of any error codes or other pertinent information you get. You might want to give these codes to Apple if you need to make a Genius Bar appointment to repair your Mac.
5. Override Your Fans
If your MacBook Air is consistently overheating and you struggle to see why, you may want to install an app that allows you to manually override the fan speed. That way, you can keep the fans on full even if your Mac doesn’t usually want to.
Of course, this might come at the expense of wearing out your fans sooner. But it’s a lot cheaper to replace a fan in your MacBook Air than to replace the logic board if it dies from heat.
The best app to use for this is Macs Fan Control, a free utility that lives in your menu bar. It provides easy controls to override the default rules about using the fans: choose to keep them on all the time or adjust the acceptable temperature range.
Download: Macs Fan Control for macOS (Free, premium version available)
6. Laptop Coolers and Cleaning
It’s a last resort, particularly for such a stylish machine, but sometimes you have to bite the bullet and buy a laptop cooler for your MacBook Air. These stands prop your MacBook up and use additional fans to encourage better ventilation.
If you use your MacBook Air at home most of the time, getting a decent laptop cooler could be the simplest solution to avoid overheating problems. This is ideal if you combine your MacBook with a monitor and keyboard, so you can keep the cooler off to the side.
If your Mac is older and the fans spin up a lot more than they used to, you may want to go a step further and clean it out. This involves opening the laptop enclosure and exposing all the delicate inner-workings. It’s entirely possible to cause permanent damage to your MacBook while doing this, so you may want to hire a professional instead.
We’ve looked at how to stop your MacBook Air from overheating. This issue is common to Mac owners, particularly those with the 2019 MacBook Air, because Macs don’t feature great ventilation options. But a Mac isn’t the only computer that overheats.
We’ve previously written about advice to fix any overheating laptop. If your MacBook Air is still getting too hot, take a look at those general tips to find out what else you can do to fix it.
If you no longer use an online service it’s a good idea to delete or deactivate your account. This is safer and more secure than letting it sit there unused.
Thankfully, you can deactivate or delete your LinkedIn account if you’re no longer searching for a job or interested in networking.
Here’s everything you need to know about deleting or deactivating your LinkedIn account…
Deactivating vs. Deleting Your LinkedIn Account
LinkedIn offers three options for limiting or cancelling your account: a hibernation feature, the option to limit public visibility, and fully deleting your account and data.
However, the hibernation feature is new and has only been rolled out to a limited number of users. So, as not every LinkedIn user currently has this option we’ll focus instead on showing you how to deactivate or delete your LinkedIn account.
Currently, LinkedIn suggests limiting the public visibility of your account if you don’t want to delete it completely. This prevents users who are not logged into the service from viewing your profile. However, it leaves your profile intact and viewable to LinkedIn users.
Deleting your LinkedIn account, on the other hand, removes your profile from the website completely. It also deletes articles, comments, and posts.
How to Deactivate Your LinkedIn Account
LinkedIn does not have a widely rolled out option for deactivating or disabling your account. Instead, all you can do is hide your account from search engine results. This also hides your profile from users who are not logged into LinkedIn.
To limit your profile visibility, select the Me menu to the top-right of the LinkedIn homepage and click on Settings and Privacy.
This takes you to your privacy settings dashboard. Select the header that says Edit your public profile.
To the side of the Public profile settings page, you will see the option to Edit Visibility. Next to the heading Your profile’s public visibility, click on the slider to toggle it on or off.
This is, however, a little misleading. As LinkedIn notes, it may be several weeks before your profile stops showing up in search engine results. You can also still log in to your LinkedIn account and use the site’s services—and your profile will still be visible to your existing connections.
NB: Another relevant setting you should change is your profile visibility on partner services. This setting is in your LinkedIn privacy dashboard. Scroll down to Profile visibility off LinkedIn and toggle the setting to off.
Editing these settings is a far cry from properly disabling or deactivating your LinkedIn account, but it is currently the only option available for those who want to temporarily disable their LinkedIn account.
To limit your profile visibility from logged-in LinkedIn users, you need to edit specific fields of your profile (e.g. recommendations) and either hide or delete them.
How to Delete Your LinkedIn Account
Completely deleting your LinkedIn account is the only way to fully remove your profile so that it cannot be viewed by anyone, including other LinkedIn users.
To fully delete your LinkedIn account, select the Me menu to the top-right of your LinkedIn homepage and click Settings and Privacy.
Switch to the Account tab and scroll down to Closing your LinkedIn account. Click the Change button to start the deletion process.
LinkedIn will ask you to enter a reason for closing your account. Once you’ve selected one, click Next. Finally, enter your password on the next page and click Close account.
If you restore your account within 20 days, portions of your profile can be recovered. However, certain information such as recommendations and group memberships cannot be recovered.
How to Delete Other Social Media Accounts
If you want to take control of your online privacy and security, you can delete or deactivate other unused social media accounts.
The many icons and symbols used across Facebook Messenger can be pretty confusing. So, what do they all mean? In this article we’ll explain what all of the Facebook Messenger icons and symbols mean.
What Do the Symbols Mean on Facebook Messenger?
We’ve researched the most common icons and symbols on Facebook Messenger to find out what purpose they serve. Here’s everything you need to know.
1. Facebook Messenger Icon: Open Blue Circle
The open blue circle Facebook Messenger icon means that your message is currently sending.
It’s best if you don’t navigate away from the message while the open blue circle is present as you may risk losing your message if you exit before it is fully sent.
2. Facebook Messenger Icon: Open Blue Circle + Checkmark
The open blue circle with a checkmark means that your message has been sent.
At this point, you should be able to navigate away from the message without any worries, but the person you are sending the message to may not be able to see it yet.
3. Facebook Messenger Icon: Filled Blue Circle + Check
A filled blue circle with a checkmark means that your message has been delivered.
While the person may not have seen your message yet, you can be confident that it’ll be available to them whenever they next check their phone, tablet, or computer.
4. Facebook Messenger Icon: Red Triangle + Exclamation
A red triangle with an exclamation point should only appear if your message is not sent due to an internet connection outage. It is arguably the least common Messenger symbol.
A message should appear alongside the red triangle that says “This message didn’t send. Check your internet connection and click to try again.” Avoid navigating away from the page until your internet connection is working, or save a copy of your message offline to ensure your information is not lost.
How to Know If Someone Saw Your Facebook Message
If someone has seen your Facebook message on the Messenger app, a small, circular version of their profile picture should appear underneath the last message they read.
You’ll also see the word “Seen” displayed under a message that has been read, along with a timestamp to let you know when the recipient opened it.
How to Hide That You’ve Read a Facebook Message
Facebook has a feature that allows you to mark messages as unread, which has led many people to think that they can read a message without the sender knowing it has been read. Unfortunately, Facebook’s Mark as Unread option is just an inbox sorting tool and won’t retract the read receipt.
Aside from using third-party add-ons in browsers, the only way to avoid someone knowing you’ve seen their message is to not open it.
Can Strangers Send You Messages on Facebook?
Facebook has also made changes to the way that strangers can send you a message. Now, if someone you don’t know wants to contact you, three things will happen:
You will receive a notification that you have a message request.
You will have the option to either Ignore or Accept the message after reading it.
A notification will remain on Messenger to let you know that you are not friends with the other person in the message.
What Is a Message Request?
A message request is a notification that you receive if someone you are not friends with sends you a message on Facebook.
This is an update from older versions of Facebook Messenger where messages from non-friends would be sorted into the Other folder in your Messenger inbox.
How to Delete Facebook Messages
There are four different ways to hide or delete messages on Facebook:
Archiving a conversation will move it out of your Inbox and into the Archived folder. The action is reversible.
Deleting a conversation will delete every message ever sent from your inbox, but not from the other person’s inbox. This is non-reversible.
Deleting Messages will allow you to select specific messages to permanently delete from your inbox, but not from the other person’s inbox.
Blocking Messages will prevent another person in the conversation from sending you any further messages. This action is reversible.
It’s also important to know that you can appear offline on Facebook or block someone from sending you messages without blocking them completely. This is a great workaround for awkward social media situations.
How to Use Messenger Without Facebook
While Messenger was originally intended for use on the Facebook platform itself, it can now operate independently from Facebook as long as you provide the app with your mobile phone number.
Facebook has added a ton of features that allow you to make your Messenger conversations dynamic and interactive. There are lots of Messenger add-on apps that enable you to do anything from singing your friends a song to adding stickers to your selfies.
If you don’t want to download external apps, Facebook Messenger has GIFs, stickers, and voice recording features that can help you dazzle your friends.
Although lots of users have taken issue with Messenger’s permission requirements, it remains one of the most-used messaging apps around. At the last count, it had over 1.3 billion active users, with 20 billion messages sent every month. Which means that you’ll almost always be able to contact the person you want to talk with.
However, if you don’t like Facebook and its products, remember that there are plenty of alternatives to Facebook Messenger you can check out.