18 February 2020

The Station: Lucid Motors spy shot and the birth of an AV startup


The Station is a weekly newsletter dedicated to all things transportation. Sign up here — just click The Station — to receive it every Saturday in your inbox.

Hello again — or perhaps for the first time. This is Kirsten Korosec, senior transportation reporter at TechCrunch and your host here at The Station. This weekly newsletter will also be posted as an article after the weekend — that’s what you’re reading now. To get it first, subscribe for free. Please note that there will be not be a newsletter Feb. 22.

It was a drama-filled week with a hearing on the hill in D.C. about autonomous vehicle legislation that got a bit tense at times. Meanwhile, Uber tipped its hat to the past, EV startup Lucid started to lift the veil on its Air vehicle (scroll down for a spy shot!) and micromobility prepared for headwinds in Germany.

Before I ride off into the sunset for my vacation, one reminder for y’all. Don’t forget to reach out and email me at kirsten.korosec@techcrunch.com to share thoughts, opinions or tips or send a direct message to @kirstenkorosec.

Micromobbin’

the station scooter1a

Welcome back to micromobbin’, a regular feature in The Station by reporter Megan Rose Dickey. Before we get into her micromobility insights, a quick note that shared scooters are facing a fight in Germany that has prompted companies to unite over their “shared” cause. (Get it?)

Micromobility vehicles, first legalized in Germany last June, have flooded the marketplace and caused a backlash in cities like Berlin, where at least six apps, including Bird, Circ (now owned by Bird), Lime, Tier, Uber Jump and Voi operate. As the Financial Times first reported, amendments to the country’s Road Traffic Act would give individual cities the power to heavily restrict the areas in which e-scooters can be parked or ban them altogether.

Now back to Dickey’s micromobbin’.

Swiftmile, the startup that wants to become the gas station for electric micromobility vehicles, announced its move into advertising this week. Swiftmile already supplies cities and private operators with docks equipped to park and charge both scooters and e-bikes. Now, the company is starting to integrate digital displays that attach to its charging stations to provide public transit info, traffic alerts and, of course, ads.

“It adds tremendous value because it’s a massive market,” Swiftmile CEO Colin Roche told TechCrunch. “Tons of these corporations want to market to that group but you cannot do that on a scooter, nor should you. So there’s a massive audience that wants to market to that group but also cities like us because we’re bringing order to the chaos.”

Meanwhile, Bird unveiled more details about its loyalty program, called Frequent Flyer. It’s currently in the pilot phase, which means it’s only available in select markets. But the benefits for riding five times in 28 days, include no start fees for rides between 5 a.m. to 10 a.m., Monday through Friday and the ability to reserve your Bird in advance for up to 30 minutes at no cost.

— Megan Rose Dickey

A little bird

blinky cat bird green

We don’t just hear things. We see things too. This week in a little bird — the place where we shared insider news not gossip — I’m going to share two spy shots of a production version of Lucid Motors’ upcoming Air electric vehicle. See below.

The photos of the production version of the Lucid Air was taken during an event hosted for some of the vehicle’s first reservation holders. (I wasn’t there, but luckily some readers of The Station were.) By the way, we also hear that reservations are in the “low four figures.”

Lucid Air production reveal

You’ll notice that the production version of the Air is nearly identical to the beta version. Unfortunately, we don’t see the interior. But reports suggest it falls in the understated luxury category and without giant screens.

Lucid is preparing for the one more important moments in its history as a company. The production version of Air will be unveiled in April at the New York Auto Show. In the run up to the auto show, Lucid is revealing more information about the vehicle, including a recent video that suggested the vehicle had a real-world range of more than 400 miles. Lucid has hit that 400-mile range in simulated testing, but how it operates on the roads is what really matters.

What’s impressive, if those numbers bear out, is that it was accomplished with a 110-kWh battery pack. That’s an improvement from back in 2016 when Lucid said it would need a 130-kWh battery pack to achieve that range. In my past conversations with CEO Peter Rawlinson — and one wild ride with him behind the wheel of an early Air prototype in Vegas — it’s clear he is obsessed with battery efficiency. That apparently hasn’t waned.

Car and Driver, which was at this special event, noted in its report that Rawlinson has a goal to get to five miles per kilowatt-hour. Right now, Tesla can lay claim to the most efficient electric vehicle with the upcoming Model Y at a claimed 4.1 miles per kilowatt-hour.

And late Friday, Tesla CEO Elon Musk tweeted that the Tesla Model S now has an estimated EPA range is now above 390 miles or ~630 km.

Inside the beltway

It got a little prickly on Capitol Hill during a House panel hearing this week that aimed to tackle how best to regulate autonomous vehicles. Watch the hearing to see it all unfold. Here’s a handy link to it.

A quick history lesson: The SELF DRIVE ACT was unanimously passed in 2017 by the Republican-controlled House of Representatives. AV START, a complementary bill introduced in the Senate, failed to pass because Democrats said it didn’t go far enough to address safety and liability issues.

A bipartisan group revived efforts to come up with legislation that would address Democrat concerns and give auto manufacturers and AV developers greater freedom to deploy vehicles that lack controls like a steering wheel or pedals, which are currently required by federal law.

There was some level of public agreement between the traditional auto manufacturers and AAJ over the issue of accountability. But there is still a huge divide between organizations like the Consumer Technology Association and safety advocates and trial lawyers over the issue of forced arbitration.

Groups like the American Association for Justice, a group representing trial lawyers, want to ban forced arbitration in any autonomous vehicle bill.

Meanwhile, CTA president and CEO Gary Shapiro submitted testimony that was clearly opposed to limiting the use of arbitration. The CTA argues that arbitration reduces the cost of litigation and provides more timely remedies.

People who were in the room told me they were surprised by how unwavering Shapiro’s comments were, and suggested that it wasn’t in step with how some auto manufacturers view the issue.

Following the hearing, the House Energy and Commerce and Senate Commerce, Science and Transportation committees circulated seven sections to industry groups covering issues such as crash-data sharing and cybersecurity, according to reporting by Bloomberg Government. There was one missing provision. Any guesses? Yup, the provision dealing with forced arbitration. That has caused some Democrats to abandon the bill.

There are two ways for this bill to survive in this congressional session — by unanimous consent, meaning everyone agrees to it, or by being attached to another bill. The first option is highly unlikely. And the second is just as slim since there are limited opportunities in the Senate to attach self-driving legislation to another bill.

Adventures in ride hailing

Two items to mention that illustrate how the world of ride-hailing continues to evolve.

First up is Uber. The company is piloting a new feature aimed at older adults that will let customers dial a 1-800 number and speak to an actual human being to hail a ride. The pilot is launching in Arizona, followed by other yet unnamed states. Sounds sort of familiar, doesn’t it?

It’s not quite like calling a taxi dispatcher though. You’ll still need a phone that can receive SMS or test messages to get information on the driver and their ETA.

Now let’s jump over to Nigeria where new regulations in the country’s commercial center of Lagos is creating some chaos.

Lagos has started to restrict where shared motorcycles, called okadas, can operate. That is affecting motorcycle-taxi businesses like ORide, Max.ng and Gokada.

In a statement via email, ORide’s Senior Director of Operations, Olalere Ridwan, said the rules entail “a ban on commercial motorcycles…in the city’s core commercial and residential areas, including Victoria Island and Lagos Island.”

The motorcycle taxi limitations have also thrown off Lagos’s disorderly transit grid — overloading other mobility modes (such as mini-buses) and forcing more people to pound pavement and red-dirt to get to work, according to reporter Jake Bright.

Google’s axe sparks a spinoff

Google bookbot-cartken

I wanted to highlight one of our ONMs, otherwise known as original news manufacturers. Ba dum bump.

Freelancer Mark Harris is back with a scoop on Google’s short-lived Bookbot program and how its death sparked a new and still-in-stealth startup called Cartken.

Bookbot was a robot created within the Google’s Area 120 incubator for experimental products. The plan was to pilot an autonomous robot in Mountain View that would pickup library books from users and bring them back to the library. Apparently, it was well received. But it was killed off far before its nine-month pilot was slated to end. Bookbot’s demise followed Google’s decision to scale back efforts to compete with Amazon in shopping.

But Bookbot appears to be back, albeit in a slicker form and with a broader use case than a library book shuttle. Engineers working on Bookbot as well as a logistics expert who was once in charge of operations at Google Express left the company to form Cartken in fall 2019.

Check out Harris’ deep dive into Bookbot, Google’s shift away from shopping and Cartken.

TC Sessions: Mobility savings

You might have heard or read here in this newsletter that TC Sessions: Mobility is returning for a second year on May 14 in San Jose — a day-long event brimming with the best and brightest engineers, policymakers, investors, entrepreneurs and innovators, all of whom are vying to be a part of this new age of transportation.

Now here’s my discount deal for you. To get 10% off tickets, including early bird, use code AUTO. Early Bird sale ends April 9. Early-bird tickets are available now for $250 — that’s $100 savings before prices go up. Students can book a ticket for just $50. Book your tickets today.

So far, we’ve announced:

  • Shin-pei Tsay, director of policy, cities and transportation at Uber
  • Boris Sofman, who is leading Waymo’s autonomous trucking efforts
  • Nancy Sun, Ike Robotics chief engineer and co-founder
  • Trucks VC general partner Reilly Brennan
  • Porsche North America CEO Klaus Zellmer
  • Olaf Sakkers, general partner at Maniv Mobility

Expect more announcements each week leading up to the May 14th event.


Read Full Article

You Can Now Rickroll Your Fortnite Friends


If you win at Fortnite it’s standard practice to troll your opponents. Because they’re losers. And now you have a new way to troll your Fortnite friends and enemies, thanks to the new Never Gonna emote. Yes, Rickrolling is still alive and well in 2020.

What Is Rickrolling?

Younger readers may not be familiar with Rickrolling, because the phenomenon peaked a decade ago. However, it still pops up every now and then. And even if Rickrolling has died down, people are still fond of Rick Astley and his song, Never Gonna Give You Up.

That song is the basis of Rickrolling, which is a classic bait and switch. To Rickroll someone, you pretend you’re linking to something amazing, but actually link to the YouTube video for Never Gonna Give You Up. A cheesy pop song first released in 1987.

How to Rickroll Your Fortnite Friends

While Rickrolling may have peaked around 2008, it’s getting a new lease of life in Fortnite. This is thanks to Epic Games launching a new emote called Never Gonna. And Epic Games even Rickrolled Fortnite players on the official Fortnite Twitter account.

The Never Gonna emote literally Rickrolls your opponents. Once triggered, your character will do Rick Astley’s infamous dance from the music video for Never Gonna Give You Up. And the actual song will play in the background, complete with Astley’s vocals.

You can buy the Never Gonna emote from the Fortnite item shop for 500 V-bucks. Which is about US$5. Even Rick Astley himself is promoting the emote on Twitter, but his warning to “grab it while you can” means it may not be available for long.

Everything You Need to Know About Fortnite

Rickrolling may not be the most up-to-date meme around, but it is a timeless classic. Hence why it can be employed in Fortnite. And if you’re old enough to remember Rick Astley being in the charts, here’s everything you need to know about Fortnite.

Image Credit: Alterna2/Flickr

Read the full article: You Can Now Rickroll Your Fortnite Friends


Read Full Article

How to Convert WAV to MP3 for Free and Fast


Many audio tools use WAV files for recording sound. Some call recording apps use WAV files, rather than MP3. But WAV files take up more space, so it makes sense to convert the WAV file to MP3.

But how can you change a WAV file to MP3? Here are X methods to do just that.

Why Convert a WAV file to MP3?

WAV (Waveform Audio File Format) files have been around for decades, longer than MP3. They record sound waves, giving a very close digital representation of an analogue phenomenon. While WAV files can store compressed audio, it’s more usual to find uncompressed audio in a WAV file.

Converting a WAV to MP3 is straightforward but finding the tools to do so might prove tricky. But why would anyone want to convert the files?

  • The WAV file takes up too much storage space
  • It’s easier to edit an MP3 file
  • MP3 files are easier to share

It makes sense to convert WAV files to MP3, especially if it is audio you want to keep long-term.

PC users have three key tools for converting WAV files to other formats:

  1. VLC Media Player
  2. Audacity
  3. iTunes

For a quick and easy option, particularly useful if you have a low-spec PC, online converters are available.

How to Convert a WAV to MP3 in VLC Media Player

VLC Media Player layer is one of the most popular free tools across all platforms. Free, open source and cross-platform, it’s capable of playing, streaming, and converting media. This makes it the ideal tool for converting WAV files to MP3.

Indeed, it can convert any media file into another of the same type (for example Audio A to Audio B, Video A to Video B). In some cases, it can even convert from video to audio, by saving the audio track from a video.

Because VLC Media Player is open source, you don’t need to pay for a license. However, if you find it useful, it’s worth supporting the project with a donation.

Download: VLC Media Player (Free)

To convert audio files in VLC Media Player, launch the app and open Media > Convert/Save.

Open files to convert in VLC

In the File tab, click Add. Browse to the WAV file you’re converting and select Open. Click Convert/Save and open the Profile drop-down menu. Here, find the Audio – MP3 option.

Convert WAV to MP3 in VLC

Select this, then set a filename and destination for the converted file in Destination.

Finally, click Start to begin conversion. A few minutes later, the new MP3 file should be ready to open from the destination location.

Convert a WAV to MP3 Using Audacity

Another free and open source tool you can install that converts WAV files to MP3s is Audacity. More commonly known as one of the most popular audio editing tools, Audacity is a Digital Audio Workstation (DAW).

Like VLC Media Player, Audacity is free and open source software, supported by donations.

Download: Audacity (Free)

To convert your WAV file to an MP3, first run Audacity then File > Open to browse to the WAV file. Once opened, check the file, perhaps cutting unwanted audio or trimming the length. When you’re happy, use the menu command File > Export > Export as MP3 to start the conversion.

Use Audacity to convert WAV files to MP3

Enter a new name when prompted, then Save. You have the option of setting tags for your MP3 file.

It’s also possible to export a portion of the WAV file as MP3. First, select the portion you want to export, then File > Export > Export selected audio. Use the Save as type box to select the export format, then Save and add tags if necessary.

Both options result in the creation of an MP3 file.

Use iTunes to Convert a WAV file to MP3

If you don’t have iTunes on your PC, you probably don’t own an iPhone or iPad. Apple’s desktop software synchronizes data from your PC to an iOS device, and vice versa.

However, iTunes also features several useful tools for converting audio file formats. One of these is a WAV to MP3 converter.

Download: iTunes (free)

To use the converter, you first need to set up the import settings. In iTunes, open Edit > Preferences. On the General tab, find Import Settings and change the Import Using drop-down option to MP3 Encoder. Adjust the quality setting to meet your requirements, then click OK to confirm, and again to exit.

You can use iTunes to convert WAV files to MP3

Next, find the WAV file on your computer, right-click, and select Open with > iTunes. Alternatively, use Add File to Library from the File menu in iTunes.

Find the WAV file in iTunes and right-click. On the context menu, find Create MP3 Version. Alternatively, select the WAV file then open File > Create New Version > Create MP3 Version.

Convert WAV files to MP3 with iTunes import and conversion tool

It’s as easy as that.

Best Online WAV to MP3 Converters

If you’re looking for a quick and dirty conversion, various online tools support WAV to MP3 converters.

A simple favorite is Zamzar.com, a tool designed for converting almost any filetype you can think of. This includes WAV and MP3 formats.

Start by heading to www.zamzar.com. Find the Add files button and use this to browse your PC for the WAV file. Alternatively, open the relevant directory on your PC and drag the WAV file onto the button. The WAV file will be identified.

Next, click the Convert To drop down menu and select mp3.

Convert a WAV file to MP3 with Zamzar

When you’re ready (and the file has uploaded) click Convert Now. Wait while the file converts; when done you’ll see the Download button to save the MP3 file to your PC.

As the site’s slogan boasts, this is “file conversion made easy.” So long as you have a good internet connection, this is the ideal solution for low-spec PCs, mobiles, and Chromebooks. Note that Zamzar has a file upload and conversion limit—to overcome this, you can sign up for a subscription.

Don’t like Zamzar? Check our list of the best online file converters for more sites.

Converting WAV Flies to MP3 Is Easy!

By this stage you should know how to change a WAV file to MP3. It’s possible with online tools (including zamzar.com) as well as desktop apps.

While Audacity, VLC, and iTunes are all adept at converting a bulky WAV file into a compact MP3, you’ll find in many cases that online converters are simpler and more convenient.

Most audio files can be converted to MP3. It saves space, making it ideal for a low-storage device like a phone or tablet. Here’s how to convert FLAC audio to MP3.

Read the full article: How to Convert WAV to MP3 for Free and Fast


Read Full Article
How to Create Custom Start Menu Tiles in Windows 10


create-custom-tiles-windows-10

Windows 10 comes with a decent range of customization options. Some of these customization options are not easy to access. As well as that, some parts of Windows 10 aren’t as easily customizable, such as the Windows 10 Start Menu tiles.

Unlock the FREE "Ultimate Windows Keyboard Shortcuts" cheat sheet now!

This will sign you up to our newsletter

Enter your Email

Although many users prioritize custom Windows 10 Start Menu tiles, Microsoft doesn’t make it easy to personalize. There are some Start Menu tile customization options, for sure. But third-party Windows 10 Start Menu tile customization tools offer way more options.

Here’s how you create custom Start Menu tiles in Windows 10.

1. Customize Start Menu System Settings

The Windows 10 system settings contain several Start Menu live tile settings you can tweak before you opt for custom live tiles. While these aren’t custom Start Menu live tiles, you might find the tweaks you make here are what you need.

Default Windows 10 Start Menu settings are found under Start > Settings > Personalization > Start.

Some of these settings, such as Use Start full screen, are great options if you are using a Windows 10 tablet.

There is also the option to Show more icons, which increases the number of programs you can add to a row from three medium tile spaces to four.

If you’re annoyed by how often you have to open File Explorer to access your Downloads folder, click on the Choose which folders appear on Start option to add certain folders directly onto your Start Menu.

If you’d like to add tiles to your Start Menu, right-click on any program and select Pin to Start. Once a program is added to the Start Menu, you can resize the icon by right-clicking the tile selecting Resize.

windows 10 custom live tile resize

Programs like weather applications downloaded through the Windows Store even have built-in live tile features. You can add Chrome applications and Universal Windows Platform (UWP) apps to the Start Menu as well, along with any program located on your PC.

However, other programs, like Steam, require some additional tweaking. Read on to find out how you can add Steam live tiles to your Windows 10 Start Menu.

By default, you can also activate the fence feature in Windows 10 by dragging a tile below or above another to create a section. You can label the tile grouping in the space provided as well.

windows 10 live tile fence effect

2. Create Custom Live Tiles with Better StartMenu

Better StartMenu is a popular Windows 10 Start Menu customization tool. It offers easy to use live tile customization options.

The tool comes in two parts: Better StartMenu and StartMenu Helper.

The Helper program saves the tile data, including the name, icon, and path of the program, while Better StartMenu adds the tile onto your Start Menu. You must install both to add a custom live tile to your Windows 10 Start Menu using this method.

Better StartMenu lists for $2.99. However, the trial version has no limitations. For now, download the free trial. If you enjoy the software, consider donating to the developer.

Download: Better StartMenu for Windows (Free Trial/$2.99)

You must also download the StartMenu Helper. Better StartMenu doesn’t work properly without these files.

Download: StartMenu Helper for Windows (Free)

Once the StartMenu Helper finishes downloading, right-click, and extract the file contents. Once you extract the contents of the archive, run BetterStartMenuHelper.

Create a Live Tile Icon in Better StartMenu Helper

Better StartMenu Helper is the tool you use to create a live tile icon. It helps you resize and modify an image to fit the various live tile sizes. But to create custom live tiles, you need some custom live tile icons.

The easiest way to find a large selection of free high-quality icons is through Flaticons, who provide free downloadable icon packs.

For this tutorial, I’m using Pixel Perfect’s Logos and Brands pack. You’ll have to create a free Flaticons account to complete the download. Once your download completes, extract the archive contents, then head back to Better StartMenu Helper.

Select New Tile to create a new live tile. Then, select Auto Generate all from a single image. Please note that Better StartMenu requires PNG files to create custom Start Menu live tiles.

windows 10 custom live tile better startmenu new tile

Configure Your Custom Live Tile Icon

Now, under Other options, give your new custom live tile a name, and decide whether you want to display the title on the tile. Next, choose the live tile a custom background, or stick to a transparent background.

The Action section is where you define which program your new custom live tile opens. First, select an option from the dropdown menu. In this case, Run desktop app is what you want, but you can see the options to open a folder, file location, and so on.

windows 10 custom live tile better startmenu actions

Now, Select the file path of the software you want to open. Click the three-dot icon and browse to the program, select it, and press OK.

Alternatively, browse to the software in your Start Menu, then right-click and select More > Open file location. Then, right-click the application and select Properties.

You’ll find the exact file location alongside Target. You can copy and paste this file path into Better StartMenu Helper.

Underneath, you can set any specific opening parameters for the software. Only do this if you know what you’re doing.

Finally, hit Generate tile data.

Pin Your Custom Live Tile to Your Windows 10 Start Menu

You now need to open the Better StartMenu software. However, do not close the Better StartMenu Helper. Better StartMenu requires the helper to remain open to process the custom live tile links.

In the bottom right corner of Better StartMenu Helper, make sure to check Run at startup. That way, you know your custom live tiles will always work.

windows 10 custom live tile better startmenu pin new tile

After you open Better StartMenu, you should spot your custom live tile. Select the custom live tile, then in the third column, hit Pin select tile to Start Menu.

Confirm that you want to add the live tile, and you’re good to go.

3 Better StartMenu Alternatives

There are three alternatives to Better StartMenu, some with different qualities. The biggest pro that most alternatives have is allowing custom live tile links to work without a secondary background program.

Here are three Better StartMenu alternatives:

  • Pin More: build large custom live tile grids, including multiple sources, and pin them all to your Start screen
  • Win10Tile: create and pin custom live tiles to your Windows 10 Start Menu
  • TileIconifier: open-source custom live tile app for Windows 10

3. Add Custom Steam Live Tiles to Windows 10 Start Menu

You can use Better StartMenu to add custom game icon tiles to your Windows 10 Start Menu. However, a better option is the free tool Steam Tile, which takes information from your Steam account direct to provide in-live tile data.

Download: Steam Tile for Windows (Free)

Steam Tile requires your SteamID to function. You must also set your profile to public. To find your SteamID, open Steam, then head to Account Name > Profile > Edit Profile > Custom URL. Add your preferred URL and click Save Changes.

After creating your SteamID, enter it into the Steam Tile welcome screen, and you can begin pinning custom live Steam tiles to your Windows 10 Start Menu.

The difference between simply adding gaming programs to your Start Menu and using Steam Tile is stark and impressive. Steam Tile also allows you gaming access without having to open the Steam library.

Use more than one gaming client? Check out Pin More, as mentioned in the previous section as an alternative to Better StartMenu.

Is Microsoft Killing Off Start Menu Live Tiles?

In mid-2019, Microsoft accidentally released an internal Windows 10 build, meant for in-house testers only. Windows 10 build 18947 included a completely new Start Menu design—without any live tiles. The new Start Menu design replaces live tile with static icons, favoring a simplified look over the current iteration.

windows 10x start menu live tiles

Later in 2019, Microsoft announced Windows 10X, a version of Windows 10 designed for dual-screen and foldable devices. Windows 10X uses the leaked version of the Windows 10 Start Menu. However, it isn’t clear if the static Windows 10X Start Menu will make its way into the regular Windows 10 build (along with the new taskbar and other Windows 10X features).

Use Custom Start Menu Live Tiles for Easy Access

Even if Microsoft is considering removing live tiles from a future Windows 10 build, you can still make the most of them for now. With these programs, you can customize your Windows 10 Start Menu, making it the dynamic feature it has the power to become.

If the Windows 10 Start Menu isn’t your cup of tea, why not try a complete Windows Start Menu alternative? Alternatively, check out our guide to Windows 10 customization for the best Windows 10 personalization hacks.

Read the full article: How to Create Custom Start Menu Tiles in Windows 10


Read Full Article
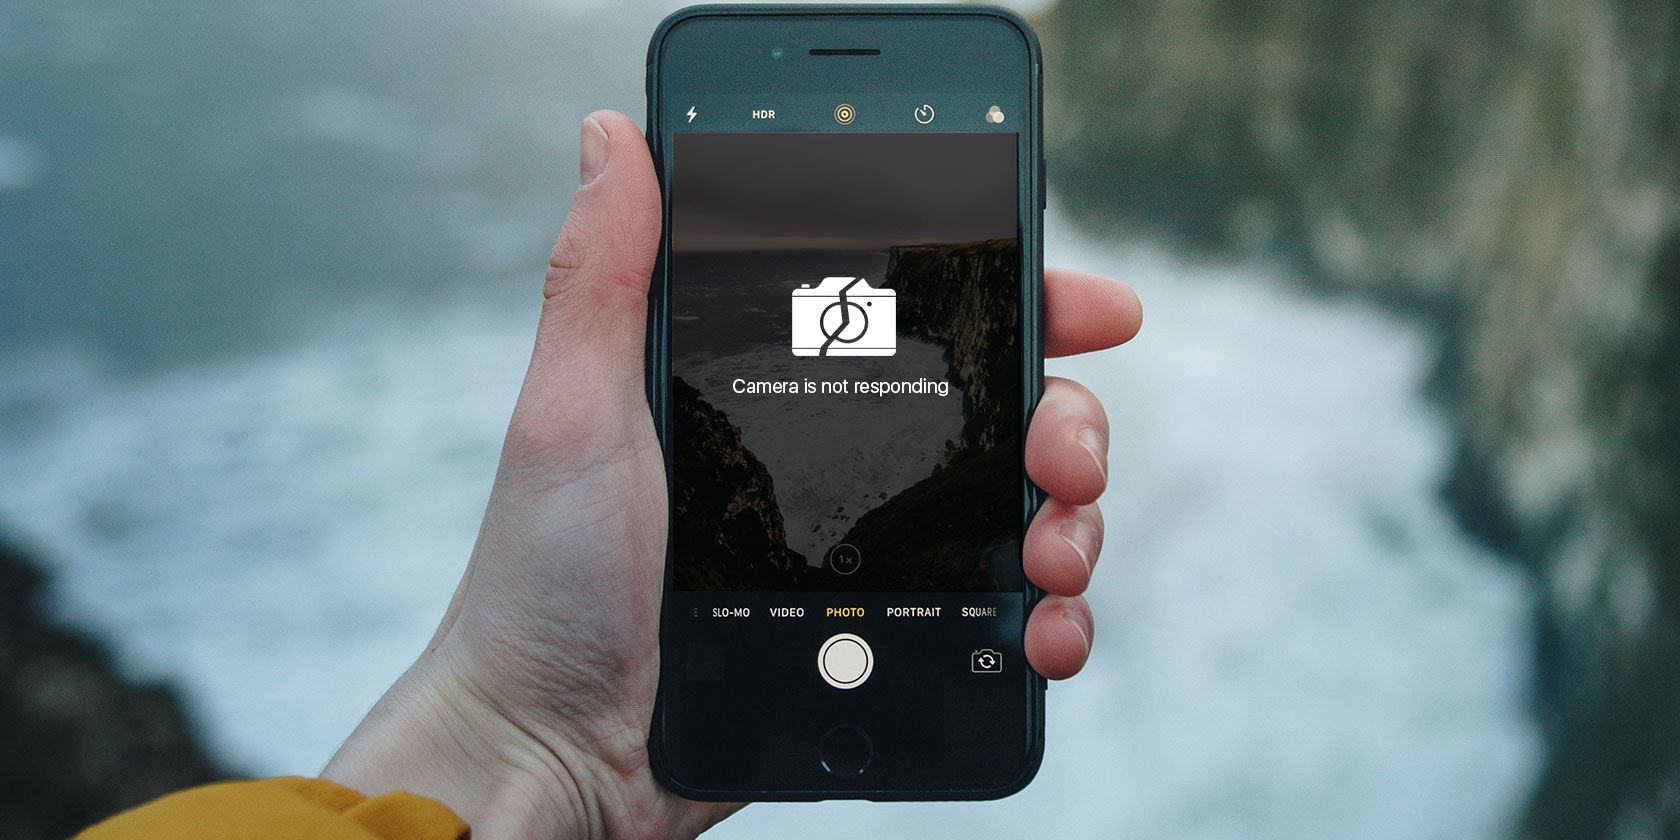
iPhone Camera Not Working? 7 Common Issues and How to Fix Them


ipone-camera-issues-fix

You wouldn’t buy a new smartphone if it didn’t have a camera on it. So what good is your iPhone when the camera isn’t working?

Unlock the free "iPhone and iPad Shortcuts" cheat sheet now!

This will sign you up to our newsletter

Enter your Email

Here are the most common problems you might come across with your iPhone camera, along with everything you can do to fix them.

1. iPhone Camera Shows a Black Screen

If you launch the Camera app and see a black screen, try the following steps to fix it:

  1. Make sure nothing is blocking the camera lens. You may have put the case on incorrectly or there may be something stuck to the back of your iPhone.
  2. Try using the official iPhone Camera app, rather than any third-party alternatives. This app is more reliable than the alternatives and more likely to work properly.
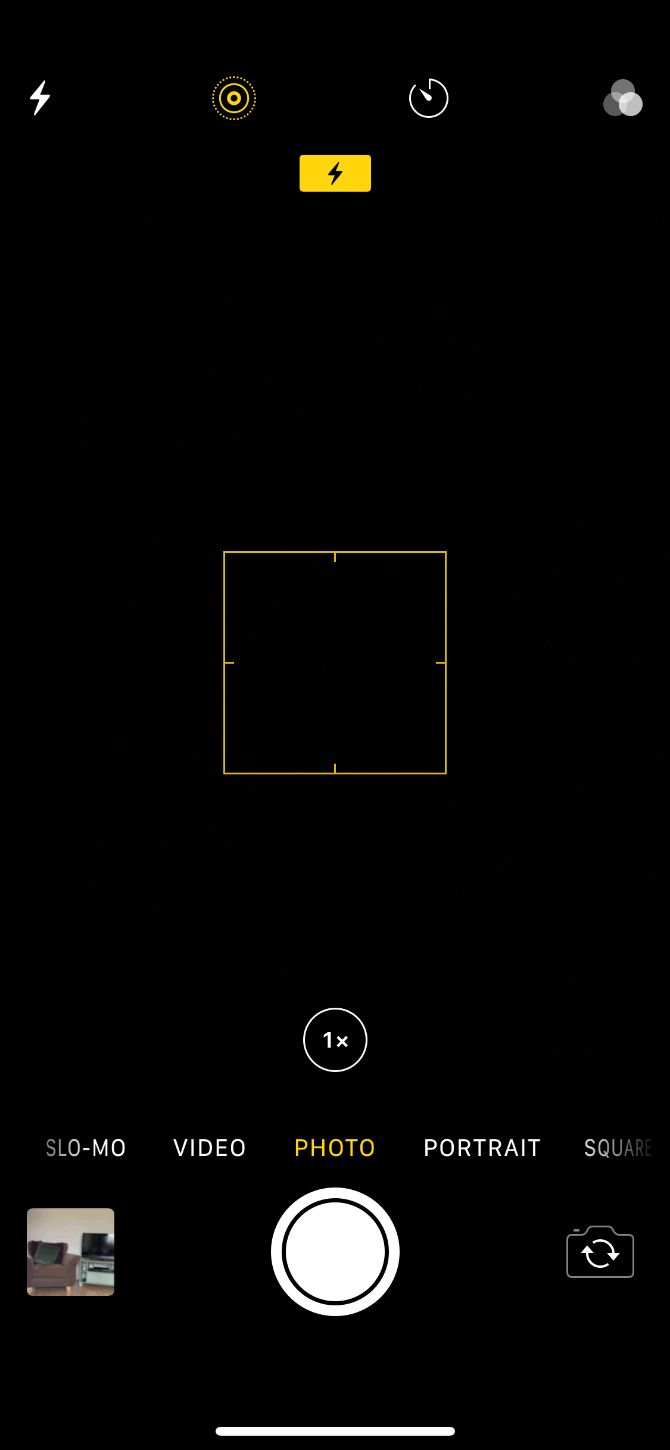
  3. In the Camera app, switch between the front and back cameras to see if both of them are working or not. To do this, tap the camera flip icon on the right side of the screen. If only one camera works, that might indicate a hardware problem.
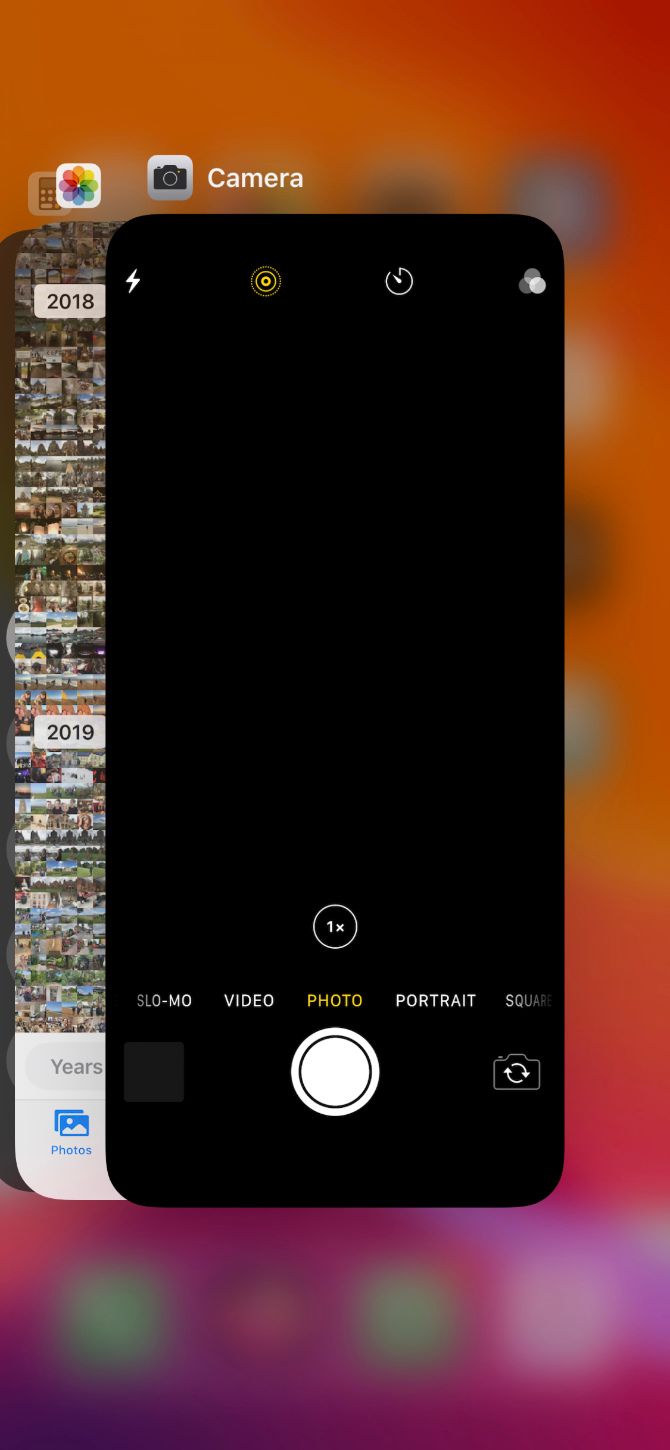
  4. Restart the Camera app. To do so, swipe up to the middle of the screen on an iPhone X or later, or double-click the Home button on an iPhone 8 or earlier. Then close the Camera app by sliding it off the top of the screen.
  5. Turn off your iPhone by holding the Side button (along with either Volume button on the iPhone X and later), then slide to power off. Wait 30 seconds before pressing the Side button again to restart your iPhone. If that doesn’t work, force restart your iPhone instead.

2. iPhone Photos Are Blurry or Out of Focus

If the photos you take with your iPhone camera are blurry or out of focus, try these fixes:

  1. Make sure both the front and back camera lenses are clean. Wipe away smudges or fingerprints using a dry microfiber cloth. If you see dirt or debris behind the glass, take your iPhone to an Apple Store or Authorized Service Provider for a repair.
  2. Remove any metallic or magnetic iPhone cases and camera accessories. They can interfere with the optical image stabilization on an iPhone 6S Plus, iPhone 7, iPhone X, or later iPhones. This might explain why the camera isn’t working.
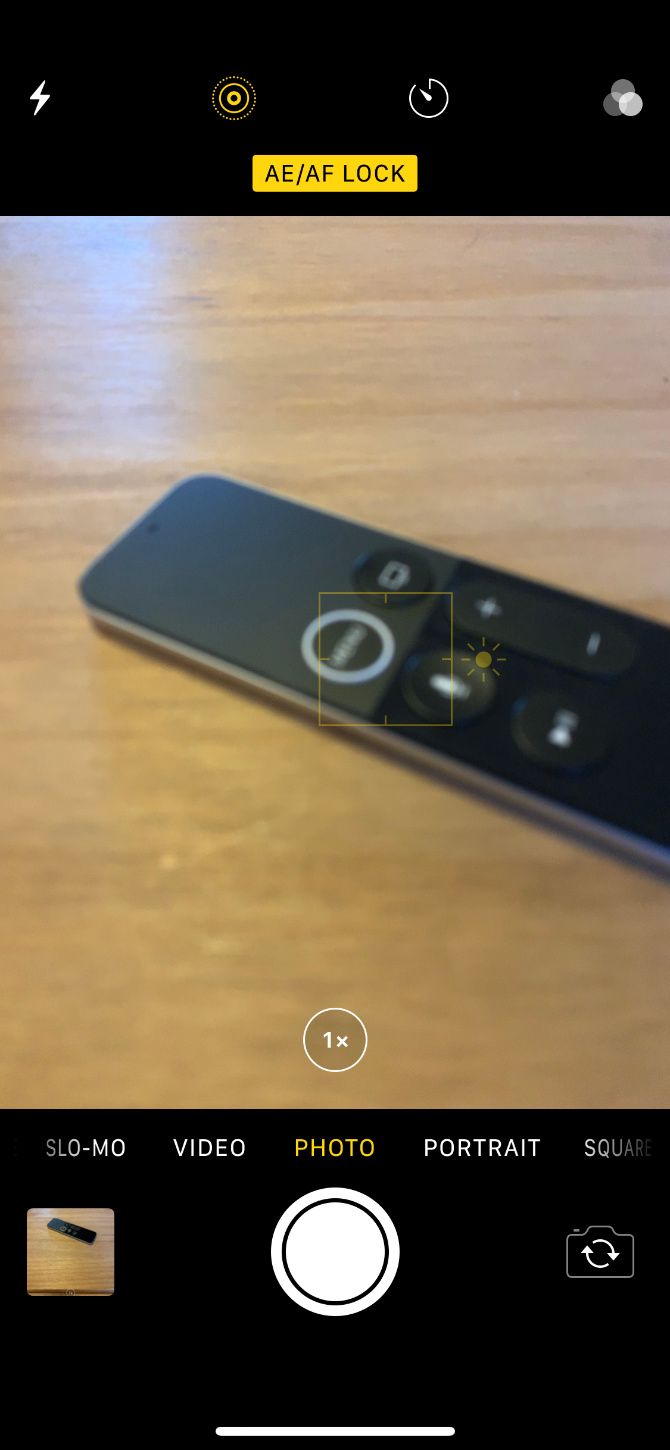
  3. If the Camera app says AE/AF Lock at the top of the screen, tap on a blank space to turn auto-focus back on. You may have accidentally locked the focus by tapping and holding in the Camera app.
  4. Keep your hand steady while tapping the shutter button. Sometimes it’s easier to press one of the Volume buttons to take steady pictures instead. Be careful in the dark when the shutter needs to stay open for longer.

3. iPhone Camera Flash Isn’t Working

iPhone Flashlight Control Center

Although most photos look better without a flash, sometimes you need that extra light for dark environments. When your iPhone flash isn’t working, try these tips:

  1. Test the LED on your iPhone by turning on the flashlight from the Control Center.
  2. Make sure you set the flash to On or Auto in the Camera app. To do this, tap the lightning bolt icon on the left side of the screen to see your flash options (you can’t use the flash for panoramic photographs or time-lapse videos).
  3. Be careful when using the flash for long videos or in hot environments. If your iPhone gets too hot, it might disable the flash entirely until it has cooled down again.

4. iPhone Photos Are Flipped the Wrong Way

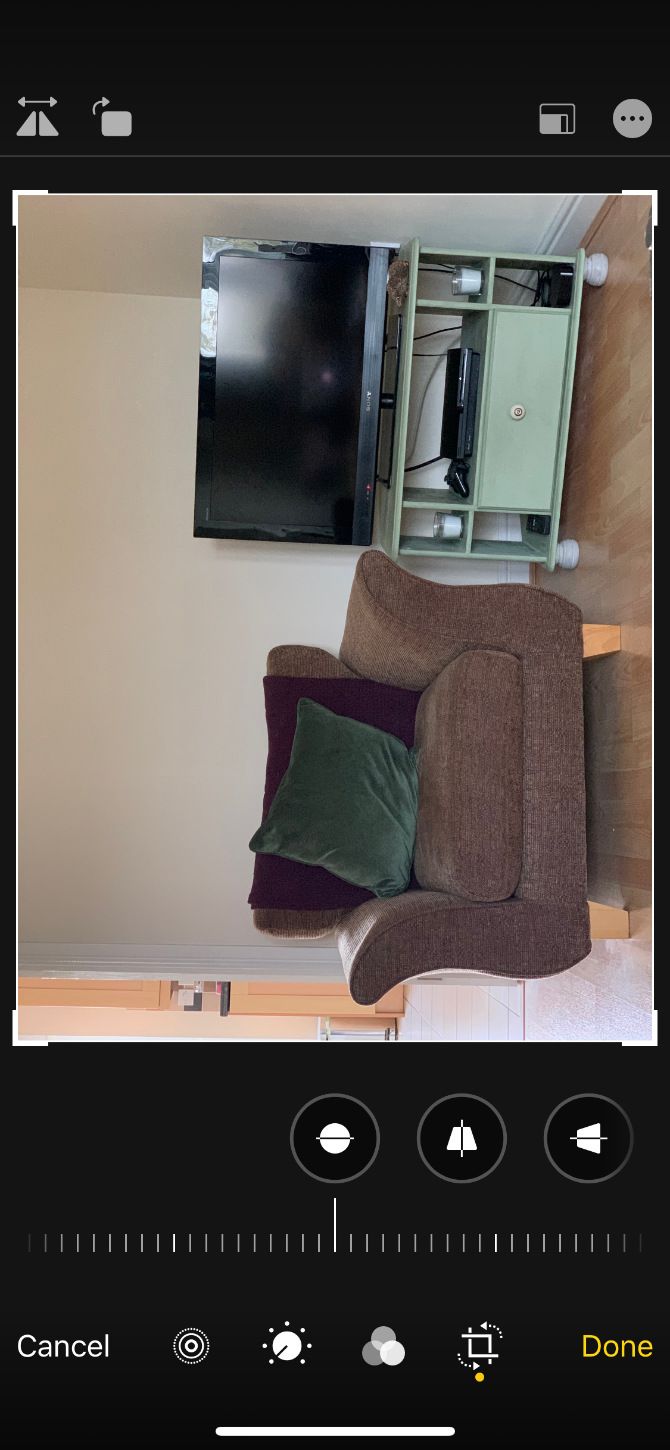
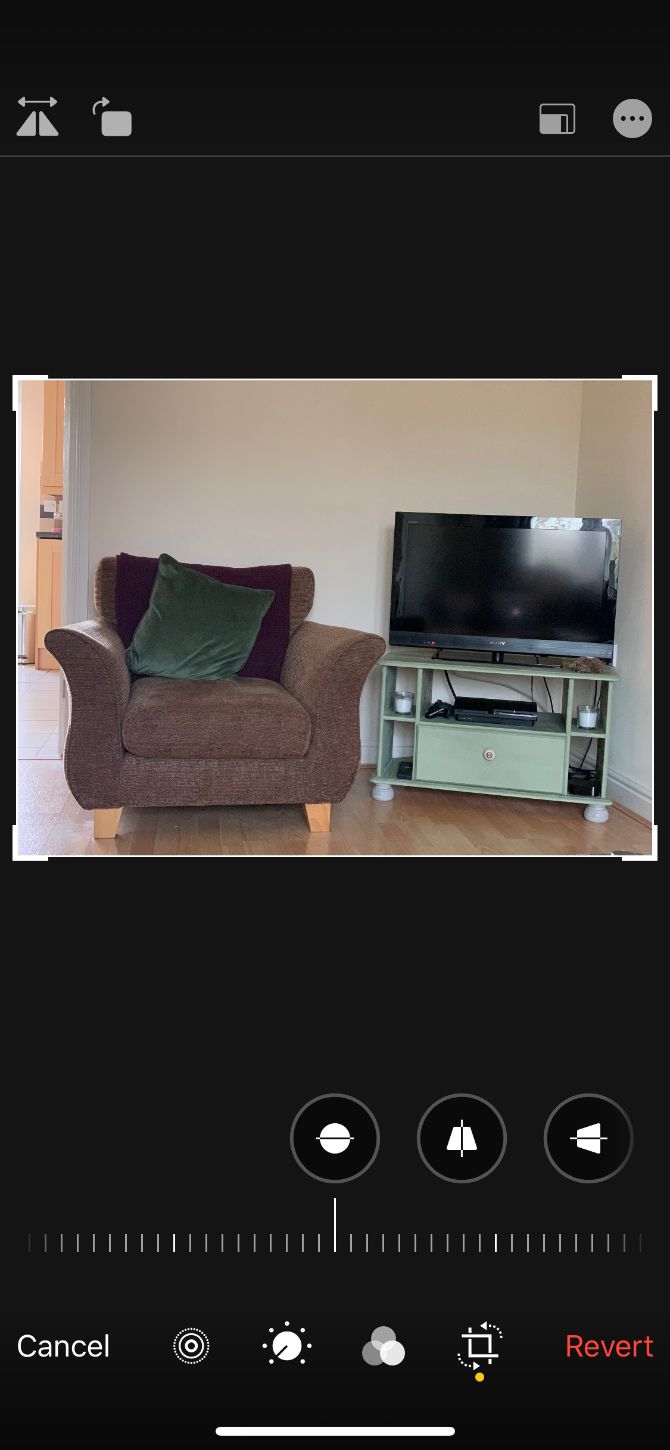
This problem can often happen when you turn your iPhone horizontally to take a landscape-oriented photo. After snapping the picture, it flips back to portrait orientation in your photo library. Try these tips to fix it:

  1. Open Control Center on your iPhone and tap the lock icon with a circle around it to turn off Rotation Lock.
    1. To open Control Center, swipe down from the top-right corner on an iPhone X or later, or swipe up from the bottom of the screen on an iPhone 8 or earlier.
  2. Before snapping a photo, take a moment to make sure that the icons in the Camera app have rotated to their new horizontal orientation. If not, rotate your iPhone back and forth until they do so.
  3. You can always edit your pictures later from the Photos app, or other third-party iPhone image editing apps.
  4. If you’re wondering why your selfies always appear mirrored, that’s simply how Apple designed the front-facing camera. The camera works like a mirror, but the photo flips over as if someone took it for you.

5. The Camera App Is Missing or Keeps Freezing

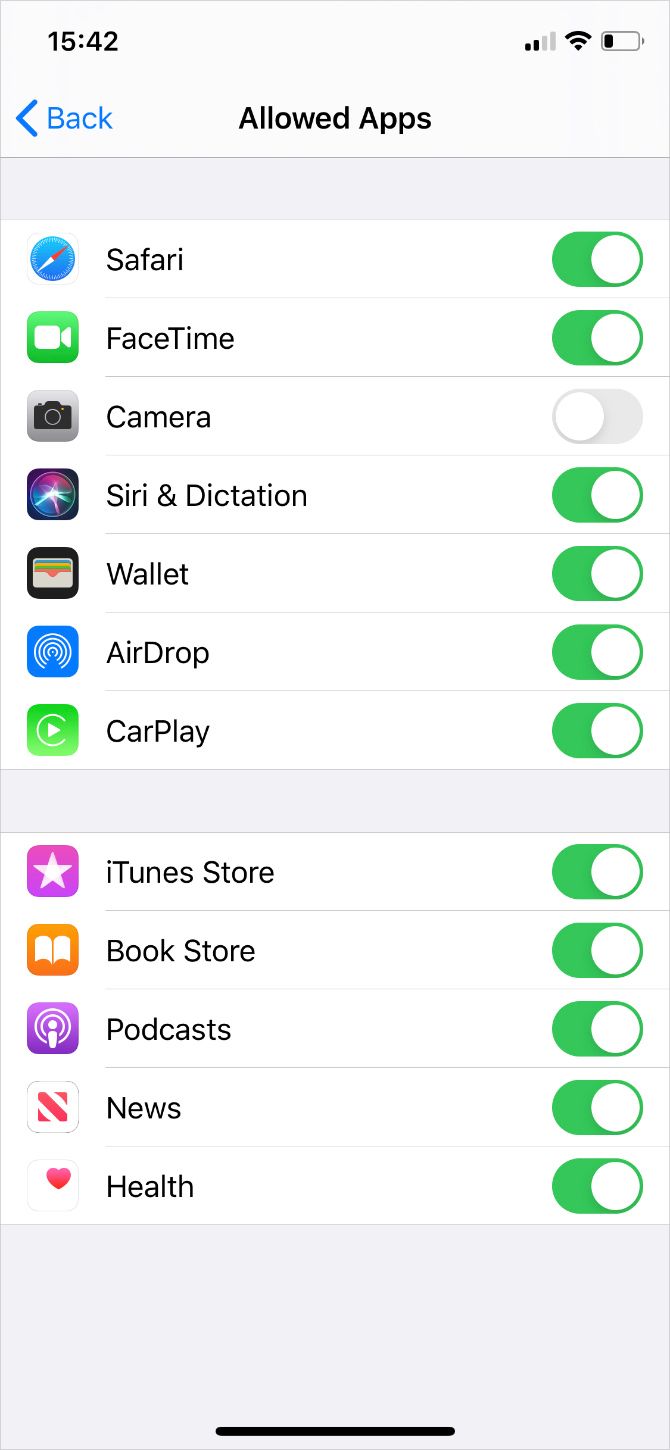
If you can’t find the Camera app on your Home screen, or if the app freezes when you switch between cameras, it may be due to your iPhone restrictions. You can check this out from the Screen Time settings:

  1. Go to Settings > Screen Time > Content & Privacy Restrictions.
  2. Tap on Allowed Apps and enter your Screen Time passcode if you have one.
  3. Make sure you turn the Camera app on; the toggle should be green.

6. General iPhone Camera Software Fixes

Reset All Settings iPhone confirmation

If you experience any other oddities with your iPhone camera not working, it’s a good idea to try some general software troubleshooting tips. Test your iPhone camera again after each of the tips below.

  1. Close all the apps on your iPhone.
  2. Restart your device.
  3. Update iOS by going to Settings > General > Software Update.
  4. Go to Settings > General > Reset > Reset All Settings. This doesn’t delete any of your content—such as photos or apps—but it does reset all your iPhone settings.
  5. Finally, factory reset your iPhone and set it up as a new device. This erases everything and is the last resort, but should resolve any software issues that stop your iPhone camera from working.

7. General iPhone Camera Hardware Fixes

iPhone 11 camera

If you’ve tried everything above and your front or back iPhone camera is still not working, you might have a hardware problem instead. Try the troubleshooting steps below to fix it:

  1. Double-check that the camera is not obstructed by a case or sticker.
  2. Make sure there are no smudges, dirt, or debris on the camera lens. Smudges and fingerprints should wipe away easily with a microfiber cloth.
  3. Contact Apple Support to arrange a hardware repair at the Apple Store or at an Apple Authorized Service Provider. If your iPhone is out of warranty, you may need to pay for this repair yourself.

Get Back to Taking Great Photos With Your iPhone

These tips cover the most common reasons your iPhone camera might not be working. If you didn’t see your exact issue, hopefully the general tips helped you fix the camera anyway. Otherwise, you may need to speak to Apple about a hardware repair.

Once your camera is back up and running, find out how to master your iPhone camera settings to start taking better photos. That way you can make sure each picture is perfectly exposed and beautifully composed.

Read the full article: iPhone Camera Not Working? 7 Common Issues and How to Fix Them


Read Full Article

How to Set a Spotify Playlist as Your Alarm on Android


discover-new-music-spotify

Tired of waking up to the same old alarm clock sound on your phone? If you have an Android device, you’ll be happy to know that you can use Spotify as an alarm.

Unlock the FREE "Spotify Keyboard Shortcuts" cheat sheet now!

This will sign you up to our newsletter

Enter your Email

The service makes it easy to wake up to a playlist of changing music for your alarm clock. Plus, those who don’t use Spotify can also use YouTube Music or Pandora for their alarm.

Let’s look at how to set a Spotify alarm on your Android device first.

How to Use Spotify as an Alarm on Android

To set Spotify music as your alarm, you’ll need to use the Google Clock app. If you have a stock Android phone like a Pixel, you likely have this installed already. Owners of other Android phones, like Samsung devices, should install Google’s Clock app free from the Play Store first.

As you’d expect, to use the Spotify alarm clock feature, you’ll also need to have the Spotify app installed. Install it and sign in if it’s not set up already. Thankfully, you don’t need a Premium account to use Spotify as an alarm.

Download: Google Clock for Android (Free)
Download: Spotify for Android (Free, subscription available)

How to Set Up the Spotify Alarm

Now that you’ve got everything prepared, here’s how to set a Spotify alarm on Android:

  1. Open the Clock app and scroll to the Alarm tab.
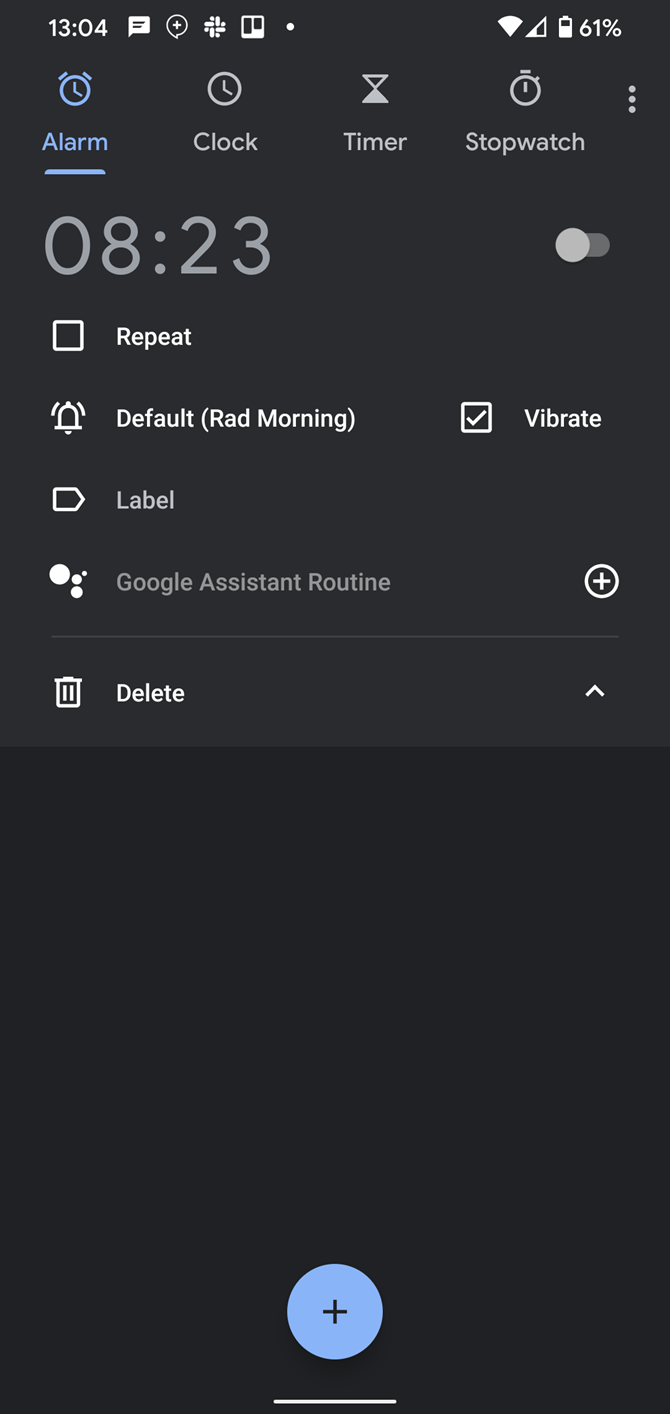
  2. Expand the alarm you want to edit by tapping the arrow below it.
    1. If you need to create a new alarm, tap the Plus button and make one first.
  3. Tap the bell icon on the alarm to open its sound settings.
  4. Select the Spotify tab.
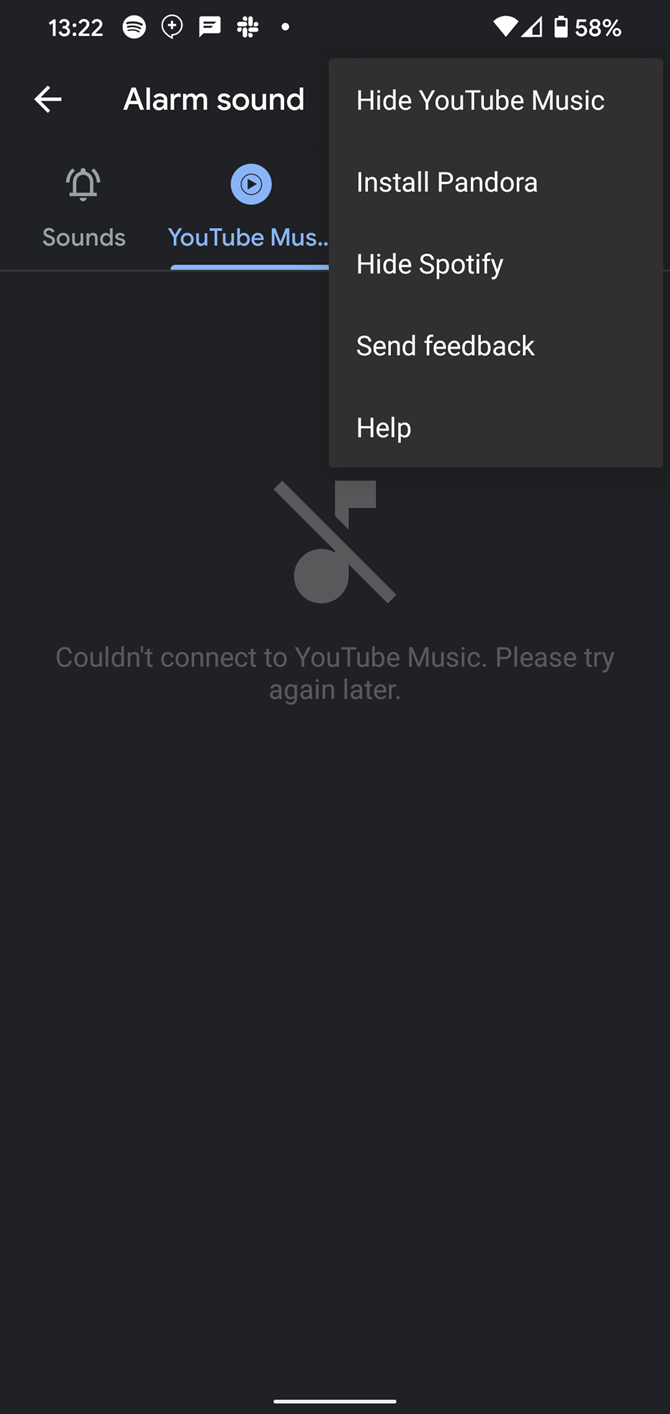
    1. If you don’t see it, make sure Spotify is installed and you’re logged in. Tap the menu button at the top-right and choose Show Spotify to make sure it’s not hidden.
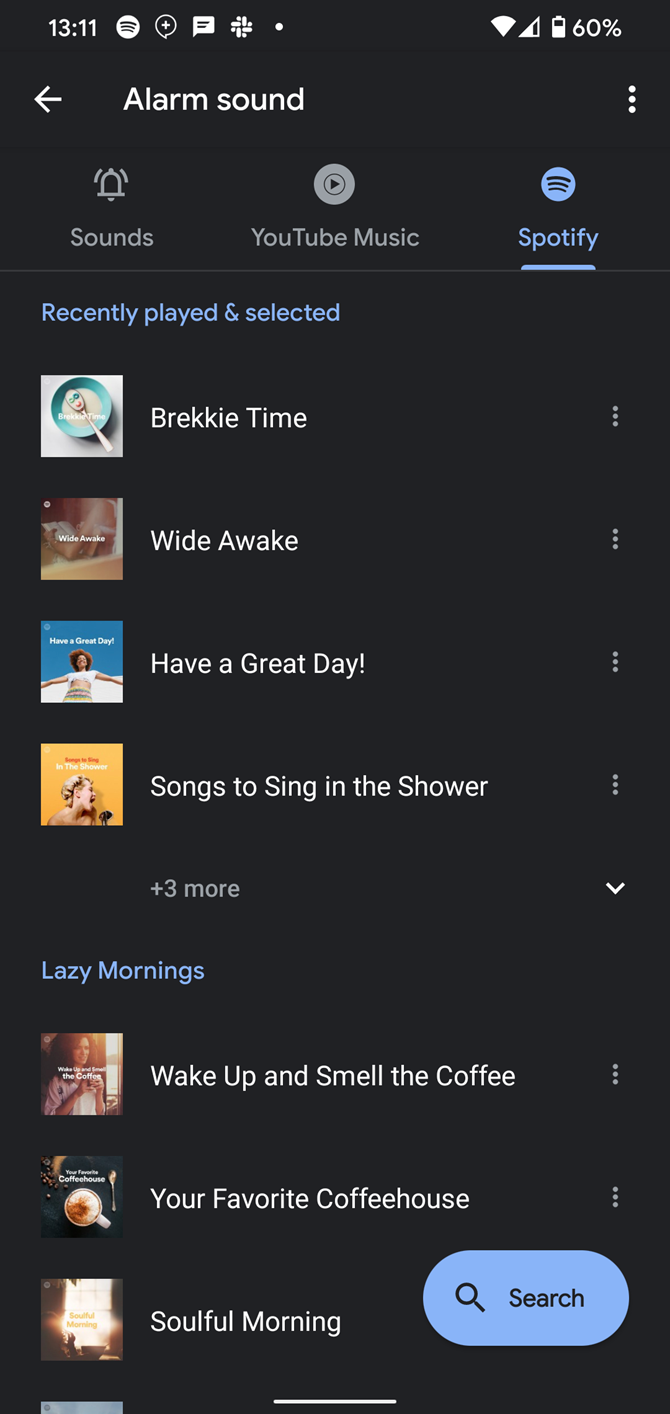
  5. If this is your first time using the Spotify alarm feature, you may need to provide your approval to link your Spotify account to the Clock app.
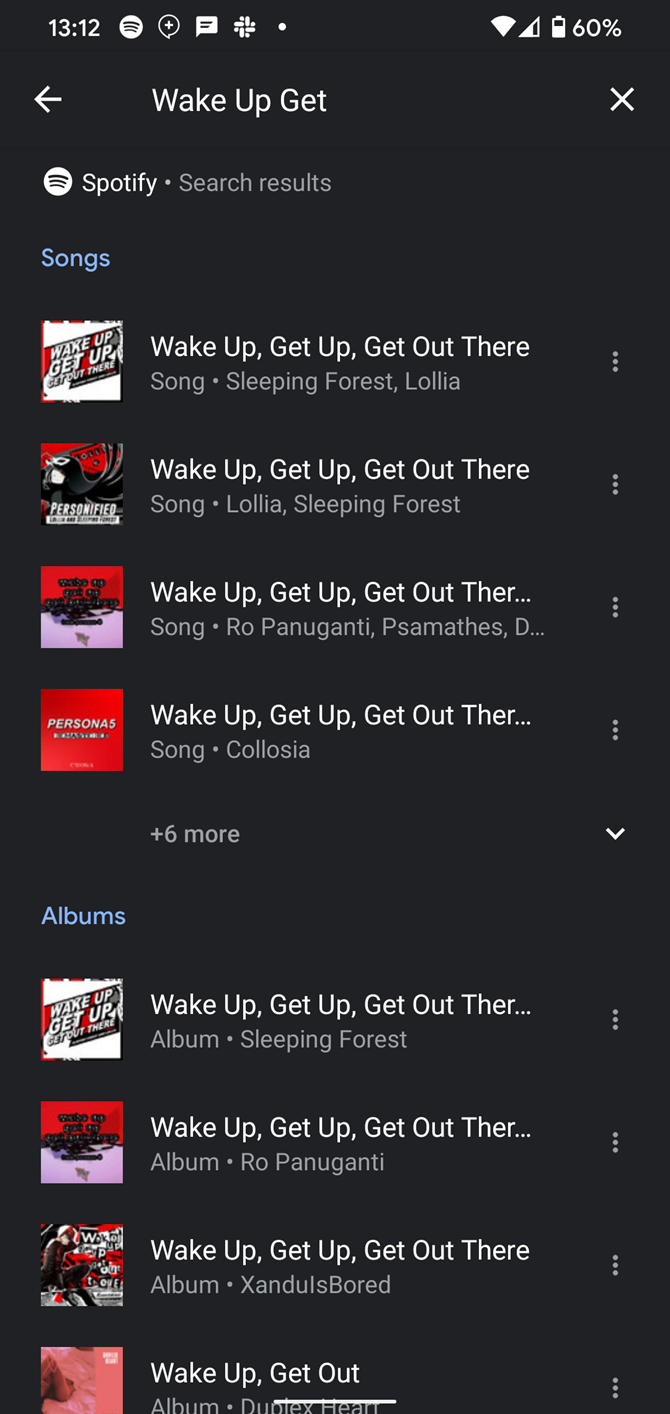
  6. Once your account is connected, you can select a playlist recommended by Spotify to use as your alarm. If you don’t like any of those options, tap Search and you can choose your own playlist, album, or song.

You can open up the playlist in Spotify to preview it before you decide. Just tap the three-dot button next to the playlist name and tap Open in Spotify to take a look.

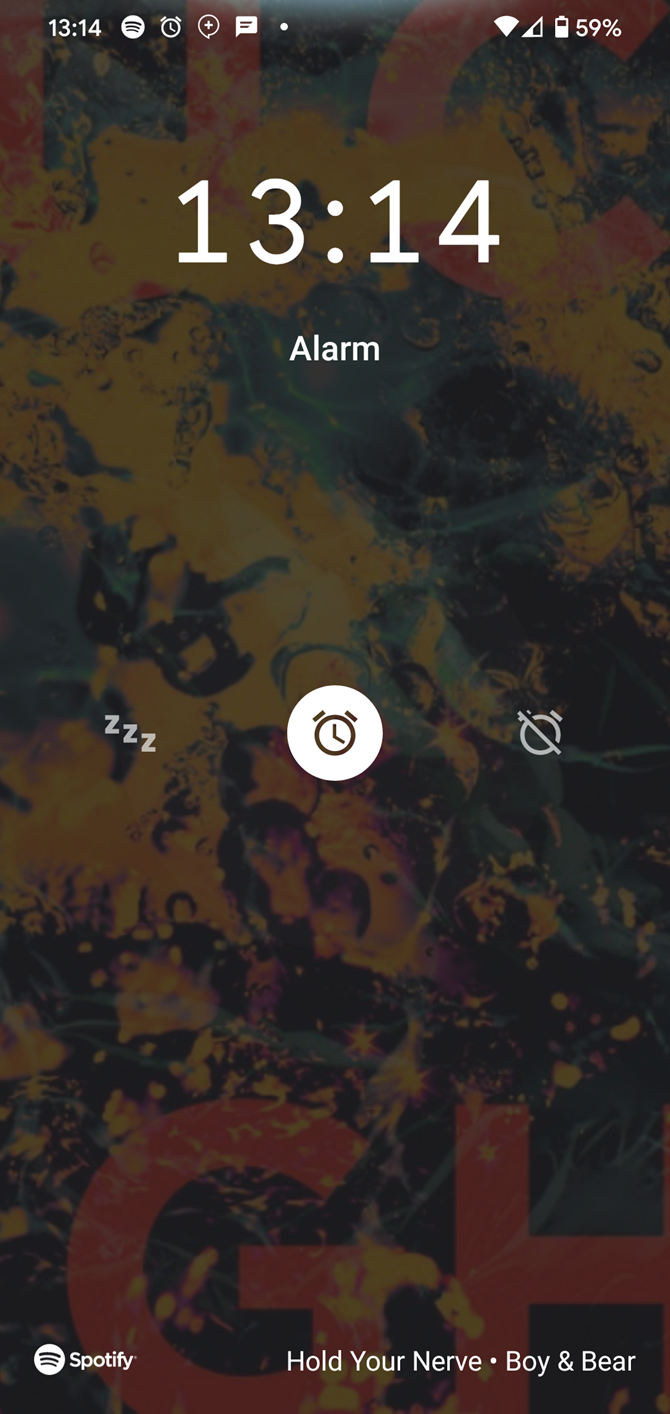
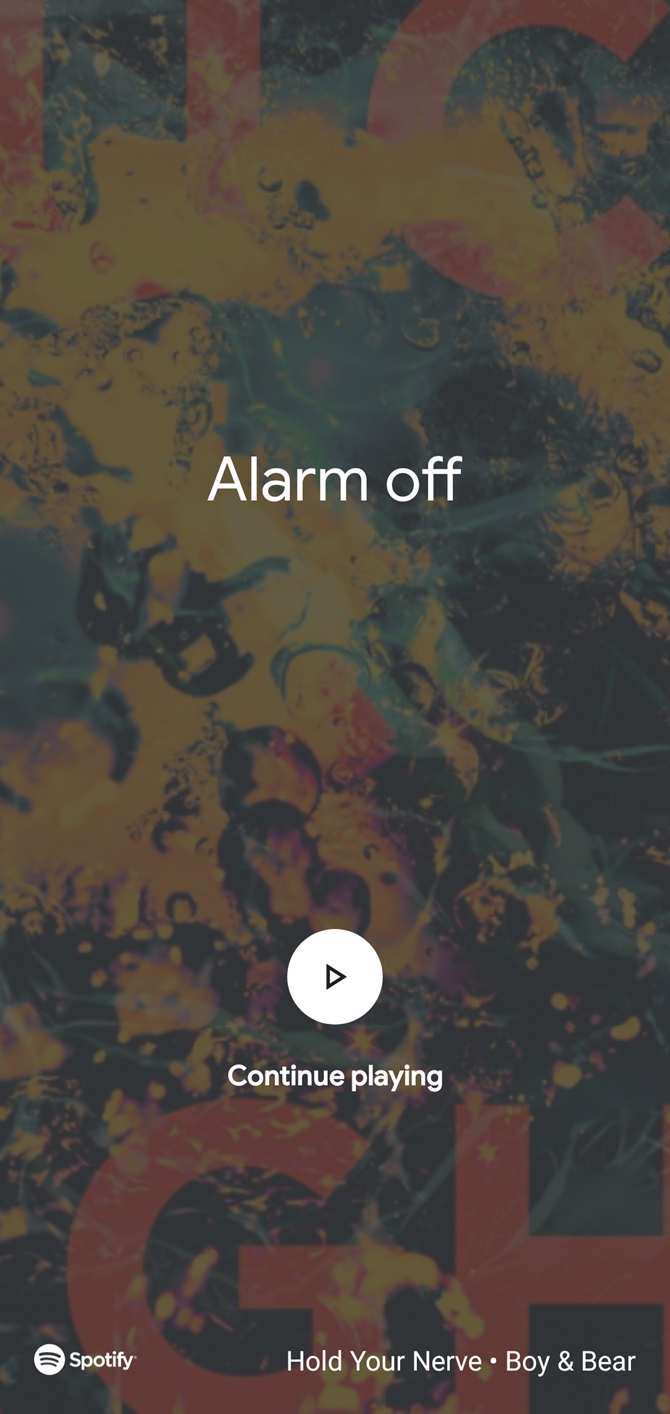
When your alarm goes off, you’ll see the name of the song at the bottom of your screen. After you stop the alarm, you have the option to keep Spotify playing as you get ready for your day—just tap Continue playing.

How to Use YouTube Music or Pandora as Your Android Alarm

Don’t use Spotify? The Clock app also supports YouTube Music and Pandora as alarm options. They’re just as easy to set up as the above steps.

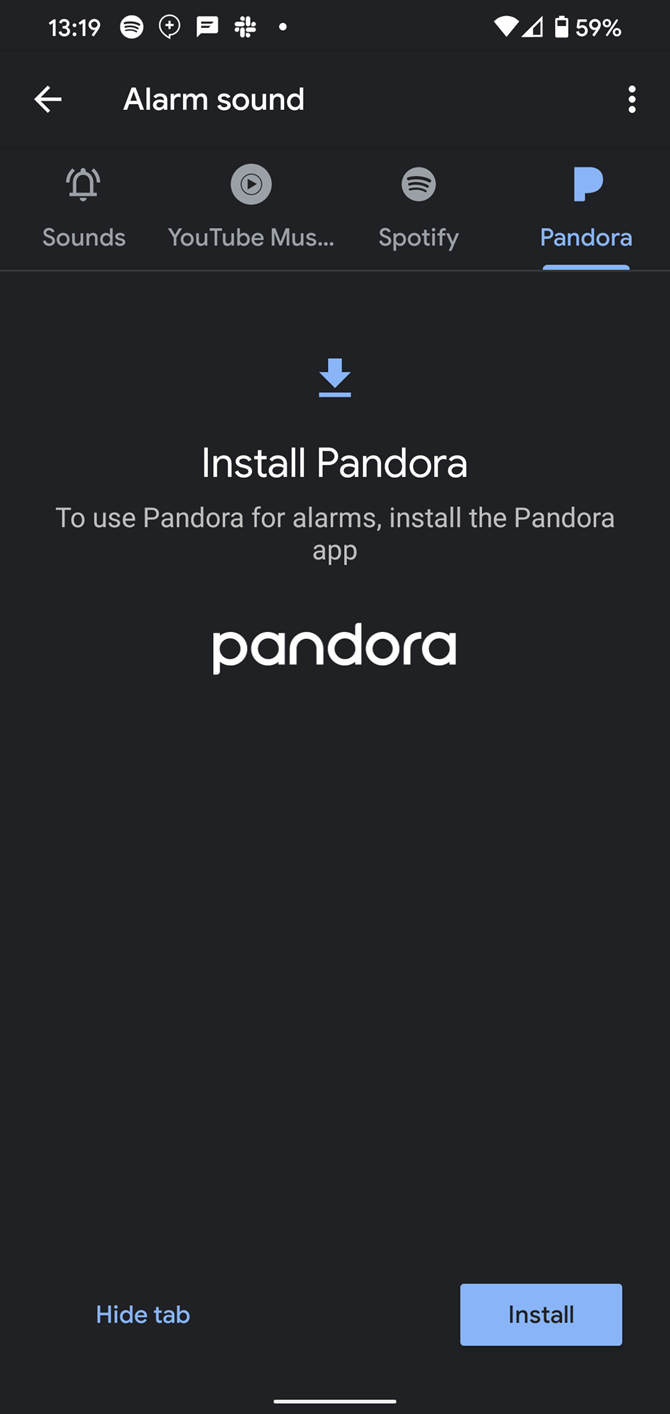
To use them, open the Clock app and tap the bell on an alarm to change its sound. Use the three-dot menu button at the top-right to hide or show each of the three services as needed.

If you don’t have the proper app installed, you’ll need to do so and sign in first. The Clock app provides a shortcut for installing them from Google Play.

After you have everything set up, Pandora and YouTube Music alarms work just like using Spotify as your alarm. Choose a playlist from the recommended options or search for one of your own, then you can continue listening after you shut the alarm off.

Download: Pandora for Android (Free, subscription available)
Download: YouTube Music for Android (Free, subscription available)

What Music Will You Wake Up To?

Now you know how to use Spotify or another music service as your alarm on Android. The advantage of using a playlist for your alarm clock is that you’re less likely to get sick of one track. We recommend that you avoid setting a favorite song as your alarm, as doing so will almost certainly make you hate it before long.

If waking up to soothing tunes doesn’t work for you, check out the best social alarm apps to help you get up. And once you’re up and working, try one of these background music playlists on Spotify to stay focused.

Read the full article: How to Set a Spotify Playlist as Your Alarm on Android


Read Full Article
The 9 Best Alternatives to Apple’s Official Magic Keyboard


mac-keyboards

The Apple Magic keyboard is a quality keyboard, but it’s not for everyone. It’s also not that cheap. While you might have got one with your brand new Mac, it’s not the only option you have if you’re looking for a new keyboard to pair with your MacBook Pro or Mac Mini.

Unlock the free "Most Useful Mac Keyboard Shortcuts" cheat sheet now!

This will sign you up to our newsletter

Enter your Email

You might prefer mechanical switches or want a wireless keyboard for Mac that you can use with other devices. No matter what type you prefer, if you’re in search of the best keyboard for Mac, these choices are a great place to start.

1. Das Keyboard Model S Professional for Mac

Das Keyboard Model S Professional for Mac Das Keyboard Model S Professional for Mac Buy Now On Amazon $118.98

They’re not everyone’s cup of tea, but mechanical keyboards provide a tactile experience that many touch typists are fond of. The Das Keyboard Model S is a sleek mechanical model that uses Cherry MX Blue switches with gold contacts. These provide the most “click” in a button press of the entire Cherry MX line.

While some mechanical keyboards are relatively barebones affairs, this one is not. In addition to the standard keys, which use the Mac keyboard layout, this has media keys, including volume and playback control. An onboard USB hub means you don’t have to reach far to plug in your phone or other accessories.

2. Das Keyboard 4 Professional for Mac

Das Keyboard 4 Professional for Mac Das Keyboard 4 Professional for Mac Buy Now On Amazon $169.00

Das Keyboard is a major name when it comes to Mac compatible keyboards of the mechanical variety, so it shouldn’t come as a surprise to see them appear twice on this list. While the Model S uses Cherry MX Blue switches, the Das Keyboard 4 Professional uses Cherry MX Brown, which are softer and quieter while still providing a tactile click to let you know you pressed the key.

Like the Model S, this edition has media keys and a full number pad. It also has an onboard USB hub. While the Model S only has a USB 2.0 hub, this model includes a faster USB 3 hub. The aluminum top panel makes the keyboard tough and sleek-looking, making it one of the best keyboards for Mac you’ll find.

3. Keychron K2 RGB Wireless Mechanical Gaming Keyboard

Keychron K2 RGB Wireless Mechanical Gaming Keyboard Keychron K2 RGB Wireless Mechanical Gaming Keyboard Buy Now On Amazon $84.99

If you want a mechanical keyboard for Mac with the exciting RGB lighting you’ll find on many PC keyboards, your options are limited. That said, the Keychron K2 RGB Wireless Mechanical Gaming Keyboard has a lot going for it. For starters, you don’t often find wireless mechanical keyboards.

You also get your choice of switches. While this uses Gateron switches instead of the more popular Cherry MX switches, you get your choice of blue, brown, or red switches. These are roughly equivalent to Cherry MX offerings, with blue being the clickiest, red being the most quiet, and brown being somewhere in between.

4. Velocifire M87 Mac Layout Mechanical Keyboard

Velocifire M87 Mac Layout Mechanical Keyboard Velocifire M87 Mac Layout Mechanical Keyboard Buy Now On Amazon $59.99

Mechanical keyboards are generally on the expensive side, but there are affordable options as well. The Velocifire M87 is a mechanical model that is a little more slimmed-down than some of the other options we’ve covered. It doesn’t feature Cherry MX or even Gateron switches, but if you want to try a mechanical keyboard for Mac, this is a good place to start.

This uses the standard Mac keyboard layout but doesn’t have the number pad. If you don’t work with numbers, this can be a positive, as it means a smaller physical footprint. The switches are brown-style, meaning it’s not so loud that it will bother anyone else around you.

5. Logitech K750 Wireless Solar Keyboard for Mac

Logitech K750 Wireless Solar Keyboard for Mac Logitech K750 Wireless Solar Keyboard for Mac Buy Now On Amazon $53.99

If you don’t count Apple’s own models, the Logitech K750 Wireless Solar Keyboard is often mentioned as one of the best wireless keyboards for Mac users. It has a Mac-style layout, plus it’s a super-thin, stylish addition to your desk. Even better, it’s solar-powered, so you don’t have to worry about plugging it in or changing batteries.

This model uses concave keycaps, which is nice for touch typists. It also has a dedicated key for Launchpad, top-mounted on/off switch, and a handy indicator light to show you if it’s getting enough sunlight. I’ve used these keyboards a lot over the years, and never found a situation where it didn’t receive enough light to stay charged.

6. Macally Ultra-Slim USB Wired Computer Keyboard

Macally Ultra-Slim USB Wired Computer Keyboard Macally Ultra-Slim USB Wired Computer Keyboard Buy Now On Amazon $48.99

If you want the look and feel of the Apple Magic Keyboard without the so-called Apple tax, the Macally Ultra-Slim USB Wired Keyboard gets you most of the way there. Specifically, this is similar to the model with the number pad. It’s plastic and feels a little lighter, but the style is close.

This model uses standard scissor-style keys, unlike the Apple butterfly keyboard that has caused so many problems in MacBooks. The keys are fairly responsive, but they don’t feel exactly like the Magic Keyboard. That said, it gets pretty close.

7. Macally Slim USB Wired Small Compact Mini Computer Keyboard

Macally Slim USB Wired Small Compact Mini Computer Keyboard Macally Slim USB Wired Small Compact Mini Computer Keyboard Buy Now On Amazon $29.99

The Macally Slim USB Wired Small Compact Mini Computer Keyboard is similar to the above model, only without the number pad. As mentioned earlier, some people will see this as a positive since this model takes up less space on a desk, making more room for a mouse or even a cup of coffee.

As with the other Macally model, this looks the most like an Apple Magic Keyboard from far away. Get close, and you’ll notice it’s plastic, not aluminum, though it does look fairly similar.

8. Logitech K380 Multi-Device Bluetooth Keyboard

Logitech K380 Multi-Device Bluetooth Keyboard Logitech K380 Multi-Device Bluetooth Keyboard Buy Now On Amazon $29.99

If you need a keyboard that can work with multiple devices, the Logitech K380 Multi-Device Bluetooth Keyboard is worth checking out. The small, circular keys will take some getting used to, but the benefits might be worth it. In addition to your Mac, this keyboard can work with your iPhone, iPad, and even Android devices.

It doesn’t stop there either. If you want an easier time typing on your Apple TV, you can use this keyboard with that too. For easy switching, you can connect to up to three devices at a time. That means this might be the best keyboard for your MacBook Pro if you also want to control your other Apple hardware.

9. Anker Ultra Compact Profile Wireless Bluetooth Keyboard

Anker Ultra Compact Profile Wireless Bluetooth Keyboard Anker Ultra Compact Profile Wireless Bluetooth Keyboard Buy Now On Amazon $16.99

If you want a Bluetooth keyboard that matches your Apple hardware better than the Logitech keyboard, take a look at the Anker Ultra Compact Profile Wireless Bluetooth Keyboard. This rechargeable keyboard will work with your Mac, plus iOS, Android, and even Windows devices.

Don’t worry though, this still has a Mac keyboard layout, so you don’t have to worry about pressing the wrong keys.

The Best Apple Keyboard Replacement

There are a lot of options out there other than the Apple Magic Keyboard. Whether you’re after the best Mac keyboard or another Mac-compatible keyboard, we’re sure you’ll find a great Apple keyboard alternative here.

Apple also produces the defacto-standard Mac mouse, the Magic Mouse. However, before you go searching for a Magic Mouse alternative, be sure to check out the things you need to know when buying a mouse.

Read the full article: The 9 Best Alternatives to Apple’s Official Magic Keyboard


Read Full Article

8 Practical Ways to Clean Up Your Instagram


cleanup-instagram

When you joined Instagram, it probably felt new and exciting. Now, years later, you may be finding it more annoying than anything. You could abandon Instagram altogether, but there is an alternative.

In this article, we offer some practical ways to clean up your Instagram. This includes unfollowing people who no longer interest you, and deleting old photos that longer represent you or your life.

1. Unfollow Accounts You Never Interact With

The chances are that you follow more accounts than you should. Scrolling through a bunch of junk to see what you’re interested in is a waste of time, so you should start by unfollowing some accounts.
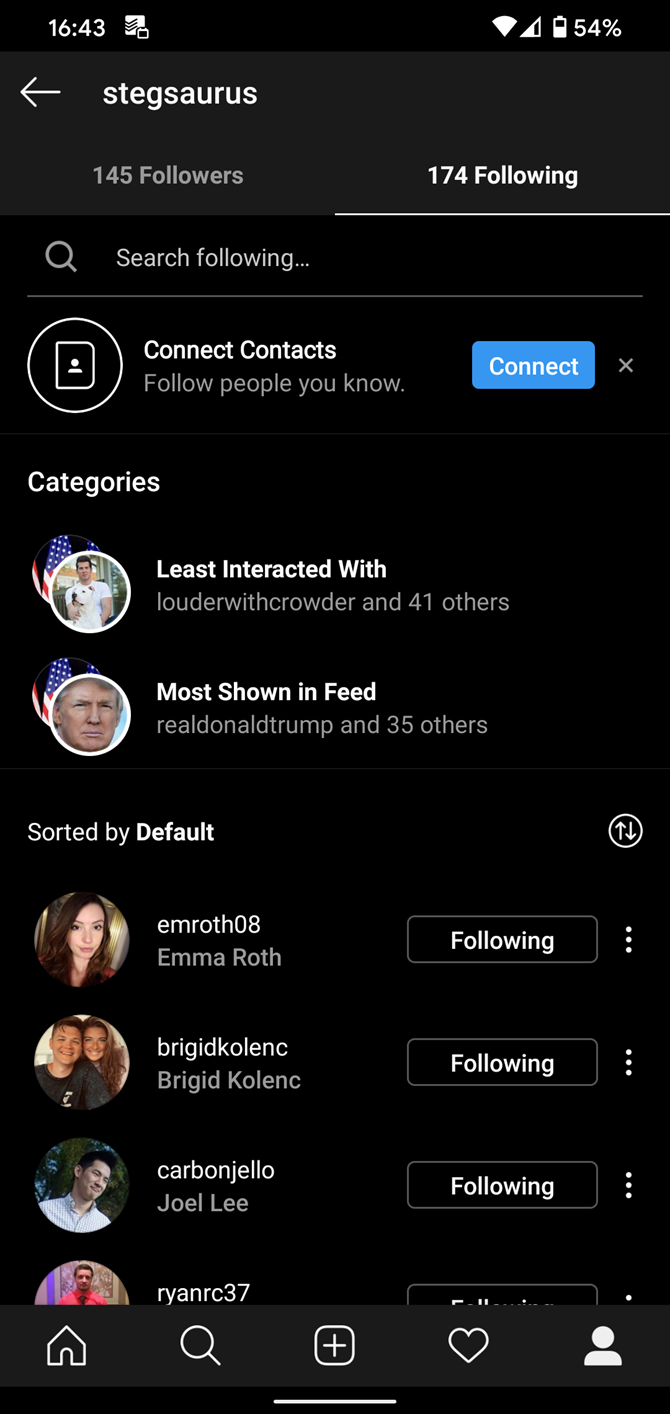
To help with this, Instagram now shows you which accounts you rarely interact with. Take a look by tapping the Profile icon in the bottom-right of Instagram to show your profile. Then, tap Following to see a list of everyone you follow.

At the top of the list, you’ll see Categories, including Least Interacted With and Most Shown in Feed. These lists will reveal the accounts whose posts you rarely like or comment on, and which accounts are filling up your feed.

You can use this as a guide to who to unfollow on Instagram. If you haven’t interacted with an account for a few months, you probably won’t miss them. The same goes for the accounts posting more often than necessary.

2. Delete or Archive Old Photos

We’ll cover more about making Instagram a better place to browse shortly, but it’s also important to review your own profile. You’ll feel more confident when you know that your page represents you well.

To that end, you should take a look through your page and consider deleting or archiving some photos. Maybe you uploaded pictures years ago that are low-quality, or have embarrassing images that reflect poorly on you. Removing these from your page lets you display only your strongest content.

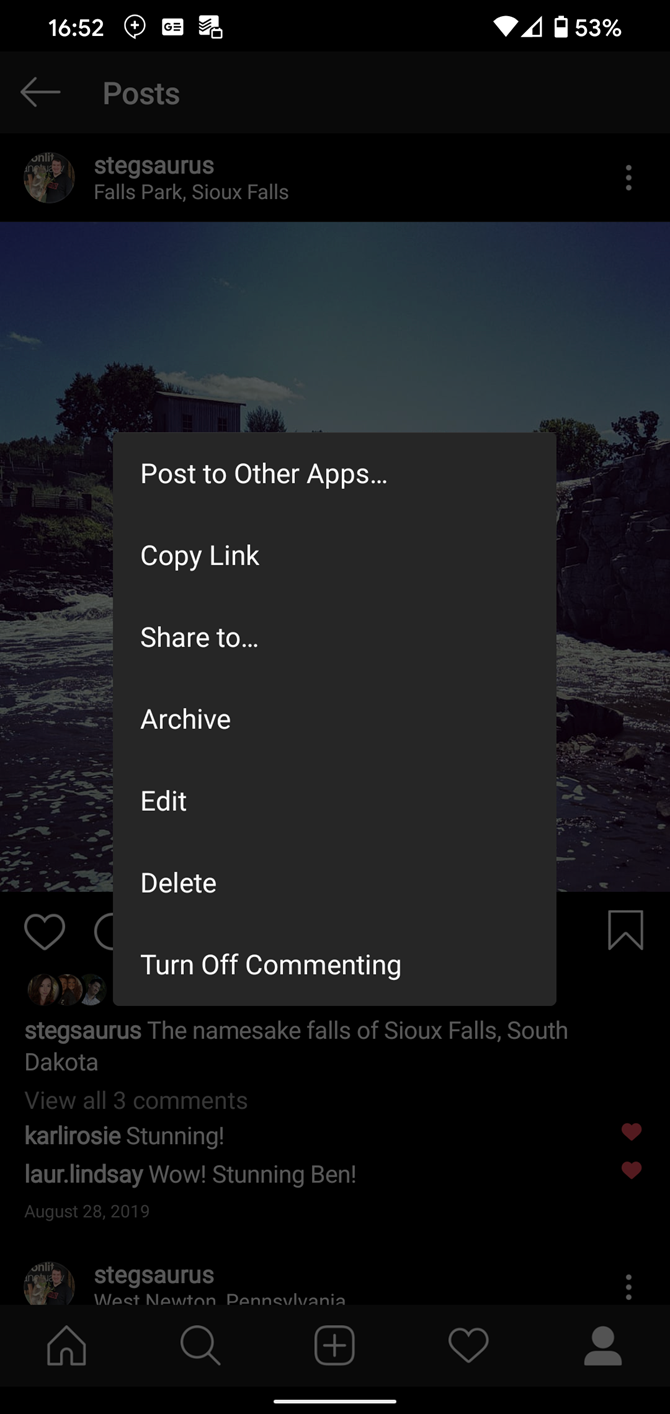
To erase a photo, select it on your page, and hit the three-dot Menu button in the top-right of the post. Choose Delete and confirm your choice. Doing this permanently deletes the photo and all related information with no option to recover it, so make sure you’re certain before deleting.

Archiving is a less severe option. When you archive a photo or video (available from the same menu), the post disappears from your public profile. However, you can still view your archived posts.

Tap the three-bar Menu button at the top-right of your profile page, then select Archive. Change the dropdown at the top of this page to Posts Archive and you’ll see all archived posts.

Tap the Menu button next to an archived photo and choose Show on Profile to restore it. This preserves all likes, comments, and other information.

3. Update Your Bio and Other Personal Info

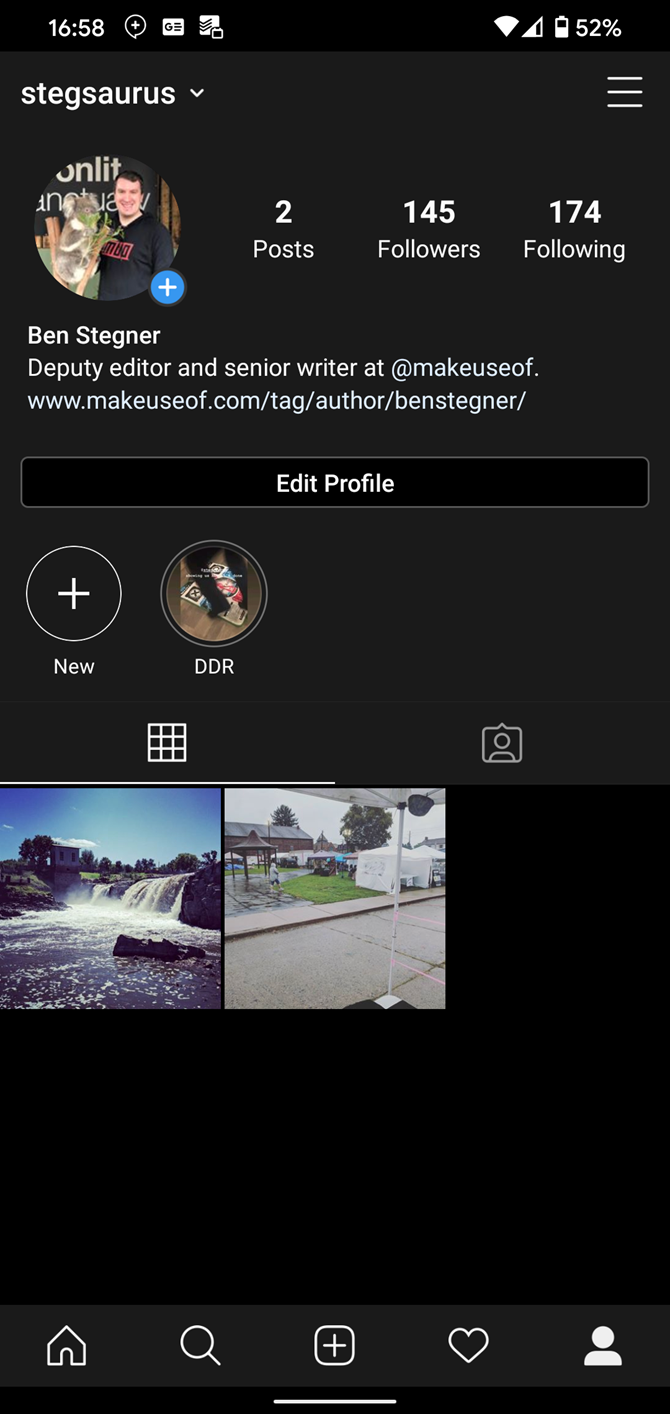
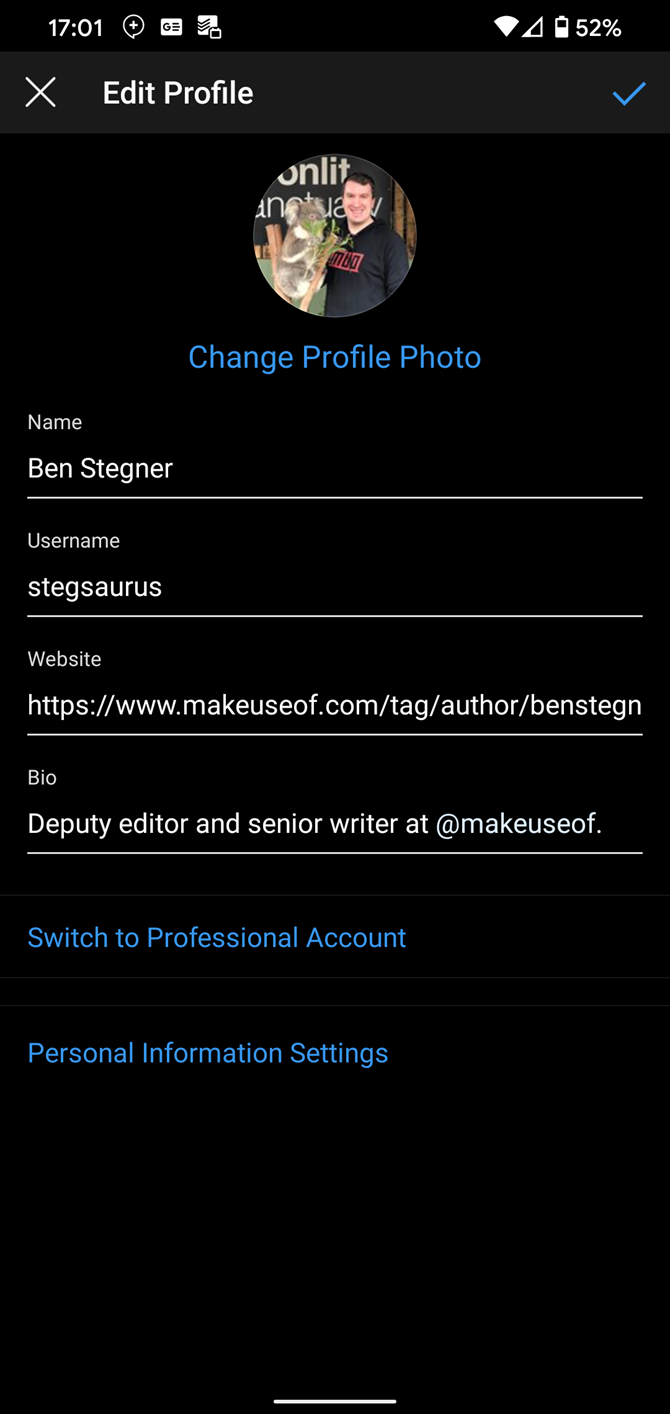
The next step in touching up your profile is making sure your personal info is correct. Visit your page and tap Edit Profile to adjust anything that’s out of date.

This lets you change your name, username, website link, and bio. Plus, if you haven’t changed your profile picture in a while, this is a great time to freshen that up.

4. Mute Stories or Posts You Don’t Care About

Did you know that you can mute stories from people you follow without hiding their regular posts? This is great for accounts that post dozens of stories and fill up your feed. Conversely, you can also mute posts and keep stories active.

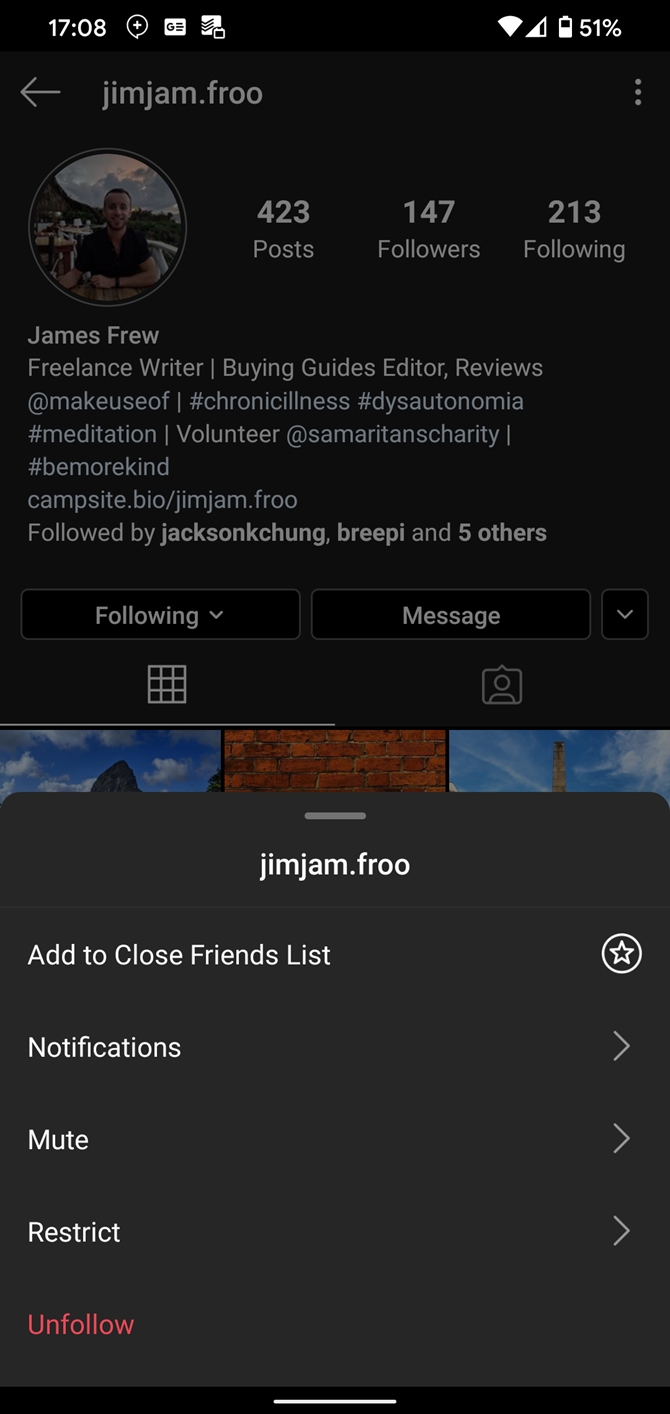
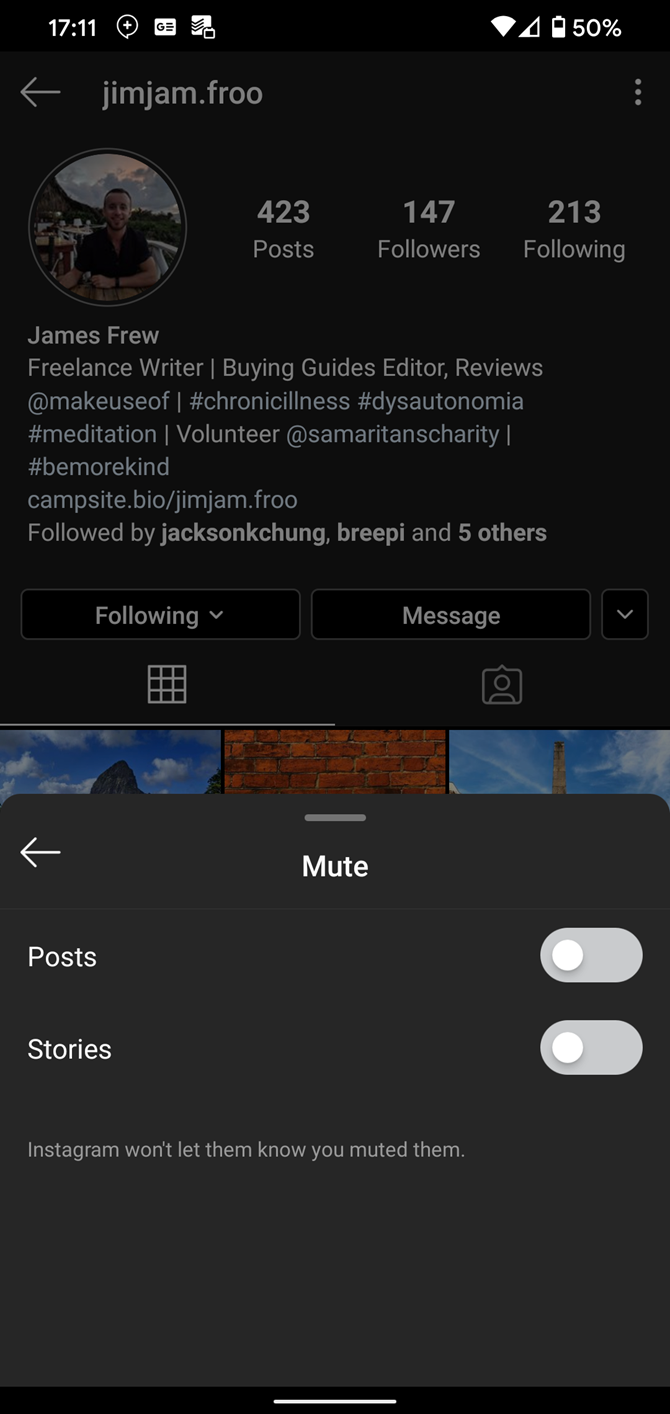
To mute content from an account, visit their profile. Tap the Following box and select Mute from the list that comes up. Use the sliders to mute Posts and/or Stories. Repeat these steps if you want to unmute the account.

When you mute stories from someone, their stories will appear at the end of the top bar, won’t light up when updated, and won’t play automatically. Muting posts means you won’t see them in your feed, but can still view them by visiting their profile.

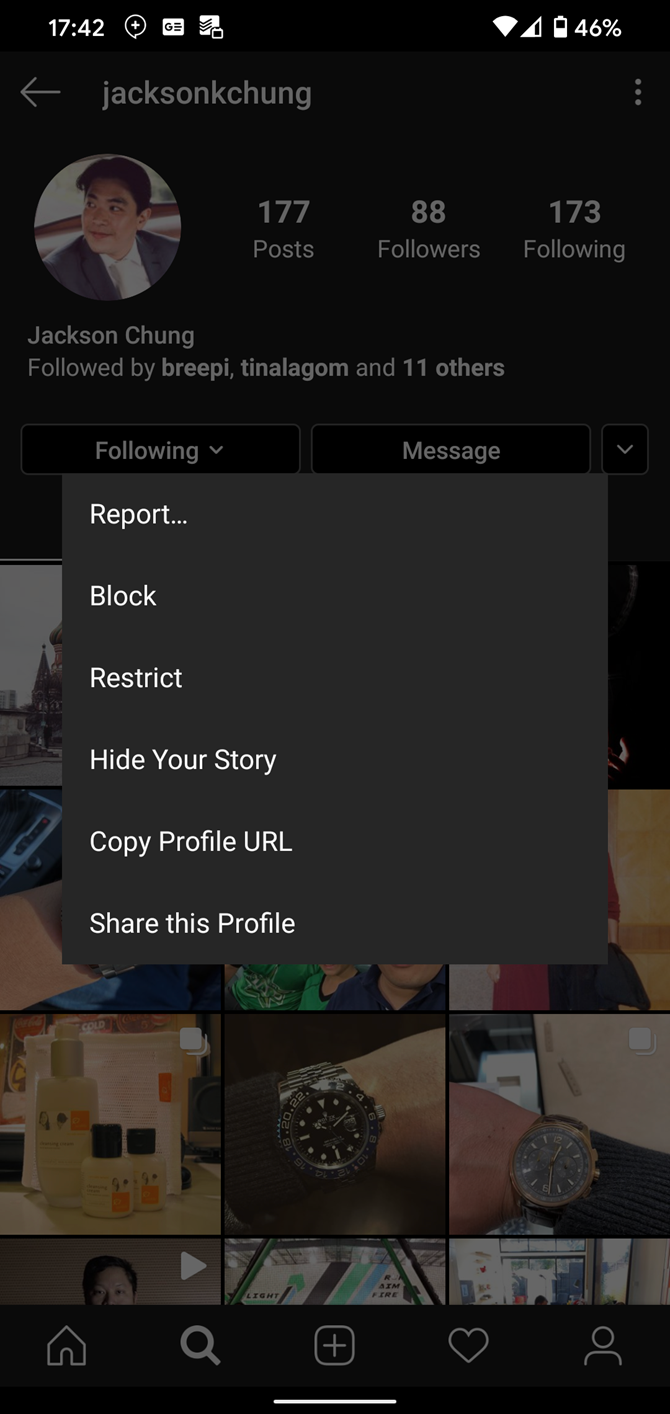
If you like, you can also prevent certain people from viewing your stories. Visit their page, tap the menu button in the top-right, and choose Hide Your Story. They then won’t be able to see anything you post to your story.

5. Use “Close Friends” to Limit Your Audience

Sometimes you want to share a story with a select group of people. Instagram provides a Close Friends function that you can use to limit the story audience when needed.

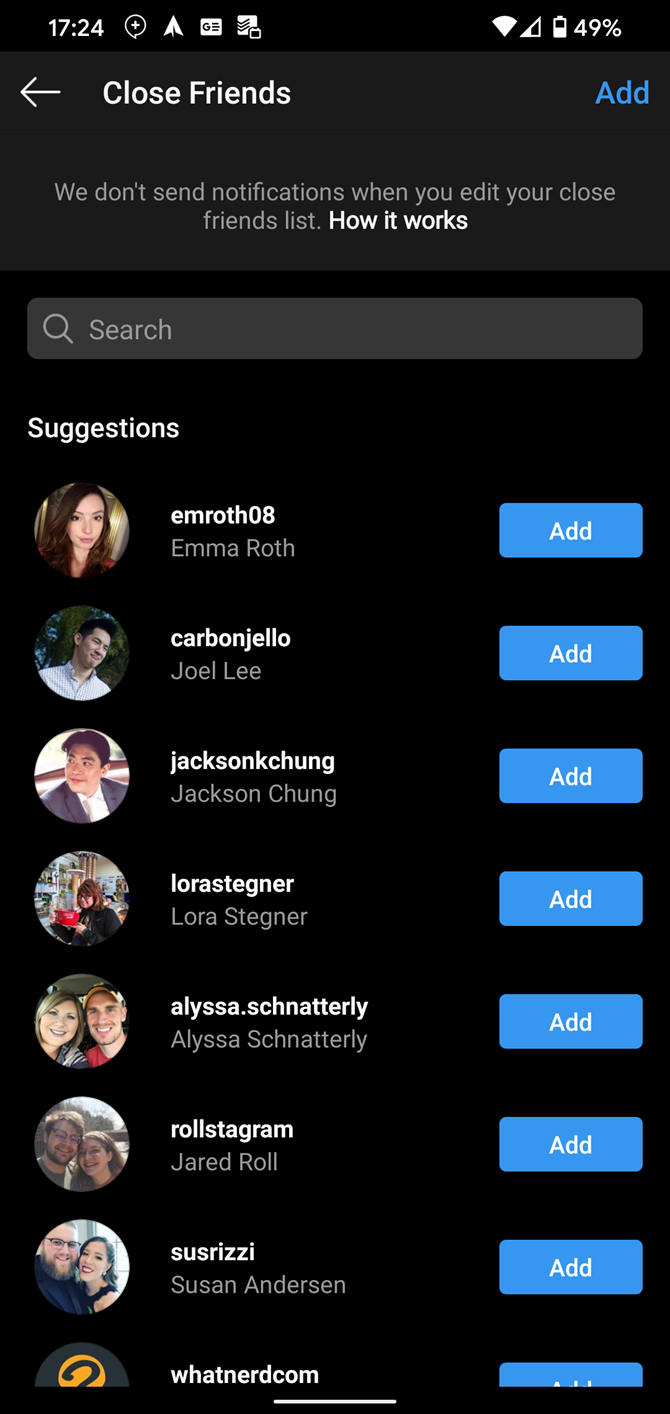
To add people to your Close Friends list, tap the Profile icon in the bottom-right and select Close Friends from the sidebar. Use the Suggestions that appear or search for people to add using the bar at the top.

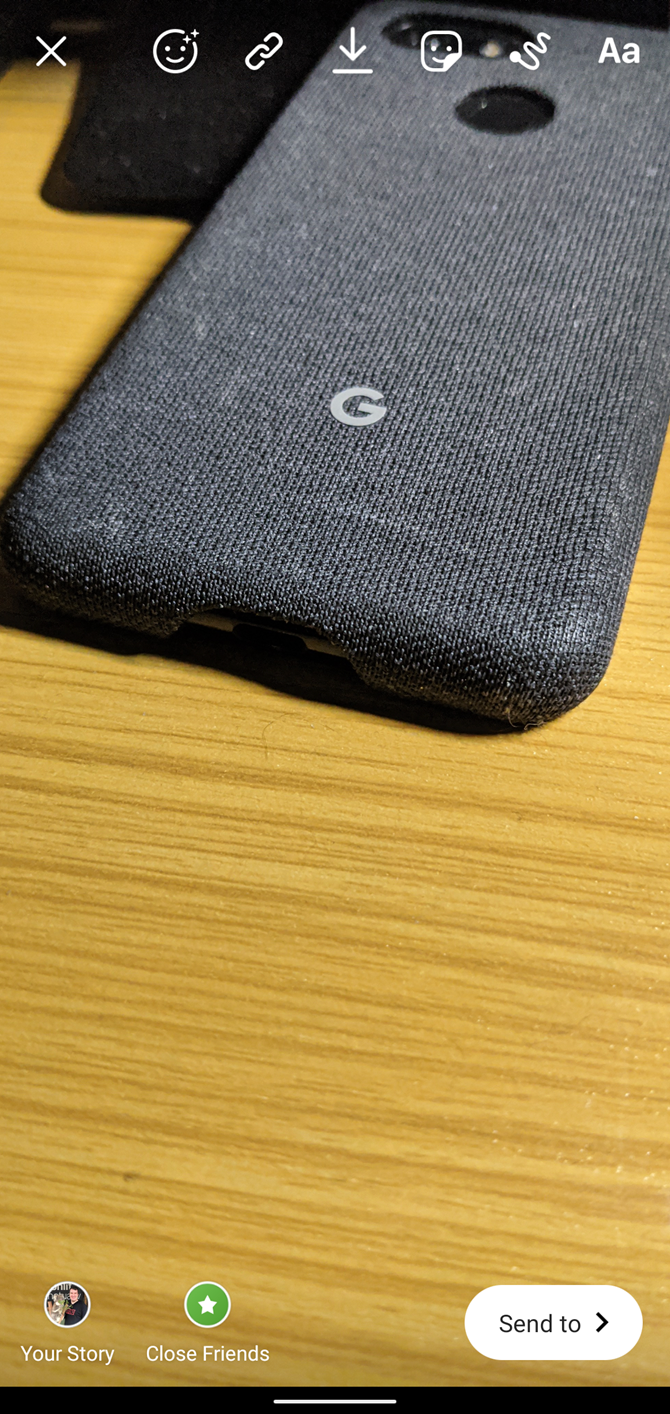
Once you have a list set up, you can use it when you’re ready to send a story. Tap Close Friends in the bottom-left of the page, and only people you’ve chosen for that list will be able to see it.

People on your Close Friends list will know because they’ll see a green ring around your profile photo when you share a story with only close friends. However, they can’t see who else is a member, and people can’t request to join your list.

6. See How Much Time You Spend on Instagram

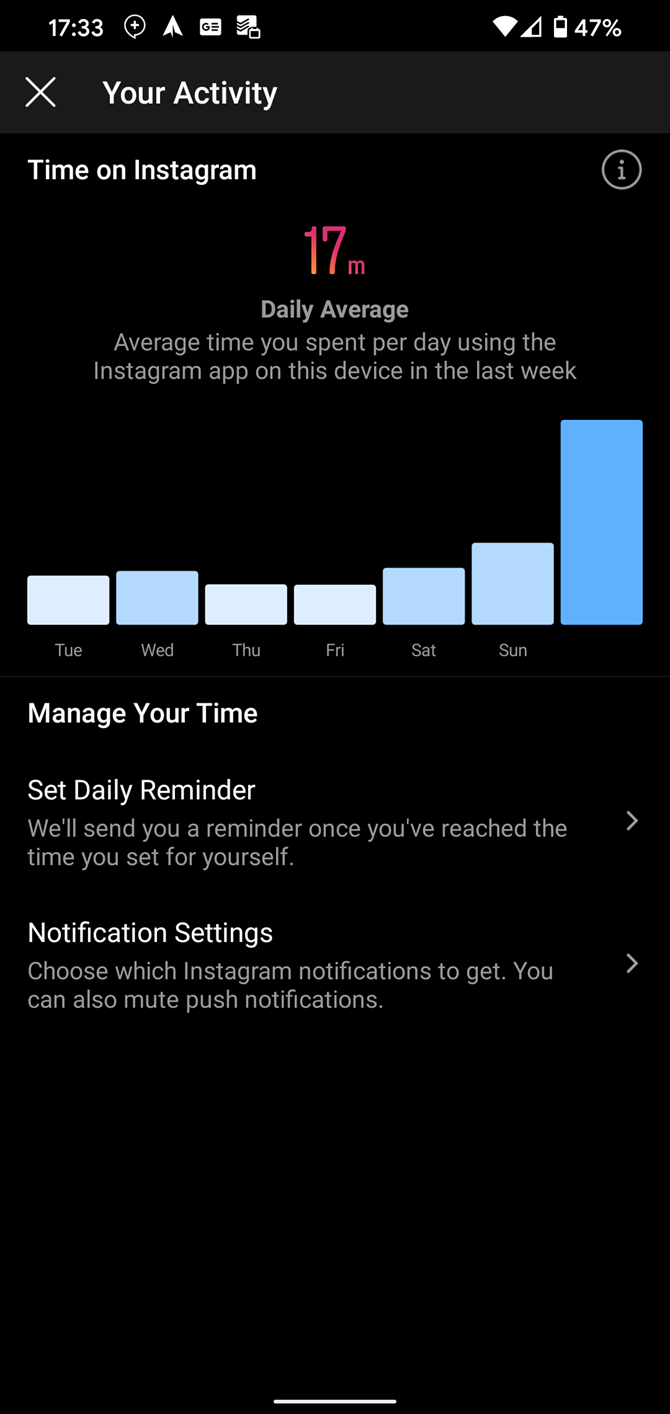
Are you worried that you spend too much time on Instagram? You can get a glimpse by visiting the Your Activity page, located on the right-hand sidebar of your profile. This shows the average amount of time you’ve spent on Instagram over the past week. Press and hold on a day’s bar to review it.

If you want to cut back on your usage, you can use the Set Daily Reminder function. Choose an amount of time, and Instagram will notify you when you’ve hit that limit for the day.

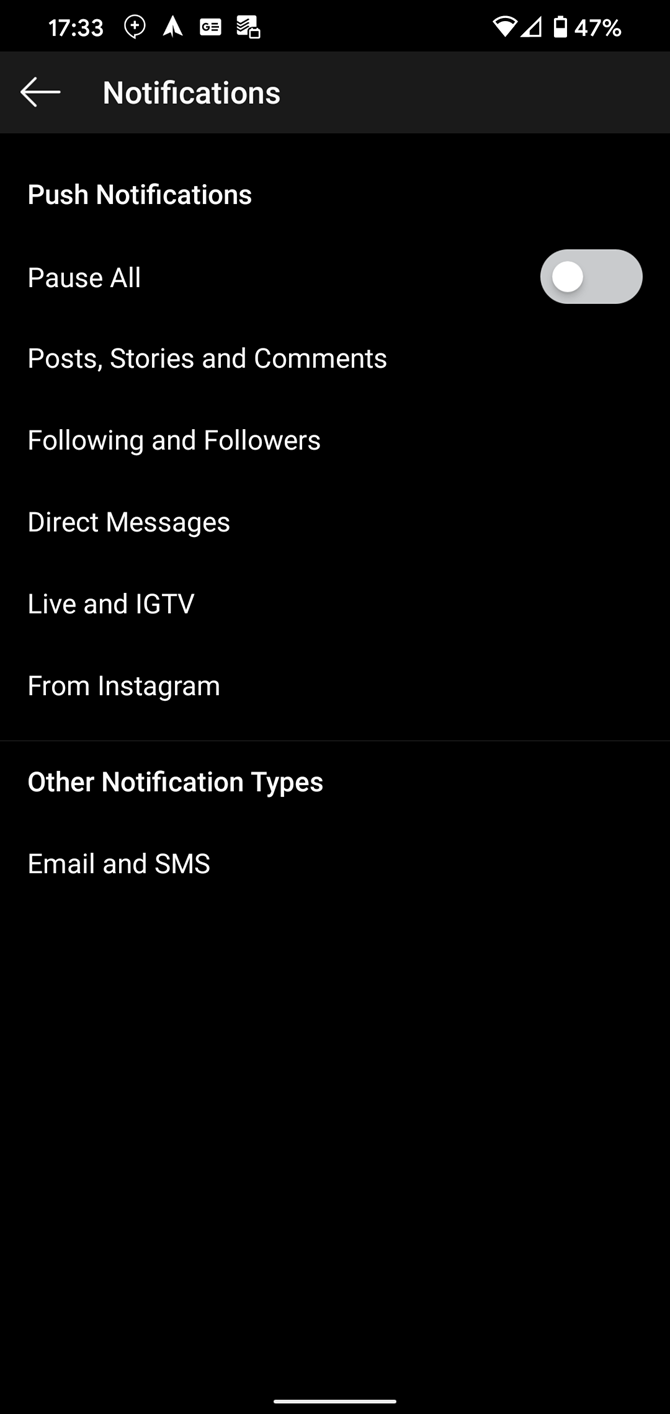
You can also modify your Notification Settings to reduce the amount of pings Instagram sends you. With fewer sounds grabbing your attention, you’ll hopefully open the app less often.

7. Restrict or Block Toxic People

If you have a serious problem with a particular user, Instagram gives you tools to shut them out.

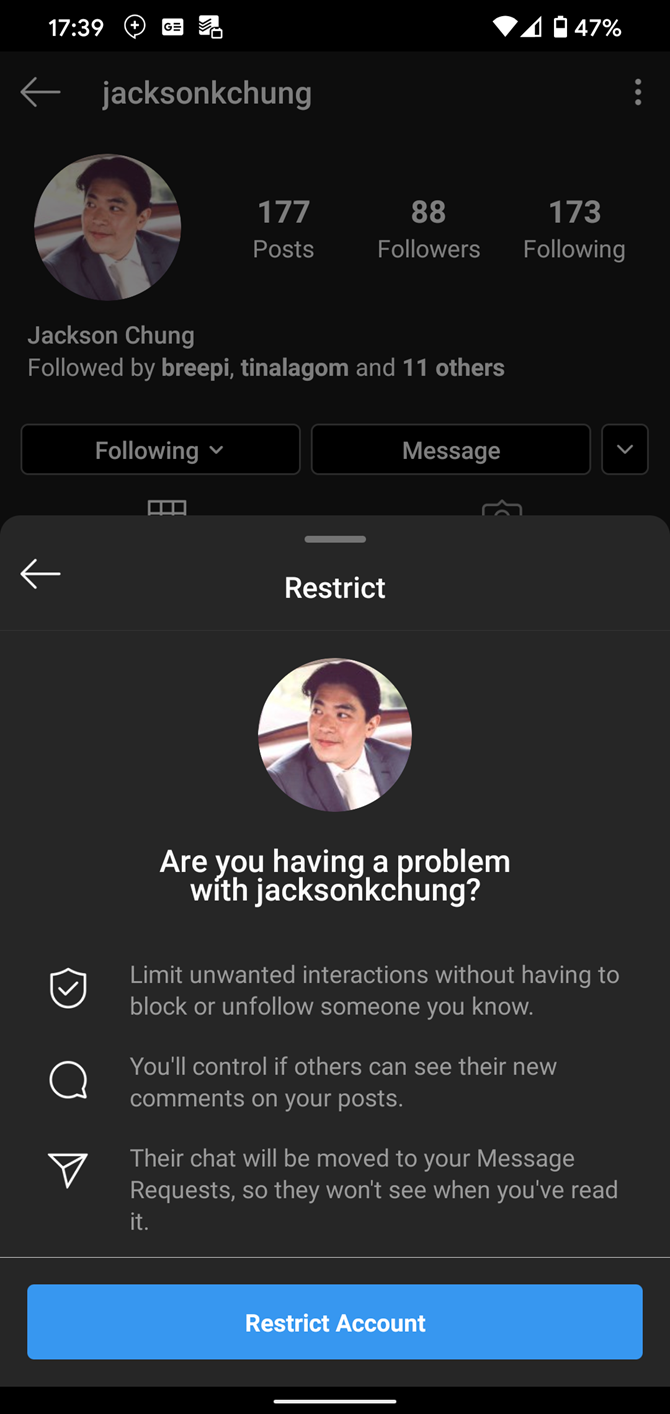
The least severe option is restricting. When you restrict someone, they effectively become shadowbanned. Their comments won’t appear publicly on your posts unless you approve them, they can’t see if your online or have read their messages, and you won’t see notifications for their comments.

To restrict someone, visit their profile, tap the three-dot Menu button in the top-right, and choose Restrict. People won’t know that you restricted them, and you can visit this window to reverse the process.

Blocking is more serious; it completely prevents people from interacting with your posts. You’ll find the option to Block on the same menu as above. Instagram doesn’t notify people when you block them, and if they visit your page, it will look completely empty.

See how to make your Instagram more private if you’re worried about sharing too much information.

8. Clean Up the Explore Page

Instagram’s Explore page helps you find new accounts to follow. However, it partially bases this on your search and activity history, meaning it can become cluttered with irrelevant suggestions over time. You can make this more useful in a number of ways.

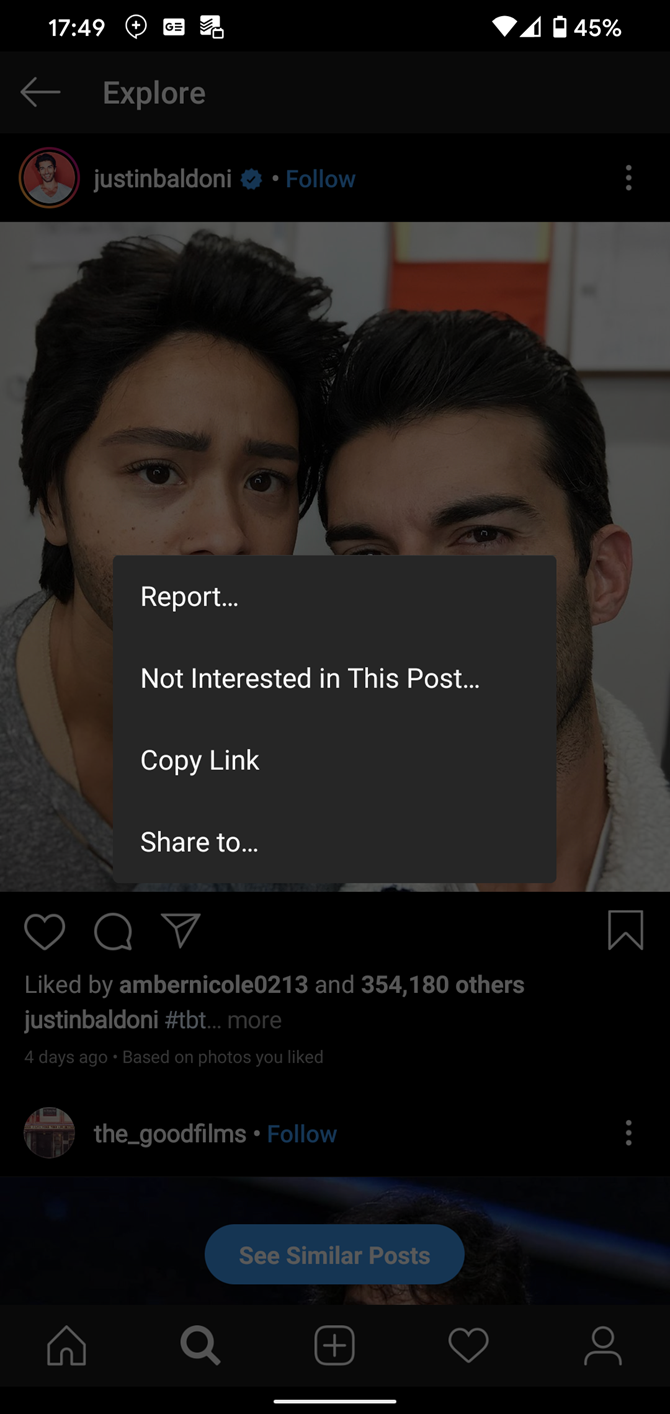
If you see something on the Explore page you don’t like, tap it, hit the Menu button in the top-right, and choose Not Interested in This Post. This will hide the post from Explore and show fewer like it in the future.

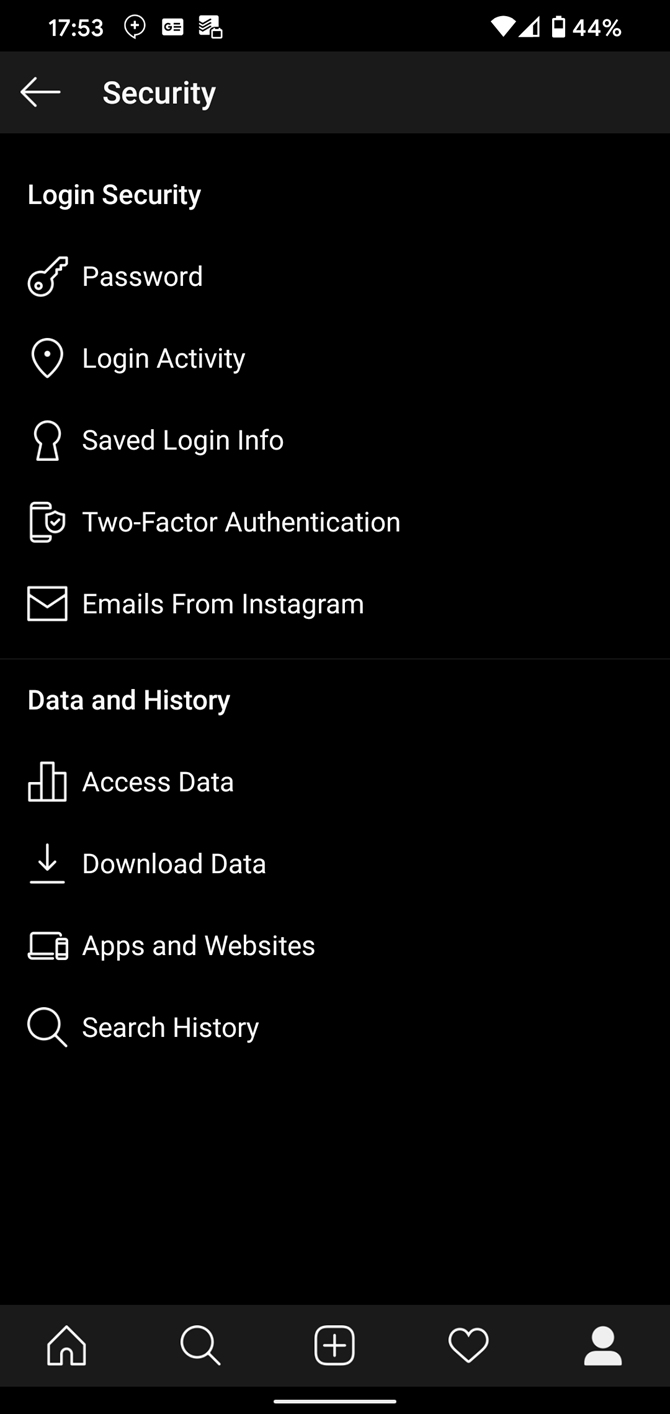
To reset your Explore page, clear your search history by visiting your profile page, opening the right sidebar, and tapping Settings. From here, go to Security > Search History. Clear individual items by tapping the X next to them, or hit Clear all to start fresh.

Maintain a Cleaner Instagram Account

With these tips, your Instagram account should look cleaner and tidier than ever. That makes your time on Instagram more efficient so you can enjoy a healthy balance of activities.

If you still feel overwhelmed by Instagram, you can temporarily disable your Instagram account using the steps outlined on Instagram Help. This allows you to take a break from Instagram without deleting all of your content, perhaps as part of a social media detox.

Read the full article: 8 Practical Ways to Clean Up Your Instagram


Read Full Article