19 May 2020

How to Use and Customize a Third-Party Keyboard on Your Mac


third-party-keyboard-mac

Apple offers two flavors of external keyboard to use with your Mac: the Magic Keyboard and the Magic Keyboard with Numeric Keypad. Despite their names, neither is particularly exciting. So you may want to set up a third-party keyboard to use instead.

There are a lot of excellent third-party keyboards available and all of them should connect to your Mac over USB or Bluetooth. But even if your external keyboard connects without any problems, you still need to customize and remap the layout to make sure all the keys work how you want them to.

Here’s all you need to know about using third-party keyboards on Mac, including how to set them up for maximum productivity.

Using a Third-Party Keyboard With Your Mac

Modern Macs support nearly all USB and Bluetooth devices. So any USB or Bluetooth keyboard should be compatible—at least for basic features like typing standard keys. Special media keys may not work, but we’ll show you some apps you can use to fix them later.

Advanced features on more technical keyboards are also less likely to work with your Mac. That said, the situation is improving with popular manufacturers. For example, the Razer Synapse software that allows for macro recording on Razer keyboards is available for Mac these days.

For the most part, you can use any third-party keyboard you find around the house and there’s a good chance it’ll work with your Mac. If you’re planning to buy a new keyboard instead, take a look at the best alternatives to the Magic Keyboard for macOS-focused options.

Connecting a Third-Party Keyboard to Your Mac

To connect a USB keyboard, simply plug it in and macOS will detect it. If it doesn’t work, visit the manufacturer’s website to check for any special drivers you need to install. Make sure you get the Mac driver and restart your computer after installing it.

For Bluetooth keyboards, navigate to System Preferences > Bluetooth on your Mac. Then turn on the keyboard and follow the manufacturer’s instructions to put it in discovery mode. Once it appears on your Mac, click the Pair button to connect it. Again, you may need to download special drivers from the manufacturer if it doesn’t work right away.

Mac Connect Bluetooth keyboard

Customize Basic Keyboard Settings on Your Mac

You can customize your external keyboard and remap certain keys by going to System Preferences > Keyboard on your Mac. It’s especially important to do this if you’re using a Windows keyboard to make sure the keys behave how you want them to.

Click Change Keyboard Type to help your Mac detect what kind of keyboard you’re using: Razer, Steelseries, Logitech, and so on. Follow the keyboard wizard that appears, asking you to press various keys. Based on these results, you Mac will set up the default settings for your keyboard layout.

Mac Keyboard preferences

Click Modifier Keys to rearrange the keys that combine with others to perform certain actions. From left to right, the modifier keys on an Apple keyboard read Control, Option, Cmd whereas non-Apple keyboards usually read Control, Windows, Alt.

By default, macOS registers the Windows key as Cmd and the Alt key as Option. So you may want to remap the modifier keys for your external keyboard to match Apple’s keyboard layout and keep the order of these modifier keys the same. This is especially useful if you get confused switching between Apple and third-party keyboards.

Mac change modifier keys

Consider enabling the checkbox for Use F1, F2, etc. keys as standard function keys if you have a third-party keyboard that shares media keys with function keys.

You may also want to alter the Key Repeat (how quickly a key repeats when held down) and the Delay Until Repeat (how long before the key repeating kicks in) settings. The default setting is fine for most users, however.

Customize Your Keyboard Layout on a Mac

If you use a non-traditional keyboard layout, such as Dvorak or Colemak, or if you have a foreign language keyboard, then you can set that up in the Input Sources section. Click the plus Add (+) button to add as many layouts as you want. You can’t define your own layouts, but Apple provides many layouts across dozens of languages.

Mac Input Sources Colemak

If you frequently switch between keyboard layouts, enable the Show Input menu in menu bar checkbox. This creates a menu bar icon that shows the layout you’re currently using. You can also click on it to quickly switch to other layouts you’ve set up.

Use Karabiner for More Keyboard Customization on Mac

If you need to tweak your keyboard even further than System Preferences allows, you may want to install Karabiner. Since Karabiner is open-source software released under the Public Domain license, it’s absolutely free to use.

With Karabiner, you can remap any keys on your external keyboard so your Mac sees them as other keys. For example, if you don’t use Caps Lock, you could use Karabiner to turn it into a second Delete key to use with your left hand. You can remap any key to any other key with Karabiner, including modifiers, arrows, and media buttons.

Mac Karabiner Preferences

Most third-party keyboards—except Razer keyboards—don’t have the Fn key you usually find on a Mac. But with Karabiner, you can remap another key to use as Fn. It also lets you remap your function keys to use as media keys, just like a standard Apple keyboard.

Download: Karabiner for macOS (Free)

Use BetterTouchTool to Create Keypress Sequences

If Karabiner isn’t enough for your customization needs, check out the excellent Mac productivity app BetterTouchTool instead. Although this app is best known for creating custom trackpad gestures, BetterTouchTool has a lot of keyboard customization options as well.

With BetterTouchTool, you can trigger system-level actions using keyboard shortcuts or keypress sequences. These actions include toggling Do Not Disturb, centering windows, changing brightness, sleeping the display, and more.

You can also set up new keyboard shortcuts or keypress sequences to trigger other shortcuts and sequences. For example, if you’d rather double-tap the Cmd button to copy text, you could set up that sequence to trigger the Cmd + C shortcut.

BetterTouchTool Mac

Best of all, you can create keyboard shortcuts and keypress sequences either for global use across all apps or only when specific apps are in focus.

BetterTouchTool is available as a 45-day free trial. If you like it, buy a two-year license for $8.50 or a lifetime license for $20.50.

Download: BetterTouchTool for macOS ($8.50, free trial available)

Make the Most of Your Keyboard With Custom Shortcuts

Apple’s official keyboard has plenty of supporters. But you can get many more features and better mechanical keys from a third-party alternative, like Razer. Since you can use the tools above to customize a third-party keyboard for your Mac, there’s no reason to spend a lot of money on a Magic Keyboard unless you really like the design.

Whatever external keyboard you settle on, you don’t need to settle with the standard keyboard shortcuts on your Mac. Find out how to create custom Mac keyboard shortcuts to boost your productivity, no matter what keyboard you use.

Read the full article: How to Use and Customize a Third-Party Keyboard on Your Mac


Read Full Article

How to Use Google Calendar for School: Organize Your Class Schedule


free-calendars-google

One of the most difficult parts of college, besides the homework, of course, is managing a complex and ever-changing schedule. Between classes, extracurricular activities, and a part-time job, you are extremely busy.

An excellent way to start your semester off or even organize it partway is to leverage free tools to help you manage everything on your plate. In this article, you’ll see how to manage your class schedule and get organized for the semester with Google Calendar.

Get Your Schedules and Mark Important Dates

Before you can get organized with Google Calendar, you need to get all your schedules together. Start by locating an official copy of your semester course schedule. You also want schedules for any extracurricular activities, work, or events you plan to participate in during the term.

Get as much information as you can for each of your events to make your schedule as robust as possible. This includes dates, durations, locations, required textbooks, and even teachers. Don’t be afraid to include too much information in this step because you can always remove it later.

And for additional tools, check out these checklist and planner templates just for students.

How to Make a Class Schedule Calendar

Head to Google Calendar, sign in, and start by creating a specific calendar to hold your class schedule. Using an individual calendar gives you the option of toggling it on or off, which can be handy if you have a lot of events.

  1. Click the Main Menu button on the top left if your sidebar is hidden.
  2. Go to Other calendars, click the plus sign, and select Create New Calendar.
  3. Give your calendar a Name, Description, and optionally choose a different Time Zone if needed.
  4. Click Create Calendar.

Google Calendar Create Calendar

When you click the arrow on the top left, you’ll be back on your main calendar page and should see your new calendar in the sidebar. If you want to change the color, click the Options button (three-dots) that appears when you move your cursor over the calendar. Then pick a new color from the palette.

Google Calendar Change Color

How to Add Classes to Google Calendar

The next step is to add your classes to Google Calendar. Head to a date on the calendar when your first class begins and click. This will open the new event window.

Start from the top and add the course Title, choose Event, and then add the start and end times with the Add Time button.

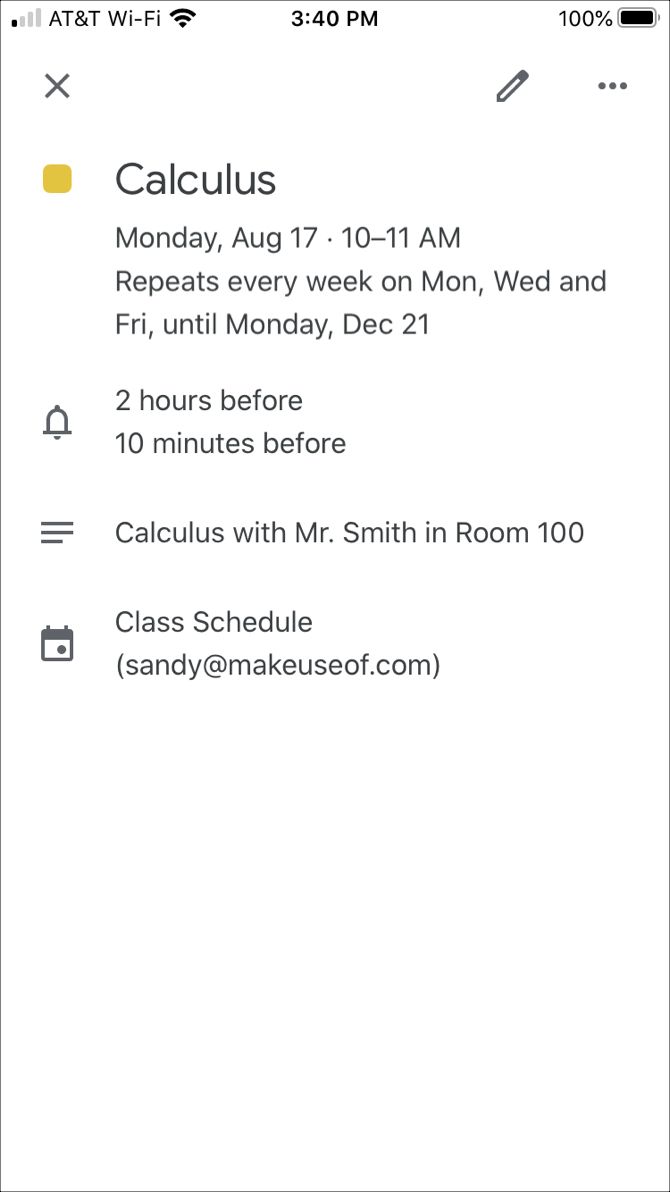
You likely won’t use the Add guests or Add Google Meet options, but you may want to include your school’s Location and add a Description to contain your instructor’s name, the room number, and other pertinent details for the class.

Be sure to choose your class schedule calendar from the dropdown list and then click Save.

Google Calendar New Class Event

Alternatively, you can choose More Options to customize your class event further with the options below. Or you can hit Save now and customize it later by clicking the event on your calendar and selecting Edit Event.

Make Your Classes Repeat

Since your classes will occur regularly, you’ll want to make this a repeating event.

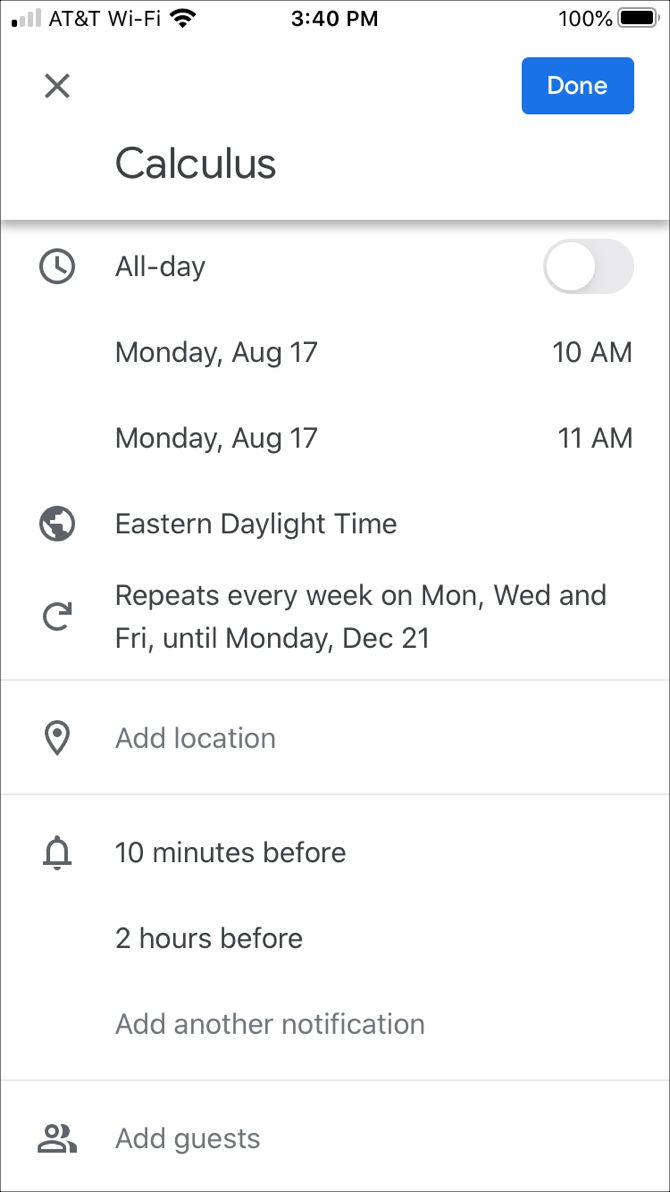
At the top, below the class title, you’ll see Does not repeat. Click that dropdown box and you’ll see some quick options you can pick from like Daily and Weekly on [specific day]. If one of these applies, go ahead and select it but if not, click Custom.

Now you can pick the exact days that this class repeats each week. And at the bottom, you can enter an end date, so the class will stop showing up on your calendar when that day comes.

Google Calendar Repeat Class Event

Click Save when you finish.

Keep adding calendar events and customizing them until your schedule is complete. Don’t forget to include things like your extracurricular activities or work schedule.

Set Up Google Calendar Notifications

A terrific feature of Google Calendar is its notifications. This helps you remember you have a class at a certain time, so you won’t forget, and you won’t (or shouldn’t) be late. You can create notifications for individual class events or for the entire school calendar.

Set Up Event Notifications

If you want to set up different notifications depending on when the class occurs, you can create individual event notifications. Select the event on your calendar and click Edit Event.

On the event detail page, click Add Notification. Select either Notification or Email in the first dropdown box, depending on how you want to receive your alert. Then choose how far in advance of your class you’d like to be notified.

You can add more than one notification too. For example, you can receive an alert one hour before your class starts and another 10 minutes before the start time. Just click Add Notification for each additional alert you’d like to create.

Google Calendar Event Notification

Click Save if you’re finished. You’ll see a popup message asking if you want to change only that event or the others you created for that repeating class. You’ll likely choose the second option for This and following events so that you’ll receive the notification for that class each time. Click OK.

Set Up Calendar Notifications

If you would rather create notifications for your entire school calendar, this is just as simple. And this way, you’ll receive a notification for any event on your calendar, whether a class, activity, or work shift.

Click the Options button next to the calendar and pick Settings and Sharing. Scroll down and you’ll see a few sections for Event Notifications, All-Day Event Notifications, and Other Notifications.

For Event and All-Day Notifications, click Add Notification, choose Notification or Email, and enter the timing for the alert. You can add more than one by clicking Add Notification.

Google Calendar Event and All Day Notifications

For Other Notifications, you can simply choose to receive an email to your connected Gmail account for each of the items listed such as new events, canceled events, or your daily agenda.

Google Calendar Other Notifications

Access Google Calendar On-The-Go

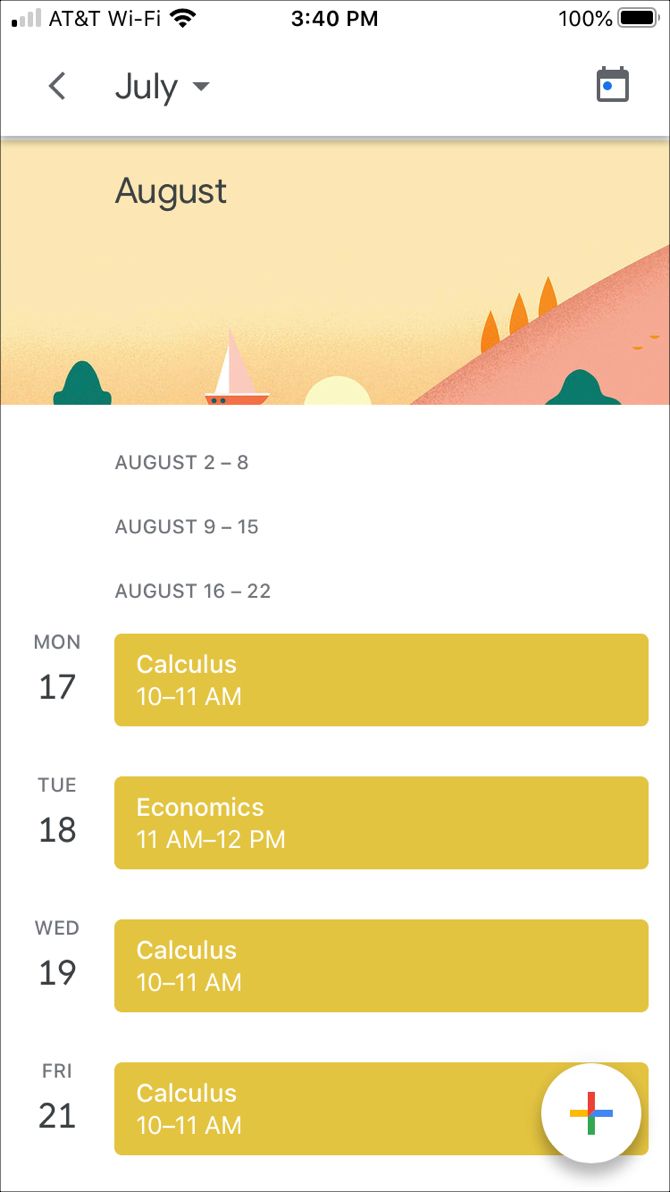
You can always access your calendar from any web browser. But if you’re out and about, you can check out your class schedule in the Google Calendar app on your mobile device.

The Google Calendar app on Android and iOS lets you view and edit your schedule and classes easily. And best of all, it’s available for free.

In addition, you can add attachments. So if you need a paper you wrote for a class, you can attach it to that class event in the app.

Download: Google Calendar for Android | iOS (Free)

Organize Your Semester With a Google Calendar Class Schedule

Although it takes a little time to put it all together, having your school schedule online and on your devices can be a great asset throughout your semester.

For more, here are several free calendars you can add to your Google Calendar and various ways to make Google Calendar your Windows desktop calendar.

Image Credit: Evan Wondrasek/Flickr

Read the full article: How to Use Google Calendar for School: Organize Your Class Schedule


Read Full Article

How to Optimize Windows 10 for Gaming and Performance


optimize-windows-10-gaming

Windows 10 is a great OS for gamers, mixing native games, support for retro titles, and even Xbox One streaming. But it isn’t perfect straight out of the box.

Some tweaks are required to enjoy the best gaming experience Windows 10 has to offer. Here are several ways to optimize your Windows 10 PC for gaming.

Unlock the "Windows Keyboard Shortcuts 101" cheat sheet now!

This will sign you up to our newsletter

Enter your Email

1. Optimize Windows 10 With Gaming Mode

Optimize Windows 10 for better gaming performance

Looking for another option to squeeze the best gaming performance out of Windows 10?

Later releases of the operating system feature a gaming mode, built-in optimizations for Windows 10 gamers. To find out more:

  1. Press Windows key + I
  2. Type game mode
  3. Click Game Mode settings or Turn on Game Mode
  4. On the Gaming screen, click Game Mode
  5. Switch to On to use Game Mode

If your PC supports Game Mode, resources will be managed to achieve the optimum frame rate. Additionally, Windows Update will be suspended.

While this is one way to improve gaming performance on Windows 10, Game Mode is not perfect. Keep reading for more Windows 10 gaming tweaks.

2. Disable Nagle’s Algorithm

Nagle’s algorithm essentially bundles data packets at the cost of a smoother internet connection. It’s useful but having Nagle’s algorithm enabled on your computer may contribute to latency issues when playing games online.

To disable this and improve gaming performance on Windows 10, start by checking your IP address:

  1. Hit Windows key + X
  2. Select Windows PowerShell
  3. Enter ipconfig
  4. Look for “IPv4 address” to identify your PC’s IP address

With the IP address noted, edit the Windows Registry:

  1. Click Start
  2. Type regedit
  3. Select Registry Editor (Tread carefully when fiddling with the Windows Registry)

In the address bar, copy and paste the following path:

HKEY_LOCAL_MACHINE\SYSTEM\CurrentControlSet\Services\Tcpip\Parameters\Interfaces

In the left-hand pane, you’ll see a collection of folders, with filenames comprised of letters and numbers. To access the correct file, match your IP address with the one listed against DhcpIPAddress in one of these folders.

Disable Nagle's Algorithm for better online gaming network speeds

When you find your matching folder:

  1. Right-click on the folder
  2. Select New > DWORD (32-bit) Value
  3. Name this TcpAckFrequency
  4. Click OK
  5. Select New > DWORD (32-bit) Value again
  6. Name this one TCPNoDelay.
  7. Double-click on each and set their parameters to 1

Doing so disables Nagle’s Algorithm. If you run into any problems, reset their parameter values to 0 and they will be disabled.

3. Optimize Windows 10 Online Gaming With Faster DNS

If you’re playing online multiplayer or relying on a remote server for Windows 10 gaming, network traffic can cause problems.

While upgrading to faster internet can help, it’s quicker and cheaper to just make some networking tweaks.

  1. Hit Windows + I to open Settings
  2. Find Network and Internet > Change Adapter Settings.
  3. Right-click on your wireless network
  4. Select Properties
  5. Highlight Internet Protocol Version 4.
  6. Make a note of the two DNS entries for future reference
  7. Replace them with 1.1.1 and 1.0.0.1.
  8. Click OK, then Close.
  9. Restart your default browser

Your internet should now be faster, which will help with online gaming.

4. Disable Automatic Updates for Better Windows 10 Gaming

Windows 10 will automatically update your OS and schedule a restart without your permission. While this feature doesn’t activate often, you never want to be caught unaware and risk your game save.

Not only can automatic updates restart Windows without warning, downloading updates in the background will limit your network connectivity.

While you cannot disable automatic restart, it can be delayed. To reduce the chance of Windows Update downloads interrupting your gaming performance:

  1. Open Settings with Windows key + I
  2. Click Update and Security > Windows Update
  3. Look for Advanced options then click Update Options
  4. Disable Restart this device as soon as possible when a restart is required to install an update.
  5. Enable Show a notification (Windows will give plenty of warning when the system is going to restart following an update)
  6. Use Pause updates to delay installation of updates for up to 35 days

Limit Windows Update to improve game performance

By specifying when you’ll be using Windows 10, you can prevent Windows Updates downloading and installing during active hours.

5. Disable Notifications in Windows 10

The Focus Assist feature in Windows 10 lets you specify how and when you receive notifications.

Popups and chimes usually accompany notifications, but these can interrupt games. The solution is to minimize the impact of notifications, using Focus Assist. It’s basically a feature that lets you manage what level of focus you devote to your work.

  1. Hit Windows + I to open Settings
  2. Click System > Focus Assist
  3. Select Alarms Only to hide all other notifications
  4. Close the Settings screen

Disable notifications to improve Windows 10 gaming

6. Prevent Steam Auto-Updating Games

If you use Windows to play games, you’re probably buying and installing games via Steam.

One of the largest annoyances with Steam is its update feature. This blocks you from preventing automatic updates across all your games. This may eat up memory by updating games you don’t play or limit your network connectivity with background updates.

To prevent Steam from updating games in the background:

  1. Launch the Steam client
  2. Open Steam > Settings > Downloads
  3. Uncheck Allow downloads during gameplay

Tweak Steam for Windows 10 gaming optimizations

You can also prevent Steam from downloading updates for largely unused games:

  1. Open the Steam Library
  2. Right-click an underused but installed game
  3. Select Properties and find Automatic Updates
  4. Change Always keep this game up to date to Only update this game when I launch it

Disable automatic updates in Steam for optimized Windows 10 gaming

With Steam correctly optimized, Windows 10 will be ready for AAA gaming.

7. Tweak Windows 10 Visual Effects for Game Improvements

Your graphical user interfaces (GUI) can be a hindrance to your processing power. By default, your Windows 10 appearance settings are set to impress.

Games running in the foreground may conflict with a shiny GUI running in the background. Adjust these settings to optimize Windows 10 for gaming performance.

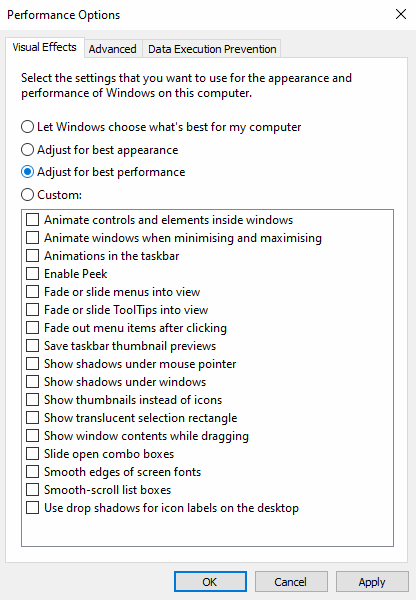
  1. Open Settings with Windows key + I
  2. Type performance
  3. Select Adjust the appearance and performance of Windows.
  4. In the settings box, select Adjust for best performance
  5. Click Apply
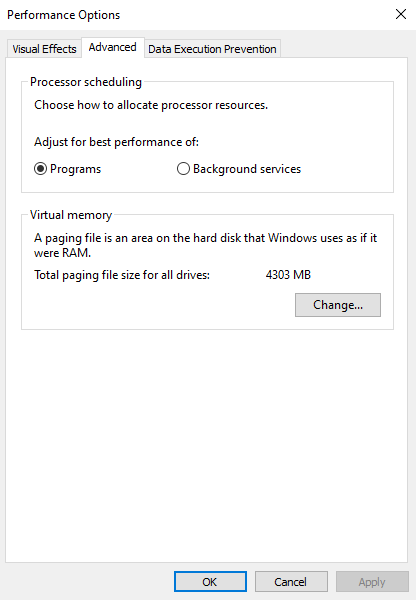
  6. Click the Advanced tab
  7. Ensure that Adjust the best performance of is set to Programs
  8. Apply again, then OK to confirm

8. Tweak Your Mouse Settings for Windows 10 Gaming

Could you mouse be impacting gaming performance on Windows 10? To find out, it’s a smart idea to optimize your mouse settings. A feature called pointer precision (AKA mouse acceleration) can impact how your mouse performs in games. Disabling this can help to optimize gaming in Windows 10.

  1. Open Settings
  2. Click Devices > Mouse
  3. View the Pointer Options tab
  4. Clear the Enhance pointer precision checkmark
  5. Click Apply
  6. Click OK to exit—you might also adjust the pointer speed to suit

Disable mouse enhancements to optimize Windows 10 gaming

If gaming has improved, your mouse was almost certainly slowing things down.

9. Max Power Plan to Improve Windows 10 Gaming Performance

Power options are often ignored due to their supposedly negligible effect. Some gamers claim adjusting for higher performance works, while others fail to notice any difference changing their PC power settings.

The only way to know for sure is to test it out on your PC. To change your power settings:

  1. Open Settings
  2. Type power
  3. Click > Power & sleep settings > Additional power settings
  4. Select the high-performance option
  5. If none is available, use Create a power plan to configure a new, custom power plan

This option will allow your PC to perform better at the cost of higher energy consumption and temperature levels. For this reason, it’s better to activate this Windows 10 optimization on the desktop rather than laptop PCs.

10. Keep Your Windows 10 Drivers Updated for Improved Gaming Performance

Your GPU (Graphics Processing Unit) is the core of your PC gaming experience. However, the GPU requires the latest Windows driver to keep it working faster and better.

All graphics cards, no matter how old or new, benefit from continually updated drivers.

To check your GPU name and specs:

  1. Right-click Desktop
  2. Select Display settings > Advanced display settings
  3. At the bottom, find Display adapter properties

Optimize Windows 10 display settings for improved gaming

You can download driver updates through this window under Properties > Driver > Update Driver. Alternatively, visit the manufacturer’s website to ensure the driver is up to date.

Manufacturers will often provide free gaming and update software to keep your drivers up to date automatically. An example is AMD’s Gaming Evolved client.

For optimal performance, it is highly recommended that you install the chipset and LAN drivers for your motherboard as well. Since these are crucial for optimal gaming performance, this makes sense.

The easiest method to check chipset drivers is to open Windows PowerShell (right-click Start to find it) and enter:

wmic baseboard get product,Manufacturer,version,serialnumber

Your motherboard’s manufacturer and the product name will appear in the command prompt.

List your manufacturer and product name to search for your drivers online. You should find the necessary software on the Support page of the manufacturer’s website.

Along with the chipset drivers, you will also find your on-board LAN drivers for an optimal internet connection.

11. Install DirectX 12 to Optimize for Gaming

DirectX 12, the latest version of Microsoft’s popular API tool, is a key element of Windows 10 gaming.

It delivers support for multiple GPU and CPU cores, better frame rates, lowered power consumption and enhanced graphical effects.

To check if you have the latest version of DirectX:

  1. Open Windows PowerShell
  2. Type dxdiag
  3. Tap Enter

Moments later, you’ll see the DirectX Diagnostic Tool.

Ensure DirectX 12 is installed to ensure game optimizations for Windows 10

Don’t have DirectX 12 installed? There’s a small chance this can happen if you have upgraded from Windows 8.1. Fix this by:

  1. Opening Settings with Windows key + I
  2. Select Update and security
  3. Find Windows Update > Check for updates
  4. Wait while the updates install

DirectX12 will automatically optimize many gaming settings in Windows 10.

Optimize Windows 10 for Gaming With These 11 Tweaks

Windows 10 is a legitimate delight for the modern gamer (and now, so is Linux, thanks to these technologies and services that have saved gaming on Linux.)

With a towering game selection, Xbox One compatibility and software specifically designed for gaming, it’s clear the gamer community has a special place in Windows 10’s future. However, nothing’s perfect. Reach closer to gaming perfection with these Windows 10 gaming optimizations:

  1. Windows 10 Gaming Mode
  2. Disable Nagle’s Algorithm
  3. Use faster DNS servers
  4. Disable automatic updates
  5. Disable Notifications in Windows 10
  6. Prevent automatic updates from Steam
  7. Tweak visual effects for performance
  8. Adjust mouse settings to improve gaming speeds
  9. Use maximum power settings
  10. Keep drivers up to date
  11. Install DirectX 12

Gaming on your laptop? You’ll benefit from these extra tips to improve gaming performance on your Windows 10 laptop. Do you also need a special router for a better gaming experience? Let’s see if gaming routers are worth it.

Read the full article: How to Optimize Windows 10 for Gaming and Performance


How to Use Google Calendar for School: Organize Your Class Schedule


free-calendars-google

One of the most difficult parts of college, besides the homework, of course, is managing a complex and ever-changing schedule. Between classes, extracurricular activities, and a part-time job, you are extremely busy.

An excellent way to start your semester off or even organize it partway is to leverage free tools to help you manage everything on your plate. In this article, you’ll see how to manage your class schedule and get organized for the semester with Google Calendar.

Get Your Schedules and Mark Important Dates

Before you can get organized with Google Calendar, you need to get all your schedules together. Start by locating an official copy of your semester course schedule. You also want schedules for any extracurricular activities, work, or events you plan to participate in during the term.

Get as much information as you can for each of your events to make your schedule as robust as possible. This includes dates, durations, locations, required textbooks, and even teachers. Don’t be afraid to include too much information in this step because you can always remove it later.

And for additional tools, check out these checklist and planner templates just for students.

How to Make a Class Schedule Calendar

Head to Google Calendar, sign in, and start by creating a specific calendar to hold your class schedule. Using an individual calendar gives you the option of toggling it on or off, which can be handy if you have a lot of events.

  1. Click the Main Menu button on the top left if your sidebar is hidden.
  2. Go to Other calendars, click the plus sign, and select Create New Calendar.
  3. Give your calendar a Name, Description, and optionally choose a different Time Zone if needed.
  4. Click Create Calendar.

Google Calendar Create Calendar

When you click the arrow on the top left, you’ll be back on your main calendar page and should see your new calendar in the sidebar. If you want to change the color, click the Options button (three-dots) that appears when you move your cursor over the calendar. Then pick a new color from the palette.

Google Calendar Change Color

How to Add Classes to Google Calendar

The next step is to add your classes to Google Calendar. Head to a date on the calendar when your first class begins and click. This will open the new event window.

Start from the top and add the course Title, choose Event, and then add the start and end times with the Add Time button.

You likely won’t use the Add guests or Add Google Meet options, but you may want to include your school’s Location and add a Description to contain your instructor’s name, the room number, and other pertinent details for the class.

Be sure to choose your class schedule calendar from the dropdown list and then click Save.

Google Calendar New Class Event

Alternatively, you can choose More Options to customize your class event further with the options below. Or you can hit Save now and customize it later by clicking the event on your calendar and selecting Edit Event.

Make Your Classes Repeat

Since your classes will occur regularly, you’ll want to make this a repeating event.

At the top, below the class title, you’ll see Does not repeat. Click that dropdown box and you’ll see some quick options you can pick from like Daily and Weekly on [specific day]. If one of these applies, go ahead and select it but if not, click Custom.

Now you can pick the exact days that this class repeats each week. And at the bottom, you can enter an end date, so the class will stop showing up on your calendar when that day comes.

Google Calendar Repeat Class Event

Click Save when you finish.

Keep adding calendar events and customizing them until your schedule is complete. Don’t forget to include things like your extracurricular activities or work schedule.

Set Up Google Calendar Notifications

A terrific feature of Google Calendar is its notifications. This helps you remember you have a class at a certain time, so you won’t forget, and you won’t (or shouldn’t) be late. You can create notifications for individual class events or for the entire school calendar.

Set Up Event Notifications

If you want to set up different notifications depending on when the class occurs, you can create individual event notifications. Select the event on your calendar and click Edit Event.

On the event detail page, click Add Notification. Select either Notification or Email in the first dropdown box, depending on how you want to receive your alert. Then choose how far in advance of your class you’d like to be notified.

You can add more than one notification too. For example, you can receive an alert one hour before your class starts and another 10 minutes before the start time. Just click Add Notification for each additional alert you’d like to create.

Google Calendar Event Notification

Click Save if you’re finished. You’ll see a popup message asking if you want to change only that event or the others you created for that repeating class. You’ll likely choose the second option for This and following events so that you’ll receive the notification for that class each time. Click OK.

Set Up Calendar Notifications

If you would rather create notifications for your entire school calendar, this is just as simple. And this way, you’ll receive a notification for any event on your calendar, whether a class, activity, or work shift.

Click the Options button next to the calendar and pick Settings and Sharing. Scroll down and you’ll see a few sections for Event Notifications, All-Day Event Notifications, and Other Notifications.

For Event and All-Day Notifications, click Add Notification, choose Notification or Email, and enter the timing for the alert. You can add more than one by clicking Add Notification.

Google Calendar Event and All Day Notifications

For Other Notifications, you can simply choose to receive an email to your connected Gmail account for each of the items listed such as new events, canceled events, or your daily agenda.

Google Calendar Other Notifications

Access Google Calendar On-The-Go

You can always access your calendar from any web browser. But if you’re out and about, you can check out your class schedule in the Google Calendar app on your mobile device.

The Google Calendar app on Android and iOS lets you view and edit your schedule and classes easily. And best of all, it’s available for free.

In addition, you can add attachments. So if you need a paper you wrote for a class, you can attach it to that class event in the app.

Download: Google Calendar for Android | iOS (Free)

Organize Your Semester With a Google Calendar Class Schedule

Although it takes a little time to put it all together, having your school schedule online and on your devices can be a great asset throughout your semester.

For more, here are several free calendars you can add to your Google Calendar and various ways to make Google Calendar your Windows desktop calendar.

Image Credit: Evan Wondrasek/Flickr

Read the full article: How to Use Google Calendar for School: Organize Your Class Schedule


Mount St. Helens


Mount St. Helens

Disney streaming exec Kevin Mayer becomes TikTok’s new CEO


Kevin Mayer, head of The Walt Disney Company’s direct-to-consumer and international business, is departing to become CEO of TikTok, as well as COO of the popular video app’s parent company ByteDance.

Founder Yiming Zhang will continue to serve as ByteDance CEO, while TikTok President Alex Zhu (formerly the co-founder of the predecessor app Musical.ly) becomes ByteDance’s vice president of product and strategy.

“I’m thrilled to have the opportunity to join the amazing team at ByteDance,” Mayer said in a statement. “Like everyone else, I’ve been impressed watching the company build something incredibly rare in TikTok – a creative, positive online global community – and I’m excited to help lead the next phase of ByteDance’s journey as the company continues to expand its breadth of products across every region of the world.”

The news was first reported by The New York Times and subsequently confirmed in announcements from ByteDance and Disney.

Mayer’s role involved overseeing Disney’s streaming strategy, including the launch of Disney+ last fall, which has already grown to more than 50 million subscribers. He was also seen as a potential successor to Disney CEO Bob Iger; instead, Disney Parks, Experiences and Products Chairman Bob Chapek was named CEO in a sudden announcement in February.

Mayer was likely an attractive choice to lead TikTok not just because of his streaming success, but also because hiring a high-profile American executive could help address politicians’ security concerns about the app’s Chinese ownership.

Over at Disney, Rebecca Campbell (most recently president of Disneyland Resort, who also worked on the Disney+ launch as the company’s president for Europe, Middle East and Africa) is taking over Mayer’s role, while Josh D’Amaro is taking on Chapek’s old job as chairman of Disney parks, experiences and products.

In a statement, Chapek said:

As we look to grow our direct-to-consumer business and continue to expand into new markets, I can think of no one better suited to lead this effort than Rebecca. She is an exceptionally talented and dedicated leader with a wealth of experience in media, operations and international businesses. She played a critical role in the launch of Disney+ globally while overseeing the EMEA region, and her strong business acumen and creative vision will be invaluable in taking our successful and well-established streaming services into the future.


Read Full Article

Disney streaming exec Kevin Mayer becomes TikTok’s new CEO


Kevin Mayer, head of The Walt Disney Company’s direct-to-consumer and international business, is departing to become CEO of TikTok, as well as COO of the popular video app’s parent company ByteDance.

Founder Yiming Zhang will continue to serve as ByteDance CEO, while TikTok President Alex Zhu (formerly the co-founder of the predecessor app Musical.ly) becomes ByteDance’s vice president of product and strategy.

“I’m thrilled to have the opportunity to join the amazing team at ByteDance,” Mayer said in a statement. “Like everyone else, I’ve been impressed watching the company build something incredibly rare in TikTok – a creative, positive online global community – and I’m excited to help lead the next phase of ByteDance’s journey as the company continues to expand its breadth of products across every region of the world.”

The news was first reported by The New York Times and subsequently confirmed in announcements from ByteDance and Disney.

Mayer’s role involved overseeing Disney’s streaming strategy, including the launch of Disney+ last fall, which has already grown to more than 50 million subscribers. He was also seen as a potential successor to Disney CEO Bob Iger; instead, Disney Parks, Experiences and Products Chairman Bob Chapek was named CEO in a sudden announcement in February.

Mayer was likely an attractive choice to lead TikTok not just because of his streaming success, but also because hiring a high-profile American executive could help address politicians’ security concerns about the app’s Chinese ownership.

Over at Disney, Rebecca Campbell (most recently president of Disneyland Resort, who also worked on the Disney+ launch as the company’s president for Europe, Middle East and Africa) is taking over Mayer’s role, while Josh D’Amaro is taking on Chapek’s old job as chairman of Disney parks, experiences and products.

In a statement, Chapek said:

As we look to grow our direct-to-consumer business and continue to expand into new markets, I can think of no one better suited to lead this effort than Rebecca. She is an exceptionally talented and dedicated leader with a wealth of experience in media, operations and international businesses. She played a critical role in the launch of Disney+ globally while overseeing the EMEA region, and her strong business acumen and creative vision will be invaluable in taking our successful and well-established streaming services into the future.


Read Full Article

Arm’s financials and the blurring future of the semiconductor sector


Amidst the blitz of SoftBank earnings news today comes the financials for all of SoftBank’s subsidiaries, which includes Arm Holdings, the most important chip design and research company in the world that SoftBank bought for $32 billion back in 2016. Arm produces almost all of the key designs for the chips that run today’s smartphones, including Apple’s A13 Bionic chip that powers its flagship iPhone. In all, 22.8 billion chips were shipped globally last year using Arm licenses according to SoftBank’s financials.

It’s a massively important company, and its finances show a complicated picture for itself — and the semiconductor industry at large.

We sat down with Arm Holding’s CEO Simon Segars last year to discuss the company’s growing appetite for ambitious research, fueled by SoftBank dollars and the bullish vision of the conglomerate’s chairman Masayoshi Son:


Read Full Article

Google is piloting a simpler Nest Hub Max interface at retirement homes


Last week, Mount Sinai showcased how it’s started using Nest devices to monitor patients remotely. Today, Google’s showing off how the Nest Hub Max is helping retirement home residents feel a little less isolated amid the COVID-19 lockdown.

To help matters along, the company is currently testing a simplified interface to make the smart screen easier to operate for less tech savvy residents. Google is currently piloting the device’s use in by handing units out to people at Merrill Gardens in Washington State. They’ll be the first to get a crack at the new UI.

Updates include additional “What can you do” cards serving as shortcuts to common requests like alarms, weather and music. Recipients will also get their devices preloaded with contacts for video calls — likely the primary use, as homes across the country institute social distancing.

“It’s important for seniors’ mental and emotional health to stay connected, and social isolation during this quarantine makes doing that especially hard,” Google’s Molly McHugh-Johnson says in a post. “As I learned with my grandma, Nest Hub Max and Duo video calling can help keep us ‘together’ while we’re apart.”

Retirement and nursing homes have been disproportionately impact during the COVID-19 pandemic. The elderly community in general has been hard hit by the virus, with a mortality rate of three to 11% for ages 65 to 84 and 10 to 27% for ages 85 and up. For that reason it’s become particularly important for communities to enact strong social distancing measures.


Read Full Article