11 February 2020

5 Reasons You Should Use iWork Instead of Microsoft Office


iwork-should-use

Apple’s iWork suite is often overlooked in favor of Microsoft Office. Word, Excel, and PowerPoint form the industry standards; they’re the apps everyone expects to use. But that doesn’t mean Microsoft Office is necessarily better than iWork.

Unlock the "Essential Microsoft Office Shortcuts" cheat sheet now!

This will sign you up to our newsletter

Enter your Email

In fact, the Apple office suite offers some huge benefits over Office. It’s free, easy to use, and syncs over iCloud. Whether you’re an Office veteran or a complete newcomer, iWork is well worth your consideration.

Let’s take a look at why we need to look at a face-off between iWork vs. Office.

1. iWork Is Free

iWork apps in iPad App Store showing as free

This might not matter if you get to use Office for free through your university or workplace, but to freelancers, hobbyists, and anyone else who uses these kinds of apps on a regular basis, the price could be a pretty big deal.

Microsoft does offer its apps for free, but they often have limitations. For example, if you download Microsoft Word on your Mac you can’t edit or create new documents, you can only read existing ones. To unlock everything, you need an active Office 365 subscription, which starts at $70 per year!

Of course, an Office 365 subscription also unlocks access to other apps such as Outlook, Publisher, and Access. But most people don’t need these niche apps anyway.

In contrast, the iWork suite is absolutely free and unrestricted on any Apple device. There are no limitations and Apple even offers free downloads of iWork to owners of older Apple products.

2. iWork Has a Cleaner Interface

Microsoft Office vs Apple iWork user interface

Word, Excel, and PowerPoint are very powerful tools, and their interfaces are jam-packed full of options and menus. This is good if you’re a power user since you have quick access to all the myriad settings you could want.

But most of us don’t need all those options.

Managing references, text elements, and mathematical equations aren’t common concerns for the average Office suite user. And all those extra features result in a messy and distracting user interface.

Microsoft Word and Excel User Interfaces

Apple iWork gets rid of a lot of this clutter in favor of a cleaner look than Microsoft Office. Eliminating all those distractions creates a peaceful environment for productivity and makes the iWork suite just as easy to use as everything else on a Mac.

The top of the Pages window, for example, has Insert, Table, Chart, Text, Shape, Media, and Comment buttons. That’s basically everything you need for word processing. The Numbers and Keynote apps are similarly sparse.

Apple Pages and Numbers User Interface

Looking at side-by-side comparisons of Apple iWork versus Microsoft Office, it is quite startling how big the difference is. iWork is so much cleaner and pleasing to look at. What’s more, many of the same settings are still available in iWork, they’re just kept out of sight in the Format sidebar.

3. Sync to iCloud and Handoff to Other Devices

Apple devices using iWork office suite

Microsoft OneDrive and Apple iCloud have a lot of similarities. They both let you sync your Office or iWork documents so the latest versions are always available online. You can then access them using any device or over the web. But iCloud has the advantage of being deeply integrated into every Apple product, from software to hardware.

Not only can you keep all your Pages, Numbers, and Keynotes documents in iCloud, but you can handoff your documents from one Apple device to another. That means you can handoff from your iPhone to your Mac, and then to your iPad without having to skip a beat. You don’t even need to click Save.

This seamless integration is far more difficult for Microsoft to replicate because there’s no telling which devices you could be using or trying to handoff between.

Pages from iPhone icon in Mac dock showing Handoff

Many of us work across various different devices these days, so having the ability to effortlessly switch between them is a big deal. It’s just another one of the reasons iWork is a more user-friendly office suite than Microsoft Office.

4. Collaboration and Co-Authoring

Add People option from iWork Real Time collaboration

Both suites offer real-time collaboration, so you can work on a document with other people remotely. When it comes to Apple iWork versus Microsoft Office, it’s hard to say which app comes out on top since the features are so similar.

In either office suite, click the Share or Collaborate button from the user interface to send a document invite to one of your contacts. That person can then make real-time changes to your document, which shows up on your screen.

Collaborate button in Pages

This is a valuable feature and it’s useful to know that you won’t sacrifice it by switching to iWork. That said, whoever you want to work with needs to use the same app as you. You can’t collaborate from iWork to Office, for instance.

Since iWork is available free on any Apple product, that might actually make it easier to find people to collaborate with.

iWork has lots of other sharing features built in, too. The Share menu lets you create iCloud links, send the document via Messages, or transfer it to another device using AirDrop. These might not seem like a big deal at first, but if you work with a lot of people who use Macs, you’ll definitely use it.

5. Microsoft Office Compatibility

iWork Pages document with Sharing File Compatibility options

Using any apps other than Microsoft Office always comes with the worry of compatibility issues. Everyone else is likely to still use Office, so how will your app deal with .doc and .docx files? This used to be a big count against Apple’s iWork suite.

But not anymore.

iWork apps have come a long way in their compatibility. These days, they can open, edit, and save files in standard Office formats. By default, they still use iWork file extensions (.pages, .key, .numbers), but you can also save files as .doc, .docx, .xls, .xlsx, .ppt, and .pptx, as well as a few others like .pdf, .csv, and .html.

While you still come across some missing fonts or formatting discrepancies, you aren’t likely to run into any serious problems. You can even use Pages to add comments to a .docx document, which Word users can still read in Microsoft Office.

The big advantage iWork has in this respect is that unlike Office, it also has the option to save them in the iWork format. That means you can always share your files in the most convenient format for whoever you’re sending them to.

Will You Make the Switch?

If you haven’t used iWork before—or if you haven’t used it in a while—you should definitely give it a shot soon. It’s cleaner, more compatible, and easier to use across multiple devices than Office. And unless you’re a real power user, you aren’t even going to miss any features.

There are lots of hidden features in Pages, Numbers, and Keynote. If you do decide to make the switch from Microsoft Office, make sure you learn all the best tips for using Apple iWork instead.

Read the full article: 5 Reasons You Should Use iWork Instead of Microsoft Office


Read Full Article

3 Reasons Why LinkedIn Premium Is Worth Paying For


linkedin-premium

LinkedIn is a great free service that helps you build a professional network. However, if you’ve used LinkedIn, you’ll know that LinkedIn tries to get you to upgrade to LinkedIn Premium on a regular basis. So, is LinkedIn Premium worth paying for?

In this article, we’ll detail everything you need to know about LinkedIn Premium. This includes how much LinkedIn Premium costs, the benefits LinkedIn Premium offers, and whether or not LinkedIn Premium is good value for money.

How Much Does LinkedIn Premium Cost?

LinkedIn Premium has four different price tiers:

  • Premium Career: $29.99/month
  • Premium Business: $59.99/month
  • Sales Navigator Pro: $79.99/month
  • Recruiter Lite: $119.95/month

Just remember that the price of LinkedIn Premium doesn’t include sales tax, which could be applicable where you live. And you can pay annually to save a sizable amount of money.

Each tier offers different features, which we’ll cover later. However, most LinkedIn users will be interested in Premium Career—so you can plan on paying $30/month (or $216/year).

You can get a free trial to try LinkedIn Premium for a month. This will give you a good idea of how the features will help you in your quest to land a new job. Many of the benefits are long-term, though, so do keep that in mind. And remember, Premium user or not, you can use LinkedIn for more than job searches.

LinkedIn Premium Features

Let’s start with the basic Premium Career features:

  • Five InMail messages per month.
  • See how many searches you appeared in and how many people have viewed your profile.
  • Applicant insight.
  • Additional information on posted jobs.
  • Additional salary information.
  • Access to on-demand learning videos.
  • Resume creation with Resume Builder.

The first two features are probably the big draw of Premium Career. Being able to message other users without connecting with them first (or being in the same group) is a huge benefit of LinkedIn Premium.

Here’s what you gain from each level of LinkedIn Premium:

  • Premium Business gives you additional information businesses and unlimited people searches.
  • Sales Navigator Pro gives you advanced search filters and the ability to make notes on user profiles, as well as numerous sales tools.
  • Recruiter Lite gives you guided search smart suggestions, projects, and other recruiting-focused features.

Keep in mind that you can always cancel LinkedIn Premium at any time.

LinkedIn Premium Benefits

Since most readers will be interested in Premium Career, we’ll focus on the benefits of that particular LinkedIn subscription.

In short, Premium Career helps you make connections and find a job. And that’s what could make LinkedIn Premium worth it for you.

If you’re searching for a job, Premium Career’s InMail credits, insight into who looked at your profile, and additional job information will all be very useful.

InMail lets you reach out to people who work at companies you’re interested in without trying to connect with them first. It’s a great tool for networking.

When you view someone’s profile without LinkedIn Premium, you’ll notice a padlock beside the Message button if you haven’t connected with them. With InMail, you won’t see that icon, meaning that you can message them without any connection.

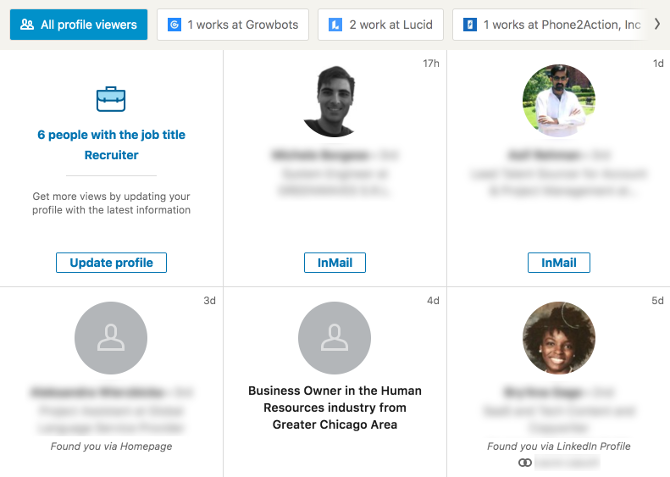
The value of taking a look at who has viewed your LinkedIn profile can’t be overstated. You can connect with those people, reach out to recruiters who have shown interest, or use your InMail credits to offer any help to people who look like they’d be valuable connections.

Additional job information may or may not be useful; when you’re looking through job listings, LinkedIn will tell you if you seem like a good candidate for a particular position.

Job info from LinkedIn Premium

Premium Career has some limitations, though. If you run a lot of people searches in a short period of time, LinkedIn will stop showing you results and tell you to get a Business subscription. And if you’re serious about making connections, you’re going to want more InMail credits.

That’s where the Premium Career vs. Premium Business distinction comes in. With Premium Business you get 15 InMail credits and unlimited people searching. Which is great for making connections. The additional information you can find on businesses may or may not be useful to you.

The next two levels are for sales and recruiting professionals. If you’re considering one of these products, you probably already know quite a bit about it. Segmentation, suggestions, email integration, projects, and other features will be a huge help in doing your job.

Reasons Why LinkedIn Premium Is Worth It

If you’re still not sure if you should pay for LinkedIn Premium, here are three specific reasons to consider:

1. See Who Looks at Your Profile

The first reason is that you get to see the people who looked at your profile. That might not seem like a big deal, but it’s hugely useful for making valuable connections.

Who Viewed Your Profile in LinkedIn Premium

Lots of people are looking at profiles on LinkedIn. Some are recruiters. Others are executives and managers looking to hire. Many are people in your field looking to make professional networking connections. All of these people make LinkedIn Premium worth it.

Even if you’re not looking for a job at the moment, you probably will be at some point in the future. And being well connected with people in your field has a lot of benefits, even outside of job hunting.

When you see that someone looked at your profile, it means they wanted to learn more about you. And that’s reason enough to get in touch, either with an InMail or a connection request. Here’s how to message recruiters on LinkedIn the right way.

2. Get Access to Improved Metrics

LinkedIn Premium Job Application

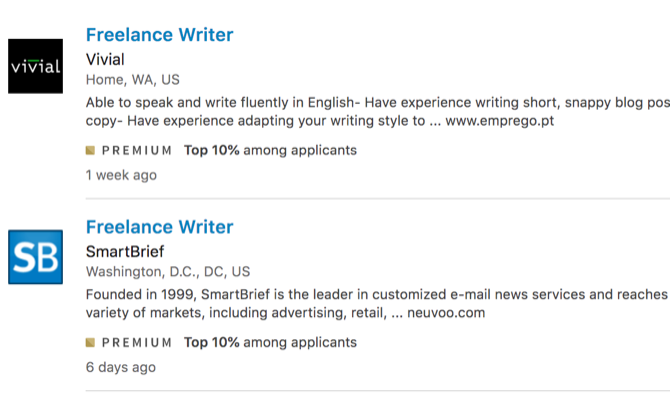
You can use LinkedIn Premium to find out information about your competition when applying for jobs. With Applicant Insight, you can see how many people applied for a position, what qualifications they have, and if your skillset matches up.

These statistics can help you determine what a potential employer is looking for, and if you have a chance at scoring the job.

LinkedIn Premium also gives you the ability to see your search appearances and profile views.

Again, this might not seem like a huge deal. But if you’re trying to improve your LinkedIn profile (and you should be!), it’s a great metric for measuring your success. This means that when you update your LinkedIn profile, you’ll get feedback very quickly on whether or not those changes have worked.

3. Unlock the LinkedIn Premium Badge

LinkedIn Premium Profile Badge

Finally, having a LinkedIn Premium account can improve your standing on LinkedIn. It seems inconsequential, but the little gold icon in your profile and on search results shows that you’re serious about using LinkedIn to build connections.

You might be surprised at how much more seriously people take you when you have that badge. Which makes it worth having when it comes to professional networking and job searching.

Will You Invest in LinkedIn Premium?

Investing in LinkedIn Premium is essentially investing in yourself. If you use it the right way, LinkedIn Premium can help you advance your career and/or find your next job.

Before you start using LinkedIn Premium, you need to make sure your profile is ready to take advantage of it. Start by using these essential LinkedIn profile tips that will help you stand out from the crowd.

Read the full article: 3 Reasons Why LinkedIn Premium Is Worth Paying For


Read Full Article

How to Fix the Inaccessible Boot Device Error in Windows 10


fix-inaccessible-boot-device

Inaccessible boot device errors in Windows 10 aren’t hard to fix. We’ve already explained how to fix one of the most common problems: the “critical process died” stop code. Now it’s time to look at another issue frequently complained about: how to fix an inaccessible boot drive error.

Unlock the FREE "Ultimate Windows Keyboard Shortcuts" cheat sheet now!

This will sign you up to our newsletter

Enter your Email

What exactly causes the issue? How do you know if it’s affecting you? And what can you do to fix it? Keep reading to find out more.

(Note: Some of these solutions will only work if you can still get occasional access to your PC without it crashing.)

What Is the Inaccessible Boot Device Error?

We all know Windows loves to update itself. Often, it’s exciting—especially when a major upgrade rolls around. But your excitement can quickly turn to despair.

Picture the scene. You eagerly wait for Windows to reboot after the upgrade, then BAM! You see a “blue screen of death” (BSOD) with the inaccessible boot drive error message and your computer restarts.

In simple terms, the message means Windows lost its access to the system partition during the startup process.

Although tens of thousands of users saw the code as a result of a 2017 update, the boot device error has a number of possible causes, including BIOS updates and overclocked CPUs. Some users suggest that the problem appears to be more prevalent in computers running an SSD.

Let’s take a look at how you can fix the inaccessible boot device error in Windows 10. Unfortunately, you might need to try several different solutions.

1. Remove Recently-Installed Packages

windows advanced startup

If you believe an update has caused your problem, you need to work through your recently installed packages and remove them one by one. Hopefully, you will eventually delete the update that’s causing the issue.

Note: The following process will restart your machine. Make sure you save any work before continuing.

To begin, open the Settings app and navigate to Update and Security > Recovery > Advanced Startup > Restart Now. After a few moments, a blue screen will pop up. Go to Troubleshoot > Advanced Options > Command Prompt.

Your computer will restart and boot into the Command Prompt app. Once the Command Prompt is on your screen, follow these instructions:

  1. Type dir c: (assuming Windows is installed in the C drive) and press Enter.
  2. Run Dism /Image:c:\ /Get-Packages.
  3. You will see all the packages installed on your system. Use the date field to identify the most recent and make a note of its complete name.
  4. To remove the package, type dism.exe /image:c:\ /remove-package /[package name]. Replace [package name] with the name you noted in the previous step.
  5. Reboot your machine.

If removing the most recent update did not fix your issue and you still see BSODs, repeat the above process with the next most recent update.

2. Remove “Update Pending” Packages

cmd for inaccessible drive

Sometimes, Windows updates get stuck in a strange limbo, forever pending and never installing. These pending updates can cause an inaccessible boot device error.

To remove them, you’ll once again need to open Command Prompt in the advanced startup options by going to Update and Security > Recovery > Advanced Startup > Restart Now > Troubleshoot > Advanced Options > Command Prompt.

When the Command Prompt app is running, run the following three commands. They will delete the SessionsPending registry key. Press Enter after each line:

reg load HKLM\temp c:\windows\system32\config\software
reg delete "HKLM\temp\Microsoft\Windows\CurrentVersion\Component Based Servicing\SessionsPending"/v Exclusive
reg unload HKLM\temp

Next, you need to move any pending updates into their own temporary file. Type dism /image:C:\ /get-packages to get a list of updates. Make a note of any which has the “Install Pending” tag.

Now you need to create a temporary file. Type MKDIR C:\temp\packages and press Enter.

Lastly, move all the pending packages into the temporary file. Type dism /image:c:\ /remove-package /packagename:[package name] /scratchdir:c:\temp\packages and press Enter. Replace [package name] as appropriate.

3. Update Your Drivers

update device drivers Windows Device Manager

If neither of the two fixes we’ve already discussed manages to solve your problem, there are some other generic troubleshooting steps you can try before heading to your local PC repair shop.

Firstly, try and update your drivers. Faulty drivers can be responsible for any number of ailments on your machine. The problem is more likely to present itself if you are using old drivers. In the case of the inaccessible boot device error, the most common culprit is an IDE ATA/SATA controller driver.

There are two ways to check for updates. Firstly, you could check the manufacturer’s website. Secondly, open Device Manager, expand the IDE ATA/SATA controller sub-menu, right-click on Standard SATA AHCI Controller, and select Update Driver.

4. Enable AHCI Mode in the BIOS

Some users have reported that enabling AHCI mode in your system BIOS instantly solves the inaccessible boot drive error.

The BIOS menu can vary considerably between manufacturers, so there’s not a one-size-fits-all way of explaining the process.

However, in general terms, you’ll need to enter the BIOS during boot (typically by press Escape, Delete, or one of the Function keys), head to the Advanced Options menu, find Set AHCI Mode, and change the value to Enabled.

5. Check for a Corrupted Hard Drive

Corrupted files on your hard drive might be the cause of the error. Thankfully, if they are the root of the issue, it’s straightforward to fix.

Firstly, you need to open Command Prompt as an administrator. To do so, press the Windows key, type cmd, right-click on the result and choose Run as administrator.

Within the Command Prompt app, type chkdsk /f /r and press Enter. Wait for the app to process your input, then type Y and press Enter. If you cannot boot Windows, you can also run this command from the recovery console by entering chkdsk /r C: instead.

Other Troubleshooting Solutions

If you’ve still not managed to fix the inaccessible boot device error, you might feel like it’s time to call in a professional.

However, depending on your technical capabilities, there are a couple more things you can try:

  • Open your machine’s chassis and check for loose cables
  • Physically inspect your RAM, motherboard, and hard drive for faults and damage

Lastly, you could try taking the nuclear option and reset Windows 10 back to a clean copy. If you choose this approach, you will lose all your data, so make sure you make a backup of your data before starting.

Read the full article: How to Fix the Inaccessible Boot Device Error in Windows 10


Read Full Article

The 5 Best Design Apps for Designers on a Budget


graphic-designer-apps

Not all designers have the money to spend on expensive hardware and software. Recent design graduates, for example, may not have the resources to compete with their more-established colleagues.

However, there are some crucial pieces of design software and business apps that you must have in order to build up your career and start making money. So how do you do that when you’re broke?

With that in mind, here are the best design apps for designers on a budget. Our list includes the best cheap or free design software you can find online, as well as other apps worth checking out.

1. Canva

Canva Design Software Free

The first design app you absolutely need to get your career off the ground? A basic account with Canva.

We’ve talked about this design software before, pitting Canva vs. Adobe InDesign. While we acknowledge that Canva isn’t the most professional design tool, it’s a great place to start.

Canva is absolutely crucial if you need a design app to hold you over during a budget-induced crunch. This is especially true if you’re looking for an app that can design a logo or handle simple, vector-based art.

While Canva does push its premade templates above all else, you can use its workspace tools to design your own templates from scratch—so long as you stick to Canva’s licensing agreements.

Your ability to design templates can also be added as a workplace skill to your portfolio.

2. GIMP

Gimp Design Software Online Free

The next free design program that you should take a look at if you’re a designer on a budget is GIMP.

GIMP is an open-source image editor. Like Canva, it has an Adobe Creative Cloud equivalent in Photoshop. We have previously pitted GIMP vs. Photoshop, so we recommend that you check that article out.

While GIMP is not as robust as Photoshop, if you’re a designer on a budget it will help you with simple image-editing tasks. You can create gradients, color fills, and flip on-screen elements—the same as you do in Photoshop. GIMP can also handle additional tasks like creating paths, spot healing, and selections.

NB: The learning curve for GIMP can be steep. This is because there are not as many tutorials explaining how to use the program in comparison to Photoshop. Nor is there a dedicated help center.

3. Clip Studio Paint

Clip Studio Paint Design Software

Let’s say GIMP gets the job done, but it doesn’t serve all your needs. Or let’s say you have a small budget to buy design software online, but that budget is not big enough to afford a monthly subscription to Adobe Creative Cloud.

When that happens, another alternative you can use is a mid-sized image editing program like Clip Studio Paint. It’s a tool popular with illustrators for its use of layers, its expansive color palette, and its brush sets.

The best part about this program is that you can buy the standard Paint Pro version for $49.99. There’s also a free trial.

Clip Studio Paint is about as cheap as you’ll get for an industry-standard tool, and works well for anyone who is more involved in the art-focused side of designing.

4. Google Slides

Google Slides Design App

Do you need to put together a slideshow for a business proposal, but don’t have access to a subscription-based program like Microsoft PowerPoint? Try Google Slides, which is a presentation-focused design app that is free-to-use and connected to your Google Drive account.

Google Slides allows you to create amazing presentation decks from scratch for a variety of different purposes. You can use Google Slides to make charts, add animated GIFs to your slides, or recolor objects and images that might not be up to standard for your work.

To learn more about the program, read our article detailing how to create a presentation in Google Slides.

5. Gmail

Gmail for Business

Another thing you’ll need as a freelance or contract designer is a dedicated, reliable email service. No ifs or buts.

It goes without saying that everyone needs an email address, but if you’re a designer you’ll need a work-oriented one, too. This is so you can reach out to potential clients and apply for jobs.

Luckily, you can use Gmail for this task. With GSuite for Business, you can also turn your @gmail.com address into one that is associated with your website. This will give your emails an air of consistency and professionalism for a relatively inexpensive cost.

Pricing plans vary, and can be billed per month.

Pro-Tip: Buy a Drawing Tablet!

Drawing Tablet for Designers

Having recommended a bunch of must-have apps for designers on a budget, we now turn our attention to the essential hardware. With a drawing tablet being THE one piece of equipment all designers need, regardless of budget.

This is extra important if you’re working in an art-focused field like illustration or animation.

A drawing tablet will make it much easier to create unique designs on your laptop or desktop computer. The lifespan on these tablets tends to be very long too. For example, I had my first tablet for approximately six years before I decided to upgrade to a bigger and better one.

Good, industry-standard tablets can cost a lot of money, so, if you’ve got a limited budget, there’s a high chance you’ll be priced out. However, there are a few starter tablets that will still do the trick.

Here’s a list of the best drawing tablets for digital artists to help you get started.

These Design Apps Will Help You Get Started

Being a designer on a budget is definitely not fun. When you’re first starting out in this field, your inability to afford the programs that you need can feel like it’s negatively affecting your career.

However, these apps will help you get through a rough patch or two, at least in the beginning. And once you have a bigger budget at your disposal, you can upgrade to bigger and better programs.

Looking for more information on working within a budget? Then check out the best apps to create fast graphic designs.

Read the full article: The 5 Best Design Apps for Designers on a Budget


Read Full Article

JavaScript Arrow Functions Can Make You a Better Developer


javascript-arrow-functions

JavaScript ES6 brought exciting changes to the world of web development. New additions to the JavaScript language brought new possibilities.

One of the more popular changes was the addition of arrow functions into JavaScript. Arrow functions are a new way to write JavaScript function expressions, giving you two different ways to create functions in your app.

Arrow functions take a little bit of adjusting if you’re an expert in traditional JavaScript functions. Let’s take a look at what these are, how they work, and how they benefit you.

What Are JavaScript Arrow Functions?

Arrow functions are a new way to write function expressions that were included in the release of JavaScript ES6. They are similar to the JavaScript function expressions you’ve been using, with some slightly different rules.

Arrow functions are always anonymous functions, have different rules for this, and have a simpler syntax than traditional functions.

These functions use a new arrow token:

=>

If you’ve ever worked in Python, these functions are very similar to Python Lambda expressions.

The syntax for these functions is a little cleaner than normal functions. There are a few new rules to keep in mind:

  • The function keyword is removed
  • The return keyword is optional
  • Curly braces are optional

There are a lot of little changes to go over, so let’s begin with a basic comparison of function expressions.

How to Use Arrow Functions

Arrow functions are easy to use. Understanding arrow functions is easier when compared side by side with traditional function expressions.

Here is a function expression that adds two numbers; first using the traditional function method:

 let addnum = function(num1,num2){
    return num1 + num2;
};

addnum(1,2);
>>3

It’s a pretty simple function that takes two arguments and returns the sum.

Here is the expression changed to an arrow function:

let addnum = (num1,num2) => { return num1 + num2;};

addnum(1,2);
>>3

The function syntax is quite different using an arrow function. The function keyword is removed; the arrow token lets JavaScript know you’re writing a function.

The curly braces and the return keyword are still there. These are optional with arrow functions. Here’s an even simpler example of the same function:

let addnum = (num1,num2) => num1 + num2;

The return keyword and the curly braces are now gone. What is left is a very clean one-line function that is nearly half the code as the original function. You get the same result with much less written code.

There’s more to arrow functions. let’s dive deeper so you get a better feel for what they can do.

Arrow Function Features

Arrow functions have many different uses and features included.

Regular Functions

Arrow functions can use one or more arguments. If you’re using two or more arguments you must enclose them in parenthesis. If you only have one argument, you don’t need to use parenthesis.

let square = x => x * x

square(2);
>>4

Arrow functions can be used with no arguments. If you’re not using any arguments in your function, you must use empty parenthesis.

let helloFunction = () => Console.log("Hello reader!");

helloFunction();
>>Hello reader!

Simple functions like these use much less code. Imagine how much easier a complex project like a JavaScript slideshow becomes when you have a simpler way to write functions.

Using This

The concept of this tends to be the trickiest part of using JavaScript. Arrow functions make this easier to use.

When you use arrow functions this will be defined by the enclosing function. This can create problems that come up when you create nested functions and need this to apply to your main function

Here’s a popular example that shows the workaround you have to use with regular functions.

function Person() {
  var that = this; //You have to assign 'this' to a new variable
  that.age = 0;

  setInterval(function growUp() {
    that.age++;
  }, 1000);
}

Assigning the value of this to a variable makes it readable when you call a function inside of your main function. This is messy, here’s a better way to do this using arrow functions.

function Person(){
  this.age = 0;

  setInterval(() => {
    this.age++; // Now you can use 'this' without a new variable declared
  }, 1000);
}

While they are great for functions, they should not be used to create methods inside an object. Arrow functions don’t use the right scoping for this.

Here’s a simple object that creates a method inside using an arrow function. The method should reduce the toppings variable by one when called. Instead, it does not work at all.

let pizza = {
toppings: 5,
removeToppings: () => {
     this.toppings--;
   }
}
//A pizza object with 5 toppings
>pizza
>>{toppings: 5, removeToppings: f}

pizza.removeToppings(); //The method will not do anything to the object

>pizza
>>{toppings: 5, removeToppings: f} //Still has 5 toppings

Working With Arrays

Using arrow functions you can simplify the code used to work with array methods. Arrays and array methods are very important parts of JavaScript so you will use them a lot.

There are some useful methods like the map method which runs a function on all elements of an array and returns the new array.

let myArray = [1,2,3,4];
myArray.map(function(element){
return element + 1;
});

>> [2,3,4,5]

This is a pretty simple function that adds one to every value in the array. You can write the same function with less code by using an arrow function.

let myArray = [1,2,3,4];
myArray.map(element => {
return element + 1;
});

>> [2,3,4,5]

It’s much easier to read now.

Creating Object Literals

Arrow functions can be used to create object literals in JavaScript. Regular functions can create them, but they’re a little longer.

let createObject = function createName(first,last) {
     return {
        first: first,
        last: last
     };
};

You can make the same object with an arrow function using less code. Using arrow notation you will need to wrap the function body in parenthesis. Here’s the improved syntax with arrow functions.

let createArrowObject = (first,last) => ({first:first, last:last});

JavaScript Arrow Functions and Beyond

You now know some different ways JavaScript arrow functions make your life easier as a developer. They shorten syntax, give you more control using this, make objects easier to create and give you a new way to work with array methods.

The introduction of arrow functions, along with many other features, in JavaScript ES6 shows just how important JavaScript has become in web development. There’s so much more you can do though.

Want to learn more about JavaScript? Our JavaScript cheat sheet provides valuable information and learning more about how JavaScript works can make you a better developer.

Read the full article: JavaScript Arrow Functions Can Make You a Better Developer


Read Full Article

How to Use the Windows Snipping Tool for Your Screenshots


windows-snipping-tool

Need to capture a screenshot of your Windows desktop? Don’t use the slow Print Screen method—there’s a much easier way by using the Snipping Tool.

Unlock the FREE "Ultimate Windows Keyboard Shortcuts" cheat sheet now!

This will sign you up to our newsletter

Enter your Email

We’ll show you how to use the Snipping Tool in Windows to capture and edit screenshots.

How to Open the Snipping Tool in Windows

The easiest way to open the Snipping Tool is by searching for it in the Start Menu. On Windows 7 or Windows 10, click the Start button at the bottom-left or press the Windows key on your keyboard. Then start typing snipping and hit Enter when it appears to open it.

Windows Open Snipping Tool

On Windows 8.1, hit the Windows key on your keyboard to open the Start screen. From here, you can type snipping and click the app to launch it.

Once you have it open, you may want to right-click on the Snipping Tool icon at the bottom of your screen and choose Pin to taskbar for easy access.

While we’ll focus on using the Snipping Tool in Windows 10 here, we’ll mention small differences in older versions of Windows where applicable.

How to Use the Snipping Tool to Capture Screenshots

Once you’ve opened the Snipping Tool, you’ll see a simple window. To capture a screenshot, you’ll first want to choose a mode. On Windows 10, use the Mode dropdown to choose one. Older versions of Windows show these under the arrow next to New.

Windows Snipping Tool Home

The Snipping Tool offers four capture options:

  • Free-form Snip: Allows you to draw a freehand shape.
  • Rectangular Snip: Draw a box around an element to capture it.
  • Window Snip: Capture an entire app window.
  • Full-screen Snip: Take a screenshot of your entire display (including multiple monitors).

If you choose one of the first two options, you’ll need to use your mouse to draw around the part of the screen you want to capture. With Window Snip, mouse over the window you want to capture and click. Full-screen Snip instantly captures your entire desktop.

Which you should use depends on your needs. For instance, Window Snip is great for capturing dialog boxes containing errors, while Rectangular Snip lets you decide exactly what to capture.

Taking Delayed Screenshots

In Windows 10, you can also capture screenshots on a delay using the Snipping Tool. This is useful for grabbing images of context menus that disappear when you click again.

To use them, click the Delay button and choose between one and five seconds. Then, when you hit New to start a snip, the tool will wait before showing the capture prompt. This allows you to open a menu or prepare an app for screenshotting.

How to Edit Screenshots in the Snipping Tool

Once you capture a screenshot, it will open in the Snipping Tool so you can edit if needed. If you’re unhappy with what you grabbed, click New to start over.

Snipping Tool Capture

The Snipping Tool only has a few tools for editing. Click the Pen to draw on the image. Use the dropdown menu next to this tool to change the color or customize the thickness.

You also have access to a Highlighter, which makes it easy to point out the focus of an image. Simply select it and use your mouse to highlight points of interest in the snip.

If you decide to remove any pen or highlighter marks, use the Eraser to remove them. Click and hold, then move your cursor over markings to erase them. There’s unfortunately no Undo function in the Snipping Tool, so you’ll have to rely on this.

For more options, click the multicolored apostrophe-looking icon at the far-right of the toolbar. This will open your snip in Paint 3D, a default Windows 10 app with additional editing capabilities. There you can crop the snip, add text or shapes, and much more.

Paint 3D Screenshot Edit

Save and Share Screenshots From the Snipping Tool

Once you’re happy with your snip, you can save the image or send it via email. Click the Save icon to choose a location on your computer for the file. The default format is PNG, which is usually best for screenshots.

Click the Copy option to place the image on your clipboard. From there, you can paste it (using Ctrl + V) anywhere you like. In addition, you can click the Email button to send the snip in your default mail client. Use the arrow to select Email Recipient (as attachment) instead if you prefer.

If you need a hard copy of the snip, press Ctrl + P to open the Print dialog.

Review the Snipping Tool Options

When you open the Snipping Tool (or under the Tools menu in the snip editor), you’ll see an Options button. This lets you change a few ways that the Snipping Tool works, though you shouldn’t need to worry about them in most cases.

Windows Snipping Tool Options

You can use Hide instruction text to remove the hints that appear in a new Snipping Tool window. We recommend keeping Always copy snips to the Clipboard enabled so you can share them easily without copying manually. And Prompt to save snips before exiting will keep you from accidentally losing a snip.

If you’d like, you can also change the Ink color used in snips. For most people, leaving the default options as shown above will work fine.

Try Snip & Sketch in Windows 10

That’s really all there is to using the Snipping Tool in Windows. However, if you use Windows 10, you might have noticed that the Snipping Tool window advertises the newer Snip & Sketch method for taking screenshots.

This is a Store app that adds a few features over the Snipping Tool, including a proper Snipping Tool shortcut. We definitely recommend using it over the Snipping Tool if you’re on Windows 10.

To open it, search for snip sketch using the Start Menu, like before. You’ll be greeted with an interface that’s similar to the Snipping Tool. Use New to start a new snip (click the adjacent arrow to set a delay), then you’ll see four icons at the top of your screen. These match the four capture modes we discussed earlier.

Windows 10 Screenshot Shortcut Toolbar

To capture snips faster, you should know the Snipping Tool shortcut for Snip & Sketch on Windows 10. Press Win + Shift + S to open the screenshot capture tool from anywhere on your system.

After capturing a snip, you can edit it. If you launched the app with the keyboard shortcut, click the notification that appears to load the editor.

Editing With Snip & Sketch

Windows 10 Snip Sketch Editor

In the Snip & Sketch editor, use the icons at the top to select a Pen, Pencil, or Highlighter, each with varying color and thickness options. In addition to the Eraser, you can use the Undo and Redo buttons (or Ctrl + Z and Ctrl + Y keyboard shortcuts).

Along the toolbar, you’ll also find a Ruler and a Protractor for measuring distance and angles. A Crop tool rounds out the enhancements that Snip & Sketch has over the Snipping Tool.

When you’re done editing, Snip & Sketch has more options under the Share button as well. This lets you send an image to other apps on your PC. To continue editing the image elsewhere, click the three-dot Menu button and choose Open with.

Alternative Free Snipping Tools

While it gets the job done, the Snipping Tool isn’t great for advanced use. Snip & Sketch is better, but you have far superior options if you capture screenshots all the time.

Take a look at our list of the best screenshot tools for Windows. These alternative tools provide additional capture options, more advanced editing capabilities, and easier ways to share your screenshots. They’re worth installing if you want to go beyond the basics described here.

You’re Fully Acquainted With the Windows Snipping Tool

Now you know how to snip in Windows with Microsoft’s built-in Snipping Tool. Taking clear screenshots is a skill everyone should have: they’re much more useful than a description alone and far clearer than a photo of the screen.

If you need to enhance your screenshots on a system with no dedicated software, check out how to edit screenshots in Microsoft Paint.

Read the full article: How to Use the Windows Snipping Tool for Your Screenshots


Read Full Article

10 February 2020

Daily Crunch: MWC faces coronavirus concerns


The Daily Crunch is TechCrunch’s roundup of our biggest and most important stories. If you’d like to get this delivered to your inbox every day at around 9am Pacific, you can subscribe here.

1. As top exhibitors pull out of MWC, organizers implement stringent safeguards

A couple of weeks before the event, the organizers of Mobile World Congress have issued some fairly sweeping safeguards over growing concerns around the coronavirus. After a number of high-profile back-outs, the organizers announced a ban of visitors originating from the Hubei province, whose capital Wuhan is believed to be the origin of the epidemic.

Following this news on Sunday, Sony and Amazon also pulled out of MWC.

2. NASA and ESA’s Solar Orbiter begins its nearly two-year journey to the Sun

After years of development, an exciting new scientific research spacecraft has launched on its journey to study our solar system’s central player: the Sun.

3. Netflix’s movies only won two Oscars this year

Two Oscars — Best Actress in a Supporting Role for Laura Dern’s performance in “Marriage Story” and Best Documentary Feature for “American Factory” — are a respectable showing for a studio that only started making movies a few years ago. Yet it still feels like a disappointment, given Netflix’s 24 nominations and its aggressive Oscar campaigns.

4. Starling Bank raises another £60M from existing backers

Starling Bank, the U.K.-based challenger bank founded by banking veteran Anne Boden, has raised another £60 million from its existing investors, Merian Global Investors and Harry McPike’s JTC. Starling is also disclosing that customers have opened 1.25 million consumer and business accounts since its banking app launched in May 2017.

5. The team behind Apple’s ‘Mythic Quest’ says video games aren’t the punch line

When video game publisher Ubisoft first approached “It’s Always Sunny in Philadelphia” stars Rob McElhenney and Charlie Day about creating a new show set in the game industry, McElhenney said they weren’t interested — at least not initially. But a visit to Ubisoft’s Montreal office changed his mind.

6. Index Fund’s portfolio is driving long-overdue innovation in femcare

We chatted with Index principal Hannah Seal about the fund’s investment in tampon startup Daye and her broader thoughts on a new generation of female-focused startups. (Extra Crunch membership required.)

7. This week’s TechCrunch podcasts

The Equity team has some thoughts about Casper’s IPO, as well as the strong post-IPO performance of One Medical. And over on Original Content, we review Netflix’s Taylor Swift documentary “Miss Americana” — even if you’re not a Swiftie, I think we had a fun conversation about celebrity culture.


Read Full Article

Elon Musk tweets out #DeleteFacebook, saying ‘it’s lame’


Facebook receives plenty of pointed criticism from numerous corners, including for refusing to police political speech on Facebook, its seemingly endless string of privacy breaches and its apparent coziness with the Trump administration.

One of the platform’s most prominent critics, somewhat unexpectedly, is comic, writer and actor Sacha Baron Cohen. Indeed, his powerful speech to the Anti-Defamation League in November, characterizing Facebook as the “greatest propaganda machine in history,” quickly went viral. (We republished it here.)

Cohen isn’t done railing against Zuckerberg, however. Last Wednesday, he tweeted in frustration, “We don’t let 1 person control the water for 2.5 billion people. We don’t let 1 person control electricity for 2.5 billion people. Why do we let 1 man control the information seen by 2.5 billion people? Facebook needs to be regulated by governments, not ruled by an emperor!”

On Saturday morning, Tesla founder Elon Musk responded to Cohen, himself tweeting “#DeleteFacebook it’s lame.”

It was short, sweet and to the point (and presumably buoyed Cohen).

One might imagine that Musk, who has always spoken his mind, has been emboldened of late thanks to the skyrocketing value of Tesla. But Musk has long been a critic of Facebook, tweeting in 2018 after deleting his companies’ Facebook pages that he doesn’t “like Facebook. Gives me the willies. Sorry.”

Musk and Zuckerberg have butted heads in the past over the future of artificial intelligence, too. In 2014, Musk reportedly met with Zuckerberg, researchers from Facebook’s AI lab and two other Facebook executives at Zuckerberg’s Palo Alto home in an effort to convince Musk that he was wrong about the potential dangers of AI. Musk wasn’t persuaded, calling Zuckerberg’s understanding of the future of AI “limited” in 2017.


Read Full Article

Imaginative sculptures that explore how we perceive reality | Alicia Eggert

Imaginative sculptures that explore how we perceive reality | Alicia Eggert

TED Fellow Alicia Eggert takes us on a visual tour of her work -- from a giant sculpture on an uninhabited island in Maine to an installation that inflates only when people hold hands to complete an electric current. Her work explores the power of art to inspire wonder and foster hope in dark times. As she puts it: "A brighter, more sustainable, more equitable future depends first on our ability to imagine it."

Click the above link to download the TED talk.

Web traffic increases in 2019 were driven by mobile; top 100 sites saw average of 223B monthly visits


Mobile adoption around the world is having a significant impact on the web’s traffic. According to a new report from SimilarWeb, out today, mobile web traffic has jumped 30.6% since 2017, while desktop traffic dropped 3.3%. But it’s not just the numbers that are changing. Mobile visitors also behave differently from their desktop web counterparts, staying on pages for shorter periods of time, for example, which is impacting core metrics web publishers today track.

The report found that 2019’s total web traffic to the top 100 sites was up 8% from 2018, and up 11.8% over 2017, averaging 223 billion visits per month. The largest increases were in April and June 2019, when traffic was up by more than 10% over the same time in 2018.


Mobile is driving these traffic increases, but mobile visitors don’t stay as long on the site. Across platforms, the overall time spent on websites has dropped by 49 seconds from 2017 to 2019, the report found.

In addition, mobile has become the platform of choice for visiting certain categories of websites. Mobile traffic dwarfs desktop on adult sites, gambling sites, food & drink, pets & animals, health, community & society, sports, and lifestyle. And over the years, other categories shifted to become more mobile as well — including news and media, vehicle sites, travel, reference, finance, and others.

But not all categories are doing well, despite the shift to mobile.

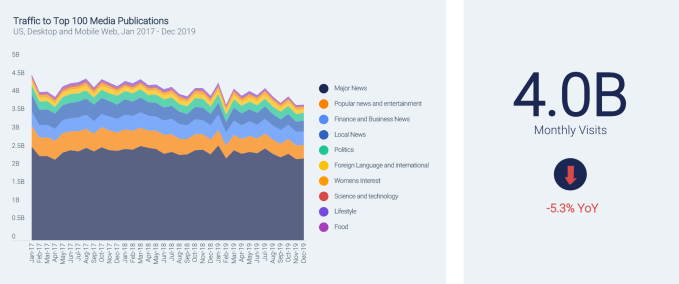
News sites, for instance, were losing traffic. The report found that traffic to the top 100 media publications is down 5.3% year-over-year from 2018 to 2019 (a loss of 4B visits), and down by 7% since 2017.

These decreases impact all sorts of media categories, with popular news, entertainment news, and local news all showing decreases of over 25%. Only business & finance and women’s interest news categories saw any increases, the report said.

The increase in mobile traffic is also helping the biggest sites on the web grow larger, helping to further cement their position on today’s internet. The top 10 biggest sites saw a total of 167.5 billion monthly visits in 2019, up 10.7% over 2018. The remaining 90 biggest sites out of the top 100 only saw a 2.3% increase, by comparison.

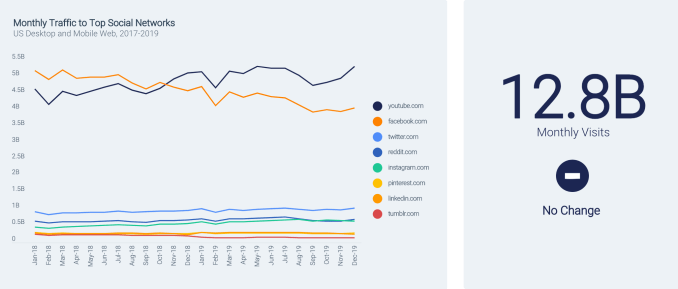
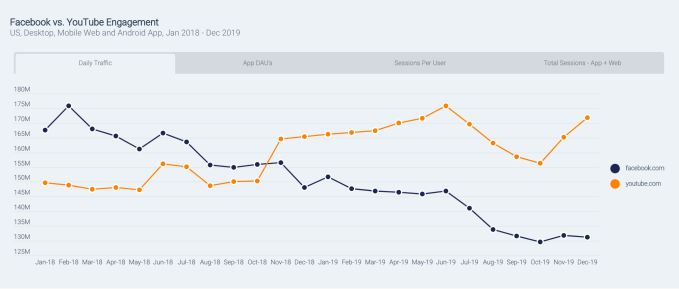
Google’s move to consolidate traffic to its core domain increased traffic to google.com helped to increase its numbers and YouTube grew as well. However, Facebook’s troubles were reflected in its numbers as it lost 8.6% of traffic over the past year alone. The report theorized that some of its lost traffic went to YouTube, which could inform Facebook’s heavier focus on video in recent years. That said, Facebook’s investments in mobile helped it grow elsewhere — both Instagram and WhatsApp saw their web traffic grow up to 74% year-over-year.

Also on the decline were Yahoo, which lost 33.6% of its 2017 traffic, and Tumblr, which banned adult sites in 2018, leading to a 33% loss in traffic.

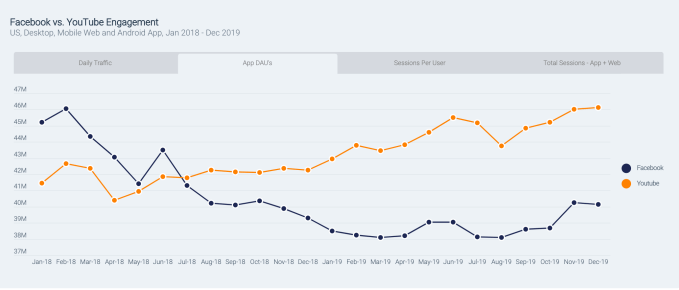
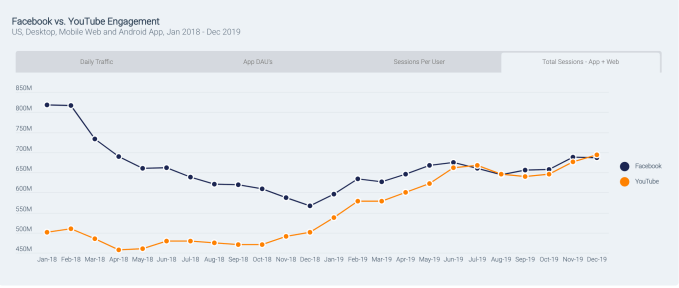
Facebook fought off the web traffic declines and related declines in app usage by re-engaging existing users in 2019, which helped it to increase the total number of app sessions throughout the year. YouTube uses a similar tactic to increase its own app engagement figures, leading to a close tie between the two on this metric.

The data for the report was gathered from January 2017 to December 2019, and tracked desktop and mobile web traffic, as well as Android app use.

The full report, available here, also dug into specific categories, like shopping, travel, finance, messaging, and more.


Read Full Article