03 June 2020

Facebook strikes global licensing deal with Indian music label Saregama


Facebook said on Wednesday it has entered into a global deal with Saregama, one of India’s oldest and largest music labels, to license its music for video and other social experiences across its eponymous service and Instagram.

The partnership, which comes weeks after Swedish music giant Spotify also signed a deal with Saregama, will allow users to choose from a wide variety of music to add to their social experiences such as videos, stories via music stickers and other creative content, Facebook said. Users will also be able to add songs to their Facebook profile.

Saregama, one of the oldest music labels in the world, is the best place to find tracks from several India music legends, including Lata Mangeshkar, R.D. Burman, Mohammed Rafi, Talat Mahmood, Manna Dey, Kalyanji-Anandji and Hemant Kumar. The giant says its library contains more than 100,000 Bollywood songs, ghazals and more in over 25 languages.

Kolakata-based Saregama’s shares surged by 20% on the news.

Facebook maintains similar deals with other music labels in India, its biggest market by user count, including Yash Raj Films, Zee Music Company and T-Series, one of the top YouTube channels worldwide. Bloomberg reported last year that Facebook was also in talks with international music labels and had started testing video music in India and Indonesia.

“At Facebook, we believe music is an integral part of self-expression and bringing people closer together and creating memories that last. We are very proud to partner with Saregama that will allow people on our platforms, globally, to use their favourite retro Indian music to further enrich their content on our platforms,” said Manish Chopra, director and head of Partnerships at Facebook India, in a statement.

Facebook has also signed deals with music labels such as Universal Music Group to license its recorded music and publishing catalogs for video and other content across its services, including Oculus. In 2018, Facebook also signed a deal with Spotify to allow users to share Spotify albums and tracks to Instagram Stories — a feature it added to Facebook Stories last year.


Read Full Article

The link between climate change, health and poverty | Cheryl Holder

The link between climate change, health and poverty | Cheryl Holder

For the poor and vulnerable, the health impacts of climate change are already here, says physician Cheryl Holder. Unseasonably hot temperatures, disease-carrying mosquitoes and climate gentrification threaten those with existing health conditions, while wealthier people move to higher ground. In an impassioned talk, Holder proposes impactful ways clinicians can protect their patients from climate-related health challenges -- and calls on doctors, politicians and others to build a care system that incorporates economic and social justice.

Click the above link to download the TED talk.

Watchful is a mobile product intelligence startup that surfaces unreleased features


Meet Watchful, a Tel Aviv-based startup coming out of stealth that wants to help you learn more about what your competitors are doing when it comes to mobile app development. The company tries to identify features that are being tested before getting rolled out to everyone, giving you an advantage if you’re competing with those apps.

Mobile app development has become a complex task, especially for the biggest consumer apps, from social to e-commerce. Usually, mobile development teams work on a new feature and try it out on a small subset of users. That process is called A/B testing as you separate your customers in two buckets — bucket A or bucket B.

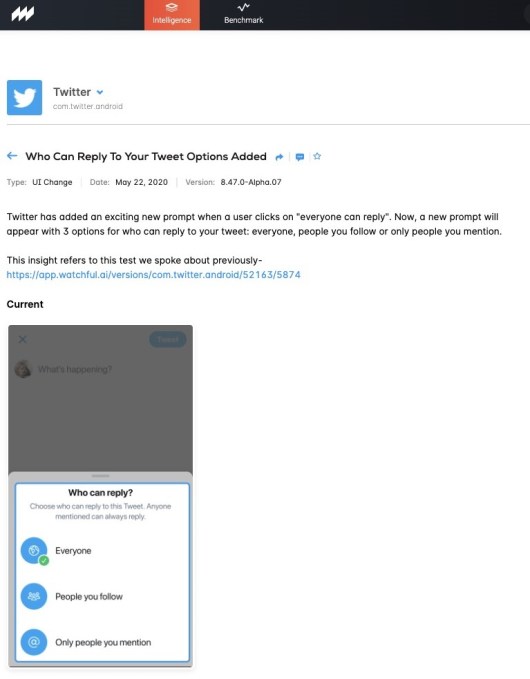
For instance, Twitter is trying out its own version of Stories called Fleets. The company first rolled it out in Brazil to track the reaction and get some data from its user base. If you live anywhere else in the world, you’re not going to see that feature.

There are other ways to select a group of users to try out a new feature — you could even take part in a test because you’ve been randomly picked.

“When you open the app, you’ll probably see a different version from the app I see. You’re in a different region, you have a different device,” co-founder and CEO Itay Kahana told me. He previously founded popular to-do app Any.do.

For product designers, it has become a nightmare as you can’t simply open an app and look at what your competitors are doing. At any point in time, there are many different versions of the same app as there are multiple A/B tests going on at the same time.

Watchful lets you learn from competition by analyzing all those different versions and annotating changes in user flows, flagging unreleased features and uncovering design changes.

It is different from other mobile intelligence startups, such as App Annie or Sensor Tower. Those services mostly let you track downloads and rankings on the App Store and Play store to uncover products that are doing well.

“We’re focused on everything that is open and visible to the users,” Kahana said.

Like other intelligence startups, Watchful needs data. App Annie acquired a VPN app called Distimo and a data usage monitoring app called Mobidia. When you activate those apps, App Annie captures data about your phone usage, such as the number of times you open an app and how much time you spend in those apps.

According to a BuzzFeed News report, Sensor Tower has operated at least 20 apps on iOS and Android to capture data, such as Free and Unlimited VPN, Luna VPN, Mobile Data and Adblock Focus. Some of those apps have been removed from the stores following BuzzFeed’s story.

I asked a lot of questions about Watchful’s source of data. “It’s all real users that give us access to this information. It’s all running on real devices, real users. We extract videos and screenshots from them,” Kahana said.

“It’s more like a panel of users that we have access to their devices. It’s not an SDK that is hidden in some app and collects information and do shady stuff,” he added.

You’ll have to trust him as the company didn’t want to elaborate further. Kahana also said that data is anonymized in order to remove all user information.

Images are then analyzed by a computer vision algorithm focused on differential analysis. The startup has a team in the Philippines that goes through all that data and annotates it. It is then sent to human analysts so that they can track apps and write reports.

Watchful shared one of those reports with TechCrunch earlier this year. Thanks to this process, the startup discovered that TikTok parent company ByteDance has been working on a deepfake maker. The feature was spotted in both TikTok and its Chinese sister app Douyin.

But Watchful’s customers aren’t news organizations. The company sells access to its service to big companies working in the mobile space. Kahana didn’t want to name them, but it said it is already working with “the biggest social network players and the biggest e-commerce players, mainly in the U.S.”

The startup sells annual contracts based on the number of apps that you want to track. It has raised a $3 million seed round led by Vertex Ventures.


Read Full Article

C4 Ventures raises $88M fund for for post-Series A startups, in a post-COVID19 world


C4 Ventures, the Paris-based VC, has raised a new €80 million ($88 million) “Fund II”. The fund was founded by Pascal Cagni, a former Europe boss of Apple, and includes cofounder Raph Crouan, another Apple alumni previously with Techstars and Hardware Club. C4 is designed to be a “post-Series A” fund and normally invests around €3-4 million euros.

The new fund is described as a “boutique” VC which will focus on tech which will thrive in “post-Covid” world. Recruited by the late Steve Jobs, Cagni started the fund within months of leaving Apple, but the firm didn’t become significant until 2014. Outside of business, Cagni is an “ally” to President Emmanuel Macron and has worked on several initiatives to boost France’s technology and entrepreneurship sectors.

Cagni, who was head of Apple in Europe from 2000 to 2012, said: “Having witnessed first-hand technology’s unique power to drive real-time behavioral change, we believe that, although Covid-19 is going to bring about an economic slowdown, it is also going to be a breeding ground for innovation and change through disruptive tech,” said Pascal Cagni. “We felt confident that we should, as planned, raise and deploy capital during this period.”

Fund II has a good head start, having invested in seven companies which will be able to adapt to a Post-Covid world including:

• Zoov, a French electric bike-sharing platform

DriveNets, a software company adapting the cloud model to networking, allowing consumer service providers to scale up for lower costs.

• Trouva, a European online homeware marketplace helping independent local shops scale their offers online.

C4 has previously invested in include Nest, the smart thermostat company acquired by Google for $3.2 billion, and Graphcore, an AI chip start-up now valued at over $2 billion. But it also put cash into Anki, a consumer robotics company that went bust last year after raising around $200 million.


Read Full Article

Intraday Trading Calls for 4-June-2020

Intraday Trading Calls for 4-June-2020

Please click on the following link to view full post.

https://marketctl.blogspot.com/2020/06/intraday-trading-calls-for-4-june-2020.html

Via https://marketctl.blogspot.com/

Asterisk In Notepad Title Bar In Windows 10


CLICK HERE TO SEE FULL POST

The other day, while jotting down something in Notepad, I noticed something new. Notepad was showing an asterisk in the title bar just before the file name. For a moment, I wondered what the asterisk was doing in the title bar. A quick web search brought me to the official Windows team blog, which revealed […]

The post Asterisk In Notepad Title Bar In Windows 10 appeared first on Into Windows. Content from IntoWindows website.


The 4 Best Windows Screenshot Apps and Tools


windows-perfect-screenshot

A good screenshot app is an essential part of your Windows toolkit. Screenshots let you capture funny moments as well as important information, or document problems to show others.

But what is the best screenshot tool for Windows? Let’s look at several top screengrab options and see which is best for your needs.

1. The Best Basic Screenshot Tool: Snipping Tool / Snip & Sketch

Windows Snipping Tool Home

If you’re using a computer where you can’t download any software or just need a basic screenshot, Windows has two built-in tools for taking screenshots that will serve you well.

The Snipping Tool, available from Windows 7 onward, is the classic version. It lets you capture screenshots in several modes and provides a few simple markup tools.

On Windows 10, we recommend using the newer Snip & Sketch tool, which is accessible anywhere thanks to a keyboard shortcut. It also features a few enhancements over the Snipping Tool. See our guide to the Snipping Tool to master using both of these apps.

Windows 10 Snip Sketch Editor

If you rarely take screenshots, these might be enough for you. But for frequent use, especially if you need to mark up your shots after taking them, we highly recommend checking out a better screen capture tool.

2. The Best Free Screen Capture Tool for Most People: PicPick

PicPick Home

PicPick is an excellent choice for anyone who needs more than the Snipping Tool can provide. It’s free for personal use and includes several features to improve your screenshot process.

The interface for PicPick looks quite similar to Microsoft Office apps, making it familiar for anyone who’s used the Office suite. It includes more screen capture options than Snip & Sketch.

For instance, Scrolling Window lets you capture long webpages all at once instead of having to stitch multiple shots together.

After you capture an image, PicPick really shines with its image editor. The Effects menu includes quick access to pixelation, watermarking, contrast adjustment, and similar. The Stamps menu lets you quickly add arrows and numbered bubbles to illustrate steps.

You can add highlights, as well as text and shapes in any color you choose. And the editor features tabs, allowing you to work on several images at once.

PicPick Editor

After you’re done editing, the Share tab lets you upload to Imgur, cloud storage, or social media pages. You can also email your image right from this menu.

Combine this handy feature set with extra graphical tools like a magnifier and crosshair to determine screen coordinates, and PicPick offers an attractive package for most people.

We recommend giving it a try if you’re new to screenshots, then moving onto one of the tools below if it doesn’t fit your needs.

Download: PicPick (Free for home use)

3. The Best Powerful Screen Capture Tool: ShareX

ShareX Home

If you’re a screenshot enthusiast looking for an app that does pretty much everything, ShareX is the answer. It’s completely free and offers an impressive suite of features that you’d usually expect to find in paid tools.

In addition to the usual capture modes, you can choose any app window from a list to capture it instantly. ShareX also lets you take easy screen recordings in GIF format, plus it has a Scrolling capture feature like PicPick.

That’s just the beginning of what ShareX has to offer. After you capture a screenshot, it includes an image editor with easy options to blur, crop, highlight, add a mouse cursor icon, and much more. It’s not quite as clean as PicPick, but still easy to use.

After you’re done editing, ShareX allows you to upload to many image-hosting services, including Imgur, Flickr, and Google Photos. It also supports adding photos to cloud storage like Dropbox and OneDrive.

For maximum efficiency, you can define custom tasks that run every time you take a screenshot.

For example, you might choose to save the screenshot, copy it to your clipboard, and open it in ShareX’s editor. It also lets you define steps to run automatically after you upload the image, so you might shorten the URL and copy it to your clipboard.

ShareX Sharing Options

ShareX has a lot more to offer, including tools like a color picker and ruler, as well as tons of settings and hotkeys to customize. It might overwhelm people who only take screenshots occasionally, but you can’t expect much more for free.

Download: ShareX (Free)

4. The Best Premium Screenshot Tool: Snagit

Snagit Editor

Snagit is the luxury option in the screenshot tool world. While its price tag of $50 might seem excessive compared to the capable free options above, it’s worth the investment for anyone who uses screenshots regularly.

The impressive Snagit feature list is too long to detail here, but some of the standouts include:

  • The Library, which holds all of your captured images and divides them by which app or website you took them from.
  • A Simplify tool, which lets you remove unnecessary info from a screenshot. It automatically generates shapes and icons using colors pulled from the image.
  • OCR, which allows you to grab text from an image and use it elsewhere. You can also select some text and use the Edit text option to change the wording inside a screenshot.
  • Video capture, which is great for creating short screencasts when a screenshot isn’t enough.
  • A huge library of stamps for adding common OS elements like loading symbols, toggle switches, and much more.
  • An excellent support library to help you learn how to use the software and get help if something goes wrong.

Snagit has a truly staggering amount of features, and it gets better all the time. But unless you work with screenshots all the time, it’s probably overkill for you.

After a free trial, the initial $49.95 purchase lets you use the current version of Snagit for as long as you like. You can add on a year of maintenance for $12.49, which guarantees you’ll get the next major version of Snagit when it launches and includes some other perks too.

Download: Snagit ($49.95, free trial available)

What About Greenshot?

For a long time, Greenshot was the preferred Windows screenshot tool of many. It offered easy capture tools, a handy and straightforward editor, and a variety of sharing options. However, at the time of writing, Greenshot has not seen an update since August 2017.

While you can still use Greenshot if you really like it, we don’t recommend using apps that have been abandoned for years. All the above options receive regular updates, and are thus safer and include more features.

What’s Your Favorite Clipping Tool for Windows?

We’ve taken a look at several free screen capture tools for Windows, plus Snagit as a premium option. Chances are that one of them will fit your needs nicely, whether you just need something basic or want advanced sharing options.

Of course, there are many other screenshot programs available, but most offer similar features to the above. The best test is integrating them into your workflow for a while so you can explore their features fully.

Meanwhile, if you want to take video recordings of your desktop, check out the best screencasting apps instead.

Image Credit: Greg Brave/Shutterstock

Read the full article: The 4 Best Windows Screenshot Apps and Tools


You Can Now Delete Your Old Facebook Posts in Bulk


It’s now easier to delete your old Facebook posts, either individually or in bulk. This will help anyone looking to move on in life, and erase the evidence of their past. Whether that’s in order to remove reminders of an ex-partner or to secure a new career.

When Facebook Posts Come Back to Haunt You

Facebook has been around for so long now that most of its users are very different people than they were when they joined the social network. They’re older and (hopefully) wiser, and they’re unlikely to want old Facebook posts to come back to haunt them.

To help avoid that fate, Facebook has launched Manage Activity, which lets you remove old posts from Facebook. You can either send them to an Archive (which hides them from everyone but you) or Trash them completely (which deletes them completely after 30 days).

How to Delete Your Old Facebook Posts

Once you have access to the Manage Activity feature, you can remove old posts at will. All you need to do is open your Activity Log and click Manage Activity. You’ll then be given the option to Manage Your Posts, with them all listed in chronological order.

If the post or posts you want to delete is recent, you can just scroll down to find it. However, you can also employ filters to narrow your results. Just press the Filters button and filter your posts by Category, Date, or People. All of which are self-explanatory.

Once you have found the post or posts you’re looking for, select them and then click either Archive or Trash. Archive hides posts from view to everyone but you. Trash removes posts from Facebook completely after 30 days (allowing you to change your mind).

Facebook is launching Manage Activity first on Facebook Lite and the Facebook mobile apps for Android and iOS. It will take several weeks to reach everyone, so you may not see it immediately. The social network has also promised to bring it to desktop in the future.

Manage Activity Is Better Late Than Never

Manage Activity is a good (albeit extremely overdue) tool we wish Facebook had launched years ago. How many people have lost their jobs or had relationships ruined thanks to old Facebook posts coming back to haunt them? Still, it’s better late than never.

Seeing as we’ve mentioned it in this article, here’s everything you need to know about Facebook Lite. And for anyone who’s really worried about the privacy implications of using Facebook, here’s what deactivating or deleting Facebook really means.

Read the full article: You Can Now Delete Your Old Facebook Posts in Bulk


Read Full Article

5 Common Internet of Things (IoT) Security Issues and Fixes


Internet of Things (IoT) devices might secure you against street crime but they don’t do a great job guarding you against privacy invasions. This article explains some of those privacy concerns and how to fix them.

Let’s start by looking at the ways that IoT devices can breach your privacy, and how to avoid them.

1. IoT Home Hub Devices Record Everything

Some devices, such as Google Home and the Amazon Echo, constantly listen to their surroundings. This ensures they hear you when you say their “hotword”, or activation word, which initiates audio recording.

Of course, something that’s always listening to you poses a privacy risk in itself. There has been a lot of speculation about whether these devices are always sending recorded information home, even if the user has not activated it via its hotword.

Even if this speculation isn’t based in truth, it is a fact that home hub operators receive private voice logs after the device mistakenly heard their hotword. The BBC reported that Apple and Google have stopped its employees from playing back recordings from home hubs. This was after third-party contractors discovered they were listening to intimate moments that were accidentally recorded.

How to Fix IoT Devices Always Listening to You

While popular smart home hubs have check boxes you can tick to tell them not to monitor your voice, who knows what’s going on in the background? Imagine if a stranger was sitting in on all of your discussions, and you simply made them promise not to tell anyone what it hears. Would you trust that stranger with your private information?

As such, the best way to fix this IoT security issue is to never allow it to occur. Don’t purchase smart devices that have a 24/7 listening capability (if possible). Always-listening devices are identifiable if they’re marketed as offering voice-activation, as they need constant monitoring to listen out for commands.

2. They Can Be Hacked From the Outside

A big draw for IoT devices is their ability to receive commands from the internet. This allows users to control smart home devices from any location in the world.

This feature isn’t perfect, though. While remote smart home control allows location-independent control and monitoring of your home, it also opens the door for hackers to do the same. Hacking is one of the scariest IoT privacy concerns, as people all around the world can gain access to your home uninvited.

It sounds like something out of science fiction, but it’s, unfortunately, a reality. Trend Micro claims their software blocked 5 million hacking attempts on IoT cameras, 75 percent of which were brute force attacks.

How to Fix IoT Problems With Remote Hacking

To fix this problem, you need to set up a proper remote system that can keep hackers out.  Given that hackers are mostly using brute force techniques to break in, your system needs to be strong enough to resist a barrage of attempts.

Secure your account with a strong password, and use a two-factor authentication device if it’s supported. These will both stop a hacker from getting easy access to your home.

3. Devices Don’t Use Encryption

This is a giant red flag for anyone who cares about their privacy. Zscaler reported that from the 56 million transactions that passed through their cloud from IoT sources, 90% of them were sent as plain text. This means no effort was made to encrypt them whatsoever; anyone could analyze the packets and extract its data.

How to Fix IoT’s Lack of Encryption

Only use IoT devices that properly encrypt their data. Hopefully, the product will state its encryption type on the box or advertising. If it doesn’t, it’s a good idea to play it safe and not purchase it.

At the very least, you could get it and take care of what data you send; never use it for anything you wouldn’t want someone else to see.

Another option is to use a VPN’s encryption scheme on your network, like OpenVPN. Some routers allow for the user to configure a virtual private network, or VPN, on it. A VPN installed on a router allows the user to encrypt and route all their traffic through a third-party server. That would prevent any third-party snoops from inspecting whatever data is transferred between you and the end point.

4. IoT Devices Aren’t Properly Updated

Devices that undergo pressure from hacking attempts should be properly equipped with the ability to receive patches. If an exploit is found in a device, the news can spread quickly amongst the internet, which puts every owner of that device at risk.

A security patch is the best way to combat these flaws as they appear over time. However, the world of IoT has some severe patching issues. Devices may have very barebones support after release or have no means of being patched whatsoever.

A device may have the foundations for security patches, but in the quick world of IoT, the company behind it may go out of business, leaving the device stranded without updates.

How to Fix It

Unfortunately, there’s no way you can actively patch your IoT devices. Fortunately, you can take measures into your own hands by choosing companies with a good reputation or look for open source IoT devices

Putting your faith in a start-up may mean their lack of experience will cause slower updates; that is if they don’t go out of business. Larger businesses will have more experience, faster patch response times, and are far less likely to fold.

5. Devices Use Default Factory Passwords

A default password is a hacker’s favorite way of cracking devices. Some companies will give each device an individual password to prevent this flaw, but others will set the same password for all the devices they create.

If the users of these devices don’t bother changing the password, hackers can learn of the factory default login information and test it on all the devices they can find. They’re bound to find a few that still has the out-of-the-box credentials, which gives them unprecedented access over the device.

The default password problem is so bad, WeLiveSecurity reported on how California has banned any device that shipped with a default password.

How to Fix It

If any devices you purchase have a default password, change it right away. Keeping the old password is leaving the door open for any potential hackers that know the credentials for your particular device.

Improving Your IoT Security

IoT is currently full of security holes, which makes it hard to trust them with your privacy. By taking some proper precautions, you can enjoy IoT devices without handing over your details to hackers.

One highly effective method for improving IoT security is using a virtual private network (VPN) with either a router or a Pi-Hole. VPNs can disguise the location of where your IoT traffic originates. However, it requires that the user install a Pi-Hole (which is a Raspberry Pi that routes traffic through a VPN) or install a VPN on their router.

Read the full article: 5 Common Internet of Things (IoT) Security Issues and Fixes


Read Full Article

4 Dating App Privacy Disasters and How to Protect Yourself


Dating apps have revolutionized the way people meet in the modern world—making it easier than ever to find romantic partners who share your hobbies, interests, and goals.

However, like most new technology, they also bring various concerns. With the launch of Facebook Dating, these concerns have only been heightened due to the company’s track record around private data.

We spoke to Anna Collard, the Managing Director of KnowBe4 Africa, to find out some of the privacy risks that platforms like Facebook Dating and other dating apps pose to users. Here are five of the biggest privacy disasters and risks these apps can expose us to.

1. Company Data Use

The primary privacy concern from dating apps like Facebook Dating is not breaches or leaks, but the data harvesting from the providers themselves.

“What many people don’t know is that their personal information is worth a lot of money to companies. There’s that saying: personal information is the new oil,” Collard notes.

“These companies don’t just make money by finding a mate for you. They make money by collecting your information and building profiles and then selling that information,” she adds.

At the end of the day, Facebook is one of the biggest advertising platforms online. This means your dating profile activity and data could be shared for targeted advertising

The company, however, claims it will keep your Dating profile separate from your Facebook profile separate. But there are already instances where the data between your dating profile and regular profile are shared. For example, Facebook Dating suggests matches based on your groups and events.

It’s also possible that the extent of data sharing between Facebook services will increase in the future, as the company has done after its acquisitions of Instagram and WhatsApp.

“Even though Facebook claims that they will keep the Facebook Dating app completely separate from the general Facebook app, I don’t think that what Facebook says can necessarily be trusted,” Collard said.

After all, companies are able to update their terms of service at a later stage. Facebook has already reneged on the commitment to not show advertising on WhatsApp, with plans to add ads to the app’s Status feature.

How to Improve Dating-App Privacy

You can limit the amount of data collected by companies by adjusting your privacy settings and carefully reading the terms of services to understand exactly what information is collected.

However, the best way to avoid data harvesting is to avoid the services completely. This is not always possible in the digital era, but you can aim to be more selective in which services you use.

Collard notes that we should reconsider whether we want a single company to have a monopoly on so much personal information, from dating to business information.

She also adds that you should post anything on an app that you wouldn’t want to become public knowledge, since this is always a risk.

2. Private Data Leaks and Breaches

The extent of data harvesting in dating apps already compromises privacy, but this issue is compounded by security breaches and data leaks.

With private data proving so valuable, it’s a frequent target of hackers and cybercriminals. For Collard, security breaches aren’t a matter of if it happens, but when it happens.

The consequences of a dating-site data breach can be far-reaching. Collard points out that after the Ashley Madison leak, people who had used their work email addresses for the site were at risk of being identified by their employers.

“Any sort of social media account carries some privacy risks, but if you look at what you’re sharing on these dating sites, it’s much more sensitive information,” she notes.

Furthermore, the more third parties or apps your data is shared with, the more points or nodes there are for cybercriminals to target.

How to Avoid Getting Your Social Media Data Leaked

There’s nothing a user can do to prevent data breaches on the platform’s side. However, you can take some precautions.

These include not reusing passwords, usernames, or email addresses across platforms.

Collard suggests that dating app users, especially those sharing sensitive information such as HIV status or sexual preferences, should set up a completely unique email address and profile when configuring Facebook accounts, if possible.

When a dating platform requires you to sign in with your Facebook profile, or another pre-existing profile, it prevents you from mitigating the risk of breaches.

3. Cyberstalking and Stalking Risks

Since the goal of dating apps is to meet up and go on dates, they present a unique physical risk that most other apps don’t have. It’s important to be aware of this and to be selective in arranging dates.

When it comes to cyberstalking, there are multiple ways for people to link your dating profile to your other online profiles. This is especially true if you re-use usernames and profile pictures across sites.

Cyberstalking is a risk on any social platform, but dating apps can result in cyberstalking turning into physical stalking.

Furthermore, if you link your Instagram profile to your dating profile, geo-tagging your pictures can make it much easier to find the places you frequent, such as your workplace or favorite café.

“If you use an account name on, let’s say Tinder, that you use somewhere else, it’s very easy for even non-technical people to find out who you really are. You have to be really careful that whatever you set up there—that you don’t expose who you are and where you live,” Collard says.

How to Reduce Cyberstalking Risks

To mitigate the physical risk of meeting up, Collard suggests the following tips:

  • Meet in public places.
  • Get to know someone before being alone with them.

When it comes to cyberstalking, it’s important to reduce the risk by keeping your dating profile separate from other profiles that can be used to identify you or your workplace. In order to keep your profiles separate, take the following precautions:

  • Use unique images of yourself
  • Never post or share your home address
  • Don’t share any identifying information that makes harassment and stalking easier for strangers.
  • Keep private communications within the dating app’s chat client for as long as possible, since they don’t require you to share a phone number like other chat apps.

4. Data Used for Extortion and Discrimination

As Collard points out, dating apps have more sensitive personal data than the average social media app.

This includes sexual preferences, fetishes, dating preferences, HIV status, and other private information that can be used to extort or discriminate against individuals.

Extortion and discrimination can happen when data is leaked or when a person’s identity is linked to a dating account. This is especially true in contexts or countries where this information attracts significant stigma or in countries where homosexuality is illegal.

How to Avoid Cyber-Extortion

Again, use caution regarding who you trust and what personal data you share on dating apps. Follow these simple tips:

  • Use a unique email address for a dating profile.
  • Do not share intimate images that can be used to blackmail you.
  • Read the privacy policy and terms-of-service of dating sites and apps to see what data they share with third parties.

Stay Safe on Online Dating Platforms

Dating apps always carry privacy risks, but make sure to take precautions when choosing to use a platform.

Always take into account a company’s track record with user privacy and data. And most of all, stay safe.

Read the full article: 4 Dating App Privacy Disasters and How to Protect Yourself


Read Full Article

5 Ways a Free VPS Can Endanger Your Privacy


Looking for a free VPS? Before we get started, we should discuss what a VPS is.

A virtual private server (VPS) is a virtualized server remotely hosted on a machine owned (or leased) by an internet hosting provider. The machine itself is physical, while the VPS is part of a virtual environment, and the operating system which you will choose is a server OS.

VPS hosting is not usually described as affordable. For hosting websites with high-performance requirements, you’re looking at $50 a month, minimum. Usually aimed at business customers, a VPS often comes with some useful features like SSL/HTTPS built in. Such servers are typically used for online stores.

Using a VPS as a personal VPN, however, requires far less in the way of hardware resources. This makes it the perfect solution for hosting your VPN.

Whether you plan to use a VPS long term or just to try it out, you might consider a free VPS host. While some VPS hosts offer free trials, often these are little more than a scam, a gateway to your bank details.

Worse still, that’s just the beginning.

1. Free VPS Located in a Place With Sketchy Laws

When you’re looking to subscribe to a hosted VPN, one of the most important considerations is its location. It’s an advantage if the service resides in a nation without data retention laws. Better still is a VPN host that doesn’t fall under the auspices of the 5-Eyes surveillance alliance.

Similarly, if you’re planning to set up a personal VPN on a free VPS host, the location of the VPS server is paramount.

While this may not be your only privacy concern, if the VPS isn’t registered in a safe location, avoid it.

2. Can You Trust the Free VPS Host With Your Data?

You need to trust the VPS host before you sign up for it.

Signing up for a service means submitting your personal data as part of the sign-up process. For free trials, you may also need to use a credit card. Once you’ve done that and your account is created, you’ll need to set up your VPS (which involves installing the server software onto the virtualized server).

Another issue is whether logs are kept of your activity. Can you trust the VPS not to retain logs of when you log on, your IP address, or monitor your connection of evidence of activity? Can you be certain that this information won’t then be sold to advertisers or given away under legal duress?

No, you can’t.

3. A Free VPS Could Be a “Man in the Middle”

The potential for security and privacy abuses by the owner of a free VPS doesn’t end there.

A man-in-the-middle attack (MITM) occurs when you log into what appears to be a legitimate destination (a router, server, or website). The MITM attacker then uses the fake or compromised destination to capture your login, passwords, and other personal data. These scams usually go after financial information.

4. Is the Free VPS Free of Vulnerabilities?

Whether the free VPS host offers Windows or Linux, vulnerabilities can always exist.

After all, why would the owner of a free VPS spend time updating software and hardware? They’ve probably got paid customers to service. Checking the available operating systems and ensuring they’re regularly updated is wise whatever VPS you’re using.

But if the VPS environment isn’t offering up-to-date OS options, there’s a risk that your VPN installation can be subverted. Consider, for example, the hardware vulnerabilities in AMD and Intel processors, Meltdown and Spectre. If mitigation isn’t in place for these flaws, they can potentially be exploited.

While an extreme example, it nevertheless illustrates that the VPS host is not obliged to maintain a free server.

5. A Free VPS Server Could Be a Scam

Finally, very few genuine free VPS services are available. Among those that are, the aim is almost certainly to onboard potential customers with the promise of gratis hosting. While the trial-period offers are oftentimes legitimate, a few disreputable hosts abuse the concept.

When a scam is in operation, the free VPS does not exist. Victims are encouraged to sign up, choose the free VPS option, but provide card details. Eventually, it becomes apparent that the free VPS doesn’t exist.

Instead, it is a scam, and victims’ credit cards are charged.

Given how freely scammers misuse their victims’ data (see above), don’t expect this to be the end of it.

Forget Free VPS Providers

Free trials are useful. Whenever a reputable VPS offers them, they’re worth trying before buying.

However, free VPS providers that don’t have that layer of trust should be avoided. Privacy is key when hosting a VPN. If you cannot trust your VPS host with a single item in this list, then it’s time to reconsider.

Instead, host your personal VPN on a paid VPS from a trusted provider. Two of the better VPN providers out there include Mullvad VPN and Windscribe VPN.

Read the full article: 5 Ways a Free VPS Can Endanger Your Privacy


Read Full Article

CactusVPN Review: Can a Free VPN Option Make It Less Prickly?


Most people interested in privacy or who stream Netflix need a VPN. You might only need it for your browser. Or you could require a full-VPN service to protect all your internet traffic. But what’s the right solution for your privacy concerns? CactusVPN offers most of what users need.

Is CactusVPN Right for You?

Subscribing to a virtual private network (VPN) means you can protect your privacy, particularly when using public Wi-Fi. It can also block electronic surveillance, and potentially frustrate advertising. A VPN can also protect against ISP throttling and geo-location blocking, if you ever need Netflix from another country (or if you want American Netflix). But all that is not the same thing as security from surveillance.

No VPN will protect you from physical surveillance. Members of your household can monitor internet activity regardless of whether you use a VPN. A VPN is designed more for domestic users than anyone else. Political journalists, dissidents, freedom fighters, and anyone wishing to learn restricted information publicly available elsewhere in the world should only rely on a VPN in conjunction with encrypted messaging (e.g. Signal) or accessing the internet via Tor.

However, if you’re comfortable with the inherent limitations of all VPN technology, CactusVPN offers relatively inexpensive plans ranging in price from $3.20 for the full package or as low as $2.27 for a less private way to bypass streaming geo-restrictions on Netflix.

Is Your Subscription Safe With CactusVPN?

Being able to trust your VPN is vital. If there is no trust, there is no point in using the service. The idea that a VPN might take your money and run, provide a substandard service, renege on its guarantees and features, and even share your logs with a third party, should be enough to make you look elsewhere.

According to their About page, CactusVPN was formed by three friends in 2011 and operates 27 high-speed VPN servers across 15 countries. Its headquarters is in Moldova (in Eastern Europe).

Moldova is not a member of the European Union so it is not under any existing or future data-sharing obligation. Similarly, it is not a Five Eyes group (FVEY) member, so there is no legal requirement for CactusVPN to share data with Anglo-sphere security services.

The CactusVPN philosophy is simple:

We believe everyone deserves privacy and freedom, we believe internet should be safe for everyone; we believe people shouldn’t be afraid of using the internet.

CactusVPN Free vs. Pro Features

To give you the full CactusVPN experience, both the free and pro (or paid) versions of the app include the same features. While the VPN service is wise to provide this, 24 hours probably isn’t long enough to fully appreciate any service.

The following features are all available in both CactusVPN free and pro modes.

Internet Kill Switch

A vital feature found in all good VPN clients, an internet kill switch cuts access if the VPN connection drops. A lot of different causes can cause a VPN to suddenly cut out. And most computers are designed to reestablish an internet connection as soon as the VPN drops. Without a kill switch, this automatically exposes your location to a variety of sources.

A kill switch in theory blocks all connection after a VPN drops. This means all internet is blocked until you manually reconnect to the VPN or close the client.

CactusVPN’s Apps Killer

CactusVPN, aside from offering a dedicated kill switch, offers a feature called “Apps Killer”. Apps Killer prevents only certain apps, that you select, from connecting to the internet. One scenario is blocking access to the internet during a DDoS attack on an online game. Meanwhile, if you’re torrenting with CactusVPN, Apps Killer will close your torrent client if the VPN connection goes down. This will conceal torrenting activity from your ISP, even in the event of a VPN outage. In theory, at least.

In practice, a kill switch is just another layer of identity protection.

Sort Servers by Speed

Need to find the fastest server? Like many VPN clients, CactusVPN has a drop-down menu to choose from the library of servers. While this is sorted by location by default, the list can be reorganized to Sort by speed. It’s a useful feature which we hope other VPNs will introduce.

Note that whatever server you choose will be affected by the basic speed of your internet connection. See below for speed testing results.

Easy Server Switching

As stated, the server can be easily switched to any other location. This is again via the drop-down menu, where the new server (in any city or country) can be selected. A short wait is needed while the VPN reconnects.

Easy VPN Protocol Switching

VPN protocol switching is also a feature, although this can only be done between connections. SSTP, OpenVPN, L2TP, PPTP, and IKEv2 protocols are all available via the Settings screen. We’ve written about the various advantages of VPN protocols, such as OpenVPN vs. IPSec and SSTP.

DNS Leak protection

Also in the settings screen is the option to enable DNS leak protection. Three servers can be used here: CactusVPN DNS, Google DNS, and OpenDNS.

DNS leakage has been a major problem for VPN services over the years. Having leak protection is always an advantage, but it’s curious to see it disabled by default. It may be that the service provider has disabled leak protection in order to improve VPN reliability. After all, many browsers can be manually set to prevent WebRTC leaks—at the cost of website compatibility.

Smart DNS

An alternative mode is bundled with CactusVPN: Smart DNS. This is an alternative to a VPN, intended to enable region-blocked streaming without the load of VPN encryption and other VPN features. Intended for streaming video, it’s ideal for viewing Netflix on CactusVPN.

VPN Apps for All OSes

CactusVPN offers apps for Windows, macOS, iOS, Android and Android TV, Fire TV, and extensions for Chrome and Firefox browsers. As such, you should be able to use the service on all your devices. There is also support for other hardware via OpenVPN.

For the Fire Stick, CactusVPN offers a (free for 24 hours) VPN app.

Download: CactusVPN for the Fire Stick (24-Hours Free)

Money Back Guarantee

On top of it all, CactusVPN offers disappointed customers their money back.

Its money-back guarantee comes into play if you’re unable to connect to the CactusVPN VPN or Smart DNS servers. This is a 30-day refund policy acts like a parachute if you subscribe after trying the CactusVPN free version.

CactusVPN Security and Privacy

An insecure VPN is of no use whatsoever. Knowing the strength of security and privacy before buying a subscription is a huge advantage. Fortunately, CactusVPN’s free option can prove advantageous here.

Shared IP Address

This is a useful security feature that prevents activity being traced to your device. Instead, a shared IP address is used, grouping CactusVPN users together.

Encryption

CactusVPN employs an interesting approach to encryption, utilizing both 128- and 256-bit AES encryption. While this might seem archaic, their reasoning is compelling:

The AES-128 is very strong and it cannot be cracked through full-scale search on the key. Although you may be entitled to think that longer keys offer more security benefits, the truth is that an algorithm can’t be ‘less broken’ than ‘not broken’. So there is no additional benefit for security from cranking up the key size to 256 bits.

In addition, CactusVPN highlights that a 256-bit AES connection will use 40% more CPU. As such, their argument is that there are computer resource trade-offs between security and computational overhead.

Meanwhile, several VPN protocols are on offer with CactusVPN: SSTP, L2TP/IPSec, OpenVPN, IKEv2/IPSec, SoftEther and PPTP. Which option is best depends on your activity. Overall, OpenVPN is perhaps the most desirable, but not always practical to set up. CactusVPN recommends OpenVPN and SoftEther for torrenting, however, and OpenVPN for security.

Logging Policy

A major concern for privacy advocates using VPNs is the logging policy (as with warrant canaries, we are agnostic about the realities of logging policies). Is the data of customer activity available to third parties?

CactusVPN has a “guaranteed no-logs policy” which they hope will generate trust. Their policy states:

…we will not store any data relating to your activities while using any of our privacy solutions, and will not record, monitor, log or store any of your information. CactusVPN also guarantees that none of your information will be passed on to a third party.

In addition, they do not store “…any IP addresses, traffic logs, connection timestamps, used bandwidth or session duration information that could be traced to a single person.”

In truth, logging policies are not very enforceable outside the legal jurisdiction in which the host company resides. They are generally designed to protect the host company against consumer violations of said policy, not the customer.

CactusVPN Speed Test

A VPN reduces the speed of your internet connection—sometimes a lot. So, it’s worth knowing in advance just how much the speed will be lost.

We’ve tested CactusVPN with premium speed-testing service Speedtest.net. Note that this test was performed on a broadband fiber FTTC (Fiber to the Cabinet) local loop.

First, the speed test without CactusVPN connected:

As you can see, the speed is 41.47Mbps down, 10.05Mbps up, with a ping of 14 meters per second.

Via a VPN server in London:

39.63Mbps down, 9.57Mbps up, 17 m/s.

Finally, a CactusVPN server in Zurich, Switzerland:

Notice the difference in ping rate: 39.33Mbps down, 9.29Mbps up, a ping of 43 milliseconds.

So, with local servers, the CactusVPN speed is good, although ping rate (understandably) degrades with distance.

Smart DNS Speed Test

In addition to testing the speed of the CactusVPN, we also looked at speed using the Smart DNS feature. After all, there’s no point advertising a fast alternative to VPN for video streaming if it isn’t fast enough.

With the Smart DNS mode enabled, the results are:

As you can see, the result is a 39.23Mbps download, and 10.09Mbps upload score. Ping is 14 milliseconds to a DNS server around 40 miles (64.37 km) away.

CactusVPN Customer Service Options

Several support options are available from CactusVPN. Foremost among these is the Submit ticket option in the client app. Available alongside a Save logs button, both are found in the Help screen (a doctor’s bag in the top-left corner), accompanied by links for the ToS, Blog, Refund Policy, and more.

Clicking Submit ticket opens the relevant page on the CactusVPN website, saving you time looking for the link. Note that all contact with CactusVPN is via the support ticket screen. While they operate social media accounts (such as @CactusVPN on Twitter) the response will always be to raise a support ticket.

You can also start a live chat during business hours. This will typically appear unprompted while you browse the site.

The Support tab on the website, meanwhile, features a collection of tutorials, an FAQ, and other guided sections.

Should You Subscribe to CactusVPN?

With all of this considered, you should be ready to decide: CactusVPN, or another service?

Overall, we found it a competent VPN service. While the Windows client crashed on one occasion while switching protocols, it was otherwise stable. It’s ideal for most activities: CactusVPN connects to Netflix libraries around the world without any problem; you can use Cactus VPN servers for torrenting. CactusVPN is also safe to use for online shopping and protecting your device on public Wi-Fi.

General usage for browsing yielded good results. However, one incident caused concern: a visit to this very site via the CactusVPN server in Kansas, USA. The resulting web page was a “520 Web server is returning an unknown error”, which didn’t occur when browsing VPN Proof normally. This appears to be a common issue with free VPNs, a good reason for avoiding them. Of course, CactusVPN is not a free VPN, but might need to take steps to avoid 520 errors.

For privacy concerns, it offers a mature, considered no-logging policy that should ensure CactusVPN earns your consideration as a VPN option.

On the other hand, not all the features were interesting. While the Smart DNS mode is useful, it’s probably more suited to streaming video through a game console than as an alternative mode on your PC.

Still not certain? Use the CactusVPN free trial to help make your mind up.

Read the full article: CactusVPN Review: Can a Free VPN Option Make It Less Prickly?


Read Full Article
The 4 Best Windows Screenshot Apps and Tools


windows-perfect-screenshot

A good screenshot app is an essential part of your Windows toolkit. Screenshots let you capture funny moments as well as important information, or document problems to show others.

But what is the best screenshot tool for Windows? Let’s look at several top screengrab options and see which is best for your needs.

1. The Best Basic Screenshot Tool: Snipping Tool / Snip & Sketch

Windows Snipping Tool Home

If you’re using a computer where you can’t download any software or just need a basic screenshot, Windows has two built-in tools for taking screenshots that will serve you well.

The Snipping Tool, available from Windows 7 onward, is the classic version. It lets you capture screenshots in several modes and provides a few simple markup tools.

On Windows 10, we recommend using the newer Snip & Sketch tool, which is accessible anywhere thanks to a keyboard shortcut. It also features a few enhancements over the Snipping Tool. See our guide to the Snipping Tool to master using both of these apps.

Windows 10 Snip Sketch Editor

If you rarely take screenshots, these might be enough for you. But for frequent use, especially if you need to mark up your shots after taking them, we highly recommend checking out a better screen capture tool.

2. The Best Free Screen Capture Tool for Most People: PicPick

PicPick Home

PicPick is an excellent choice for anyone who needs more than the Snipping Tool can provide. It’s free for personal use and includes several features to improve your screenshot process.

The interface for PicPick looks quite similar to Microsoft Office apps, making it familiar for anyone who’s used the Office suite. It includes more screen capture options than Snip & Sketch.

For instance, Scrolling Window lets you capture long webpages all at once instead of having to stitch multiple shots together.

After you capture an image, PicPick really shines with its image editor. The Effects menu includes quick access to pixelation, watermarking, contrast adjustment, and similar. The Stamps menu lets you quickly add arrows and numbered bubbles to illustrate steps.

You can add highlights, as well as text and shapes in any color you choose. And the editor features tabs, allowing you to work on several images at once.

PicPick Editor

After you’re done editing, the Share tab lets you upload to Imgur, cloud storage, or social media pages. You can also email your image right from this menu.

Combine this handy feature set with extra graphical tools like a magnifier and crosshair to determine screen coordinates, and PicPick offers an attractive package for most people.

We recommend giving it a try if you’re new to screenshots, then moving onto one of the tools below if it doesn’t fit your needs.

Download: PicPick (Free for home use)

3. The Best Powerful Screen Capture Tool: ShareX

ShareX Home

If you’re a screenshot enthusiast looking for an app that does pretty much everything, ShareX is the answer. It’s completely free and offers an impressive suite of features that you’d usually expect to find in paid tools.

In addition to the usual capture modes, you can choose any app window from a list to capture it instantly. ShareX also lets you take easy screen recordings in GIF format, plus it has a Scrolling capture feature like PicPick.

That’s just the beginning of what ShareX has to offer. After you capture a screenshot, it includes an image editor with easy options to blur, crop, highlight, add a mouse cursor icon, and much more. It’s not quite as clean as PicPick, but still easy to use.

After you’re done editing, ShareX allows you to upload to many image-hosting services, including Imgur, Flickr, and Google Photos. It also supports adding photos to cloud storage like Dropbox and OneDrive.

For maximum efficiency, you can define custom tasks that run every time you take a screenshot.

For example, you might choose to save the screenshot, copy it to your clipboard, and open it in ShareX’s editor. It also lets you define steps to run automatically after you upload the image, so you might shorten the URL and copy it to your clipboard.

ShareX Sharing Options

ShareX has a lot more to offer, including tools like a color picker and ruler, as well as tons of settings and hotkeys to customize. It might overwhelm people who only take screenshots occasionally, but you can’t expect much more for free.

Download: ShareX (Free)

4. The Best Premium Screenshot Tool: Snagit

Snagit Editor

Snagit is the luxury option in the screenshot tool world. While its price tag of $50 might seem excessive compared to the capable free options above, it’s worth the investment for anyone who uses screenshots regularly.

The impressive Snagit feature list is too long to detail here, but some of the standouts include:

  • The Library, which holds all of your captured images and divides them by which app or website you took them from.
  • A Simplify tool, which lets you remove unnecessary info from a screenshot. It automatically generates shapes and icons using colors pulled from the image.
  • OCR, which allows you to grab text from an image and use it elsewhere. You can also select some text and use the Edit text option to change the wording inside a screenshot.
  • Video capture, which is great for creating short screencasts when a screenshot isn’t enough.
  • A huge library of stamps for adding common OS elements like loading symbols, toggle switches, and much more.
  • An excellent support library to help you learn how to use the software and get help if something goes wrong.

Snagit has a truly staggering amount of features, and it gets better all the time. But unless you work with screenshots all the time, it’s probably overkill for you.

After a free trial, the initial $49.95 purchase lets you use the current version of Snagit for as long as you like. You can add on a year of maintenance for $12.49, which guarantees you’ll get the next major version of Snagit when it launches and includes some other perks too.

Download: Snagit ($49.95, free trial available)

What About Greenshot?

For a long time, Greenshot was the preferred Windows screenshot tool of many. It offered easy capture tools, a handy and straightforward editor, and a variety of sharing options. However, at the time of writing, Greenshot has not seen an update since August 2017.

While you can still use Greenshot if you really like it, we don’t recommend using apps that have been abandoned for years. All the above options receive regular updates, and are thus safer and include more features.

What’s Your Favorite Clipping Tool for Windows?

We’ve taken a look at several free screen capture tools for Windows, plus Snagit as a premium option. Chances are that one of them will fit your needs nicely, whether you just need something basic or want advanced sharing options.

Of course, there are many other screenshot programs available, but most offer similar features to the above. The best test is integrating them into your workflow for a while so you can explore their features fully.

Meanwhile, if you want to take video recordings of your desktop, check out the best screencasting apps instead.

Image Credit: Greg Brave/Shutterstock

Read the full article: The 4 Best Windows Screenshot Apps and Tools


Read Full Article

The 5 Best Fitness Trackers With Heart Rate Monitoring


heart-rate-tracker

Fitness trackers have changed the way we exercise. Not only do they motivate us to stay active, but the wrist-worn devices also record data so we can chart our progress.

All fitness trackers feature a pedometer for counting steps as standard. Alongside that, though, a heart rate monitor can be invaluable to help you reach your fitness goals.

Here are the best fitness trackers with heart rate monitoring available today.

1. Fitbit Charge 4

Fitbit Charge 4 Fitbit Charge 4 Buy Now On Amazon $149.95

The Fitbit Charge 4 is the best fitness tracker available today. The company was the first to popularize the wearable device. Despite widening its range to smartwatches, it has always maintained a focus on its core fitness trackers. The Charge 4 is the latest in the Charge line up and has a range of features that make it worth the money.

Alongside a pedometer and heart rate monitor, the Charge 4 also includes built-in GPS so you can track your workouts without your phone. The heart rate monitor is always on, so it monitors your pulse throughout the day, and even while you sleep. There’s an NFC chip too, which enables the company’s contactless payment service, Fitbit Pay.

The Fitbit Charge 4 includes sleep tracking as well, so you can see how well you rested using the Fitbit mobile and web app. Unlike some wearables, the battery lasts up to seven days on a single charge, so you won’t have to recharge it each night either.

The device is designed to be a complete fitness companion, so there are on-device workouts courtesy of Fitbit Premium, although this training service requires a subscription.

Before investing, take a look at our review of the Fitbit Charge 3, the previous iteration of the company’s flagship fitness tracker.

2. Xiaomi Mi Band 4

Xiaomi Mi Band 4 Xiaomi Mi Band 4 Buy Now On Amazon $36.00

While the Fitbit Charge 4 is considered the best fitness tracker, it is also among the most expensive. Additionally, Google acquired Fitbit in late-2019, raising privacy concerns and casting doubt on the future of the brand. The Xiaomi Mi Band 4, however, makes an excellent alternative and is the best affordable fitness tracker available today.

Despite the low price, the device is feature-packed and has some of the best fitness tracking hardware. The Mi Band 4 uses Bluetooth 5.0, includes a 135mAh battery for 20-day usage, and is waterproof up to 50 meters. Unlike the competition, the tracker also includes a color screen, which makes it easier to quickly check your stats. Notably, there’s even a swim tracking feature, so you can keep an eye on your underwater progress, too.

The heart rate monitor runs continuously, collecting data to the Mi Band 4. If you download the Mi Fit app on your smartphone, you can sync the data across and view it on your mobile device. The fitness tracker also supports notifications, so you can check messages, alerts from your favorite apps, and see incoming calls from your wrist.

If you’re interested in this affordable fitness tracker, check out our review of the Mi Band 3, the predecessor to the Mi Band 4.

3. Apple Watch

Apple Watch Apple Watch Buy Now On Amazon $414.00

Although most smartwatches come equipped with fitness tracking capabilities, they aren’t made for fitness activities. However, there is one exception; the Apple Watch. The device focuses on health, wellbeing, and fitness, with a range of hardware and software to help you achieve your goals. Primary among them is the high-quality heart rate monitoring.

This feature is so effective, it can analyze your heart’s electrical rhythms and determine if you are experiencing a medical emergency. In that event, the Apple Watch will even contact the emergency services on your behalf. Of course, this is a fail-safe only if the worst were to happen. There are plenty of other fitness features included on the Apple Watch.

As you’d expect, there is close integration between the Apple Watch, the data it collects, and Apple’s other services. The data syncs to your iPhone and is collated in the Health app which can be accessed through your Apple account. In has GPS built-in for location tracking and real-time directions and is water-resistant up to 50 meters. You can personalize your Apple Watch with alternative straps, too.

4. Garmin vivosmart 4

Garmin vivosmart 4 Garmin vivosmart 4 Buy Now On Amazon $97.43

Fitbit has positioned itself as a fitness brand for everyone. However, fitness enthusiasts often opt for Garmin’s products instead. The Garmin vivosmart 4 is the company’s primary fitness tracker. At first glance, the device looks like many other fitness trackers, but it’s the internal hardware and Garmin’s software that make this tracker worth the money.

It is one of only a handful of fitness trackers that can monitor your blood oxygen levels while you sleep. Although the vivosmart 4 is not a medical device, your nighttime blood oxygen levels may give an early warning of medical conditions like sleep apnea. This sensor is coupled with the company’s well-regarded heart rate monitoring.

The built-in heart rate monitor informs some of the wearable’s other functions. For instance, it can track your estimated stress levels and Vo2 Max. If you feel stressed, or the device suggests you might be, you can use the wrist-based relaxation breathing timer to take a moment for yourself. There are other wellbeing features like timers and tracking for walks, runs, strength training, swimming, and yoga.

5. Oura Ring

Oura Ring fitness tracker

It’s possible that you aren’t interested in a wrist-worn fitness tracker. Perhaps you’d rather wear a traditional wristwatch, or just don’t like the idea of a cluttered forearm. In that case, the Oura Ring may be the best fitness tracker for you. As the name suggests, this is a fitness tracking smart ring, with sensors lining the inside.

Despite being much smaller than many fitness trackers, it still has a lot of the same features. The Oura Ring can measure your heart rate, monitor your sleep, and track your steps. The ring comes equipped with infrared LEDs, temperature sensors, an accelerometer, and a gyroscope to provide all-day monitoring.

Like the other fitness trackers on offer here, there is a dedicated Oura app used for syncing the data from the ring to your device. From there, it can sync with your mobile platform’s health service, either Google Fit or Apple Health. The Oura ring uses wireless charging to provide up to seven days’ worth of use from a one hour charge. The titanium ring is water-resistant and only weighs 0.25 ounces.

The Best Fitness Tracker for Your Goals

Fitness trackers strike a balance between features, cost, and usability. They are comfortable to wear, unobtrusive, and often have superior battery life when compared to smartwatches. Notably, the Apple Watch is an exception and is a worthwhile fitness tracker and smartwatch.

That said, smartwatches tend to serve a different purpose. So, there’d be no reason you couldn’t enjoy the features of both. If you’re considering investing in a wrist-worn wearable, consider one of the best affordable smartwatches.

Read the full article: The 5 Best Fitness Trackers With Heart Rate Monitoring


Read Full Article

22 Essential iPhone Keyboard Tips and Tricks


tips-tricks-iphone-ipad-keyboard

Apple’s mobile devices are great productivity machines, brimming with apps for getting work done on the go. You might be using intelligent email apps and smart task management apps, but have you considered upgrading your iOS keyboard game?

There are small tricks for the keyboard on your iPhone or iPad that end up saving a lot of time, taps, and frustration down the line. If you type a lot on your iPhone or iPad, here are all the best keyboard tips and tricks for you to learn.

1. Use QuickPath to Type With Swipes

QuickPath swipe line on iPhone keyboard

The QuickPath feature on your iPhone keyboard makes it possible to type faster than ever by swiping instead of tapping. All you need to do is swipe from one letter to the next until you’ve spelled an entire word, then lift your finger to make it appear onscreen.

If QuickPath misinterprets your swipes, tap the delete button once to delete the entire word. Then swipe it out again or start tapping to type as usual.

2. Drag and Drop the Cursor

Drag and drop cursor in Notes app

You often need to move the cursor on your iPhone or iPad to start typing somewhere new. Apple makes it easy to do so by allowing you to drag and drop the cursor wherever you want it, no matter which app you’re using.

3. Use Trackpad Mode for Better Cursor Control

3D touch keyboard trackpad mode

Tap and hold on the Space button to make the keyboard transform into a trackpad. Without lifting your finger, slide across this trackpad area to move the cursor exactly where you want it to be, including the middle of a word.

You can even use this keyboard trick mode to select text on your iPhone or iPad screen. While moving the cursor, tap with a second finger to start selecting text.

If your iPhone supports 3D Touch, press firmly to enter trackpad mode anywhere on the keyboard, without needing to hold the space button. Squeeze again to start selecting text.

On an iPad, enter trackpad mode by moving two fingers across the keyboard. You can’t select text at the same time with this method, unfortunately.

4. Double or Triple-Tap to Select

Selected text in Notes app

Double-tap to select a single word or triple-tap to select the entire paragraph. After you do so, use the popup menu to edit the text. This iOS and iPadOS keyboard tip makes it easy to select text to copy and cut from your iPhone or iPad.

5. Pinch to Copy, Cut, and Paste

Copy alert from Notes app

Pinch in with three fingers to copy the selected text on your iPhone or iPad. Then pinch a second time to cut the selection. After moving the cursor somewhere new, pinch out with three fingers to paste your selection.

These keyboard gesture tricks are easiest to use on an iPad, where you have more space. If you have an iPad Pro, there are other Smart Keyboard shortcuts you can use to copy and paste as well.

6. Copy and Paste With the Universal Clipboard

If you use multiple Apple devices—an iPhone and an iPad, for example—you can use the universal clipboard to copy text from one device and paste it to the other. There’s nothing special you need to do for this; simply use the standard copy and paste functions on each device.

If it doesn’t work, make sure both devices are connected to the same network with Wi-Fi and Bluetooth turned on. Also, make sure they’re both using the same Apple ID account.

7. Swipe to Undo and Redo

Undo alert from Notes app

If you make a mistake while typing, swipe from right-to-left with three fingers to undo your last action. You can do this multiple times to keep undoing the last edits you made or the last words you typed.

If you accidentally use undo too many times, swipe from left-to-right with three fingers to redo instead.

8. Shake to Undo

shake to undo

Swiping with three fingers can be fiddly on a small iPhone screen. Fortunately, you can also shake your entire iPhone or iPad to undo as well. You need to do this with a bit of vigor. After you do so, a popup appears to ask if you’d like to undo your last action.

9. Replace a Double Space With a Period

You don’t have to go into the punctuation keyboard after typing a sentence—simply double-tap the Space button to automatically type a period. This simple keyboard trick makes it much easier to type long paragraphs quickly on your iPhone or iPad.

10. Shift Key Tricks on Your iPhone and iPad Keyboard

shifty key gesture

Swipe directly from the Shift key to the letter you want to capitalize. To use this trick on an iPad, you need to make the keyboard smaller, but once you do so you can access other characters with it as well.

You can also tap on the Shift key twice to turn on Caps Lock for your iPhone or iPad keyboard, shown by an extra line on the Shift icon. Alternatively, tap and hold on the Shift key with one finger while tapping on the letter you want to capitalize with another.

11. Swipe Across From Numbers and Punctuation

numeric key swipe gesture

When typing on your iPhone or iPad, you should see a 123 or an ABC button in the bottom-left corner for alternative keyboards. To quickly type a number, punctuation mark, or letter, just swipe from this button to the character you want.

This is a super quick trick for typing numbers and punctuation on your iPhone without switching keyboards.

12. Pull Down for Alternate Characters on iPad

iPad keyboard pulling down to number

On an iPad, you should see gray numbers and punctuation marks above each letter on the keyboard. Simply swipe down on a letter and release to type the gray character instead of the black one. This tip makes it simple to type numbers and punctuation marks on an iPad keyboard.

13. Tap and Hold on a Letter for More Options

Alternate characters for letter A on iPhone keyboard

Foreign languages frequently use accented characters or alternative punctuation marks that you rarely find in English. The easiest way to type these characters on an iPhone or iPad keyboard is to tap and hold on a letter, revealing all the available variations.

That might include accented versions of a particular letter (à, á, and â) or alternative punctuation marks (¿, ¡, and €). You can also use this keyboard trick to change the color of your iPhone and iPad emojis.

14. Disable QuickType for More Space

Predictive option in Keyboard settings on iPhone

Alongside auto-correct, the keyboard in iOS and iPadOS also has a predictive text feature that Apple calls QuickType. It appears at the top of the keyboard showing three words it thinks you want to type. Tap one of these words at any time so you don’t need to finish typing it, or disable the feature entirely to get more space on your screen.

To disable the QuickType predictions, go to Settings > General > Keyboard and turn off Predictive. This keyboard secret is particularly useful on devices with a smaller screen, like the iPhone SE.

15. Create Custom Text Replacement Shortcuts

text replacement

With Text Replacement, you can expand text shortcuts into complete words, phrases, or sentences that you type frequently. This could be your email address, your postal address, or any boilerplate text you find yourself using a lot.

Open the Settings app on your iPhone or iPad and go to General > Keyboard > Text Replacement. Tap the Add (+) button and type out the complete phrase along with the shortcut you want to use. Be sure to make your shortcut unique, so you won’t type it by mistake.

Next time you’re using the keyboard on your iPhone or iPad, type out the shortcut then hit Space to make it expand into the complete phrase.

16. Reject Autocorrect Replacements

Popup showing alternate spellings for a word

Your iPhone or iPad automatically corrects misspelled words as you type, often doing such a good job that you don’t even notice. But it isn’t perfect. Sometimes autocorrect replaces a word it thinks you spelled wrong with something totally different.

To undo these autocorrect mistakes, tap the Delete button until you get back to the replaced word. A popup menu appears with alternative replacements, including what you originally typed on the left. Tap any of the options to use that word instead.

17. Use the Microphone to Dictate Text

Dictation keyboard on iPhone

Why type when you can speak to your iPhone or iPad instead? Both iOS and iPadOS have a built-in dictation feature in the keyboard that works impressively well, even when you aren’t connected to the internet.

While the keyboard is open, tap on the Microphone icon in the bottom-right corner and start dictating. When you’re finished, tap the Keyboard icon to stop. Your iPhone or iPad underlines any words that might be wrong in blue.

18. Look Up Dictionary Definitions

You can look up the definition of a word you just typed without leaving your app using this handy iPhone and iPad trick. All you need to do is double-tap to select a word, then tap Look Up from the popup menu.

It’s also possible to do this when reading in the Books app or browsing the web in Safari. In fact, there are lots of other hidden Safari tricks like this you could learn as well.

19. Try Landscape Mode on Plus-Sized iPhones

essential ios keyboard tips and tricks 4

If you’re using an iPhone Plus model, turn your iPhone sideways to use the keyboard in landscape mode. Alongside the regular set of keys, this also lets you cut, copy, paste, and access formatting tools right alongside the keyboard.

20. Enable One-Handed Typing

One-handed keyboard on iPhone

If you’ve ever struggled to reach across the keyboard while using your iPhone with one hand, this is the trick for you. The one-handed keyboard shifts the keyboard to the left or right of your screen, making it easier to reach with a single hand.

Tap and hold the Keyboard or Emoji icon in the bottom-left corner to reveal a popup menu, then tap the left or right-handed keyboard at the bottom.

After your keyboard moves to the side of the screen, tap the large arrow that appears to move it back to the center when you’re finished.

21. Shrink, Move, and Split the iPad Keyboard

Small keyboard on iPad

Pinch in with two fingers on the center of the keyboard to shrink to an iPhone-sized keyboard. Drag and drop using the bar at the bottom to move this keyboard anywhere on the screen. And pinch out to go back to normal. You can also swipe to type using QuickPath on this smaller keyboard.

Alternatively, to split your iPad keyboard in two, pinch out with two fingers from the center of the keyboard. It should separate into two halves—one at either side of the screen—letting you type with your thumbs. Pinch the two halves together to go back to normal.

22. Hide the Keyboard

Sometimes the keyboard appears when you don’t need it. When this happens, it takes up half the screen and makes it difficult to see what’s beneath. Simply swipe down from the center of your iPhone or iPad screen to hide the keyboard in these situations.

Do More With Third-Party iPhone Keyboards

All these tips and tricks make the iPhone and iPad keyboard pretty awesome, but it’s not the only option. There are plenty of third-party keyboards available to download from the App Store which add completely new typing options as well.

Google’s Gboard keyboard has an integrated Google search bar. Fleksy lets you use gestures to type. And Chroma injects exciting colors to your keyboard. Find out more about these keyboards and more in our rundown of the best iPhone keyboard apps.

Read the full article: 22 Essential iPhone Keyboard Tips and Tricks


Read Full Article