26 May 2020

Let's make the world wild again | Kristine Tompkins

Let's make the world wild again | Kristine Tompkins

Earth, humanity and nature are inextricably interconnected. To restore us all back to health, we need to "rewild" the world, says environmental activist Kristine Tompkins. Tracing her life from Patagonia CEO to passionate conservationist, she shares how she has helped to establish national parks across millions of acres of land (and sea) in South America -- and discusses the critical role we all have to play to heal the planet. "We have a common destiny," she says. "We can flourish or we can suffer, but we're going to be doing it together."

Click the above link to download the TED talk.

Why I’m Never Buying an Arduino Again: The Wio Terminal


Wio Terminal development board featured image
Our verdict of the SeeedStudio Wio Terminal:
Packed full of sensors, buttons, a color LCD screen, and Wi-Fi connectivity, the Wio Terminal from SeeedStudio is fantastic value and well documented. That makes it easy to get on with what's really important: making cool stuff.
910

Electronics programming can be quite frustrating at times. Sourcing components, finding the right libraries to make use of them, figuring out the right parameters to pass in, then hoping there’s some example code to get started with. It all adds up to a massive time suck that detracts from the fun stuff. That’s largely why I’ve fallen out of love with the Arduino ecosystem. SeeedStudio thinks the Wio Terminal might rekindle my relationship with electronics though, and I think they’re right.

The Wio Terminal is an Arduino-compatible development board, crammed full of features and well documented, available for an entirely reasonable $30. Read on to find out why it’s the coolest thing since an Arduino Uno.

Wio Terminal Features and Specifications

The Wio Terminal is built around an ARM Cortex M4F system-on-a-chip, which is a 32-bit ARM processor running at 120Mhz (200Mhz burst). It features 4MB storage, 192k RAM, and there’s a Realtek RTL8720DN wireless chip providing Wi-Fi and Bluetooth connectivity (though the Bluetooth stack wasn’t implemented at the time of writing).

In terms of built-in features, there’s a lot to shout about:

  • 2.4″ color LCD screen
  • 3 pushbuttons
  • 5-way joystick
  • Buzzer
  • Micro SD card slot
  • Light sensor
  • IR emitter
  • Accelerometer
  • Wi-Fi
  • Bluetooth
  • USB-C, for client or host mode
  • Two Grove system connectors
wio terminal rainbow lcd output
Having an easy-to-use LCD screen is a useful addition to nearly any type of project.

The USB-C connector is how you’ll power the device for now, though a battery kit is expected to be available at a later date. The Wio Terminal can act as both a USB client, to emulate a keyboard, mouse or MIDI device to the host PC; or a host, so it can, for instance, read signals from a wired game controller (though it’s not yet clear how to power it in this mode).

For more complex projects, or those who just prefer Python, the Wio Terminal is able to combine the best of both worlds with ArduPy. You’ll be able to program in Python using the MS Visual Code editor, yet still import your favorite Arduino libraries (or make use of existing ArduPy ones). Personally, I can’t stand Python, but you can learn more about using the Wio Terminal in this way on the SeeedStudio blog.

Getting Started with Wio Terminal

Power on the device with the switch to the left of the screen–and you’ll be immediately greeted by a small Flappy-bird stype retro game (the code for which is available here in case you ever want it back).

wio terminal flappy bird game

You’ll need the Arduino IDE installed to begin programming the Wio Terminal, and to install support for the Wio boards. Enter the URL provided in your preferences, then use the Boards Manager screen and search for Wio.

You’ll find countless code examples for all the various onboard components on the Wio wiki. Many require you to install an additional library into your Arduino Libraries folder, but that’s a simple process (Sketch -> Include Library -> Add Zip).

My first foray involved the sample code for reading accelerometer values and plotting the results on the screen. Very cool, and it really shows off the device’s capability for data logging projects. You’ll also find code for writing values to an SD card.

wio terminal- accelerometer readings

From there, it was trivial to modify that to read values from the included light sensor instead.

wio terminal reading values from the light sensor

Another ten minutes later, I’d combined the joystick code sample with the LCD fonts demo, to make a simple joystick test program with visual output.

At that point, I wanted to connect another sensor from my bits box, and it was then that I realized there’s a small trade-off to be made in such a polished device. Compared to the barebones board and pin access of the Arduino Uno, it’s a little more difficult to get to the pins on the Wio Terminal. The pinouts for the 40-pin connector can be found in the online documentation, but they aren’t labeled on the device itself and there’s always a risk of plugging in the wrong things.

Which brings us neatly on to the topic of: what options are there for adding components and sensors?

Grove Connectors

On the front of the device are two Grove connectors. Grove is a mature hardware ecosystem that covers every kind of sensor you could possibly want, and more besides.

grove connectors on the wio terminal

This is by far the easiest way to add something to the Wio Terminal, and of course, all the Grove components are also well documented with libraries provided. For beginners, it’s a fantastic place to expand from. There’s a small premium on sensors and components within the Grove system, but not a huge amount–and the time you’ll save not having to mess around means it’s absolutely worth it.

For pro users, you can still make use of existing components either through direct pin access on the underside or through the use of Grove system breakout cables. You won’t have as many digital or analog pins as an Arduino, simply because many of them are already in use by on-board components.

Realistically though, how many times have you needed all those IO pins?

Connectivity Options

The model we were sent for review is an engineering prototype, so getting Wi-Fi to work requires a firmware upgrade. It’s a fiddly process and only needs to be done once, but I expect later models to have this ready to go out of the box.

Unfortunately, the Bluetooth hardware is not yet functional. It’s all there on the board, but the libraries needed to use it are not developed yet. Again, this is an early prototype, so I expect a couple of things to unpolished. The Wio Terminal is the latest in a long line of Wio branded devices, and SeeedStudio is an established company, so I’m confident this will be added in time. Still, if you were hoping to use the Bluetooth features straight away in your project, hold off on purchasing for now.

On the underside of the Wio Terminal, you’ll find a 40-pin Raspberry Pi compatible connector, which enables you to use the Wio Terminal as a Raspberry Pi Hat. This functions via a serial device, so you could send messages from Python running on the Pi to display on the Wio Terminal, for instance. You could feasibly offload some processing work to the Wio Terminal (it can run Tensorflow Lite), use it for the buttons etc, but this seems a waste. Unless you really, really want to program in Python, you’d probably be better off doing everything natively on the Wio Terminal itself. Still, it’s nice to have options.

Is the Wio Terminal Right for You?

Given the choice between the Wio Terminal, which is stuffed to the brim with hardware features like a color screen and joystick–for an entirely reasonable $30–or a $20 official Arduino Uno which has literally nothing else… I know which one I’d choose.

matrix code
Re-live 1999 with this movie reference, and you too can feel old.

Of course, you could opt for unofficial clones and then source only the additional features and components you needed for a somewhat cheaper price. But you should also factor in your time. Part of what’s so attractive about the Wio Terminal package is that everything is so well documented, and I don’t need to track down compatible libraries or code snippets. That means you can concentrate on the things that matter: building awesome stuff.

rainbow swirl circle code wio terminal

That’s why I’m calling it now. The Wio Terminal is the new standard for IoT and data logging development boards. And for beginners looking to get started with electronics programming, the Grove sensor system will save you time and frustration in those crucial early learning stages. At $30, the Wio Terminal is a bargain.

Enter the Competition!

Wio Terminal Giveaway

Read the full article: Why I’m Never Buying an Arduino Again: The Wio Terminal


Read Full Article

How to Use Different Controllers With Google Stadia


stadia-controllers

Anyone can sign up for Google Stadia and stream games to their PC. But do you need a Google Stadia controller to play Google Stadia games? In a word, no.

Several popular game controllers will work with Stadia, meaning you can get started with Google’s game streaming service right away.

Here’s how to use different controllers with Google Stadia…

How to Use Google Stadia on Your PC

You may not know this, but you don’t need a Chromecast or even a special Stadia controller to access the service. And because it is a game streaming service, you don’t need a powerful PC, either.

All you need is the Google Chrome browser. Simply visit stadia.google.com, sign in with your Google account, and start playing. Google offers a trial period for you to sample its collection of games, and all you need is a controller.

For the best results, however, be sure to run a single Chrome browser window and tab for Stadia. This will ensure your browser doesn’t use too much of your computer’s resources for streaming games.

You Can Also Play Google Stadia on Mobile

In addition to a computer and the Chrome browser, you can play Stadia games on the following devices:

  • Pixel 2, 2XL, 3, 3XL, 3a, 3a XL, 4, 4XL
  • Samsung S8, S8+, S8 Active, Note 8
  • Samsung S9, S9+, Note 9
  • Samsung S10, S10+, Note 10, Note 10+
  • Samsung S20, S20+, S20 Ultra
  • OnePlus 8, 8 Pro
  • Asus ROG Phone, ROG Phone II
  • Razer Phone, Razer Phone II

These are arguably the most popular Android phones available right now, so you can potentially take console-standard gaming anywhere. Of course, you’ll need a top-quality internet connection without a data limit if you’re not using Wi-Fi.

You’ll also need to have the Google Stadia app installed on your phone.

Download: Google Stadia for Android (Free)

For more about this game streaming platform, be sure to read our Google Stadia review.

What Controllers Can You Use With Stadia?

If you own a computer or a current-generation game console, you probably have a controller that works with Stadia. Suitable controllers are considered to be:

  • Xbox One controller.
  • PlayStation 4 controller.
  • Nintendo Switch Pro controller.
  • Stadia controllers.
  • A Keyboard and mouse.

Read on to find out how to connect your controller to the Stadia service.

Connect a Console Controller to Stadia

As you will have gathered, there are two ways to play Google Stadia with a game controller: on your computer or on Android.

Windows, macOS, Chrome OS, and Linux computers are all suitable for connecting controllers for playing games on Stadia. However, there is some difference in compatibility between them. As a rule, if you want to guarantee compatibility, use USB rather than Bluetooth.

Xbox One, PS4, and Nintendo Switch Pro controllers will all connect to your PC via USB. Furthermore, they will all be automatically detected by Chrome. As such, you’ll be able to play Stadia games using one without any fuss or bother.

Connect Console Game Controllers to Stadia on Your Computer

With a game controller hooked up to your computer you can play Stadia games. There are some differences between console controllers and the Stadia controller (see below) but otherwise the variation is minimal.

So, what do you need to know about connecting your favorite console controller to Stadia?

If you run into any trouble, it’s wise to check some online support groups. While Google maintains a Stadia Help Center, you’ll get a quicker response from the community and developers in the Stadia subreddit.

Connect Almost Any Game Controller to Stadia on Android

For playing games on Android, a controller is recommended. This isn’t just for Stadia; an increasing number of Android games support USB and Bluetooth controllers.

Android is flexible enough to connect almost any game controller. You’ve already seen above that the Switch Pro controller can be hooked up to your Android. Our guide to connecting game controllers to Android shows you how to connect PS4, Xbox, and Nintendo Switch controllers to your phone.

Using Third-Party Controllers With Stadia

When using a non-Stadia controller with Stadia, there are some differences in the controls. While the overall similarities are clear, secondary buttons differ.

The Stadia menu can be opened by pressing your controllers Home button (Shift + Tab on a keyboard). However, this doesn’t work on Xbox Adaptive Controllers for Android, Linux, or Chrome OS.

Additionally, Windows users can’t use the Home button on Xbox controllers with Stadia without launching the Game Bar. The Shift + Tab keyboard shortcut should be used instead.

Just Use Your Computer’s Keyboard and Mouse

While perhaps not completely suitable for all titles, your computer’s keyboard and mouse is a good alternative for Stadia.

In fact, if you only have one game controller and fancy some multiplayer gaming, using the keyboard and mouse is the ideal solution for a second player.

While there aren’t a vast number of strategy games on Stadia, plenty of first-person shooters are available. PC gamers have long had an advantage over consoles in this regard, with the mouse/keyboard combination considered superior to controllers.

You have the perfect opportunity to find out if this is true.

Connect Stadia Controllers to Your PC’s USB Ports

To play Stadia games through your TV you’ll need a Stadia controller. This is a Wi-Fi enabled controller that syncs with your remote hosted games—but does it work without a TV?

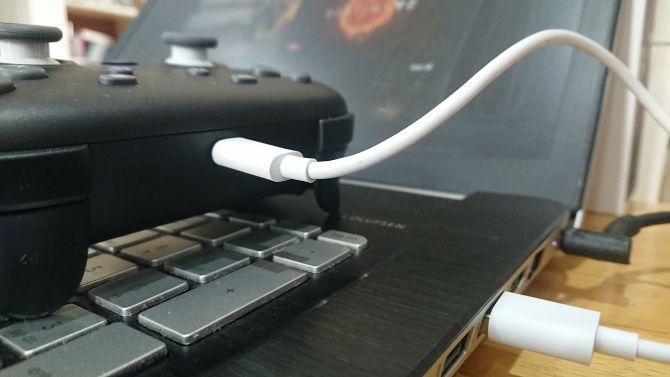
Connect a Stadia controller to your PC

As Stadia can be accessed via your web browser, the answer is yes. Just connect your Stadia controller to your PC using the USB-C cable it ships with. Do this before starting your gaming session, however, to ensure that it installs correctly.

When you’re ready, head to the Stadia website, sign in, and play.

The Best Google Stadia Games to Play

Stadia’s initial marketing focused on the Chromecast Ultra/Wi-Fi controller setup, a strong but expensive option for streaming games on your TV. It turns out, however, that you require neither of these items.

If you own a suitable controller, you can play Stadia games. And future upgrades will surely add support for more controllers.

If you’re new to Google Stadia and looking for some recommendations, check out our list of the best Google Stadia games to get you started.

Read the full article: How to Use Different Controllers With Google Stadia


Read Full Article

Brand Your Web Project the Right Way With a .TECH Domain Extension


tech-domain

While many of our original plans for 2020 have flown out the window due to the current environment, the pause in normal life does offer new opportunities. If you have ever come up with a great idea and pushed it aside due to lack of time, now is your chance to make it happen. Many people are already doing this, setting up blogs, building online stores, and launching services.

If you’re looking to launch a similar project, one of the first things you’ll have to do is pick a domain name. Of course, with most decent .COM and .NET domain names already taken, you’ll likely have to settle for a subpar domain for your new project, which is not the best way to start. Instead, you should opt for a .TECH domain name.

Unlike its .COM and .NET counterparts, the .TECH domain extension is relatively new, so there are plenty of domain name options to choose from, and with “tech” in the name, it can brand your new blog, store, service, or any other tech project perfectly, making it easily recognizable and relevant to those searching online.

The extension carries as much authority with search engines as .COM and other extensions. It’s even being used by major players in the tech scene including CES (www.ces.tech) and Intel (www.insight.tech), and hundreds of thousands of developers, startup founders and tech enthusiasts.

By going with the .TECH domain extension, you’ll have a much better chance of finding a domain name that suits your project, and you’ll be giving it a major edge over competing sites that might not be using the extension.

And, right now, you can save 80% on all one-year and five-year registrations when you use code TECHNOW.

To get started, head over to the homepage for .tech domain names and start searching for your perfect domain name today.

Read the full article: Brand Your Web Project the Right Way With a .TECH Domain Extension


Read Full Article

5 Free Homeschooling Websites to Teach and Educate Children at Home


Homeschooling Websites

With the internet, education comes to your home as you can teach kids through online classes. Where do you start? Try these best free websites and apps for homeschooling children.

If homeschooling is a permanent plan for you, you’ll likely want to spend on premium apps and websites that offer robust packages. But if you are temporarily homeschooling or trying it out for the first time, the internet makes it easy to do it for free.

1. TED-Ed@Home (Web): TED-Ed’s Free Homeschooling Newsletter and Activities

TedEd@Home issues a daily newsletter for easier homeschooling, and hosts a daily new speaker on Instagram

The makers of TED Talks launched a new program to encourage learning for students without going to school. The TED-Ed@Home initiative is a daily newsletter with free lessons, activities, and challenges to support students of all age groups, and parents and teachers too.

The newsletter includes new lessons daily for elementary, middle school, high school, and university. A single click will take you to TED-Ed’s archive of educational videos appropriate for that age group. The lessons cover the arts, literature, language, math, science, technology, and more.

You can also browse all TED-Ed lessons, which you can filter by subject, student level, content type, date uploaded, and popularity.

Also, check out the new TED Challenges on the @TEDEducation Instagram page. Every weekday, a new TED speaker will take over the account for a brief educational talk, and a family-oriented challenge that students can do at home.

Remember, TED isn’t the only platform of its type. You should check out the best TED Talks alternatives and see if their lessons are better suited for your children.

2. Things to Do Indoors (Web): Free Resources From Roald Dahl’s Official Website

Roald Dahl's Things to Do Indoors has a variety of free learning resources for children

The books of Roald Dahl are ever-popular among children. The official website now has a mini-page called Things to Do Indoors, which collects free resources to entertain and educate kids at home.

It’s a mix of fun activities and educational pieces. For example, teachers can browse the “Lickswishy Lesson Plans” to find interactive ways to teach language skills. Or take drawing classes to learn how to draw some of Dahl’s famous characters like Matilda.

There are quizzes, puzzles, arts and crafts, and much more for children to browse directly, as well as adults to teach their kids.

Dahl’s website tries to be as inclusive as possible. The video storytelling section, for example, tells some of his classics in sign language. Also, download the giant activity pack from the Create and Learn page, which has quizzes, activity sheets, dress-up ideas, and more.

3. Techie Home School Mom (Web): Beginner Homeschooling Advice and Curriculum Directory

Techie Home School Mom has an easy to browse directory of home learning courses and curriculum

Beth decided to homeschool her kids, and share all the tips and tricks she learns along the way. Despite the name of her blog, you don’t need to be adept at technology to use it. Beth’s articles are accessible for any level of tech expertise.

The first thing to check out at Techie HomeSchool Mom (THSM) is the online homeschool curriculum directory. Beth has scoured the best free online homeschooling courses to make them easy for you to browse.

Filter by subject, grade, or type, and you’ll find a brief description of each course, the class format, grade levels, and categories it applies to.

Throughout the website, Beth shares to-the-point articles about what you’ll need to successfully homeschool children. It’s a lot of thoughtful things that you wouldn’t have considered, like the equipment you’ll need, or specific homeschooling advice for children struggling with certain subjects.

4. Scholastic Learn at Home (Web): Free 4-Week Homeschool Courses

Scholastic teaches children at home through free four-week courses

Educational books giant Scholastic released some of its library to make four-week-long educational courses. You need to sign up to use it as a teacher, parent, or student, and then it’s completely free, no strings attached.

First, choose a grade group: PreK and Kindergarten, Grades 1 and 2, Grades 3 to 5, or Grades 6 to 9. Each course has four weeks divided into a normal 5-day week. Every day has four activities or educational elements.

Scholastic draws upon its vast repository of educational materials to mix up the lessons for well-rounded learning.

Generally, the kids will have to read an article or watch a video, and then have a follow-up activity like writing an essay based on what they learned. By finishing the daily activities, kids earn a “daily reading quest” for enjoyable comprehension.

Scholastic has also made BookFlix free till the end of the school year. BookFlix is its interactive story-telling app that teaches children to learn to read. Check out the Resources for Families section to learn how to use BookFlix free, and get other free downloadables.

5. GoNoodle Good Energy at Home (Web): Free PE and Exercise Games for Kids

GoNoodle's Good Energy at Home has free weekly physical education and exercise activities for kids

Homeschooling needs to be well-rounded like the system a real school would provide. Your child needs physical activity, and GoNoodle’s Good Energy at Home is the answer. Get free movement, yoga, and mindfulness videos for kids in a variety of activities.

The website has new activities every week, where kids learn different exercises with a bit of fun to them. For example, an NFL player taught children some coordination and agility training exercises. Dance instructors teach kids to shake a leg while getting some cardio. And there are other printables, videos, and activities to find something new each day of the week. Plus, you can always go back through the archives for more.

GoNoodle also works on Apple TV, Amazon Fire TV devices, and Roku, for a big-screen activity experience. Several parents reviewing the app say it’s a great compromise. Kids are happy to get a little extra “screen time”, and parents are happy that the child is active and moving. Plus, it also recommends a few off-screen activities to give those eyes some rest.

Download Free Homeschool Printables

Scholastic doesn’t do what GoNoodle does, and GoNoodle has none of the activities from Roald Dahl’s free site. Ideally, you should mix and match the above recommendations to create your own schedule. And you’ll need to print that out for the child to stick to it.

Much like at the school, homeschooling often requires good old paper and pen. But the good news is that you don’t need to draw up those charts, report cards, and schedules. We’ve got your back with a collection of the best free homeschool printables and templates you can download.

Read the full article: 5 Free Homeschooling Websites to Teach and Educate Children at Home


Read Full Article

A new Android bug, Strandhogg 2.0, lets malware pose as real apps and steal user data


Security researchers have found a major vulnerability in almost every version of Android, which lets malware imitate legitimate apps to steal app passwords and other sensitive data.

The vulnerability, dubbed Strandhogg 2.0 (named after the Norse term for a hostile takeover) affects all devices running Android 9.0 and earlier. It’s the “evil twin” to an earlier bug of the same name, according to Norwegian security firm Promon, which discovered both vulnerabilities six months apart. Strandhogg 2.0 works by tricking a victim into thinking they’re entering their passwords on a legitimate app while instead interacting with a malicious overlay. Strandhogg 2.0 can also hijack other app permissions to siphon off sensitive user data, like contacts, photos, and track a victim’s real-time location.

The bug is said to be more dangerous than its predecessor because it’s “nearly undetectable,” Tom Lysemose Hansen, founder and chief technology officer at Promon, told TechCrunch.

The good news is that Promon said it has no evidence that hackers have used the bug in active hacking campaigns. The caveat is that there are “no good ways” to detect an attack. Fearing the bug could still be abused by hackers, Promon delayed releasing details of the bug until Google could fix the “critical”-rated vulnerability.

A spokesperson for Google told TechCrunch that the company also saw no evidence of active exploitation. “We appreciate the work of the researchers, and have released a fix for the issue they identified.” The spokesperson said Google Play Protect, an app screening service built-in to Android devices, blocks apps that exploit the Strandhogg 2.0 vulnerability.

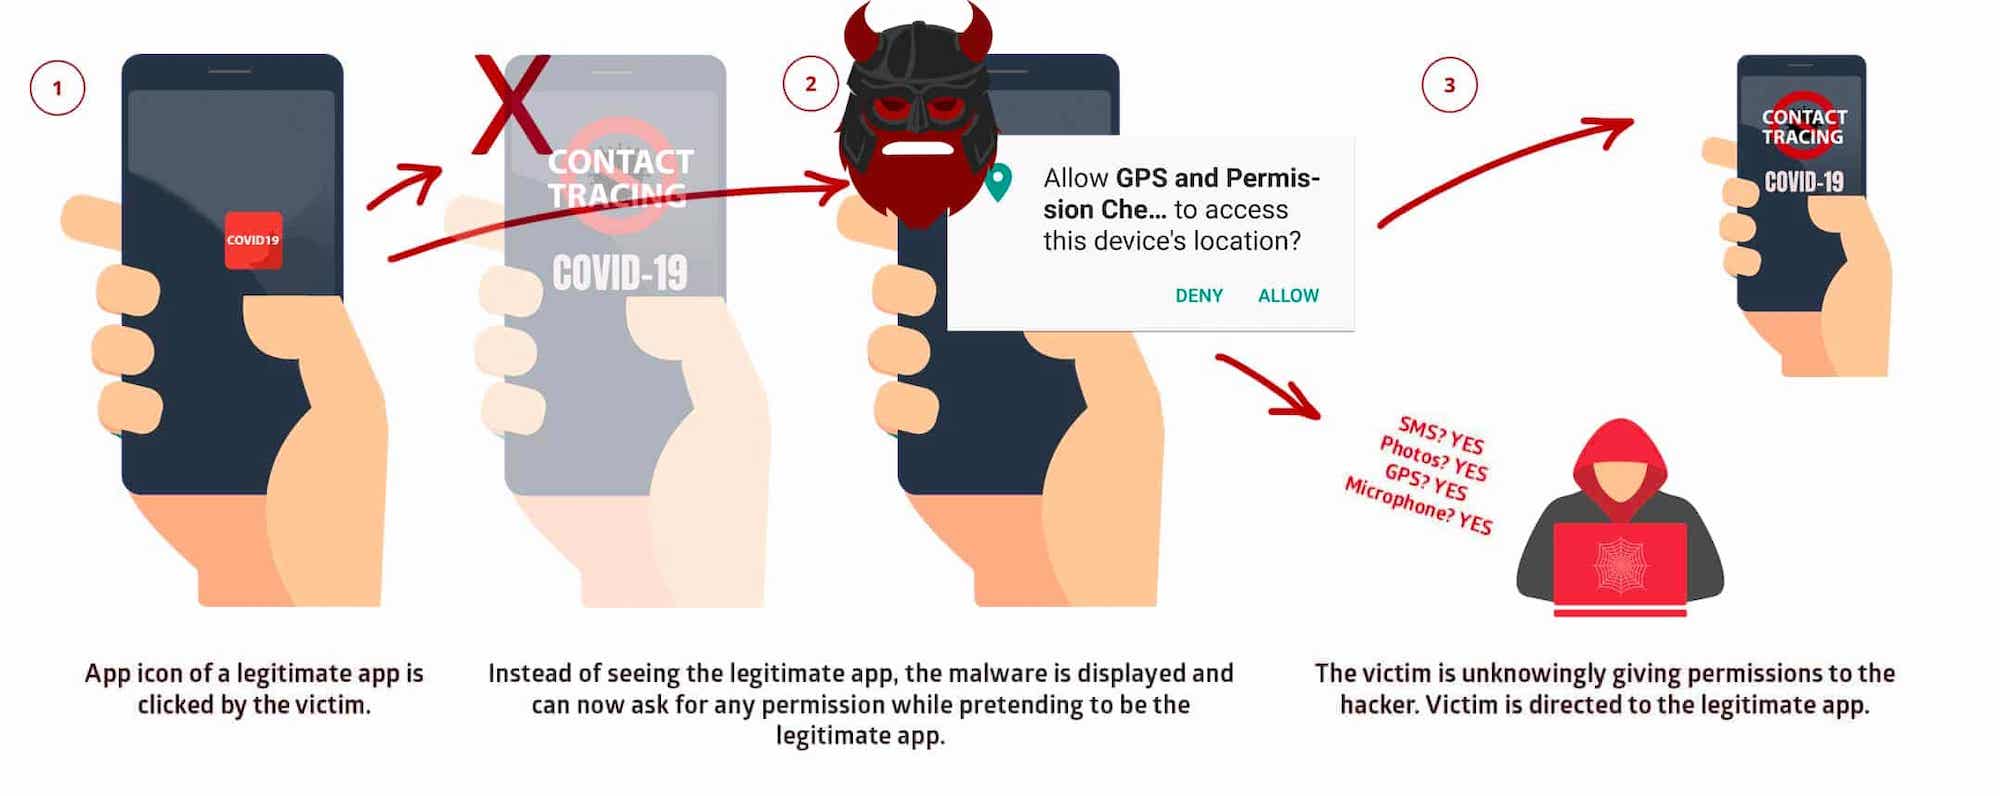
Standhogg 2.0 works by abusing Android’s multitasking system, which keeps tabs on every recently opened app so that the user can quickly switch back and forth. A victim would have to download a malicious app — disguised as a normal app — that can exploit the Strandhogg 2.0 vulnerability. Once installed and when a victim opens a legitimate app, the malicious app quickly hijacks the app and injects malicious content in its place, such as a fake login window.

When a victim enters their password on the fake overlay, their passwords are siphoned off to the hacker’s servers. The real app then appears as though the login was real.

Strandhogg 2.0 doesn’t need any Android permissions to run, but it can also hijack the permissions of other apps that have access to a victim’s contacts, photos, and messages by triggering a permissions request.

“If the permission is granted, then the malware now has this dangerous permission,” said Hansen.

Once that permission is granted, the malicious app can upload data from a user’s phone. The malware can upload entire text message conversations, said Hansen, allowing the hackers to defeat two-factor authentication protections.

The risk to users is likely low, but not zero. Promon said updating Android devices with the latest security updates — out now — will fix the vulnerability. Users are advised to update their Android devices as soon as possible.


Read Full Article

Scandit raises $80M as COVID-19 drives demand for contactless deliveries


Enterprise barcode scanner company Scandit has closed an $80 million Series C round, led by Silicon Valley VC firm G2VP. Atomico, GV, Kreos, NGP Capital, Salesforce Ventures and Swisscom Ventures also participated in the round — which brings its total raised to date to $123M.

The Zurich-based firm offers a platform that combines computer vision and machine learning tech with barcode scanning, text recognition (OCR), object recognition and augmented reality which is designed for any camera-equipped smart device — from smartphones to drones, wearables (e.g. AR glasses for warehouse workers) and even robots.

Use-cases include mobile apps or websites for mobile shopping; self checkout; inventory management; proof of delivery; asset tracking and maintenance — including in healthcare where its tech can be used to power the scanning of patient IDs, samples, medication and supplies.

It bills its software as “unmatched” in terms of speed and accuracy, as well as the ability to scan in bad light; at any angle; and with damaged labels. Target industries include retail, healthcare, industrial/manufacturing, travel, transport & logistics and more.

The latest funding injection follows a $30M Series B round back in 2018. Since then Scandit says it’s tripled recurring revenues, more than doubling the number of blue-chip enterprise customers, and doubling the size of its global team.

Global customers for its tech include the likes of 7-Eleven, Alaska Airlines, Carrefour, DPD, FedEx, Instacart, Johns Hopkins Hospital, La Poste, Levi Strauss & Co, Mount Sinai Hospital and Toyota — with the company touting “tens of billions of scans” per year on 100+ million active devices at this stage of its business.

It says the new funding will go on further pressing on the gas to grow in new markets, including APAC and Latin America, as well as building out its footprint and ops in North America and Europe. Also on the slate: Funding more R&D to devise new ways for enterprises to transform their core business processes using computer vision and AR.

The need for social distancing during the coronavirus pandemic has also accelerated demand for mobile computer vision on personal smart devices, according to Scandit, which says customers are looking for ways to enable more contactless interactions.

Another demand spike it’s seeing is coming from the pandemic-related boom in ‘Click & Collect’ retail and “millions” of extra home deliveries — something its tech is well positioned to cater to because its scanning apps support BYOD (bring your own device), rather than requiring proprietary hardware.

“COVID-19 has shone a spotlight on the need for rapid digital transformation in these uncertain times, and the need to blend the physical and digital plays a crucial role,” said CEO Samuel Mueller in a statement. “Our new funding makes it possible for us to help even more enterprises to quickly adapt to the new demand for ‘contactless business’, and be better positioned to succeed, whatever the new normal is.”

Also commenting on the funding in a supporting statement, Ben Kortlang, general partner at G2VP, added: “Scandit’s platform puts an enterprise-grade scanning solution in the pocket of every employee and customer without requiring legacy hardware. This bridge between the physical and digital worlds will be increasingly critical as the world accelerates its shift to online purchasing and delivery, distributed supply chains and cashierless retail.”


Read Full Article

What to Know Before Changing iTunes and App Store Country


switch-apple-store

We might live in an interconnected world, but international laws and policies can’t always keep up with our jet-setting ways. You’ll discover this first-hand if you ever try to change your iTunes or App Store account from one country to another.

Although it is possible to switch your iTunes or App Store country—which we’ll show you how to do below—doing so comes with a fair amount of drawbacks, like losing access to all your previous purchases.

Here’s everything you need to know about this process.

The Problem With Changing Your iTunes or App Store Country

App Store purchases not on this iPhone for download

Each country accesses a different version of iTunes or the App Store. Sometimes these stores have different apps, music, movies, and other media available in them. But even if two stores have exactly the same content, you can only access your purchased media from the store you bought it from.

That means you lose access to all your existing iTunes and App Store purchases when you change your Apple ID to a different country.

Anything already on your device is still available to use and apps you’ve already downloaded still get the latest updates. But you’ll need to change the App Store and iTunes settings back to your original country again if you want to access purchases that you hadn’t already downloaded.

The biggest issue with this is that you need a valid payment method for whichever country you want to change iTunes and the App Store to. You can’t use an Australian credit card in the US App Store, for example.

So if you moved from Australia to the US, you’d need to get an American credit card to change to the US App Store. Then, if you ever wanted to access your Australian purchases again, you’d need to use your old Australian card to change back. This might be impossible to do if you moved to America permanently and your Australian payment details have expired.

One way to get around this problem is to create a second Apple ID account, rather than changing the settings for your existing one.

The Benefits of Creating a Second Apple ID Account

Create Your Apple ID website with Country selected

Instead of changing the country or region for your existing iTunes and App Store account, sometimes it’s beneficial to create a second Apple ID to use instead. With two separate accounts—one for Australia and one for the US, for example—you can switch between them at any time without needing to update your payment information.

All you would need to do is sign out of iTunes and the App Store on your device, then sign in again using the second account. After doing so, you get instant access to all the iTunes and App Store content from that country, including your previous purchases.

It’s possible to create a new Apple ID account without attaching any payment information to it, allowing you to download free media from iTunes or the App Store in any country. If you want to buy something from another country, you can either add a payment method from that country or purchase a foreign iTunes gift card to use with that account.

The problem with this method is that it splits your purchases across two separate accounts. You need to associate each of them with a separate email address. And if you lose access to one of the accounts, you also lose all the purchases you made using it.

How to Keep iTunes and App Store Purchases From a Different Country

Downloaded purchased movies from iTunes

If you’ve already downloaded them to your device, you can still use any apps, music, movies, TV shows, books, and other iTunes or App Store purchases regardless of which country or account you purchased them from.

That means you should download all the purchases you want to keep using before changing your iTunes and App Store country, or before creating a separate Apple ID account.

If possible, create another copy of these purchases by making an iPhone backup on a computer. When creating the backup, be sure to select the option to Back up all the data from your device to your computer.

If you lose access to your original Apple ID account or if you’re unable to change the iTunes and App Store back to your original country, you can restore this backup to retrieve your original purchases.

How to Change the iTunes and App Store Country Settings

If you are moving to a different country permanently—meaning you only expect to change the country for iTunes and the App Store once—then you should change the settings for your account.

Otherwise, you should create a second account to make it easier to switch between iTunes and App Store countries multiple times. This second method is particularly useful if you don’t have a payment method for the new country you want to use.

We explain each option below.

Method 1: Change the Country Settings for iTunes and the App Store

There are a few steps you need to take before you can change your iTunes and App Store settings to a different country:

  • Cancel any existing subscriptions on your account, such as Apple Music or Apple TV+.
  • Leave your Family Sharing group, unless you’re the Family Organizer.
  • Spend any remaining credit in your Apple ID account.
  • Download any apps, music, movies, TV shows, books, or other media you might want to access in the future.

You also need to make sure you have a valid payment method and billing address for your new country. You’ll need to add this payment method to your Apple ID account when you change countries.

While you can change the iTunes or App Store country from any device, you only need to do it once. After you change the settings on one device, it affects the same account across all your other Apple devices as well.

On an iPhone, iPad, or iPod touch:

  1. Open the Settings app and go to [Your Name] > iTunes & App Store.
  2. Tap your Apple ID username and choose to View Apple ID from the popup.
  3. Tap Country/Region and choose to Change Country or Region, then select the new country you want to change to.
  4. After agreeing to the Terms and Conditions, enter the payment information and billing address for your new country and tap Done.

On a Mac:

  1. Open Apple Music and go to Account > View My Account from the menu bar.
  2. Under the Apple ID Summary section, click the option to Change Country or Region.
  3. Select the new country you want to change to.
  4. After agreeing to the Terms and Conditions, enter the payment information and billing address for your new country and tap Done.

Change Country or Region button in Apple Music app on Mac

Method 2: Create a Second Apple ID Account for Another Country

Creating a second Apple ID account is the best way to switch iTunes and the App Store to a different country temporarily. You don’t need a foreign payment method and it’s easy to switch back and forth between your old account and the new one within the App Store itself.

The easiest way to create a new Apple ID account is directly on your device. When you do so, make sure you select the right country for your new account. You’ll need to confirm this by adding a billing address in that country and verifying your account with an email address (and possibly a phone number as well).

You can use any phone number, even if it’s from a different country. But you need to use a new email address that isn’t linked to an existing Apple ID account.

On an iPhone, iPad, or iPod touch:

  1. Go to Settings > [Your Name] > Sign Out.
  2. Choose which iCloud data to save to your device and tap Sign Out.
  3. Open the App Store and tap the Account icon in the top-right corner, then choose to Create New Apple ID.
  4. Select your new country beneath the email address and password fields.
  5. Enter an email address and password to use with your new account. You can’t use an email address associated with another Apple ID account.
  6. Tap Next and fill in every requested Apple ID field. If you don’t have a payment method for this country, choose None. Even without a payment method, you need to find a billing address you can use in this country.
  7. Tap Done when you’re finished to create your new account.

Top Up Your Account With an iTunes Gift Card

After you create a new Apple ID account or change the settings on your existing account, you should be able to access content from iTunes or the App Store in the new country of your choice.

To make purchases, you need to ensure your payment information and billing address matches your new country. Alternatively, buy an international gift card and use it to add credit to your account. Learn all there is to know about iTunes Gift Cards before buying one to make sure you get what you need.

Read the full article: What to Know Before Changing iTunes and App Store Country


Read Full Article
8 Must-Have iPad Pro Accessories for Optimal Productivity


ipad-pro-accessories

The iPad Pro is Apple’s most powerful tablet. The device is positioned as a viable laptop alternative, thanks to its large screen, multitasking support, and the inclusion of the tablet-specific iPadOS operating system.

However, to make the most of your iPad Pro, you’ll need some accessories to go alongside it. While Apple has an official range available through their stores, we’re going to look mostly at third-party options here.

These are the best iPad Pro accessories available today.

1. Otterbox Defender iPad Pro Case

Otterbox Defender iPad Pro Case Otterbox Defender iPad Pro Case Buy Now On Amazon $63.12

It’s well-known that Apple’s devices can be fragile. All it takes is a small fall or a brief collision with the screen, and your premium device could be out of action. To protect your investment, consider the Otterbox Defender iPad Pro Case.

Otterbox cases are regarded as the best rugged protection you can give your mobile device. The Defender case doesn’t only cover the rear of the iPad Pro. Instead, you insert your tablet inside the case and lock it inside. This protects the screen, keeps your tablet clean, and assists with unexpected shocks.

2. Arteck iPad Pro Keyboard

Arteck iPad Pro Keyboard Arteck iPad Pro Keyboard Buy Now On Amazon $38.99

Although Apple produces its own keyboard for the iPad Pro, the Smart Keyboard Folio, it is expensive. If you aren’t going to be using it that regularly, you can find a more affordable iPad Pro keyboard elsewhere. The Arteck iPad Pro Keyboard is a great alternative and is equipped with many of the same features.

The keyboard doubles as a stand for your tablet and when not in use becomes a protective case for the iPad Pro. The keyboard follows the standard Mac layout and connects via Bluetooth. The built-in battery is good for around 100 hours of use before it needs a two-hour recharge.

3. Apple Pencil

Apple Pencil Apple Pencil Buy Now On Amazon $114.98

While the iPad Pro is designed around its touchscreen, it’s not the most precise input. That’s especially true if you are using it for graphics editing or handwritten notes. The Apple Pencil is the tablet’s official stylus and one of the best iPad Pro accessories.

If you need to replicate the experience of putting pen to paper, then the Apple Pencil will be your most valuable peripheral. The device wirelessly connects to your iPad Pro and supports wireless charging, too. There’s a palm rejection feature included so you can use the Apple Pencil naturally as well.

4. Apple AirPods Pro

Apple AirPods Pro Apple AirPods Pro Buy Now On Amazon $229.95

In Marvel’s Iron Man films, Tony Stark controls all of his technology by voice through his smart assistant, Jarvis. As science fiction becomes reality, you can control your devices with a voice assistant, too. In Apple’s case, that’ll be Siri.

If this kind of hands-free interaction is important to you, then consider investing in a set of Apple AirPods Pro earbuds. The Bluetooth headphones are tightly integrated with Apple’s software, thanks to the company’s H1 chip. The AirPods Pro also come equipped with active noise cancellation.

5. JETech iPad Pro Screen Protector

JETech iPad Pro Screen Protector JETech iPad Pro Screen Protector Buy Now On Amazon $17.99

As you interact with the iPad Pro through the display alone, it makes sense to keep it protected and clean. The JETech iPad Pro Screen Protector is one of the best iPad Pro accessories you can buy. You’d think all screen protectors are alike, but that isn’t the case.

Some protectors interfere with your tablet’s features like Face ID, touch performance, or the camera. This option plays nicely with all of those important functions and is even compatible with the Apple Pencil. Thankfully, the JETech iPad Pro Screen Protector is also fingerprint-resistant.

6. Anker PowerPort PD 2

Anker PowerPort PD 2 Anker PowerPort PD 2 Buy Now On Amazon $21.94

Due to the iPad Pro’s large battery, topping up your tablet can be a slow affair without the right charger. The Anker PowerPort PD 2 is one of the best iPad Pro chargers available today. This is thanks to its 18W USB-C output with which it can recharge your portable Apple devices at the fastest speeds possible.

There’s also a USB-A charging port for all non-USB-C devices, equipped with Anker’s PowerIQ charging technology. As the plug can be folded, the PowerPort PD 2 is the ideal travel charger for the iPad Pro, too.

7. Uni USB-C SD Card Reader

Uni USB-C SD Card Reader Uni USB-C SD Card Reader Buy Now On Amazon $12.99

If you use the iPad Pro for creative pursuits like photography, you’ll need a way of transferring files to the tablet. The Uni USB-C SD Card Reader is compatible with SD, SDHC, SDXC, MicroSD, MicroSDHC, and Micro SDXC cards.

Just pop in the SD card, connect the USB-C cable to your iPad Pro and it will launch the Import function in the Photos app. You can tap to select the images or videos you want to import. Once the transfer is done, you can delete them from the SD card as well.

8. Satechi Aluminum USB-C Hub

Satechi Aluminum USB-C Hub Satechi Aluminum USB-C Hub Buy Now On Amazon $59.99

Most USB-C hubs and adaptors in the market will work with the new iPad Pro. But because of their short cables, they’re unwieldy to use with the device propped up. Satechi has an Aluminum USB-C Hub specially designed for the iPad Pro.

Just plug the hub into the tablet, and you’ll have access to an HDMI port, USB-A port, SD card reader, and a USB-C port. It’s important to note that the USB-C port is for charging only. The HDMI port supports monitors with up to 4K resolution at 30Hz.

The Best iPad Pro Accessories

The iPad Pro was designed with productivity in mind. The larger screen and the optimized iPadOS software make the iPad Pro an ideal laptop alternative. These accessories enhance the experience further, helping you focus on what’s important to you.

However, the iPad Pro isn’t right for everyone. If you’re unsure which of Apple’s tablets would suit you best, use our iPad comparison to find the right iPad for your needs.

Read the full article: 8 Must-Have iPad Pro Accessories for Optimal Productivity


Read Full Article

How to Search Reddit Effectively: Useful Tips and Tricks to Know


reddit-extensions

Reddit is a huge website, containing thousands of posts and comments across numerous subreddits. As such, if you want to find a post that covers a specific topic, it’s a good idea to get to grips with the different ways of using Reddit’s search engine.

So, in this article, we explore how to search Reddit, including some unofficial ways to get better results.

How to Search Reddit for Subreddits, Users, and Posts

If you want to search across all of Reddit—whether you’re looking for a subreddit or a post—you can use the search bar. If the term “subreddit” just flew right over your head, be sure to check out our guide on what Reddit is and how it works before reading any further.

The search bar is in different locations, depending on which kind of Reddit design you’re using. If you’re using the old Reddit design, the search bar is in the top-right.

The search bar on the old Reddit design

If you’re using the new Reddit design, it’s at the very top in the middle.

The search bar on the new Reddit design

Type what you want to see in here and press Enter to search. When you use the search bar, Reddit will pull up subreddits, users, and posts that contain your search term. For example, if you search for “cats,” you’ll find the subreddit /r/cats, as well as every post on Reddit that has “cats” in the title.

If you want to search just subreddits, you can visit the subreddit page. This is used for managing the subreddits you follow, but it also comes with a search box exclusively for finding new communities.

How to Search Reddit Using Modifiers and Operators

You can also use the following modifiers as mentioned in Reddit’s advanced search:

  • title:[text] searches only post titles.
  • author:[username] searches only posts by the given username.
  • selftext:[text] searches only the body of posts that were made as self-posts.
  • subreddit:[name] searches only posts that were submitted to the given subreddit community.
  • url:[text] searches only the URL of non-self-post posts.
  • site:[text] searches only the domain name of non-self-post posts.
  • nsfw:yes or nsfw:no to filter results based on whether they were marked as NSFW or not.
  • self:yes or self:no to filter results based on whether they were self-posts or not.

You can also use boolean operators to better refine your search.

  • AND means you want both sides to be true.
  • OR means only one side needs to be true.
  • You can use parentheses () to group modifiers together in case the search query is a complex mixture of ANDs and ORs.
  • You can negate/exclude certain modifiers by preceding them with (minus sign).

How to Search Within a Subreddit

If you want to search a subreddit, you can use the subreddit search modifier we mentioned above. However, there is an easier way that will save you a little bit of time.

For example, let’s say you’re browsing a subreddit and you’re not finding what you want to find. Instead of browsing until you find it, you can search only within the subreddit you’re on. To do this, type what you want to look for within the search bar.

If you’re using old Reddit, click the checkbox under the search box that says “limit my search to [subreddit name]”. When you hit Enter, only results from that subreddit will appear.

Searching a subreddit on the old Reddit design

If you’re using the new Reddit design, however, you won’t see a tickbox. Instead, search the term as if you were searching the entire website. Then, on the results page, click the link that says “show results from [subreddit name]”. This then filters the search to show only content from your current subreddit.

Searching a subreddit on the new Reddit design

How to Search Reddit Comments

You’ve probably noticed that the search engine can’t look through Reddit comments; at least, it can’t at the time of writing. However, there is still a way to search Reddit comments; we just need to move away from Reddit and use third-party tools instead.

One of the best tools available is Pushshift Reddit Search. This website will let you search through Reddit comments, but as you’ll see when you visit the website, that’s not all it can do. If you get frustrated with Reddit’s search engine, be sure to try this one instead.

The PushSearch website

To search comments, ensure that you’re on the “Search” category on the first row of options. On the second row, unselect “Posts” and select “Comments”. On the third row, select the span of time you want to search in. Enter what you’re looking for in the “Search Terms” box.

If you want to search a specific subreddit, enter it into the “Subreddits” field. The “Domains” field is looking for posts that link to a specific website, but you don’t need to fill this out if you’re looking through comments.

When you click on “Search,” Pushshift will scour through Reddit and pull up all the comments that match your query.

A search result from a PushSearch query

How to Find Deleted Reddit Comments

Sometimes you’re looking through a comment thread for discussion. You’ll find a comment that says “[Deleted],” followed by a chain of replies discussing the matter further. The start to the conversation is lost forever—or so you might think.

A deleted comment on Reddit, with replies

There’s a handy website called Removeddit that stores as many comments on Reddit as possible. As such, if a comment is deleted, Removeddit will “remember” it and show you what it used to say. Moreover, it will even let you know if the user deleted their own comment by marking it blue, or if a mod removed it by marking it red.

To use Removeddit, navigate to the Reddit comment section that you want to check. Then, edit the URL so that the “Reddit” part in the domain name becomes “removeddit.” There’s no need to delete the name and re-type it; just add “move” after the “re” in “Reddit.”

Restoring deleted comments with Removeddit

When you press Enter, you’ll load the Removeddit page for that comment thread. Removeddit will look through its database and show all of the comments it has on file for that thread. If Removeddit managed to archive the comment before it was deleted, you’ll find it here in its former glory. Otherwise, if it got deleted before Removeddit could see it, the website will show an error message instead.

Upgrading Your Reddit Experience

As you can see, there are various ways to search Reddit. So, whether you’re looking for a new community to join, or are trying to find that one funny meme you stumbled across weeks ago, you should be fine. Especially if you make use of the third-party options mentioned above.

Now that you know how to search like a pro, you may want to consider upgrading to Reddit Premium. But before you do, find out what Reddit Premium is and how it works.

Read the full article: How to Search Reddit Effectively: Useful Tips and Tricks to Know


Read Full Article