24 January 2020

Facebook’s dodgy defaults face more scrutiny in Europe


Italy’s Competition and Markets Authority has launched proceedings against Facebook for failing to fully inform users about the commercial uses it makes of their data.

At the same time, a German court has today upheld a consumer group’s right to challenge the tech giant over data and privacy issues in the national courts.

Lack of transparency

The Italian authority’s action, which could result in a fine of €5 million for Facebook, follows an earlier decision by the regulator, in November 2018 — when it found the company had not been dealing plainly with users about the underlying value exchange involved in signing up to the “free” service, and fined Facebook €5 million for failing to properly inform users how their information would be used commercially.

In a press notice about its latest action, the watchdog notes Facebook has removed a claim from its homepage — which had stated that the service “is free and always will be” — but finds users are still not being informed, “with clarity and immediacy” about how the tech giant monetizes their data.

The Authority had prohibited Facebook from continuing what it dubs “deceptive practice” and ordered it to publish an amending declaration on its homepage in Italy, as well as on the Facebook app and on the personal page of each registered Italian user.

In a statement responding to the watchdog’s latest action, a Facebook spokesperson told us:

We are reviewing the Authority decision. We made changes last year — including to our Terms of Service — to further clarify how Facebook makes money. These changes were part of our ongoing commitment to give people more transparency and control over their information.

Last year Italy’s data protection agency also fined Facebook $1.1 million — in that case for privacy violations attached to the Cambridge Analytics data misuse scandal.

Dodgy defaults

In separate but related news, a ruling by a German court today found that Facebook can continue to use the advertising slogan that its service is “free and always will be” — on the grounds that it does not require users to hand over monetary payments in exchange for using the service.

A local consumer rights group, vzbv, had sought to challenge Facebook’s use of the slogan — arguing it’s misleading, given the platform’s harvesting of user data for targeted ads. But the court disagreed.

However, that was only one of a number of data protection complaints filed by the group — 26 in all. And the Berlin court found in its favor on a number of other fronts.

Significantly, vzbv has won the right to bring data protection-related legal challenges within Germany even with the pan-EU General Data Protection Regulation in force — opening the door to strategic litigation by consumer advocacy bodies and privacy rights groups in what is a very pro-privacy market.

This looks interesting because one of Facebook’s favored legal arguments in a bid to derail privacy challenges at an EU Member State level has been to argue those courts lack jurisdiction — given that its European HQ is sited in Ireland (and GDPR includes provision for a one-stop shop mechanism that pushes cross-border complaints to a lead regulator).

But this ruling looks like it will make it tougher for Facebook to funnel all data and privacy complaints via the heavily backlogged Irish regulator — which has, for example, been sitting on a GDPR complaint over forced consent by adtech giants (including Facebook) since May 2018.

The Berlin court also agreed with vzbv’s argument that Facebook’s privacy settings and T&Cs violate laws around consent — such as a location service being already activated in the Facebook mobile app; and a pre-ticked setting that made users’ profiles indexable by search engines by default

The court also agreed that certain pre-formulated conditions in Facebook’s T&C do not meet the required legal standard — such as a requirement that users agree to their name and profile picture being used “for commercial, sponsored or related content,” and another stipulation that users agree in advance to all future changes to the policy.

Commenting in a statement, Heiko Dünkel from the law enforcement team at vzbv, said: “It is not the first time that Facebook has been convicted of careless handling of its users’ data. The Chamber of Justice has made it clear that consumer advice centers can take action against violations of the GDPR.”

We’ve reached out to Facebook for a response.


Read Full Article

How to Add Website Shortcuts to the iPhone Home Screen


organize-iphone-apps

With millions of apps on the App Store for iPhone and iPad, you think there would be an app for everything. Sadly, that’s not the case.

Sometimes you’ll come across a great website that doesn’t offer a dedicated app. Or maybe you just want quick access to your favorites sites from your iPhone’s home screen. Whatever the case, you can easily add websites to your home screen on iPhone thanks to a neat Safari trick.

We’ll show you how to make any website an app on iPhone and iPad.

How to Add Website Apps to the iPhone Home Screen

To add websites to your home screen like apps, follow these steps:

  1. Open Safari. Other browsers, such as Chrome, won’t work for this.
  2. Navigate to the website you want to save to your home screen. Make sure you visit the exact page you want to open through the shortcut.
  3. Tap the Share button at the bottom of the page. It looks like a square with an arrow pointing out of the top.
  4. In the list of options that appears, scroll down until you see Add to Home Screen. Tap this.
  5. On the next screen, choose a name for the website shortcut on your home screen. You’ll see the link so you can confirm it, as well as the site’s favicon that becomes its “app” icon. Click Add when you’re done.
  6. Now just tap the new app on your home screen, and it will open the website in its own navigation window, independent of what you have open in Safari.

If you ever decide you want to remove the website shortcut, you can delete it just like you would any other app on your phone.

Add Everything to Your Home Screen

This is a great way to add website “apps” to your home screen for services that don’t have them. Video game music radio site Rainwave, which we used above, is a good example. It’s a lot better than having to open Safari and jump to a bookmark every time you want to visit a particular site.

Many people prefer to have an app for everything they use on their phones. With this method, it’s easy to do so. If you get overwhelmed with all the apps on your home screen, check out our tips for organizing your iPhone apps and creative layouts to organize your iPhone home screen.

Read the full article: How to Add Website Shortcuts to the iPhone Home Screen


Read Full Article

How to Recover Your PC Using an Android Device


recover-pc-using-android

Your PC’s operating system crashed, and the only chance of recovery is an ISO file flashed to a USB stick.

But if you don’t have a spare PC to create installation media with, don’t worry. Android has you covered. Here’s how to recover your system by creating a bootable USB from Android without a PC.

Your PC Is Toast: What Now?

We’ve all been there: your PC won’t load. Perhaps a virus has compromised the operating system, or the hard disk is failing and needs replacing. There’s data you need to recover, but you have no way to burn a recovery disk.

You may think your PC is the only device you have that can download and burn ISO files (disk images saved as a single file). Or is it?

If you have an Android phone or tablet on hand running Android 3.1 or later, the device probably has USB On-The-Go (OTG) support. This means you can attach USB devices to your phone or tablet, like a mouse, keyboard, or even a USB storage device.

This is the path you can use to recover your PC. Download the recovery disk ISO file, connect the USB device to your tablet or phone, and burn the ISO file using a dedicated app.

Using Android Like a PC

If you have an Android phone or tablet nearby with OTG support, there’s a good chance you can use it to fix your PC.

But wait: have you diagnosed the problem? Before proceeding with recovery, search online to check what the boot issue might be. Think about the symptoms, what your PC did before it crashed, and how long you’ve had the problem. Taking this approach will help you to decide what path to take later when burning an ISO.

For instance, you might require a dedicated recovery disk, or simply a fresh version of your preferred operating system. However, if you’re not sure, opt for the recovery disk. If your Android device has enough storage space, find a suitable disk image ISO file and download it. If you’re low on space, try a tiny Linux distro.

Be sure to use your home network connection for this, rather than mobile internet. Downloading an operating system will use several gigabytes of data, which could eat up your entire mobile allowance.

Create a Bootable USB on Android Without a PC

Once you’ve downloaded the ISO you want, you’ll need a tool to burn it with. On Windows, you would probably choose Rufus, but this is not available for Android. However, several Rufus-like alternatives are available.

Of these, the most reliable is the ISO 2 USB Android utility. This basically does the same job as Rufus, turning a portion of your phone’s storage into a bootable disk.

With this, you can run recovery, or simply install a new operating system.

Download: ISO 2 USB for Android (Free)

Create Bootable ISO Media

To use this, however, you’ll also need an OTG adapter. This is an affordable cable that you can purchase from mobile phone retailers or online. Two types are available: one for phones with USB-C ports, and another for those with micro-USB ports.

USB C to USB Adapter USB C to USB Adapter Buy Now On Amazon $7.99 Micro USB 2.0 OTG Cable Micro USB 2.0 OTG Cable Buy Now On Amazon $5.29

Once connected to your phone, simply plug a USB flash drive into the OTG adapter. You can write your downloaded ISO to this destination.

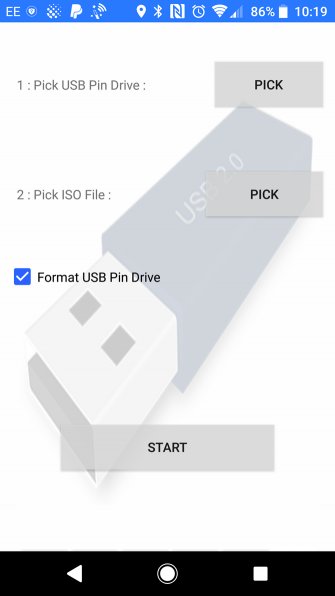
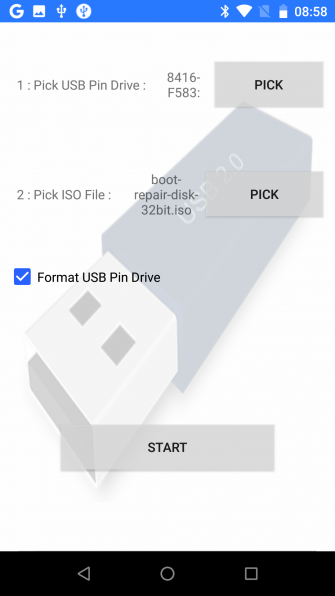
Begin by connecting the USB drive via the OTG cable, then tapping the first Pick button. Choose your USB drive, then proceed to the second Pick button to choose the ISO file.

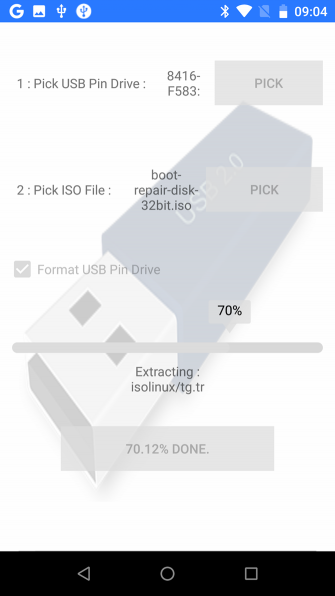
Be sure to accept Android’s permissions requests throughout; the app will request access to your media files, as well as the USB drive. With both selected, you can then tap Start to begin writing the data.

It shouldn’t take long to complete; once done, remove the USB device, insert it in your PC, and begin recovery. Remember to change the boot order in your computer’s BIOS to enable booting from USB.

Turning an Android Phone Into a Bootable Linux Environment

Don’t have a USB flash drive or a USB to OTG cable? If your Android device is rooted, you can try an alternative approach.

DriveDroid is a useful utility that lets you boot your PC directly over a USB cable using any ISO or IMG file stored on your phone. You just need your Android smartphone or tablet and a suitable cable—no flash drives required.

Download: DriveDroid (Free) | DriveDroid Paid ($1.99)

It’s important to note that this is only an option for rooted devices. Even then, some phones may not work as intended due to kernel quirks.

Note also that this solution requires support for USB Mass Storage on your device. While modern versions of Android don’t support USB Mass Storage, DriveDroid’s website notes that “DriveDroid has various methods of enabling Mass Storage.”

How to Recover a PC Using DriveDroid

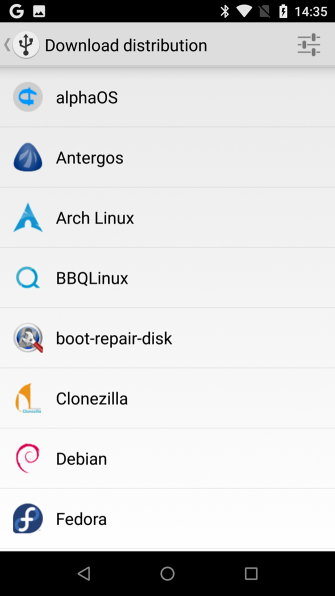
Run DriveDroid and Grant root permissions. Next, click the Download button, and select an OS to download to your phone. A massive selection is available, from Ubuntu to ZorinOS, Tiny Linux, Gentoo, Arch Linux, and other top Linux distros.

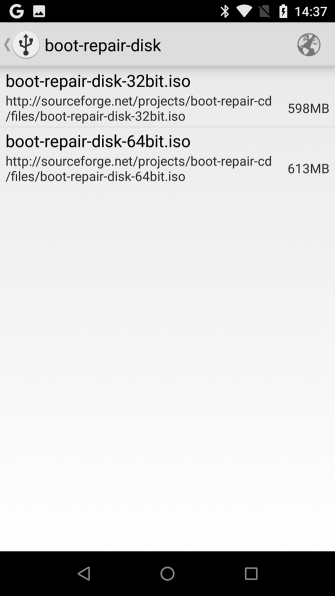
However, if you’re trying to recover your PC, the best options are boot-repair-disk, or CloneZilla if you need to clone the contents of your dying HDD.

Note that when you select an OS, you’re given a choice of version. This is typically a recent build, in 32-bit or 64-bit flavors. Be sure to select the OS that suits the build of the PC you’re attempting to recover.

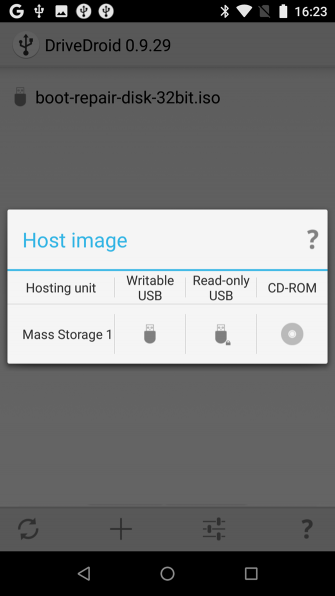
With the OS selection made, wait while it downloads to your Android device. The ISO file will save in the Downloads folder but will also appear in the main DriveDroid screen. Select the ISO, then wait while the options are displayed. Choose standard USB storage, read-only USB storage, or CD-ROM. This will determine how the ISO behaves when you reboot your computer.

You can then connect the Android device to your PC and reboot. If your computer’s boot order is configured to boot USB devices, the downloaded operating system will boot from your phone. You can then use this to recover your PC, or even install a brand-new OS.

How to Install Windows 10 From an Android Phone to PC

There is another benefit of using the DriveDroid app rather than ISO 2 USB. DriveDroid adds the ability to install Windows 10 from an Android phone or tablet.

So if Linux isn’t ideal for you, and the recovery tools don’t repair your Windows partition, you can simply reinstall. For $1.99, this is a good deal. You could have Windows 10 reinstalled on your PC using your Android phone in under an hour.

That’s not bad for an Android app.

Two Options to Recover Your PC With Android

If your PC is out of action, you can install a new operating system or run a recovery environment thanks to Android. Two solid options are available:

  • ISO 2 USB: Lets you burn an ISO file directly to a USB flash drive over USB-OTG.
  • DriveDroid: Enables you to store bootable ISO files on Android. With the paid version, support for Windows 10 installation images is added.

By now you should have a USB stick or an Android device ready to boot your PC.

Still having trouble? Try another recovery option. If you end up gaining access to a second PC, follow our guide to backing up your data when your computer won’t boot.

Read the full article: How to Recover Your PC Using an Android Device


Read Full Article

Tinder Helps You Stay Safe While Dating


Tinder is rolling out new features designed to help you stay safe while dating. This includes a panic button you can trigger if a date goes horribly wrong, and photo verification to ensure people are who they say they are. Which should help prevent catfishing.

While Tinder has helped revolutionize dating, allowing people to hook-up without any effort, it isn’t perfect. There are the obvious dangers of dating in this way, plus Tinder scams which prey on people looking for an easy way to meet new partners.

How Tinder’s New Safety Features Work

Tinder IS keen to keep people safe, and its latest features are designed to help you stay safe while dating. In a post on the Tinder Blog, Tinder has announced a slew of new features dedicated to safety, including Photo Verification and a Noonlight integration.

Elie Seidman, the CEO of Tinder, said, “Every day, millions of our members trust us to introduce them to new people, and we’re dedicated to building innovative safety features powered by best-in-class technology that meet the needs of today’s daters.”

The first new feature is an integration With Noonlight. This allows members to “share details about upcoming dates via Noonlight’s Timeline feature [and] easily and discreetly trigger emergency services if they are feeling uneasy or in need of assistance.”

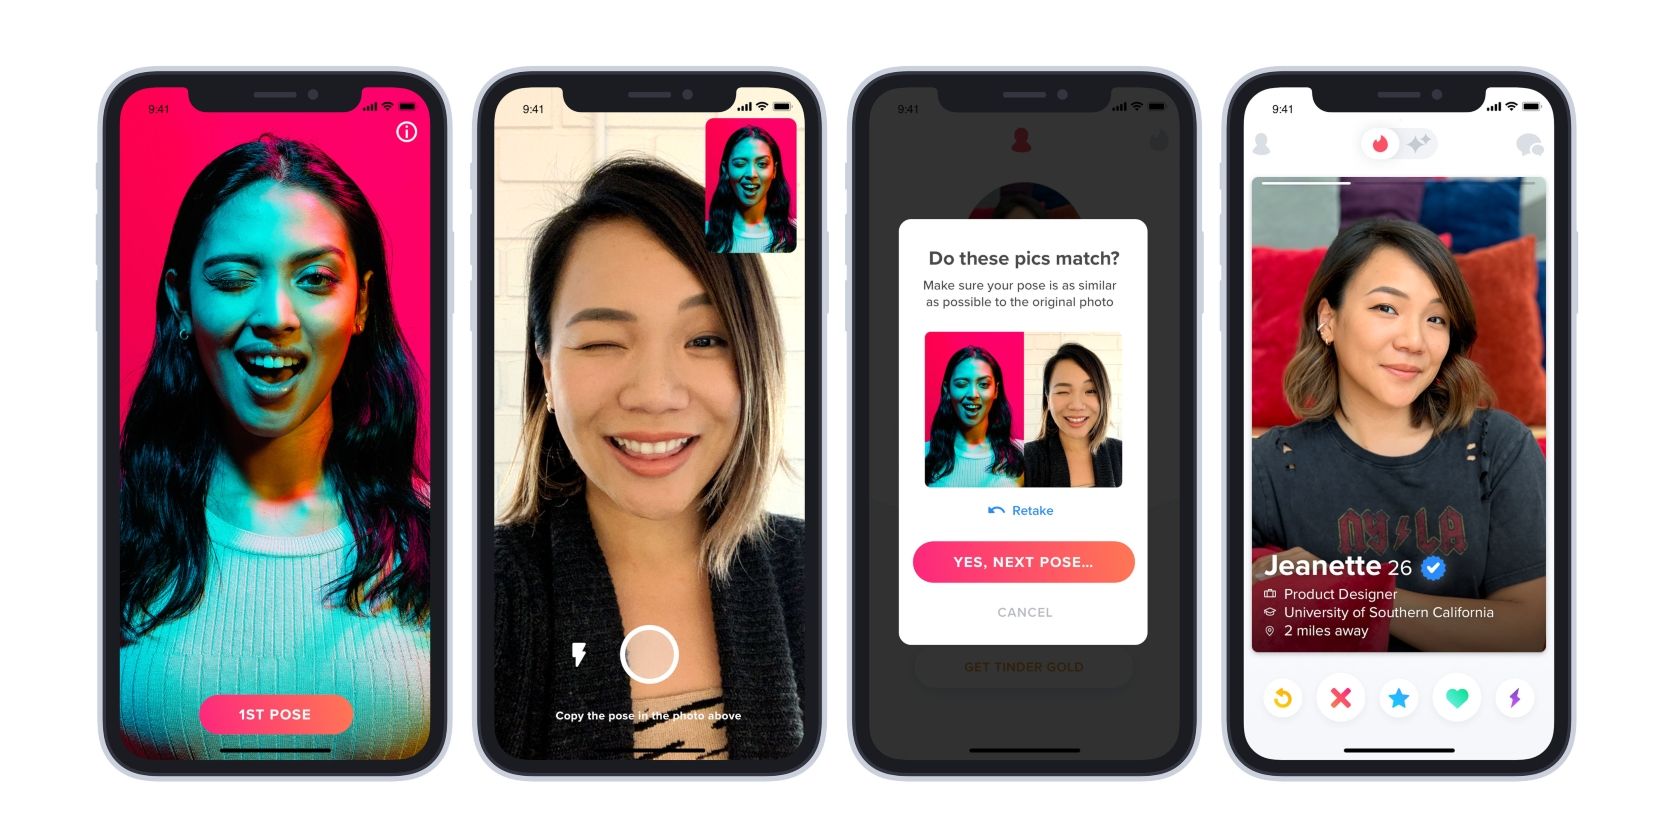
Tinder also now offers Photo Verification. This “allows members to self-authenticate through a series of real-time posed selfies,” and, once completed, “verified profiles will display a blue checkmark so members can trust their authenticity.”

Lastly, Tinder is launching “a comprehensive Safety Center […] dedicated to keeping members informed about these features while providing resources and tools.” This is launching in the US, UK, France and Germany soon, with additional markets added later.

How to Stay Safe When You Match on Tinder

Tinder deserves credit for working behind the scenes to keep people safe while using its app. Unfortunately, there’s still a risk attached to using dating apps, so we recommend using these new features to give yourself the best chance of a positive experience.

If you’re new to Tinder, possibly thanks to these new safety features, here’s what to do when you match with someone on Tinder. The article includes important information regarding how to stay safe. Which should be your number one priority at all times.

Read the full article: Tinder Helps You Stay Safe While Dating


Read Full Article

Screen Burn-In Fixes and Why LCD Can Be Fixed


Have you ever left your TV or monitor on for days, stuck on the same image? You return to your screen, only to find an image burned into the display. No matter what you do, it won’t go away. It is a permanent image burn.

Why do monitors and TVs get image burn? Why can’t manufacturers prevent LCDs and plasma screens from a burnt image imprint? Moreover, what can you do to fix an image burn?

In some cases, you can minimize the image burn effect. In others, you can remove the image burn completely, so long as it hasn’t been burning too long.

What Are LCD, LED, and Plasma Screens?

Before flat-screens and crystal displays, most TVs and monitors featured CRT (Cathode Ray Tube) technology. In CRTs, individual pixels comprise a red, blue, and green phosphor component. Depending on the intensity of each phosphor component, the pixel appears to the human eye as a unique color.

When a particular still image remains for too long, the intensity of each phosphor component diminishes at an uneven rate. The result is a ghost image on the screen, which is known as image burning.

burned-lcd-display-2

Plasma displays use plasma, a gaseous substance containing free-flowing ions. When the plasma is not in use, the particles in the plasma are uncharged and display nothing. With the introduction of an electric current, the ions become charged and begin colliding, releasing photons of light.

This is a very simplified version of how a plasma screen works. However, the main thing to understand is that plasma screens use phosphor material (like CRTs) to turn those photons into images.

LCD and LED do not work in the same way as CRTs, either. LCD and LED screens use backlit liquid crystals to display colors. Although manufacturers market screens using LED and LCD, an LED screen is still a type of LCD. The white backlight filters through the liquid crystals, which extract particular colors per pixel.

LCD and LED displays don’t suffer from the same type of image burn as CRTs and plasma screens. They’re not completely clear though. LCD and LED screens suffer from image persistence. Read on to find out more about image persistence.

Why Do Plasma Screens Burn-In?

Before you can fix screen burn-in, take a second to understand why these images burn in the first place. LCDs and LEDs don’t suffer from burn-in as seriously as plasma screens. But static images can leave an imprint on both display types if left alone for too long. So, why does image burn happen?

First, let’s tackle plasma screen burn-in. Remember why CRTs experience image burn? When a still image remains on the screen for too long, the phosphor components in each pixel wear out at different rates. The uneven burn rates leave behind a ghost image, forever etched into the screen.

Plasma screens also suffer from phosphor deterioration. Plasma burning occurs when pixels on the screen are damaged through long exposure. The phosphor loses its intensity and only shows the light it was fed repeatedly. In this case, the still image, which causes the burn.

Do LCDs and LEDs Experience Image Burn?

LCD and LED screens can also experience image burn, though the image burn process can longer to develop into a permanent issue. LCD and LED screens suffer from another issue, known as image retention (also known as image persistence or an LCD shadow).

Image retention is a temporary issue that you are more likely to notice before it becomes a permanent issue. However, proper image burn can still affect LCD, LED, and OLED screens.

Image retention is a different issue to image burn (although it is a precursor to image burn). For example, you’re using a single image of a steam train as a reference point for a drawing. You have the steam train image on your screen for a few hours, before you decide to play a video game instead.

When you load up the video game on the screen, you can still see the faint outline of the steam train on the screen. The steam train image will remain for a short while, but the movement and color changes of the video game (or film, TV show, or other media type) should erase the retained image.

The other thing to consider is that LED and OLED image burn-in, when it happens, is irreversible. That’s because of how LED and OLED screens work. Individual pixels within an LED display decay when they emit light.

When the screen fixes on a single image, those pixels decay at a faster rate than those around it. Once the pixel itself is dead, there is no recovery.

Under normal use, an LED, OLED, or QLED screen won’t suffer image burn. If you leave your screen on a single channel for hours every day, then burn-in can become an issue, as it would with almost any screen.

Issues arise when a screen shows a single news channel 24 hours a day, every day, causing channel logos to burn-in, along with the outline of the scrolling news ticker and so on. News channels are a well known source of television burn-in, no matter the screen type.

Check out Kannon’s article on LED, OLED, and AMOLED image burn-in and how you can avoid it. It has some handy tips in there for smartphones, too!

LCD and Plasma Screen Burn-In Fixes

Image burn-in fixes exist for LCD and plasma screens. How effective an image burn-in fix is depends on the screen damage. Depending on the length and severity of the image burn, some displays may have permanent damage.

1. Prevent LCD and Plasma Screen Burn

The best fix for screen burn is to prevent it in the first place. Okay, that isn’t super useful if your screen is already experiencing image burn. However, you should always try not to leave your screen on a still image for too long. The time it takes for an image to burn-in varies from screen to screen,  between manufacturers, sizes, and panel type.

My personal rule of thumb is to turn off and display if I plan on being away for more than 15 minutes. That way, it is difficult to get caught out, plus you save yourself money on electricity costs and monitor or TV wear and tear.

2. Reduce LCD and Plasma Screen Image Burn

Another prevention method is to reduce screen contrast as much as you can. Most screens aren’t calibrated correctly, often pushing the contrast and brightness settings too high.

Lower contrast means the lighting across your screen is more even. This means less strain on specific areas of the screen, which in turn helps protect against image burning.

3. Use Static to Fix LCD and Plasma Burn-In

If your plasma or LCD screen already has image burn-in, you can try turning on white static for 12 to 24 hours. The constant moving of white-and-black across your screen in random patterns can help remove the ghost image from your screen.

Unfortunately, this won’t work for extreme cases. Some TVs will have a built-in pattern swiping option that basically accomplishes the same thing (by filling your screen with random patterns).

4. Use Pixel-Shift to Fix LCD and Plasma Image Burn

Some TVs and monitors feature pixel-shift or screen shift technology. Pixel-shift constantly slightly adjusts the image on your screen, which varies the pixel usage enough to counteract image burn. You might have to enable a pixel or screen shift option in your screen settings. Pixel-shift is a handy feature for LED and OLED screens that cannot recover from image burn, and should help counteract an LCD shadow.

Other modern screens feature built-in screen refresh functions that the manufacturer will advise using to remove image retention and image burn issues.

5. Use JSCreenFix to Fix LCD and Plasma Screen Burn

The best tool that I’ve found for fixing ghost images is JScreenFix. Though the original program design was to help fix monitors with dead pixels, they now have a JScreenFix Deluxe which uses advanced algorithms to repair burned screens and prolong plasma and LCD longevity.

There is a free version available, but if you want to run the program for more than 20 minutes at a time, you’ll need to purchase a license for $25 USD.

If you’re unsure if you have a dead pixel, try one of these dead pixel locating programs to find out. Some options have built-in fixes, too.

6. Use a White Screensaver to Fix LCD and Plasma Image Burn

Another option is to set a completely white desktop background and leaving to run for a few hours. The solid color might reset the image burn. A solid color background is more likely to help with image persistence than image burn, but it is still worth trying.

If you have television burn-in, you can attach a laptop to your TV using a HDMI cable, extend your desktop to the television, and share the white screensaver. Hopefully that will shift your television burn-in.

The Best Way to Prevent Screen Burning

There are several ways you can attempt to fix screen burn-in. The results will vary between the screen type and the level of burn-in. A screen with extensive image burn may not clear entirely, although you might see an improvement.

Some screen degradation over time is understandable. However, if you follow the steps in this guide, you’ll protect your screen from image burn before it becomes a permanent issue.

Interestingly, screen burn-in brings us back to a nostalgic computer feature: the screensaver. Are screensavers still relevant? And could a screensaver protect your screen from image burn?

Read the full article: Screen Burn-In Fixes and Why LCD Can Be Fixed


Read Full Article

How to Create Shared Collaborative Google Maps


google-maps-features-android

Google Maps is the ultimate web mapping service. It makes it a breeze to find a place, plan a route, or just see the world from the comfort of your home.

One underused feature is the ability to create custom maps, which can then be shared with others publicly or privately for collaboration. Everyone can contribute to the same map—great for things like planning a vacation, creating a dream travel list, or even a unique address book.

We’re going to show you how to create a Google map to share and collaborate with others.

1. Create Your Collaborative Google Map

To begin, you need to be signed in to your Google account, so do that first.

Now it’s time to create a blank map. To do this, click Menu > Your places > Maps.

Google Maps your places

If you have ever created or viewed a shared map in the past, it will appear in this list. You can click See all your maps if you want to filter that list by ownership or date.

For now, click Create map. This will bring up a blank, untitled map in a new window.

2. Edit Your Collaborative Google Map

Set Up Your Map

The first thing to do is give your map a name. Click the Untitled map to edit it. You can also add a description if you like, though it’s optional. Click Save when done.

Google Map designs

Next, choose a design for your map. Click the dropdown arrow next to Base map to see the options. You can choose between different color schemes or whether to have satellite imagery. Simply click the option you want and the map will automatically update.

Don’t worry, you can change both these options at any time if you change your mind.

Build Your Map

You can now start building your custom map.

At the top is a search box where you can look for specific things—cities, landmarks, restaurants, and so on, just like you normally do on Google Maps. A pin will be placed on the map for anything you search for here.

Pin a location on Google Maps

For example, I’ve searched for ‘Leicester Square’ because I want to pin this on my map. Now it appears listed on the left in a temporary layer and I can click Add to map to pin it to my map permanently (or alternatively do nothing, if you just wanted to zoom in somewhere to begin).

Layers are essentially ways to organize the different things on your map. Click a layer name to rename it, the checkbox to hide or unhide it, or click Layer options > Delete this layer to remove it.

Google Map toolbar

Use the toolbar beneath the search box to add elements to your map. The options, from left to right, are:

  • Undo: To reverse your last action.
  • Redo: To reverse the undo.
  • Select items: To move the map around and to select landmarks. With a landmark selected, you can click Add to map.
  • Add marker: Place a pin anywhere on the map. Once done, you add a name and description, change the color and icon of the pin, and provide a supporting image.
  • Draw a line: Manually map out driving, biking, and walking routes, or draw a shape. For the shape, click on the map to begin, and click each time you wish to place a corner, then double click when done. You can then name the shape and customize its style.
  • Add directions: This will add a new layer for you to designate the start and end of the route, which will then be mapped automatically.
  • Measure distances and areas: Click on the map to begin measuring a distance; click multiple times to build a shape to measure area. This is temporary, is visible only to you, and will disappear when you click something else.

Example Map

Google Map example

Here is an example map I built for a trip to London.

I used the Add directions tool to create a walking route between four destinations.

Next, I used Select items to add some points of interest I want to check out on my route.

Finally, I used Draw a line to create a shape around the area I want to cover on the first day of my trip.

3. Share Your Collaborative Google Map

When you’re ready for others to collaborate with you on the map, click Share. This will bring up a Sharing settings modal window.

Google Maps sharing settings

So that only specific people can access the map, use the Invite people box to enter names or email addresses. The pencil icon will let you switch between whether that person can edit the map or only view it.

If you keep Notify people ticked, they will receive an email inviting them to the map. Once opened, they can then edit the map the same way that you can.

Google Maps link sharing

If you want the map to be accessible by an unmoderated group, click Change next to Private – Only you can access.

You can set the link sharing between Public on the web or Anyone with the link. Then choose between Can view and Can edit.

Bear in mind that anyone with editing access can chop and change anything, including what you add, so keep the list to trusted people only.

To see what your map will look like to those who have view-only access, go back to the map editor and click Preview.

Share a Static Google Map

This guide has been all about how to share maps with others and collaborate with them. If you simply want to share a location or route as a one-off, there’s a simpler process for that.

First, return to the normal Google Maps. Set the map to whatever you need, whether that’s a building, a walking route, or whatever.

Google Maps send a link

Next, go to Menu > Share or embed map. A modal entitled Share will appear, which will confirm what your map is set to show.

Finally, click Copy link and then share that URL to whoever. You can also click Facebook or Twitter to share directly with those social media sites.

When the receiver opens the link, they will see exactly what you set the map to show.

More Great Google Maps Tips

Now you know how simple it is to create handy shared maps with Google Maps. Hopefully, now you can take advantage of maps to share information related to travel, business planning, or just sharing your favorite eating spots.

For even more Google Maps knowledge, be sure to check out our great Google Maps tips to change how you navigate.

Read the full article: How to Create Shared Collaborative Google Maps


Read Full Article

How to Make Your Own Calendar Using Canva


make-calendar

Many of us use calendars to keep track of the days, weeks, and months as they fly by. However, calendars can be expensive, so here’s how to make your own calendar using Canva.

Lots of people use an online calendar to keep up with their to-do list, but this article is for those who would prefer to make their own printable calendar to hang on the wall.

If that describes you, here’s how to use Canva to make your own calendar.

Step 1: Find a Printable Calendar Template

Canva is a website where you can customize different design templates for free. You just need to have an account to get started. If you want some background before getting started, here are the things you can create in Canva.

If you want to make your own calendar, the first thing you’ll want to do is find Canva’s list of printable calendar templates. There are two ways you can find these templates:

  • Through the search bar where it says Design anything.
  • By scrolling through the templates already listed under the header Create a design.

Calendar Template Canva

If you look closely under Create a design, you’ll see an icon with a red square around it. Beneath that is the word Calendar. This is the template we’ll be using, so click on it.

After you click on Calendar, Canva will take you to your workspace. There, you’ll see a bunch of calendar-formatted templates along the left hand side of your screen, divided by topic.

Scroll through these templates to find a calendar design that fits your needs.

Calendar 2020 Canva

For this tutorial, we’re going to pick a template called “Classroom Calendar”. However, I personally don’t like the color combination this calendar is using. If you tried to print it up on your home printer, it would use a lot of ink.

Calendar Printable Canva

So, the first thing we need to do is change the background color on our printable calendar.

Step 2: Change the Calendar’s Color

Changing the color of different elements requires a bit of thought and planning.

For example: Let’s say I wanted to print a calendar, and to print it, I’m going to change the background color to white or grey.

You’ll notice with this particular template that there are some foreground elements that are also white, which means they may get lost when we change this background.

So, it’s best to change these foreground elements first, to maintain the contrast.

To change the color of these elements, click on one so its blue bounding box emerges. Next, click on the color icon in the top left-hand corner of your workspace, seen here in red:

Design a Calendar

By clicking on this icon, you can expand the color menu. From there, you can pick:

  • Document Color: These are colors already found in your template.
  • Default Color: These are colors available to all Canva templates.
  • Choose a custom color with the New color icon. This will either show up as a + sign or as a multicolored square at the top of the palette.

After you’ve decided on a color and applied it to your foreground elements, you can change the background color on your calendar, too.

For this tutorial, I’ve decided on a very light gray that will contrast with the calendar and the text. Because this color was not available in the Default Colors section, I went to my New color section to choose a custom color.

Change Background Color Canva

NB: You can change the background color on a bunch of calendar slides simultaneously by checking off the Change all function, located at the bottom of your color toolbar.

When you click on this option, it will change all background elements with the same color to this new color you’ve picked out. It’s a quick, easy way to get your calendar looking lovely with half the effort.

Step 3: Copy-Paste Your Calendar Style

Of course, the Change all option is not the only design hack that comes in handy. Another way that you can quickly replicate a style is through the Paste style button, which you can see here in red. It looks a bit like a paint roller:

Paste Style Canva

This tool is great when you want to apply the same font, style, or color to different elements within the calendar, but not necessarily to a bunch of elements all at once.

To use this tool, click on an element that you want to change. Make sure the blue bounding box appears, then make the changes that you need to make.

Next, go to your Paste style button, and click on it.

After that, click on a different element that you want to transfer this style to, making sure that you still have the Paste style button activated. Canva will automatically offload the style.

Step 4: Adjust Your Calendar Text

After you adjust the background elements in your calendar, you’ll want to adjust your text. The nice thing about Canva is that they have already marked which days of the week each number of the month falls on, so you don’t have to worry about inputting these dates manually.

However, you can still go in and change the font style for these numbers. You can also change their color.

To change the look of these dates, click on a number so its blue bounding box emerges. Go to the top left-hand toolbar and start experimenting with font, font size, color, and spacing.

Change Text Color Canva

Next—where it says “Classroom Calendar”—change the placeholder text to something more personal.

To do this, click on the text so its bounding box appears. Start typing something else in.

Change Text Color Canva

Tip: If you want to change the color of some of this text, but not all of it, highlight a single word instead of all the text. Then go up to the font color tool, seen above in red. Pick a color with your color picker.

Step 5: Check Your Work on Your Printable Calendar

Now that you’ve created a simple calendar, it’s time to zoom out and view your work, to check for any errors. Use the zoom tool, located in the bottom right-hand corner of your workspace, to do this.

When you zoom out and view your work, you should be able to see your calendar in its entirety. While our own calendar is functional and easy to read, its design is also sort of boring.

Save Calendar on Canva

If you wanted to keep the simplicity of this calendar, but add more excitement to it, there’s a simple fix for that.

Step 6: Last-Minute Fixes

An easy way to add emphasis to a simple calendar is to add variation to its color scheme. In this case, let’s give each month of the year a different dominant color. Pink for February, green for March, and so on.

To do this, click on the individual elements on each page and use your color tool.

Design a Calendar Color

After you’ve changed the color on each individual slide, you can zoom out and take a look at your document. As you can see by our layout, even just this simple fix can add a lot of visual distinction!

Printable Calendar

Step 7: Download Your Printable Calendar

At long last, your calendar is complete and ready to download. To print a copy for personal use, go to the Download button, seen here in the top right-hand corner of your screen:

Download Printable Calendar

Click on File type. Under File type, you’ll see a list of suggested file types to download. A small crown next to a file type means that the particular extension is part of Canva Pro: you cannot use it without subscribing.

If there is no crown, then the file is free.

If you plan to print your calendar, choose PDF Print. This is the standard file format that you’ll need to take to a print shop, and the kind of file that you should be using at home.

When you choose PDF Print, turn on Crop marks and bleed. This will make it easier for you to cut your calendar out of the piece of paper that it is printed on.

After that is done, select the number of pages that you want to print. Then click Download. This is how you make a calendar printable.

Add Crop Marks to Calendar

When you download your file, you may see a sign that pops up that says “Try Canva Pro free for 30 days!”

To avoid confusion: you are not being charged for your PDF print. This is just an advertisement you will see if you’re using the free version of Canva and are not subscribed to Canva Pro.

To exit this advertisement and continue back to your account, click on the x in the top-right hand corner.

Canva Pro Prompt

Once the file is downloaded, open it up with a preview viewer on your computer, to triple check how it looks. Then print your calendar, either from home or at a print shop.

Make Your Own Calendar to Organize Your Life

Having a monthly calendar hanging on your wall can really help you organize your day-to-day life, and we strongly recommend using one. It will help you be more efficient with your time and help you allocate resources in advance.

That said, what if you prefer digital calendars instead of paper ones? Here’s how to make a new calendar in Google Calendar.

Read the full article: How to Make Your Own Calendar Using Canva


Read Full Article

Insta360 One R: The Modular Action Cam That Does Everything (and More)


Our verdict of the Insta360 One R Twin Edition:
If you're only going to take one camera, make it the One R. An innovative modular design, AI editing and the best quality footage yet make this a must-buy for action camera and 360 fans.
910

Having perfected the art of affordable and feature-packed 360 and VR180 cameras, Insta360 is taking on the action cam market. As expected, they’ve blown away expectations with a unique modular design that doesn’t compromise on price or features. Meet the Insta360 One R; an adaptive camera with AI software that makes editing a breeze. We’ve had our hands on the Twin Edition for a few weeks, so here’s what we think of it.

Action Cam? 360? Why Not Both!

As well as the best image quality Insta360 has made yet in an affordable and rugged package, the main selling point of the One R is that you don’t need to choose between taking a 360 camera or 4K action cam: you can have both.

insta360 one r with action cam mod
Standard 4K action cam mode, with preview screen on rear.

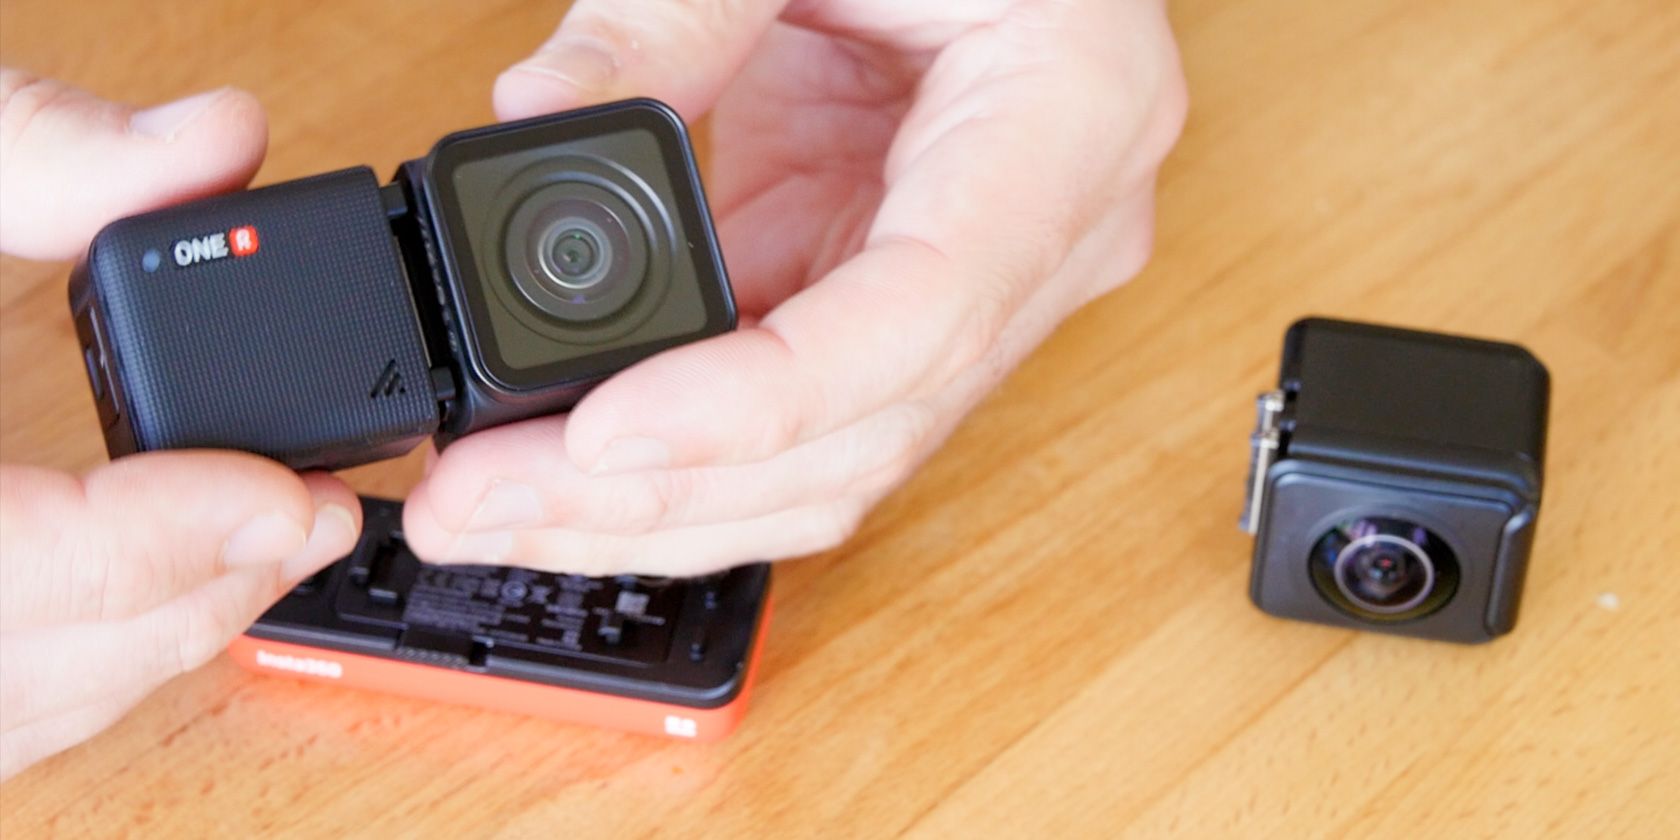
Swapping out the different mods takes less than 30 seconds, even when it’s all bundled up in the rugged case.

insta360 one r with dual lens mod
Dual-lens mod equipped for 360 shooting

Not only that, but if you want to use the action cam for vlogging, you can flip the screen module around to see a live preview. The preview screen also works for 360 shooting, so you can check exposure and such before recording.

insta360 one r with vlog mode
Reverse the screen module when used with the 4K mod for use when vlogging

What’s In The Box?

In the Insta360 One R Twin Edition you’ll find:

  • Battery base
  • Camera module with touchscreen
  • Dual-lens 360 mod with lens cover
  • Reversible 4K wide-angle action cam mod
  • Case with standard 2-to-3 mounting point
  • Tripod thread adaptor

Available separately, you can also purchase additional lens guards for the 360-mod (pictured below), and an invisible selfie stick. The 4K action cam mod doesn’t require additional protection. There are additional modules to be released at a later date.

Note: we were given prototype hardware to review, and you may notice small differences to the final production device from that in the photos here. 

Insta360 One R Specifications

  • 4K Action cam: f2.8 16.4mm equivalent. Up to 3840 x 2860 (4k) @60FPS with motion smoothing. HDR drops this down to 30FPS.
  • Dual-lens 360 mod: f2.0 7.2mm equivalent. Max 5.7K resolution @ 30FPS; 4K@50FPS; 3K @100FPS.
  • 1190mAh battery; 65 min charging time (USB-C).
  • Waterproof to 5m (deeper with a dive case available later)
  • Dimensions: 72 x 48 x 32.4mm (with 4K mod, 360 is slightly thicker at 43mm)

New and Notable Features

If you’re familiar with the Insta360 range, you’ll already know some of the amazing features offered when shooting with the dual-lens mod. These include the ability to add dynamic timeshifting, hyper lapses, and reframing. You also don’t need to perform any stitching, as this is all handled on camera. These features alone are stunning in their own right, but the One R adds even more.

Point to track, with voice commands. When using the 360 mod, simply point the camera (as indicated by the small triangle above the viewing screen) at your subject, and say “mark that”. The software will follow the subject and intelligently pick them back up if they move out of view. Voice commands also extend to starting and stopping recording when used with any lens.

Flashcut is the new AI editing helper, available on both the desktop and mobile app. The beauty of shooting in 360 is that you don’t need to think about framing shots beforehand; just shoot everything and frame later. But what if you want a compilation of the best bits? Simple: just let Flashcut identify shots automatically, then choose the ones you want to use. The AI identifies features like animals, people, buildings, then saves them for use in Stories. Flashcut works with all the lens mods, but you’ll get the best results from the 360 lens since it has more footage to choose from.

Stories is something we first saw on the Insta360 Go; a set of video templates that picks your best shots and edits them into a short video, set to music, with each clip matched on the beat.

Starlapse. My favorite feature so far, Starlapse is a new long-exposure interval shooting mode. Despite terrible internet, rural living has its perks: we’re situated on the edge of the Bodmin Moor dark sky zone, so weather permitting, we have a stunning view of the night sky.

It’s really simple to shoot a Starlapse video: just set up the One R with the dual-lens 360 mod outdoors, plug in an external power bank just in case, and choose the Starlapse preset from the menu. After importing the footage and choosing the Starlapse story mode, you can choose the ideal viewing angle, enable or disable star trails, and a 30 second clip set to music will be output. Stunning. Sadly, I forgot to turn off the power LED, which made its way into this clip. As soon as it stops raining, I’ll have another shot!

GPS and Stats Dashboard. When connected to your mobile device or the optional GPS remote control, you can enable a stats dashboard on your footage.

Insta360 One-R Video Quality

If the video quality was substandard, nothing else would matter. Thankfully, it’s incredible. Featuring an updated FlowState Stabilization algorithm, it’s also the smoothest yet. Check out the review video, which was almost entirely shot on the One R.

The 4K action cam mod is crystal clear and silky smooth at 60FPS. It’s good enough that I’m seriously considering shooting most videos on this rather than my DSLR. Like any small sensor though, it’ll perform best in well-lit scenes.

In low-light, 4K video is predictably bad; no amount of processing can help there.

A still screen from 4K video shot in low light.

Photos are much better, but for video output you’ll need to invest in the one-inch mod instead.

Bracketed exposures mean night time photos are crystal clear (shot in the exact same conditions as the video still from above)

The 360 dual-lens mod shoots in 5.7K, though the best output you’ll get from that is 1080p once you’ve selected the desired angle. Stitching is generally good, but some anomalies are still present, particularly if the sun is bright enough to cause lens flares. For social posts and other HD output, the quality is fine. It’s the features offered by 360 shooting that you’re really after.

The Future of One-R

As a modular design, what you see here isn’t everything Insta360 has planned.

Releasing in February is the 1-inch mod, engineered with Leica. Featuring a larger wide-angle lens and a one-inch image sensor, the module will offer an unparalleled 5.3K resolution action cam with great low-light performance (though the full resolution will only be available at 30FPS).

insta360 1-inch mod

A larger battery pack is also planned (double the capacity, with built-in tripod mount), as well as a VR180 adaptor for the dual-lens 360 mod to shoot stereoscopic scenes.

The One-R is truly shaping up to be one camera to rule them all, and I’m excited to see what else might come in the future.

Perfect For Vlogging

As well as the preview screen, the One-R adds some key audio features that make it perfect for vlogging. With a USB-C to 3.5mm adaptor, you can add a wireless LAV mic, or attach a hot-shoe adaptor for use with a shotgun mic. There’s also the option to wireless pair your AirPods if you’re traveling light, and use those as audio input.

The intuitive app then makes it easy to process your shots into a hyper-lapse or story template, without complex editing software. It’s never been easier to produce compelling video content of your adventures, without a computer.

Who Should Buy the Insta360 One R?

Many attempts to offer one device that performs multiple purposes have failed. They are inevitably a jack of all trades, master of none. Not so with the modular Insta360 One R: it’s a master of everything it does, without being twice the price of competitors.

By purchasing directly from Insta360, you can create your own bundle with the exact accessories and modules you need, and remove those you don’t. The Twin Edition package (as reviewed), with 4K and 360 mod, costs under $500. The Expert edition, which swaps out the stand 4K action cam mod for the 1-inch mod, rises to $750.

The clever features are demanding, however. AI editing requires a powerful mobile device with a separate Neural Processing Unit (NPU). My iPhone X is equipped with a first-generation NPU, and even that at times felt painfully slow to analyze long clips. If you have anything less powerful than an iPhone X, you’ll be left wanting to upgrade. The app is compatible with Apple A11 chips and better; while on the Android side, you’ll need at least a Snapdragon 845, Kirin 980, or Exynos 9810.

If you’re not interested in the modular aspect or 360 shooting, and you’re happy with just 4K, a dedicated device may serve you better and allow for redundancy. If you were take a single camera on your epic adventure, only to have it stolen or lost, you’d be up the proverbial creek without any camera to document your lack of paddle. That said, being able to replace parts of the camera if they fail, or incrementally upgrade them is a tremendously useful feature, even if you aren’t interested in 360 shooting.

For the super lazy among us who don’t want the hassle of dealing with action cam mounts or spend more than 5 minutes putting together a video, the Insta360 GO may be more suitable. It’s a tiny little stabilized camera that can be worn on a pendant (or mounted anywhere, in fact), and used discreetly to capture those important moments with a single tap.


Enter the Competition!

Insta360 One R Twin Edition Giveaway

Read the full article: Insta360 One R: The Modular Action Cam That Does Everything (and More)


Read Full Article

Coding for Kids: The Best Classes and Websites


coding-kids

Teaching kids to code is increasingly important and not something you can leave to schools to handle. Just like literacy and numeracy, coding needs to have a place in home learning.

If you home school your children, coding becomes even more vital. But even if you’re adept at coding yourself, it might be simpler to rely on online sources. We’ve compiled a list of the best websites and online classes to teach coding for kids.

Why Teach Kids to Code?

In the technological era, teaching children basic coding and the skills required to built websites, apps, and games, is vital.

From getting a handle on mark up and stylesheets to appreciating Python, Ruby, JavaScript, and so on, coding is vital. You’re literally handing the keys to future academic success across all subject areas to your children.

Great courses to teach computer coding for kids

STEM (Science, Technology, Engineering, Math) and STEAM (the same, with added Art) is the main driver in education for the first half of the 21st century. As important and numeracy and literacy, coding (you’ll notice all three intersect) will be vital at all levels of industry.

Consider the skills required to develop an app; update a PC or cash machine; wire up an IP phone; manage an industrial centrifuge; secure IoT medical data. Even if a kid can’t actually code, the understanding of how software works remains vital.

While your child’s school may offer a strong program of coding and development classes, why not offer additional support? Use these coding websites, apps, and other tools to help introduce coding concepts and nurture software development skills.

Learn With These Coding Websites for Kids

Countless coding websites are available on the web. Not all are suitable for children, however. We’ve compiled the best for you right here.

Code.org

Choose from four Minecraft Hour of Code tutorials

Perhaps the number one destination for coding wannabes, Code.org boasts “23,446,123,774 lines of code written by 46 million students.” Courses on Code.org are completely free, starting with elementary level through to post-school study.

Code.org supports Hour of Code and in conjunction with Microsoft has produced Minecraft Hour of Code tutorials. We’ve previously looked at how Minecraft Hour of Code teaches programming.

If you’re looking for somewhere kids can learn coding for free, Code.org is the answer. It’s supported by some of the biggest names in tech, including Amazon, Microsoft, Facebook, and Google.

Codecademy

Millions are using Codecademy to develop new skills. A system for teaching coding has been developed here, perfected by training over 45 million people.

The site identifies what you want to learn, then puts you to work right away. Within minutes you’ve learned basic programming; the website checks your progress, tests you, and encourages further development. While free, Codecademy also offers a pro option ($39.99 a month, or $19.99 if billed annually) with a more intensive program of courses and projects.

Code Avengers

Code Avengers has three options for new visitors.

Here, children aged 5-14 can start learning coding with the Jr course. Those 15+ who have already begun programming can access the Pro course. Meanwhile, educators teaching kids to code can access the Teach resources.

At Code Avengers, kids can learn to code in Python, HTML and CSS, and JavaScript. There is also the opportunity to learn web development and design.

Code Avengers is not cheap, however. Pricing starts at $29 a month (annual billing is $240) but includes 500+ lessons, 100+ projects, certification, and assistance via an exclusive Slack channel.

Codemoji

Designed for 1st-8th grade students, Codemoji teaches HTML, CSS, and JavaScript. The site offers a free 14-day trial for new users, covering game and website development.

The site features 500 coding lessons for kids, teaching by breaking down challenges into easy-to-learn chunks. Kids will learn how to recognize important patterns, create models, and automate solutions using algorithms. Codemoji is $5 a month for children, $7 monthly for parents.

CrunchZilla

Try Codemonster to learn coding for kids

A simple, fun tool from CrunchZilla, Code Monster teaches preteen kids with ambitions of coding. Basic instructions from the Code Monster guide young coders through basic JavaScript. Input instructions into a live coding window, with instant results.

While simpler than most online coding courses for kids, Code Monster is free, and gets you learning quickly. For older children, CrunchZilla offers similar (but tougher) lessons with Code Maven, while Game Maven and Data Maven are also provided.

Khan Academy

A “nonprofit with the mission to provide a free, world-class education for anyone, anywhere,” Khan Academy is geared towards students, parents, and educators.

Learning is personalized, content trusted, and tools for teachers can help spot gaps in a student’s progress.

While recognized as a powerful home-schooling resource, Khan Academy features a heavy selection of coding courses for children. These include computer programming (HTML, CSS, JavaScript), computer animation, computer science, and more.

Kodable

Declaring “Programming for kids, made with love” is bold. However, Kodable claims to be trusted by over 50 percent of US schools.

With courses aimed at kids aged 4-10, the program includes drag and drop programming, JavaScript and Swift courses, object-oriented programming, and much more. Edutopia described Kodable as “A great way to introduce the concepts of programming,” so it is certainly worth checking out.

Kodable is $6.99 a month with a 7-day free trial. You get a 30 percent discount for annual billing, which works out at $4.99 a month.

Tynker

“Coding Made Easy” boasts Tynker, a coding resource that claims to have “Everything your child needs to learn computer programming the fun way!” Intended for age five and above, Tynker features the NASA coding challenge, and has been used by over 60 million kids worldwide.

Tynker offers over 40 award-winning block and text-based courses, with in excess of 3,700 learning modules. Kids learn JavaScript, Python, HTML, and CSS, with projects covering drones, Minecraft, and more mainstream STEM topics.

Tynker has a free signup, with course plans for individuals and families. These start from $20 a month for an individual plan, and go as far as $270 for a lifetime family plan.

For more see our list of the best coding apps for kids.

Online Coding Classes for Kids

For a more structured approach to learning, children might respond better to online courses. Combining practical tasks with video tutorials, these coding classes for kids are ideal for teaching them to code.

KidsCanCode

Associated with the KidsCanCode program, co-founder Chris Bradfield hosts this YouTube channel. The message for this YouTube channel is simple: “Every kid should learn to code!  Learning to program a computer is fun, rewarding, and empowering.”

A vast library of videos is available to view, all geared towards younger minds looking to learn coding. These online coding classes are easy to follow, providing new ideas in digestible chunks. Python coding and development of games with the Godot engine from MIT are key features of the channel.

As well as producing the YouTube videos, Chris and Priya Bradfield also host coding classes in school. Head to kidscancode.org to find out more.

Many other YouTube coding classes are available, but KidsCanCode is the best starting point.

Programming for Kids and Beginners: Learn to Code in Scratch

Other online coding classes for kids are available, but these come with a fee. Udemy is a good source of online classes, such as Programming for Kids and Beginners. Course subscribers get over seven hours of on-demand video, nine downloadable resources, lifetime access, and a certificate of completion. A key aim of this course is to help you to learn coding faster.

You can also complete the course with the ability to code games, animations, and even “cool video effects.” Coursework relies on Scratch, the popular coding platform for children.

Kids Coding—Introduction to HTML, CSS, and JavaScript

As you know, programming isn’t all about games and apps. For kids more interested in online publishing and web development, Udemy’s Introduction to HTML, CSS, and JavaScript course is ideal.

In this course, children learn computer programming basics, CSS, HTML, JavaScript, and gain knowledge “of a valuable lifelong skill.”

Seven hours of video, a single article, one downloadable resource, and lifetime access are included in the course fee. Completion results in a certificate, so kids can prove they’ve finished their study and keep a record of their studies.

Make Learning Fun With Coding Games for Kids

If structured course-based learning isn’t having the desired effect, it might be time to introduce an element of fun.

Coding games teach children coding skills without the pressure associated with learning. Instead, children gain new skills as part of playing fun games.

Lightbot

Designed as a programming puzzle game, Lightbot’s game mechanics require the application of programming logic to solve levels.

Lightbot is available for iOS, Android, Windows, and macOS as a paid app. You can also access Lightbot in the browser, but you’ll need to have Flash enabled.

Code Combat

Taking a similar attitude to the teaching of coding is Code Combat. In this RPG-style game, complete levels by demonstrating understanding of coding concepts. It starts with syntax, methods, loops, variables, etc., then lets you take a path through web development or game development.

Levels are unlocked as the game progresses, with new concepts introduced via compulsory levels. The game environment is realistic and compelling—Code Combat is fun, and it works.

For more fun ways to teach programming, see our guide to the best coding games for kids.

Great Sites and Classes for Coding Kids!

By now you should have everything you need to get your kids coding. Online classes are useful, websites with tutorials offer a more practical approach, and then you’ve got apps and games.

Want more tools to help your kids with programming? Try these toys, designed to teach coding skills to kids.

Read the full article: Coding for Kids: The Best Classes and Websites


Read Full Article