06 February 2020

Daily Crunch: LinkedIn is getting a new CEO


The Daily Crunch is TechCrunch’s roundup of our biggest and most important stories. If you’d like to get this delivered to your inbox every day at around 9am Pacific, you can subscribe here.

1. Jeff Weiner will step down as CEO of LinkedIn June 1, product head Ryan Roslansky steps up

The changes are LinkedIn’s first big executive shakeup since the company was acquired by Microsoft in 2016. It’s notable that both of the new appointments (Roslansky and new product head Tomer Cohen) involve long-time LinkedIn executives — they’re not looking to rock the boat too much.

Weiner, meanwhile, says that LinkedIn was his “dream job” and that he’s moving on to the next “dream job” as executive chairman. But we expect to start seeing his name floated for other CEO roles very shortly.

2. Ancestry lays off 6% of staff as consumer genetic testing market continues to decline

The move from Ancestry follows job cuts at 23andMe in late January, which saw 100 staffers lose their jobs (or roughly 14% of its workforce). The genetic testing company Illumina has been warning of softness in the direct-to-consumer genetic testing market as well.

3. Twitter reports $1.01B in Q4 revenues with 152M monetizable daily active users

Twitter posted $1.01 billion in sales — the first time its revenues have broken past the billion-dollar mark — due to a strong quarter in advertising sales. However, net income and earnings per share both saw significant drops from the same period a year ago.

4. Google Maps adds more crowdsourced transit data and gets a new navigation bar

Google is updating Google Maps on Android and iOS with a revamped tab bar at the bottom, a new icon and a couple of new features. In particular, the company is putting more emphasis on user-generated content and recommendations.

5. Where top VCs are investing in open source and dev tools (Part 1 of 2)

We asked 18 of the top open-source-focused VCs to share what’s exciting them most and where they see opportunities. For purposes of length and clarity, responses have been edited and split (in no particular order) into part one and part two of this survey. (Extra Crunch membership required.)

6. Reddit partners with Tagboard to bring its content to TV broadcasts

Through this partnership, broadcast networks will be able to easily display Reddit’s content on TV. That includes Reddit’s unique content like AMA (Ask Me Anything) recaps and Photoshop battles, as well as popular posts and comments.

7. NASA astronaut Christina Koch returns to Earth after record-setting stay in space

Koch spent 328 consecutive days at the International Space Station. She’s second only to Scott Kelley, who spent 340 days in space, and she’s officially the woman with the longest stay in space worldwide, passing fellow U.S. astronaut Peggy Whitson’s record of 289 days.


Read Full Article

What to expect from Samsung’s S20 event


Next Tuesday, Samsung kicks off smartphone season with its Unpacked event in San Francisco. One of two tentpole events for the company, the big show brings with it the latest edition of the company’s primary flagship line, the Galaxy S.

Samsung played a fun little trick, holding the event on February 11th at 11AM PT, all while skipping the Galaxy S11 entirely. Granted, this is still firmly in the realm of rumors here, but evidence is mounting that the company is actually skipping nine full model numbers and going straight to the Galaxy S20.

Why? Well, reasons. It’s 2020, for one. Also, Apple skipped the iPhone 9 a while back, so Samsung can now do it nine better — and perhaps adopt a numbering system more akin to Huawei’s 10-at-a-time updates. Honestly, though, the most likely answer is the simplest: Smartphone sales have slowed for many manufacturers and this is a sneaky way to generate a little interest.

But what’s in a name, really? One thing that’s certainly in line with previous Galaxy releases is the veritable deluge of leaks leaving little to the imagination in the lead-up to the event. We’ve been seeing fairly consistent renders for weeks and months, and earlier this week, what appears to be marketing images have surfaced.

Along with the S20 name, the shots showcase a design scheme featuring a hole punch camera up front (the “Infinity O”) and a long, prominent camera array on the rear. The also-rumored Galaxy S20 Ultra appears to add an even more intense camera array to the mix, including a “Space Zoom 100x,” which would bring a pretty crazy level of zooming capabilities to the smart phone — through, one assumes, a hybrid of digital and optical.

There’s already a lot of camera literature to crawl through here, including the patenting of the term “nonacell.” That, understandably sounds like nonasense, but appears to use pixel binning to create 12-megapixel images from the 108-megapixel sensor. That seems likely to be reserved for the Ultra — one of the versions of the handset, which include the S20 and S20+. All are believed to have a 5G option — logical, given that Samsung was among the first to bring the technology to market.

We have less information about the Galaxy Z Flip, but Samsung’s second foldable appears destined to get some stage time at the show. The device could well be far more accessible than the original Fold. First, there’s the clamshell design that has more in common with the new Motorola Razr than the original Fold. It’s also believed to be a little more rugged — owing to…issues with the original version of the Fold.

Pricewise, the Flip is expected to be, well, pricey — but considerably less so than the Fold. Rumored at around $1,500, it’s $500 less than Samsung’s original foldable.

New versions of Samsung’s quite good Galaxy Buds are expected, as well. The Galaxy Buds+ reportedly offer a large bump in battery, up to a total of 22 hours. Also expected is multi-device connectivity and a $20 price bump.


Read Full Article

How to Cancel an Office 365 Subscription and Get a Refund


office-365

Microsoft Office remains the de facto gold standard when it comes to office productivity suites. The software’s full-featured apps alongside its tight integration with the world’s most popular operating system, Windows, have helped it to amass hundreds of millions of users.

Unlock the "Essential Microsoft Office Shortcuts" cheat sheet now!

This will sign you up to our newsletter

Enter your Email

It makes you wonder why anyone would want to cancel a Microsoft office 365 subscription!

We jest. Office 365 is not right for everyone. Some people don’t need all the bells and whistles that come with the full version of the suite, while others might balk at the high subscription prices—especially given how many excellent free alternatives to Microsoft Office are out there.

How to Cancel Microsoft Office

cancel office 365 subscription

So, if you have decided it’s time to cancel Microsoft Office 365, keep reading. We’re going to how to end your subscription and explain some of the little things you need to be aware of while working through the cancelation process.

To cancel your Office 365 subscription, follow the instructions below:

  1. Go to account.microsoft.com/services and enter your login credentials.
  2. In the Services and Subscriptions section, locate your subscription.
  3. Click on Manage.
  4. Select Cancel.
  5. In the popup box, select Confirm Cancellation.

Your entitlement to a refund depends on where you are in your billing cycle. According to Microsoft, you can request a refund if either of the two conditions is met:

  • You bought an annual subscription to Office 365 within the last 30 days.
  • You have a monthly subscription and cancel within 30 days of your last renewal.

Should you decide to claim a refund, all your Office apps will immediately go into a reduced functionality mode. You can still use the apps to read and print documents, but you will not be able to edit documents. You will also lose additional Office 365 benefits such as OneDrive storage space and Skype minutes.

Lastly, anyone who you have shared your plan with will also lose access to their Office apps when you cancel an Office 365 subscription.

If you’d like more help determining whether you should subscribe to Office 365 or a pay a one-off fee, check out our guide on the subject.

Read the full article: How to Cancel an Office 365 Subscription and Get a Refund


Read Full Article

What Is a Work OS? The 7 Best Work OS Tools Compared


work-os-explained

You probably know what an operating system is—the underlying software on your computer. It ties software applications and computer hardware together to power the work you do every day.

But what is a Work Operating System (Work OS)? Let’s take a look.

“Work OS” Explained

A Work OS is an emerging software category. It is a type of platform that allows teams to plan, run, and track projects, processes, and everyday work.

A dynamic and thriving workplace will have a Work OS used by almost all level of colleagues (even domestic services in some cases). Teams can collaborate across departments and partner organizations.

Meanwhile, managers, team leads, and even executives can use a Work OS. They might use it all in different ways, but with the same aim.

The Features and Benefits of a Work OS

All Work OS systems are different. Ultimately, however, they should be able to handle all (or most) of the following:

  • Build and manage work blocks to create workflows for any situation
  • Automate workflows to eliminate human error in repetitive tasks and reduce manual work
  • Integrate information from external applications, enabling centralized access and analysis to power data-driven decisions
  • Data capture, aiding flexibility and improvement across the business
  • Data dashboards to communicate different aspects of the same information, depending on role
  • Improving work-related asset sharing to save time locating, loading, and collaborating
  • Tracking progress of live projects, plus details of completed work
  • In-context communication, such as commenting or annotating images from project work
  • Controlled autonomy, allowing teams to work to their strengths

At a basic level, Work OS platforms should enable the users to easily adapt to the software. It should save time and enhance collaboration, integrate with multiple external applications, and adapt to any workflow.

Choosing a Work OS Platform

Various Work OS tools, commonly offered with online collaboration as the key feature, are available. monday.com is perhaps the most famous, along with Notion, Asana, Wrike, and others. But which of these offers the best Work OS hub? The following comparison should help.

1. monday.com

The magic of monday.com is how it enables you to plan, organize, and track work from a “single collaborative space.” monday.com offers easy onboarding, which is ideal for existing teams and newcomers alike. The tools are provided to customize workflows and create custom dashboards.

Six views track progress: calendar, map, chart, files, Kanban, and timeline. In addition, this Work OS supports integrations with popular major software applications. monday.com provides automation, as well as data imports from relevant software.

monday.com offers a free trial, but this won’t be enough for most users. The basic $39 package (based on five users) provides 5GB of storage and activity logged for one week, while the standard $49 package ups this to 50GB for an unlimited duration. The pro package is $79 and adds unlimited storage, logging, sharing, and more.

Huge names such as Hulu, eBay, the BBC, and PayPal use monday.com. Take a look at our overview of monday.com for more info.

2. Airtable

A key competitor of monday.com is Airtable, described as “part spreadsheet, part database, and entirely flexible.”

“Airtable blocks” are the key to this tool, enabling the creation of custom workflows. These can cover almost any eventuality. Meanwhile, you can track project progress with five views: grid, calendar, Kanban, gallery, and form.

The free option from Airtable has most of the key features, but skips admin and advanced functionality. You can’t unlock these with the $10/month Plus package; instead it increases the records, attachment space, and revision history. For $20 a month, Pro increases these further, while unlocking admin features.

You won’t get the advanced toys (largely customization and password-protected shares) without the Enterprise solution. As far as name recognition, Airtable can be found on the systems of 80,000 of the world’s leading companies, including BuzzFeed, Box, and Expedia.

3. Asana

Is Asana the Work OS for you?

Asana is a popular tool among online publishers. It offers six views for team members and project managers alike to rely on. These views (list, board, timeline, calendar, progress, forms) provide all relevant information to the successful completion of projects. Task syncing adds oversight to ongoing work.

Asana also supports time-saving workflow automation, along with app integrations of popular software. Its free package is ideal for individuals and teams stepping into project management for the first time.

For a more comprehensive setup, the Premium $10.99/month package adds advanced features, including an admin console. The Business option super-charges this, adding more features for $24.99.

Nasa and Comcast-NBCUniversal are among the well-known names using Asana.

4. Notion

This is another Work OS platform aimed at helping you and your team “write, plan, collaborate, and get organized.”

Notion comes with a bunch of alternatives to software you’re already familiar with. Its Notes and Docs apps replace Google Docs and Evernote, while Knowledge Base supplants Confluence and GitHubWiki.

Elsewhere, Tasks and Projects provides alternatives to Trello, Asana, and Jira, with Spreadsheets and Databases replacing Google Sheets and Airtable.

Notion includes customizable workflow blocks, a distraction-free focused interface, Markdown support, text shortcuts and commands, and powerful real-time collaboration. As you might expect, there is support for integrations with your usual tools.

The free option from Notion is limited to 1,000 blocks and 5MB of file uploads. The Personal $4/month package is better for newcomers, with unlimited blocks and uploads.

A Team package at $8/member/month is also available, adding admin tools. Meanwhile, the Enterprise package offers the full Notion experience.

The Wall Street Journal and Reddit are just two of the big brands relying on Notion.

5. Smartsheet

A slightly more linear option is Smartsheet, offering a “flexible work execution platform” with integration support for apps and chat tools.

Users can check progress across four views: Gantt, grid, card, and calendar. Meanwhile, Smartsheet supports a wealth of collaboration options, commenting, and attachments, as well as alerts and forms.

Smartsheet offers critical automations for repetitive tasks as well as interactive reporting tools. It’s used by big-hitters Netflix, Cisco, Hilton, and others.

While you can try Smartsheet for free, the Individual package is just $14 a month (billed annually). The Business option is $25/month, adding progress tracking and extended analytics. Enterprise and Premier plans are also available.

6. Coda

Focusing on workflow building blocks and time-saving templates, the company states that “Coda brings all of your words and data into one flexible surface.”

It does this by providing customizable views, based on popular apps. This helps with onboarding, making the unfamiliar seem instantly familiar. Meanwhile, Coda offers third-party app integration and detailed project tracking.

Coda has an unusual approach to billing, with only the “Document Maker” coming at a cost. This means that people viewing and editing documents do so at no charge. A free version supports a small number of integrations—this increases with the Pro plan at $10/month. Larger teams will require the $30/month subscription.

Uber, Spotify, and the New York Times all use Coda in their workflows.

7. Wrike

Is Wrike the Work OS for you??

Wrike has positioned itself as a “cloud-based collaboration and project management software that scales across teams in any business.” To this end, it boasts real-time reports, block-based project workflows, and the all-important Gantt chart view.

The service supports collaboration, including a useful tagging system for providing feedback. In addition, it packs automation tools along with integrations for the biggest desktop and collaborative tools. These include Google, Box, Microsoft, Adobe, and more.

Wrike offers a scalable service, starting with a free shared task list for small teams of up to five users. There’s also a Professional package (for full project planning and collaboration) for $9.80 a month, up to 15 users.

The Business package covers a maximum of 200 users, adding work management, customization, and exec reporting for $24.80 a month. There’s also an Enterprise option, with case-by-case pricing. All paid packages start with a free trial.

It’s a popular Work OS solution, as Mars, Hootsuite, and even Google use Wrike.

Which Is the Right Work OS for Your Team?

Clearly, the various online collaboration and project management solutions that fall under the “Work OS” umbrella are very similar. You might even have tried some of them.

Finding a new tool for a team-based environment is not easy. It must fulfill the requirements of the project at hand, as well as those that will follow. Integration is vital; automation perhaps less so. Stable collaboration and version control is imperative, while ease of use and intuitive onboarding can save hours of training time.

Each of the solutions above offers those qualities. But on the cusp of the era of the Work OS, who will you trust to deliver yours?

What Makes monday.com the Best Work OS?

Productivity matters more than almost anything else. Having the right tools for the job means that your Work OS will be the efficiency hub you need.

Whether you’re overseeing company accounts or project managing a building development, you need a feature-packed Work OS. monday.com offers everything you’ll need, while the alternatives provide subsets of features and functionality, to varying degrees.

It’s time to embrace the concept of the Work OS and access workflows, track progress, communicate, collaborate, and more all in one place.

Read the full article: What Is a Work OS? The 7 Best Work OS Tools Compared


Read Full Article

How to See What’s Trending on Google: A Quick Guide to Google Trends


google-trends-guide

With Google’s ubiquity, seeing what people search for is quite telling. By looking at trending searches, you can easily find what the hottest topics are, which terms people care about, and gain insight into the minds of internet users.

Did you know that Google provides a powerful tool called Google Trends that lets you access and filter through this information with ease? Let’s take a look at Google Trends and see how to find what’s trending right now and much more.

What Is Google Trends?

At its core, Google Trends is a web service where Google lets you check out what’s trending on Google and see what people search for. While useful for business research, it offers a lot of fun for casual use, too.

On the Google Trends homepage, you’ll see some starter examples of topics to explore. These include worldwide interest in the World Cup by country in the past week, and overall interest in the word “cupcake” worldwide since 2004.

Google Trends Example Home


Continue scrolling down, and you’ll see trends inspired by new stories. These include global interest in the Lunar New Year and US interest in the primary elections, at the time of writing.

Further on the page, Google collects recent trends. This is a great way to see what’s trending as it starts to take off.

Near the bottom of the page, you’ll find the neat Year in Search archives. In these, you can find the most popular terms of the year on Google in a variety of categories, like car models, dog breeds, games, and GIFs.

If you like, you can see these summaries for a different country. Google also shows an overview of the year’s biggest stories through search.

That’s just the homepage, though. Google Trends is capable of a lot more.

Searching for Trends on Google

Google Trends really shines when you use it to research something you’re interested in. Enter a search term into the top bar, and you’ll see detailed trends for it.

Depending on what you enter, Google Trends considers it either a search term or topic. For example, if you type Call of Duty, you can choose the generic Search term entry or the more specific Video game series.

Google Trends’s comparison help page explains that search terms show matches for all terms in the given language, while topics are groups of terms across languages.

Google Trends Topic vs Trend


So if you use Washington D.C. as a topic, it will include searches for United States capital and equivalents in other languages. But Washington D.C. as a term will also include partial matches like Washington Nationals, for instance.

Google Trends Search Criteria

Once you enter a search term, you can set a variety of criteria underneath it.

Use the first box to set the region of search. You can choose Worldwide to see everywhere or drill it down to specific regions of a country. For instance, under United States, you can select a state like Virginia to see only information for that area.

Google Trends Choose Region

The second dropdown lets you choose the time frame. The default is Past 12 months, but you can select as recently as the past hour or as far back as 2004. This lets you see trends over years, as well as how a term’s popularity has risen or fallen in the short-term.

Change the All categories box if you want to search in a specific area like Books & Literature. Usually, you can leave this on All categories unless a term has multiple meanings.

Finally, you can change the default Web Search to Image, News, Shopping, or even YouTube Search to see trends on those Google sub-sites.

Google-Trends-Criteria

Once you’ve set your criteria, you’re ready to check out the results!

Google Trends Search Results and Comparison

On the search results page, you’ll see several data visualizations of what you searched for.

One is an Interest over time graph, which charts interest on a relative scale of 0-100 for the time period you’ve chosen. The Interest by subregion lets you see a heatmap of which states, countries, or regions search for the topic most. Mouse around on either of these to see search breakdowns.

Google Trends Single Term

At the bottom, you’ll find related queries and topics.

Comparing Topics With Google Trends

This is interesting on its own, but Google Trends really shines when you use it to compare topics. At the top of the results page, click Compare to add another topic. You can compare up to five terms.

Once you add more, you’ll see them color-coded throughout the page. The region breakdown shows you which areas search most for what items, and the breakdown among them. It’s a really neat way to see what people think of competing topics.

Google Trends Compare Topics


To drill down even deeper, click the three-button Menu on a search term and choose Change filters. This lets you edit the region or time period for one item. You could use this to see how interest for MacBooks in Australia compares to worldwide interest in Computers, to take a potential example.

Exploring What’s Trending on Google

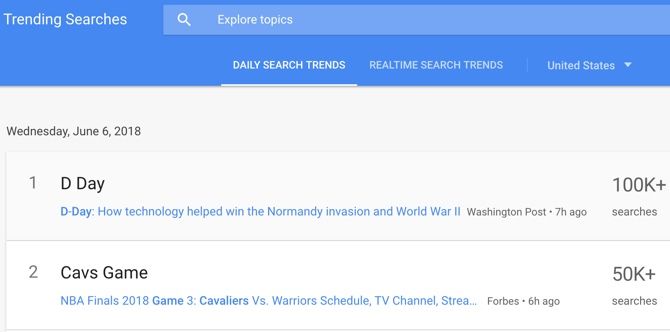
You can have a lot of fun playing with the Explore features above, but other tools reveal more about trending Google searches. Open the left slide-out menu and choose Trending Searches to see what the world is looking for right now.

Google Trending Searches

This page holds the top searches in your area per day, along with their search volume and related stories. It’s a great way to get a snapshot of trending news for each day. Use the dropdown below the search box to look at a different region.

If you’re interested in keeping up with social trends, you can also get email notifications for trending topics. Click the Envelope icon at the top-right of the Daily Search Trends tab to get periodic emails about the biggest topics. You can also subscribe via RSS.

Switch to the Realtime Search Trends tab at the top to see terms that have quickly taken off in popularity.

Subscribing to Google Trends Updates

The Trending Searches tab lets you sign up for notifications about hot topics, but the Subscriptions tab lets you get updates about any term or topic you like. Just click the Plus icon in the bottom-right corner to add a new subscription.

Enter a search term or topic you’re interested in, set the region, and specify whether you’d like updates once a week or once a month.

Google Trends Subscription

If you want regular updates on how a particular term performs but don’t want to check Trends manually, this is a convenient option.

Gain Powerful Insights With Google Trends

We’ve seen what Google Trends offers to those who wonder what’s trending on Google. Whether you just want to peruse the latest trends or dig into detailed comparisons with data visualization, there’s something here for everyone.

It’s fascinating to see what the world searches for. What will you discover with Google Trends? If you’re looking for more search tools, we’ve rounded up the best free keyword tools for your website.

Read the full article: How to See What’s Trending on Google: A Quick Guide to Google Trends


Read Full Article

How to Batch Convert and Resize Images on Your Mac


image-viewers-mac

Do you work with a lot of images at one time? Maybe you have a large group of images you need to resize to a consistent size and convert from PNG to JPG. Instead of changing each image separately, there are easy ways to quickly batch convert and resize images on your Mac.

Unlock the free "Most Useful Mac Keyboard Shortcuts" cheat sheet now!

This will sign you up to our newsletter

Enter your Email

Below, we look at using the built-in tools in Preview and Automator to batch convert and resize images. We’ll also introduce a couple of third-party apps that will do the trick with some extra features thrown in.

For this guide, we’ll combine converting and resizing. But you can also do each separately on your batch of images.

Batch Convert and Resize Images Using Preview

The built-in Preview app has been around a long time on macOS, and you can do much more with Preview than just view images. One hidden but useful feature is the ability to batch convert and resize a large group of images.

In Finder, select a group of image files, and right-click on them. Go to Open With > Preview. If you have the Preview icon on your Dock, you can also drag the selected files onto the Preview icon to open them. From there:

  1. Click in the left pane then press Cmd + A, or click Edit > Select All from the menu bar to select all the images.
  2. Select Tools > Adjust Size from the menu bar.
  3. Choose the units you want to use (pixels, percent, inches, cm, mm, or points) from the dropdown box to the right of the Width and Height fields.
  4. If you want the Height to adjust automatically when you enter the Width, or vice versa, make sure to check the Scale proportionally box.
  5. Enter values for one or both the Width and Height and click OK.
    1. Note that if your images are all different sizes, you may want to use percent, because it’s relative to the original size.

Batch Resize Images Preview Mac

Now, let’s convert the images. Batch image conversion in Preview works with almost all image formats, including GIF, JPEG, JPEG-2000, BMP, Photoshop PSD, PNG, TIFF, and even PDF. You can convert any number of image files using this.

To start converting in Preview:

  1. Make sure all the images are still selected and go to File > Export Selected Images.
  2. Navigate to the folder where you want to save the images and click Options to reveal the Format dropdown list.
  3. Select the desired format, optionally adjust the available settings, and click Choose.

Batch Convert Images Preview Mac

Batch Convert and Resize Images Using Automator

Automator is a powerful, built-in utility on your Mac that allows you to create custom automation apps without knowing any coding. Don’t be intimidated by Automator—it’s easy to use.

Using a custom Automator app to batch convert and resize a group of images is faster than using Preview. Once you create a workflow in the Automator app, save it as an application, and add it to your Dock, you can simply drag and drop images onto the icon.

To start a new Automator document:

  1. Open Automator from your Applications folder (or search for it using Spotlight with Cmd + Space) and click New Document.
  2. On the Choose a type for your document dialog box, click Application and then hit Choose.

There are two main sections on the Automator window: Actions and Variables are on the left, while the workflow is on the right. The process of building an Automator workflow involves selecting the type of Action or Variable you want and then dragging it into your workflow.

In essence, you’re building a step-by-step process that tells Automator what to do with the files you give it.

Create a New Folder

First, we’re going to have Automator create a folder to place the converted and resized images into.

Make sure Actions is selected right under the toolbar. Select Files & Folders under Library on the left. Next, find the New Folder action in the second column and drag it to the workflow on the right. After this, the New Folder action is put in place at the beginning of the workflow, with some options on the action box.

Enter a name for the new folder in the Name box. By default, this new folder will be created on the Desktop, but you can choose another location using the Where dropdown list.

Create New Folder Automator Mac

Get the Images

So far, we’ve told Automator to take the images you drag onto the app icon and copy them to the new folder. Now, we need to tell Automator to select the images to modify.

Under Library, select Files & Folders. Next, drag the Get Folder Contents action to the bottom of the workflow.

Get Contents Automator Mac

Convert the Images

The next step is to tell Automator to convert the images. Under Library, select Photos, and then drag the Change Type of Images action to the bottom of the workflow.

A dialog displays asking if you’d like to add a Copy Finder Items action to the workflow so the image files will be copied, preserving your original files.

Don't Add Copy Dialog Automator Mac

Because we added an action to the workflow that will create a new folder, we don’t need to make copies of the original files. The New Folder action will take care of that. So click Don’t Add on the dialog box.

On the Change Type of Images action box in the workflow, select your desired image format from the To Type dropdown list. This will take the images you’ve added using the Get Folder Contents action and convert them to the selected image format.

Convert Images Automator Mac

Resize the Images

If you also want to resize your images, you can add an action that will scale them all. Under Library, select Photos. Next, drag the Scale Images action to the bottom of the workflow.

Select whether you want to convert the images to a specific size in pixels or using a percentage from the dropdown list. Enter the number in pixels or the percentage in the box. As mentioned earlier, if you’re working with images of various sizes, you may want to use By Percentage as it works relative to the original size.

Resize Images Automator Mac

You’ll be asked again if you’d like to add a Copy Finder Items action to the workflow to make a copy of the original files. Again, click Don’t Add.

Save the Application and Add It to Your Dock

We’re finished creating our workflow. Now, it’s time to save it as an app. Go to File > Save. Navigate to where you want to save your app and enter a name for the app in the Save As box at the top of the dialog box. Next, click Save.

Finally, drag the Automator app file you just saved to the Dock for easy access.

Convert and/or Resize the Images

To convert and resize a batch of images, select the image files and drag them onto the app icon on the Dock.

Batch Convert Resize Images Automator Mac

Depending on the number and size of the selected images and the speed of your Mac, after a few seconds or minutes, you’ll have a new folder on your Desktop containing the converted and resized images. This preserves the original files, so you don’t have to worry about any irreversible changes.

Batch Convert and Resize Images Using a Third-Party App

There are also third-party apps you can install on your Mac to convert and resize your images. Here are a couple for you to consider.

XnConvert

batch convert resize images mac xnconvert

XnConvert is a free program that makes it easy to batch convert and resize images. In addition, it can perform many other actions on images, like rotating/cropping and adjusting the brightness, contrast, and saturation. You can also use it to apply blur, emboss, and sharpen filters, or add masking and watermarking effects.

Add your images on the Input tab. Next, add an action on the Actions tab to resize the image by pixels, percent, inches, cm, or mm and specify the Width and Height values.

On the Output tab, select the folder for the converted files and choose a format you want to convert to. You can also customize the file names and adjust some other options.

When you’re ready to convert your images, click Convert.

Download: XnConvert (Free)

ImageSize

batch convert resize images mac imagesize

With ImageSize, you can batch resize, convert, and rename your image files and keep the original aspect ratio from them. You can resize images by pixels, percent, or fixed width or height. Input and output formats include the most popular types like JPG, JPEG, PNG, TIFF, GFT, BMP, and more.

Add your images on the ImageSize window and set the resize options on the Resize tab on the right. Then click the Output tab, pick the image Format you want, and select the Output Folder.

Click Resize Images on the Output tab to resize and convert your images and save them to the selected folder.

Download: ImageSize ($3.99)

Need More Options for Mac Image Conversion?

Now you know how to resize and convert any image on your Mac without any hassle. Whether you do this rarely or every day, these methods make it simple.

If you’re looking for a more powerful tool for jobs like this, have a look at the best image editors for your Mac.

Image Credit: tan4ikk/Depositphotos

Read the full article: How to Batch Convert and Resize Images on Your Mac


Read Full Article

10 Free Operating Systems You Maybe Never Realized Existed


Chances are, your computer came with Windows or macOS. These operating systems may seem free, but they’re not. Manufacturers have to pay Microsoft for Windows, and macOS updates are only available to people who have purchased Macs. On our end, the cost is hidden in the price of the computer.

Unlock the "Essential Linux Commands Cheat Sheet" now!

This will sign you up to our newsletter

Enter your Email

There are many operating systems that are actually free. The most popular is Linux, but keep reading. By the time you finish this list, Linux will seem downright mainstream. Here are ten weird or obscure operating systems that most of us have never heard of.

1. FreeBSD

If you’re using a free operating system that isn’t Linux, then it’s probably based on BSD. FreeBSD is only one of several UNIX-like operating systems. Others include NetBSD, OpenBSD, and PC-BSD. Whichever one you use, much of the experience is similar to what you will find on Linux. Free and open source software available for one is typically able to run on the other.

Even if you’re not a free software lover, you may be using parts of FreeBSD without realizing it. Due to the project’s permissive license, some of the code has made its way into Apple macOS, the Sony PlayStation 4, and Juniper routers.

2. ReactOS

Most free operating systems provide an alternative to Windows. ReactOS, in a sense, strives to be Windows. The goal is giving users a means to run software made for Windows without having to buy an operating system from Microsoft.

ReactOS is a free and open source operating system, so it can’t utilize any of Windows’ actual code. The project has partially implemented many Windows APIs, and it collaborates with the Wine project to get programs up and running.

3. FreeDOS

Do you live in the terminal? Did you use computers back when that was the only option? Are you having fond memories of MS-DOS?

FreeDOS lets you relive that bygone era. The barebones OS gives you a means to run old DOS programs on more modern hardware or inside a virtual machine. Or you can just use it to run old games.

4. Haiku

Haiku free operating system desktop
Image Credit: Haiku

Haiku draws inspiration from BeOS. Drawing a blank? Me too. BeOS was a graphical operating system developed by Be Inc to run on the BeBox back in 1995. The operating system stuck around for five years, before the last update went out in 2000.

BeOS may not have been a household name, but it picked up some users, and a few wanted to see the OS live on enough to create their own open source version. The goal is for software written for BeOS to work on Haiku, sort of like what ReactOS wants to do with Windows. All things considered, the Haiku team probably has an easier job on its hands.

5. illumos

Oracle used to maintain an operating system called Solaris. It was originally closed source, but the project became open in 2008. Oracle discontinued OpenSolaris in 2010 and went back to a proprietary model with Solaris 11 in 2011.

illumos is an effort to keep OpenSolaris alive. Like Linux, you don’t download illumos directly. Instead, you grab a distribution such as DilOS or openindiana.

6. Syllable

Syllable desktop
Image Credit: Adam “Speaktrap” Ga?ek/Wikimedia

Syllable is based on AtheOS, an AmigaOS clone that was abandoned around the turn of the century. As for AmigaOS, it’s still alive despite being born in the 80s for a line of computers long considered ancient.

Syllable targets home and home office users with a usable interface and native apps, including a Webkit-based web browser and an email client. Thing is, it can do this on a computer with only 32MB of RAM (though at least 64MB is recommended for browsing). The full installation should only take up around 250MB of hard drive space.

7. AROS Research Operating System

While Syllable is based on an AmigaOS clone, AROS takes a different approach. It actually aims to be binary compatible with AmigaOS at the API level. This is similar to how ReactOS targets Windows, and Haiku targets BeOS.

You may be wondering if it’s worth giving AmigaOS this much attention. Did I mention that AmigaOS is still around? It’s not free either. Someone out there is still willing to pay for an operating system most people have never heard of. AROS offers a way to use some AmigaOS programs without having to hand over money. Plus it’s open source, which may leave you feeling more secure.

8. MenuetOS

Here’s the thing about MenuetOS—it’s small enough to fit on a single floppy disk. These were the flash drives of the 90s, and they only offered up to 1.44MB of storage. Considering many Linux distros have a hard time fitting on a 700MB CD, booting from a floppy is hard to fathom in this day and age.

MenuetOS is written entirely in 32/64-bit assembly language and is designed to run with very little overhead, even though it does support up to 32GB of RAM.

9. DexOS

Do all desktop operating systems feel a bit same-y? Here’s a weird operating system that takes a different approach. Firing up DexOS will feel less like using the computer in keyboarding class and more like playing on a basic home game console.

Launching applications within DexOS feels vaguely like inserting a disc into an old Dreamcast. The experience feels seems more authentic if you’re actually playing a game. And another cool thing? This free OS is also small enough to fit on a floppy. Try putting a version on a Raspberry Pi.

10. Visopsys

Like DexOS, Visopsys is the hobby project of a single developer. Check this out if you want another look at how much a single person can create.

The Visual Operating System (admittedly a name that could possibly apply to any OS with a desktop environment) has been in development since 1997. Impressively, it’s not based on any pre-existing OS. That’s not to say the project doesn’t utilize pre-existing code. You will find common GNU tools here, and the icons may look familiar to KDE Plasma users.

Would You Use Any of These Free Operating Systems?

Most of them—no. Haiku developers don’t run Haiku full-time. The Visopsys developer explicitly says the OS isn’t as functional as Linux or, perhaps a more fair comparison, Syllable. DexOS is more an experiment than anything else.

That said, there are plenty of folks who prefer FreeBSD over Linux. illumos may not be a household name, even among FOSS lovers, but it has its uses. And did I mention using FreeDOS to play all those old DOS games?

But if you want to stick with a free operating system millions of people use everyday, there are many awesome Linux distributions to explore.

Read the full article: 10 Free Operating Systems You Maybe Never Realized Existed


Read Full Article
You Can Now Watch YouTube Originals for Free


youtube-premium-originals

You can now watch YouTube Originals for free, with YouTube having made its Originals free-to-watch. Some content remains exclusive to YouTube Premium subscribers. However, YouTube Originals released after September 2019 are available to watch for free.

What Are YouTube Originals?

As the name suggests, YouTube Originals are original movies and shows produced by YouTube. YouTube began producing original programming as a way of enticing viewers into subscribing to YouTube Red. Which has since been rebranded as YouTube Premium.

There are some YouTube Originals worth watching, but most YouTube Originals aren’t up to the standard of the original programming produced by Netflix, Hulu, and Amazon. Which is probably why YouTube has switched its Originals to an ad-supported model.

How to Watch YouTube Originals for Free

Since September 2019, anyone and everyone has been able to watch YouTube Originals for free. According to an email sent out to existing YouTube Premium subscribers, this applies to all YouTube Originals released after September 24, 2019.

To watch YouTube Originals for free, just head over to the YouTube Originals YouTube channel. There, you’ll find all of YouTube’s original programming, most of which will be available to watch for free. Simply click a video to start watching it.

This means that non-members will be able to watch YouTube Originals for free by sitting through the occasional advert. However, according to this YouTube Help page, this only applies to new content, and not seasons of shows already released.

YouTube Premium subscribers can also benefit from ad-free viewing, access to all episodes in a season straight away, the ability to download episodes to watch offline, and exclusive access to bonus content. Which YouTube hopes is enough added value.

Is YouTube Premium Worth Paying For?

YouTube has done well to make its Originals free-to-watch, as it opens the content up to people who don’t currently subscribe to YouTube Premium. After all, $11.99/month is a lot to pay to watch the handful of YouTube Originals you’ve actually heard of.

We have previously asked, is YouTube Premium worth the money? And access to YouTube Originals was one of the benefits listed. With YouTube Originals now accessible to everyone, this surely makes YouTube Premium less appealing. Convince us otherwise.

Read the full article: You Can Now Watch YouTube Originals for Free


Read Full Article

How to Update Kodi on Amazon Fire Stick


Kodi’s developers frequently release new updates for the app. There has been an average of one update every two months since February 2017. Because there are so many releases, it’s vital to keep your Kodi app up to date on every device.

Unlock the list of "Essential Amazon Fire Stick TV Channels" now!

This will sign you up to our newsletter

Enter your Email

Failure to do so could see you missing out on new features and leave you exposed to security flaws. So if you’re running Kodi on your Amazon Fire Stick, you need to keep it updated. But how?

Annoyingly, you won’t find Kodi in the Fire Stick’s app store, so you will have to perform the upgrade manually. With that in mind, here’s how to update Kodi on a Fire Stick.

How to Update Kodi on Amazon Fire Stick

installing kodi downloader

If you want to update your version of Kodi to the latest release, just follow the simple step-by-step instructions below.

(Note: Before beginning the process, head to Settings > My Fire TV > Developer Options and make sure you have turned on Apps From Unknown Sources.

  1. Download an app called Downloader from the Amazon Appstore.
  2. Long-press the Home button.
  3. Launch Downloader.
  4. In the box below Enter the URL of the website you want to load or the file you want to download, type https://ift.tt/1q1qItl and select Go.
  5. Use the remote to select Android.
  6. Choose either the 32-bit or 64-bit version of Kodi. First-generation Fire sticks have 32-bit CPUs; the newer ones have 64-bit.
  7. Choose the Release version of the app. Nightly builds are more likely to contain bugs.
  8. Wait for the APK file to download.
  9. When complete, Downloader will automatically attempt to install it.
  10. On the on-screen pop-up, click on Install.

You will now have the latest version of Kodi running on your Amazon Fire Stick. All of your content and settings should have been retained.

Now you’re all set to start watching movies on Kodi, and you can use these legal Kodi add-ons for free movies to do so!

And if you need any more help with Kodi, our Kodi setup guide for beginners should provide answers to your questions.

Read the full article: How to Update Kodi on Amazon Fire Stick


Read Full Article

How to Clean the Dust From Your Noisy PS4


clean-up-noisy-ps4

If you’ve had a PlayStation 4 for a while, chances are it’s running a lot louder than it did when you bought it. Like most devices, dust tends to build up over time inside the system.

To keep your PS4 running at its best, it’s wise to clean your system every once in a while. To quiet it down and remove all that nasty dust buildup, follow our guide to cleaning your PS4.

Warning: Take Care Cleaning Your PS4

While this is a relatively straightforward process, you should still take care when performing this. We cannot be held responsible for any damage you may do to your system. You may want to make sure you’ve backed up your saved data before proceeding just in case.


With that out of the way, let’s look at how to clean your PS4.

Step 0: What You’ll Need for Cleaning a PS4

00-PS4-Cleaning-Materials

PS4 cleaning is a relatively simply job, but does require a few materials:

  • A TR9 Torx security bit screwdriver. The PS4 uses T9 security screws. A T8 screwdriver may work, but you should use a T9 for best results. Make sure you get a screwdriver with a security bit, which has a tiny hole in the center.
  • A standard Phillips-head screwdriver. There are a few screws inside the PS4 that require this screwdriver to remove. A smaller screwdriver will work best here.
  • A knife or other sharp object. You’ll want this to peel off the stickers covering the PS4’s rear screws.
  • A can of compressed air. You’ll need this to blow out the dust. You can purchase these online or at stores like Walmart.

For a more efficient cleaning, you may also want to use these optional materials:

  • Cotton swabs and/or cotton balls. If you’d like, you can use these to help you remove some of the dust. A cotton swab also helps you keep the fan from spinning. If you want to go above and beyond, try making some cleaning putty and using that instead.
  • A flashlight. It can be tough to see where the dust hides; a flashlight makes it easier to spot.
  • A paper towel or piece of tape to hold the screws. You don’t want tiny screws to go missing, so it’s good idea to have somewhere to keep them. When removing the screws, you may want to place them in the same pattern you removed them, so you know which goes where.
  • A cleaning brush or old toothbrush. Dust caked onto the PS4’s fan is difficult to remove since the blade gaps are so small. A brush can scrape off whatever the canned air can’t clear out.

Note that if you have an original model PS4, opening your console and cleaning it will void your warranty (which is valid for one year after purchase). However, you can remove the cover from the Slim and Pro models without voiding the warranty. Chances are that if you’ve had your PS4 for long enough that dust buildup is an issue, your warranty has probably expired anyway.

We’ll show steps for the original PS4 for this guide (since it’s the one I have, and the most complicated). At the end, we’ll mention the differences for the other models.

Step 1: Shut Down and Unplug Everything

Before you start cleaning your PS4, make sure the console is turned off. If you see an orange light, then it’s in Rest Mode (a low-power state) and you’ll need to shut it down fully.

Turn your console on, then press and hold the PlayStation button on your controller to open the Quick Menu. Head to Power > Turn Off PS4. Wait until all lights on your PS4 turn off, then unplug the power cable, HDMI cord, and anything else connected to it (like USB devices).

01-Shut-Down-PS4

Bring your PS4 to a place where you have some room to work. Since you’ll be removing screws, you should have a safe place to set them.

Like when building a PC, you should take care not to build up static electricity. Don’t work on a static-prone surface, such as a shaggy carpet, and try to only touch the plastic components when cleaning.

Step 2: Remove the Back Stickers and Screws

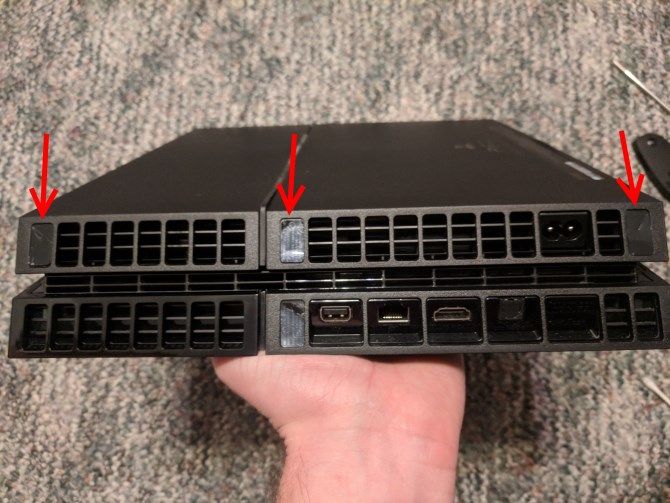
Now that you’ve got your PS4 ready to work, turn it around so the back is facing you, then flip it upside-down. You’ll see three stickers along the “top” (which is really the bottom of the system, in line with the port for the power cable) that you must remove.

Note that if you’re using the slightly revamped model of the original PS4, you’ll only see one sticker and screw here in the middle.

02-PS4-Back-Stickers

The middle one has a special warranty sticker that damages itself when you remove it. The other two are a bit thicker and might require a bit of extra work. Use your knife or another pointy tool to peel back a corner of the stickers, then they should come off easily. Be careful not to scratch your system while you remove them.

Set them aside if you want to re-apply them later, or throw them out if you don’t care. Once you’ve removed the stickers, use your TR9 screwdriver to remove the screws underneath. They’re short, so they shouldn’t require much effort. Take care not to strip them, and set them aside in a safe place.

03-PS4-Removing-Back-Screws

Step 3: Take Off the PS4 Cover

Now that you’ve removed the screws(s) holding the cover in place, you can pop it off. Start at the back (facing you) and lightly pull up on the edges. Don’t use a ton of force; as you work your way around the PS4, the cover should come free. Tug it up and remove it.

04-PS4-Removing-Cover

At this point, you can look at the cover you just removed and clean any dust inside. Your compressed air will make short work of it; this is also a good place to use a cotton ball to dab it out. After cleaning it, set the cover aside for now.

Back on the system, you can now see the fan, which is a good indicator of how dusty your system is. However, there’s one more component to remove first.

Step 4: Remove the Power Supply

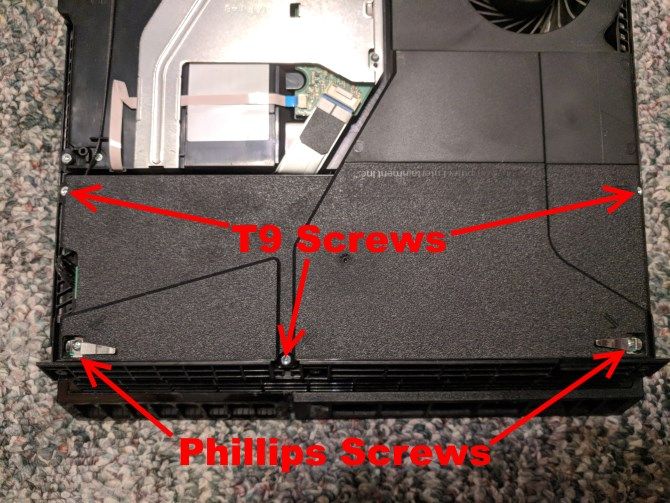
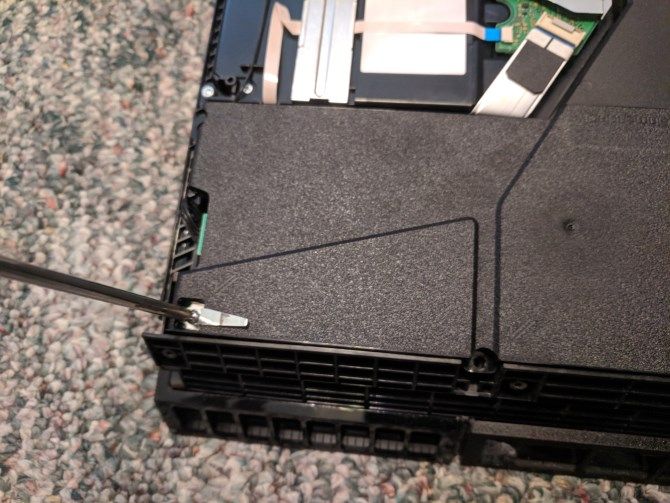
You’re nearly there! Now you just need to remove the power supply so you can gain access to the heat sink and perform the most thorough cleaning. There are five screws holding the PSU in place. Three of them use the same TR9 security screws as the back cover, and the other two are standard Phillips head screws.

With the PSU on your side and the fan in the upper-right corner, the two Phillips head screws are closest to you on the far left and right of the PSU. Use your TR9 screwdriver to remove the other three screws.

Note that if you’re using the slightly revamped model of the original PS4, you’ll see one screw in a different location here. The T9 screw in the upper-left of the below photo will be a few inches above the T9 screw at the bottom instead.

05-PS4-PSU-Screws

The Phillips screws are longer than the others and are a bit tougher to remove, so you may need to slide your knife or another thin object under the clips to pull them up. Take care when doing this so you don’t bend the clips.

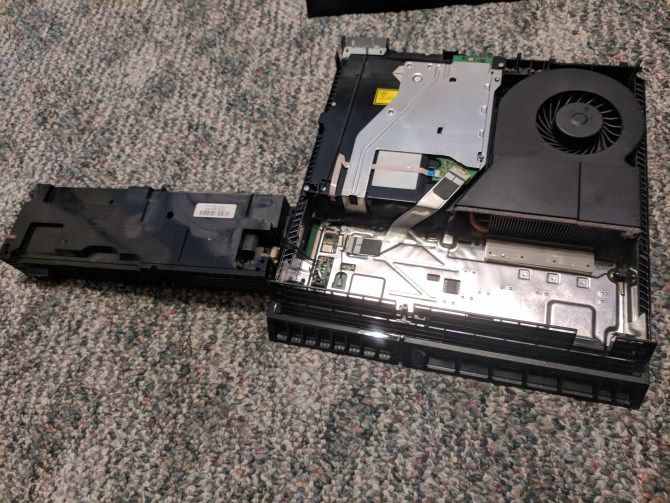
Now you can remove the PSU. There’s a cable connecting it to the motherboard underneath, which you don’t need to remove and don’t want to accidentally unplug. Carefully grab the PSU by both sides and lift it up evenly. It may take a bit of wiggling to come free.

Once you’ve got it lifted up, gently “flip” it over the left side so it rests carefully while staying plugged in.

06-PS4-PSU-Removed

Step 5: Blow the Dust Out of Your PS4

Finally, you have access to the heat sink and fan. Now we can explain how to clean your PS4’s fan and remove dust deep in the system.

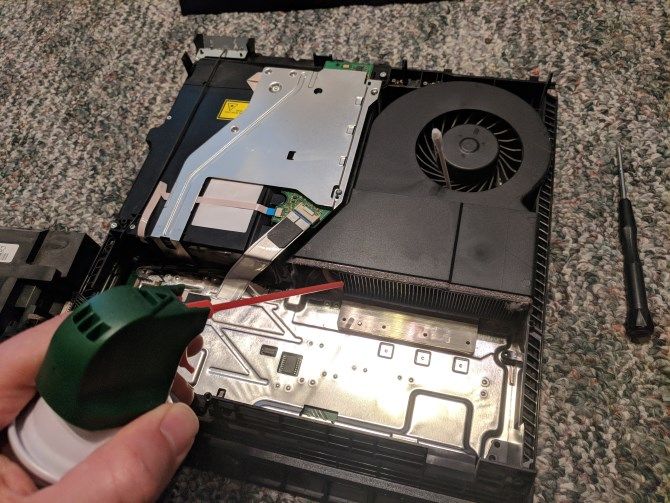
Take your can of compressed air and insert the straw (if it has one) for more focused cleaning. Spray a few blasts of air away from your PS4 first, in case there’s any liquid in the tip.

Now, use your canned air to blow short bursts of air all around your PS4, getting rid of the dust. Make sure to check the corners for hidden dust (the flashlight can help here), and take care to blow it out of the system instead of further in. You can also use your cotton swabs or cotton balls to help you remove any dust the air won’t reach.

07-PS4-Cleaning-with-Air

Focus especially on the fan, heat sink, and outside edges of your PS4 when looking for built-up dust, as these are common locations for it.

Note a few important warnings when using canned air:

  • Never, ever hold the can upside-down. This will force the liquid inside the can out and could damage your PS4.
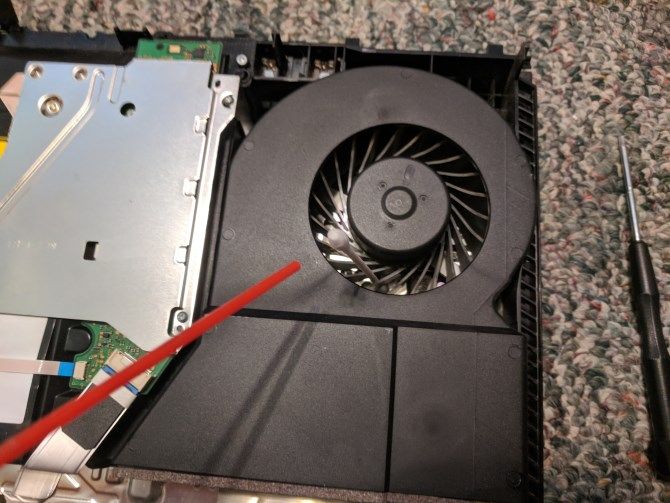
  • Do not spray compressed air directly into the fan. Spinning the PS4’s fan at an extreme speed could damage the circuitry. Before you blow air near the fan, make sure you’re either holding it with a finger or have jammed it with a cotton swab.
  • Use compressed air in ventilated areas only. Canned air can bother your skin and other body parts, and it’s dangerous to breathe it in for an extended time.
  • Spray in bursts. Holding a steady spray of air will quickly cool the can, making it difficult for you to handle.

08-PS4-Cleaning-Fan

Step 6: Reassemble the PS4

Once you’re satisfied with your work cleaning out your PS4, it’s time to put everything back together in reverse order.

First, carefully “flip” the power supply over and put it back in its spot. You’ll notice two prongs in the bottom-left corner; make sure those line up with the gap in the PSU.

Replace the five screws holding it in place. Remember that the two on the bottom-left and bottom-right are the longer Phillips head screws with clips. The other three are security screws.

09-PS4-Replace-PSU-Screws

Next, snap the cover back into place. Start from the front of the system (make sure you have don’t have the cover backwards). Lightly press down all around the edges to the system to make sure it’s secure. When done, it shouldn’t wiggle.

Now, replace the TR9 screws on the back of the PS4. Take care when screwing them back in not to damage them. If you decided to keep the sticker(s), replace them now. The warranty sticker will appear scratched; this is by design.

Now your PS4 is all cleaned out and back together, but there’s an additional spot you might want to check quickly.

Step 7: Clean Your PS4’s HDD Bay (Optional)

The PS4 has a separate compartment for the hard drive that may or may not have built up dust. It’s not vital to check, but it’s worth taking a moment while you have your system out.

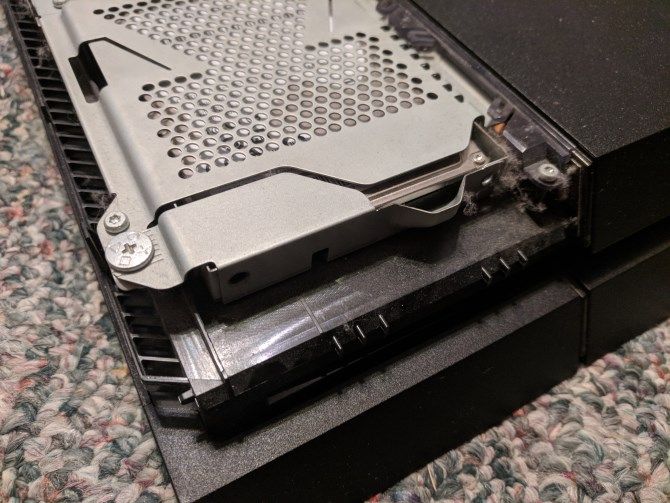
To access it, lightly press and slide the shiny part of your PS4 (on the left when looking at it from the front) straight out to the left. This will remove the cover, allowing you to access the HDD bay.

10-Remove-PS4-Top-Cover

A simple Phillips head screw adorned with the PlayStation button icons holds it in place. You can remove the HDD if you like and clean out any dust in this area. Then just slide the HDD back in, replace the screw, and slide the cover on.

11-PS4-HDD-Screw

Step 8: Perform a Database Rebuild (Optional)

Now you can replace your PS4 and plug all your cables back in.

One last step isn’t strictly necessary, but since you’ve just cleaned out your PS4’s hardware, it’s a good time to optimize its software performance too.

The PS4 includes a utility called Rebuild Database that optimizes all the data on your drive. It’s essentially like defragmenting your computer. If you’ve had your PS4 long enough to build up significant dust, chances are it could benefit from this operation too.

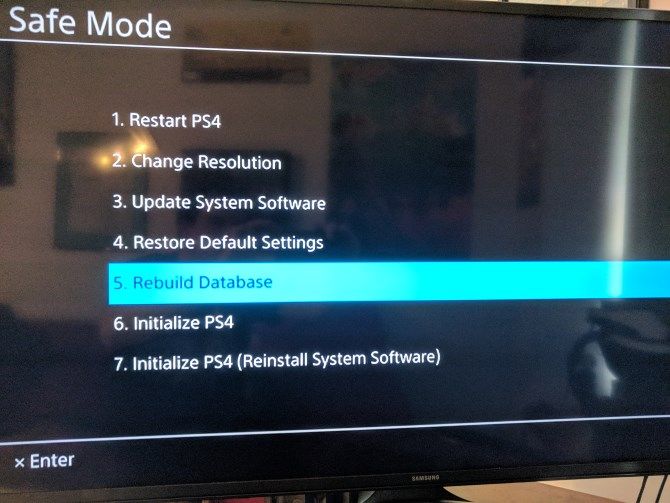
To access it, shut down your PS4 (fully, so it’s not in Rest Mode). Once it’s off, press and hold the Power button on the front of the console (the top button). You’ll hear one beep right away; continue holding it until you hear a second beep. This boots the PS4 into Safe Mode.

Connect your controller to the PS4 with a micro-USB cable, then press the PlayStation button to sync it. Select the Rebuild Database option and confirm the operation. Your PS4 will then perform the process.

12-PS4-Rebuild-Database

The system says this could take some time depending on how much data you have. However, it didn’t take more than 15 minutes or so for me with nearly 2TB of data on my hard drive. Once it completes, you’ll be back at your home screen.

This doesn’t delete any of your data, but it does have a few minor consequences. The PS4 will show you Discover notifications again for basic tips you’ve probably already seen. Your Home screen won’t show your recently played games, so you’ll have to track them down manually once. And your PS4 will also check for game updates for games you haven’t played in a while.

Once you’ve done this, you should hopefully notice your PS4 runs a bit smoother in the menus.

How to Clean the PS4 Slim and PS4 Pro

To clean the fan on the PS4 Slim, you don’t need to remove the warranty sticker. It’s much easier to remove the cover, too. All you have to do is pull up on the left and right corners on the front of your system. Pull on the middle, then slide the cover back and it will come right off.

From here, you’ll be able to see the fan even though it’s obstructed by a cover. If your fan doesn’t look too dirty (a flashlight will help with this), you can spray some canned air into it and probably call it a day. Remember to use a cotton swab to prevent the fan from spinning.

For full cleaning, you’ll need to remove several screws from the cover and the power supply plate. Since we focused on the original PS4, please see the video below for PS4 Slim-specific instructions.

The PS4 Pro is similar, but it’s even simpler. Simply pull up on the front left and right corners to loosen the cover, then slide it back. You can see the fan as soon as you remove this, making basic cleaning quite easy.

Unfortunately, the heat sink is buried deep in the PS4 Pro, and requires disassembling almost the entire console. Thus, you should stick to cleaning the fan. Check the below video for more details.

Now Your PS4 Is All Clean

Now you know how to clean your PS4! You should notice it running much more quietly than it was before, especially if you’ve had the system for years. While you could clean even deeper into the system, this would require some potentially risky operations. It’s better to avoid damaging your system and stick to this basic cleaning.

In the future, take a brush, some compressed air, or cotton swab along the outside edges of your system to remove the dust once in a while. This should help prevent dust from building up inside so you don’t have to go through this process as often.

Some have recommended placing plastic bottle caps or similar small objects under the four corners of your console. This lifts it off the below surface and should help with air flow. Aside from this, make sure your PS4 has room to breathe (keep it out of enclosed spaces). Paired with this cleaning when needed, your PS4 should stay cool and quiet.

For more DIY PS4 advice, check out our guide on upgrading your PS4’s hard drive and how to transfer your PS4 data to a new system. If you followed this guide, show us your dusty PS4 pictures in the comments below!

Read the full article: How to Clean the Dust From Your Noisy PS4


Read Full Article