04 May 2018

The Question of Quantum Supremacy


Quantum computing integrates the two largest technological revolutions of the last half century, information technology and quantum mechanics. If we compute using the rules of quantum mechanics, instead of binary logic, some intractable computational tasks become feasible. An important goal in the pursuit of a universal quantum computer is the determination of the smallest computational task that is prohibitively hard for today’s classical computers. This crossover point is known as the “quantum supremacy” frontier, and is a critical step on the path to more powerful and useful computations.

In “Characterizing quantum supremacy in near-term devices” published in Nature Physics (arXiv here), we present the theoretical foundation for a practical demonstration of quantum supremacy in near-term devices. It proposes the task of sampling bit-strings from the output of random quantum circuits, which can be thought of as the “hello world” program for quantum computers. The upshot of the argument is that the output of random chaotic systems (think butterfly effect) become very quickly harder to predict the longer they run. If one makes a random, chaotic qubit system and examines how long a classical system would take to emulate it, one gets a good measure of when a quantum computer could outperform a classical one. Arguably, this is the strongest theoretical proposal to prove an exponential separation between the computational power of classical and quantum computers.

Determining where exactly the quantum supremacy frontier lies for sampling random quantum circuits has rapidly become an exciting area of research. On one hand, improvements in classical algorithms to simulate quantum circuits aim to increase the size of the quantum circuits required to establish quantum supremacy. This forces an experimental quantum device with a sufficiently large number of qubits and low enough error rates to implement circuits of sufficient depth (i.e the number of layers of gates in the circuit) to achieve supremacy. On the other hand, we now understand better how the particular choice of the quantum gates used to build random quantum circuits affects the simulation cost, leading to improved benchmarks for near-term quantum supremacy (available for download here), which are in some cases quadratically more expensive to simulate classically than the original proposal.

Sampling from random quantum circuits is an excellent calibration benchmark for quantum computers, which we call cross-entropy benchmarking. A successful quantum supremacy experiment with random circuits would demonstrate the basic building blocks for a large-scale fault-tolerant quantum computer. Furthermore, quantum physics has not yet been tested for highly complex quantum states such as this.
Space-time volume of a quantum circuit computation. The computational cost for quantum simulation increases with the volume of the quantum circuit, and in general grows exponentially with the number of qubits and the circuit depth. For asymmetric grids of qubits, the computational space-time volume grows slower with depth than for symmetric grids, and can result in circuits exponentially easier to simulate.
In “A blueprint for demonstrating quantum supremacy with superconducting qubits” (arXiv here), we illustrate a blueprint towards quantum supremacy and experimentally demonstrate a proof-of-principle version for the first time. In the paper, we discuss two key ingredients for quantum supremacy: exponential complexity and accurate computations. We start by running algorithms on subsections of the device ranging from 5 to 9 qubits. We find that the classical simulation cost grows exponentially with the number of qubits. These results are intended to provide a clear example of the exponential power of these devices. Next, we use cross-entropy benchmarking to compare our results against that of an ordinary computer and show that our computations are highly accurate. In fact, the error rate is low enough to achieve quantum supremacy with a larger quantum processor.

Beyond achieving quantum supremacy, a quantum platform should offer clear applications. In our paper, we apply our algorithms towards computational problems in quantum statistical-mechanics using complex multi-qubit gates (as opposed to the two-qubit gates designed for a digital quantum processor with surface code error correction). We show that our devices can be used to study fundamental properties of materials, e.g. microscopic differences between metals and insulators. By extending these results to next-generation devices with ~50 qubits, we hope to answer scientific questions that are beyond the capabilities of any other computing platform.
Photograph of two gmon superconducting qubits and their tunable coupler developed by Charles Neill and Pedram Roushan.
These two publications introduce a realistic proposal for near-term quantum supremacy, and demonstrate a proof-of-principle version for the first time. We will continue to decrease the error rates and increase the number of qubits in quantum processors to reach the quantum supremacy frontier, and to develop quantum algorithms for useful near-term applications.

How to Convert a PDF to PowerPoint Presentation


PDFs are one of the most-used file formats in the world. However, they don’t readily lend themselves to being used in PowerPoint presentations.

Of course, it’s unlikely you’d want to turn a 100-page academic paper into a slideshow, but PDFs aren’t only used for text. Plenty of graphs, charts, and images are also distributed in the PDF format.

So, if you have an informative PDF file that you’d love to turn into a presentation, keep reading. We’re going to show you how to convert a PDF to a PowerPoint file, then offer a few formatting tips that’ll help to make it shine.

How to Convert a PDF to PowerPoint Presentation

As with most file format conversions, there are two ways you can turn a PDF file into a PowerPoint file. You can either use a web app or a desktop program.

Web App: Smallpdf

With a bit of digging, you will be able to find quite a few tools that can turn a PDF document into a PPT file. However, we like Smallpdf. In our testing, it was the most reliable and returned the most impressive results.

The app has some other significant benefits that users will appreciate. Firstly, it’s entirely free to use. Secondly, Smallpdf does not retain any of your files on its servers (it retains your file for one hour in case you want to download your conversion multiple times). Finally, it’s entirely web-based; you don’t need to install anything on your machine.

convert pdf to powerpoint presentation

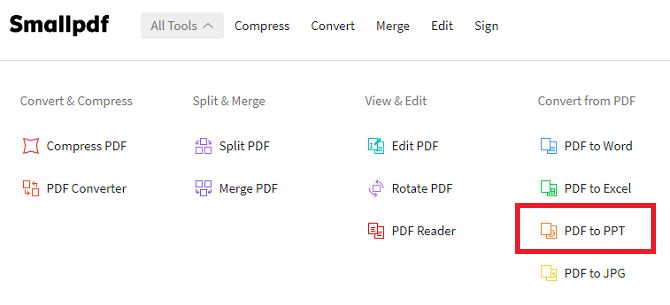
To begin your conversion, head to the Smallpdf website. Using the navigation bar at the top of the window, go to All Tools > Convert from PDF > PDF to PPT.

You should now see a yellow box on your screen. There are three ways to add the file you want to convert into the web app. You can upload a file from your computer (by dragging-and-dropping or clicking Choose File), add a file from Google Drive (by clicking on From Google Drive), or add a file from Dropbox (by selecting From Dropbox).

convert pdf to powerpoint presentation

Note: If you want to add a file from Google Drive or Dropbox, you will need to give Smallpdf permission to access your account. If you’re uncomfortable doing so, download the PDF in question onto your computer, then re-upload it to the web app.

Once you have selected your file, the upload process will begin. Depending on the size of your PDF, it could take a few minutes.

As soon as the upload is complete, the conversion process will start. Again, the amount of time it takes will vary depending on the size of your original PDF.

convert pdf to powerpoint presentation

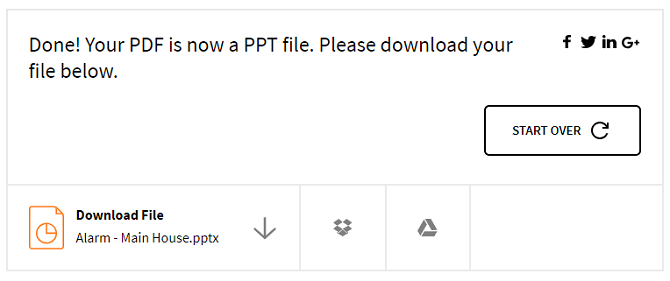
Eventually, you will see the results screen. You can either download your new PowerPoint file directly onto your computer, or you can save it to Google Drive or Dropbox.

If you want to convert a second document, just click Start Over.

Desktop App: Wondershare PDF Converter Pro

Before you keep reading, a word of warning. There are no worthwhile free apps for converting a PDF to a PowerPoint file on your desktop.

The developers’ logic is simple: Very few people need to make the number of conversions that would warrant needing a dedicated desktop app, and those that do are probably using the tool in a professional environment.

So, which app is best?

Well, Smallpdf also offers a desktop app for converting PDF into PowerPoint presentations, but it’s a new app and doesn’t yet offer the same number of features as some of its more established competitors.

The two most well-known desktop PDF converter tools are ILovePDF (offers a 15-day trial) and Adobe Pro DC (offers a seven-day trial). Thereafter, for both PDF tools you will need to pay for a license.

If you’re looking for a clear “winner,” it’s hard to argue against Acrobat Pro DC. However, it will set you back $14.99 per month. If you only make occasional conversions, the cost of the subscription is hard to justify.

Feature-wise, you can use the Adobe Pro DC app (and thus make conversions) from any device, select which parts of the PDF file you want to convert, and set up pre-defined PPT formats.

If you’re looking for a cheaper alternative, try Wondershare PDF Converter Pro. It still costs $79.95, but it’s a one-time fee for a lifetime license. Again, a trial period is available, so you can try before you buy.

convert pdf to powerpoint presentation

To convert a PDF file into the PPT format, fire up the app and open the original file. Next, click on the Home tab and select To Others on the right-hand side of the ribbon. A save dialogue will pop up. Select PPT in the Save as Type dropdown menu and hit Save. The conversion might take a few minutes, depending on the size of your file.

Other apps to consider include:

Editing Your PDF

Given the nature of file conversion, the simpler you can make the original, the better the converted file will look.

Of course, if the PDF’s original author has locked the file for editing, you might not be able to do much about it. However, if you can edit the original file, strip out any content that you don’t need in your presentation. You should especially try to remove (or tweak) any overlapping elements as much as possible.

You will find that removing overlapping elements will make it easier to edit the converted PPT file. The conversion software will try to identify all the elements on your PDF’s page and make them individually editable. Overlapping content increases the likelihood of the software incorrectly recognizing each content item.

No PDF-to-PowerPoint Solution Is Perfect

Whenever you’re converting PDF files into the PowerPoint format, you need to remember that the final product is unlikely to be perfect.

PDF conversion is difficult at the best of times, especially when converting between formats as different as PDF and PPT.

All conversion software is only making a guesstimate of how the file should look. You always need to be prepared to do a reasonable amount of post-conversion editing if you’re planning to use your presentation in a professional environment and want to avoid slideshow mistakes.

If you’re starting to think that converting a file from PDF to PowerPoint sounds like to much hassle, you could consider converting it into a Word file instead.


Read Full Article

The 15 Best Comedies on Netflix You Might Have Overlooked


While Netflix has done remarkably in forever changing the landscapes of TV drama and documentaries, sometimes we all just need to laugh. And thankfully, Netflix is jam-packed with awesome comedies worth watching ad infinitum.

Everyone already knows the big-name comedy shows on Netflix—The Office, Friends, Arrested Development, etc—but there’s more humor to be found if you look a little deeper. With that in mind, here are the best lesser-known comedies you may have missed.

1. Trailer Park Boys (2001)

IMDb: 8.4

Trailer Park Boys is a Canadian mockumentary. It follows two ex-convicts as they return to life in a trailer park once they’re released from a correctional facility after serving 18 months for prior crimes. Now that they’re out of jail, it’s time to live life, but they find that it’s not as easy as it sounds.

This is a mature cult comedy with a lot of coarse language, drugs, alcohol, and violence. It’s an unusual show, to say the least, and may take several episodes before you acquire the taste, but once you do, you’ll find there’s no other show that can scratch the same itch. There’s a reason why Trailer Park Boys has garnered international success across dozens of countries. It’s uniquely funny in its trashy ways.

Watch Trailer Park Boys on Netflix

2. Atypical (2017)

IMDb: 8.3

Atypical is a drama-comedy about a high-school teenager with autism. The show approaches the subject with respect, exploring the kinds of struggles that might affect a person on the autistic spectrum, and not just him but his family as well—all in a way that’s funny. Heavy, but funny.

Don’t go into Atypical expecting a traditional sitcom. The way its characters’ relationships are written, the kinds of humor that are mined in its situations, and the general tone and feel of the show are all atypical in their own ways. The first episode might be uncomfortable viewing, but it’s worth powering through.

Watch Atypical on Netflix

3. Grace and Frankie (2015)

IMDb: 8.3

Imagine you’re a middle-aged woman who’s settled in life, when out of nowhere your husband of 20 years announces that he’s gay. Not only is he gay, but he’s in love with the husband of who you might consider your arch-nemesis, and the two of them are leaving the both of you to live out the rest of their lives together.

That’s the premise of Grace and Frankie. It sounds strange, but it’s one of the best comedy shows on Netflix. Deeply driven by its characters and relationships, Grace and Frankie uses its wacky opening to set up compelling character developments, and keeps itself grounded as it explores what really makes its characters tick.

Watch Grace and Frankie on Netflix

4. The Inbetweeners (2008)

IMDb: 8.3

The Inbetweeners is about four suburban teenagers and the antics they get into, mainly at school but elsewhere as well. The Inbetweeners delivers a quirky brand of British humor, so don’t be surprised if you don’t like it.

It’s crude, it’s slapstick, and it can even be cringey at times. Don’t go into it expecting your everyday sitcom, because it’s nothing close to being that. But if you’re fed up with the sterilized comedies on broadcast TV, this may be the show for you.

Watch The Inbetweeners on Netflix

5. American Vandal (2017)

IMDb: 8.2

American Vandal is a mockumentary that satirizes the true crime documentaries that we’ve seen over the past decade. When a local high school becomes the victim of a phallic graffiti attack, the class clown is blamed and expelled. He denies the allegations, which leads another student to start a documentary investigation into his innocence.

American Vandal never takes itself too seriously. The show is wildly funny, and you can tell the writers are having fun with it. But beneath all of its silliness lies an indictment of modern documentaries, in how manipulative they can be and how much damage they can indirectly cause to people and communities.

Watch American Vandal on Netflix

6. The End of the F***ing World (2017)

IMDb: 8.2

The End of the F***ing World is a dark comedy that centers on two high school students: one boy who thinks he’s a psychopath and decides to murder a classmate to find out for sure if he is, and one girl who’s an outcast and wants to escape her crappy life. The two run away together, with her being his intended target.

It’s a short series, so not much else can be said without giving away important plot and character details. Suffice to say that The End of the F***ing World is a comedy like no other, finding its humor in the most absurd-yet-relatable areas of the human heart.

Watch The End of the F***ing World on Netflix

7. Comedians in Cars Getting Coffee (2012)

IMDb: 8.2

This show is exactly what it says on the tin. In every episode, Jerry Seinfeld picks up one of his comedian friends, takes them out for coffee, chats for a bit, then drops them back off at home. Oh, and he drives a different vintage car in each episode, usually one that somehow matches or represents that episode’s guest.

It’s technically an interview show, but nobody’s talking about anything important. Comedians in Cars Getting Coffee is nothing more than an opportunity to sit in on the kinds of conversations celebrities have when they’re just shooting the breeze. It’s nonsense, but extremely entertaining nonsense.

Watch Comedians in Cars Getting Coffee on Netflix

8. The Good Place (2016)

IMDb: 8.1

What happens when you die? Why, you end up in The Good Place, of course. If you’ve been a good person, anyway. Otherwise you end up in The Bad Place. But you wake up in The Good Place and everything seems great, except you aren’t who everything thinks you are. You’ve been sent to The Good Place by mistake. Now what?

All you need to know is that The Good Place is produced by Michael Schur, the same mind behind masterpieces like The Office, Parks and Recreation, and Brooklyn Nine-Nine. It’s hilarious, unlike anything ever aired before, and absolutely one of the best comedies on Netflix.

Watch The Good Place on Netflix

9. Lovesick (2014)

IMDb: 8.1

Formerly known as Scrotal Recall, Lovesick follows a British bachelor who gets diagnosed with chlamydia and decides to reach out to all of his former partners to let them know. Each episode focuses on one of these partners, and employs a dual-timeline structure: a story in the present and a story told in flashbacks.

Lovesick isn’t a groundbreaking comedy, but it is a solidly executed one. The characters are likable, the stories are interesting, and it’s generally enjoyable.

Watch Lovesick on Netflix

10. Glow (2017)

IMDb: 8.0

When a struggling actress fails to find any work in 1980s Los Angeles, she bites the bullet and auditions for something unconventional: GLOW, the Gorgeous Ladies of Wrestling, a televised professional wrestling circuit.

It sounds cheesy, but there’s a lot to like about this show. It’s a unique take on the rags-to-riches story archetype (although “riches” might be exaggerating here) with a lot of laughs and a lot of drama along the way.

Watch Glow on Netflix

11. Big Mouth (2017)

IMDb: 8.0

Big Mouth is an animated Netflix series for adults that touches on all kinds of mature themes including puberty, sex, and pregnancy. It makes sense given that the show is about two adolescent boys in seventh grade, but it’s crude and definitely polarizing.

It’s one of the few shows that I recommend judging by its description: if it doesn’t sound appealing then you’ll probably hate it. But those who like it tend to love it.

Watch Big Mouth on Netflix

12. Schitt’s Creek (2015)

IMDb: 7.9

When a wealthy family loses their riches, they’re forced to start over by living out of a shabby motel located in a small town called Schitt’s Creek. The humor—and there’s lots of it—comes from the contrast between the family’s rich attitudes and mentalities versus the stark and humble reality of their new lives.

Watch Schitt’s Creek on Netflix

13. Episodes (2011)

IMDb: 7.8

Episodes is a show-about-a-show where two British writers are brought to Hollywood to write and run a new show. But against their protests, Matt LeBlanc (playing a satirized version of himself) is forced into the lead role by the network, and everything goes downhill from there.

The premise may sound bland and uninspired, but Episodes is consistently hilarious and gets better with every season. It deftly mixes British humor with American humor and introduces larger-than-life characters than are kept grounded by the levelheadedness of the two Brits. Episodes was a critical success that absolutely deserves a watch.

Watch Episodes on Netflix

14. Santa Clarita Diet (2017)

IMDb: 7.8

Santa Clarita Diet is a purposely overacted and over-the-top show that takes the concept of zombies and plants it firmly within an upper-middle-class family who live in the suburbs of Santa Clarita. It’s one of the best sitcoms to watch on Netflix right now.

The first episode is a bit rushed, and it may take another episode or two to really settle into the weirdly bright tone of the show, but it’s all laughs from there. Beware, however, that some scenes can be graphic and may disturb those with weak stomachs.

Watch Santa Clarita Diet on Netflix

15. Love (2016)

IMDb: 7.7

From the creator of Freaks and Geeks, Anchorman, Superbad, and Bridesmaids comes this drama-comedy that centers on a nerdy tutor and an impulsive radio station assistant, and explores the nature of romantic relationships through their eyes.

The show flits back and forth between being heartwarming and gut-wrenching, but always manages to find the funny—even if it’s mostly an awkward sort of funny.

Watch Love on Netflix

More of the Best Comedies on Netflix

If you’ve read this far and found that none of the above shows caught your eye, then maybe you’d be better off watching the best standup comedy specials on Netflix. After all, for laughs-per-minute, nothing beats a good hour of standup.

Image Credit: ikostudio/Depositphotos


Read Full Article

The first 3D camera built on Google VR180 tech arrives


Timed with the release of the Mirage Solo headset, Lenovo is also releasing the first camera based on Google’s 180 tech. The Lenovo Mirage Camera, which seems to be geared heavily towards YouTube creators packs a pair of fisheye 13MP lenses positioned about eyes-distance apart, allowing for high-quality 3D vision that’s perfect for VR viewing. At $299, the camera isn’t too expensive for creators looking to experiment, but it’s a worthy question of how big that niche really is. It starts shipping today.

The camera is based on YouTube’s VR180 platform, which is aiming to basically make capturing VR live-action content a little more palatable to creators. 360-degree cameras have certainly gotten a lot of attention, but creators haven’t really figured out what to do with them for the most part. Google’s compromise here is to simplify the medium with a camera that shoots half as much but isn’t too expensive and delivers crisp 3D 4K video.

In terms of build, the camera is very nice. It doesn’t feel like it’s overtly high quality, but it’s solid enough and most importantly very pocketable.Like many 360 cameras, battery life isn’t awesome at two hours, but the battery can be swapped in and out and the camera comes with a spare which is very nice. VR180 means 180 degrees which you will understand in photos especially if your finger creeps to the outer edge of the top of the camera, it will invade the 180 half-dome.

Users can utilize Google’s VR180 app to preview shots and live-stream footage from the camera.

It could all be a winning solution, but the question is really whether this product is popping up a little late. Tons of YouTube creators have undoubtedly experimented with VR-focused video and have gotten tied up in the frustrations, while the number of headsets is still growing, it’s still not enough that VR viewers can sustain a channel, and while VR180 videos are visible in “magic window” mode without a headset as well on mobile and desktop, it obviously loses the 3D capability as a result which is kind of the biggest draw.


Read Full Article
Review: Lenovo Mirage Solo headset with Google WorldSense tracking


Only a couple of days before Google I/O 2018, one of the biggest VR announcements from last year’s developer conference is finally coming to light. Lenovo’s Mirage headset is now on sale for $399, the standalone device is unique largely because of its inside-out tracking, a technology that has not been available on a VR headset widely sold stateside.

The Mirage Solo arrives just a couple days after Facebook opened sales of the much cheaper $199 Oculus Go, so how does the Daydream headset that’s double the price stack up?

Well first off, Google’s WorldSense tracking is wildly impressive. The inside-out tracking tech is among the best I’ve ever demoed on a headset. While playing titles like Extreme Whiteout, I was able to use the headset’s tracking to move from side to side while skiing down a mountain, Merry Snowballs gave me the ability to dodge snowballs while firing my own at pesky kids using the standard Daydream controller.

The build of the headset is pretty solid. Bulkiness and a lack of sexiness are foregone conclusions for VR tech in general right now, but yes this also has those issues. While the rigid PSVR-like visor head strap is certainly very comfortable, it also makes the headset a bit difficult to transport, which is arguably pretty essential to a standalone VR headset. I do wish there was integrated audio, but the headset does include some little earbuds.

The headset charges via USB-C and has a microSD card slot that can expand its 64GB of onboard memory. A big advantage this headset has over others is its battery life which spans two or three hours of gameplay on a charge, which seems good enough for sure.

The titles that make specific use of WorldSense certainly gain something new, but it still feels as though the tech is wasted on a platform that limits your movements so heavily to only a step or two in each direction. While the Mirage headset operates on Snapdragon’s 835 chipset, unlike Qualcomm’s own 835 VR platform a Google employee tell me WorldSense on Mirage could be capable of full room-scale tracking.

This limitation is hardly Lenovo’s fault, Google should have waited another year and introduced a more defined high-end platform that integrated tracked controllers. Instead, what we’re left with is a piece of hardware that’s capable of so much but is limited by the content platform which has to optimize for the lowest common denominator. This may have worked better had HTC launched its Vive Focus on the Daydream platform as was originally planned, but it seems the struggling Taiwanese tech company realized that hardware margins would be tight and they had little to gain unless they owned the platform.

This all leaves Lenovo in a shitty, yet familiar, position where they are the first to buy into an “emerging” Google platform but are left as the only entrant. Just as Lenovo’s Phab 2 Pro was the first (of two) smartphones to build in Tango AR functionality, without other WorldSense headsets, developers are going to have a tough time justifying building apps that make extensive use of the WorldSense feature. If that happens, the headset-tracking will turn into a feature that is mainly one for comfort, rather than changing gameplay.

Compared to the standalone headsets that have come before it, the Lenovo Mirage is a steal at $399, but with the $199 Oculus Go launching this week as well, I have a tough time recommending the Mirage over the Go. Oculus has invested so much more time into its core apps than Google has and while the WorldSense positional tracking is exceptionally impressive from a tech perspective, without tracked controllers the experience for the end consumer is only improved a bit.


Read Full Article
Google’s VR180 cameras get their own app that live streams to YouTube


Just ahead of Google’s big developer conference next week, Google I/O, the company has quietly rolled out a new mobile app for its VR180 point-and-shoot cameras, allowing users to set up their device, view and manage clips, and upload photo and video content to Google Photos and YouTube.

At CES in January, Google had shown off new VR180 cameras including Lenovo’s Mirage, and one from a Chinese manufacturer Yi, called the Horizon.

The name, VR180, refers to a new VR format for capturing 180-degree panoramic images, that was created through a collaboration between YouTube and Google’s Daydream VR division. The idea is that photographers could use these new cameras to capture photos and videos that are immersive, but don’t stretch all the way around in a full 360 degrees.

The content captured by the VR180 cameras includes 3D photos and ultra HD 4K resolution videos, but these can be viewed and shared in both 2D and 3D. To view them in VR, you can use a VR headset, like Google Cardboard, Daydream, or PlayStation VR.

The new VR180 app, which launched yesterday on both iOS and Android, according to data from Sensor Tower, is meant to support the VR180 cameras.

Explains the App Store description, the app lets you set up and manage your VR180 camera from your mobile device and can be used to capture 180-degree VR content with the camera using a “Live Preview” feature.

You can then transfer files to your phone or cloud – meaning Google Photos or YouTube. You can also use the app and camera to live stream to YouTube, the VR180 website explains.

And you can share clips directly with friends and family, or discard unwanted clips.

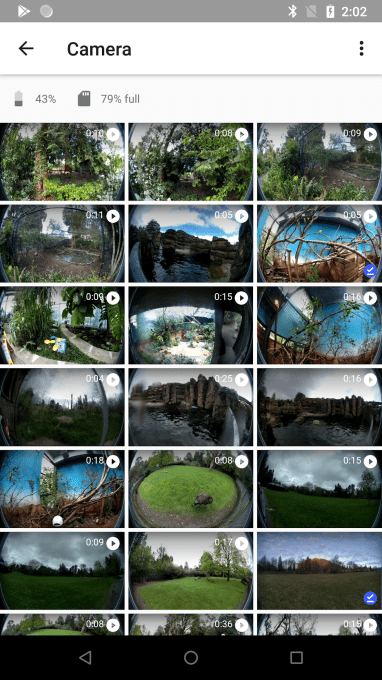
The app will also give you information about your camera’s status, like the battery charge, capture activity, available storage, and more.

The introduction of a simpler way to capture VR content – point-and-shoot cameras – is meant to encourage more people to try VR, and offer a new way of remembering moments in time. For example, the app store screenshots tout the camera’s personal use cases – for capturing things like videos from a wedding or of a mother with her baby.

The idea that VR will be used to create immersive re-creations of our memories that we can dive back into a later date is not unique to Google. Facebook this week also announced something called “VR Memories,” which will take your old photos then leverage computer vision to turn the flat 2D images and videos into spatial point clouds that can be explored in VR.

[gallery ids="1633750,1633749,1633748,1633747,1633745"]
Read Full Article
China said to be discussing ZTE ban with U.S. officials


The Chinese government is reportedly going to bat for ZTE over a seven-year ban that would have broad ranging consequences for the phone maker. According to a new report from Reuters, the subject was broached during a meeting with between senior Chinese and U.S. officials in Beijing this week.

The ban imposed by the Department of Commerce is the result of a violation against U.S. Iranian sanctions. ZTE pled guilty, agreeing to pay a fine and penalize employees. After the DOC insisted it failed to do the latter, it barred US companies from selling software or components to the phone maker for seven years. Between chip makers like Qualcomm and software providers including, most notably, Google, the restrictions will prove next to impossible for ZTE to circumvent.

For many, the steep penalty appears to be part of a larger looming trade war between the two countries that’s also found ZTE and Huawei caught in the crosshairs over ties to the Chinese government. U.S. officials, however, have insisted that the ban isn’t related to trade issues between the two countries.

Earlier this week, the Pentagon banned the sale of both companies’ phones on military bases — just the latest in a long line tough breaks here in the States.  ZTE has largely weathered the broader U.S. spying concerns better, due in part to a broader footprint in the States than Huawei, but the company admitted that this latest ban would be downright devestating. 

“The Denial Order will not only severely impact the survival and development of ZTE,” the company told TechCrunch, “but will also cause damages to all partners of ZTE including a large number of U.S. companies.”

ZTE has also reportedly been in talks with U.S. companies like Google and has suggested it will take judicial action, if necessary. 


Read Full Article
7 Instagram Alternatives for Smartphone Photographers

Facebook is still falling short on privacy, says German minister


Germany’s justice minister has written to Facebook calling for the platform to implement an internal “control and sanction mechanism” to ensure third-party developers and other external providers are not able to misuse Facebook data — calling for it to both monitor third party compliance with its platform policies and apply “harsh penalties” for any violations.

The letter, which has been published in full in local mediafollows the privacy storm that has engulfed the company since mid March when fresh revelations were published by the Observer of London and the New York Times — detailing how Cambridge Analytica had obtained and used personal information on up to 87 million Facebook users for political ad targeting purposes.

Writing to Facebook’s founder and CEO Mark Zuckerberg, justice minister Katarina Barley welcomes some recent changes the company has made around user privacy, describing its decision to limit collaboration with “data dealers” as “a good start”, for example.

However she says the company needs to do more — setting out a series of what she describes as “core requirements” in the area of data and consumer protection (bulleted below). 

She also writes that the Cambridge Analytica scandal confirms long-standing criticisms against Facebook made by data and consumer advocates in Germany and Europe, adding that it suggests various lawsuits filed against the company’s data practices have “good cause”.

Unfortunately, Facebook has not responded to this criticism in all the years or only insufficiently,” she continues (translated via Google Translate). “Facebook has rather expanded its data collection and use. This is at the expense of the privacy and self-determination of its users and third parties.”

“What is needed is that Facebook lives up to its corporate responsibility and makes a serious change,” she says at the end of the letter. “In interviews and advertisements, you have stated that the new EU data protection regulations are the standard worldwide for the social network. Whether Facebook consistently implements this view, unfortunately, seems questionable,” she continues, critically flagging Facebook’s decision to switch the data controller status of ~1.5BN international users this month so they will no longer be under the jurisdiction of EU law, before adding: “I will therefore keep a close eye on the further measures taken by Facebook.

Since revelations about Cambridge Analytica’s use of Facebook data snowballed into a global privacy scandal for the company this spring, the company has revealed a series of changes which it claims are intended to bolster data protection on its platform.

Although, in truth, many of the tweaks Facebook has announced were likely in train already — as it has been working for months (if not years) on its response to the EU’s incoming GDPR framework, which will apply from May 25.

Yet, even so, many of these measures have been roundly criticized by privacy experts, who argue they do not go far enough to comply with GDPR and will trigger legal challenges once the framework is being applied.

For example, a new consent flow, announced by Facebook last month, has been accused of being intentionally manipulative — and of going against the spirit of the new rules, at very least.

Barley picks up on these criticisms in her letter — calling specifically for Facebook to deliver:

  • More transparency for users
  • Real control of users’ data processing by Facebook
  • Strict compliance with privacy by default and consent in the entire ecosystem of Facebook
  • Objective, neutral, non-discriminatory and manipulation-free algorithms
  • More freedom of choice for users through various settings and uses

On consent, she emphasizes that under GDPR the company will need to obtain consent for each data use — and cannot bundle up uses to try to obtain a ‘lump-sum’ consent, as she puts it.

Yet this is pretty clearly exactly what Facebook is doing when it asks Europeans to opt into its face recognition technology, for example, by suggesting this could help protect users against strangers using their photos; and be an aid to visually impaired users on its platform; yet there’s absolutely no specific examples in the consent flow of the commercial uses to which Facebook will undoubtedly put the tech.

The minister also emphasizes that GDPR demands a privacy-by-default approach, and requires data collection to be minimized — saying Facebook will need to adapt all of its data processing operations in order to comply. 

Any data transfers from “friends” should also only take place with explicit consent in individual cases, she continues (consent that was of course entirely lacking in 2014 when Facebook APIs allowed a developer on its platform to harvest data on up to 87 million users — and pass the information to Cambridge Analytica).

Barley also warns explicitly that Facebook must not create shadow profiles, an especially awkward legal issue for Facebook which US lawmakers also questioned Zuckerberg closely about last month.

Facebook’s announcement this week, at its f8 conference, of an incoming Clear History button — which will give users the ability to clear past browsing data the company has gathered about them — merely underscores the discrepancies here, with tracked Facebook non-users not even getting this after-the-fact control, although tracked users also can’t ask Facebook never to track them in the first place.

Nor is it clear what Facebook does with any derivatives it gleans from this tracked personal data — i.e. whether those insights are also dissociated from an individual’s account.

Sure, Facebook might delete a web log of the sites you visited — like a gambling site or a health clinic — when you hit the button but that does not mean it’s going to remove all the inferences it’s gleaned from that data (and added to the unseen profile it holds of you and uses for ad targeting purposes).

Safe to say, the value of the Clear History button looks mostly as PR for Facebook — so the company can point to it and claim it’s offering users another ‘control’ as a strategy to try to deflect lawmakers’ awkward questions (just such disingenuousness was on ample show in Congress last month — and has also been publicly condemned by the UK parliament).

We asked Facebook our own series of questions about how Clear History operates, and why — for example — it is not offering users the ability to block tracking entirely. After multiple emails on this topic, over two days, we’re still waiting for the company to answer anything we asked.

Facebook’s processing of non-users’ data, collected via tracking pixels and social plugins across other popular web services, has already got Facebook into hot water with some European regulators. Under GDPR it will certainly face fresh challenges to any consent-less handling of people’s data — unless it radically rethinks its approach, and does so in less than a month. 

In her letter, Barley also raises concerns around the misuse of Facebook’s platform for political influence and opinion manipulation — saying it must take “all necessary technical and organizational measures to prevent abuse and manipulation possibilities (e.g. via fake accounts and social bots)”, and ensure the algorithms it uses are “objective, neutral and non-discriminatory”.

She says she also wants the company to disclose the actions it takes on this front in order to enable “independent review”.

Facebook’s huge sprawl and size — with its business consisting of multiple popular linked platforms (such as WhatsApp and Instagram), as well as the company deploying its offsite tracking infrastructure across the Internet to massively expand the reach of its ecosystem — “puts a special strain on the privacy and self-determination of German and European users”, she adds.

At the time of writing Facebook had not responded to multiple requests for comment about the letter.


Read Full Article

How to Play Dreamcast Games on Raspberry Pi With RetroPie


Video game emulation of retro platforms just won’t go away. With so many different emulators available, it’s possible to play pretty much any classic game on any device now. You might like to run emulators on your phone or tablet, or even on a games console or PC.

Or even a Raspberry Pi. We’ve previously shown how RetroPie can be used to create a retro “gamestation”, and how RecalBox delivers a polished console-like retro gaming experience.

But RecalBox has a problem: it can’t currently run game ROMs for the Sega Dreamcast. So, how can you get Dreamcast games running on your Raspberry Pi? That’s what this article will show. If you’d rather see all of the step-by-step instructions in video form, watch this:

Playing Dreamcast Games on Raspberry Pi

A sixth-generation console released in 1999 (1998 in Japan), the Dreamcast was Sega’s final hardware launch. Despite a successful launch, the Dreamcast was held back by Sony’s dominance and the launch of the PlayStation 2. However, it remains a much-loved platform among those who remember it. You can pick up a used Dreamcast on eBay for under $100.

how to play dreamcast games on raspberry pi

Or you could just use a Raspberry Pi. As long as you own original copies of the games you want to play, it’s straightforward to install an emulator and download game ROMs. Plug in a game controller, connect the Pi to your TV, and a few moments later you’ll be reliving those heady console gaming days from the late 1990s!

To do this, you will need:

  • Raspberry Pi 2 or 3 (I’m using a Raspberry Pi 3B+)
  • MicroSD card (8GB or greater)
  • HDMI cable.
  • Ethernet connection to your router
  • Game controller (mine is an Xbox 360 USB controller)
  • Keyboard (for quicker setup)

Why You Need RetroPie to Emulate the Dreamcast

Raspberry Pi users have the option of two great gaming emulation suites: Recalbox and RetroPie.

But to play your favorite Sega Dreamcast games on a Raspberry Pi computer, you’ll need to use the RetroPie image. This is because the emulator for Dreamcast games, Reicast, doesn’t run with Recalbox. However, it does run under RetroArch, of which RetroPie is a fork.

You’ll also need to ensure that you’re using a Raspberry Pi 2 or 3 for the best results. The newer the Raspberry Pi model, the better, as superior hardware delivers more consistent results. While there remain a few Dreamcast games that won’t play on the Raspberry Pi (see below), using a Pi 3 B+ will give you the best chance of being able to enjoy the Dreamcast gaming experience.

Beware: Not all Dreamcast games will run. Keep reading to learn more about this.

Setting Up RetroPie to Play Dreamcast Games

Get started by downloading the RetroPie image from the website. This will need to be written to SD card in the usual way. If you’re using Windows, follow our guide for installing an operating system on the Raspberry Pi. If you don’t use Windows, setting up a Raspberry Pi in Linux is even simpler; macOS users should find installing RetroPie simple too.

Download: RetroPie for Raspberry Pi 2/3
Download: RetroPie beta images for Raspberry Pi 3 B+ (the only version that will run on the B+ as of this writing)

With the RetroPie image written to the disk, safely remove this from your PC and insert into your powered-off Pi. Ensure the device is connected to your HDMI TV (other display options are available) and the network cable is inserted, then connect the power lead to boot it.

It shouldn’t be long before you’re presented with RetroPie setup screen. This can be accessed later on, but for now you’ll need it to specify any particular settings, such as audio, or Bluetooth.

Note that if you have a game controller connected, the configuration screen for this will be displayed first. Since original Dreamcast controllers will not connect—they don’t have USB connectors—you’ll need to rely on a standard USB controller.

The Xbox 360 and PS3 controllers are good options. Detailed controller help with RetroPie can be found online. (If you have a Bluetooth controller, however, this can also be added with the help of the Bluetooth submenu on the main screen.)

Installing Reicast on RetroPie

While several emulators are included by default in RetroPie, some need to be added manually. One such emulator is Reicast.

how to play dreamcast games on raspberry pi

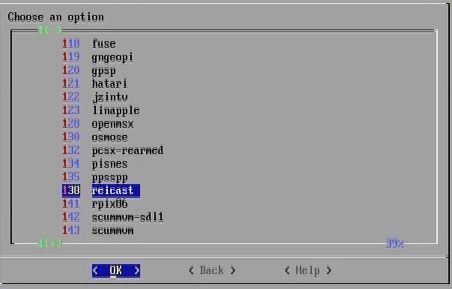
When you see the main RetroPie menu, use your controller or keyboard to scroll down to RetroPie Setup. From here, select (P) Manage packages > Manage optional packages, then scroll down to 138 reicast. Select OK to (B) Install from Source.

It’s important that you choose the Install from Source option, rather than Install from Binary.

Once installed, click Back repeatedly, then Exit, to return to the main RetroPie menu.

Copying Dreamcast ROM Files to RetroPie

Once your ROMs are downloaded, make sure you unzip them before copying the games to your RetroPie.

how to play dreamcast games on raspberry pi

Getting your game ROMs onto your RetroPie is possible via several methods.

  1. USB stick, copying the contents to the appropriate folder (for instance, Dreamcast games to retropie/dreamcast).
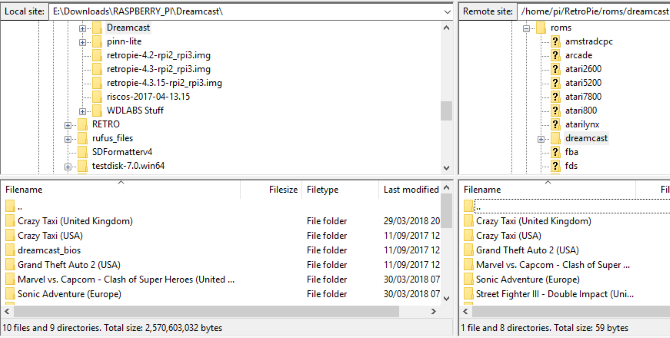
  2. SFTP via your FTP application. This will need to be enabled in the raspi-config screen, however. Go to Interfacing Options > SSH and select Enable. Next, check the device’s IP address in Show IP. Finally, input the IP address into your SFTP-compatible FTP program (I used FileZilla) with the default username/password of pi and raspberry.
  3. Once connected, expand the RetroPie directory, and open roms > dreamcast. Simply drag the Dreamcast ROM files from your computer (displayed in the left pane) into the dreamcast directory. Our article on Raspberry Pi data transfer methods explains in more detail.
  4. Our favorite option for Windows, however, is simply opening File Explorer and inputting the device name to access it via Samba. All you need is \\retropie and the remote device directories will be displayed. After browsing to the right folder, copy the directories across.

Note that ROMs should be in the CDI or GDI format, as indicated by the corresponding file extensions. GDI is intended purely for emulation, and is arguably more reliable. However, the downloaded files are almost always larger.

Don’t Forget the BIOS!

With your games copied across, you’ll also need to ensure the BIOS files for the Dreamcast are also present on the device. These can be downloaded from various locations on the web. Remember to unzip the contents before copying to your Raspberry Pi; the files you want are dc_boot.bin and dc_flash.bin, and they should be pasted into the BIOS subdirectory.

Once this is done, return to the main menu, press the Menu button and select Quit > Restart System > Yes. Alternatively, press F4 for a command line and input the reboot command:

sudo reboot

When the device reboots, it will be into the main RetroPie screen, which uses the Emulation Station user interface. Emulators and games can be selected using the left/right controls on your controller.

Will Your Favorite Dreamcast Games Run on RetroPie?

The games you want to play might not be suitable for use with a Dreamcast emulator on a Raspberry Pi. Even the Raspberry Pi 3 is a modest piece of hardware, and may not have the capabilities to run the ROM. Alternatively, the Reicast emulator may be unsuitable if the game in question is coded in an unusual way.

To find out more, check this Google Sheets list to get an idea of which games play well, and which have issues. You’ll also spot ones to avoid.

Preparing Reicast

Before you can run a game, you’ll first need to prepare the emulated Dreamcast’s VMUs, essentially virtual storage cards. Do this by scrolling to the Dreamcast option in the Emulation Station menu, and selecting Start Reicast.

how to play dreamcast games on raspberry pi

You’ll be prompted to set the date and time; you don’t need to do this, as the information isn’t saved. Instead, click Select, then into File. Here you’ll find two VMUs, listed as A1 and A2.

how to play dreamcast games on raspberry pi

Select each in turn, choosing the All > Delete All option, and confirming with Yes. When you’re done, both VMUs should have been reset. You’ll also need to choose a decoration for the storage before exiting. Just choose the quickest option, then Yes.

Running a Dreamcast Game With Reicast

Following this setup, you should be returned to the Reicast submenu. Here, you should find your games listed, ready to play.

how to play dreamcast games on raspberry pi

Upon selecting a game, rather than clicking the main button to launch it, you can press right or left on your controller to return to the RetroPie setup screen. Here you’ll find various options for selecting a default screen resolution for the game, etc.

This can prove useful for getting the best results from your games. If you’re running into any problems with the games, taking the time to carefully tweak the results can make all the difference between having games that work, and games that don’t.

Troubleshooting: Suitable Video Format

I’ve been trying this method of emulating Dreamcast games on the Raspberry Pi for some months, and I’ve discovered that a lot of people are failing to run games. Most of them can get the emulator running, and manage the virtual storage cards. The problem comes with launching games.

While this won’t cover all problems, it is worth taking the time to consider what version of the game you are using:

Back in the 1990s, before the days of high-definition flat-screen video displays, consoles played through TVs that were either NTSC (North America) or PAL (Europe). Oddly, it seems that if you use the wrong version of the game ROM, it simply won’t load. Once I started using UK/European ROMs rather than those meant for North America, everything suddenly started working.

Now You Can Play Dreamcast Games on Raspberry Pi

Although there is a lot to do in order to get this right, you should now have a successfully setup RetroPie installation with the Reicast plugin. Dreamcast games are now running on your Raspberry Pi—it doesn’t get much better than this, right?

If you’ve got a taste for Dreamcast emulation, remember that it can be emulated on desktop systems too!


Read Full Article

7 Mobile Apps Every Star Wars Fan Needs

Google Kubeflow, machine learning for Kubernetes, begins to take shape


Ever since Google created Kubernetes as an open source container orchestration tool, it has seen it blossom in ways it might never have imagined. As the project gains in popularity, we are seeing many adjunct programs develop. Today, Google announced the release of version 0.1 of the Kubeflow open source tool, which is designed to bring machine learning to Kubernetes containers.

While Google has long since moved Kubernetes into the Cloud Native Computing Foundation, it continues to be actively involved, and Kubeflow is one manifestation of that. The project was only first announced at the end of last year at Kubecon in Austin, but it is beginning to gain some momentum.

David Aronchick, who runs Kubeflow for Google, led the Kubernetes team for 2.5 years before moving to Kubeflow. He says the idea behind the project is to enable data scientists to take advantage of running machine learning jobs on Kubernetes clusters. Kubeflow lets machine learning teams take existing jobs and simply attach them to a cluster without a lot of adapting.

With today’s announcement, the project begins to move ahead, and according to a blog post announcing the milestone, brings a new level of stability, while adding a slew of new features that the community has been requesting. These include Jupyter Hub for collaborative and interactive training on machine learning jobs and Tensorflow training and hosting support, among other elements.

Aronchick emphasizes that as an open source project you can bring whatever tools you like, and you are not limited to Tensorflow, despite the fact that this early version release does include support for Google’s machine learning tools. You can expect additional tool support as the project develops further.

In just over 4 months since the original announcement, the community has grown quickly with over 70 contributors, over 20 contributing organizations along with over 700 commits in 15 repositories. You can expect the next version, 0.2, sometime this summer.


Read Full Article

How to Add Security Questions to Windows 10 Local User Accounts


Forgetting your computer password isn’t fun. Thankfully, if you use a Microsoft account to sign into Windows 10, you can reset your password through Microsoft’s website and it’s relatively painless.

But it’s a different story with a local account. If you forget that, it’s a doable but tedious process to reset the password for a local account.

The latest April 2018 Update for Windows 10 adds a new feature that makes recovery a lot easier: security questions. Here’s how to set them up.

How to Add Security Questions to Windows 10

Windows 10 Security Questions

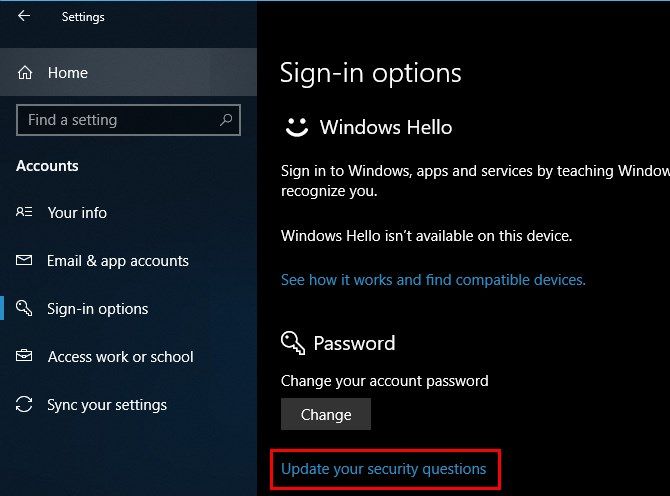
  1. Open Settings and navigate to Accounts > Sign-in options.
  2. Scroll down to the Password header. Under the Change button, you’ll see an Update your security questions link. Click this. (If you don’t see it, you’re using a Microsoft account to sign in.)
  3. Confirm your account password, then you’ll see three boxes where you can select a question and provide an answer.
  4. Choose your questions and answers wisely. You shouldn’t provide obvious answers to security questions.
  5. Once you’ve added an answer for all three, click Finish and enter an administrator password if needed.

Your security questions are ready to go once you’ve done this. To reset your password with them, look for a Reset password link that appears under the password entry box on the login screen. You’ll see it after you type an incorrect password.

Enter the correct answers for your three questions, and you’ll be able to reset your account password. If you use a Microsoft account, you can reset your password at the login screen using Microsoft’s utility instead.

We recommend that anyone using a local account adds these questions and notes their answers in a safe location. It’s a lot easier to reset your password with this than it is with workarounds, and it only takes a moment to set up.


Read Full Article
How to Manually Download the Windows 10 April 2018 Update


The Windows 10 April 2018 update has finally begun rolling out to users. The update is packed with a ton of new features, while there are a few features that you’ll no longer have access to.

Microsoft has said that it is gradually rolling out the update but it could take months for it to reach all users. If you want to jump the queue and get the April 2018 update, or Windows 10 build 1803, there is a way to do that.

How to Check for the Windows 10 April Update

Before manually downloading the update, you should check to see if you’re one of the lucky ones who is first in line to try the latest features. To do this, do the following:

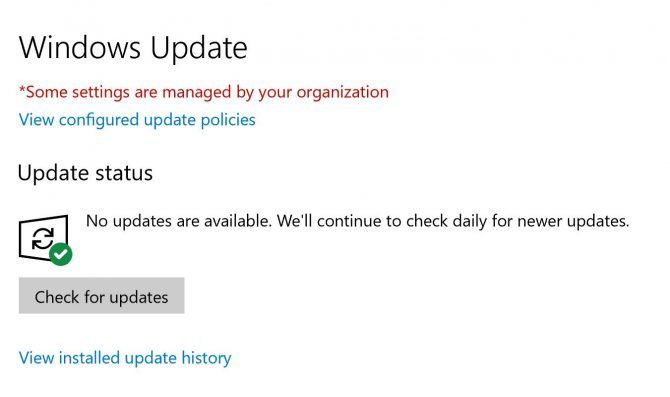
  1. Go to Settings > Update & Security.
  2. Under Windows Update, click the Check for updates button.
  3. If the update is available, you should see a message letting you know as much, and it will automatically download and install to your computer. Be warned, it can be a pretty slow process with reports from users saying it took several hours and you’ll be prompted to restart your computer multiple times.

How to Manually Update Windows 10

If the update hasn’t been made available to you, but you’re ready to try out all the new features, you can manually download it.

But as Tina points out in her thorough rundown on how to upgrade your Windows 10 machine, there are some things to keep in mind:

  • You can only upgrade if you’re running the Windows 10 Fall Creators Update or Windows 10 version 1709.
  • You are running a risk by forcing the update. Microsoft rolls out the update to machines based on how other similar machines behaved during beta testing.
  • By forcing the update, you’re taking a risk since Microsoft is probably still fixing common bugs.
  • You can roll back to your previous Windows version for 10 days, but it’s probably not worth the hassle.
  • As with any updates, it’s best to back up your computer before starting the process.

If all of the above doesn’t bother you, you can skip ahead and get the latest update by doing the following:

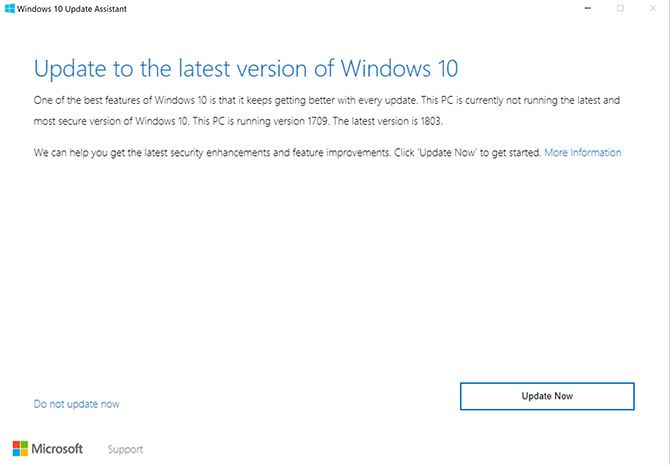
  1. Go to Microsoft’s Download Windows 10 page.
  2. Click Update Now to download the Windows 10 Update Assistant.
  3. Once the update assistant is open, click the Update Now button. 
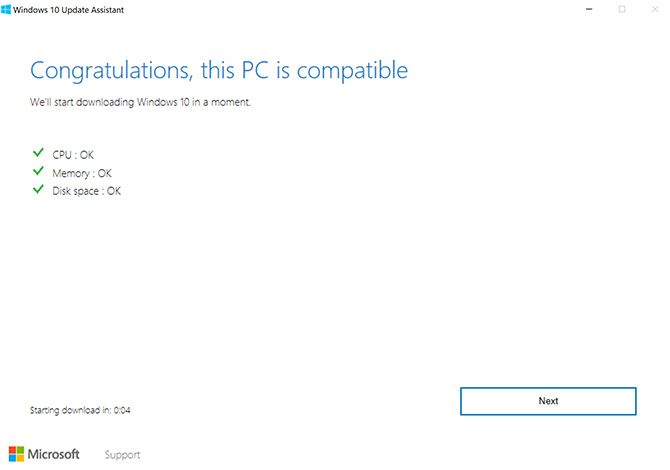
  4. The assistant will check if your machine is compatible with the update. It’s checking CPU, Memory, and Disk Space.
  5. If you get the go ahead click Next
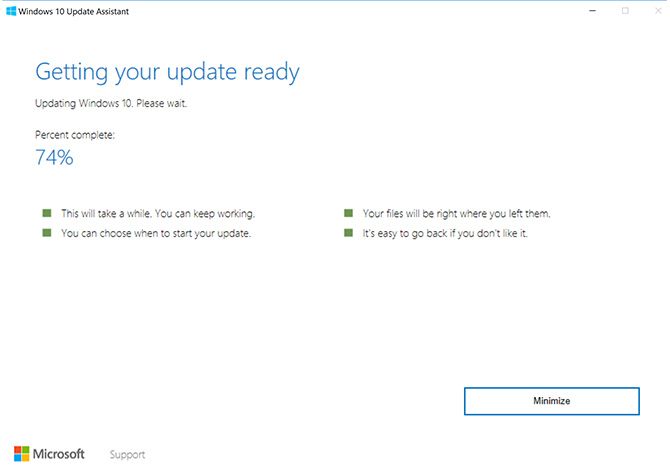
  6. The download and upgrade will begin, during which you can still use your computer. 
  7. Once the update is ready, you’re going to need to restart your computer. You can either click Restart now to finish the upgrade process. Or you can click Restart Later to finish it at a later time. If you opt for the later option, the computer will restart automatically at a time when you’re not using it. You’ll also see a countdown for when your machine will restart if you don’t click Restart later.

According to Microsoft, once you hit Restart, the process should take around 90 minutes.

Microsoft is definitely trying to make it easier for users to manage their OS updates and the Windows Update Assistant, is no exception, but make sure that you know what you’re getting yourself into by starting an early update.


Read Full Article
How to Search Google Using Your Handwriting


Do you type faster than you write? You can put your handwriting and typing speed to the test with your next Google Search.

Using your handwriting to search with Google.com has existed since a 2012 update to the search engine. Let’s see how you can enable the setting and use it for your everyday searches.

How to Search Google Using Your Handwriting

The idea is to use handwriting recognition on your touch-enabled devices and make search more convenient. Handwrite for web search on mobile phones and tablets allows you to write anywhere on the Google.com screen. There is no special box or interface. Enable it from Google.com’s Settings first.

On your phone or tablet, use any browser to visit Google.com:

  1. Tap Settings (usually, it is located at the foot of the page).
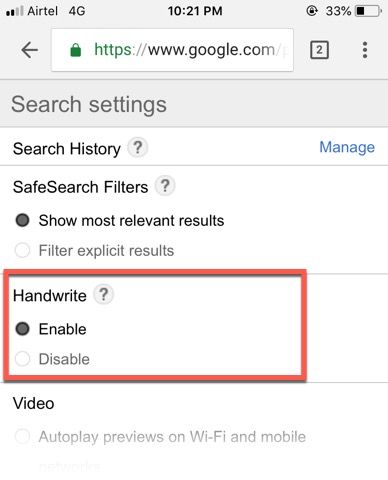
  2. Go to the Handwrite section.
  3. Tap and select Enable to switch on handwriting recognition. Tap Disable to switch it off.
    Handwrite in Google
  4. Swipe to the bottom of the page and tap on Save. Refresh the page to see the Handwrite icon on the lower right of the screen.
  5. Use your finger to write your search terms anywhere on the screen.

The handwritten text is converted into text in the search box. Tap the search icon to complete the search. Handwrite also supports predictive text search like any other search method on Google. Also, when you type a character that could be mistaken for another, like 0 (the number) and O (the letter), a list of options might appear at the bottom of the screen.

Handwrite might be prone to errors if you natural flow is awful. Also, a finger instead of a stylus is less than ideal for writing on the screen. But Google says that it is meant to complement rather than replace typing. You can turn to the keyboard anytime with a tap on the search box.

For other times, there’s always Google Assistant’s voice recognition to help you out.


Read Full Article

You Should Change Your Twitter Password Right Now


If you’re using Twitter you should change your password. Because Twitter messed up in a fundamental way. So while there’s no indication that any passwords have been accessed, the social networking service is strongly urging you to change your password.

You Should Probably Heed Twitter’s Advice…

In a blog post titled “Keeping Your Account Secure“, Twitter has owned up to making a rather fundamental error. The error being that passwords were written to an internal log without being hashed. Which potentially exposed them to Twitter employees.

As is standard across the industry, Twitter uses something called hashing to mask passwords. Hashing replaces actual passwords with a set of numbers and letters. So Twitter’s systems can log you in just fine without your password being visible.

According to Twitter, a recently discovered bug meant that passwords were written to an internal log before the hashing process had completed. Twitter found this bug, fixed it, and removed the unhashed passwords from the internal log.

However, despite fixing the issue, Twitter is still strongly recommending every single user changes their password as soon as possible. And you may actually have already encountered a warning screen advising you to change your Twitter password.

If Twitter is to be believed—and we have no reason to doubt it—this is just a precautionary measure. In fact, Twitter makes it clear that is has “no reason to believe password information ever left Twitter’s systems or was misused by anyone.”

Mildly Inconveniencing 330 Million People

Twitter deserves credit for coming clean. Naming no names, plenty of companies have sat on data breaches for years, choosing to protect their brand rather than their users. Whereas Twitter has chosen to mildly inconvenience 330 million people instead.

This might be an ideal time to read up on passwords. Whether you need help creating a strong password you won’t forget or just want to know which password manager is the most secure, we’ve got you covered here at MakeUseOf.

Image Credit: Duncan Hull/Flickr


Read Full Article

How to Sync or Share Your Kodi Media Library on Multiple Devices


One area where Kodi lags behind Plex is in how easy it is to share your media library on multiple devices. On Plex, the process is as simple as installing the appropriate app and entering your password. On Kodi, the process is much more convoluted. But, thankfully, convoluted doesn’t mean impossible.

There are actually two ways to sync or share your Kodi media library on multiple devices. You can either use Emby (the easy way) or MySQL (the hard way). In this article, we explain the easy way—because, well, why would you ever choose the more difficult option?

Using Emby to Sync Your Kodi Library

The easiest way to share your Kodi library with multiple devices is to use Emby.

In case you’re not aware, Emby is a competitor to Kodi and Plex. In many ways, it offers a happy compromise between its two big brothers; it has adopted Plex’s client-server model while remaining open source like Kodi.

To use Emby to sync your media library between devices, you’ll need to set up the Emby server app, install some additional plugins, and then install the Emby addon on Kodi.

How to Set Up an Emby Server

The first part of the process is to get your Emby server up and running. The server will become the backend for your media library, thus replacing the Kodi library database. Using the Emby backend will also sync a video’s watched status between devices.

To begin, head to the Emby website, click on the Download tab at the top of the page, and grab a copy of the app. Emby is available on Windows, Mac, and Linux, as well as NAS devices and the Docker containerization app. Indeed, it’s one of the best media servers you will find on Linux.

For maximum ease-of-setup, you should install the app on the same hard drive or storage location as your media files—though you can add network locations.

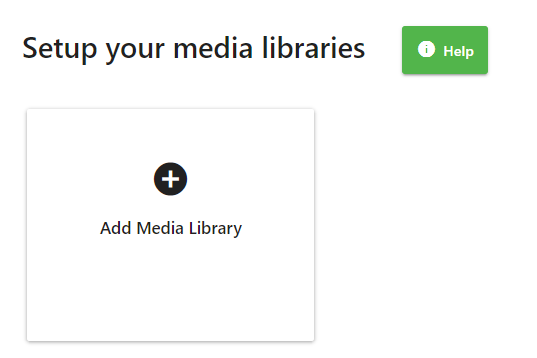
When you run Emby for the first time, you’ll need to work through the initial setup screens. Eventually, you will arrive at the Setup your media libraries screen.

emby setup library

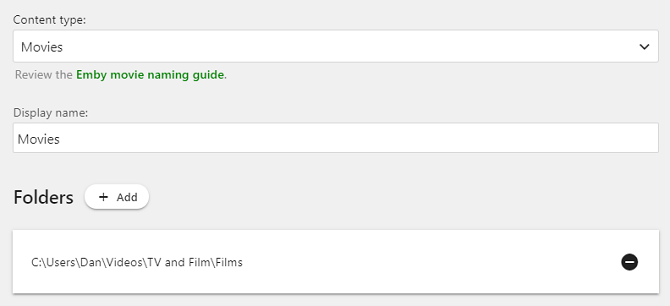
Click Add media library, give the library a name and choose the type of content, then pick the folders you want to include. You need to repeat this set for each individual library you want to create (for example, if you want three separate libraries for movies, TV shows, and music).

If you wish, scroll down the page to customize your library’s advanced settings. It’s worth ensuring Download artwork and metadata from the internet and Save artwork and metadata into media folders are both ticked. It’s not essential to make the app work, but some users have reported artwork and metadata issues in Kodi when they’re not.

emby add library

When you’re ready, click on OK, then click Next.

On the Configure Remote Access screen, make sure you tick the checkbox next to Allow remote connections to this Emby Server if you plan to use Kodi when you’re away from your home network.

Click Next one more time, agree to Emby’s terms of service, and you’re ready to move onto the next phase of the setup process.

Install Additional Emby Plugins

Before adding Emby to Kodi, you should take the time to install some additional plugins on your Emby server. They will help to make the Emby addon run faster and sync more thoroughly, thus giving you a more enjoyable user experience.

Here are the three plugins you should use:

1. Emby for Kodi Sync Queue

This is the most important plugin. Everyone following this guide should install it. It can keep track of events connected to Emby, even while Kodi is offline. As such, it lets the Emby addon for Kodi start much more quickly.

2. Auto-Box Set

If you’re a movie fanatic, install Auto-Box Set. It will automatically organize all movies in your Emby library into collections using data from themoviedb.org. The collections are automatically pulled into Kodi.

3. Trakt.tv

Any long-term Kodi user will be familiar with trakt.tv (we consider it an essential Plex plugin). It’s best described as Last.fm for videos. It will monitor what you’re watching and sync your series progress across all devices where the app is running. If you install Trakt.tv on Emby, make sure you disable any instances of the app running natively on Kodi.

Add the Emby Addon to Kodi

Installing the Emby plugin on Kodi uses the same process as any other plugin. You just need to make sure you add the dedicated Emby repo before you begin. Because it’s an official repo, it hasn’t been affected by the spate of recent closures; it’s NOT one of the Kodi repos you should avoid.

Download: Emby Repo for Kodi

Once you have a copy of the repo, launch Kodi. Then, from the Kodi homepage, go to System > Add-ons > Install from ZIP file.

Using the on-screen browser, locate and select the Emby repo ZIP file that you just downloaded. The addon will take a few minutes to install.

Before continuing, make sure the Emby server you installed earlier is running.

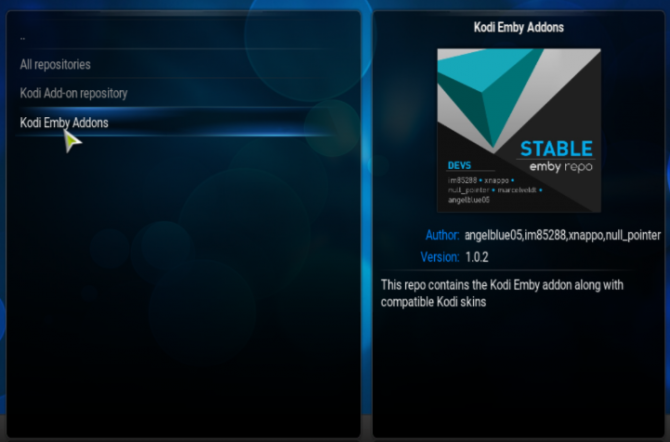
As soon as the repo has finished installing and you’ve confirmed Emby is running, return to the Kodi home screen. Now, navigate to System > Add-ons > Install from Repository > Kodi Emby. When the repo opens on your screen, go to Video Addons > Emby. Hit Install.

kodi emby addons to sync kodi

The Emby addon should automatically detect your Emby server and ask you for permission to connect to it. Click on Yes to agree.

To complete the initial setup, choose your Emby user from the dropdown menu.

You’ll now need to wait while Kodi scans and imports your Emby library. If your library is extensive, this might take a long time.

Next, you need to make one tweak in the addon’s settings. Go to System > Add-ons > My add-ons > Video add-ons > Emby > Configure and mark the checkbox next to Enable fast startup under Sync Options.

Finally, you need to add shortcuts to your various Emby libraries onto your Kodi homescreen. Emby and Kodi will create the shortcuts automatically; the shortcut will be tagged using the Emby library names. You will find them in your list of video nodes and playlists.

To add shortcuts to the Kodi homescreen, go to System > Appearance > Skin > Settings > Add-On Shortcuts.

Note: The process might vary if you’re using your own skin. For more information about installing repos, read our beginner’s guide to using Kodi.

Kodi With Emby Is Easier Than Using MySQL

The official way to sync and share your Kodi library on multiple devices is to use MySQL.

And while it works perfectly well, it’s incredibly complicated to set up, especially if you have no prior knowledge of MySQL. However, if you’d like to try the MySQL method for syncing and sharing your Kodi media library, you can follow the 10-page guide on the official Kodi wiki.

If you’re a Kodi beginner and just learning about this process for the first time, make sure you check out our list of essential Kodi tips for new users.


Read Full Article

4 Reasons to Set Up a VPN on Your Router (Instead of Your PC)

How to Make a YouTube Intro (And 4 Free Tools to Start Using)


If you watch some of the most popular YouTube channels, you’ve probably noticed that most of them have good intros that are engaging and in line with their brands. And if you have been thinking of starting your YouTube channel, you’re going to need to make YouTube intros too.

The good news is it’s not that difficult. Even better, we have written a whole article telling you what makes a good intro. We will also introduce you to a few free tools that will help you create your own YouTube intro when it comes time to do so.

Examples of Great YouTube Intros

Most YouTubers include their signature intro in every video. Still, you probably couldn’t name your favorite one straight away, even if you’ve seen it a hundred times before. So, let’s look at some examples of awesome YouTube intros and see what makes them so great.

1. TED Talks

how to make a YouTube Intro - ted talks intro

TED Talks is one of the best YouTube channels for personal and professional development. If you watch TED Talks on a regular basis, you’ve probably noticed how the latest set of their videos opens. The essence of what TED Talks are all about is perfectly captured in a captivating seven-second sequence.

2. Good Mythical Morning

how to make a YouTube Intro - good mythical morning intro

Good Mythical Morning is all about helping you start your day on a good note. In their daily talk show, Rhett and Link feature funny sketches, music videos, and lots of little experiments. All of that is captured in their very unusual YouTube intro.

3. My Virgin Kitchen

how to make a YouTube Intro - my virgin kitchen intro

Animated storytelling is a great way to tell your story in just a few seconds. My Virgin Kitchen’s YouTube intro summarizes the story of Barry Lewis and how his channel came to be in the first place.

What Makes a Good YouTube Intro

Now that we’ve taken a moment to appreciate some great intros, you can see that they all follow a certain pattern or even a set of rules. And so should your (future) opening sequence. We have previously talked about the key ingredients of a successful YouTube channel. Now, it’s time to look at the key ingredients of an engaging YouTube intro.

Keep It Short and Sweet

Firstly, you’ll want to keep your YouTube intro under a few seconds. You only want your readers to get a general idea of what your channel is about without boring them.

Think of the last time you marathoned shows on Netflix. After the first couple of episodes, you lose patience and start skipping the opening credits. Similarly, people will start doing it on YouTube if they find your intro dragging on for too long.

Include Your Brand Name

It goes without saying that in order to get your viewers to recognize your brand you should include your brand name in your intro. You can also include your tagline if you have one. The more people see this information, the more they’ll associate your brand with your content on YouTube.

Besides, it’ll help your people recognize your brand when it gets mentioned somewhere outside YouTube.

Use Your Brand Colors

Do you want to really build your brand’s recognition? Then decide on your brand’s signature colors and include them in your intro. Whether it’s a filter, the color of the font of your channel’s name, or even just the background. Take advantage of every chance you get to remind your viewers of what your brand is all about.

Tell Your Story

When new viewers find themselves on your YouTube channel, they won’t be watching your videos in chronological order. Keeping that in mind, each new video should give them an idea of what to expect from your channel and what they’re about to watch.

Aside from the animation, you can do it with a montage of your most interesting or fun moments on camera. Just make sure that whatever option you choose suits the content of your YouTube channel well.

Tools to Use to Create a YouTube Intro

Do you have an idea for your intro, but don’t know where to begin? Thankfully, there are a number of tools that you can use online (and for free) to create your own unique opening sequence. Most of the tools are suitable for both complete beginners and advanced users. Here are a few that we recommend.

1. Animaker

Animaker is one of the most popular options. If you’re looking for the perfect balance between quality and simplicity, this online tool should be your go-to. Here you have an option of choosing one of the 20 free templates or starting from scratch.

2. Panzoid

how to make a YouTube Intro using panzoid

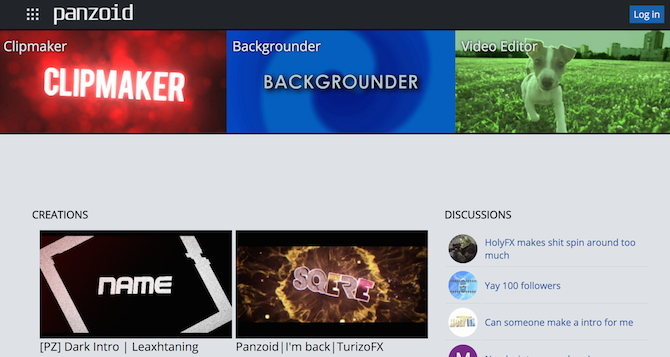
Panzoid is especially good if you don’t want to use a cliched template for your intro. On this platform, you can still choose a template, but it will be one generated by a community member. That way, you will have a unique base for your intro without having to make it yourself from scratch.

3. Blender

Blender is an open-source 3D creation suite. It’s a little more advanced than the tools listed above and there’s a learning curve with this one. However, you can learn how to use Blender by checking out one of the YouTube tutorials. Choose Blender if you’re looking to create a unique animated 2D or 3D intro.

4. YouTube Audio Library

how to make a YouTube Intro using youtube audio library

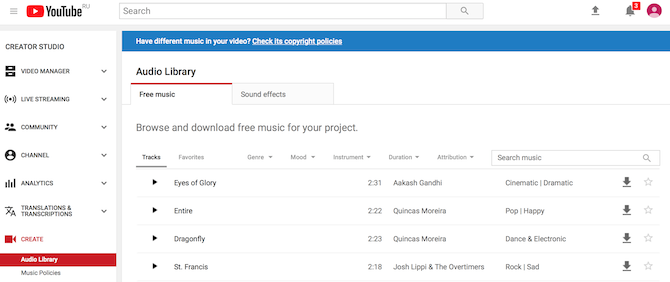
If you’re looking to include music or sound effects in your intro, check out YouTube Audio Library. You’ll find lots of tracks that you can use for free. That way you never have to worry about getting a copyright complaint.

Now You’re Ready to Create YouTube Intros

And that really is all you need to know about creating a YouTube intro. Watch good and bad examples of YouTube intros, identify what elements you want to include in yours, and then choose the right tool to help you make it.

So, whether you’re just starting your own YouTube channel, or you already have one and are looking to make your YouTube videos more popular, a good intro is a step in the right direction.

Make your intro sequence creative and engaging and it won’t just warm up your audience to your content, but also help you build (and reinforce) your brand. That will definitely help make your channel more popular and maybe even help you make money as a YouTuber.


Read Full Article