06 November 2018

The 12 Best Meeting Minutes Templates for Professionals


meeting-minutes-templates

Whether your business meetings are online or in person, following up with minutes and notes is a sure way to keep all attendees on the same page with what took place and what happens next. To make capturing those meeting minutes easy, handy templates are available for a variety of applications. Here are 12 awesome options to get you started.

Unlock the "Essential Google Drive Keyboard Shortcuts" cheat sheet now!

This will sign you up to our newsletter

Enter your Email

Meeting Minutes Templates for Microsoft Word

Third-Party Templates

Microsoft Word is probably one of the most popular applications for meeting minutes and the template options available are plentiful. Here are just a few templates that are effective and useful.

From Vertex42, this basic template provides only a few sections which is just enough for small meetings. This style works well for team status meetings, one-on-one get-togethers, and informal last-minute meetings. You can easily insert a short agenda, include action items, add attendees, and write up other notes as needed.
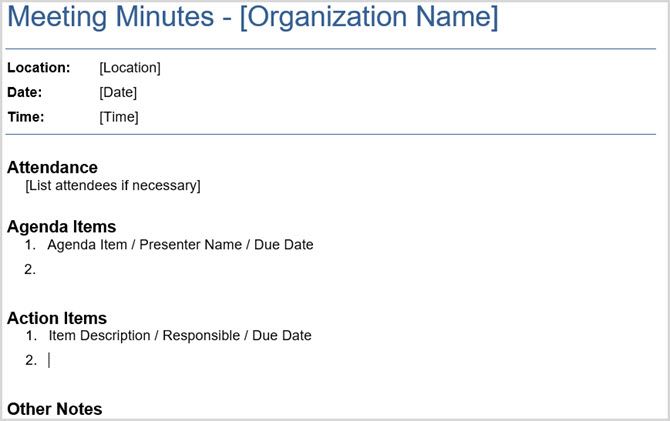
Basic Meeting Minutes Vertex42

For a detailed meeting minute template, this option also from Vertex42 lets you add information for more official meetings. Whether you are getting together with your department, staff, or committee, these additional details bring more formality to the document than the basic template.

You can include names for who called the meeting, the timekeeper, and the note taker. You can also add an objective and meeting type along with decisions made during the session.
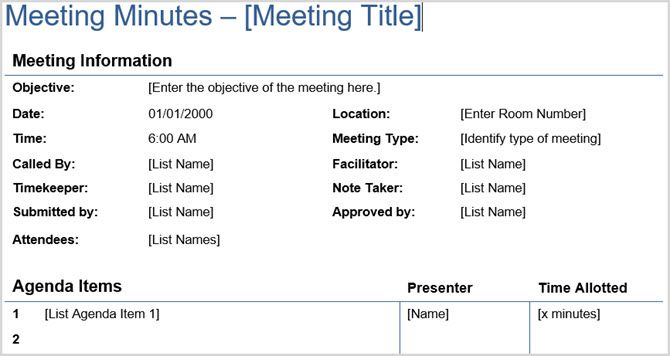
Detailed Meeting Minutes Vertex42

Microsoft Word 2016

If you are a Microsoft Word 2016 user, you can take advantage of the meeting minute templates within the application. Select File >New to open the template section. In the search box type in the words Meeting Minutes to find relevant results.
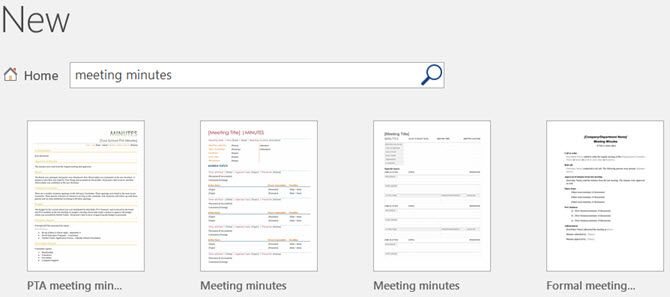
Word Search Meeting Minutes

This detailed meeting minute template not only adds a splash of color to your document, but it’s also formatted in a nice, neat table. You will see a section at the top for adding names just like with the detailed template from Vertex42.

This one also breaks down each agenda topic into its own section. You can then pop in the discussion, conclusions, deadline, person responsible, and action items for each topic separately. This format offers great organization of notes for project meetings where tasks are assigned and deadlines are crucial.
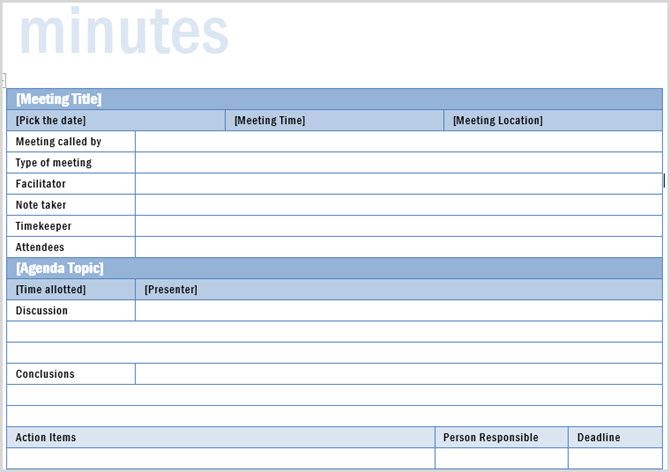
Detailed Meeting Minutes Word 2016

Another attractive and useful template in Word 2016 falls into the PTA meeting category. It includes all necessary sections for principal and committee reports, budget details, and board information. Each area has a clean separation for easy reading and you can add information in either paragraph or bullet format.

Obviously created for PTA meetings, you could also use this template for business meetings, conferences, or volunteer committee meetings with just a few adjustments to the section titles.
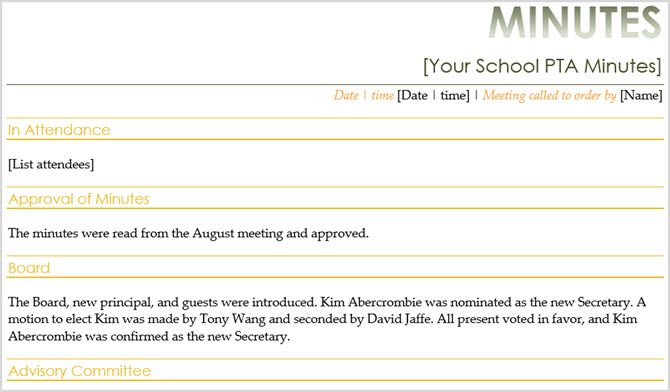
PTA Meeting Minutes Word 2016

Microsoft Word Online

If you prefer to use Microsoft Word Online, you can access several different meeting minute templates from the Microsoft Office website. When you arrive on the site, just select Minutes from the Browse by Category section on the left.

Word Online Minutes Page 2

One option is a formal template that includes call to order, approval of minutes, reports, and adjournment sections. At the bottom is a spot for the secretary to sign and date the notes. This type of template with its formal sections is appropriate for committee, executive, and board meetings.
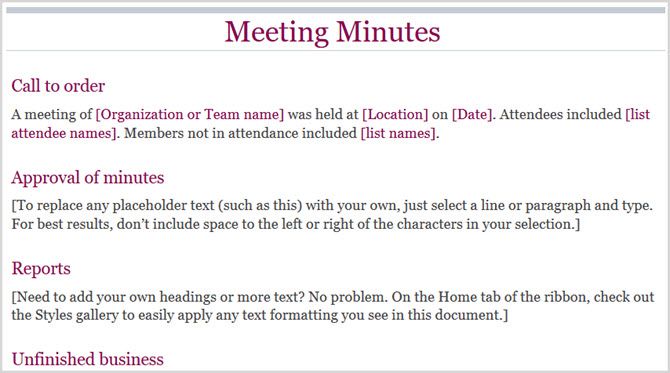
Basic Meeting Minutes Word Online 1

Another good template option for Word Online has a more basic format with a little bit of color. With sections for attendees, discussion, announcements, and roundtable, this is an all-purpose meeting minute format. You can easily use it for area, team, or department meetings.
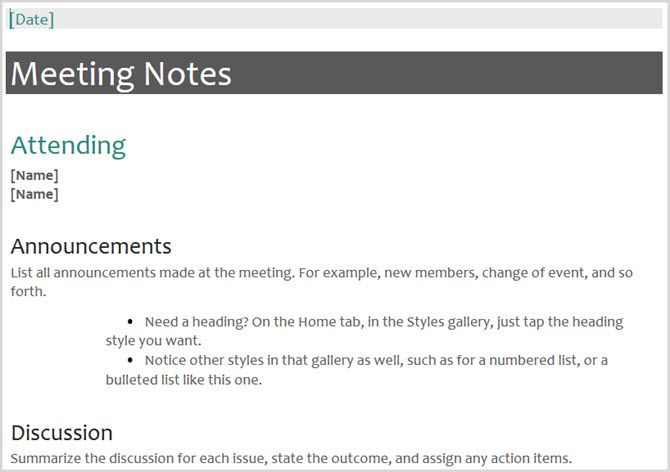
Basic Meeting Minutes Word Online

While you can edit and add your details to these templates using Word Online, you can also save them to and access them from Microsoft OneDrive for additional flexibility.

Meeting Minutes Templates for Microsoft OneNote

Microsoft OneNote is a wonderful tool for capturing meeting minutes. With five built-in templates for business notes, you can choose from a basic to a formal look with sections to match.

To access these templates in OneNote 2016, select Insert from the top navigation and then click Page Templates. You will then see a list of recently-used templates and an option to open all of them by selecting Page Templates in the drop-down box.
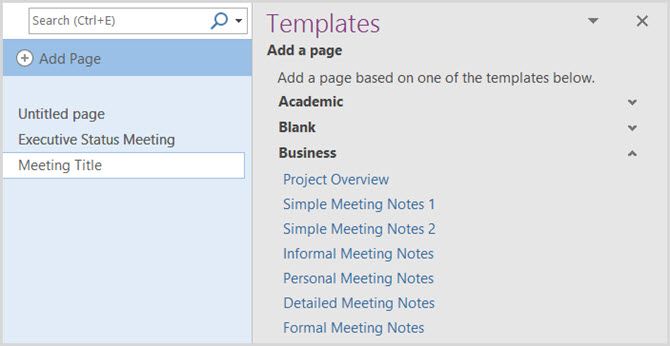
OneNote Minutes Templates

For older versions of OneNote, begin by opening a new tab in your notebook. You will then see New Page on the right side and when you click the arrow, you will see a drop-down box where you can select Page Templates.

Basic meeting minute templates are perfect for small team meetings or even a get-together with your boss. The two simple templates for OneNote have just three sections where you can add the agenda, attendees, and action items.
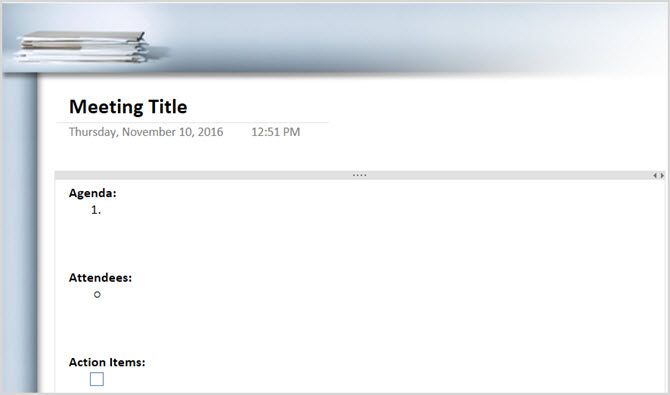
Basic Meeting Minutes OneNote 2016

Informal yet detailed meeting minute templates are ideal for those meetings that fall between a small team and a large group of executives. Along with the basic information, these templates include sections for announcements, discussion, previous actions items, and next meeting details.
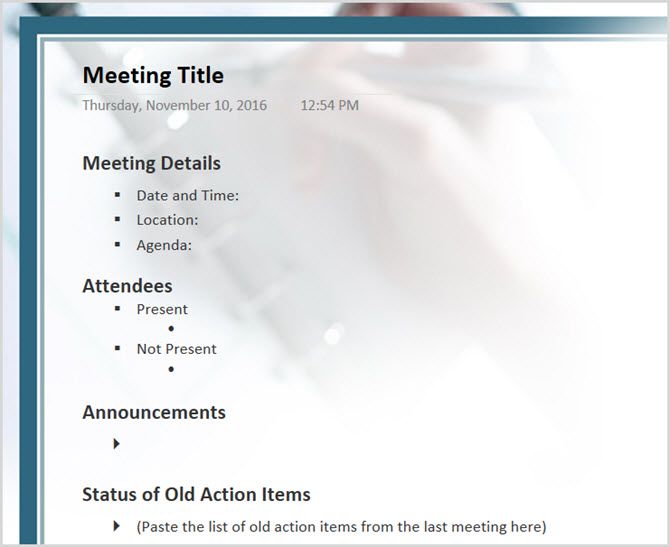
Detailed Meeting Minutes OneNote 2016

Formal meeting minute templates are normally used for executive, board, or official meetings with many discussion points. This OneNote template includes sections for opening and closing the meeting, pending issues, new business, and approvals, in addition to the basics.
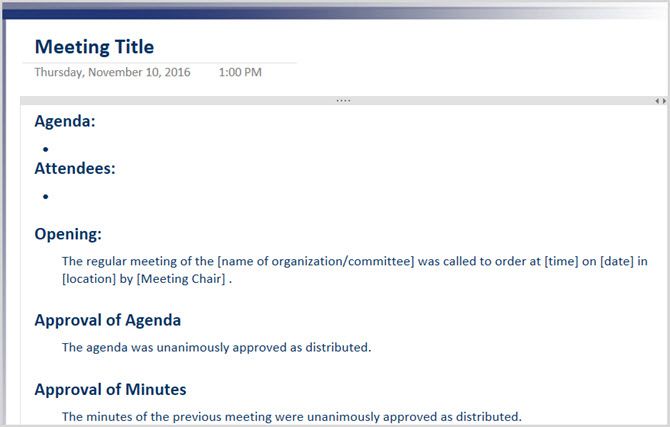
Formal Meeting Minutes OneNote 2016

Meeting Minutes Templates for Evernote

If Evernote is your note-taking tool of choice, a couple of meeting minute templates are available on the Evernote Support website. A nice feature of these templates is that they include both a meeting agenda and meeting minutes.

To save and use a template, select View in Evernote from the top right of the template preview page. You will need to log into Evernote, unless you already are. Next, you will see the template pop right into an Evernote note for you to use. Check out the instructions in green and them remove them to use the template.
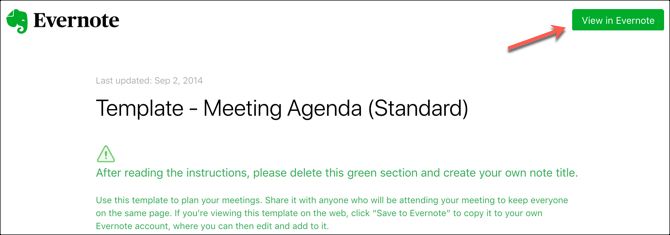
View Template in Evernote

The first template is an expanded meeting minute option that includes agenda and action items, each within a clean table structure along with checkboxes for completed items. There is also a small section for free-form note-taking. This type of format is useful for most small to medium sized meetings that are considered informal like team or weekly updates meetings.
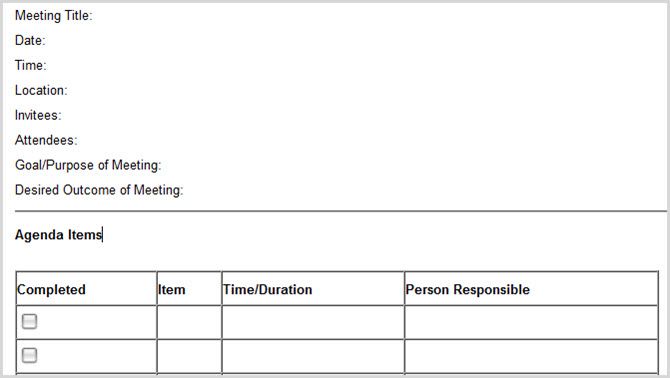
Expanded Meeting Minutes Evernote

The second template is very standard with three main sections for agenda, notes, and action items. This option is more useful for extremely informal or quick one-on-one meetings due to its simple structure.
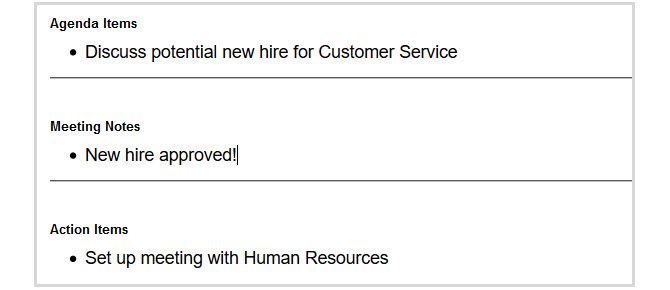
Standard Meeting Minutes Evernote

The convenient thing about using Evernote for your meeting minutes is that you can easily share with the attendees directly through the Evernote application. Plus, you can take advantage of Evernote’s attachment and reminder features.

Meeting Minutes Templates for Google Docs

If you prefer to use Google Docs for your business documents, meeting minute templates are readily available. To access your options, sign into your Google Docs account and at the top under Start a new document, select the More arrow to expand the section. Then, scroll down to the bottom under Work and you will see a few meeting note templates.
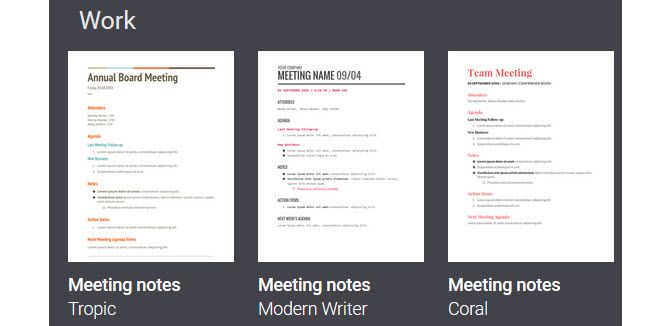
Google Docs Minutes Templates

The three templates have a somewhat informal look and feel, so you can use them for most any type of meeting from casual to formal. With necessary sections for agenda, attendees, action items, notes, and next meeting details, these options are well organized. The only difference between the three templates is the font and color scheme.

Tropic Meeting Minutes Google Docs

Prepare to Capture Those Meeting Minutes

Whether you use Word, OneNote, Evernote, or Google Docs for your meeting minutes, each has attractive, organized, and helpful template options. And if none of the available templates suits your needs, you can always import a third-party template and make it work with your favorite note-taking tool.

Read the full article: The 12 Best Meeting Minutes Templates for Professionals


Read Full Article

How to Send Emails From an Excel Spreadsheet Using VBA Scripts


To send emails from Microsoft Excel only requires a few simple scripts. Add this functionality to your spreadsheets and you can really enhance how much you can accomplish in Excel.

Unlock the "Essential Microsoft Office Shortcuts" cheat sheet now!

This will sign you up to our newsletter

Enter your Email

We’ve covered a lot of great Excel macros, which can accomplish the same things VBA scripts can, but without the need for programming knowledge. But there are many advanced things you can only do with VBA, like creating a spreadsheet report with all of your PC information.

Why Send Email From Excel?

There are a lot of reasons why you might want to send an email from inside Microsoft Excel.

Maybe you have staff that updates documents or spreadsheets on a weekly basis, and you’d like to receive an email notification of when those updates are done. Or you might have a spreadsheet of contacts and you want to send one email to all of them at once.

You’re probably thinking that scripting an email broadcast from Excel is going to be complicated. That’s not the case at all.

The technique in this article will make use of a feature that’s been available in Excel VBA for a long time, Collaboration Data Objects (CDO).

cdo in excel

CDO is a messaging component used in Windows since very early generations of the OS. It used to be called CDONTS, and then with the advent of Windows 2000 and XP, was replaced with “CDO for Windows 2000”. This component is already included in your VBA installation within Microsoft Word or Excel and is ready for use.

Using the component makes sending emails from within Windows products with VBA extremely easy. In this example, you’ll use the CDO component in Excel to send out an email that will deliver the results from a specific Excel cell.

Step 1: Create a VBA Macro

The first step is to go to the Excel Developer tab.

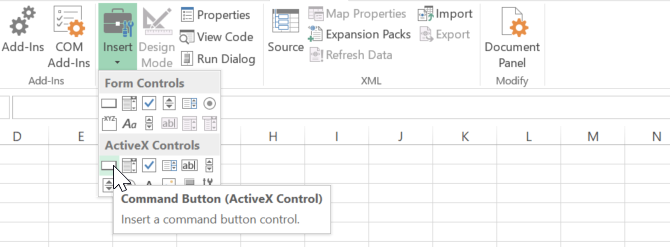
Inside the Developer tab, click on Insert in the Controls box, and then select a command button.

adding button in excel

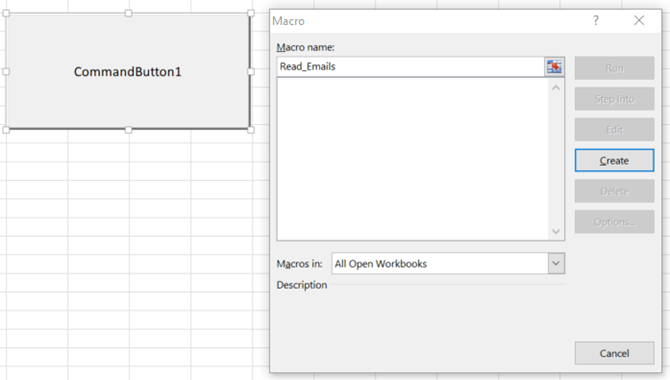
Draw it into the sheet and then create a new macro for it by clicking on Macros in the Developer ribbon.

add macro for command button

When you click the Create button, it’ll open the VBA editor.

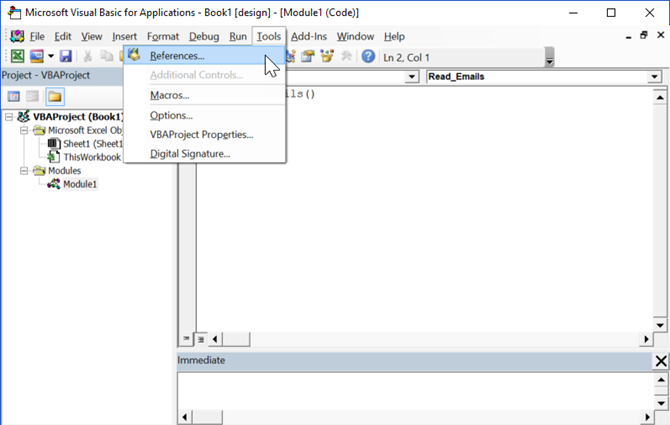
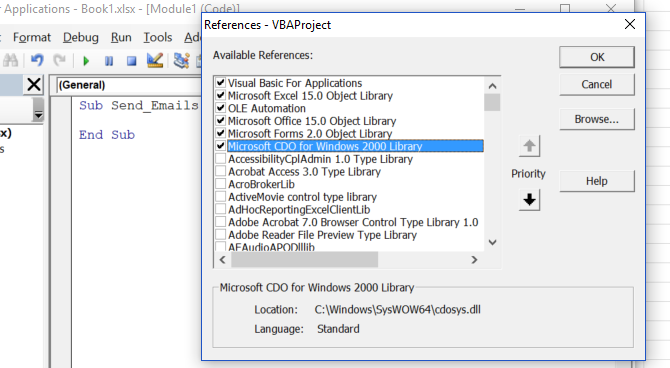
Add the reference to the CDO library by navigating to Tools > References in the editor.

adding references in excel

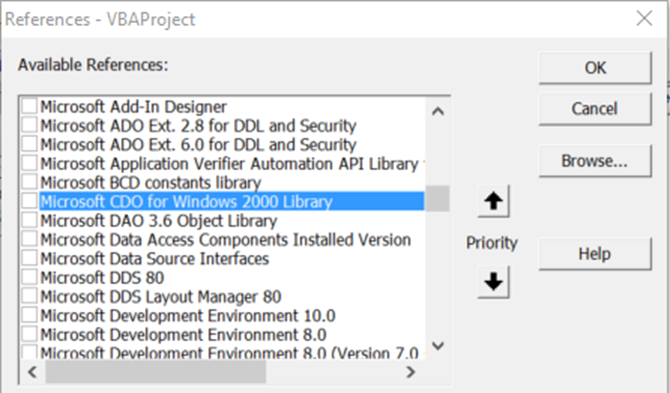
Scroll down the list until you find Microsoft CDO for Windows 2000 Library. Mark the checkbox and click OK.

adding cdo for windows reference

When you click OK, make note of the name of the function where you’re pasting the script. You’ll need it later.

Step 2: Set Up the CDO “From” and “To” Fields

To do this, you first need to create the mail objects and set up all of the fields that are necessary to send the email.

Keep in mind that while many of the fields are optional, the From and To fields are required.

Dim CDO_Mail As Object
Dim CDO_Config As Object
Dim SMTP_Config As Variant
Dim strSubject As String
Dim strFrom As String
Dim strTo As String
Dim strCc As String
Dim strBcc As String
Dim strBody As String

strSubject = "Results from Excel Spreadsheet"
strFrom = "rdube02@gmail.com"
strTo = "rdube02@gmail.com"
strCc = ""
strBcc = ""
strBody = "The total results for this quarter are: " & Str(Sheet1.Cells(2, 1))

The cool thing about this is that you can create up any string you want to customize a full email message and assign it to the strBody variable.

Piece together components of the message by using the & string to insert data from any of the Microsoft Excel sheets right into the email message, just like shown above.

Step 3: Configure CDO to Use an External SMTP

The next section of code is where you will configure CDO to use any external SMTP server to send the email.

This example is a non-SSL setup through Gmail. CDO is capable of SSL, but that’s outside the scope of this article. If you need to use SSL, this advanced code in Github can help.

Set CDO_Mail = CreateObject("CDO.Message")
On Error GoTo Error_Handling

Set CDO_Config = CreateObject("CDO.Configuration")
CDO_Config.Load -1

Set SMTP_Config = CDO_Config.Fields

With SMTP_Config
 .Item("http://schemas.microsoft.com/cdo/configuration/sendusing") = 2
 .Item("http://schemas.microsoft.com/cdo/configuration/smtpserver") = "smtp.gmail.com"
 .Item("http://schemas.microsoft.com/cdo/configuration/smtpauthenticate") = 1
 .Item("http://schemas.microsoft.com/cdo/configuration/sendusername") = "email@website.com"
 .Item("http://schemas.microsoft.com/cdo/configuration/sendpassword") = "password"
 .Item("http://schemas.microsoft.com/cdo/configuration/smtpserverport") = 25
 .Item("http://schemas.microsoft.com/cdo/configuration/smtpusessl") = True
 .Update
End With

With CDO_Mail
 Set .Configuration = CDO_Config
End With

Step 4: Finalize the CDO Setup

Now that you’ve configured the connection to the SMTP server for sending the email, all you have to do is fill in the appropriate fields for the CDO_Mail object, and issue the Send command.

Here is how you do that:

CDO_Mail.Subject = strSubject
CDO_Mail.From = strFrom
CDO_Mail.To = strTo
CDO_Mail.TextBody = strBody
CDO_Mail.CC = strCc
CDO_Mail.BCC = strBcc
CDO_Mail.Send

Error_Handling:
If Err.Description <> "" Then MsgBox Err.Description

There won’t be any pop-up boxes or security alert messages, which can happen when you resort to using the Outlook mail object.

CDO simply puts together the email and utilizes your SMTP server connection details to fire off the message. It’s the easiest way to incorporate email into Microsoft Word or Excel VBA scripts.

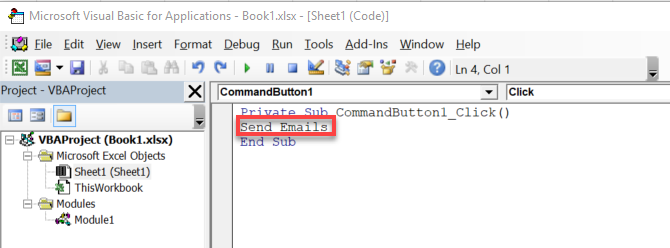
To connect your command button to this script, go into the code editor and click on Sheet1 to view the VBA code for that worksheet.

Type the name of the function where you pasted the script above.

connect command button to script

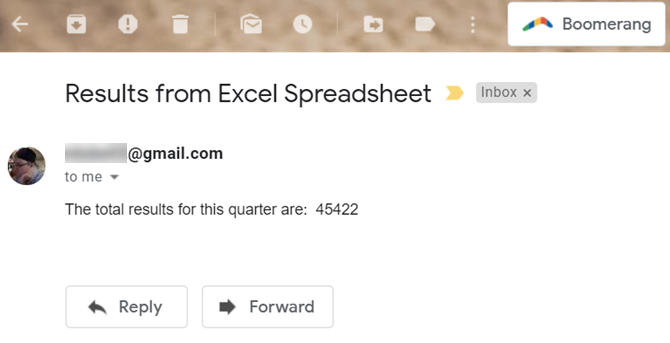
Here’s what the message looked like that I received in my inbox:

excel email received

Note: If you receive an error that reads The transport failed to connect to the server, make sure you’ve entered the correct username, password, SMTP server, and port number in the lines of code listed underneath With SMTP_Config.

Take It Further and Automate the Whole Process

It’s all well and good to be able to send email from Excel at the touch of a button. However, you might want to use this functionality on a regular basis, in which case it would make sense to automate the process.

To do so, you’ll need to make a change to the macro. Head to the Visual Basic Editor and copy and paste the entirety of the code we put together.

Next, select ThisWorkbook from the Project hierarchy.

From the two dropdown fields at the top of the code window, select Workbook and select Open from the Methods dropdown.

Paste the email script above into Private Sub Workbook_Open().

This will run the macro whenever you open up the Excel file.

Next, open up Task Scheduler.

You’re going to use this tool to ask Windows to open up the spreadsheet automatically at regular intervals, at which point your macro will be initiated, sending the email.

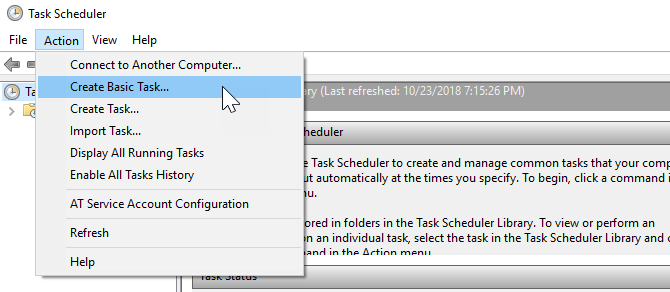
create basic task in task scheduler

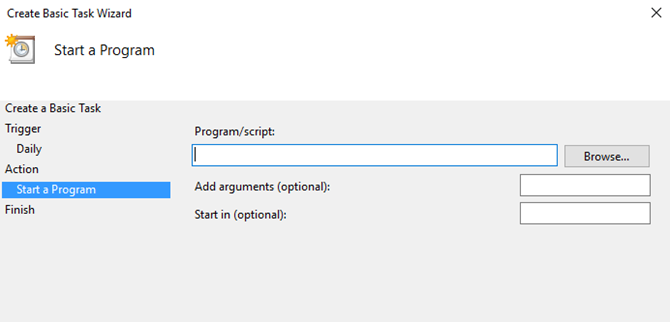
Select Create Basic Task… from the Action menu and work your way through the wizard until you reach the Action screen.

Select Start a program and click Next.

select program task scheduler

Use the Browse button to find Microsoft Excel’s location on your computer, or copy and paste the path into the Program/script field.

Then, enter the path to your Microsoft Excel document into the Add arguments field.

Complete the wizard, and your scheduling will be in place.

It’s worth running a test by scheduling the action for a couple of minutes in the future, then amending the task once you can confirm that it’s working.

Note: You may have to adjust your Trust Center settings to ensure that the macro runs properly.

To do so, open the spreadsheet and navigate to File > Options > Trust Center.

From here, click Trust Center Settings, and on the next screen set the radio dial to Never show information about blocked content.

Make Microsoft Excel Work for You

Microsoft Excel is an incredibly powerful tool, but learning how to get the most out of it can be a little intimidating. If you want to truly master the software, you’ll need to be comfortable with VBA, and that’s no small task.

However, the results speak for themselves. With a little VBA experience under your belt, you’ll soon be able to make Microsoft Excel perform basic tasks automatically, giving you more time to concentrate on more pressing matters.

It takes time to build expertise with VBA, but you’ll soon see the fruits of your labors if you can stick with it.

One great place to start is our authoritative tutorial on using VBA in Excel. Once you’re done with that, this simple script to send emails from Excel will feel like child’s play.

Read the full article: How to Send Emails From an Excel Spreadsheet Using VBA Scripts


Read Full Article
How to Get Free PC Games: 4 Sites to Download Premium Games


Want to play great games without paying a cent? Then you have two options. You can take the illegal route and resort to internet piracy for video games, or you can stay within the law and settle for free-to-play games, freebie deals, and giveaways.

This sounds like a huge compromise, but it really isn’t. There are tons of excellent free games out there, and there are enough of them that you won’t run out of games to play any time soon. Some premium AAA games from 5-10 years ago are also available for free now as well.

Will you be able to legally download mainstream games like Civilization V, Grand Theft Auto V, or Destiny 2 for free? Probably not. But I guarantee that you’ll find at least one legally free game you’ll enjoy using the sites below.

1. Steam

free-games-on-steam

Steam is the go-to destination for digital games. Even though Valve’s customer support is often crappy and you’re banking on the hope that Steam will be around for years to come, many users feel that Steam’s massive video game selection is worth the risks.

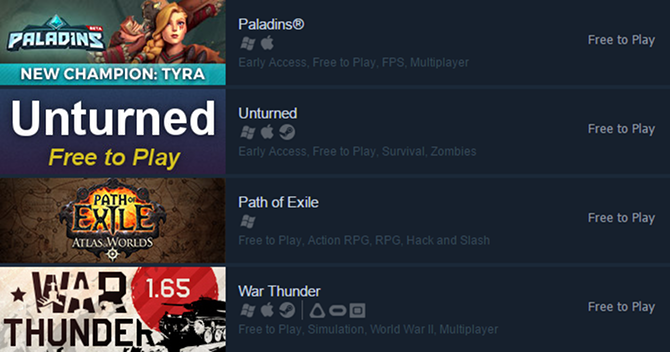
For free games, stick to the Free to Play section of Steam. You can filter by genre, by category, by features, and by operating system. You can also view by New Releases, Most Popular, and Coming Soon. Or you can narrow it down with a search term.

As of this writing, the Free to Play section on Steam has just shy of 3,200 games. Even if you gave each game only one hour of your time, that’d still amount to 133 full days of entertainment—and many of these games are fantastic, including Dota 2, Paladins, Brawlhalla, Duelyst, Path of Exile, and Warframe.

You can also check out the Demos section of Steam, which currently has over 2,400 demo games that you can try to see if the full game is worth spending money on.

2. itch.io

free-games-on-itchio

Up until the indie games renaissance of the late 2000s, indie games had a terrible reputation for being buggy, ugly, and boring. They were good as filler games to play when you needed to kill time between “real” games, and that was about it.

Nowadays, indie games are some of the best games around. Think about Undertale, Path of Exile, Braid, Spelunky, and The Binding of Isaac—all games made by single developers or small development teams.

And we’re starting to see more high-quality indie games hit the market, which is why itch.io is such an awesome platform. It specializes in indie games, both paid and free, and has grown quite a bit since its debut in 2013.

The Free section of itch.io has over 126,000 titles. Not all of them are good, of course, but there are plenty of diamonds to find in the rough. If you’re tired of big game studios killing the industry, these indie games may be perfect for reigniting your love for gaming.

3. GOG

free-games-on-gog

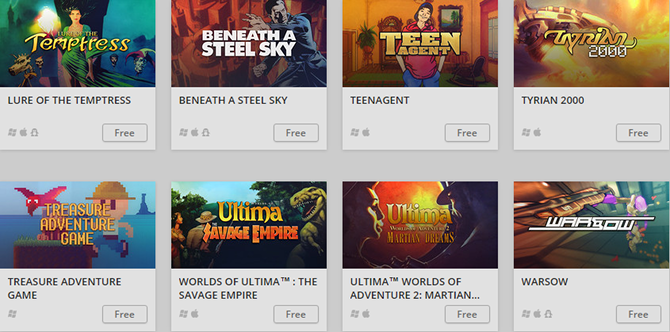
There are many reasons why you might not want to buy games on Steam, but the biggest reason is that Steam games have DRM. If Steam ever shuts down or bans your account for whatever reason, you’ll lose access to all the games you’ve bought.

Which is why a lot of gamers prefer to use GOG over Steam whenever the situation allows for it. GOG is a game distribution platform like Steam, but all of its games are DRM-free—your games aren’t linked to your GOG account, so even if GOG shuts down, you’ll still have access to the games you downloaded. Most of the games on GOG are also playable on Linux, which is a nice bonus if you’re into that sort of thing.

The downside is that GOG’s library size doesn’t even come close to what Steam offers. GOG’s total library size is just over 2,700 games, and the Free section on GOG only contains about 70 games as of this writing. GOG is better if you have some cash to spare because its Under $5 section has way more games.

4. Twitch Prime

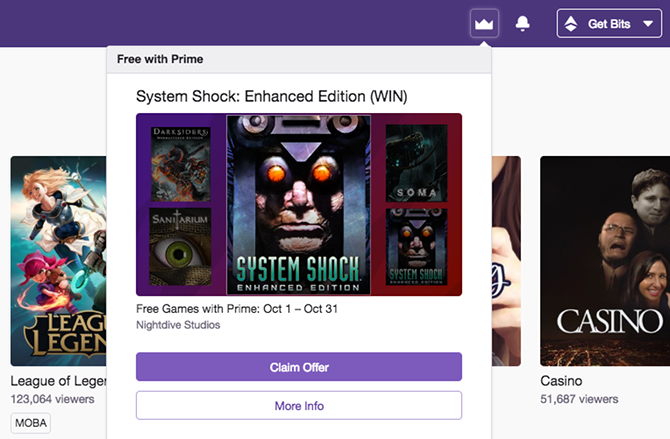
Twitch Prime is one of the many awesome benefits of an Amazon Prime membership. Of course, Amazon Prime itself isn’t free—but if you’re already subscribed for other reasons, then Twitch Prime is essentially a free benefit that you can take advantage of.

In this case, the benefit of Twitch Prime is that commercial games are made free to download every month.

These are always limited-time offers, so you’ll need to check in every so often and claim the free games as they’re made available. Past games that were once available include Telltale’s The Walking Dead, Psychonauts, SteamWorld Dig 2, Shadow Tactics, Superhot, and more.

Other Free and Legal Options for Games

Maybe you aren’t satisfied with the platforms above, and that’s fine. There are a handful of other ways to find high-quality games that won’t cost anything to download and play—they just won’t be as straightforward to acquire.

I recommend starting with the Wikipedia page on commercial games released as freeware. Sort by year to find the recent ones (older games may not be compatible with modern operating systems). I also recommend /r/FreeGames and /r/FreeGamesOnSteam on Reddit for all kinds of freebie offers and deals.

Other noteworthy platforms include IndieDB (a database of in-development indie games) and ModDB (a database of in-development game mods and indie games).

And lastly, if you’re okay with almost-free-but-not-quite, then you should check out the Humble Store, which has a bunch of discounted games, and the Humble Bundle, which is a monthly pay-what-you-want bundle of premium games. Both provide DRM-free games!

Read the full article: How to Get Free PC Games: 4 Sites to Download Premium Games


Read Full Article
Teclast F5 Review and Giveaway: It’s a Laptop, and a Tablet

6 Easy Ways to Reduce Mac Backup Sizes and Save Space


reduce-mac-backup

When you take regular backups of your Mac (which you hopefully do), you’ll eventually run into storage-related problems. After some time, you’ll run out of space on the external drive that holds your data. Or you might find that you’re paying too much for a cloud because it charges by the gigabyte. Meanwhile, a slow internet speed can make large backups slow and painful.

One approach to these problems is to reduce the total amount of data you’re backing up. We’ll show you several easy steps to cut the backup size and make sure you backup only important files on your Mac.

1. Use Optimized Storage

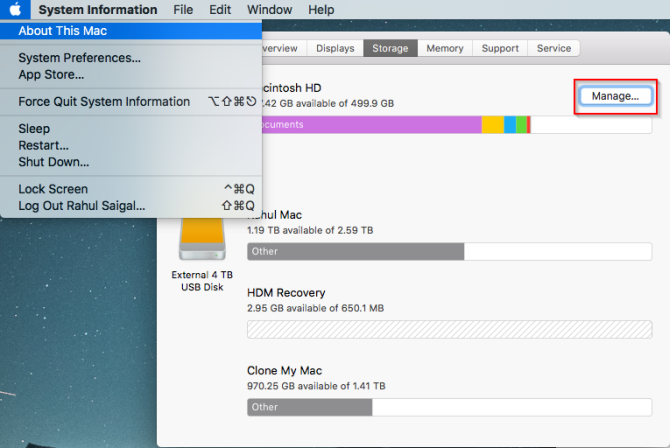
In macOS Sierra and later, the iCloud Optimized Storage feature lets you save space. It does this by storing files you seldom use in iCloud and makes them available on demand. To get started, open Apple menu > About This Mac > Storage and click Manage.

open the system information window

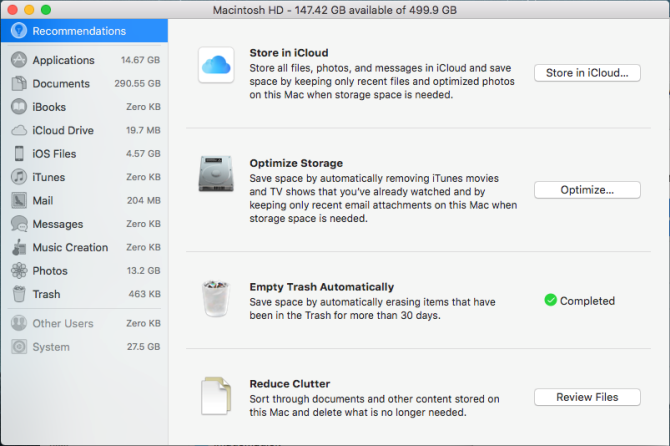
In the list on the left panel, click Recommendations and explore the four options on the right panel. We cover three of them below.

optimized storage window Mac

Store in iCloud

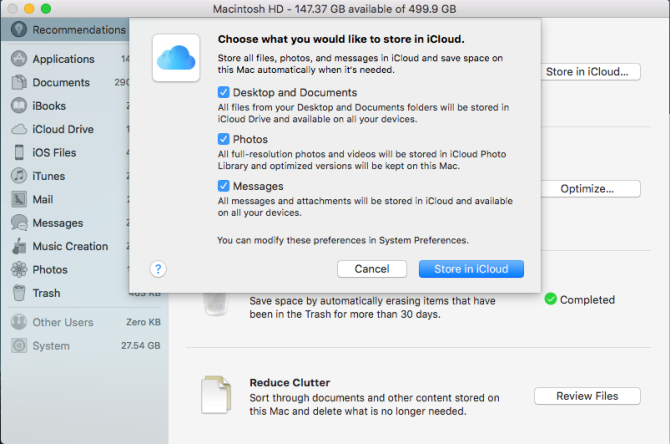
Click the Store in iCloud button to store all files, photos, and messages in iCloud and save space on your Mac automatically when needed. Check Desktop and Documents to move the data from these locations to iCloud Drive and make them available on all your devices.

Similarly, check Photos to keep full-resolution photos in iCloud Photo Library and optimized versions of those items on your Mac. Keep a note of space the items in those folders occupy to avoid any surprised with the impact on your iCloud storage space and internet data caps.

store files in iCloud

Optimize Storage

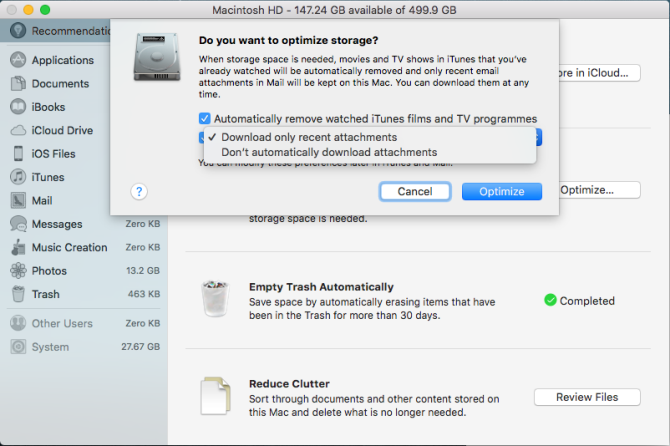
Click the Optimize button and follow the prompts to have macOS remove movies and television shows that you’ve watched. You can also tell Apple Mail to Download only recent attachments or no attachments at all. Later on, if you need those items, you can download them on demand.

optimize storage option to remove huge files

Once you enable these features, macOS will perform the necessary tasks in the background. You’ll be less likely to run out of disk space and thus significantly reduce your backup size.

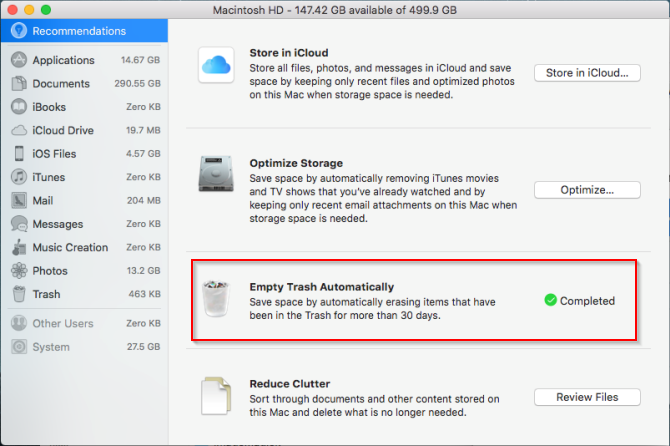
Empty Trash Automatically

The Trash is just another folder residing on your Mac. Moving files or folders to the Trash doesn’t delete them. Its contents continue to take up space and could result in longer backups. Right-click on the Trash icon and choose Empty Trash to clean it out manually.

To do this automatically, enable the option here to erase items that have been in the Trash for more than 30 days.

empty trash from optimized storage window

2. Uninstall Apps You Don’t Need

If you’ve installed dozens of apps, then your backups might take longer to complete. With so many apps, it’s also hard to remember the apps you last opened. Thankfully, there’s a way to tackle this problem.

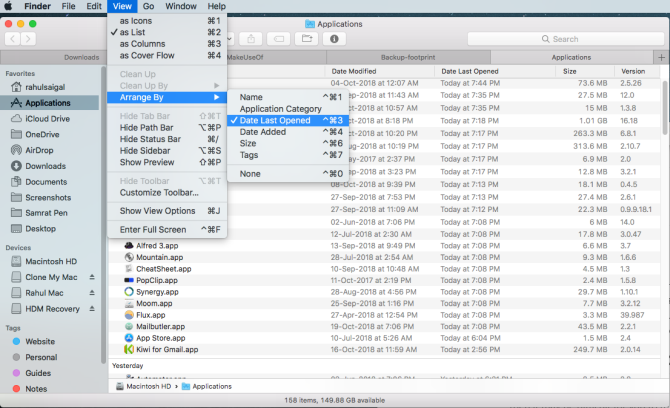
Click the Applications shortcut located on Finder’s sidebar. Right-click on the column header and check Date Last Opened. You’ll then see a date and time next to all the apps.

In list view, click View and choose Arrange By > Date Last Opened. As you do this, the apps will arrange in descending order from today backwards.

sort the apps by date last opened

Then decide on apps you use frequently and which ones you can remove. While here, we recommend you make a list of apps installed on your Mac and keep it safe.

When you delete Mac apps by simply dragging them to the Trash, some files remain on your Mac. They consume disk space and thus affect backups. Consider using AppCleaner to remove extra files while uninstalling an app.

3. Split the Photo Library

The Photos app lets you create multiple photo libraries. You can keep separate photo libraries for independent personal and work photos, saving iCloud space, reducing backup size, and more.

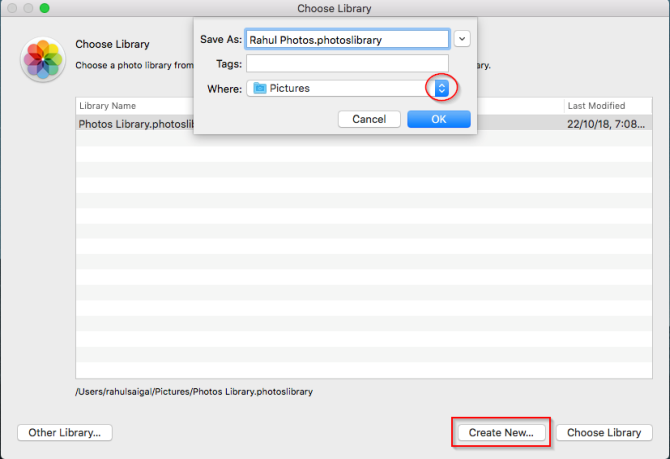
To get started, quit the Photos app. Then press and hold the Option key while relaunching the app. In the Choose Library dialog, click the Create New button. Enter a library name and choose the location—preferably an external hard drive.

create a new photos library

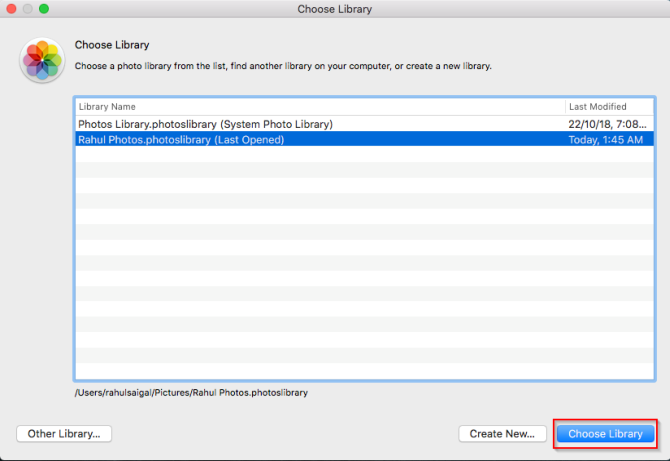
A fresh copy of Photos app will launch. Import old archives, screenshots, and photos you don’t want to keep in the main collection. To switch between libraries, quit the Photos app and hold Option while restarting it again. When you see the Choose Library dialog, select the library you just created and click the Choose Library button.

switch between photo libraries

While you do get the benefit of reduced backup size, remember that Photos only lets you choose one System Photo Library. Only this library can sync with iCloud and your iOS devices. If you care about the other photo library, then consider Google Photos to back up that library.

4. Remove Duplicate Files

If you have two or more identical copies of a file on your Mac, all but one of them is a waste. With the right tools, you can quickly find and delete duplicate files that bloat your backup size.

PhotoSweeper

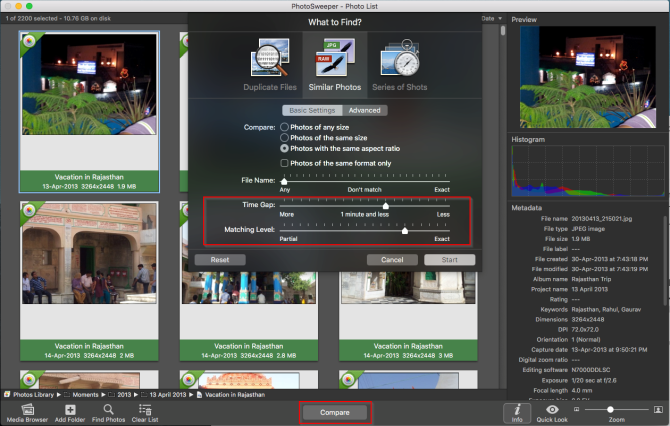
remove duplicate photos with photosweeper

PhotoSweeper is a fast, precise, and efficient tool to remove similar or duplicate photos from your photo collection. It works with Photos, Lightroom, and even photos scattered across your hard drive. Click the Media Browser on the toolbar to add your Photos library.

Then photos from your Photos library get added to the Photo List. Now click the Compare button and select Similar Photos mode. Adjust Time Gap and Matching Level to your needs.

Download: PhotoSweeper (Free trial, $10)

Gemini 2

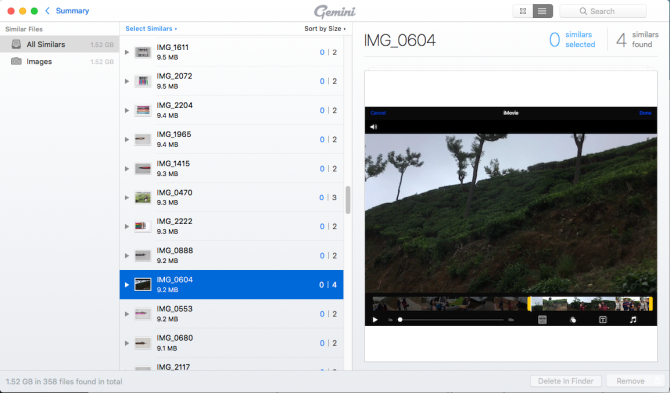
gemini2-duplicate-files-scan

Gemini 2 helps you find duplicate and similar files on your Mac, including those on Photos, iTunes, and external drives. Its easy-to-use interface and smart selection algorithm lets you clean files in no time.

To get started, drag and drop a folder onto the window. Once the scan is complete, review the results and click Smart Cleanup. Gemini will move duplicates to the Trash.

Download: Gemini 2 (Free, $20 premium version available)

5. Clean Your Desktop and Downloads Folder

Your Desktop and Downloads folders likely contain a bunch of files. These folders quickly become unmanageable and clogs up backups slower. You’ll save space on your disk and make backups faster with these tricks and built-in tools to clean up folders.

Ask Where to Download Files

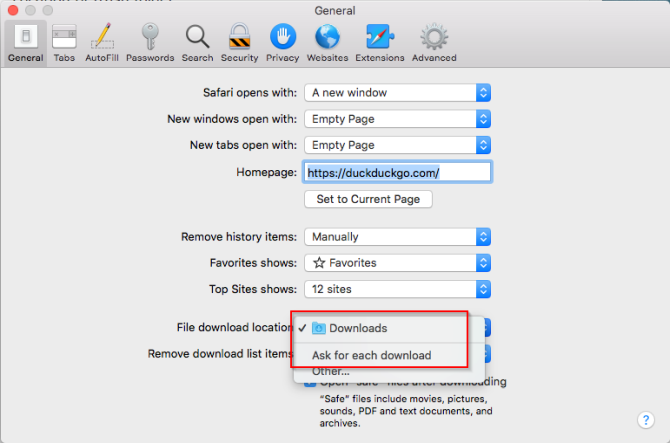
change the downloads folder location in safari

Instead of downloading files to a set location, you can set the browser to ask you where to download files every time. In Safari, go to Preferences > General > File download location and change it to Ask for each download.

While it’s a hassle to select folder every time, you can altogether avoid the navigation and save files easily with Default Folder X. This app lets you save a file to any directory with the press of a hotkey.

Keep Downloads Folder Clean

Most files stick around in your Downloads folder for some time. You can use Automator to automatically move any files older than, say, 90 days to the Trash.

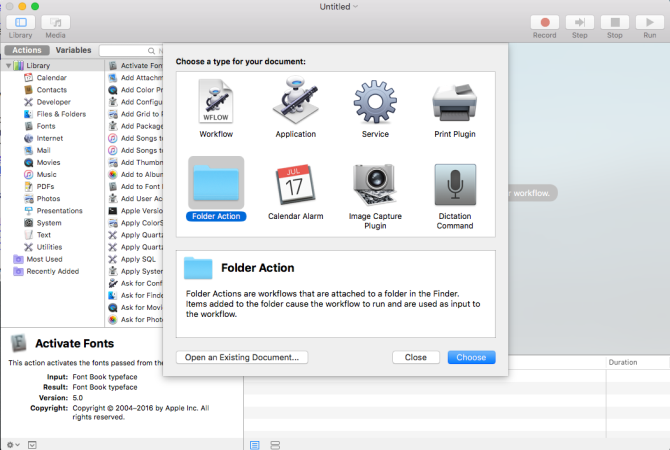
Open Automator and create a new document. Choose Folder Action.

choose folder action in automator

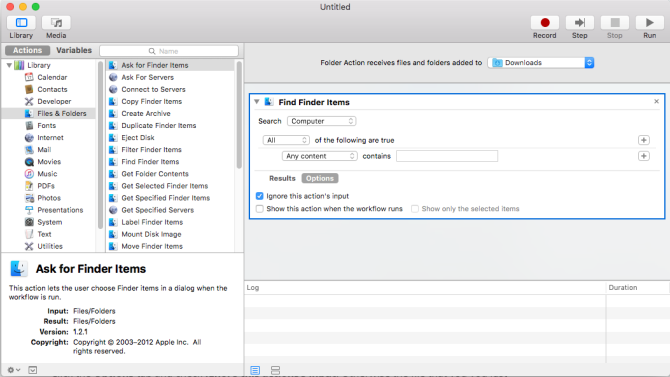
Using the Choose Folder picker, find your Downloads folder.

In the left pane, click Files and Folders, then drag the Find Finder Items action into the right pane. Click the Options tab and check Ignore this action’s input. Otherwise, the file that you just downloaded will get deleted too.

setting up the rule in automator

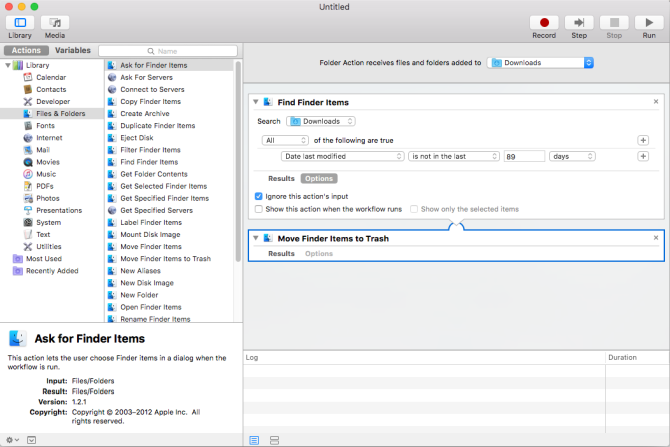
Change the Search folder to Downloads and choose a Date Last Modified range that suits you. Click back to the Results tab and click Run to ensure you see the files you want.

In the last step, drag the Move Finder Items to Trash action to the workflow. Then save the Automator action you just created and you’re all set.

final setup of rule in automator

Hazel: Sort and Delete Files Automatically

hazel automation app

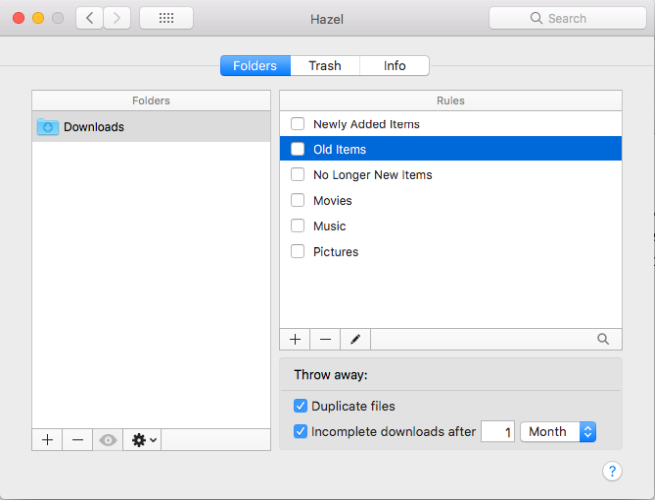
Hazel is an automation app for Mac that monitors changes in a folder, based on rules you set, and then performs a particular action. The app lets you set complex rules to sort and delete files in a single workflow.

Download: Hazel (Free trial, $32)

6. Archive Files With Cloud Storage Services

Backup and archiving serve different functions, yet you’ll often hear these words used interchangeably. Archiving lets you move files you rarely use but want to keep into secondary storage. Backup is for saving a copy of files you regularly use and don’t want to lose.

Unfortunately, most people don’t decide which files to archive instead of backing up. As a result, their backups increase in size.

If you have files suitable for archiving, you can subscribe to a service that gives you tons of storage space at a fraction of typical costs.

Backblaze B2

backblaze b2 cloud storage service

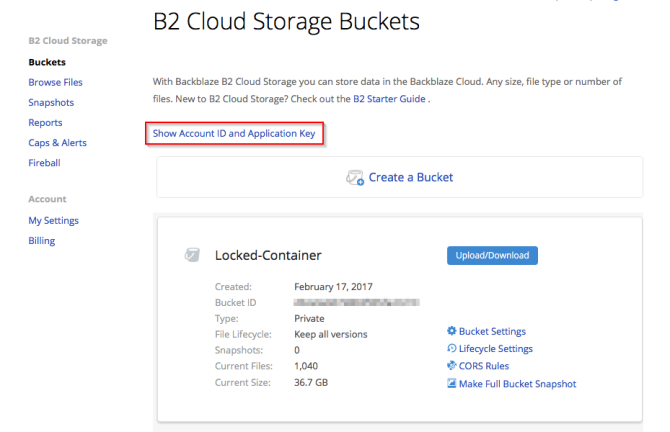
Backblaze B2 is a “cold storage” cloud service for storing files. The cost for B2 is variable based on the amount of data, bandwidth used, and transactions performed. The baseline cost of storage is $0.005 per GB per month, with the first 10GB free.

To get started, sign up for a Backblaze account. Once you enable B2 for your account, you’ll get access to Account ID and Application keys in your account settings. B2 does not include any client apps, but you can use various third-party apps that integrate with its API to upload and download data.

Amazon Glacier

Amazon Glacier is a secure, durable, and low-cost cloud storage service for data archiving and long-term backup. The baseline cost for storing data is $0.004 per gigabyte per month, with the first 10GB free. Amazon Glacier provides three options for access to archives, from a few minutes to several hours.

To get started, set up and log into your Amazon AWS account. Get the Application Keys and create a vault in Amazon Glacier. Regardless of whether you use S3 or Glacier, there are excellent third-party apps available to upload and download data through it. Some choices are CloudBerry Backup, Arq Backup, and Duplicati.

Slimmer Mac Backups, Happier Drives

Doing regular backups keeps your data safe. But if you’re not careful, you’ll run of disk space in no time. Going through these steps will keep you from having to buy a new external drive or pay for more cloud storage so soon. Plus, backups will be much faster.

And remember, you don’t have to stick with Time Machine. Check out our favorite alternate tools for backing up your Mac.

Read the full article: 6 Easy Ways to Reduce Mac Backup Sizes and Save Space


Read Full Article