10 April 2018

Go find out now if Cambridge Analytica had access to your data


Facebook promised it would alert users yesterday who were impacted by the whole Cambridge Analytica mess. No doubt you’ve been waiting on that information since the whole thing crossed your radar. Well, you can either sit around and wait for a notification, or you can go find out yourself, by visiting this Facebook Help Center page.

The link will let you know if you were among the 87 million or so Facebook users who had their information compromised when you or one your friends logged into the “This is Your Digital Life” app. If so, there’s a good chance your profile, city, birthday and the pages you like were also shared.

If you were impacted, the page also notes that “a small number of people who logged in” may have given the service access to their “news need, timeline, posts and messages which may have included posts and messages from you.”

Of course, there’s a lot more information still to come from all off this — some of which which will hopefully come to light when Mark Zuckerberg testifies to the Senate today.


Read Full Article

How to Install Android on a Raspberry Pi


Although there are so many operating systems available for the Raspberry Pi, you might think you’ll be happiest sticking with one based on Linux.

But what about Android? Can you install Android on Raspberry Pi, and does it make a significant difference? Let’s find out.

Why Install Android on Raspberry Pi Instead of Linux?

Linux is widely available for the Raspberry Pi. From the Raspbian Stretch distribution released by the Raspberry Pi Foundation to Arch Linux, versions of Ubuntu, and more, it’s the mainstream choice. The lightweight Raspberry Pi operating systems (typically used when you need a barebones approach) are all based on Linux, too.

Android Running on Raspberry Pi

So why choose Android? Well, there’s the touch screen factor, for starters. None of the other Raspberry Pi operating systems have these, save those running other software on top, such as Kodi.

Then there’s the choice of apps. While Android for Raspberry Pi isn’t 100 percent stable, it is nevertheless capable of offering a vast selection of apps and games for you to use and play with. Online RPGs, handy utilities, office tools (Microsoft Office, for instance), and much more are available.

Then there are the usual utilities that you might expect to find in Linux, such as a terminal emulator, disk manager, and similar. Of course, Android is based on Linux, so installing it at least makes sense.

What You’ll Need

To install Android on Raspberry Pi, you will need:

  • Raspberry Pi 3
  • A reliable, suitable power supply
  • A high-quality microSD card, at least 16GB
  • Display (the official 7-inch Raspberry Pi Touchscreen Display is a good option)
  • Mouse and/or keyboard if you’re not using a touchscreen display

You also must download the Android image for the Raspberry Pi 3. Finally, you’ll need the Etcher software, used for writing disk images to flash storage. This is available for Windows, macOS, and Linux, in 32-bit and 64-bit versions.

Download: Android for Raspberry Pi 3 (This is our preferred version, although other projects are available.)
Download: Etcher

Let’s get started.

Step 1: Flash Android to microSD Card

With all your files downloaded, start by installing Etcher on your computer. In the meantime, insert the microSD card into your card reader. Also, ensure you’ve unzipped the Android image file and it’s ready to use.

Once Etcher is installed, launch it. If you haven’t used this tool, you’ll notice that it is far simpler than any of the alternatives. It features a three-step process, which you start by clicking Select image. Browse your device to find the unzipped Android ISO file, select it, and click OK.

Etcher Flash Android on Raspberry Pi

Etcher will reformat your SD card, too, so there’s no need to worry about doing this first.

The app should detect your microSD card automatically. If not, click Select Drive (or Change if the wrong device is selected) and browse to it.

Finally, click Flash to begin writing to your microSD card. Wait while the process completes, then close Etcher and safely remove the microSD card. You can then insert the card in your powered-off Raspberry Pi 3. Connect a display and input device (keyboard, mouse, touchpad, or touchscreen), then boot it up.

Step 2: Run Android on the Raspberry Pi

When you switch on your Raspberry Pi, Android will boot instead of Raspbian. The experience may be a little sluggish at first, and you can expect an initially slow boot while the system configures. After a few minutes (ours took 90 seconds), however, you should notice normal performance.

Android Apps on Raspberry Pi

From here, you can access all the usual default Android apps, and get online as you normally would via the pull-down menu. If your Raspberry Pi 3 is connected to your network via Ethernet, this is already done; otherwise, use Wi-Fi.

At this point, the operating system is up, running, and usable. In many scenarios this might be enough. But what if you want to install apps? The only option is to sideload, importing APK files (Android app installation programs) from external storage or a cloud drive.

To do this, however, you’ll first need to enable Unknown Sources in the Settings > Security menu. You’ll find Settings by moving your mouse to the top-right corner of the screen, or clicking and dragging up on the arrow on the home screen.

Android Raspberry Pi Enable Unknown Sources

If you want to install an APK file from your cloud storage, open the storage in the browser, and download the APK file. Once downloaded, drag down the notification bar from the top of the screen, and select the APK file to install it.

Check the permissions, then install. It’s not as simple as having access to Google Play, but it’s good enough. If you’re missing a store environment, use a Google Play alternative.

Does the Raspberry Pi Make a Good Android Device?

It’s not bad, but it could do with better support. Happily, there seems to be enthusiasm in providing a workable version of Android for the Pi, so we should expect improved releases to appear over time.

What apps might you play? Well, with a big-screen TV connected, media-related apps are particularly promising. You could install video apps like Netflix, Hulu, Amazon Prime Video, and even Kodi. Alternatively, you may prefer to run games on your Raspberry Pi-powered Android device.

Unfotunately, support for the Raspberry Pi from Android app developers is non-existent. Meanwhile, running apps and games is a bit of a lottery, despite the improved hardware stats of the Raspberry Pi 3. All in all, though, Android runs reasonably well on the Raspberry Pi (better than on some cheap tablets!), and you should enjoy the apps you can run.

Android is a great operating system, but perhaps it’s not the right one for your Raspberry Pi. Looking for an alternative to Linux? Plenty of Raspberry Pi-compatible operating systems don’t use Linux.


Read Full Article

Instagram traps data without a Download Your Information tool


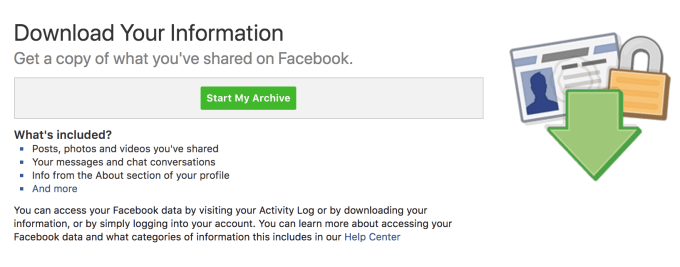
It’s hard to #DeleteFacebook with no viable alternative, but at least you can export all your data. There’s no such option on Instagram. That lack of data portability puts users at the mercy of Instagram’s product and policy decisions. And it could even put users at risk as those who seek to backup their accounts and content are forced to use unofficial third-party apps that require their password.

Facebook launched its Download Your Information tool in 2010, six years after the social network launch. It lets you export a zip file of all your status updates, photos, profile info, messages, friend lists, and a whole lot more. The idea is that if you wanted to ditch Facebook, you could take your data with you and get set up on some other social network. The fact that you only get a list of your friends’ names by default, not their email addresses or another way to easily find them on different apps, limits that power. But at least you get all the content you created.

Soon to be eight years old, Instagram still lacks its own version of Download Your Information. When asked about this, an Instagram spokesperson merely said “Instagram does not currently have a data portability tool.

Instagram doesn’t even offer a way to download your photos or videos after you share them to its feed. Unlike most apps and websites, you can’t just tap and hold on a photo to save it to your phone. The closest option is to use Instagram’s share via email feature, which send a saveable version of an image. Otherwise you need to set Instagram to save images when you post them.

Third-party tools have cropped up to fill the gap, but their security and privacy practices can be questionable. Vibbi Instaport, Insta Saver, 4K Download, PicoDash are a few. These services typically require you to log in with your Instagram credentials, which puts your username and password at risk of leaking to hackers. It’s also unclear what else could happen to your images once they export them. And the fact that some of these services like Instaport offer to sell you Instagram followers too shows how scammy they can be.

The rest of your profile information, photos you’re tagged in, people you follow or who follow you, your Likes and comments, and any other Instagram data is all trapped in the app.

The U.S. government may have been shortsighted to let Facebook acquire Instagram in 2012 for $715 million. Now at over 800 million monthly users, Instagram joining Facebook led to a massive centralization of social networking that gives users fewer options. But even with the backlash against big tech and Facebook, it seems unlikely that the government has the resolve to break up Facebook, Instagram, and WhatsApp.

But at the very least, Instagram should give users the ability to leave without losing their visual history. That way, if someone actually did build a decent competitor, users could choose where they want to put their windows to the world. At the Download Your Information tool launch in 2010, Facebook CEO Mark Zuckerberg himself said, “Stuff that you put into the site, you should be able to take out.”


Read Full Article

How to Add a Start Menu or Recent Documents List to Your Mac Dock


macOS doesn’t really need a Start Menu, but some people prefer having one nonetheless. Having a list of apps you can refer to and peruse is handy, especially if you’re coming from Windows. Plus, the Applications folder is a hot mess of everything installed on your machine.

Today we’ll look at adding two useful items to your dock: a Mac Start Menu of items chosen entirely by you, and a recent documents stack for quickly finding what you were last working on.

1. Add a Start Menu to Your Mac Dock

The Start Menu we will create today is little more than a regular folder that you pin to the dock as a shortcut. The first decision is choosing where you want to store your Mac’s Start Menu. For ease, we’ll be using the Documents folder.

In a new Finder window, locate the Documents folder and create a new folder using File > New Folder. For the purposes of this article we’ll name ours Start—remember not to delete it!

Mac Create Start Folder

Within this folder you can start creating new folders based on how you want to organize the Start Menu on your Mac. It’s probably a good idea to only include the apps you most use, since the macOS Applications folder already makes it difficult to find what you’re looking for.

I created three folders: Games, Utilities, and Programs. You might want to create folders for other uses like Work, Steam Apps, System Tools, and so on. Click and drag your newly made Start folder to the far end of the dock, near the Trash can. Right-click on it and specify the following options:

  • Sort By: Kind
  • Display as: Folder
  • View content as: List

Drag Start Folder to Mac Dock

Once you’re done with the basic structure, it’s time to start adding shortcuts to your apps.

2. Create Aliases and Organize Your Menu

We’ll use aliases to create a list of apps. Aliases are tiny files that represent other files, like a shortcut in Windows. Unlike a Windows shortcut however, aliases will still link to the target object even if it is moved.

There are all sorts of creative uses for aliases on macOS, not least populating a list of favorite apps. There are two ways to create an alias in macOS:

  • Highlight an item, right-click, and select Make Alias; or use the keyboard shortcut Cmd + L.
  • Click and drag an item, hold the Cmd + Option keys, then release to create an alias in the target location.

The latter technique is more useful here, since you can highlight multiple items, click and drag them all, then hold Cmd + Option and release to create multiple aliases. This is best done with two Finder windows side-by-side.

Drag to Make Alias in Finder

Highlight and create aliases for any relevant folders. Your aliases will use the same icons and names as the target objects, except you’ll see a small “shortcut” arrow in the bottom-left corner of the icon. You can change the names and icons of your aliases, and they will still work just fine.

For fun, I added an alias to the Terminal called Run and a System Preferences alias called Control Panel in the root Start folder.

Note: You could alternatively drag an alias of your entire Applications or Utilities folder, if you want a list of everything installed.

3. Change the Icon to Suit

To differentiate your Mac’s Start Menu folder from the others pinned to your dock, you’ll want a distinctive icon. Google Image Search will help you find variations on Microsoft’s Start theme, or you can opt for an Apple logo of some sort if you want to think a little different. I chose this Vista Orb on DeviantArt.

Navigate to the directory containing your Start folder. Right-click on the folder, and choose Get Info. Drag your image file over the default folder icon in the top-right corner, and watch it change. To remove your custom icon, click on it and hit the Delete key.

Start Menu Applications on Mac

If your icon doesn’t display in the dock, right-click on it and choose Display as > Folder instead.

4. Add a Recent Documents Folder

Unfortunately, saved searches don’t automatically expand in pinned folders. That means you can’t nest a Recent items “folder” in your new Start Menu. However, you can add a Recent folder to the dock, where it will sit alongside your Start Menu and perform basically the same task.

You can customize it so that only relevant documents are displayed, set your own range, exclude files and apps, and enforce any other criteria possible through macOS Smart Folders.

Option 1: Recent Documents Stack Using Terminal

This is simple, but you won’t get as much control over what displays using this method. You can use it to display recent applications, documents, servers, and favorite volumes and items.

  1. Launch Terminal and paste the following command followed by Enter:
    defaults write com.apple.dock persistent-others -array-add '{"tile-data" = {"list-type" = 1;}; "tile-type" = "recents-tile";}'; killall Dock
    
  2. Wait for the dock to disappear and reload, then find the new Recent Applications stack next to the Trash.

Recent Documents Mac Shortcut

You can right-click this stack and choose what content to display, and how to display it. You can also run this command multiple times to add the same stack to your dock.

Option 2: Recent Documents Folder With a Smart Search

Launch Finder and select File > New Smart Folder. You’ll see a small bar appear at the top of the Finder window. Leave This Mac selected, then click on the plus (+) icon.

From the dropdown menu choose Last opened date, then specify a range in days. I went for 30, but you could leave it at a week or less if you get through a lot of documents on your Mac. At this point, you’ll see the results of your search below:

Smart Folder criteria Mac

In this instance, there are three items I want to remove from my search: applications, folders, and chat logs. None of these are particularly useful additions to a recent documents list, so we can set rules to exclude them.

Hold the Option key on your keyboard, watch the plus (+) icon change to an ellipsis (…), then click on it. On the next row down, choose None of the following are true, which will allow us to specify exclusions to the rule.

Smart Folder exclusions

On the next row, select Kind in the first dropdown, and Application in the second. Click on the plus (+) button again to add another exclusion, and specify Kind in the first box and Folder in the second. Both application files and folders will now disappear from your results.

To exclude chat logs, click on the first dropdown and choose Other. This is where you can add all manner of custom criteria. We’re looking for Delivery type in this instance; check it and hit OK. Now specify Delivery type in your search, and type iMessage in the custom field. Add another Delivery type rule and type SMS into the custom field.

Smart Folder criteria

You can continue refining your results until you’re happy. When you’re done, click Save and put your smart folder somewhere you can find it. Finally, drag your smart folder into the dock area near the Trash. You can right-click it and sort by Last Opened, plus choose between Folder and Stack, and List and Grid views.

Master Spotlight for Mac Proficiency

Creating a Mac Start Menu gives you the option of shortlisting your favorite apps and locations. You could add remote servers, frequently used documents, or your own AppleScript automations. The recent document menu is handy too, particularly if you can’t remember what you were last working on.

But for most tasks, your Mac’s built-in search tool Spotlight is a faster way to work. You can invoke Spotlight anytime by hitting Cmd + Space. Start typing an app name and hit enter to launch it. You can even use natural language for search queries, just like that fancy smart folder we made earlier.


Read Full Article

DFS Lab is helping the developing world bootstrap itself with fintech


Entrepreneurs have it rough in Africa, India, Pakistan — places where VC cash doesn’t fall from the sky and necessary infrastructure like reliable banking and broadband can be hard to come by. But companies grow and thrive nevertheless in these rugged environments, and DFS Lab is an incubator focused on connecting them with the resources they need to go global.

The company was founded, and funded, on the back of a $4.8 million grant from the Gates Foundation, which of course is deeply concerned with tech-based solutions for well-being all over the world. Its name, Digital Financial Services Lab, indicates its area of focus: fintech. And anyone can tell you that sub-Saharan Africa is one of the most interesting places in the world for that.

This week DFS Lab is announcing a handful of new investments — modest ones on the scale companies are used to in Silicon Valley, but the money is only a small part of the equation. Investment comes at the end of a longer process, the most valuable of which may be the week-long sprint DFS Lab does on the ground, helping solidify ideas into products, or niche products into products at scale.

The relative lack of VCs and angel investors puts early-stage companies at risk and can discourage the most motivated entrepreneur, so the program is aimed at getting them over the hump and connected to a network of peers.

The latest round puts a total of $200,000 into four startups, each touching on a different aspect of a region or vertical’s financial needs. All, however, are largely driven by the massive growth of mobile money in Africa over the last decade and the more recent, ongoing transition to modern smartphones and the app/data landscape familiar to the U.S. and Europe.

  • Nala aims to move p2p payments away from the antiquated but widely used USSD system (more on this later) to a Venmo-like app interface that integrates multiple native mobile currencies like M-Pesa into a single tool.
  • Cherehani connects female entrepreneurs with financial resources; the idea is to provide both much-needed credit and financial literacy at as early an age as possible. (They have a chatbot too, naturally.)
  • Nobuntu is a platform through which South Africans can open and contribute to pension plans via mobile money, simply and with low overhead costs.

The fourth company is choosing to remain in stealth mode for now, but you see the general theme here.

For one reason or another there are major gaps in everyday services that many of us take for granted — the ability to prove one’s identity, for example, is critical but commonly absent. I talked with Paul Damalie, founder of a DFS-funded company called Inclusive that helps address that particular shortcoming.

Basic ID verification can be difficult when you remove many of the things we take for granted. So when, for example, someone wanted to get a loan, a savings account, or some other basic financial service, “Originally you’d have to literally walk into the bank to do it,” Damalie said. Needless to say that isn’t always convenient, and banks as well as users want better options.

“We’ve been collecting existing databases and building a layer of rich access around it,” he continued. “Now we can use facial recognition to check those details. Once you have the ID, you need to check it with the government records” — which Inclusive also does. A range of other data creates a confidence score in the person’s identity, helping avoid identity fraud.

Another opportunity arises not from these gaps but from the unique ways in which the African ecosystem has evolved. USSD, which I mentioned before, is probably unknown to many of our readers — it certainly was to me. But it’s become a standard tool used regularly by millions for important tasks in Africa; if you want to work in that market, you have to deal with USSD one way or another.

The problem is that, as you might guess from Nala trying to deprecate it, USSD is a technology dating back to the ’90s, a text-based interface that’s rudimentary but, much like SMS, universally accepted and intelligible. The importance of cross-platform compatibility in mobile markets as fragmented as these can’t be overstated.

So bridging the gap between USSD and a “traditional” (as we might call it) payment app is a unique opportunity, and one a company called Hover (also in the DFS Lab portfolio) is addressing. Its tech acts as a sort of translation layer between USSD and smartphone app interfaces, allowing for modern app design but also deep back-compatibility. It’s an opportunity specific to this time and this area of the world, but nevertheless one that may end up touching millions.

And from the narrowness of its vision that DFS Lab derives its effectiveness.

“They’re one of the most specialized accelerators in the world,” said Damalie. “It goes beyond just funding — it involves having the right kind of network: access to partners, data, sources across the continent. They had context-relevant fellows, people who had very specific challenges.”

“The grant was useful and let us build a proof of concept, and of course the Gates Foundation gives us credibility. But they were taking bets on us as individuals.”

Although DFS Lab has heretofore been funded by the Gates infusion, that well will run dry soon. Jake Kendall, DFS Lab’s executive director, indicated that the plan is to move towards a more traditional investor fund. They already focus on profitability and the potential for growth to the continental stage or beyond; this isn’t a charity but tactical investment in such a way that social good is a necessary byproduct.

“The best way to have a global impact is to be self-sustaining,” he said.


Read Full Article

b8ta unveils Shopify-like solution for retail stores


b8ta, the store founded by Nest alums to sell trendy gadgets, is entering new territory. Today, the startup is launching “Built by b8ta,” which functions as a retail-as-a-service platform for brands that want a physical presence.

Building off the success of its own retail stores, b8ta is confident it can provide an easy, cost-effective solution to brands wanting to launch physical stores of varying sizes. Since launching its first store in December 2015 in Palo Alto, b8ta has built and deployed an additional 78 stores across the country.

“As our business grew, there started being a class of larger companies in apparel and beauty that wanted to bring products to stores but the product experience was misaligned with what they wanted to do,” b8ta CEO Vibhu Norby told TechCrunch. “With apparel, you don’t need a separate display for every shirt. So we started imagining creating a number of different brands for other categories.”

Instead of creating those brands itself, b8ta figured it would be more scalable to open up its store building and infrastructure processes to other entrepreneurs looking to open their own stores. That’s how b8ta landed on selling its software and retail services for a flat, monthly fee. The monthly fee, of course, depends on the square footage required, as well as the cost of real estate in whichever market the customer decides to open the retail store.

“For most brands we’re working with, the costs are quite reasonable,” Norby said. “I’ll say that it’s at least 50 percent cheaper than doing it yourself.”

b8ta’s flagship store

b8ta’s software solution includes checkout, inventory, point of sale, inventory management, staff scheduling services and more. Netgear will be the first customer to launch a Built by b8ta store this June in Silicon Valley’s Santana Row, and b8ta has plans to deploy additional stores for other brands in that area. In fact, Norby said there are a handful of other brands that b8ta will announce soon. This year, b8ta expects anywhere from 10 to 15 companies to launch stores built by b8ta across cosmetics, apparel and furniture.

“This is designed for direct-to-consumer brands who have no store space but believe it’s important or they’ve done one or two stores and are having a hard time scaling that up to 10, 20 or 30,” Norby said.

Some of these built by b8ta stores will exist within some of b8ta’s existing flagship stores. For brands that need more space, b8ta can build out separate medium to large-sized stores.

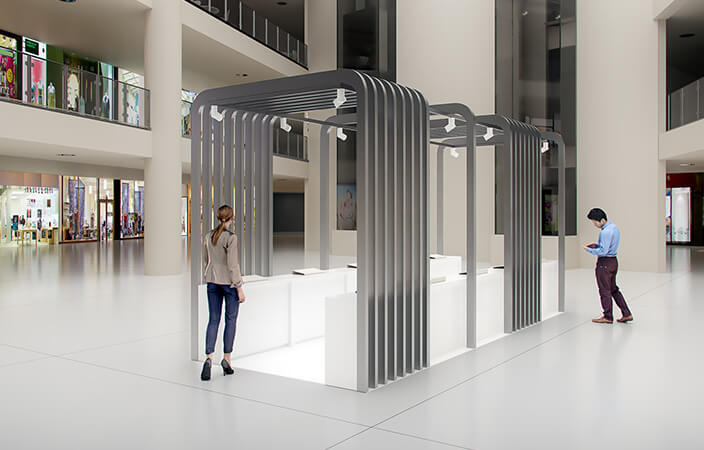
b8ta’s concept of small store inside a shopping center

b8ta likens its offering to Shopify, in that it provides physical stores for brands while Shopify provides virtual stores for brands. Instead of requiring brands to deal with store build-outs, infrastructure, real estate people and so forth, b8ta can provide all of that for them. On the real estate side, b8ta already has relationships with national real estate owners, architects, contractors and designers.

“We already have tremendous scale,” Norby said, noting how b8ta has a whole supply chain for fixture manufacturing and modular designs. On the staffing side, Norby said, the “big innovation” b8ta has is opening up many stores in the same shopping center, which is what b8ta plans to do with Santana Row. That enables b8ta to cover operations and management for multiple brands.

“In our system, no individual store needs to hire their own management team,” Norby said. “It’s just one team looking over the whole center.”


Read Full Article

Instagram rolls out Focus portrait mode for videos and photos


Instagram is one-upping Apple with a portrait mode feature that runs on a wider variety of phones and works with video, not just photos. Last month TechCrunch reported about a Focus feature buried in Instagram’s code which began publicly testing a week later. Now Instagram is rolling out Focus, which blurs the background while keeping someone’s face sharp for a stylized, professional photography look. “Focus mode leverages background segmentation and face detection technology” an Instagram spokesperson told me when asked how it works without the need for dual cameras.

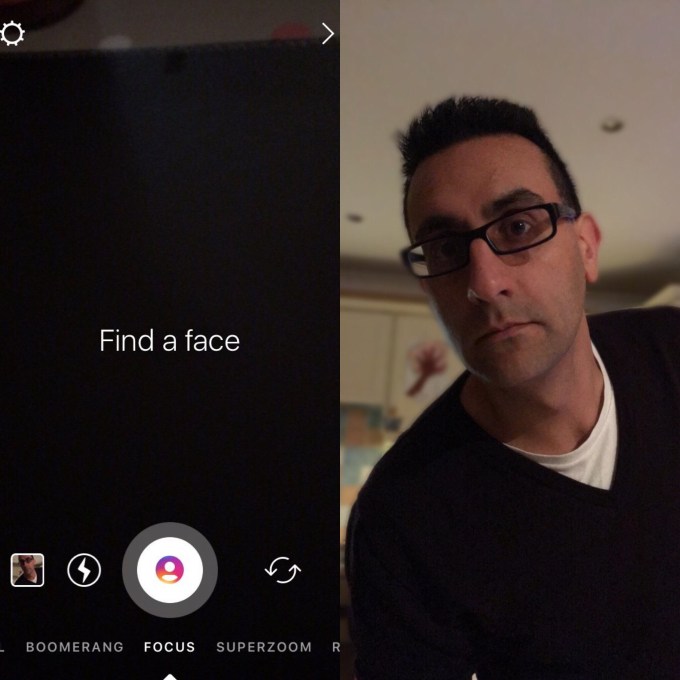
Focus can be found in the Instagram Stories format options alongside Boomerang and Superzoom in both the selfie and rear facing cameras, and it rolls out globally today on iPhone 6S, 6S+, 7, 7+, 8, 8+ and X as well as select Android devices. That’s compared to Apple’s portrait mode that only works on the iPhone 7+, 8+, and X, and Android portrait mode that exists on the Pixel 2 and Pixel 2 XL. Instagram’s launch could also suck attention away from “fake portrait mode” apps like Magic Portrait Mode, FabFocus, LightX and Point Blur that can also add blurry background ‘bokeh effects’ to images.

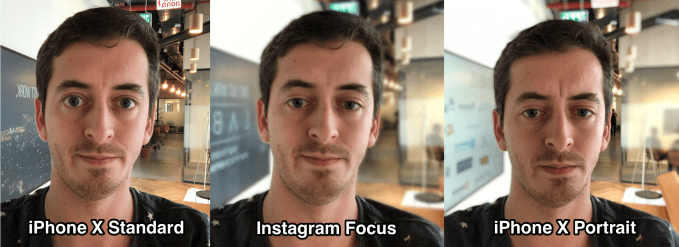
This comparison provided to TechCrunch by reader Genady Okrain shows how Instagram Focus blurs the background, but can make the edges of the face look a bit hazy too. The iPhone portrait mode that takes advantage of newer models’ dual cameras does a little better job of keeping the whole face in focus, but it’s not available on older iPhones and can’t do video.

Focus gives people another reason to choose Instagram over Snapchat, and could make shooting inside the Instagram app more appealing. After 8 years of sunsets and latte art, it’s the selfies and portraits that still feel fresh on Instagram. Making them look as good as possible could keep Instagram from growing stale as it rockets towards 1 billion users.

Focus appears as an Instagram Stories format alongside Boomerang and Superzoom. Screenshots via Social Pip 

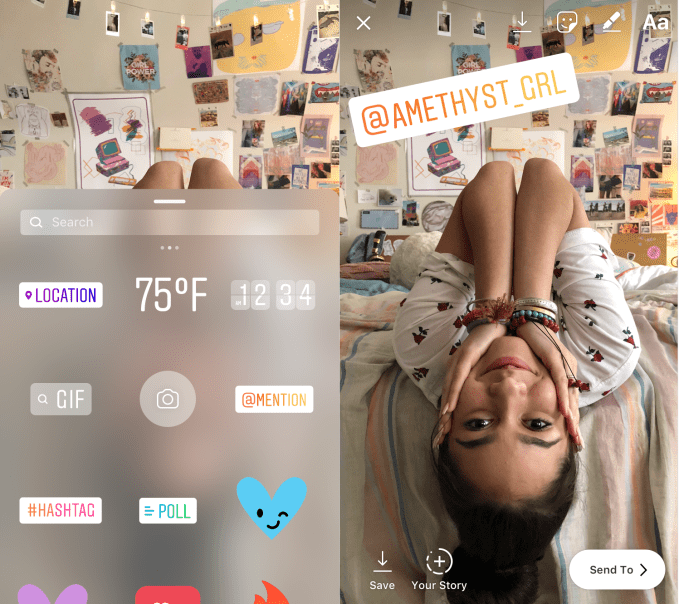
Meanwhile, Instagram is starting to roll out Mentions stickers that make it easy to tag friends in a Story with a stylized graphic instead of just text. Instagram tested these last month, but now they’re becoming available to all iOS users. Just like adding emoji to photos and videos, you can select the Mention sticker, use the typeahead to find a friend’s username, and tag them in a resizable sticker. That lets people tap through to view their profile, and generates a notification to the tagged user.

Instagram has had text mentions since November 2016, soon after it launched Stories, but Snapchat just added them last month. Mentions could make it easier for creators on both the apps to collaborate and cross-promote each other, or encourage fans to spread their name to friends.

 As Facebook endures unending scandals, Instagram has remained relatively unscathed by the backlash. Without links and resharing, its immune to a lot of the fake news and politics that have made Facebook exhausting. Instagram seems to see rapid feature development as the best distraction. Beyond Focus mode, TechCrunch recently reported that Instagram voice and video calling features are hidden inside the app’s code. And it’s just begun testing a Snapchat QR code-style feature called Instagram Nametags that make it easy to follow someone.


Read Full Article

13 Essential Gmail Terms and Features You Should Know About


Where are the folders in Gmail?

Are labels the same as folders?

How are both different from categories?

You might have questions like these about the web version of Gmail if you’re new to it. To help you get familiar with Gmail, we’ll give you the gist of all the essential Gmail features you should really know about.

1. Conversation View

conversation-view-gmail

You know this as an email thread. Conversation View packs an email and all replies to it into a single view to ensure that you get the context when you’re reading any of the messages. Each message in the group gets its own collapsible section.

To turn on this Gmail feature, visit Settings > General. There, under the Conversation View section, select the radio button for Conversation view on.

2. Importance Markers

important-markers-gmail

These are visual cues that highlight emails Google thinks might be important to you. You’ll see them as yellow-colored tags next to certain emails once you enable the Show markers option under Settings > Inbox.

How does Gmail decide which emails you’re likely to consider important?

It relies on the way you process email. Gmail pays attention to which emails you open and reply to, which ones you archive or delete, which contacts you communicate with, and so on.

When Gmail mistypes an email as important, you can correct it by clicking on the marker to disable it. Likewise, you can enable a marker for an email that you consider important but Gmail has failed to mark as such. In both cases, Gmail learns from your actions to improve its accuracy.

3. Undo Send

undo-send-gmail

As its name suggests, Undo Send lets you pull back an email you’ve hit Send on. You have a ten-second window to do it though, and you can tweak this interval by a few seconds under Settings > General > Undo Send.

Gmail enables the feature by default, and right after you send an email, you’ll see the Undo option right below the search box.

4. Labels

labels-gmail

Labels are the signature Gmail feature. They’re text-based, color-coded identifiers to help you find the right emails faster. The items you see in the sidebar like Inbox, Trash, and Drafts happen to be labels that Gmail has already set up for you.

Labels behave somewhat like folders and somewhat like tags. You’re better off thinking of them as tags though. Read our power user guide to Gmail to understand them better. (Note that Gmail doesn’t have actual folders or tags.)

5. Categories

categories-gmail

These are a set of default labels that show up as tabs in Gmail. You have four of them: Social, Promotions, Updates, and Forums.

Categories add context to your emails and keep automated messages like social media updates and promotional mailers out of your primary inbox.

Thanks to the category tabs, you can find specific types of emails faster. For example, if you’re looking for a password reset email, you can jump right to the Updates tab because that’s where it’s programmed to show up.

If you want to stick with the Primary tab only, turn off the category tabs via the Configure inbox option hidden behind the “gear” (Settings) icon.

6. Filters

filters-gmail

Filters are rules you set up to teach Gmail to process your emails for you based on various criteria.

You can use filters to stop automated emails, find emails with large attachments, and mark emails as read. You can also use them to label, delete, and organize emails automatically. Start by setting up smart Gmail filters to deal with the bulk of your email.

7. Labs

labs-features-gmail

You might have seen a section titled Labs in Gmail settings. It’s dedicated to experimental Gmail features. (We’ll cover three of them in the upcoming sections.) There’s no guarantee that these features won’t break or disappear altogether, but they come in handy anyway.

You can toggle a Labs feature by selecting the Enable or Disable radio button next to it. Be sure to hit the Save Changes button to wrap up.

8. Preview Pane (Labs Feature)

preview-pane-gmail

This is a time-saving Gmail feature that displays the content of an email right next to the message list. Essentially, you get a split-pane view that ensures you don’t have to open a message to read it.

To use the Preview Pane feature, you’ll need to enable it first from Settings > Labs. Once you do, you can tell Gmail to display email previews either below or beside your inbox. Click on the icon next to the “gear” (Settings) icon to toggle between the two views.

9. Multiple Inboxes (Labs Feature)

multiple-inboxes-gmail

Multiple Inboxes are a set of up to five inbox panes stacked below your primary inbox. The beauty of it is that you get to decide what kind of emails should go in each pane.

For example, you can have one pane for messages with a certain label and another one for starred messages. Throw in a third pane for emails that match a particular search query. It’s all up to you.

To configure what you want to see in each custom inbox, you’ll have to visit Settings > Multiple Inboxes. You’ll see this section only after you enable the Multiple Inboxes feature under Settings > Labs.

10. Canned Responses (Labs Feature)

Happy Birthday Email Template

Canned responses are nothing but email templates. Set them up to save yourself the hassle of having to type the same stuff over and over.

For repetitive business emails, season’s greetings and such, start with a canned response and tweak its details.

11. Priority Inbox

priority-inbox-gmail

This is a special Gmail view to ensure that the right messages bubble to the top in your inbox. By the right messages we mean the unread ones, the ones marked as Important, and your starred messages. Everything else comes second.

To switch to the Priority Inbox view, hover on Inbox in the sidebar and click on the tiny down arrow that shows up. You should now see a popup menu with a list of views or Inbox Types to choose from. You know what you have to select!

It’s handy that you can customize the kind of messages you see in the Priority Inbox. To get started, go to Settings > Inbox > Inbox sections.

12. Gmail Offline

offline-gmail

As you might have guessed, this is Gmail’s way of giving you offline access to your email. It allows you to read, organize, search, delete, archive, compose, and queue emails for sending—all without an internet connection. It’s a pity that you can take advantage of this Gmail feature only if you use Google Chrome.

To start accessing your Gmail messages when you’re offline, you’ll need to install the Gmail Offline Chrome app. Instead of visiting the Chrome Web Store, you can also click on the Install Gmail Offline button under Settings > Offline to install the app.

When you run the Chrome app for the first time, it asks you for permission to access your inbox offline. Select the Allow offline mail radio button and hit the Continue button to set up Gmail for offline use.

For help with configuring the offline version of Gmail, read our complete guide on how to use Gmail offline.

13. Inbox by Gmail or Google Inbox

inbox-card

This is Gmail’s better-looking in-house competitor. Inbox by Gmail is super efficient and saves you time. It brings a different layout, smart email groups (Bundles), reminders, scannable cards for important data, and a lot more to your inbox.

Of course, you might still prefer the old Gmail over Google Inbox. You don’t have to choose between them though. Switch between the old and new versions of Gmail anytime by jumping to the right link:

Learn the Ins and Outs of Gmail

If you’ve got yourself a brand new Gmail account or if you have always favored a desktop client to use Gmail, the web version can take a bit of getting used to.

The Gmail way of doing things can even feel illogical or complex to you. But that’s only until you get the hang of its best features, which you will sooner or later. Our beginner’s guide to Gmail is here to help!


Read Full Article

Instagram rolls out Focus portrait mode for videos and photos


Instagram is one-upping Apple with a portrait mode feature that runs on a wider variety of phones and works with video, not just photos. Last month TechCrunch reported about a Focus feature buried in Instagram’s code which began publicly testing a week later. Now Instagram is rolling out Focus, which blurs the background while keeping someone’s face sharp for a stylized, professional photography look. “Focus mode leverages background segmentation and face detection technology” an Instagram spokesperson told me when asked how it works without the need for dual cameras.

Focus can be found in the Instagram Stories format options alongside Boomerang and Superzoom in both the selfie and rear facing cameras, and it rolls out globally today on iPhone 6S, 6S+, 7, 7+, 8, 8+ and X as well as select Android devices. That’s compared to Apple’s portrait mode that only works on the iPhone 7+, 8+, and X, and Android portrait mode that exists on the Pixel 2 and Pixel 2 XL. Instagram’s launch could also suck attention away from “fake portrait mode” apps like Magic Portrait Mode, FabFocus, LightX and Point Blur that can also add blurry background ‘bokeh effects’ to images.

This comparison provided to TechCrunch by reader Genady Okrain shows how Instagram Focus blurs the background, but can make the edges of the face look a bit hazy too. The iPhone portrait mode that takes advantage of newer models’ dual cameras does a little better job of keeping the whole face in focus, but it’s not available on older iPhones and can’t do video.

Focus gives people another reason to choose Instagram over Snapchat, and could make shooting inside the Instagram app more appealing. After 8 years of sunsets and latte art, it’s the selfies and portraits that still feel fresh on Instagram. Making them look as good as possible could keep Instagram from growing stale as it rockets towards 1 billion users.

Focus appears as an Instagram Stories format alongside Boomerang and Superzoom. Screenshots via Social Pip 

Meanwhile, Instagram is starting to roll out Mentions stickers that make it easy to tag friends in a Story with a stylized graphic instead of just text. Instagram tested these last month, but now they’re becoming available to all iOS users. Just like adding emoji to photos and videos, you can select the Mention sticker, use the typeahead to find a friend’s username, and tag them in a resizable sticker. That lets people tap through to view their profile, and generates a notification to the tagged user.

Instagram has had text mentions since November 2016, soon after it launched Stories, but Snapchat just added them last month. Mentions could make it easier for creators on both the apps to collaborate and cross-promote each other, or encourage fans to spread their name to friends.

 As Facebook endures unending scandals, Instagram has remained relatively unscathed by the backlash. Without links and resharing, its immune to a lot of the fake news and politics that have made Facebook exhausting. Instagram seems to see rapid feature development as the best distraction. Beyond Focus mode, TechCrunch recently reported that Instagram voice and video calling features are hidden inside the app’s code. And it’s just begun testing a Snapchat QR code-style feature called Instagram Nametags that make it easy to follow someone.


Read Full Article