25 October 2018

Fleksy’s keyboard grabs $800k+ via equity crowdfunding


The dev team that’s now engineering the Fleksy keyboard app has raised more than $800,000 via an equity crowdfunding route.

As we reported a year ago, the development of Fleksy’s keyboard has been taken over by the Barcelona-based startup behind an earlier keyboard app called ThingThing.

The team says their new funding raise — described as a pre-Series A round — will be put towards continued product development of the Fleksy keyboard, including the core AI engine used for next word and content prediction, plus additional features being requested by users — such as swipe to type. 

Support for more languages is also planned. (Fleksy’s Android and iOS apps are currently available in 45+ languages.)

Their other big push will be for growth: Scaling the user-base via a licensing route to market in which the team pitches Android OEMs on the benefits of baking Fleksy in as the default keyboard — offering a high degree of customization, alongside a feature-set that boasts not just speedy typing but apps within apps and extensions. 

The Fleksy keyboard can offer direct access to web search within the keyboard, for example, as well as access to third party apps (in an apps within apps play) — to reduce the need for full app switching.

This was the original concept behind ThingThing’s eponymous keyboard app, though the team has refocused efforts on Fleksy. And bagged their first OEMs as licensing partners.

They’ve just revealed Palm as an early partner. The veteran brand unveiled a dinky palm-sized ‘ultra-mobile’ last week. The tiny extra detail is that the device runs a custom version of the Fleksy keyboard out of the box.

With just 3.3 inches of screen to play with, the keyboard on the Palm risks being a source of stressful friction. Ergo enter Fleksy, with gesture based tricks to speed up cramped typing, plus tried and tested next-word prediction.

ThingThing CEO Olivier Plante says Palm was looking for an “out of the box optimized input method” — and more than that “high customization”.

“We’re excited to team up with ThingThing to design a custom keyboard that delivers a full keyboard typing experience for Palm’s ultra mobile form factor,” adds Dennis Miloseski, co-founder of Palm, in a statement. “Fleksy enables gestures and voice-to-text which makes typing simple and convenient for our users on the go.”

Plante says Fleksy has more OEM partnerships up its sleeve too. “We’re pending to announce new partnerships very soon and grow our user base to more than 25 million users while bringing more revenue to the medium and small OEMs desperately looking to increase their profit margins — software is the cure,” he tells TechCrunch.

ThingThing is pitching itself as an neutral player in the keyboard space, offering OEMs a highly tweakable layer where the Qwerty sits as its strategy to compete with Android’s keyboard giants: Google’s Gboard and Microsoft-owned SwiftKey. 

“We changed a lot of things in Fleksy so it feels native,” says Plante, discussing the Palm integration. “We love when the keyboard feels like the brand and with Palm it’s completely a Palm keyboard to the end-user — and with stellar performance on a small screen.”

“We’ve beaten our competitor to the punch,” he adds. 

That said, the tiny Palm (pictured in the feature image at the top of this post) is unlikely to pack much of a punch in marketshare terms. While Palm is a veteran — and, to nerds, almost cult — brand it’s not even a mobile tiddler in smartphone marketshare terms.

Palm’s cute micro phone is also an experimental attempt to create a new mobile device category — a sort of netbook-esque concept of an extra mobile that’s extra portable — which looks unlikely to be anything other than extremely niche. (Added to its petite size, the Palm is a Verizon exclusive.)

Even so ThingThing is talking bullishly of targeting 550M devices using its keyboard by 2020.

At this stage its user-base from pure downloads is also niche: Just over 1M active users. But Plante says it has already closed “several phone brands partnerships” — saying three are signed, with three more in the works — claiming this will make Fleksy the default input method in more than 20-30 million active users in the coming months. 

He doesn’t name any names but describes these other partners as “other major phone brands”.

The plan to grow Fleksy’s user-base via licensing has attracted wider investor backing now, via the equity crowdfunding route. The team had initially been targeting ($300k). In all they’ve secured $815,119 from 446 investors.

Plante says they went down the equity crowdfunding route to spread their pitch more widely, and get more ambassadors on board — as well as to demonstrate “that we’re a user-centric/people/independent company aiming big”.

“We are keen to work and fully customize the keyboard to the OEM tastes. We know this is key for them so they can better compete against the others on more than simply the hardware,” he says, making the ‘Fleksy for OEMs’ pitch. “Today, the market is saturated with yet another box, better camera and better screen…. the missing piece in Android ecosystem is software differences.”

Given how tight margins remain for Android makers it remains to be seen how many will bite. Though there’s a revenue share arrangement that sweetens the deal.

It is also certainly true that differentiation in the Android space is a big problem. That’s why Palm is trying its hand at a smaller form factor — in a leftfield attempt to stand out by going small.

The European Union’s recent antitrust ruling against Google’s Android OS has also opened up an opportunity for additional software customization, via unbundled Google apps. So there’s at least a chance for some new thinking and ideas to emerge in the regional Android smartphone space. And that could be good for Spain-based ThingThing.

Aside from the licensing fee, the team’s business model relies on generating revenue via affiliate links and its fleksyapps platform. ThingThing then shares revenue with OEM partners, so that’s another carrot for them — offering a services topper on their hardware margin.

Though that piece will need scale to really spin up. Hence ThingThing’s user target for Fleksy being so big and bold.

“We’re working with brands in order to bring them into any apps where you type, which unlocks brand new use cases and enables the user to share conveniently and the brand to drive mobile traffic to their service,” says Plante. “On this note, we monetize via affiliate/deep linking and operating a fleksyapps Store.”

ThingThing has also made privacy by design a major focus — which is a key way it’s hoping to make the keyboard app stand out against data-mining big tech rivals.


Read Full Article

The 6 Best GarageBand Alternatives for Music Production on Windows


GarageBand-alternatives

Are you a Windows user who’s been tempted by talk of GarageBand? There are great Windows compatible programs and apps which can do as much, if not more. Here are the best alternatives to Apple’s music production software that you can run on your PC.

1. LMMS

Open-source production software with a bevy of built-in samples and instruments.

The LMMS project is the work of a volunteer development team committed to making an open-source, cross-platform music production suite. It is a flexible and powerful tool that will get you up and running in no time at all. All at the bargain price of free.

LMMS sports a good variety of software instruments. Samples and effects are pre-loaded, which allows you to get up and running straight away. The interface could be clearer. Even then, it’s easy to use the instruments and make beats by experimenting.

Synthesizers are played via musical typing, mapping the computer keyboard to notes on the instrument. Drum sequencing is made easy with a visual mapping tool. While live recording isn’t possible, LMMS comes loaded with an impressive array of samples. External samples are also supported. So if you are using your phone to make recordings, you can import them into LMMS and use them.

Building tracks piece by piece is where LMMS shines, and Fruityloops/FL Studio users will find it very familiar. LMMS has an online forum with an active community and a yearly “Best of LMMS” competition!

Download: LMMS for Windows | macOS | Linux (Free)

2. Mixcraft 8 Home

Loop-based software that’s a great first step for budding music producers.

One of GarageBand’s most popular features is its large and diverse library of loops. Users can quickly and easily build a song that sounds good, simply by layering loops of different instruments over one another in a way that sounds pleasing to them. It might be something of a shortcut, but it’s a great way for the uninitiated to dip their toe in the waters of digital music production.

Mixcraft offers a comparable broad selection of loops in an intuitive environment that makes it easy to get up to speed quickly. On top of this, live recording is also possible making this a real direct competitor to GarageBand.

The caveat is that the home edition is limited to just 16 tracks and a reduced set of instruments and samples. Mixcraft 8 Home is perfect for musicians just starting out, though the reduced feature set might be something you outgrow in time.

Download: Mixcraft 8 Home ($40)

3. Music Maker Jam

An entertaining but limited music production app.

While there are certainly plenty of musicians who use GarageBand as a tool, many users enjoy the software as a fun way to play around with music. If you’re more interested in that sort of experience rather than full-on music production, Music Maker Jam will have you creating no time.

Unlike the other software covered here, Music Maker Jam is an app that you can download from the Windows App Store. It is also available for Android and iOS, joining an ever increasing list of music making tools for smartphones.

The workflow begins by selecting loops by genre, before transferring them into an arrangement to create a song. BPM and volume levels can be tweaked on the fly, and FX applied as you see fit.

Compared to others on this list, the app is limited in what you can do. More a fun way to share music with friends than a fully fledged DAW, it has some unique features aimed at casual musicians. The ability to record vocal tracks over quickly built loops make it perfect for budding MCs and singers.

Star DJs and musicians contribute sound packs to the app, along with stems from popular tunes for users to remix. Winners of remix competitions and trending songs feature on the official Music Maker Jam YouTube channel.

Download: Music Maker Jam (Free, with In-App Purchases)

4. Stagelight

Intuitive and straightforward software on multiple platforms.

Much like Music Maker Jam, Stagelight comes in the form of an Android app for music creation alongside Mac and Windows programs.

Stagelight takes a slightly different approach to digital music production than other similar packages, with a focus on the interface typically known as a live mode. It’s a way of testing out different loops and audio clips together to see what meshes well, used by some electronic artists in their live performances.

The free version has the same unlimited tracks as the upgraded “Unlock” versions and some limitations. The drum machine and instruments are cut back basic versions, and you get fewer effects and presets overall.

Stagelight brings a unique way of working to the table, and the free version will be more than enough for many users.

Download: Stagelight (Free, with Paid Upgrades)

5. FL Studio

Broad package suitable for all experience levels that benefit from a clean and straightforward design.

Now in its 20th year, FL Studio is one of the most widely used digital audio workstations available. It’s an excellent intermediate choice for anyone who might have cut their teeth on something like GarageBand, but now wants a package with a bit more depth.

FL Studio sets itself apart from other comparable software in the way that it balances broad functionality with a very straightforward workflow. Whether you want to tweak the specifics of a synth or customize your recording technique to suit the sort of instrumentation and style you’re going for, you’re given plenty of options that make it easy to personalize your experience.

Another major selling point for FL Studio is simply that it’s fun to use. Experimenting with beats using its pattern feature is fast and responsive. making it easy for you to get the results that you want without any unnecessary hassle.

FL-Studio is easy to pick up and trusted by thousands and is likely the best value product you are going to find at this price.

Download: FL Studio for Windows | macOS ($89 with free trial)

6. Reaper

Complex production software that works particularly well with live instrumentation.

There are plenty of apps and programs out there that attempt to make music creation approachable for anyone. But the highest levels of production require complex software. Reaper is a package that gives the expert user a lot of options. Though, it won’t hold your hand through the process. A certain level of knowledge is assumed when you open up the program.

The advantage that Reaper has over the big names in the field of digital audio workstations is its price. Whereas competitors like Cubase, Ableton and Pro Tools typically cost hundreds of dollars, the basic license for Reaper is just $60 for personal use.

While Reaper has an impressive library of VST effects, they require a high level of skill to use. Reaper is also lacking in VST instruments that work “straight out of the box”. Use of external VSTs gets around this problem, but if you already have this knowledge you likely aren’t looking for some simple GarageBand fun anyway!

This is professional-grade equipment for musicians looking to get real work done, and it does an excellent job if you’re willing to learn the ropes.

Download: Reaper ($60 with free trial)

Music Production on Windows Is Possible

There are many great options for Windows users who like the idea of GarageBand. Something on this list will appeal to any budding musician. None of them can compete with the excellent features provided by Ableton Live, but at these prices, they don’t need to.

Read the full article: The 6 Best GarageBand Alternatives for Music Production on Windows


Read Full Article

5 Free Game Development Software Tools to Make Your Own Games


Do you have an idea for a game that’s been brewing for years? What if you could bring that idea to life, even without any game development experience? These days, anyone can make a video game with the right software and a bit of know-how.

Of course, that doesn’t mean game development is easy. Even a simple game like Flappy Bird or Tetris requires effort if you want it to look and feel good. But thanks to free game development software tools, a game that once might’ve taken a year to make can now be made in months or days—sometimes even without any code!

Here are the best free game development tools and software you can use to start making your dream game today.

Note: This list is ordered from least complex to most complex. The simpler free game development tools are easier to pick up, but have more limitations. As you go down the list, you’ll gain more flexibility but steeper learning curves.

1. Construct 3

No programming needed. Construct 3 is the best option if you’ve never written a line of code in your life. This game development tool is completely GUI-driven, meaning everything is drag-and-drop. Game logic and variables are implemented using the design features provided by the app itself.

Create once, publish everywhere. The beauty of Construct 3 is that it can export to dozens of different platforms and formats, and you don’t have to change a single thing in you game to accommodate these various options. Once your game is done, you can export to HTML5, Android, iOS, Windows, Mac, Linux, Xbox One, Microsoft Store, and more.

Lots of documentation. Construct 3 has some of the best and most comprehensive documentation I’ve ever seen for a game development tool. In addition, there are hundreds of tutorials that will help you understand concepts from basic to advanced, and the forum community is extremely active if you ever need assistance.

Asset Store. Most programmers have no skills in art, music, or animations. But that’s fine with Construct 3 because you can always browse and purchase ready-made assets from the Scirra Store. Most asset packs are just a few dollars, but the professional-grade stuff can price at $30 or beyond. You can also buy sample games with source, which can be helpful for studying and learning new tips and tricks.

Pricing. The free version has all of the core features but is limited to 25 events, 2 object layers, 2 simultaneous special effects, 1 web font, no multiplayer functionality, can only export to HTML5, and no permission to sell your games. The Personal license is $99/year and lifts all of these restrictions.

Download: Construct 3

2. GameMaker Studio 2

Drag-and-drop OR code. Like Construct 3, GameMaker Studio 2 allows you to create entire games using nothing more than its drag-and-drop interface for variables and game logic. But unlike Construct 3, GameMaker Studio 2 grants more power through its Game Maker Language, which is a C-like scripting language with a lot of flexibility.

Create once, publish everywhere. Once your game is done, you can export to any number of platforms and formats without having to adjust your code: Windows, Mac, Linux, HTML5, Android, iOS, Nintendo Switch, PlayStation 4, Xbox One, and more. The free version unfortunately doesn’t allow exporting to any platforms.

Long history. GameMaker Studio 2 is a rewritten-from-scratch version of Game Maker: Studio, which started way back in 1999. Today, it’s one of the most popular and active free game development engines currently available. New versions with feature updates are released at regular intervals.

Built-in advanced features. GameMaker Studio 2 is great because it supports a lot of interesting quality-of-life features right out of the box, such as the ability to add in-app purchases to your game, real-time analytics on how users play your game, source control, multiplayer networking, and extensibility through third-party extensions. It also has built-in editors for images, animations, and shaders.

Pricing. The free version can be used indefinitely, but has limitations on how complex your games can be. The Creator plan costs $39/year and allows exporting to Windows and Mac. Or you can unlock individual exports each with a one-time permanent purchase: Desktop for $99, HTML5 for $149, Amazon Fire for $149, and Android/iOS for $399. Exports for Nintendo Switch, PlayStation 4, and Xbox One are available for $799/year each.

Download: GameMaker Studio 2

3. Unity

Supports 2D and 3D. Unity started off as a 3D engine, but eventually added official 2D support in 2013. Although it’s perfectly capable of creating 2D games, you may run into the occasional bug or glitch because Unity’s 2D system is actually tacked onto its core 3D system. This also means that Unity adds a lot of unnecessary bloat to 2D games, which could affect performance.

Component-based design. Unity didn’t come up with component-entity design, but it had a huge hand in popularizing it. In short, everything in the game is an object and you can attach various components to each object, where each component controls some aspect of the object’s behavior and logic.

Widespread usage and documentation. To make the most of Unity, you’ll need to use C#. The good news is that Unity is so widely used—among hobbyist and veteran game developers alike—that you’ll find thousands of tutorials all across the web to help get you started. Unity itself also has numerous in-depth video series for newbies, and the provided documentation is excellent.

Interested in the coding aspect? Check out our introduction to Unity.

Create once, publish everywhere. Unity has the widest export support of any game engine: Windows, Mac, Linux, Android, iOS, HTML5, Facebook, all kinds of VR systems like Oculus Rift and Steam VR, as well as several gaming consoles like PlayStation 4, Xbox One, Nintendo Wii U, and Nintendo Switch.

Asset store. Want a minimap system in your game? Or how about a commercial-grade networking solution? Maybe you need 3D models, HUD graphics, and environmental textures? Or even a dialog system for your action-adventure RPG? You can acquire all of this and more on the Unity Asset Store, many of which are available for free.

Pricing. The Personal plan is completely free and doesn’t restrict any engine features, as long as you earn less than $100,000 in annual revenue from your games. The Plus plan is necessary up to $200,000 in annual revenue, and also unlocks the coveted “dark theme” for the editor. After that, you’ll need the Pro plan, which allows for unlimited revenue.

Download: Unity

4. Godot Engine

Supports 2D and 3D. Like Unity, Godot supports the creation of both 2D and 3D games. Unlike Unity, however, Godot’s support is far better. The 2D aspect of the engine was carefully designed from the start, which means better performance, fewer bugs, and a cleaner overall workflow.

Scene-based design. Godot’s approach to game architecture is unique in that everything is divided into scenes—but not the kind of “scene” you’re thinking of. In Godot, a scene is a collection of elements like sprites, sounds, and/or scripts. You can then combine multiple scenes into a bigger scene, and then those scenes into even bigger scenes. This hierarchical design approach makes it very easy to stay organized and modify individual elements whenever you want.

Custom scripting language. Godot uses a drag-and-drop system for maintaining scene elements, but each of those elements can be extended through the built-in scripting system, which uses a custom Python-like language called GDScript. It’s easy to learn and fun to use, so you should give it a try even if you have no coding experience.

Create once, publish everywhere. Godot can deploy to multiple platforms right out of the box, including Windows, Mac, Linux, Android, iOS, and HTML5. No extra purchases or licenses necessary, though some restrictions may apply (like needing to be on a Mac system to deploy a Mac binary).

Built-in advanced features. Godot iterates surprisingly quickly for a game engine. There is at least one major release every year, which explains how it has so many great features already: physics, post-processing, networking, all kinds of built-in editors, live debugging and hot reload, source control, and more.

Free and open source. Godot is the only tool on this list that’s actually free through and through. Because it’s licensed under the MIT License, you can use it however you want and sell the games you make without any restrictions. You can even download the engine’s source code and modify it! (The engine is coded in C++.)

Download: Godot Engine

5. Unreal Engine 4

Developed by industry masters. Of all the tools on this list, UE4 is the most professional. It was created from scratch by the geniuses behind the Unreal franchise—people who know what’s needed in a top-shelf engine and what it takes to deliver next-generation features. They know exactly what they’re doing.

Cutting-edge engine features. One of UE4’s driving principles is allowing you to iterate and develop as quickly as you can, so you get features like live debugging, hot reloading, a streamlined asset pipeline, instant game previews, plus hundreds of included assets and systems like artificial intelligence, cinematic tools, post-processing effects, and more.

No code necessary. The unique selling point of UE4 is its Blueprint system, which lets you create game logic without touching any code. It’s advanced enough that you can create entire games, even complex ones, without ever opening a source editor. But if you want to code your own Blueprints, you can do that too.

The best tutorials on the planet. The UE4 YouTube channel has over 800 videos that take you through every inch of the engine, and most of those videos are between 20 and 60 minutes long. That’s more content than you’d get from a semester-long course at university. If you need step-by-step guidance, UE4 has you covered.

Create once, publish everywhere. Starting to see a pattern here? All of the best engines allow seamless exporting to multiple platforms, and UE4 is no exception: Windows, Mac, Linux, Android, iOS, HTML5, PlayStation 4, Xbox One, Oculus VR, and more.

Pricing. As a free user, you get access to the entire engine (including source code). You only need to pay a 5% royalty on all revenues after the first $3,000 earned every quarter per game. In other words, you only start paying when your game succeeds.

Download: Unreal Engine 4

Other Notable Free Game Development Software

There are a handful of other game development tools that didn’t quite make the cut for Top 5 but are still worth checking out, especially if the ones listed above are too complex or simply aren’t what you’re looking for:

  • Defold (like a lightweight version of Unity, except using Lua rather than C#)
  • RPG Maker MV (if you want to create traditional 2D RPGs, scripted using JavaScript)
  • Cerberus X (great for creating 2D games, using a custom programming language)
  • Stencyl (very similar to Construct 3 in that it’s drag-and-drop only)
  • GDevelop (also drag-and-drop but not quite matured yet)

If you want to get serious about game development, you should really learn some programming. We recommend getting started with these fun programming games to build your skills and learn about how much money game programmers can earn.

Image Credit: Radachynskyi Serhii/Shutterstock

Read the full article: 5 Free Game Development Software Tools to Make Your Own Games


Read Full Article

5 Ways to Bypass Torrent Connection Blocking


There’s a worldwide war against torrents right now. Content-makers and copyright holders are trying their best to shut down access to torrent hosting websites. Some ISPs (Internet Service Providers) are under pressure to block all torrenting activity.

In a world where you don’t need to be a pirate anymore, blocking the illegal download of copyrighted works should no doubt be stopped. But blocking the act of torrenting, which can also have legitimate purposes, isn’t the right way to go about it. Here’s how you can bypass any torrent connection blocking initiatives.

Note: MakeUseOf doesn’t condone the illegal use of torrents. Using the following sites for illegal purposes is done entirely at your own risk. We assume no responsibility for any legal issues you may encounter.

A Simple Hack: Start on a Different Connection

WiFi Connection

The first workaround for blocked torrent connections is a simple hack. You’ll find yourself saying, “Why didn’t I think of this first?”

A lot of ISPs and network firewalls (like those at offices or universities) apply only basic blocks. This basic block is restricting the first point of connection to a site or torrent. So, to bypass it start your torrent on a different connection, like by tethering to your phone’s internet data. Once the torrent starts downloading, switch back to the “blocked” Wi-Fi and it will continue downloading.

This method doesn’t work if the firewall is a little more advanced, but you’ll be surprised how often that’s not the case. Try it out, you might have the easiest workaround with this hack.

1. Change the DNS Server to Unblock Websites

Often, the only block that your ISP implements is at the DNS level. The DNS, or Domain Name System, translates IP address numbers into website names. By default, you are using the DNS server controlled by your ISP. If you switch that to a public DNS, you will solve your problem.

The most popular free public DNS servers are:

  • Google DNS: 8.8.8.8 | 8.8.4.4
  • OpenDNS: 208.67.222.222 | 208.67.220.220
  • Comodo DNS: 8.26.56.26 | 8.20.247.20

You can change your DNS server in network settings, and you’ll soon be able to access all those blocked websites.

  • On Windows: Go to Network Device and right-click > Click Properties > IPv4 Properties, and then change the DNS servers and click OK.
  • On macOS: Go to System Preferences > Network > Advanced > DNS, and add the new DNS servers, and click OK.
  • On Linux: Click the Network applet > Edit Connections > Edit > IPv4 Settings > Automatic (DHCP) addresses only > DNS Servers, and add each new address separated by a comma.

2. Use a Free VPN to Unblock Websites

ProtonVPN Free Unlimited VPN

If you aren’t comfortable messing around with network settings, an alternative method to unblock websites is to use a VPN. A VPN, or virtual private network, masks your IP address’ origin. Basically, you are shown as accessing the internet from a different country, where that site isn’t blocked. And so you can see it.

For this, you can use a few reliable free VPN services, but they usually limit the monthly data download. There are a few other unlimited free VPNs, but they have their own hidden costs. Remember, we are only using this VPN to access blocked sites and download torrent files or magnet links. You shouldn’t actually download the whole torrent over such free VPNs.

I would recommend using ProtonVPN, since the company does not store any logs of what its users access, and is transparent about data-sharing requests from companies.

3. Use a Premium VPN to Download Torrents

Unblocking a website is the easy part. But some ISPs or institutional firewalls are more devious in their blocks. Your torrents simply won’t start on such networks. That’s when you need to bring out the big guns and use a paid VPN service for torrenting.

Paid VPNs have fewer restrictions and will usually encrypt your data too. They also don’t log your activity on the network. Set it up on your computer or on your router, and you can access and download torrents easily.

We recommend ExpressVPN and CyberGhost, both tried-and-tested services that are excellent for torrenting. Use this link to get three FREE months when you sign up for one year of ExpressVPN.

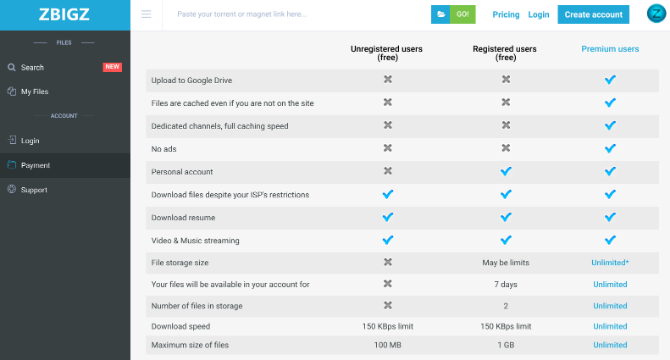
4. Use ZbigZ or a Premium Seedbox

ZbigZ is a free seedbox for downloading torrents

Seedboxes are the new big thing in the world of torrents. A Seedbox is a virtual server that lets you upload and download torrents. You can then download or upload torrents to your seedbox from your computer. Think of it as Dropbox for torrents.

Why are seedboxes popular? Seedboxes transfer data to your computer using the same method that any website transfers data to your computer. This means a network administrator cannot block a seedbox since that would mean blocking all web access.

Seedboxes are usually paid, but there is one popular free app called ZbigZ. The free account has some restrictions, like a 150 KBps download limit, 1GB maximum file size, two files in storage at any time, and a seven-day expiry.

Paid seedboxes do away with most of these limitations, or give different limits based on your plan. The easiest torrent-oriented seedboxes are RapidSeedbox and Seedbox.io. If you’re comfortable setting up your own virtual private server or VPS, then DediSeedbox and UltraSeedbox are the recommended options.

5. Use Port 80 (But It’s Slow)

Use Port 80

Unfortunately, some ISPs block ports and port-forwarding used by common torrent applications. If you don’t want to pay for a seedbox, you can use the same idea for free.

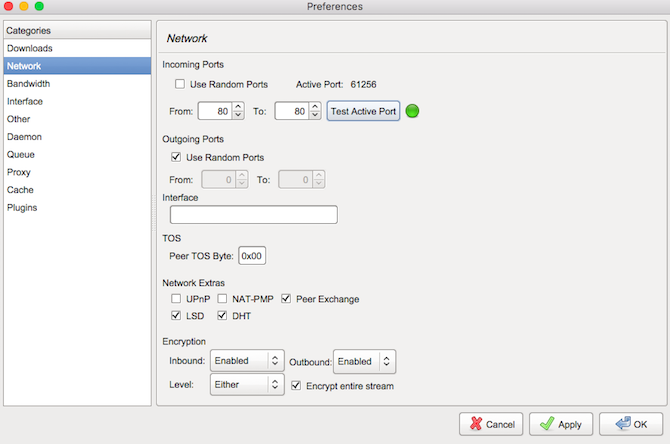
Port 80 is the default port for all HTTP data transfer, so it’s never blocked by network admins. All you need to do is set up your torrent application to use port 80 only.

Go to the application’s network preferences, and uncheck “Random Ports” first. Then set Port 80 as the port, and test to make sure it works. Finally, uncheck the boxes for UPnP and NAT-PMP, and you’re good to go.

Be warned, this will slow down torrent speeds drastically. It’s the slowest of all the options here, but hey, beggars can’t be choosers.

Your Choice of Torrent Client Matters

Torrents get a bad reputation because of how closely associated they are with piracy. But there are several legal uses for BitTorrent, from downloading ISOs of new operating systems to large video game updates.

But even if you are using torrents legally, you still need a good client. And no, that does not mean uTorrent. In fact, uTorrent has had a host of problems over the past few years, including security vulnerabilities, bloatware, and serving ads. Instead, go for one of these best torrent clients to replace uTorrent.

Read the full article: 5 Ways to Bypass Torrent Connection Blocking


Read Full Article

10 Exclusive F-Droid Apps You Can’t Get on Google Play Store

7 Nifty Tips for Getting the Most Out of Finder’s View Options on Mac


mac-finder-view-options

If you’ve stuck with the default layout or view that Finder on your Mac came with, you’re missing out. The app has three other useful views that work better in different contexts. Let’s take a closer look at them and at the default view.

We’ll discuss the benefits of Finder views and outline tips, tricks, and shortcuts to make the best of them.

1. The Icon View

icon-view-in-finder-on-mac

Finder starts you off with a grid-based layout of icons called the Icon view. This default view allows you to arrange icons in custom patterns by dragging and dropping them in place.

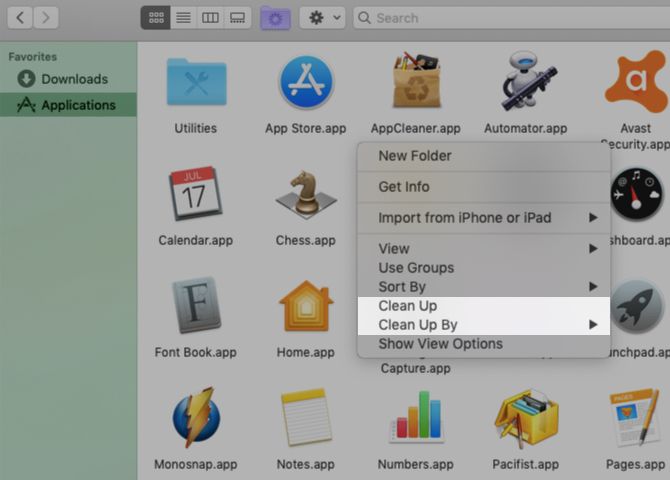
If the Icon view gets messy, you can clean it up quickly with the special context menu options that are unique to this view:

  • Clean Up: To snap misaligned icons to the nearest point in the grid without destroying the custom order in which you’ve arranged them.
  • Clean Up By: To align icons to the grid based on their name, size, tags, and so on.

context-menu-clean-up-options-in-finder-on-mac

The Icon view also helps when you want strong visual cues to identify Finder items. For example, in the Applications folder you likely find it easy to locate apps by their icons.

You can even switch to custom icons in Finder and change folder colors for better visual organization.

Now, let’s explore the three alternatives to Icon view.

2. The List View

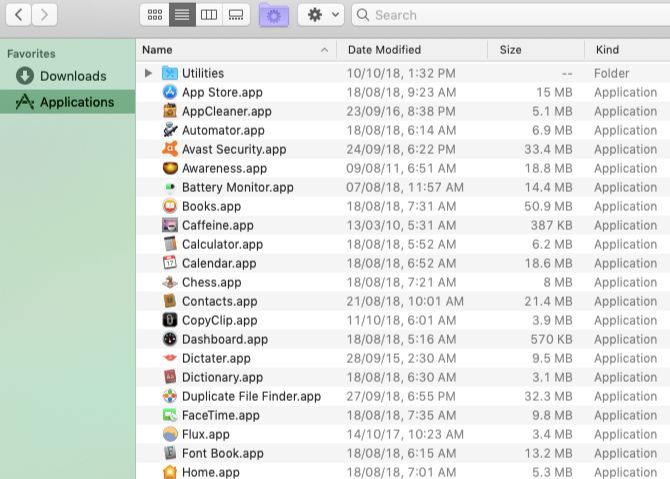
list-view-in-finder-on-mac

In the List view, Finder contents show up as a list, with various item attributes appearing in columns side-by-side. This view is ideal when you want more details about individual items aside from just their names and icons.

Each item’s size, kind, and date it was modified show up by default. You can display other file attribute columns (such as tags and comments) and also hide visible columns on the fly. All you have to do is Control-click the separator between column names and then click on the appropriate attribute to toggle it.

When you’re looking at a set of folders in the List view, you can expand a selected folder by hitting the Right Arrow key. To collapse the folder contents, press the Left Arrow key.

Now try this: select all folders in a set with the shortcut Cmd + A and then press the Right Arrow key. You’ll see that this expands all the folders together, allowing you to scan their contents at a glance. (Again, Left Arrow collapses them all.)

3. The Column View

column-view-in-finder-on-mac

Want to copy-paste files without opening separate tabs for the source and destination files? The Column view is perfect for that.

Here, you see items displayed within the Finder’s file hierarchy. As you move from column to column towards the right, you reveal the nested structure where the file, folder, or app actually lives.

If you want columns of equal sizes, hold down the Option key while resizing them. This helps cut down on the horizontal scrolling required when you’re dealing with a deeply nested folder structure. (The Option key trick is just one of the many tiny but useful macOS features you’ll want to know about.)

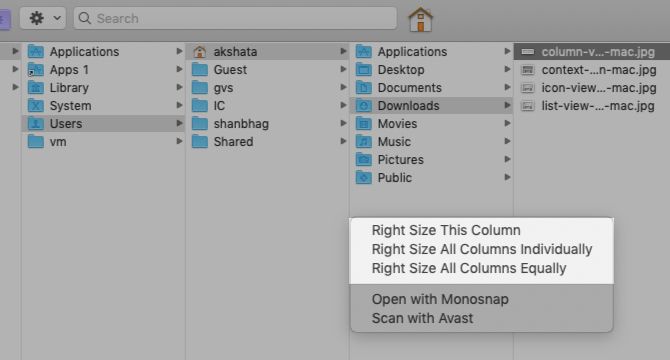
You’ll find a few more resizing options if you right-click on the separator between two columns.

context-menu-options-in-column-view-in-finder-on-mac

Another useful trick lets you scale a column to fit the longest file name. Just hold down the Option key and double-click on the separator after the column.

4. The Gallery View

gallery-view-in-finder-on-mac

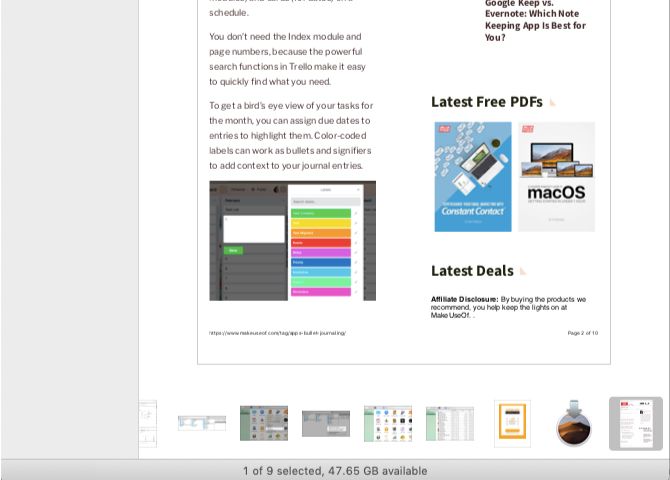
This view displays Finder items as a strip of thumbnails. The contents of the selected file show as a larger-sized thumbnail above the set of smaller ones. Since you can scrub through the gallery thumbnails, you’ll find it quite easy to pinpoint the files you’re looking for.

The Gallery view is helpful when you want to find the right images or documents without having to open them. It’s also faster than sifting through said items with the Quick Look preview feature.

If you haven’t updated to macOS Mojave, you’ll have a Cover Flow view instead of the Gallery view. This is similar to Gallery view, but it displays folder contents as a list and not as a set of thumbnails.

5. How to Switch Finder Views

toolbar-buttons-for-finder-views-on-mac

To jump between the four Finder layouts or views, you’ll have to use the set of four toolbar buttons located to the right of the Back/Forward buttons.

You can also click on the corresponding View menu options:

  • as Icons (Cmd + 1)
  • as List (Cmd + 2)
  • as Columns (Cmd + 3)
  • as Gallery (Cmd + 4)

Keep in mind that the Preview pane that displays information about a selected Finder item has nothing to do with any of the views. It stays put no matter which Finder view you switch to. If you want to turn off this pane, click on View > Hide Preview.

6. How to Customize a Finder View

Want to scale up the icon size in the Icon view or display larger thumbnails in the Gallery view?

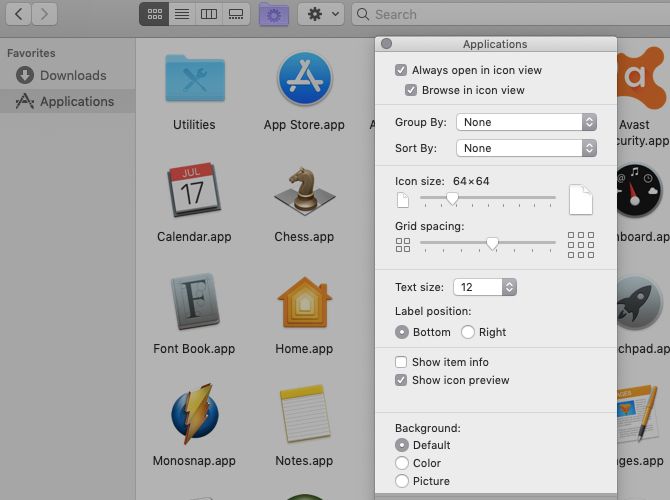
You can do that and more from the View Options panel. To bring up this panel, switch to the folder whose view you want to customize and click on View > Show View Options. For a quicker method, simply hit Cmd + J.

view-options-for-applications-folder-in-finder-on-mac

You should have no trouble tweaking the settings for any view, since the contents of the View Options panel are intuitive. To ensure that you’re editing the settings for the right folder, see that the title of the panel matches the folder name.

Keep in mind that the panel contents are mostly unique for each view. So you can, say, add a new background only in the Icon view or scale thumbnail sizes only in the Gallery view.

However, you’ll also find a few options in common for all views. One such option is Sort By. It lets you sort Finder contents by name, size, tags, etc.

This particular option comes in handy when the Clean Up and Clean Up By context-menu options in the Icon view go missing. Selecting Sort By > None either from the context menu or from the View Options panel brings back those missing options.

The second common setting across all views is Always open in [View Name] view. This checkbox sets the default view for that folder. If you want the subfolders to reflect the same view, you’ll also need to select the corresponding sub-option: Browse in [View Name] view.

Want a subfolder to use a different view instead of reflecting that of its parent folder? You’ll have to tweak the subfolder’s View Options panel separately to configure the Always open in [View Name] view option.

7. Use a Customized View Across Finder

Let’s say that you’re customizing the List view for a particular folder from its View Options panel. If you want these custom settings to apply to the List view across all folders in Finder, click on the Use as defaults button within the panel.

use-as-defaults-button-in-icon-view-in-finder-on-mac

There’s More to Finder Under the Surface

If you only use Finder as a basic file explorer, you’ll lose out on many useful elements hidden in the app. The special views we discussed above are a case in point. Then there are:

To get the best of Finder, we suggest a spot of exploring and customization. Begin with our starter tips for Finder and then move on to advanced tips like setting up smart folders.

Read the full article: 7 Nifty Tips for Getting the Most Out of Finder’s View Options on Mac


Read Full Article

7 DIY Computer Desk Projects That’ll Save You Money

How Much Data Does Streaming Video Use?


streaming-video-data-usage

Watching video is one of the primary ways that people eat through their allowance. So it makes sense to know how much data does streaming video use.

After all, for many people in the United States and beyond, internet data caps are a reality. Worse still, your internet service provider (ISP) can charge you an exorbitant amount of money per gigabyte if and when you go over your cap.

Knowing how much data streaming video uses should help to prevent any nasty surprises when you receive your next bill.

1. YouTube

Let’s start with YouTube. We’ve already covered how much data YouTube uses in a previous article. To sum up, we discovered that the service uses 562.5MB of data/hour if you stream at 480p resolution (standard definition).

If you want to watch higher resolutions at 60 frames-per-second, the figure jumps to 1.86GB/hour for 720p, 3.04GB/hour at 1080p, and a mammoth 15.98GB/hour if you want to watch videos in 4K.

Thankfully, we included some tips to help you reduce the amount of data YouTube uses in the same article.

2. Netflix

netflix data recommendations

Netflix is the world’s most popular streaming service by some distance. It has more than 130 million subscribers, many of whom don’t necessarily have high-speed internet.

Therefore, like YouTube, there are a number of different quality options available on the app.

According to Netflix’s own information, an hour of streaming video in standard definition will use approximately 1GB of data. Watching high definition video sees that number rise to 3GB. Ultra-high definition will use 7GB of data/hour.

By default, your account is set to automatically choose which resolution is most appropriate for your connection. However, if you’d like to save data while watching Netflix, you can override the setting. Go to Account > My Profile > Playback Settings to make your selection. Hit Save when you’re ready.

3. Amazon Prime Video

Amazon Prime is just one of many Amazon services. It went live in 2006 but only became a streaming service in 2011. Nonetheless, in just half a decade, it’s grown to become Netflix’s biggest competitor.

The service offers three resolutions to desktop users. They are Good, Better, and Best. Good streams videos at 480p standard definition and uses 800MB of data/hour. Better streams in HD and requires 2GB of data/hour. The ultra-high definition 4K option (Best) will consume 6GB of data/hour.

Mobile users also have a further Data Saver option.

Note: Watching Amazon Prime Video on the mobile app uses slightly less data than watching the same video via the desktop app.

4. Hulu

Hulu is arguably the third member of the video streaming triumvirate. Just like its rivals, Hulu offers some unmissable TV shows.

Hulu’s data usage while streaming video is slightly lower than Netflix and Amazon Prime Video, making it the most economical of the three.

On the standard definition option, you can expect to use 680MB/hour. The 720p high definition setting increases the figure to 1.3GB/hour, and the 1080p resolution increases the usage yet further to 2.7GB/hour.

If you sign up to Hulu’s $39.99/month plan, you can also stream live TV. Hulu only offers its live channels in 720p HD quality, so mobile users on capped plans should steer clear.

5. Spotify

Spotify is most well-known as a music streaming service. However, since mid-2016, it’s also offered a video service in selected markets.

Unfortunately, the company is not very forthcoming about how much data its video service uses. On its website, Spotify merely says “Videos use more data than music due to larger file sizes. But our data usage is comparable to other popular video channels.”

Most of the videos on the service are in high definition, so if we take Spotify’s claims at face value, we can assume an hour of streaming will use between 1.5GB and 3GB of data (based off data from Netflix et al.).

If you’d like to learn about how much data Spotify uses while streaming music, check out our previous article.

6. Vimeo

Like Spotify, Vimeo does not offer any official data usage guidance on its website. However, in third-party testing, one user found that standard definition content used 353MB of data/hour and HD videos used 2.75GB/hour.

7. Stan

Stan is only available in Australia and offers a mix of on-demand movies and TV shows.

The app offers four tiers of quality. The lowest standard definition setting only uses 570MB of data/hour, making it comparable with Netflix. The medium standard definition uses 1.13GB/hour, and the HD and 4K use 2.89GB/hour and 7GB/hour, respectively.

8. DirecTV

DirecTV is yet another company that doesn’t offer clear bandwidth usage information on its website.

Its guidelines simply say, “If your provider caps your bandwidth or data, change your video quality settings to low or medium.”

It’s safe to assume DirecTV’s data usage is in line with the other platforms we have discussed.

9. PlayStation Vue

PlayStation Vue’s guidelines are much clearer. It uses 500MB/hour on Low Quality, 1GB/hour on Medium Quality, and 2GB/hour on High Quality.

Since 2017, the service has also offered a native bandwidth cap. You can set it to your preferred limit and streaming will automatically cut off when the limit is hit.

10. Sling TV

For Sling TV, we once again need to turn to third-party research. According to Cord Cutters News, Sling TV’s highest quality streaming will use 1.66GB/hour. That drops to 540MB/hour on medium and 360MB/hour on low.

Keep an Eye on Your Monthly Data Cap

Going over your data cap could be disastrous for your bank account. If you’re lucky, your ISP will only throttle your speed. If you’re unlucky, it might charge you a sizable fee for every extra gigabyte over your limit you use.

We think it’s a shame that out of all the services we’ve discussed, only PlayStation Vue comes with a built-in bandwidth monitor. It should be something that all video streaming services offer as standard.

Thankfully, other companies are cottoning on to the need to help people keep an eye on their data usage. Learn more about how to monitor your data usage on Windows 10.

Read the full article: How Much Data Does Streaming Video Use?


Read Full Article

How to Spot Fake “Evil Twin” Public Wi-Fi Networks Run by Hackers


wifi-evil-twins

Whether you’re in an airport, in a coffee shop, or a library, free Wi-Fi is available almost everywhere these days. Unfortunately, not all free Wi-Fi networks are vigilantly protected when it comes to their IT security.

That Wi-Fi network you’re using could be open to security threats by hackers and cybercriminals, putting your personal information at risk. Here’s what you need to know about fake Wi-Fi networks.

Why Do Hackers Use Fake Wi-Fi Networks?

Starbucks Wi-Fi login page

Public Wi-Fi is often a target for Man in the Middle (MITM) attacks. According to SaferVPN, up to 25 percent of all public hotspots are used by hackers to access your personal information.

Besides taking advantage of any insecure Wi-Fi networks to steal your identity, two additional Wi-Fi vulnerabilities that hackers can use are Rogue Access Points (AP) and Evil Twins. These are seemingly genuine wireless networks created to trick potential victims into giving away their personal information.

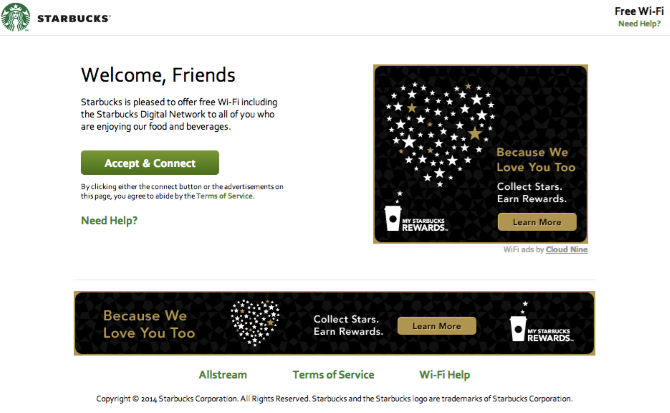
They can look and act as what you would expect from a real network. This includes using the same or similar name (think Starbucks Wi-fi versus Starbucks Free Wi-Fi), and the same login screen.

While connected to an insecure and unencrypted network, you are at minimum giving the hacker free access to anything you do while online. This includes grabbing any usernames, passwords and other personal information that you enter.

At most you’ll download a virus or malware and give them full access to your device even after you disconnect from the insecure “network”.

If you connect to a network where a credit card is required for access, like a hotel, or an airplane “pay per hour” network, the hacker will have copied your credit card info even before you start browsing. In short, any data you upload or download while on the hacker’s Wi-Fi is visible to them.

While there are other ways hackers can use public Wi-Fi to steal your identity, we’re going to focus on what Evil Twins and Rogue Access Points are, what to look for, and what you should do if you connect to one.

What Is a Rogue Access Point (AP)?

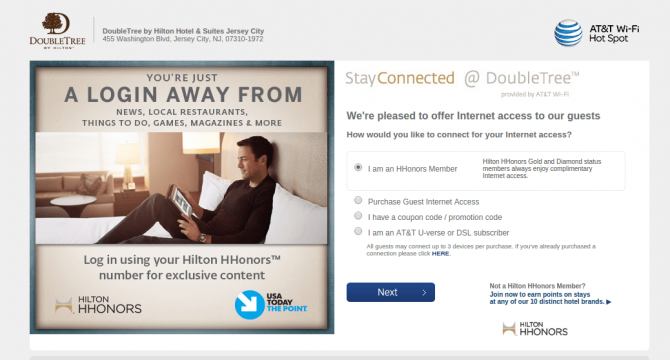
hilton wifi login screen

A Rogue AP, sometimes used interchangeably with Evil Twin, is an insecure device connected to a network unbeknownst to the owner. This device will broadcast its own Wi-Fi that will connect you to the genuine network created by the business.

It will seem like connecting to the Wi-Fi as normal, but your connection will go via the hacker’s access point instead of the intended secure device.

A hacker will usually combine this with a Denial of Service attack on the original access point to disable it, making theirs the only available signal.

Rogue Access Points are a massive security issue that threaten the security of all the connected users. Any network security features and firewalls that may be enabled on the network will not affect a Rogue APs access to your transmitted data.

A Rogue AP is difficult to spot as a user. However, if you’re worried that you might have any extra devices on your network, here’s how to find a rogue device on your network.

What Is an Evil Twin Wi-Fi Network?

An Evil Twin is technically a type of Rogue Access Point that can be set up with any phone or laptop with wireless capabilities. It differs in that it’s not strictly connected to the business’ Wi-Fi unknowingly. The hacker will set up a duplicate wireless network that also looks and acts the same way as the original network, down to using the same name and seemingly the same security features.

The signal of this Wi-Fi will usually overpower that of the real network, simply by being physically closer to the user. Again, a Denial of Service attack to knock out the original access point is not uncommon in this scenario.

Either way, this means that potential victims will connect to the hacker’s signal rather than the genuine network.

How to Spot an Evil Twin Wi-Fi Network

Unfortunately, in real life, evil twins don’t wear goatees to make them easy to identify. Don’t assume that because the name of the Wi-Fi is “Starbucks Free Wi-fi”, that it is secure, or even that it belongs to Starbucks.

Oddly enough, the easiest Evil Twins to spot can be those that are password protected. If you purposely enter the wrong password and you don’t get an error message, the access point is likely fake. An Evil Twins will commonly let anyone access it regardless of the password you enter.

Look out for very slow network connections. This could be a sign that the hacker is using mobile internet to connect you to the web.

Also, pay attention to the address bar of the websites you visit. If your banking website shows an unencrypted HTTP version instead of HTTPS, your connection is definitely unsafe. This is called SSL Stripping, and a hacker can get your passwords or banking details as you enter them.

It’s easy for a hacker to redirect you to a fake version of any website if you connect through their device, and this way, they can get your login details as soon as you enter them. Using a VPN will not protect you in these cases, as you are entering your information into the hacker’s own website.

However, make sure that the URL is correct, and look out for grammatical errors or language that you would not expect from the website.

Fake domains (often using misnamed addresses) are something you should watch out for when browsing in any situation, as they are one of many common social engineering threats you can face online.

How to Avoid Being a Victim of Public Wi-Fi Hacks

Always use a VPN, like our #1 ranked service ExpressVPN, on your tablet, phone, or laptop. There are VPN solutions for pretty much all devices, including your smartphones, tablets, laptops, desktops, and routers.

When accessing a public Wi-Fi, especially if you don’t have a VPN installed, keep to regular browsing. Avoid accessing any websites where you will input sensitive data, like Amazon or your online banking.

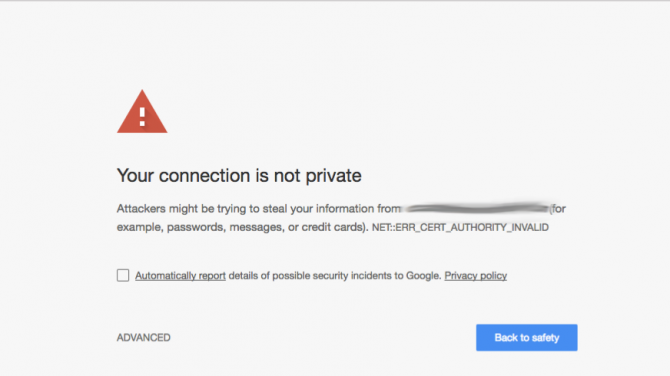
Look out for SSL certificate errors. Many browsers will let you know if you are accessing an insecure and unencrypted page. Make sure that you access encrypted versions of any website. Always check if the “Secure” notice in your address bar is green. In addition to a VPN, you should consider security extensions like HTTPS Everywhere.

If you do see a security certificate error, don’t ignore it. Instead, close the website, and look for other hints that you are on a suspicious network.

It might also be worth disabling your device’s “auto-connect to Wi-Fi” feature to prevent accidentally connecting to an illegitimate network.

Take care and follow these seven secure strategies to use public Wi-Fi safely on your phone.

What to Do If You Connect to an Evil Twin or Rogue AP

Even if you are vigilant, your phone might automatically connect you to an insecure network without you realizing. If you suspect that you have connected to a compromised network, follow these steps to reduce the potential consequences.

  • Disconnect as quickly as possible.
  • Clear your list of saved Wi-Fi connections, to avoid connecting to the same one in the future.
  • Clear your browser cache
  • Run antivirus and malware checks.
  • Change the password to any site you logged in to, and any other websites that use the same login information.
  • Call your bank and cancel any bank cards you used.

Any unencrypted network and public Wi-Fi can be targets for a MITM attack. In fact, the network doesn’t even need to belong to a hacker with criminal intent—any network set up without security in mind is vulnerable. So be careful out there, and always use a VPN  when you’re online!

Read the full article: How to Spot Fake “Evil Twin” Public Wi-Fi Networks Run by Hackers


Read Full Article

Google Maps takes on Facebook Pages with new ‘Follow’ feature for tracking businesses


Google Maps has been steadily rolling out new features to make its app more than just a way to find places and navigate to them. In recent months, it’s added things like group trip planningmusic controls, commuter tools, ETA sharing, personalized recommendations, and more. Now, it’s introducing a new way for users to follow their favorite businesses, as well – like restaurants, bars, or stores, for example – in order to stay on top of their news and updates.

If that sounds a lot like Google Maps’ own version of Facebook Pages, you’re right.

Explains the company, once you tap the new “follow” to track a business, you’ll then be able to see news from those places like their upcoming events, their offers, and other updates right in the “For You” tab on Google Maps.

Events, deals and photo-filled posts designed to encourage foot traffic? That definitely sounds like a Facebook Page competitor aimed at the brick-and-mortar crowd.

Businesses can also use the Google Maps platform to start reaching potential customers before they open to the public, Google notes.

After building a Business Profile using Google My Business which includes their opening date, the business will then be surfaced in users’ searches on mobile web and in the app, up to three months before their opening.

This profile will display the opening date in orange just below the business name, and users can save the business to one of their lists, if they choose. Users can also view all the other usual business information, like address, phone, website and photos.

The new “follow” feature will be accessible to the over 150 million places already on Google Maps, as well as the millions of users who are seeking them out.

The feature has been spotted in the wild for some time before Google’s official announcement this week, and is rolling out over the next few weeks, initially on Android.

The “For You” tab is currently available in limited markets, with more countries coming soon, says Google.


Read Full Article

Google Lens comes to Google Images for searching – and shopping – inside photos


Google this morning announced it’s bringing its A.I.-powered Lens technology to Google Image Search. The idea, explains the company, is to allow web searchers to learn more about what’s in a photo – including, in particular, items they may want to shop for and buy. For example, a photo of a well-decorated living room might have a sofa you like, but the photo itself wouldn’t have necessarily informed you who made the sofa or where it was for sale.

Google Lens – yes, acting very much like Pinterest – will now be able to help with that.

You’ll be able to tap on “dots” that appear within the photo, which designate items Google Lens has identified, or you can use your finger to “draw” around an object in the photo to trigger Google Images to search for related information. Google then searches across the web, including for other images, web pages, and even videos where this object may appear.

This isn’t just for shopping, of course. Google Lens can also be used to learn more about landmarks, animals, places you want to travel and more.

But Google naturally sees a good fit for Lens when it comes to directing users to products and, therefore, the websites of potential Google advertisers. This is the area where Pinterest has been steadily advancing.

Pinterest last month reported a 25 percent increase in monthly active users, as it gears up for its IPO. That means more people are starting their shopping journeys on its site, looking for purchase inspiration around things like fashion, home décor, travel, and other ideas. It’s also been beefing up its advertising product to further capture users’ interests and connect them with brands, having earlier this year added promoted videos to its ad products. 

And just a week ago, Pinterest announced it had rebuilt the infrastructure around product pins to make its site and app more “shoppable,” while reporting that tests of the changes had shown a 40 percent increase in visits to retailers’ site, as a result.

For these reasons – not to mention the looming threat of Facebook and Instagram ads sending users directly to retailers’ websites, and Amazon’s not insignificant entry into the advertising business – it’s clear that it was time for Google to leverage its own technology to help improve shopping and click-through rates for retailers on its site, as well.

Google says Lens in Images is now live on the mobile web for people in the U.S. searching in English, and will soon be rolled out to other countries, languages and Google Images locations.


Read Full Article
Europe’s parliament calls for full audit of Facebook in wake of breach scandal


The European Parliament has called for a full audit of Facebook following a string of data breach scandals —  including the Cambridge Analytica affair.

MEPs are urging the company to allow European Union bodies to carry out a full audit to assess data protection and security of users’ personal data, following the scandal in which the data of 87 million Facebook users was improperly obtained and misused.

In the resolution, adopted today, they have also recommended Facebook make additional changes to combat election interference — asserting the company has not just breached the trust of European users “but indeed EU law”.

We’ve reached out to the company for comment on the parliament’s resolution.

Earlier this month the EU parliament’s civil liberties committee adopted a similar resolution, calling for a full and independent audit of Facebook and for the company to make further changes to its platform.

The Libe committee also called for an update to EU competition rules to reflect what it dubs “the digital reality”, and investigation of what it called the “possible monopoly” of big tech social media platforms.

Commenting in a statement today, following the parliament’s vote, civil liberties committee chair Claude Moraes said: “This is a global issue, which has already affected our referenda and our elections. This resolution sets out the measures that are needed, including an independent audit of Facebook, an update to our competition rules, and additional measures to protect our elections. Action must be taken now, not just to restore trust in online platforms, but to protect citizens’ privacy and restore trust and confidence in our democratic systems.”

The resolution follows an appearance by Facebook’s founder Mark Zuckerberg in front of the EU parliament’s Conference of Presidents in May, and a series of parliament committee hearings including with Facebook staffers.

The EU’s tough new data protection framework, GDPR, only came into force this May — so the Cambridge Analytica breach is being handled under the bloc’s prior data protection framework, comprising a patchwork of Member State laws.

And earlier today a fine handed to Facebook for this breach by the UK data watchdog was upheld. The £500k penalty is the maximum possible fine under the country’s prior data protection regime.

In the new resolution, MEPs have suggested the data obtained by Cambridge Analytica may have been used for political purposes, by both sides in the UK referendum on membership of the EU and to target voters during the 2016 US presidential election — describing it as a matter of urgency that electoral laws be adapted to take account of digital campaigning. (Clearly with an eye on the upcoming EU elections, next May.)

To combat electoral meddling via social media, MEPs are proposing:

  • applying conventional “off-line” electoral safeguards online: rules on spending transparency and limits, respect for silence periods and equal treatment of candidates;
  • making it easy to recognise online political paid advertisements and the organisation behind them;
  • banning profiling for electoral purposes, including use of online behaviour that may reveal political preferences;
  • that social media platforms should label content shared by bots, speed up the process of removing fake accounts and work with independent fact-checkers and academia to tackle disinformation;
  • investigations should be carried out by member states with the support of Eurojust, into alleged misuse of the online political space by foreign forces.

In the UK a parliamentary committee also recently urged the government to prioritize updating electoral law to take account of digital risks to democratic processes. Although the government has so far only taken a cautious approach, saying it’s still gathering evidence via a series of reviews into different aspects of the issue.

Meanwhile Facebook has been rolling out its own system of checks on political advertisers in certain regions — including the UK.  Though MEPs evidently believe the company needs to go further.

The UK’s DPA also previously called for an ethical pause on political microtargeting via online platforms, saying it had a number of concerns about how data is being used and potentially misused.


Read Full Article
Xiaomi opts for sliding camera and no notch for new bezel-less Mi Mix phone


Xiaomi has announced the newest version of its bezel-less Mi Mix family, and it doesn’t sport a notch like its Mi 8 flagship. Indeed, unlike the Mi 8 — which I called one of Xiaomi’s most brazen Apple clones — there’s a lot more to get excited about.

The Mi Mix 3 was unveiled at an event in Beijing and, like its predecessor, Xiaomi boasts that it offers a full front screen. Rather than opting for the near-industry standard notch, Xiaomi has developed a slider that houses its front-facing camera. Vivo and Oppo have done similar using a motorized approach, but Xiaomi’s is magnetic while it can also be programmed for functions such as answering calls.

That array gives it a claimed 93.4 percent screen-to-body ratio and a full 6.4-inch 1080p AMOLED display. The slider, by the way, is good for 300,000 cycles, according to Xiaomi’s lab testing.

The device itself follows the much-lauded Mi Mix aesthetic with a Snapdragon 845 processor and up to 10GB in RAM (!) in the highest-end model. Xiaomi puts plenty of emphasis on cameras. The Mi Mix 3 includes four of them: a 24-megapixel front camera paired with a two-megapixel sensor and on the back, like the Mi 8, a dual camera array with two 12-megapixel cameras.

Xiaomi has also snuck an ‘AI button’ on the left side of the phone, a first for the company. That awakens its Xiao Ai voice assistant, but since it only supports Chinese don’t expect to see that on worldwide models.

The 10GB version — made in partnership with Palace Museum, located at the Forbidden City where the device was launched — also packs 256GB of onboard storage and is priced at RMB 4,999, or $720. That’s in addition to a ceramic design that Xiaomi says is inspired by the museum… better that than a fruity-sounding U.S. company.

That’s the special model, and the more affordable options include 6GB + 128GB for RMB 3,299 ($475), 8GB +128G for RMB 3,599 ($520) and 8GB + 256GB for RMB 3,999 ($575). The company also plans to introduce a 5G version in Europe sometime early next year.

Xiaomi said the phones will go on sale in China from 1 November, there’s no word on international availability or pricing right now.


Read Full Article