A blog about how-to, internet, social-networks, windows, linux, blogging, tips and tricks.
03 September 2018
Get Started With Image Recognition Using TensorFlow and Raspberry Pi

TensorFlow is Google’s Neural Network library. Given that machine learning is the hottest thing around currently, it is no surprise that Google are among the leaders in this new technology.
In this article, you will learn how to install TensorFlow on the Raspberry Pi, and run simple image classification on a pre-trained neural network.
Getting Started
To get started with image recognition, you will need a Raspberry Pi (any model will work) and an SD card with the Raspbian Stretch (9.0+) operating system (if you’re new to the Raspberry Pi, use our installation guide). Boot up the Pi and open a terminal window. Make sure your Pi is up to date, and check your Python version.
sudo apt-get update
python --version
python3 --version
You can use both Python 2.7 or Python 3.4+ for this tutorial. This example is for Python 3. For Python 2.7, replace Python3 with Python, and pip3 with pip throughout this tutorial.
Pip is a package manager for Python, usually installed as standard on Linux distributions. If you find you don’t have it, follow the install for Linux instructions in this article to install it.
Installing TensorFlow
Installing TensorFlow used to be quite a frustrating process, but a recent update makes it incredibly simple. While you can follow this tutorial without any prior knowledge, it might be worth understanding the basics of machine learning before trying it out.
Before installing TensorFlow, install the Atlas library.
sudo apt install libatlas-base-dev
Once that is finished install TensorFlow via pip3
pip3 install --user tensorflow
This will install TensorFlow for the logged in user. If you prefer to use a virtual environment, modify your code here to reflect this.
Testing TensorFlow
Once it has installed, you can test whether it is working with the TensorFlow equivalent of a Hello, world!
From the command line create a new Python script using nano or vim (If you aren’t sure which one to use, they both have advantages) and name it something easy to remember.
sudo nano tftest.py
Enter this code, provided by Google for testing TensorFlow:
import tensorflow as tf
hello = tf.constant('Hello, TensorFlow!')
sess = tf.Session()
print(sess.run(hello))
If you are using nano, exit by pressing Ctrl + X and save your file by typing Y when prompted.
Run the code from the terminal:
python3 tftest.py
You should see “Hello, TensorFlow” printed. If you are running Python 3.5, you will get several runtime warnings. The official TensorFlow tutorials acknowledge that this happens, and to ignore it.

It works! Now to do something interesting with TensorFlow.
Installing the Image Classifier
In the terminal, create a directory for the project in your home directory and navigate into it.
mkdir tf1
cd tf1
TensorFlow has a git repository with example models to try out. Clone the repository into the new directory:
git clone https://github.com/tensorflow/models.git
You want to use the image classification example, which can be found at models/tutorials/image/imagenet. Navigate to that folder now:
cd models/tutorials/image/imagenet
The standard image classifying script runs with a provided image of a panda:

To run the standard image classifier with the panda image provided enter:
python3 classify_image.py
This feeds an image of a panda to the neural network, which returns guesses as to what the image is with a value for its level of certainty.

As the output image shows, the neural net guessed correctly, with an almost 90 percent certainty. It also thought the image might contain an custard apple, but it was not very confident with that answer.
Using a Custom Image
The panda image proves that TensorFlow works, but that is perhaps unsurprising given it is the example the project provides. For a better test, you can give your own image to the neural net for classification. In this instance, you’ll be seeing if the TensorFlow neural net can identify George.

Meet George. George is a dinosaur. To feed this image (available in cropped form here) into the neural net, add arguments when running the script.
python3 classify_image.py --image_file=/home/pi/george.jpg
The image_file= following the script name allows the addition of any image by path. Lets see how this neural net did.

Not bad! While George is not a triceratops, the neural net classified the image as a dinosaur with a high degree of certainty when compared to the other options.
TensorFlow and Raspberry Pi, Ready to Go
This basic implementation of TensorFlow already has potential. This object recognition is happening on the Pi, and needs no internet connection to function. This means that with the addition of a Raspberry Pi camera module and a Raspberry Pi-suitable battery unit, the whole project could go portable.
Most tutorials only scratch the surface of a subject, but it has never been truer than in this case. Machine learning is an incredibly dense subject. One way to take your knowledge further would be by taking a dedicated course. In the meantime, get hands on with machine learning and the Raspberry Pi with these TensorFlow projects you can try yourself.
Read the full article: Get Started With Image Recognition Using TensorFlow and Raspberry Pi
Read Full Article
Network Drives at IFA 2018: What’s New and What’s Hot?

The were several new NAS systems on show at IFA 2018, along with updated versions of previous systems. Here is a rundown of what we saw.
Note: This article may be updated at a later date.
QNAP
TS-251B NAS

Price: Around $350
QNAP showcased it’s 2018 version of the TS-251B NAS system. Aimed at the home/home office market, the small NAS box has a few interesting features. Equipped with an Intel Celeron J3335 dual-core 2.0 GHz processor and a choice of 2GB or 4GB of RAM, its PCIe expansion slot adds a variety of extra functions.
Onboard LAN is 1 Gigabit with dual RJ34 ports, but this can extend to 10 Gigabits via the QM2 PCIe expansion card. This card serves a dual purpose, as it can also house extra storage. Alongside the two drive bays, further storage is available through an M.2 SSD PCIe expansion card. Some flexibility is available here as the card can contain up to 4 M.2 SSDs, or 2 SSDs with a 10 Gigabit LAN port. A Wi-Fi card is also available, though M.2 SSDs cannot be fitted in conjunction with it.
The modular feature set and small form factor of this NAS make it a good contender for a home NAS unit. It comes with an HDMI port, and while transcoding is not possible, it would make an excellent media center alongside all of the features expected of home and small office NAS systems.
Terra Master
F8-421

Price: Not Given
Terra Master showcased an eight-bay NAS system aimed at home and professional users alike. Featuring a Quad Core 1.5 GHz processor and 8GB of DDR4 RAM, it is capable of sustaining up to 96TB of storage (8 x 12 TB).
Alongside upgrading the number of drive bays, a software update was promised this month adding further functionality to the NAS with Docker along with other updates. Due to a new collaboration with Seagate, expect to see the Ironwolf drives sold in conjunction with Terra Master NAS systems in the future.
WD
My Passport Wireless SSD

Price: 250GB ($191.99), 500GB ($289.99), 1TB ($499.99), 2TB ($774.99)
WD’s new Passport Wireless SSD (available on Amazon) came about through collaboration with professional photographers. As a standalone portable NAS, the previous version had a standard HDD and was prone to failure in harsh environments. The SSD version is less susceptible to this problem, and a silicon protective casing is designed to protect the unit in the event of it being dropped.
Available in various disk sizes, it is a fully functional Linux-based NAS system with a 6400 mAh battery. Devices connect to the box wirelessly, with up to 8 simultaneous connections possible. A connection is also available via SD card slot (configurable for automatic transfer) and USB 3.0 slot.
The My Passport app also can integrate with the Adobe Cloud allowing for the direct transfer of media into a working environment quickly. Plex and Twonky can be used with it, though the small form factor and battery requirements mean no transcoding. A use case presented to us by a WD representative was for car journeys with children—setting it up as a portable streaming hotspot for cartoons. While possible, this device seems to shine for media use, with up to 10 hours of battery life claimed when used in conjunction with one device.
Designed as the child unit to WD’s larger home NAS solutions, it works intuitively with them, though it should work perfectly as a standalone mobile storage solution with 250GB/500GB, and 1/2TB versions available.
NAS at IFA 2018
While there was little wholly new or groundbreaking in NAS at IFA 2018, some great systems were on show for users ranging from home and small office systems, to large-scale business uses.
Read the full article: Network Drives at IFA 2018: What’s New and What’s Hot?
Read Full Article
Cameras at IFA 2018: What’s New and What’s Hot?

If you’re not into Instant Cameras, the big announcement at IFA may be a series of rumored full-frame mirrorless cameras from Canon and Panasonic. For those interested in actual announcements, the bombshell revelation was the Mint line of instant camera products.
Polaroid
Mint 2-in-1 Instant Camera

The new Polaroid Mint 2-in-1 Photo Printer takes Instant Camera portability to the next level. More so than other Instant Cameras, the Mint focuses on lighter weight, longer battery life, increased expandable storage size, and more. In fact, it can shoot 5o to 60 photos on a single battery charge and sport up to 256GB of expandable storage.
The biggest advantage, though, that the Mint 2-in-1 has over its competitors is its best-in-class portability. Not only is the Mint 2-in-1 sleek, it can also comfortably fit inside of a coat or pants pocket.
So how did Polaroid improve over last year’s products? The Polaroid Mint 2-in-1 combines wireless Bluetooth smartphone pairing, so if you want to print photos direct from an infinitely superior smartphone camera, you can.
However, the demonstration model did not, in any sense of the word, print instantly. Printing over Bluetooth causes a small amount of input lag, delaying photos by around 20 or 30 seconds. Not bad by any means, but perhaps not as instant as the product’s name would suggest.
The Mint 2-in-1 should cost $129 making it one of the most expensive Instant Cameras on today’s market.
Mint Printer

While the Mint 2-in-1 can shoot images and spit out physical photographs, the Polaroid Mint Printer more or less turns your infinitely better smartphone into an Instant Camera.
A point of confusion that readers might have is that the two devices (printer and 2-in-1) look almost identical, except that one includes a camera lens and costs more—$129 for the 2-in-1 and $99 for the photo printer.
Of the two devices, I’d say that the printer offers more value. Why would anyone want to take photos with a weaker quality camera sensor than what’s in their smartphone?
Panasonic
LX100 II
Panasonic may have officially announced the LX100 II at IFA, but there’s a rumor of another upcoming model scheduled for debut on September 25.
The LX100 II is more or less an incremental update on the fairly successful LX100. Like the LX100, it uses the Lumix’s Micro Four-Thirds sensor, which is—as the name suggests—a 4:3 aspect ratio sensor which is almost full-frame (but not). It improves on the previous camera sensor in terms of megapixels, going from 13MP to 17MP. A minor upgrade at best.
The real news will most likely come on September 25, just a few weeks after Canon’s highly anticipated full-frame mirrorless DSLR announcement. If true, Panasonic may attempt to counter Canon’s announcement with its own full-frame mirrorless Lumix model. However, keep in mind that these are all show-floor rumors and may be the product of overly vivid imaginations.
Kodak
PrintoMatic Instant Camera

The newest model of PrintoMatic camera doesn’t add much in terms of features, but it managed to stand out with its lower cost and good print quality. At its listed price of $69.99, the PrintoMatic offers similar features as the more expensive Polaroid Mint.
2018’s PrintoMatic adds a simple but appealing feature: a wider array of color options. Among these are the colors:
- Millennial Pink
- White
- Yellow
- Black
- Blue
I don’t know why Kodak rebadged pink as “Millennial Pink” while leaving their other colors with names as unoriginal as “Yellow” and “Blue,” but if you are a fan of the original PrintoMatic, the different colored models may impress you.
Insta360
Pro 2 360 Camera

The Insta360 360 camera is a professional-grade 360-degree camera capable of shooting 3D video in a complete circle.
A big issue with 360-degree 3D cameras is that they oftentimes unintentionally include the cameraman in the shot (because it shoots everything). The Insta360 is capable of removing the cameraman at up to 300-meters distance.
That’s extremely useful to professional filmmakers who don’t want to pay for digital cameraman removal in post-production.
What’s the Best Camera Announced at IFA 2018?
It’s a tossup between the PrintoMatic’s Millennial Pink color scheme or the Polaroid Mint Printer. If you forced me to choose between the two, I’ll come clean: the new camera revelations were overshadowed by the rumored announcement of full-frame mirrorless cameras from Canon and Panasonic. Look forward to them at Photokina 2018.
Read the full article: Cameras at IFA 2018: What’s New and What’s Hot?
Read Full Article
How to Use Smart Objects in Adobe Photoshop

Smart objects are an incredibly useful feature in Photoshop. They let you edit images and add filters without any loss of quality. However, they aren’t that well known.
Beginners may not even have heard of smart objects, and casual users might think they’re an advanced option beyond their capabilities In fact, everyone should make use of smart objects.
In this guide, we’ll show you how to get started using smart objects in Adobe Photoshop.
What Are Smart Objects?
A smart object is a special kind of layer that enables true non-destructive editing in Photoshop.
When you convert a normal layer into a smart object, the content of that original source layer gets saved separately—as a file-within-a-file. No matter how much you edit the smart object, the original source content remains untouched.

Smart objects can contain both raster and vector content, and work like normal layers. You can resize or transform them, apply filters or add adjustment layers. You’re also able to make selections and use masks.
What makes it even more useful is that you can access and edit the source content at any time, too. Just double-click the thumbnail image for the layer in the Layers panel.
Use Smart Objects for Non-Destructive Editing
Non-destructive editing is the main reason why you should use smart objects. You can scale, resize, and rotate them without any loss of quality.
Here’s how it works.
Open an image on a new layer. Use the Free Transform tool (Ctrl + T on Windows, or Cmd + T on Mac) to make the image smaller, then hit Enter to apply the change.
Now use Free Transform again to enlarge the image back to its original size. Notice how the image is now soft or pixellated.
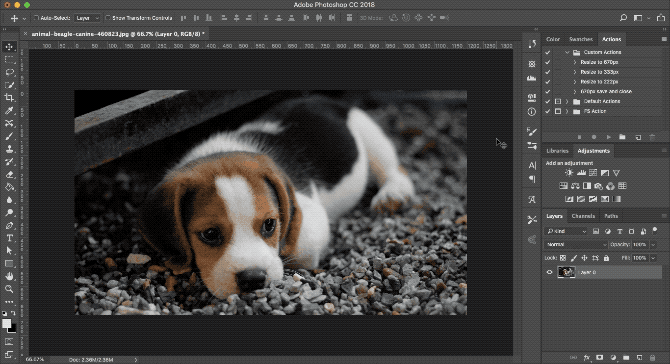
This happens because when you made the image smaller Photoshop threw away the extra detail that was no longer needed.
Now try this.
Reopen the original image. Right click on the layer in the Layers panel and selecting Convert to Smart Object. Now repeat the above steps, making the image smaller, then bigger again.
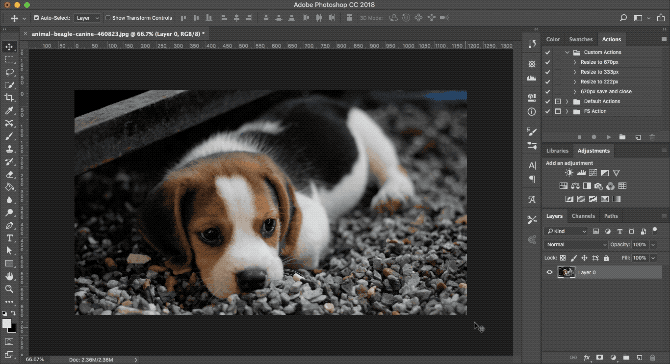
This time there’s no loss in quality. A smart object saves a copy of the original, unedited content so any changes you make are not permanent. You can even properly resize images fully without losing quality.
Edit Multiple Smart Objects Together
Often you’ll need to reuse the same picture, shape, or other object more than once in the same image. By turning it into a smart object you can edit multiple instances of that element in one go.
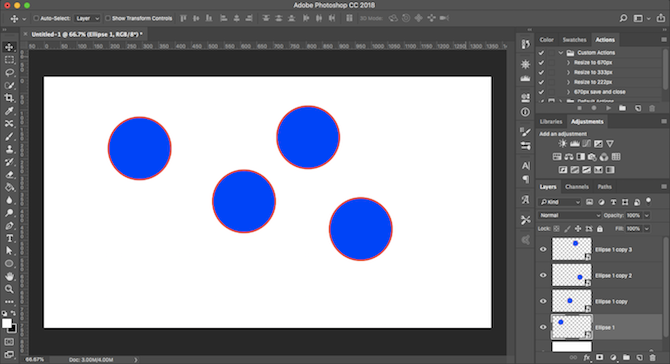
Highlight the layer containing the content you want to repeat, right-click, and select Convert to Smart Object.
Next, duplicate the layer several times by hitting Ctrl + J on Windows, or Cmd + J on Mac. This creates multiple copies of the same smart object, all tied to the same source content.
Use the Move tool (V) to reposition all your duplicated layers.

Now, for any one of the duplicated layers, double-click the thumbnail in the Layers panel. This will open the original source content in a new tab. Edit it, then save, and close the tab.
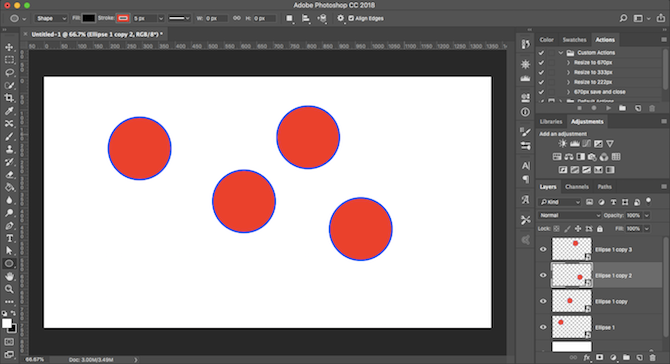
Back in your main file, all instances of the duplicated smart object will have been updated to reflect the changes you just made.
Edit Smart Objects Individually
You can, of course, use smart objects more than once but still edit them individually.
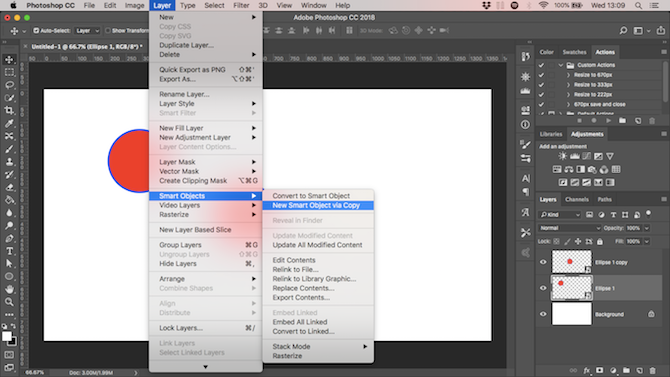
To do this, don’t duplicate the layer.
Instead, go to Layer > Smart Objects > New Smart Object via Copy. This creates a copy of both the smart object layer and the original source file.
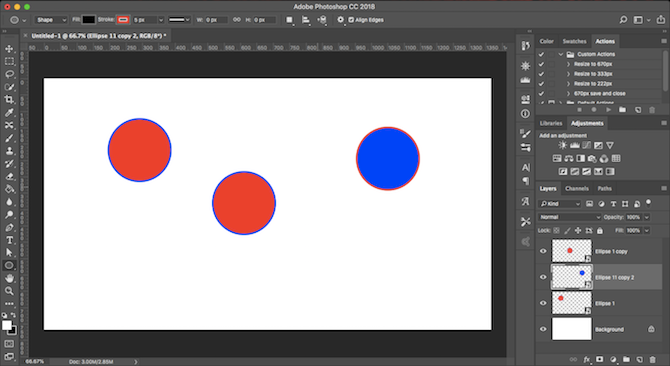
Use Linked Smart Objects Across Several Files
In most cases, a smart object uses content embedded in your image file. But you can also create smart objects linked to external files.
This allows you to reuse smart objects across several files and projects. Whenever you update the linked source image, all the files that share the smart object will also be updated.
Here’s an example.
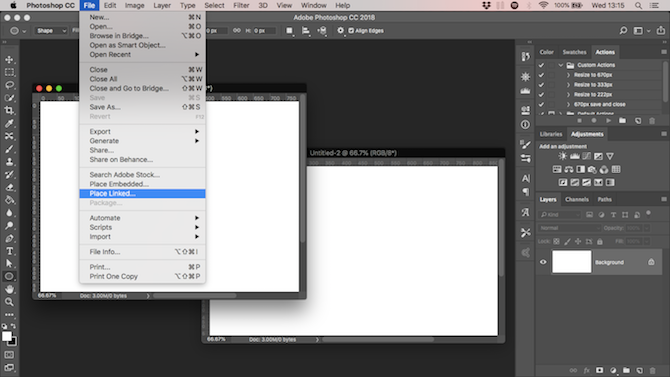
Go to File > Place Linked and select an image file from your desktop that you want to use as the basis for your smart object. This will open the image on your canvas as a smart object. Hit Enter to confirm.
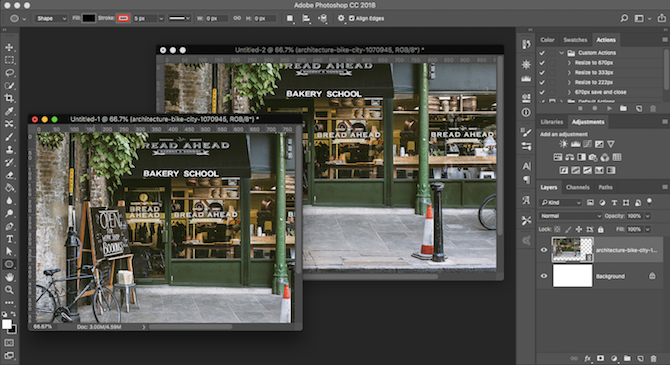
Create another file and do the same again, using the same source image. You should have two documents containing the same image.
Now open the external, linked source image, edit it, then save it. Both the files that link to this image will now be updated with the new changes.
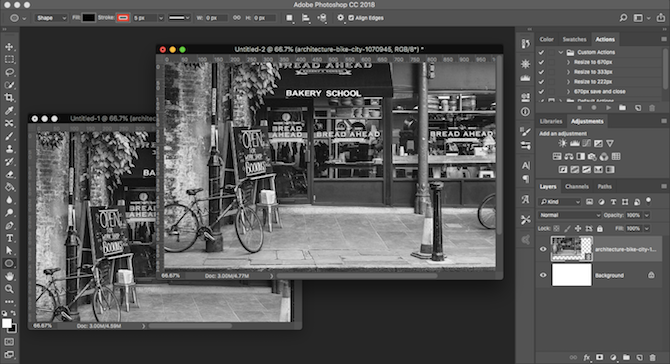
When you use this option, you need to take an extra step when saving your file. First, save it as normal. Then, go to File > Package then hit Choose to save both your Photoshop file and the linked image together in a folder. If you move or delete the linked image otherwise, your file will break.
Use Smart Filters
Smart objects give you a massive upgrade to Photoshop filters, turning them into smart filters.
Filters are normally quite heavy handed. You apply them, and if you don’t like the effect you have to undo it and try again.
Smart filters on smart objects are non-destructive. You can edit them at any time, and even hide or delete them if you no longer need them.

It’s simple to use. Turn your layer into a smart object then apply a filter in the normal way. Look in the layers panel, and you’ll see the filter listed below the smart object layer.
Double-click to edit it, or drag it onto the trashcan to remove it.
Mask Filters in Photoshop
Even better, you can mask smart filters to control where on your image they take effect.
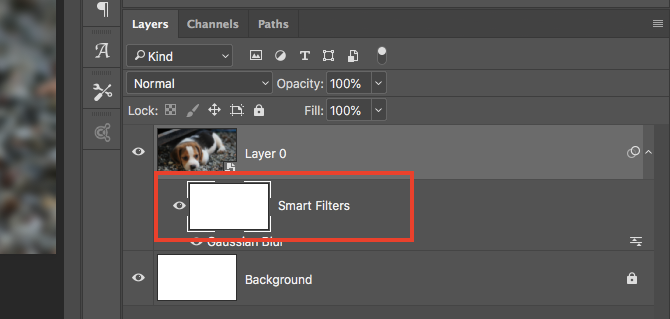
Smart filters have masks automatically applied to them. It’s the box above the filter in the layers panel. The mask is empty (white) by default. This means the filter effect is applied across the whole layer.
Click the mask thumbnail, select a brush, and set it to black. Now start painting over your image. The filter effect is removed from all of the black areas.
Set the brush to gray to make it partly visible.
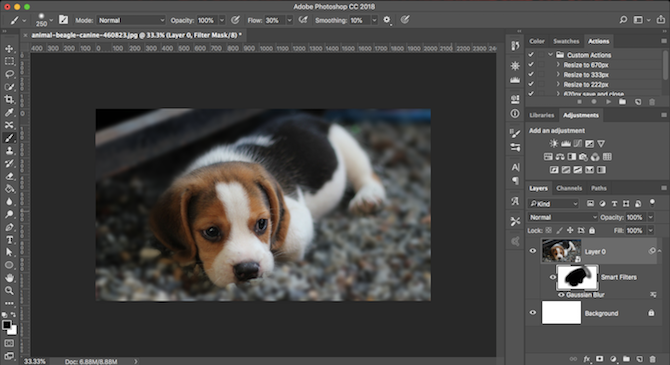
Masking filters like this enables you to create bokeh effects in portraits, or to selectively apply sharpening or noise reduction to specific areas of a photo.
Use Smart Objects to Create Templates
A final great reason to use smart objects is that they make it easy to create templates in Photoshop.
Just right-click on the smart object layer and select Replace Contents. Then select the new image that want to use as the source content.
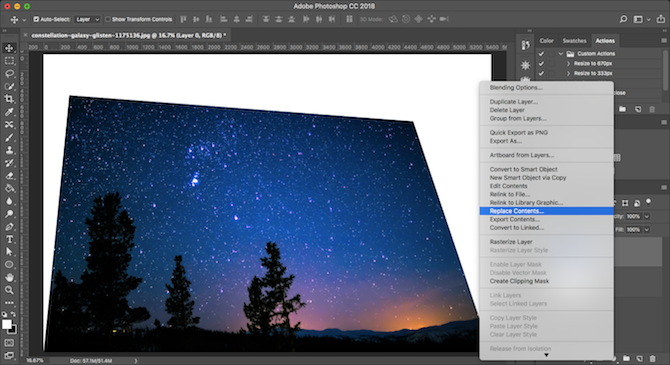
Why is this so useful?
Because if you’ve applied filters, or altered the shape of a layer, then the new source image for your smart object will retain these properties. This wouldn’t happen if you simply dropped in a new image onto a separate layer.
Downsides to Using Smart Objects
Smart objects are extremely useful, but they have a few downsides you need to know about.
First, files that contain smart objects are heavier. They’re larger and often require more system resources.
Second, they can also be more complex. If you’re using a lot of smart objects you need to label and group your layers properly to help stay organized.
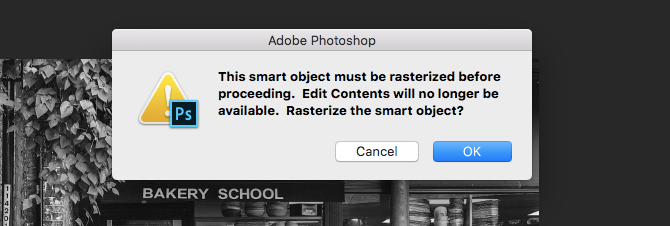
Third, smart objects are not directly editable. You can’t use things like the brush tool or clone stamp on one without converting it back to a raster layer, losing the benefits of smart objects in the process. Do this at Layer > Smart Objects > Rasterize.
Alternatively, you can directly edit the smart object’s source content. In most cases, this can be a better option.
The Next Steps
Smart objects are so useful, whether you use Photoshop for vector graphics or photo editing. And they’re easy enough to use that anyone—from beginners to pros—can benefit from using them.
As we’ve seen, one of their best uses is for adding filters to images. We’ve covered the basics in this article, but there’s a lot more you can do with them. Check out our guide on how to apply a smart filter to multiple layers to discover how you can take things to the next level.
Read the full article: How to Use Smart Objects in Adobe Photoshop
Read Full Article
7 Certified Data Science Courses to Upgrade Your Job Skills With Coursera

Looking to start a career path around data science? Why not get started with Coursera?
We’ve previously highlighted some of the best Coursera courses worth paying for. But if those were too broad for you, have a look at these excellent courses in data science.
What Is Data Science?
Just in case you’re not aware, we’ll briefly describe the field of data science so you have an idea of what these courses involve.
Data science, in a sentence, is a field that uses all sorts of methods to pull insights from data. This enables people to make better decisions.
With the explosion of big data and easier ways to collect data in large quantities than ever before, having data science around to process and make meaningful choices based on it is essential. These courses will introduce you to data science and help you branch out to a specific area that you’re interested in.
1. The Data Scientist’s Toolbox by Johns Hopkins University
The first course in the university’s data science specialization. It serves as an overview of what data scientists do and work with. You’ll learn the basics of how to turn data into information you can take action on, as well as technical tools used in other data science courses like R programming, git, and similar.
You won’t get into the nitty-gritty of data science just yet, but this serves as a valuable foundation for the tools of the trade.
2. Getting and Cleaning Data by Johns Hopkins University
As this course’s description says, before you can work with data, you need some data! Thus, this class focuses on ways to obtain some. You’ll learn how to grab data from the internet, databases, various APIs, and more.
Similarly, you’ll learn the essentials of data cleaning, the process of making your data neat so you can work with it more easily. By keeping your data in good shape, it becomes much easier to work with and more useful.
3. Machine Learning by Stanford
Machine learning, the process of making computers act without explicit programming, is huge today. The progress made in self-driving cars, automated web technologies, and similar fields has been fantastic, and machine learning powers them all.
It’s an important part of data science, making it a great Coursera course to take. You’ll get some practice working with machine learning techniques, how to apply them, and some best practices in the field. Interestingly, this course is taught by Andrew Ng, the co-founder of Coursera.
4. Introduction to Data Science in Python by University of Michigan
Python is a popular programming language for all sorts of purposes, so it’s no surprise to see it used in data science. This course, the first in a five-part Applied Data Science with Python Specialization set from the University of Michigan, looks at the basics of Python and data manipulation.
After this course, you’ll know how to clean and manipulate data in Python. It’s an intermediate-level course, so total newcomers to Python or statistics need not apply.
5. Google Cloud Platform Fundamentals: Core Infrastructure by Google Cloud
Google’s cloud technology is one of the front runners of data science, so why not learn from the best? This course is the first part of Google’s cloud platform specialization, and walks you through the basics of working with the various services. You’ll meet Google App Engine and Google Computer Engine, for starters.
It’s a great overview of the powerful services Google has at its disposal and will help you decide if you want to continue learning about them. Notably, this course has just one week of study, so you can complete it in roughly seven hours.
6. Inferential Statistics by University of Amsterdam
If you don’t have any experience with statistics, you might run into trouble understanding data science. In those cases, this course will provide you with some background on the field.
You’ll learn basic principles for testing specifics, then explore common statistical tests and how to interpret them.
7. Data Science Specialization by Johns Hopkins University
If you’re serious about data science, take a look at Coursera’s data science specialization. This is a nine-course introduction to the discipline, capped off by a real-world project.
Some of the above courses were taken from this specialization, so you can take them individually if you only have a passing interest in the subject. But working through the whole package enables you to learn much more, and you’ll have a valuable certificate upon completion.
This specialization takes about nine months to complete, with five hours of work per week. It’s intended for beginners and doesn’t require any background knowledge other than a basic working knowledge of Python.
Ready to Learn About Data Science?
We’ve highlighted six courses that cover different areas of the data scientist’s toolkit for you to explore on Coursera. If you want to go further, look into the Johns Hopkins specialization for much more on this topic.
Data science is an exciting field, and it will only continue to grow as technology becomes more powerful. Take advantage of Coursera‘s excellent (and affordable) courses now to get your career started!
Read the full article: 7 Certified Data Science Courses to Upgrade Your Job Skills With Coursera
Read Full Article
10 of the Best Travel Documentaries on Netflix

Maybe you’ve caught the travel bug. Maybe you have returned home from a big trip abroad and are wondering where to go next. Or maybe you’re an aspirational traveler who partakes in wanderlust, but from the comfort of your own sofa.
No matter what your motivations are, Netflix has you covered. In this article we list the best travel documentaries you can watch on Netflix right now. All of which are guaranteed to make you long for a week experiencing new sights and sounds.
1. Expedition Happiness
What is life’s purpose? To be happy? But how? In Expedition Happiness, a couple tries to find out. What is happiness after all? Is happiness a wedding? A loft overlooking a great view of the city’s chaos? A monotonous routine just to maintain a healthy bank balance?
After all, what is the point of living if you do not break the routine. Sit back and stream the Alaskan mountains to the Mexican beaches with the “Loft on Wheels” created by Mogli and Felix with their dog Rudi. Let your soul travel as these three try to figure out what happiness is.
Get to know the ups and downs of executing a moving residence, to make happiness out of an old school bus.
2. Stephen Fry in America
From genre-defining sketch comedy to drama, Stephen Fry has done it all (including providing the narration for some of the best audiobooks to listen to). In this documentary he packed himself into his trademark London black cab for a drive through America.
Along with the signature sense of humor, you also get to see a new side of Stephen Fry. The genuine curiosity that oozes out of every encounter Stephen has in the United States.
The main question on his mind? How is every American state united and how are they all different from one another? Hop into the black cab and let Stephen explain it all.
3. Somebody Feed Phil
This is hands down the most fun I’ve had watching a food and travel documentary. The way that Phil approaches new food, new places, and new people is a breath of fresh air.
He’ll take you to places you never thought of. Places you’ll end up adding to your bucket list. Here’s a glimpse into what I ended up adding to my list: coffee in Vietnam, vegetarian food in Israel, dragon fruit in Thailand, and hot dogs in Copenhagen, to name a few.
As Phil says, “If you like a dish, go to the source.” Get delighted, get amused, get amazed and definitely get hungry while somebody feeds Phil.
4. Dark Tourist
Not all travel has to be about the beautiful and the serene. If you’re in the market for a slightly twisted travel story, Dark Tourist is for you. David Farrier, a New Zealand based filmmaker and journalist travels around the world looking for unusual and often morbid tourist spots across the world.
This documentary explores a new phenomenon called Dark Tourism. This is where tourists intentionally travel to places associated with death and destruction. A war-torn country? Sure. A dangerous border crossing? Why not. A quick trip around radioactive environments? Don’t mind if I do.
5. National Parks Adventure
The U.S. National Parks Service is more than a 100 years old. That’s more than a century of protecting natural wilderness in the United States.
This breathtaking documentary by filmmaker Greg MacGillivray will make you want to go visit a national park right away. Between the beautiful montages is a story of three artists as they revisit Roosevelt and Muir’s camping trip, where the Parks Service began.
6. Anthony Bourdain: Parts Unknown
Anthony Bourdain revolutionized the food and travel documentary genre. And Parts Unknown is his magnum opus. Living life on the edge can be dangerous and one is not always willing to take that risk, yet some risks are worth taking in the name of food.
Ever had a food bucket list to fulfill? Then get into this ride along with Anthony Bourdain who takes you to the parts unknown just to eat. And maybe fall in love. With the food, the people, or life itself.
Eat hungrily and happily with Bourdain with a seemingly innumerable amount of delicacies that the world has to offer. Experience meal after meal from various countries as well as their political issues, while Bourdain feasts on food of all kinds.
7. Jack Whitehall: Travels With My Father
Father-son bonding is a different experience for everyone. When comedian Jack Whitehall was young, he and his father Michael never really had that.
Now, Whitehall wants to bring that spark back by taking a gap year and traveling with his father. Watch as this comedian trades the stand-up stage (the best stand-up comedy specials on Netflix) for a tuk-tuk in Thailand.
What better way to spend time with your parent than by going on a trip. But what happens when you have a slightly grumpy father and you are the overly energetic one? Quite a blast, actually, Watch as this father-son team gets into accidents, goes to odd places, and attempts to open up to one another.
8. The Moaning of Life
In this poignant series, Karl Pilkington takes on the herculean task of figuring out life itself and if he’s cut out for it, now that he’s turning 40.
Experience the reality of life itself with Karl as he tries to contemplate things he has never really given a second thought. Like the need for love, the secret of happiness, and, at the end, death itself.
There are questions about life itself, like why to get married, why to have children, or why do we need to travel? All with a dash of that infamous British humor.
9. Under an Arctic Sky
Who’s really in charge? Nature or humans? The answer may lay under an arctic sky.
Everyone takes meticulously planned trips, but have you ever felt adventurous enough to venture out into the storm and travel on? In this monumental documentary, photographer Chris Bukard and filmmaker Ben Weiland beautifully capture the wrath and serenity of nature.
With freezing temperatures, brutal storms, and three hours of daylight, Iceland is far from being the perfect surf trip. Set out with a brave crew to explore the unknown islands of the north in the midst of the worst storm the country has experience in the past 25 years.
10. Planet Earth II
Planet Earth II in 4K is a breathtaking look at the world we live in.
Experience our own planet all over again with the epic camerawork and cinematography. Live that experience in high definition, as we encounter the wildlife, flora, and fauna with which we coexist.
This documentary series reveals a different perspective of Earth, not only through marvelous cinematography but also with the understanding of nature.
Keep Going With Food Documentaries on Netflix
Travel and food go hand in hand. But what if you’re more of a foodie than a traveler? Now that you know what travel documentaries you should be watching on Netflix why not check out the best documentaries about food. The stories covered come from a pastry chef in New York and a Sushi chef in Japan, amongst others.
Read the full article: 10 of the Best Travel Documentaries on Netflix
Read Full Article
Skype rolls back its redesign by ditching stories, squiggles and over-the-top color
Just over a year after Skype introduced a colorful, Snapchat-inspired makeover which included its own version of “stories,” the company says it’s now going to refocus on simplicity – and it’s ditching stories along the way. The redesign had been met with a lot of backlash. Skype had clearly wanted to appeal to a more youthful demographic with its update, but in doing so, it cluttered the user experience with features no one had asked for or needed.
One of these was “Highlights,” a feature that was very much Skype’s own take on Snapchat’s or Instagram’s Stories. With Highlights, Skype users were able to swipe up to pull up their smartphone’s camera, then snap a photo or record a video that could be decorated with typed or handwritten text, as well as with Skype’s own set of stickers. This could then be shared with individual Skype users, groups, or posted to the Highlights section of the app.
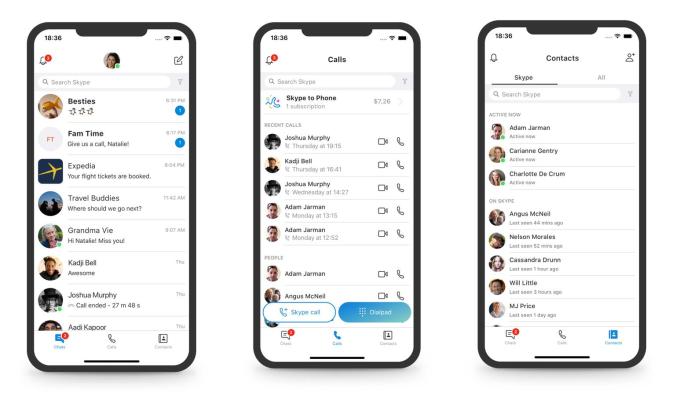
Above: Skype on mobile
The company had argued at the time that the rise of stories across social media meant it was something that all social apps would adopt. And because it was the way people were used to interacting now, Skype needed to include the feature in its own app, too.
But stories, as it turns out, may not be as ubiquitous or as in-demand as a “news feed” interface – there are places it makes sense, and those where it does not. Skype is the latter.
In its announcement, Microsoft admitted that the changes it had introduced weren’t working.
“Calling became harder to execute and Highlights didn’t resonate with a majority of users,” wrote Peter Skillman, Director of Design for Skype and Outlook.

Instead, the app is introducing a simpler navigation model where there are now just three buttons at the bottom of the mobile app – Chats, Calls, and Contacts. Highlights and Capture are both gone. (If you actually used Highlights, you have until September 30 to download them to save them before the feature is removed).
There were already some hints Microsoft was planning to dial back its design changes. It recently announced it was keeping Skype Classic (Skype 7) around for an extended period of time, after its plans to shut the app down was met with overwhelming user outcry. It said then that it would gather more feedback to find out what it is that people wanted before forcing the upgrade to Skype 8.0.
With the new desktop version of Skype, the company now says it’s moving the Chats, Calls, Contacts, and Notifications to the top left of the window to make it easier for long-time Skype users to understand.
Skype also toned down its over-the-top use of color in the app and introduced a Skype “Classic” blue theme adjusted for contrast and readability. It yanked out some of its goofier decorative elements, as well, like the notifications with a squiggle shape cut out, which it admits “weren’t core to getting things done.” (Ya think?)
Below: Squiggles

While it’s good that Skype is now listening to users – it says it’s testing new prototypes across global markets and it launched a UserVoice site – it’s concerning that it had not done enough listening beforehand. If it had, it wouldn’t have released a version of its app that bombed.
Skype should embrace its “classic” status, and not feel the need to play catch-up with teen chat apps like Snapchat, or social media trends like stories. People use Skype to get things done – calling faraway friends, placing work calls, and even recording podcasts. Being a simple and stable voice and video calling app is one that can retain loyal users over time, and attract those who need to communicate across platforms without all the fluff found elsewhere.
The latest design is available in Skype version (8.29) for Android, iOS, OS X, Linux, and Windows 7, 8 & 8.1 operating systems.
Read Full Article
UK media giants call for independent oversight of Facebook, YouTube, Twitter
The UK’s leading broadcasters and ISPs have called for the government to introduce independent regulatory oversight of social media content.
The group of media and broadband operators in the tightly regulated industries spans both the state-funded and commercial sector — with the letter to the Sunday Telegraph being inked with signatures from the leaders of the BBC, ITV, Channel 4, Sky, BT and TalkTalk.
They argue there’s an “urgent” need for independent oversight of social media, and counter suggestions that such a move would amount to censorship by pointing out that tech companies are already making choices about what to allow (or not) on their platforms.
They are argue independent oversight is necessary to ensure “accountability and transparency” over those decisions, writing: “There is an urgent need for independent scrutiny of the decisions taken, and greater transparency. This is not about censoring the internet, it is about making the most popular internet platforms safer, by ensuring there is accountability and transparency over the decisions these private companies are already taking.”
“We do not think it is realistic or appropriate to expect internet and social media companies to make all the judgment calls about what content is and is not acceptable, without any independent oversight,” they add.
Calls for regulation of social media platforms have been growing from multiple quarters and countries, and politicians clearly feel there is political capital to spend here. (Indeed, Trump’s latest online punchbag is Google.)
Yet policymakers the world over face the challenge of how to regulate platforms that have become so popular and therefore so powerful. (Germany legislated to regulate social media firms over hate speech takedowns last year but it’s in the vanguard of government action.)
The UK government has made a series of proposals around Internet safety in recent years, and the media & telco group argues this is a “golden opportunity” to act against what they describe as “all potential online harms” — further suggesting that “many of which are exacerbated by social media”.
The government is working on a white paper on Internet safety, and the Telegraph says potential interventions currently under private debate include the creation of a body along the lines of the UK’s Advertising Standards Authority (which reports to Ofcom), which it says could oversee Facebook, Google and Twitter to decide whether to remove material in response to complaints from users.
The newspaper adds that it is envisaged by proponents of this idea that such a regime would be voluntary but backed with the threat of a legislative crackdown if the online environment does not improve. (The EU has been taking this approach with hate speech takedowns.)
Commenting on the group’s letter, a government spokesperson told the Telegraph: “We have been clear that more needs to be done to tackle online harms. We are committed to further legislation.”
For their part, tech platforms claim they are platforms not publishers.
Yet their algorithms indisputably create hierarchies of information — which they also distribute at vast scale. At the same time they operate their own systems of community standards and content rules, which they enforce (typically imperfectly and inconsistently), via after-the-fact moderation.
The cracks in this facade are very evident — whether it’s a high profile failure such as the Kremlin-backed mass manipulation of Facebook’s platform or this smaller scale but no less telling individual moderation failure. There are very clearly severe limitations to the self-regulation the companies typically enjoy.
Meanwhile, the impacts of bad content decisions and moderation failures are increasingly visible — as a consequence of the the vast scale of (especially) Facebook and Google’s YouTube.
In the UK, a parliamentary committee which has been probing the impact of social media amplified disinformation on democracy recently recommended a third category be created to regulate tech giants that’s not necessarily either a platform or a publisher but which tightens their liabilities.
The committee’s first report, following a long and drama-packed enquiry this year (thanks to the Cambridge Analytica Facebook data misuse scandal), also called for social media firms to be taxed to pay for major investment in the UK’s data protection watchdog so it is better resourced to be able to police data-related malfeasance.
The committee also suggested there should be an education levy also raised off social media firms to pay for the digital literacy skills necessary for citizens to navigate all the stuff being amplified by their platforms.
In their letter to the Sunday Telegraph the group emphasizes their own investment in the UK, whether in the form of tax payments, original content creation or high-speed broadband infrastructure.
Whereas U.S. tech giants stand accused of making lower contributions to national coffers as a result of how they structure their businesses.
The typical tech firm response to tax-related critiques is to say they always pay the tax that is due. But technical compliance with the intricacies of tax law will do nothing to alleviate the reputational damage they could suffer if their businesses become widely perceived as leaching off (rather than contributing to) the nation state.
And that’s the political lever the media firms and ISPs look to be seeking to pull here.
We’ve reached out to Facebook, Twitter and Google for comment.
Read Full Article
5 macOS Folders You Should Never Touch (And Why)
macOS has a deep and nested folder structure, and a default macOS installation has many unfamiliar-sounding directories. The majority of users don’t ever need to touch these files.
Apple keeps certain folders hidden for a reason. Messing with these directories could result in an unstable system, loss of data, or worse—prevent your Mac from booting up. We’ll show you the places that most users shouldn’t touch in the macOS file system.
1. Language Files and Folders
Mac apps come with language files for every language they support. When you switch your Mac’s system language, the app will change to that language immediately.
To see the language files of an app, right-click it and choose Show Package Contents from the context menu. The path will look like this:
AppName.app/Contents/Resources/Lang.lproj
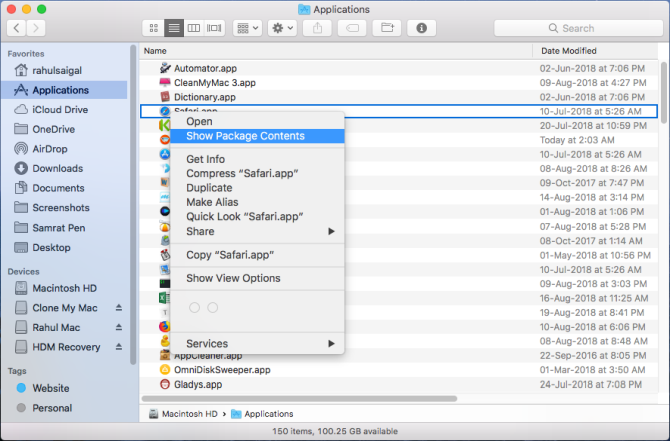
Removing the language files for third-party apps is easy through Terminal. But for the default macOS apps, you need to disable System Integrity Protection which we don’t recommend at all. Although there is a lot of advice on the internet recommending that you delete language files to gain disk space, the amount of space you earn is not significant enough for the risks involved.
A quick scan with CleanMyMac shows that my Mac will gain about 520MB of disk space by deleting these files. The result might be different in your case, but it’s highly unlikely that you’ll gain more than a few gigabytes. Also, you must redo these steps after every major macOS upgrade.
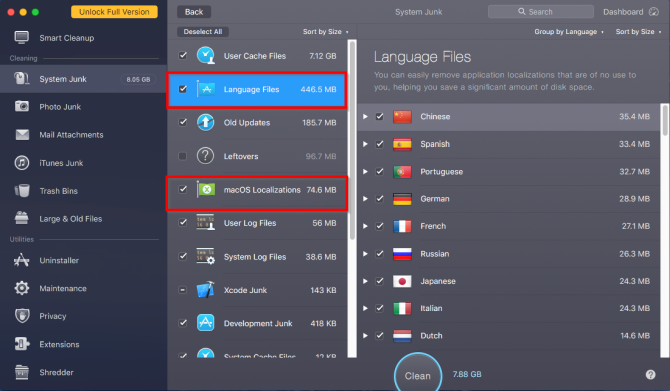
When you remove language files, you can’t predict which apps will crash or freeze. In the worst case, you’ll have to reinstall the app. Plus, old versions of programs like Microsoft Office and Adobe apps may not work properly or update. Therefore, it’s best to ignore the language files and folders.
Check out our tips for freeing up space on your Mac for better ways to do this.
2. Hidden /private/var Folder
macOS creates several user and system-related cache files to speed up the system. The cache and temporary data located in /Library/Caches is under your control. You can manually delete this cache without any third-party tools.
But the ones in the system folder are entirely managed by macOS. They’re not even visible to you. Sometimes items in these directories can take up vast amounts of disk space. Thus, you might wonder whether it’s safe to delete the contents of /private/var/folders or not.
Location of /private/var/folders
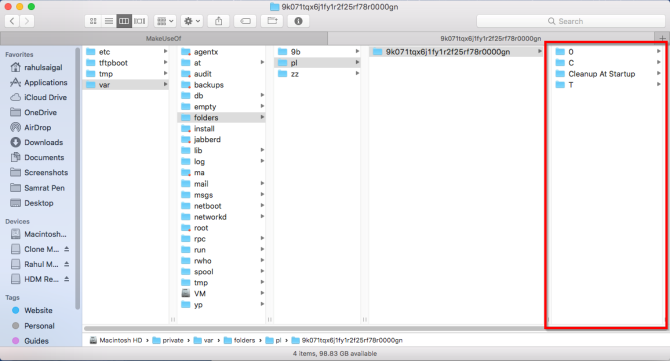
The simplest way to find the /private/var folder is through the Finder Go to Folder menu. Press Cmd + Shift + G to bring up the Go to Folder box and enter /private/var/folders. A new Finder tab will open immediately.
To open the location of system cached and temporary files, launch a Terminal window and type the following:
open $TMPDIR
You’ll see a two-character folder name with long, seemingly random subfolders. As you navigate the folder tree, explore these three folders. The C folder represents Cache, while T is for Temporary files. User files live in the 0 folder.
Issues With /private/var/folders
A quick scan with OmniDiskSweeper shows that the size of /private/var/folders is 1GB and that of /private/var is about 4GB. The size of these folders can vary between system, but shouldn’t be too large. If these directories take up more than 10GB, then they’re a concern.
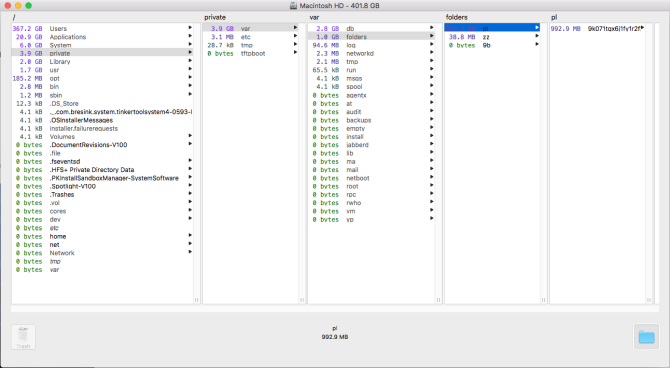
You should not attempt to manually delete files from any of the /private/var directories even if they’re large. Doing so might damage core macOS files, corrupt document data, and prevent your Mac from booting or behaving as expected. You’d then be stuck reinstalling macOS from scratch.
To safely remove these files, quit all apps, and choose Apple Menu > Shut Down. When you reboot your Mac, you trigger the built-in cache clearing mechanisms. This deletes the unnecessary contents, caches, and temporary items in /tmp, /private/var, and /private/var/folders.
If for some reasons these files don’t clear, then reboot your Mac in Safe Mode. macOS deploys additional built-in mechanisms to get rid of caches and temporary files in this mode. Then reboot into normal mode as usual and recheck your available disk space.
Other Important Folders in /private/var
Concerning disk space, there are few more folders which you should not touch:
- /private/var/db: Includes a bunch of macOS configuration and data files. They include Spotlight database, network configuration files, and more.
- /private/var/VM: Contains swap and sleep image files. If you hibernate your Mac, this directory will occupy more than 5GB of disk space.
- /private/var/tmp: Another temporary file directory.
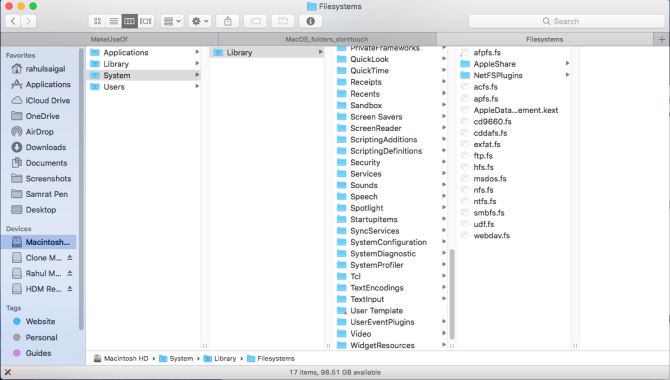
3. System Library Folder
The macOS filesystem contains multiple Library folders. This is by design, and while many similarities exist between the contents of the Library folders, each folder has a different role to play in the macOS filesystem. You’ll find three Library folders:
- /Library
- /System/Library
- ~/Library
The main and System Library folder have a global scope. Their contents support every aspect of the system. The System Library folder contains the files that macOS needs to operate. Only the OS has the right to modify its data, and only system-level events should affect them. There’s no reason for you to touch anything in this folder.
4. User Library Folder
The Library folder inside the home directory is your account’s personal Library. Here, macOS stores system, third-party support files, and preferences. It also includes Mail settings, Safari bookmarks, history, calendar data, and much more. The Library folder also include folders that need occasional cleaning. However, not all folders are safe to touch.
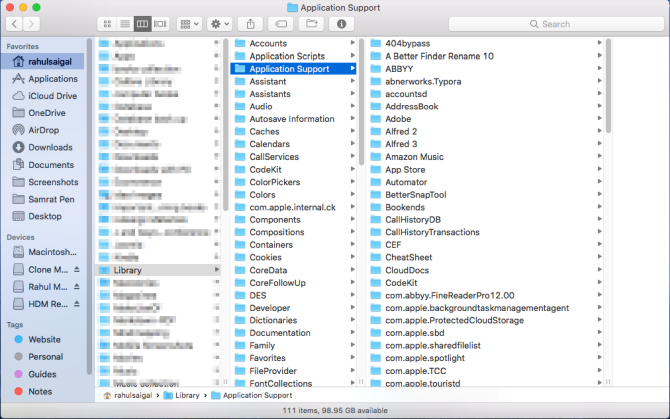
~/Library/Application Support
In this folder, both system and third-party apps store support files, usually in a subfolder named after the application. They contain registration data and even store saved app data used in a particular session. Do not delete contents of the Application Support files directly. Instead, use an app called AppCleaner to delete support files along with the app.
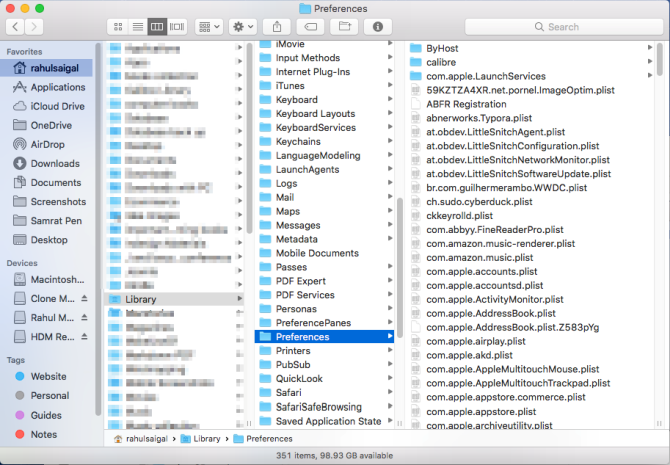
~/Library/Preferences
This folder contains all the preference data for default and third-party apps. Again, don’t delete the contents of the Preferences folder; otherwise an app will revert to its default state or might crash. AppCleaner will take care of preferences while uninstalling an app.
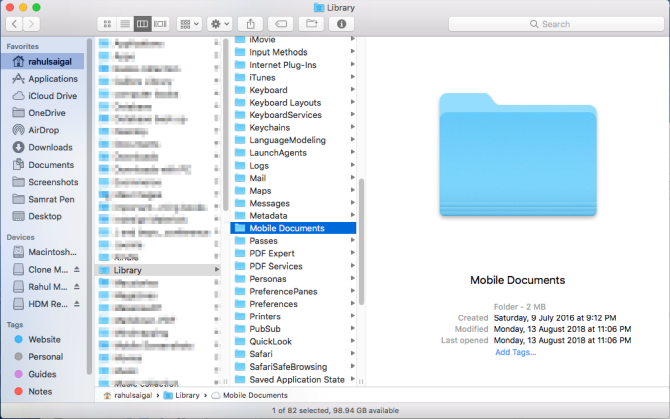
~/Library/Mobile Documents
This is the actual location of the iCloud folder. Documents, application preference files, iOS app data, and more lives in this folder. You should not move, rename, or delete it. It’s also a folder that takes up lot of disk space if you use iCloud. Delete the files you don’t need from iCloud Drive to reduce its size.
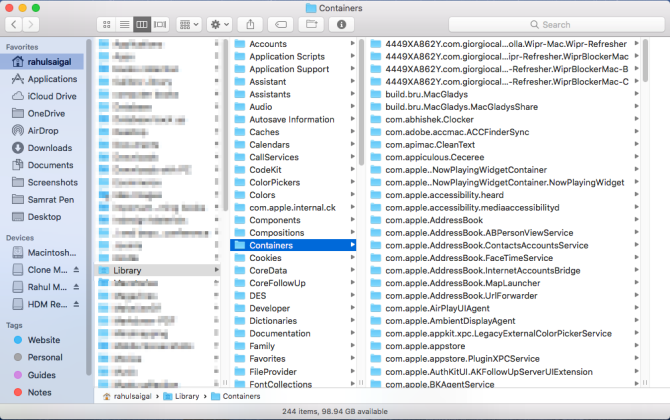
~/Library/Containers
This contains support files, cached data, and temporary files for apps you’ve download from the Mac App Store. Since apps on the App Store are sandboxed, they cannot write data anywhere on the system. Again, don’t delete the contents of this folder. If the Containers folder takes up lot of disk space, reinstall the affected app.
5. Hidden Folders in the Home Folder
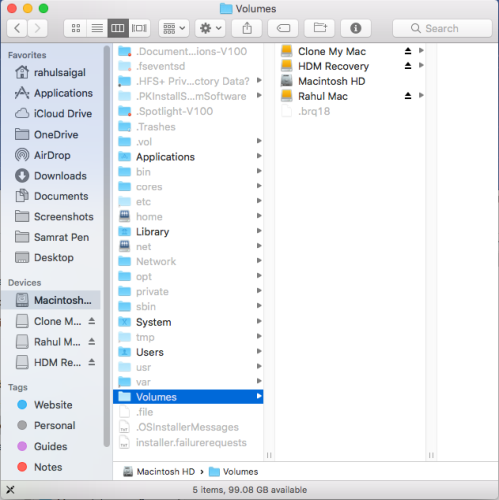
When you press the Cmd + Shift + Period keys in the Finder, you’ll see plenty of files and folders in the Home directory which are typically hidden from view. Different macOS technologies and apps store their data in these folders for the smooth working of your Mac. You should not modify or delete any of these folders:
- .Spotlight-V100: Spotlight metadata for each mounted volume. The mdworker processes use this metadata to update Spotlight search.
- .fseventsd: A log file of FSEvents logged by the fseventsd launchdaemon process. It monitors file system events, such as file creation, modification, deletion, and more. Time Machine uses this data to process backup in the background.
- .DocumentRevisions-V100: macOS versioning database used by apps to save and retrieve different versions of a document.
- .PKInstallSandboxManager: Used for software updates and sandboxing.
- .PKInstallSandboxManager-SystemSoftware: Used for system software updates.
- .Trashes: Trash folder in each mounted volume.
You Must Take a Backup
Messing with these folders is risky, as doing so might corrupt your apps, documents, and macOS. While most Mac users don’t have to worry about these folders, you might be tempted to start exploring these folders when disk space becomes an issue.
Having a backup is essential. If you lose any data, you can recover it relatively easily. If you don’t know how to back up, learn how to use Time Machine or check out some great alternatives to Time Machine.
Read the full article: 5 macOS Folders You Should Never Touch (And Why)
Read Full Article
