25 April 2020

How to Send Reminder Emails Based on Dates in Google Sheets


John Q Public runs a travel agency and they have thousands of clients across the globe. Other than managing tickets and travel itineraries, the agency also keeps a record of passports and visas of their clients to ensure that customers have valid documents at the time of travel.

Most countries require that a foreigner’s passport must be valid for at least six months from the date of entry. The US government, therefore, recommends that you renew your passport at least nine months before it expires.

Send Automatic Emails with Google Sheets

John’s agency is looking for a reminder system that will automatically send an email notification to their customers when their passports have expired or are due for renewal in the next few months. Let’s see how they can build such a workflow in 10 minutes with the help of Mail Merge for Gmail.

The idea is simple.

We have the customer data in a Google Sheet or a Microsoft Excel spreadsheet. The “Expiry Date” column in the spreadsheet contains the date when the passport is set to expire. We setup a cron job that runs in the background and monitors the expiry date. If any date in the sheet is less than, say, 12 months from today, an automatic email reminder is sent to the customer.

Create the Reminder Email Workflow

To get started, install the Mail Merge for Gmail add-on for Google Sheets. If you have never used the merge add-on earlier, please watch the Mail Merge tutorial for a quick overview.

Email Reminders Sheet

Next, create a new Google Sheet and choose Addons > Mail Merge with Attachments > Create Merge Template. If you have your customer data in an Excel sheet, you can easily import the records into this Google sheet using the File > Import menu.

Next, we’ll use the Array Formulas to populate the Scheduled Date column based on the date in the Expiry Date column. Go to row #2 of the scheduled date column and paste this formula:

=ArrayFormula(IF(ISBLANK(E2:E),"",E2:E-365))

The date in the Scheduled Date column will automatically be filled with a date that is 12 months before the date in the Expiry Date column. Thus if the passport expiration date is set to July 12, 2021, the follow-up reminder email would be sent exactly a year earlier on July 12, 2020.

Reminder Dates

Open the Gmail website, compose a new email message that will be the reminder template and save it in your drafts folder. The email body and subject can include column titles, enclosed inside double-curly braces and these will be replaced with actual values from the Google Sheet when the email is sent.

Auto Expiry Reminder Email

Here’s how are sample reminder email template looks like. You can also include emojis, images, and file attachments in your email drafts.

Automatic Email Reminder

Now that our customer data is ready to be merged, go to the Addons menu in the sheet and choose Configure Mail Merge.

Here follow the step-by-step wizard to add your sender’s name and also specify addresses that you wish to CC/BCC in every merged message.

In the Create Email Template section, choose “Use a Gmail Draft” and select the draft template that you’ve created in the previous step.

Send Date-based Reminder Emails

Expand the “Send Email Campaign” section and choose “Send a Test Email” to preview your message before it gets sent to external users. If all looks good, choose “Run Mail Merge” and hit “Go”.

That’s it. Mail Merge will setup a background task that will continuously run in the background and whenever a passport is due to expire, an email reminder is automatically sent to the client based on the date in the Scheduled Date column.

Send Reminder Emails

You can check the “Mail Merge Logs” sheet to track progress and a copy of all emails will also be saved in your Gmail Sent Items folder.

The reminder emails are sent based on the timezone of your spreadsheet. If you would like to send emails in a different timezone, go to the File menu inside Google Sheet, choose Spreadsheet Settings and update the timezone.

You can also make use of Filters in Google Sheets to send automatic emails to rows that meet specific criteria - when the country is “India” or when a cell value contains “Follow-up” and so on.

The same date-based workflow can be utilized to automate email sending in multiple scenarios like sending personalized wishes on birthdays and anniversaries, domain renewal reminders, fee payment reminders, appointments and more.

See the Mail Merge section for help.


How to Suspend a Google Script to Avoid Limits


Google Script imposes quotas around different services. If your script exceeds the specified quota, it throws an exception and terminates execution until the quota is reset.

For instance, a Google Script can read 20,000 email messages from Gmail per 24 hours before it throws an exception like Service invoked too many times.

The Save Gmail addon downloads email messages from Gmail and writes them as PDF files to your Google Drive. It uses a time-based trigger to run the script in the background or a user can manually run the app to download emails.

If a user’s Gmail account has a large number of emails and they try to run the script too frequently, it could exceed the quota and the trigger may fail. It thus help to have some sort of checks in the script that will temporarily pause the script execution if a known exception if thrown.

const suspend = (timeInMinutes = 60) => {
  CacheService.getScriptCache().put('SUSPEND', Date.now(), timeInMinutes * 60);
};

const isSuspended = () => {
  return CacheService.getScriptCache().get('SUSPEND');
};

We are using the CacheService of Google Script to track if a script has been suspended.

The expiry time is set to 60 minutes so the script will automatically resume execution once the cache value has expired.

In the main app, we add a try catch block that parses the exception message. It the message matches one of the known errors - like Service using too much computer time for one day or Service invoked too many times - we pause the script for 60 minutes.

const app = () => {
  try {
    // download emails
  } catch ({ message }) {
    if (/Service invoked too many times/.test(message)) {
      suspend(60);
    }
  }
};

const hourlyTrigger = () => {
  if (!isSuspended()) {
    app();
  }
};

The next time our hourlyTrigger is invoked, it will run the main app only if the Google Script is not in suspended state. As we are using the Cache Service here, the suspended state is automatically reset when the cache expires.


Samson Satellite USB Microphone: No Standout Features, But a Solid Bargain


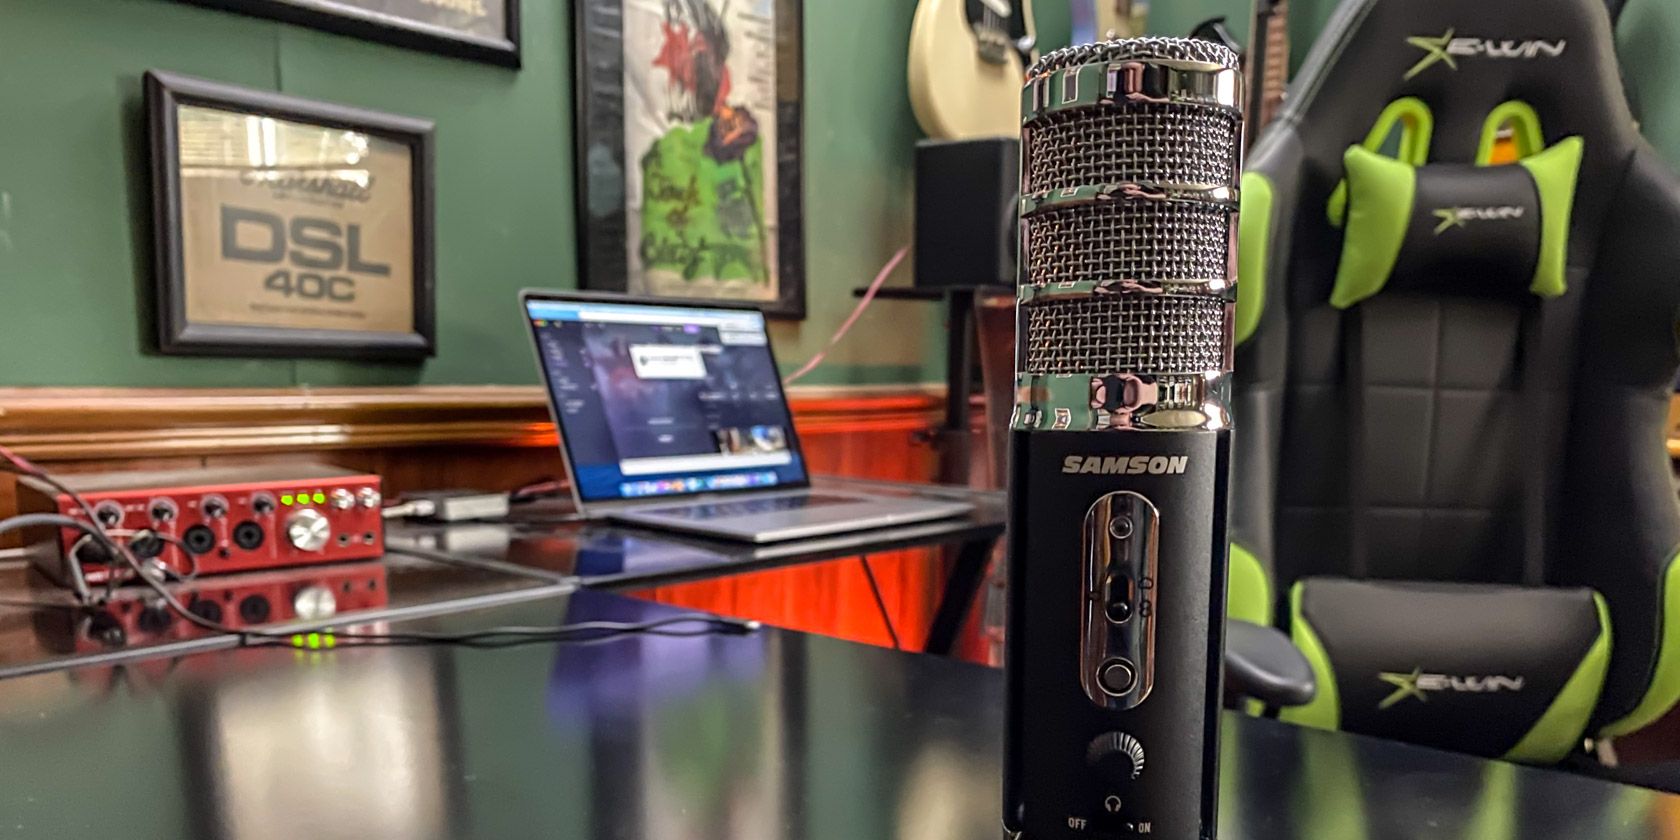
samson satellite usb desk mic
Our verdict of the Samson Satellite:
The Samson Satellite doesn't bring anything new to the desktop USB microphone. That said, it provides useful features at a lower price than its competitors.
710

When you think of portable USB microphones, a few names probably come to mind. Rode and Blue are both popular options, while Samson may not ring a bell. But it turns out that Samson has been manufacturing audio products since the 1980s.

The Samson Satellite is the company’s latest portable USB microphone, aimed at streamers, podcasters, and other digital broadcasters. It has a lot in common with some of its competitors’ offerings, but it also packs a few of their tricks up its sleeve at a lower price. These may just make it your new go-to choice for recording on the run.

What’s in the Box?

Samson Satellite box and contents

Opening up the Samson Satellite, you’re not going to find much you wouldn’t expect. The microphone itself occupies the majority of the box, but it’s not the only thing inside. You also get a small manual as well as a few accessories.

The Satellite includes not one but two cables. One is a standard micro USB cable with a standard-sized USB connector on the other end for plugging into a computer. The other cable has the micro USB on one end and a Lightning connector on the other for connecting to an iPhone or iPad.

Specifications

Samson Satellite USB/iOS Broadcast Microphone for Recording, Podcasting and Streaming (SASAT) Samson Satellite USB/iOS Broadcast Microphone for Recording, Podcasting and Streaming (SASAT) Buy Now On Amazon $99.99
  • Element Type: Electret condenser
  • Polar Patterns: Cardioid, Bidirectional (Figure-8), Omnidirectional
  • Frequency Range: 20Hz–20kHz
  • Max. SPL: 135dB SPL at 200Hz
  • Bit Depth/Sample Rate: 24-bit/up to 96kHz
  • Digital Output: USB
  • Headphone Output/Impedance: 1/8″ (3.5mm)/32?
  • Headphone Power Output: Minimum 38mW @ 32?
  • Controls: Polar Pattern, Mute, Headphone Volume, Monitor On/Off
  • LED: 3-color Power/Clip/Mute
  • Dimensions: 8.6″ (218mm) x 4.3″ (108mm) x 1.7″ diameter (45mm diameter)
  • Weight: 0.75lb (0.34kg)

Features

The Satellite's built-in stand

One of the main features that the Samson Satellite boasts that you’ll normally only find in more expensive microphones is multiple polar pickup patterns. The microphone has a standard directional mode, known as cardioid, that works as most microphones do: it picks up what is directly in front of it. The two other modes are where things get more interesting.

One of the Satellite’s other two modes is the figure-8 or bidirectional pattern. If you’re directly in front of the mic, it will pick your voice up the same way, but it will also pick up sound in the opposite direction. This is great for a two-person recording with each of you sitting on the opposite sides of a table, for example.

The final pickup pattern is omnidirectional. As the name implies, this picks up sound all around the microphone. If you’re recording more than two people, this is the ideal way to make sure everyone is heard.

No matter which pickup pattern you’re using, you can monitor the input using the built-in headphone jack. This is important because it enables zero-latency monitoring. You could monitor through your Digital Audio Workstation (DAW) or however you’re recording, but this often adds latency, which can make listening difficult. The only other button is a touch-based mute control, letting you easily cut the audio.

Finally, as you may have guessed from the inclusion of a Lightning cable, the Satellite supports iOS devices. The microphone is fully USB Class Compliant, so it will work with any recording software or DAW on your iPad or iPhone.

Who is the Samson Satellite For?

The Satellite in use

Despite its multiple pickup patterns, the Samson Satellite isn’t a microphone aimed at musicians. The lack of a traditional XLR connector for interfacing with audio gear like mixers and mic preamps is your first clue. Can you use it for recording vocals and instruments? Sure, but you might not get the results you expect.

As Samson indicates on its website, the Satellite is meant more for the spoken word. If you’re looking for a microphone to record a podcast, this is the ideal mic for you. While Samson also mentions streamers, you might find you need a longer cable than the included model if you’re looking to attach the microphone to a desk-mounted boom arm as many streamers use.

The multiple pickup patterns make this ideal for multi-person podcasts with just one mic. We’ll look at the quality later, but it’s nice to have this as an option for recording a group with just one mic.

Build Quality and Design

The Satellite in use

Cheaper microphones usually mean cheaper materials and as a result, cheaper look and feel. That isn’t the case for the Samson Satellite. Constructed out of solid metal, the Samson feels like it can easily stand up to the rigors of regular use. The metal build also means it’s heavier, which makes it far less likely to fall over.

Of course, using the built-in stand, the mic wouldn’t be that likely to fall over in the first place. Three legs fold into the body when not in use, allowing you to attach the microphone to a proper mic stand. Once extended, these legs feel quite sturdy. I can’t speak to how they’ll hold up over time, but they never started to slip during my testing.

This sturdy feel extends to the knob and switch as well. Again, I can’t speak to how well they’ll work in five years, but I’ve felt far flimsier switches and knobs on microphones that cost twice the price. You certainly don’t have to worry about accidentally switching polar patterns when reaching for the volume knob.

While everything I’ve talked about so far has been about how the mic functions, it actually looks quite nice as well. It looks like a professional piece of equipment, which is something I can’t say about some of this mic’s closest competitors.

Using the Samson Satellite

Micro USB on the Samson Satellite

Most people will likely use the Samson Satellite with a computer, so it’s fortunate that this is an easy process. Whether you’re using a Windows PC or a Mac, all you need to do is plug it in. There are no drivers or other software to install.

In your DAW or audio app of choice, select the Samson Satellite as your desired input device. If your audio app doesn’t support this (though the vast majority of them do), you’ll need to set it as the default microphone in your computer settings.

Using the Samson Satellite with iOS is even easier. For my testing, I used the microphone plugged into a Lightning-equipped iPad Pro and used the Ferrite app for test recording. I didn’t even have to select the microphone, as the app recognized the microphone and defaulted to using it.

No matter what you’re using the microphone with, the headphone jack for zero-latency monitoring is useful. If you’re not getting a signal in an app, you can use this to make sure that the microphone itself is picking up the audio. You can also use it to make sure it’s picking up everyone’s voice before you hit record.

Audio Quality

Headphone jack on the Satellite

The Samson Satellite uses 16mm condenser capsules. In cardioid mode, only one of these is enabled, while the microphone engages both in the bidirectional and omnidirectional modes. To get the sound into your computer or iOS device, the microphone has a built-in 24bit/96kHz audio interface.

In cardioid mode, the Samson Satellite sounds roughly as good as most other condenser microphones in its price range. This means that it covers bass and midrange fairly well, while the high-end is somewhat prone toward emphasizing sibilance in some situations. Compared to dynamic microphones, there is less of a tendency toward proximity effect–an increase in low end as you get closer to the mic.

Speaking of which, no matter which mode you’re using, you won’t want to get too close to the mic. Unless you’re using a windscreen or pop filter between you and the mic, you’re likely to get audible pops from P and B consonants. A small pop filter included in the box would have been nice, but these are relatively cheap, so buying your own won’t be a problem.

Because of the need for a pop filter, this isn’t the best microphone for video. It will work in a pinch, but you’ll need a longer cable because the built-in stand is less than ideal. For most video purposes, you might be better off looking at a wireless lavalier mic.

The bidirectional mode sounds similar to cardioid mode, while omnidirectional sounds less focused. This is true even if you’re using it alone, as the mic picks up significantly more room tone in omni mode than it does in cardioid mode.

Is the Samson Satellite Worth the Price?

Samson Satellite USB/iOS Broadcast Microphone for Recording, Podcasting and Streaming (SASAT) Samson Satellite USB/iOS Broadcast Microphone for Recording, Podcasting and Streaming (SASAT) Buy Now On Amazon $99.99

The Samson Satellite packs more features into a USB microphone than most of its competitors’ reserve for higher-priced models. The question is whether or not these features are important to you. If you frequently do interviews or field recordings, having multiple pickup patterns in a mic you can fit in your bag or (in a pinch) even your pocket is key. If your only computer on the road is an iPhone or iPad, then the Satellite is perfect for you.

It would have been nice to see a pop filter or windscreen included, but this will likely be a minor issue for most people. Other handy features like the built-in stand and ability to mount on a traditional mic stand or boom arm are nice to have. If you’re buying this as your first or only microphone, the multitude of options means it can grow with you, and you’ll likely always find a use for it.

Enter the Competition!

Samson Satellite USB Microphone

Read the full article: Samson Satellite USB Microphone: No Standout Features, But a Solid Bargain


Read Full Article

Boost Your Productivity With This FREE Ebook Worth $10!


productivity-new-year

If you want to discover how to get more done with less stress, this free copy of Productivity: Get Motivated, Get Organised and Get Things Done, from Wiley, is for you.

Throughout this book, you will learn to find your own rhythm in order to maximize your productivity, no matter what situation you’re in.

This isn’t about squeezing productivity out of every waking second, though. You’re not a machine. Instead, it’s about working smarter. It’s about getting organized so you can tackle your important tasks efficiently and effectively.

Download This Ebook For Free

Free Productivity Ebook

Whether you want to get more done, fit more in, or achieve more by doing less, this ebook will steer you in the right direction.

Inside, you will learn how to:

  • Develop a personal productivity mindset.
  • Identify your optimum times of day.
  • Plan your time purposefully.
  • Manage difficulties and setbacks.
  • And more.

Interested? Simply click here to download this free ebook (worth $10) from TradePub. You will have to complete a short form to access the ebook, but it’s well worth it!

Note: This free offer expires 1 May 2020

Read the full article: Boost Your Productivity With This FREE Ebook Worth $10!


Read Full Article

5 Meditation and Relaxation Apps to Beat Stress and Anxiety


Meditation at Home

When the whole world seems to be in turmoil, how do you deal with stress and anxiety? Try these meditation and relaxation apps to build a positive mindset and stay mentally healthy.

The entire planet is trying to stay safe and healthy during the COVID-19 pandemic. But apart from the virus itself, the changes and upheavals in lifestyle can take a heavy toll on mental health.

Time and again, meditation has proven to be the best practice to relieve stress and reduce anxiety. Apart from mindfulness meditation for beginners, there are other techniques like self-reflection and mind training to counter those negative thoughts. And you can get it all for free with these apps.

1. 1 Giant Mind (Android, iOS): 12-Day Guide, 30-Day Challenge

1 Giant Mind is a fantastic app for beginners to learn about meditation. Meditation teacher and author Jonni Pollard simplifies how to do it and has answers for common questions and obstacles that stop you.

The app asks you to start with the 12-step “learn meditation” course. It doesn’t matter if you’ve meditated before this, this step can’t be skipped. With one step every day, Pollard guides you to understand his take on meditation, which is all about making it as effortless as possible and relinquishing control.

He touches upon common topics like a mantra, breathing, and so on, but there’s a bit extra. After each session, the app asks what broke your concentration. Select one of the common reasons and you’ll get a short clip from Pollard on how to beat that obstacle.

This is one of the small ways 1 Giant Mind goes beyond a regular meditation app.

After finishing the 12-step introductory course, try the 30-day meditation challenge. It’s an excellent course to build the habit of meditating regularly. The app also includes a mood tracker after every session, as well as a journal.

If you simply want to start a quick session, use the meditation timer to select a guidance coach, background music, and duration.

Download: 1 Giant Mind for Android | iOS (Free)

2. Medito (Android, iOS): Free-Forever, No Strings Meditation App

The Medito Foundation believes meditation can transform lives by reducing anxiety and stress, and improving general well-being. That’s why they made Medito, a free-forever app with meditation guides for both beginners and experienced practitioners.

Most newcomers should first go through the introduction, beginner, and intermediate courses, which tell you the basics of meditation and mindfulness. Select between two voices (Will or Steve) and go through the guided courses step by step.

It’s a pleasant guided audio course to understand what you can expect to feel through different packs.

Once you know the basics, choose a pack based on your meditation type. Medito offers guided audio meditations for sleep, stress and anxiety, breathing exercises, loving kindness, body scan, mantra, and a daily meditation where you can change the length. The also comes with a built-in meditation timer if you don’t want an audio guide.

Download: Medito for Android | iOS (Free)

3. The Wim Hof Method (Web): Meditation Technique and Immunity Boost

The Wim Hof Method teaches you meditation and claims to boost your immunity too

The Wim Hof Method is one of the most popular meditation techniques across the world. It’s one of the most referenced methods when it comes to the mind over matter” aspect of meditation. While the full course takes a long time, you can get started with the three-part free mini-course by Wim Hof himself.

In the three Vimeo videos, the first class focuses on breathing. In a short discourse followed by a guided meditation, Hof teaches the importance of breathing and how it affects energy, stress, and your immune system.

The second video is where the Wim Hof method sets itself apart, where you have to embrace the cold. It’s all about improving your cold tolerance through cold showers and other methods, which Hof claims burns fat and releases “feel good” chemicals in your brain.

The third part is about putting the learnings of the first two into action. Keep in mind that this is a beginner-level introduction to the Wim Hof Method. You’ll soon master these aspects and want to upgrade.

The website offers longer paid courses, discounted currently as the coronavirus pandemic grips the globe.

4. GG Life (Android, iOS): Retrain Your Brain for Positivity

Anxiety, self-doubt, and other negative thoughts can suppress one into inaction. Over time, we subconsciously train our brain to believe the worst and imbibe depressing thoughts. The GG Life app wants to retrain your brain to think better thoughts about yourself and the world.

The app’s quick training system will show you how it works. It displays short messages with both good and bad outcomes. When you see a positive thought, drag it towards yourself and accept it in your head. Flick negative thoughts away, both on screen and in your mind. The entire thing takes just three minutes.

The app and theory is backed by clinical psychologist Guy Doron and several studies across the world.

Through repeated practice, GG Life trains you to think more positively. The app tackles several different issues like self-esteem, confidence, body image, anxiety and health, moods, parenting, sexuality, and trauma. The app tracks your progress, issues daily reminders to use it, and makes it feel like a game to level-up yourself.

Download: GG Life for Android | iOS (Free)

5. Cactus (Android, iOS): Self Reflection to Build Resilience

Productivity experts recommend journaling and daily gratitude as some of the best practices for mental health. But you need a reminder, right? Cactus is that unobtrusive prompt to take a look at your thoughts, feelings, and attitude at different intervals.

Every day, you’ll see two questions. One questions your motivation for using Cactus, while at the same time reminding you why you wanted this in the first place.

The other is a query about one of the principles of positivity: kindness, gratitude, energy, calmness, and so on. Answer the question truthfully and go back to your day.

This act of daily self-reflection is the whole ball game. Cactus makes you pause and think about values that you gloss over during the routine of life. Do it for a day and it won’t have much effect, but build a habit over time, and your mindset changes.

It’s a proven technique with a scientific basis, which will help you build a healthier attitude and mind.

Download: Cactus for Android | iOS (Free)

Having Trouble Sleeping?

These meditation and relaxation techniques help in getting through the day without feeling bogged down. Make sure you pick the right app for your needs and practice it regularly, it’s the best way to stay mentally fit.

But at the end of the day, you might still have trouble unwinding, and especially sleeping. If you have a lot on your mind that keeps you tossing and turning, check out the best apps for relaxing and sleeping. There’s nothing like a good night’s rest to boost mental health.

Read the full article: 5 Meditation and Relaxation Apps to Beat Stress and Anxiety


Read Full Article

Google Will Now Admit When Its Search Results Suck


google-search

Google refines Search every year, training its algorithms to understand language and context to help you find exactly what you’re looking for online. However, Google will, on occasion, fail. And now, rather than leave you in the dark, it’s going to admit its failings.

Google Admits That Search Is Fallible

In a post on The Keyword, Google details how it’s now going to admit defeat on certain web searches. On the very few occasions that Google fails to deliver solid results, you’ll now see, “It looks like there aren’t any great matches for your search”.

This message will be accompanied by some tips to help you further refine your search. The idea being that by providing more (and clearer) information, Google will be able to turn its failures into successes. It will even provide alternative search terms to try.

Google will obviously also still provide results, and it’s up to you whether or not you use them. It’s just that the company will be admitting upfront that they may not deliver what you were looking for. Potentially saving you from time-consuming disappointment.

Google is keen to point out that it already employs several methods to avoid this happening. As an example, if you spell something incorrectly, Google Search will detect the misspelling and provide results for the words and phrases it thinks you meant to type.

How to Find Anything on Google Search

To be fair, Google is usually brilliant at helping you find what you’re looking for on the web. Which means you’re unlikely to ever see this message. However, on the odd occasion that Google cannot provide solid results, it’s nice to know that Google will admit as much.

If Google does let you down, here’s how to find anything and everything using Google Search. And if you want even more ways to find what you’re looking for on the web, be sure to check out our Google Search cheat sheet packed full of tips and tricks.

Read the full article: Google Will Now Admit When Its Search Results Suck


Read Full Article

How to Add Textures to Text in Adobe Photoshop


One very easy way to bring text to life in logos, page headers, and other parts of your branding is to add texture to it.

Whether it’s a watercolor effect, metal, flames, or something else, texture can bring interest to otherwise flat type.

Here are the steps you need to add a texture to text in Adobe Photoshop…

Step 1: Add Your Text

Using the Text tool, type out your text in Photoshop. You need to use a thicker font to make sure the full effect of the texture is visible—at the very least choose a bold variant of your chosen typeface.

Also, try and match the font to the kind of texture you want to use. A handwritten font works well with a watercolor texture; a slab font goes well with a metallic effect, and so on. Check out our guide detailing where to download free fonts to increase your options.

The color of the text doesn’t matter as it will soon get covered with a texture.

add text photoshop

Step 2: Find a Texture

Your texture can come from two places. You can either make it manually on a separate layer in your Photoshop file, or you can import it from an external image file.

It’s easy enough to create your own textures in Photoshop for simple things, like adding a color gradient to your text. However, in many cases you’ll be better off using an existing texture from another file. You can find many ready-made ones on some of the best free stock image sites.

Step 3: Place the Texture

The next step is to place your texture. If you’ve made your own, make sure it’s on a layer that is directly on top of your text layer.

If you’re importing a texture from another file, go to FilePlace Embedded. Then navigate to the texture you are using and hit the Place button.

place embedded image photoshop

If the image is fully covering your text, hit Enter. If it isn’t, you can enlarge the texture using the handles at the corner of the image to change its size. (Be sure to hold down the Shift key if you want to maintain the proportions of the image.) Now hit Enter to move on.

resize texture photoshop

Step 4: Create a Clipping Mask

Go to your Layers panel. (If it isn’t displayed, go to WindowsLayers.) You should see three layers in your file—the background, the text, and the texture.

Make sure that the layer containing the texture is placed right above the text. Now right-click that layer and select Create Clipping Mask.

create clipping mask

The full texture layer will disappear, and only be visible where there’s text below it.

add texture to text photoshop

Step 5: Adjust the Position

Both the text and texture layers remain fully editable, just as normal layers are. This means you can go back in and edit the text without needing to remove or reapply the texture. Add more text and the texture will automatically be placed on it.

If the texture isn’t placed exactly where you want it, select the layer and open the Marquee Tool, or hit M on your keyboard. You can move the texture around by holding the Ctrl key on Windows or Cmd on Mac and dragging the image around with your mouse.

move texture

If you want to resize it, right-click anywhere on the text, and click Free Transform. This will reactivate the bounding box around the texture and you can resize it in the same way detailed in Step 3 above when placing the image.

Step 6: Extend or Soften the Text Edges

By now your image should be looking pretty good, and you can leave things there if you’re happy. But there’s one final, optional step you can try.

Depending on the type of effect you’re going for, you might not always want hard edges on your text. A flame texture, for example, could extend beyond the edges of your characters, or a corrosion effect could eat into them. Fortunately, this is easy to achieve.

To cut away the edges from your text, select the Text layer and click Add Vector Mask. Now choose the Brush tool (B), and select a brush that fits the style you want.

Next, set the Color to black, make sure you’ve selected the vector mask, and paint over the edges of the text. Paint white to restore any parts you’ve removed by mistake. It should look something like this:

corrosion effect photoshop

To add more texture beyond the edges of your text, select the Text layer, then grab the Brush tool. Double-click on the canvas. You’ll be prompted to convert the text to a raster layer. This means you’ll no longer be able to edit the text, so you might want to duplicate the text layer first to create a backup. Click OK to continue.

Select an appropriate brush and set the paint color to white. Now start painting around the edges of the text and you’ll see more of your texture appearing. Because we aren’t using a mask here, you have to use the Undo tool to remove any mistakes.

The result will look something like this:

fire text effect photoshop

Step 7: Save Your Image

The final step is to save or export your image. Save it as a PSD file to save a master copy with all the editable layers in tact. Or save it as a JPEG to save a flattened copy of the image with a white background.

To save the text with a transparent background, perhaps for use on the web or in another graphic design document, remove or hide the white background layer, then save the image as a PNG file (or a GIF).

Discover More Photoshop Tricks

As you can see, it’s quite easy to add a texture to type in Photoshop. The most important thing is to get the right texture and the right fonts. If you need help picking fonts for your projects, our article on font pairing tips will help.

The clipping mask that we’ve used in this tutorial is a very versatile tool that lends itself to a lot of cool uses. It enables you to crop images in unique ways while making sure they’re still fully editable. You can learn one of the best uses in our guide detailing how to crop images using shapes in Photoshop.

Read the full article: How to Add Textures to Text in Adobe Photoshop


Read Full Article

Why You Should Buy a Kindle (Even If You Love Real Books)


buy-kindle

If you’ve ever set foot in a bookworm’s bedroom, the first thing you’ll notice are the books. In fact, there are probably so many books that the dusty shelves are creaking under the weight of limited edition hardcovers and dog-eared paperbacks.

This lack of space can lead people to wonder what they should do with their own books. Fortunately, there are a host of brilliant ereaders available, with the Amazon Kindle being the best of the bunch. And these devices solve the problem of space.

And that’s far from the only reason to buy a Kindle, even if you’re a fan printed books. So, in this article, we tell you why you should buy a Kindle, even if you love “real” books.

1. The Single Biggest Reason to Buy a Kindle…

Should I Get a Kindle

Forget the Kindle Store. Forget the convenience of having thousands of books on a single device no thicker than a pencil. Put aside the robust, well-built hardware that survives even the most careless of users.

The single biggest reason why the Kindle is awesome is because it’s really easy to use. There’s no learning curve and very few bells or whistles.

Front and center of this reading experience is the screen itself. The Kindle Paperwhite, the most popular Kindle model, uses E Ink Carta technology. With a visual appearance similar to printed words on a sheet of paper, the Paperwhite also has a dimmable screen for reading late at night, and no glare on sunny days.

Additionally, the latest version of Amazon’s E Ink screens refresh almost immediately, so there’s little to no lag.

The Kindle battery can also run for weeks on end while slowly sipping electricity. This makes reading on a Kindle just as easy, if not easier, than reading a printed book.

Moreover, unlike old-school books:

  • You don’t have to worry about bent pages or bookmarks falling out; you’ll never accidentally lose your place in a story.
  • You can highlight passages without ruining the page, or see what other people have highlighted.

This winning combination of easy-to-use features has people reading far more than they otherwise would.

2. Should I Buy a Kindle If I Read at Night?

Should I Buy a Kindle If I Read in Bed?

Lots of us read late at night, but hardcover books aren’t always great for reading in bed. Having a lamp on for too long can also cause eye strain.

This is why Amazon Kindle is great for night owls.

The reason for this? In all modern Kindle devices (ranging from the Paperwhite to the Oasis), there are small LED lights located beneath the screen. This LED system makes sure the screen is lit up just enough for you to read late at night, but not enough that the backlight can disrupt your sleep schedule.

Sleep disruptions caused by backlights are common with phones and laptops, but with Kindle devices, the LED system has a natural, soft white light. It can be manually adjusted for the amount of illumination you require, which ensures that you get the best of both worlds: sleep and entertainment.

3. Why Get a Kindle When I Can Buy Books in a Store?

Why Get a Kindle?

Because you can buy even more books through the Kindle Store, that’s why.

Before we praise the Kindle Store, we want to say that we’re well aware that book lovers enjoy the act of browsing a bookstore to find new content. There’s something magical about wandering the aisles, only to find the perfect book on sale.

It’s hard to replicate that feeling of nostalgia and adventure in an online setting. Fortunately, having a Kindle doesn’t stop you from browsing the shelves. In fact, it will actually increase your ability to hunt for the best book.

The Kindle Store is much larger than most physical buildings. At the last count, it had millions upon millions of titles available, which is huge.

Additional facts about the Kindle Store:

  • You can download free book “samples” to read at a later date.
  • When you buy a book, titles are delivered to your Kindle in seconds.
  • Every day, Amazon sells a wide range of top-tier novels and non-fiction books at knockdown prices. Some of these sales can bring book prices down to $2 a pop, which means that the sales are pretty hard to resist.

Seriously, Kindle is by far the best platform to impulse buy books at all hours of the day, and find new content.

4. Should I Buy a Kindle If I Use Goodreads?

How Do I Use Goodreads on Kindle

In 2013, Amazon acquired the book-based social network Goodreads for an undisclosed sum. While this move was initially quite controversial within the Goodreads community, since then, Amazon has largely maintained a hands-off approach to running the site.

The only thing that’s really changed? Amazon has slowly integrated support for Goodreads into all of its Kindle devices, making Goodreads one of the must-have mobile apps for book lovers around the world.

So long as you bought your Kindle from a supported Marketplace, your device should automatically have a Goodreads icon at the top of the screen. Through this integrated app function, you can:

  • See what your friends are reading, and rate the books that you’re reading via Goodreads, too—all without putting down your device.
  • Additionally, you can share passages that you think are interesting or meaningful.
  • You can also see recommendations based upon books you’ve previously purchased or rated.

This is a huge plus for book lovers, especially if you’re looking for ways to easily contribute to this millions-strong community of bibliophiles.

Why Buy a Kindle? Because It’s Awesome!

The Amazon Kindle isn’t perfect, but then, what is? However, we personally feel the advantages of owning a Kindle far outweigh the disadvantages.

For the majority of people, a Kindle offers the ideal way to read ebooks. They’re easy to use, have a low physical footprint, boast a long battery life, and a large storage capacity. And they’re pretty affordable too.

There are also plenty of apps and sites that can improve your Kindle experience. So, if you have the time, we suggest you read up on them too.

Read the full article: Why You Should Buy a Kindle (Even If You Love Real Books)


Read Full Article

4 Ways to Factory Reset Your Windows Computer


factory-reset

Factory resets are the nuclear solution for many Windows issues. If your computer is far slower than it once was, you have a malware infection that won’t go away or plan to sell your machine, a factory reset is the most convenient solution.

Depending on your setup and installed version of Windows, you have a few different ways to factory reset a Windows laptop or desktop. We’ll show you how to reset a Windows 10, 8, or 7 computer as easily as possible.

Unlock the "Windows Keyboard Shortcuts 101" cheat sheet now!

This will sign you up to our newsletter

Enter your Email

Before a Factory Reset, Make Sure You Back Up!

Before we look at how to reset Windows, you should ensure you have a recent backup of your files. Performing a factory reset will wipe out all your installed programs and files, so you don’t want to leave anything behind.

Check out our ultimate Windows 10 backup guide for all the available methods.

1. How to Factory Reset Windows 10 Using the Built-In Method

Factory resetting Windows was once an inconvenient process, but Microsoft introduced a much easier way to do so in Windows 8. It’s also included in Windows 10 and is the best way to factory reset a computer for most people.

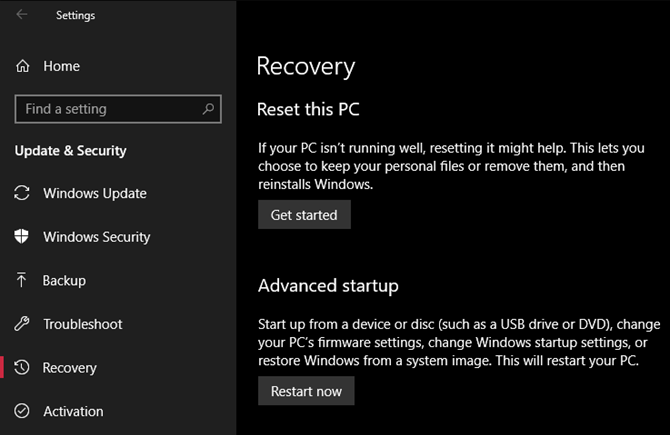
To access it, head to Settings > Update & Security > Recovery. You’ll see a Reset this PC header; click the Get started button underneath this.

Windows 10 recovery options

Keep Your Files or Remove Everything?

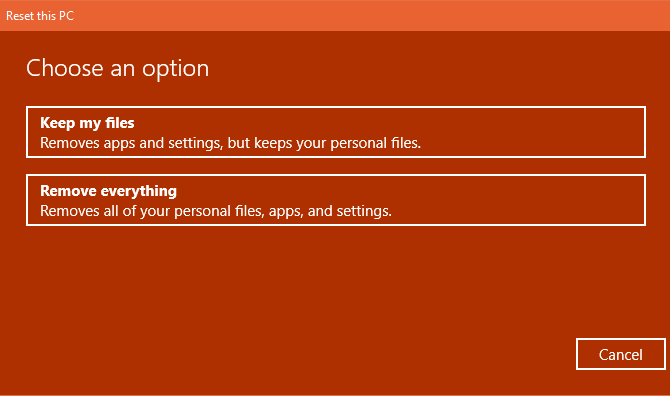
You’ll have two options to choose from when you reset Windows 10 this way: Keep my files or Remove everything.

The first option sets your options back to default and removes all your installed apps (like browsers, Microsoft Office, and games), but keeps your data. True to its name, Remove everything is a factory reset: it brings all options back to factory defaults and removes your files and apps.

Though the Keep my files option will retain your data, you should still back up before using it in case something goes wrong.

Keep my files or Remove everything

Options When Resetting

If you picked Remove everything, Windows will display some Additional settings for you to review. By default, the process will remove your files, but doesn’t securely erase them. It also only clears data from the drive where you have Windows installed.

Select Change settings to adjust these options. If you enable Data erasure, Windows will obliterate everything on the drive to reduce the chances of data recovery. Though this process takes some time, you should use it if you’re getting rid of your computer. It’s not necessary otherwise.

Finally, enable Data drives to erase everything on all drives you have connected to your computer. This includes external hard drives and recovery drives. Because you probably have backups and files on those drives, you shouldn’t use this unless you want to permanently erase everything associated with your computer.

Windows Factory Reset Options

Otherwise, if you picked Keep my files, you’ll see a summary of what Windows is about to do. Click the List of apps to be removed link to see what apps it will uninstall.

Starting with the Windows 10 20H1 update, Microsoft will offer a Cloud download option at this point. This lets you reset Windows 10 by downloading a fresh copy from the internet, which could come in handy if your current installation is corrupted or you have a fast network connection.

Finally, confirm the operation by clicking Reset and wait for the process to complete. If you’re factory resetting a laptop, make sure you plug it in to avoid losing power during the operation. You’ll need to walk through the setup procedure once it’s done—make sure you take the right steps after installing Windows 10 too.

2. Factory Reset Windows 10 Using the “Fresh Start” Option

In a past update to Windows 10, Microsoft added a new way to factory reset your computer. It’s similar to the above, but has a few small differences that make it worth a look.

On the Settings > Update & Security > Recovery page, click the link text Learn how to start fresh with a clean installation of Windows at the bottom. This will open a Windows Security window to the Fresh start option. Click Get started to proceed.

Windows 10 Security Fresh Start

Compared to the above reset option, Fresh Start has the following differences:

  • Fresh Start always keeps your personal files, with no option to remove them like above.
  • Fresh Start downloads the latest version of Windows 10, while the standard reset option uses the recovery information on your hard drive. This is provided by your PC manufacturer, or in the protected C:\Recovery folder if you installed Windows on your own.
    • Because of this, Fresh Start avoids clutter by removing all non-standard Windows apps, including manufacturer bloatware. The only exception are Microsoft Store apps that were installed by the manufacturer, which stay.
  • Finally, Fresh Start keeps “some Windows settings” but doesn’t specify which. The above reset does not keep any of your settings.

To summarize, Fresh Start downloads a fresh copy of the most recent Windows 10 version, keeps your files and some settings, and doesn’t leave any bloatware aside from Store apps. In comparison, the standard reset option lets you choose whether to keep your files, doesn’t save any settings, and will reinstall Windows and apps based on your recovery partition.

Keep in mind that after doing this, you may need to enter license keys again for premium apps and will likely need to update system drivers.

3. Reinstall Using Windows Installation Media

If you’re not using Windows 8 or 10, want to know how to factory reset Windows 10 without the Settings menu, or don’t want to use the methods above for some reason, you can always factory reset Windows using installation media. This allows you to install a fresh copy of Windows on your computer and wipe out everything currently on it.

For Windows 10, check how to install Windows 10 using Microsoft’s Media Creation Tool, which is free and easy.

If you want to reinstall Windows 7 or 8 from scratch, you can use Microsoft’s Windows 7 download tool or Microsoft’s Windows 8.1 download tool. These let you download an ISO to burn onto a flash drive or DVD so you can reinstall Windows. You’ll need to provide a valid Windows 7 product key to do so, but that’s not necessary for downloading Windows 8.1.

Either way, simply insert the USB drive or disc containing your install media, then boot from the removable device. You’ll be greeted with the Windows setup screen, which you can proceed through to install a clean copy. Remember that doing this will remove everything currently on the drive where you install Windows.

4. Factory Reset Windows 10 From Boot Using Advanced Methods

While the three methods listed above will work for the most users, there are a few advanced ways to reset Windows if you’re interested. To run a Windows 10 factory reset from boot (in case you can’t get into Windows normally, for example), you can start a factory reset from the Advanced Startup menu.

To launch this if Windows is working properly, visit Settings > Update & Security > Recovery. Under the Advanced startup section, click Restart now to reboot into Advanced Startup. Alternatively, hold down the Shift key as you click the Restart button on the power menu.

In case you can’t do either of these, try pressing F11 as you boot, which will open Advanced Startup on some systems. Failing this, Windows will launch Advanced Startup on its own after three failed boots.

Once it’s open, choose Troubleshoot, then select Reset This PC to begin the same factory reset procedure as #1 above. You can pick Advanced options for more choices, but none of them let you factory reset Windows 10 unless you have a saved system image.

Windows Reset PC Advanced Options

Otherwise, you may be able to boot into the BIOS and directly access the recovery partition on your hard drive, if your PC manufacturer included one. However, if you factory reset with this method, you’ll reinstall all the manufacturer bloatware. While it’s not ideal, it can work if you have no other options.

You can also type “create a recovery drive” into the Start menu to access a tool that lets you make your own. However, this requires a fair bit of space, and you’ll have to do it before you have a problem. If you didn’t already make one, you’re best off making a new Windows 10 install disk as described in #3.

Overall, if you’re using Windows 8 or 10, one of the built-in reset options is your best bet. Windows 7 users should download an image from Microsoft and perform a clean installation that way.

Now You Know How to Factory Reset Your Computer

You have several options for factory resetting a Windows computer. Whether you need to full reset your laptop before you sell it or just want to refresh your PC for a performance boost, one of these methods will have you on your way as fast as possible.

In case you run into problems, we have help on fixing issues that occur when installing Windows.

Read the full article: 4 Ways to Factory Reset Your Windows Computer


Read Full Article

Daily Crunch: AT&T CEO steps down


AT&T is getting a new boss, the first piece of Apple and Google’s COVID-19 contact tracing program should be available soon and Snap is looking to raise more debt.

Here’s your Daily Crunch for April 24, 2020.

1. Randall Stephenson to step down as AT&T chief, succeeded by COO John Stankey

A big changing of the guard is underway at one of the world’s biggest names in telecoms and media. The change is effective on June 1, and while Stephenson is retiring, he will stay on as executive chairman of AT&T until January 2021.

Stankey has held other roles at AT&T, including CEO of WarnerMedia and CEO of the AT&T Entertainment Group. His promotion suggests a continuing emphasis on the media side of the business.

2. First version of Apple and Google’s contact tracing API should be available to developers next week

The first version of Apple and Google’s jointly developed, cross-platform contact tracing API should be available to developers as of next week, according to a conversation between Apple CEO Tim Cook and European Commissioner for internal market Thierry Breton.

3. Snap looks to load up on cash in sizable debt offering

Snap’s Q1 earnings impressed investors but the company is still losing plenty of cash and it’s clear that the full impact of the digital ad market’s downturn won’t be seen until the company’s Q2 earnings. The company is now looking to raise looking to raise $750 million.

4. Google ditched tipping feature for donating money to sites

Leaked images obtained by TechCrunch reveal that Google considered and designed a feature that would let people donate money to websites to help support news publishers, bloggers and musicians. But the company ultimately scrapped the idea.

5. Seven VCs look into the future of fintech

Although it looks like the COVID-19 pandemic has clipped the tails of many unicorns, this era won’t last forever. Investors expect the domestic and global economy to recover, perhaps as soon as late 2020 or early 2021. (Extra Crunch membership required.)

6. House passes COVID-19 relief package to replenish PPP loan funding

The interim legislation will allocate $310 billion to replenish the SBA’s Paycheck Protection Program (PPP), $75 billion for hospitals and $25 billion for COVID-19 testing. President Trump previously expressed his approval of the bill, as well as his intention to sign it and make the funds available as quickly as possible.

7. After 160,000 accounts are compromised, Nintendo shuts down NNID logins

Nintendo confirmed earlier reports of account breaches dating back over the past few weeks. The gaming giant issued an update (via Nintendo Japan) noting that around 160,000 Nintendo Accounts were impacted, with accounts being used to purchase digital items without the owner’s consent.

The Daily Crunch is TechCrunch’s roundup of our biggest and most important stories. If you’d like to get this delivered to your inbox every day at around 9am Pacific, you can subscribe here.


Read Full Article

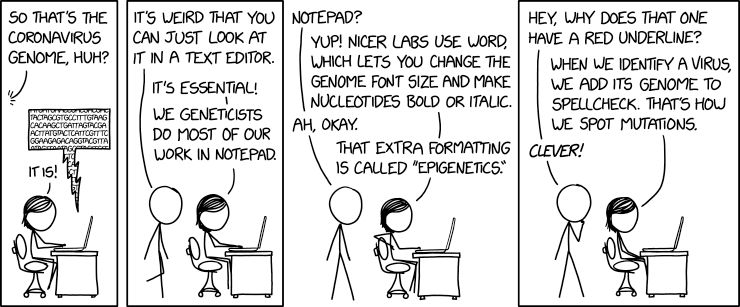
Coronavirus Genome


Coronavirus Genome

My experience with the CARES Act was frustrating, confusing and unfair


As a small business owner, I was excited to learn about the $2.2 trillion Coronavirus Aid, Relief, and Economic Security Act that offers low-interest loans to firms impacted by the COVID-19 pandemic. However, as I read through the details and began to apply, it became clear that this legislation — while well-intentioned — may not be enough to help many SMBs and startups.

Here’s a quick recap of my experience.

Emergency Economic Injury Grants and Economic Injury Disaster Loans

First and foremost: You need to act swiftly. Emergency Economic Injury Grant and Economic Injury Disaster Loan programs included in the CARES Act function on a first-come, first-served basis, and are funded from a limited pool of resources.

I began my company’s application process by submitting our EIDL and EEIG applications through the SBA website. This was easy, if tedious. It took about two hours to complete the necessary online forms and about two seconds to click the EEIG checkbox. Submission was seamless, but I haven’t received any further communication from the SBA since completing my application, which is a bit confusing — EEIG funds are supposed to be dispersed within 3-5 days of the submission date.

However, I know there’s been a huge volume of submissions recently and this must be exceptionally difficult to handle. I look forward to any email correspondence or updates from the SBA that might give me — and other applicants — an updated estimate of the expected dispersal timeline.


Read Full Article

Facebook to launch ‘virtual dating’ over Messenger for Facebook Dating users


Facebook will soon allow users to go on “virtual dates,” the company announced today. The social network is planning to introduce a new video calling feature that will allow users of its Facebook Dating service to connect and video call over Messenger, as an alternative to going on a real-world date. This sort of feature is much in demand amid the coronavirus pandemic, which has forced people to stay home and practice social distancing.
But for online dating apps which aim to connect people in the real world, it’s a significant challenge for their business.

For the time being, government lockdowns have limited the places where online daters could meet up for their first date. Restaurants, malls, bars, and other retail establishments are closed across regions impacted by the coronavirus outbreak. But even when those restrictions life, many online dating app users will be wary of meeting up with strangers for those first-time, getting-to-know-you dates. Video chat offers a safer option to explore potential connections with their matches.

When the new Facebook Dating feature goes live, online daters will be able to invite a match to a virtual date. The recipient can either choose to accept or decline the offer via a pop-up that appears.

If they accept, the Facebook Dating users will be connected in a video chat powered by Facebook Messenger in order to get to know one another.

As the feature is still being developed, Facebook declined to share more specific details about how it will work, in terms of privacy and security features.

Facebook is not the first online dating service to pivot to video as a result of the pandemic. But many rival dating apps were adopting video features well before the coronavirus struck, as well.

Bumble, for example, has offered voice and video calling in its app for roughly a year. The feature there works like a normal phone call or Apple’s FaceTime. However, users don’t have to share their phone number or other private information, like an email address, which makes it safer.

The company says use of the feature has spiked over the last two months as users embrace virtual dating.

Meanwhile, Match Group has more recently rolled out video across a number of the dating apps it operates.

This month, the Match app added video chat that allows users who have already matched to connect over video calls. Match-owned Hinge also rolled out a “Dating from Home” prompt and is preparing its own live video date feature, as well, Match says. Plenty of Fish (PoF), another Match property, launched livestreaming in March, giving singles a new way to hang out with friends and potential matches.

Match Group’s flagship app Tinder has not yet embraced live video dates, but still offers a way for users to add video to their profiles. The company couldn’t comment on whether or not video dating was in the works for Tinder, but in the post-COVID era, it would be almost bizarre to not offer such feature.

Other dating apps have also launched video dating, including eHarmony and a number of lesser-known dating apps hoping to now gain traction for their video dating concepts.

Facebook says the feature will roll out in the months ahead and will be available everywhere Facebook Dating is available.


Read Full Article