18 June 2018

Venmo Makes Its Website Much Less Useful


Venmo is making its own website much less useful. The peer-to-peer payments service no longer lets you make payments via its website, and it looks like this is just the start of an intentional effort to degrade the Venmo website.

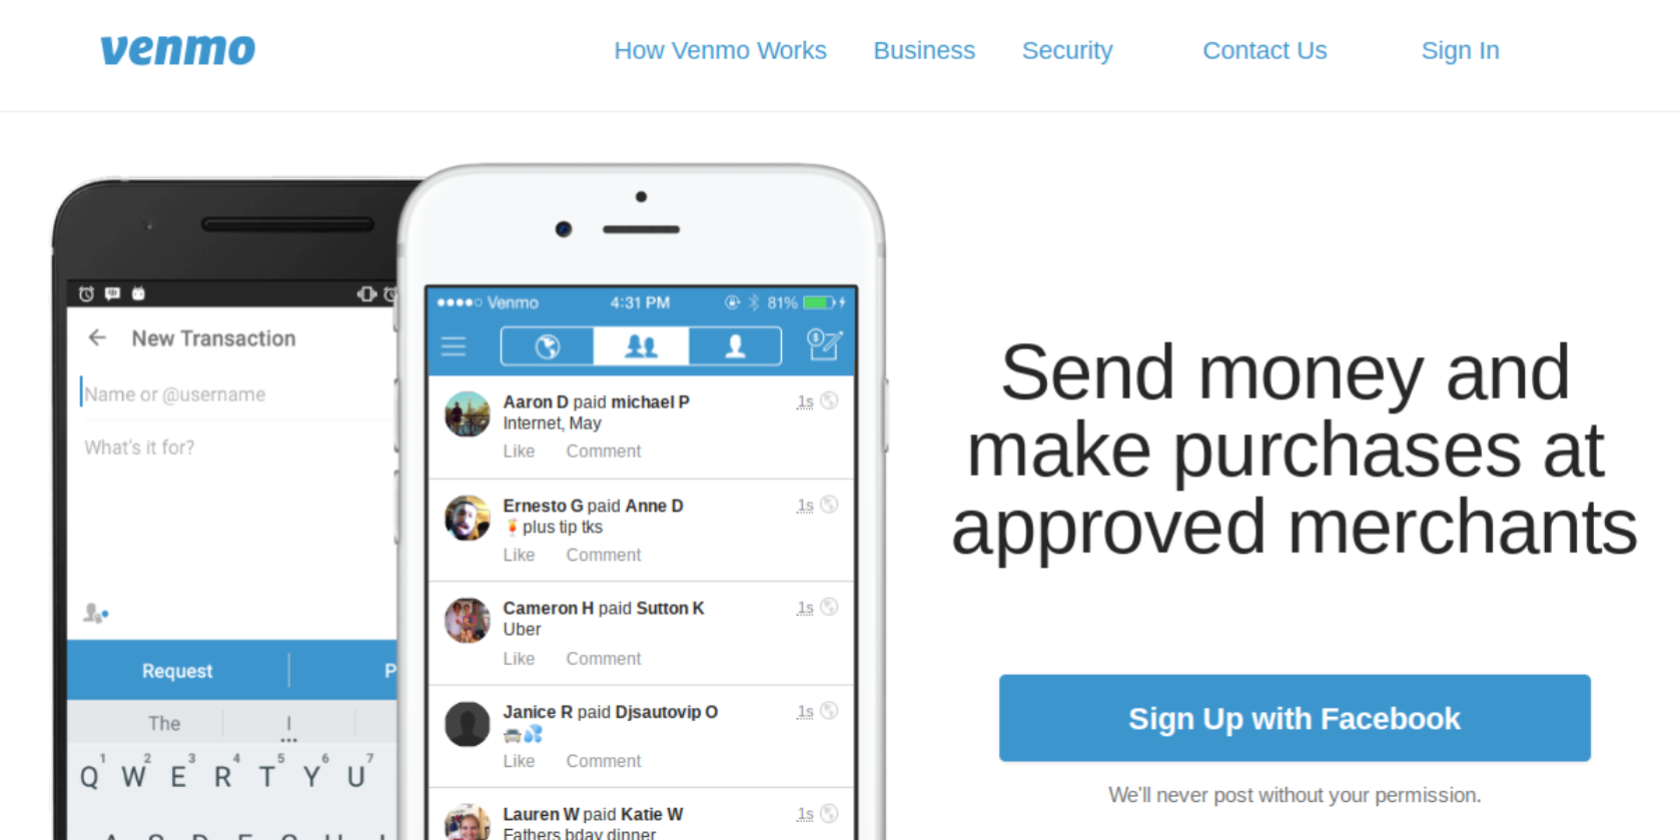
Venmo, which is owned by PayPal, allows users to send payments to each other using their smartphones. However, until now, Venmo has offered similar functionality with its website. Unfortunately, the company is now changing tack.

Venmo Degrades Its Website for Reasons

Now, you can no longer send payments or charge someone using the Venmo website. Instead, you’ll have to use the Venmo mobile app on Android or iOS. And Venmo isn’t done degrading its website either, promising even “less functionality” moving forward.

As reported by TechCrunch, Venmo informed users about these changes in their account summaries for May 2018. However, to the annoyance of some users, Venmo hasn’t explained its reasoning or told users what else is changing.

“Venmo has decided to phase out some of the functionality on the Venmo.com website over the coming months. We are beginning to discontinue the ability to pay and charge someone on the Venmo.com website, and over time, you may see less functionality on the website — this is just the start. We therefore have updated our user agreement to reflect that the use of Venmo on the Venmo.com website may be limited.”

As a result of these changes, the Venmo website is now all about admin. So, you can cash out your balances, view your transactions, and change your settings. However, you’ll have to open Venmo’s mobile app to actually send and receive money.

Venmo Wants to Be Different From PayPal

There are two reasons why Venmo may have done this. First, it helps differentiate Venmo from PayPal, which is still seen as mostly web-based. Secondly, if the majority of people are using the mobile app, it makes sense to focus entirely on that side of things.

While Venmo has proved popular with the tech-savvy generation, it’s far from the only option for sending payments to other people. So, there are plenty of mobile apps which allow you to send money painlessly, including Google Wallet, you can use instead.

Read the full article: Venmo Makes Its Website Much Less Useful


Read Full Article

The 20 Best Video Game Soundtracks for Studying or Relaxing


video-game-music

Video games are awesome. Beyond their gripping stories, engaging gameplay, and social aspects lies an oft-overlooked aspect: video game music.

A good video game original soundtrack (OST) is tough to get right. It needs to highlight whatever emotion the player should be experiencing at a point in time, as well as being submissive enough to not distract the player.

Today, we’re going to celebrate some stellar video game soundtracks, perfect for those times when you’re studying or trying to focus.

Why Listen to These Video Game Soundtracks?

You may wonder what the big deal about listening to game soundtracks is, especially if you don’t play video games. As mentioned above, the soundtracks are engineered so that players can enjoy them while still being able to focus on what they’re doing. In addition, it’s difficult to really enjoy a good soundtrack unless you’ve listened to it outside the game, since all sorts of sound effects get in your way while playing.

The games discussed here have some of the best game soundtracks of all time, and make excellent collections that provide a good background for focus. If you enjoy them, check out some of the music genres gamers should love.

1. Donkey Kong Country 2 (SNES; 1995)

Kicking off the list is one of the most-beloved soundtracks of all time. The first Donkey Kong Country game was an awesome title, but its sequel improved on it in every way imaginable, with better graphics, more varied locations, amazingly intuitive secrets, and one of the greatest game soundtracks ever.

It’s amazing to think that this much emotion could be packed into a game soundtrack, but composer David Wise made it happen. It is mostly upbeat and good for those times when you need a medium pace for your work.

2. Bastion (Multi-Platform; 2011)

Bastion is an action game with role-playing elements that follows “the Kid” as he strives to restore a fallen world. The soundtrack is excellent; it gives the feeling of the Wild West while also being upbeat and taking you to a fantasy world. The game’s Narrator is certainly one of the highlights; you can hear a sample of his voice in the opening track of the OST.

Bastion’s soundtrack is great for an even-headed day when you need some music to keep you fantasizing about saving the world.

3. The Legend Of Zelda: The Wind Waker (GameCube; 2003)

Nearly any of the Zelda games could have made this list, but Wind Waker’s soundtrack goes great with any kind of work. It’s also lengthy, so you won’t have to worry about opening a new video anytime soon.

Wind Waker’s soundtrack has an Irish feel to it, with pipe-based instruments bringing a sense of being in the beautiful outdoors.

4. VVVVVV (Multi-Platform; 2010)

Adding some variety into the mix is the soundtrack for VVVVVV (pronounced V-6), a retro-infused platformer game where you reverse gravity instead of jumping. Its 30-minute soundtrack is full of boppy tunes that would have been at home on the early consoles of the ’80s.

We featured VVVVVV in our list of tiny games that are fun to play. If you don’t mind a bit of a challenge, try it out.

5. Assassin’s Creed II (Multi-Platform; 2009)

The Assassin’s Creed series has been around for over a decade, and allows players to explore various historical cites. Assassin’s Creed II, one of the best, offers an equally historic and beautiful soundtrack with the sounds of Renaissance-era Italy.

6. Super Meat Boy (Multi-Platform; 2010)

Super Meat Boy is a tough-as-nails indie platformer, but it’s not unfair. SMB goes to great lengths to ensure you have everything you need to succeed. The soundtrack is just as well-crafted, and brings some tension while still being smooth enough to allow you to focus.

In Super Meat Boy, each level has a Light and Dark World variant. Most players will be able to clear the Light World levels, but the Dark World path contains some of the most difficult platforming stages in modern gaming.

What’s neat is that the music for each world reflects this. A more pleasant, traditional tune is used for Light and a twisted remix of it for Dark. Note that newer ports of the game feature a different soundtrack, which is inferior to the original.

7. Spyro 2: Ripto’s Rage! (PlayStation; 1999)

Spyro is one of the classic PlayStation franchises. The second game’s soundtrack is whimsical and has a fantasy element to match the locales you visit. This ensures the high-energy gameplay of Spyro has some great background music to go along with it.

Unfortunately, the series has degraded over time. But the original trilogy stands as excellent 3D platformers, and we’re still enjoying their soundtracks today.

8. Fez (Multi-Platform; 2012)

Fez creator Phil Fish has a rocky story in the gaming industry. The one game he gave us, though, is brilliant. It tells the tale of Gomez, who learns that the world he thought was 2D is actually 3D.

The mostly electronic soundtrack conveys the lands you travel to well. If you want a dynamic OST to listen to, this is one to try.

9. Journey (PS3, PS4; 2012)

Journey’s name describes it perfectly. It’s a game all about wandering around and exploring, and cuts out the background noise of many modern games. The music, of course, gives you an awesome backdrop for this exploration. Even some movies don’t have soundtracks like this!

10. Braid (Multi-Platform; 2008)

Braid is one of the most popular indie games of all time, introducing many people to that special subset of games. In Braid, you control time by rewinding it at will, which also affects the music. Because of this, even if you’ve played it, you can’t appreciate the beauty of the soundtrack unless you’ve heard it without these interruptions.

Unlike most other game soundtracks, Braid’s music wasn’t created specifically for the game. Developer Jonathan Blow used licensed music to convey the game’s mood. Even if you don’t like video games, this is one soundtrack you have to give a listen.

11. Crash Bandicoot 2: Cortex Strikes Back (PlayStation; 1997)

Crash is another PlayStation gem, and it too had golden days with its first three iterations. The second game’s soundtrack is like Spyro’s: whimsical and excellent at matching the various locales you visit in Crash’s adventure.

The orange bandicoot recently made his return with the N. Sane Trilogy on PS4, and that’s one of the remastered games worth playing, especially if you never played the originals.

12. Banjo-Kazooie (N64; 1998)

Banjo-Kazooie is one of the most beloved games on the N64 thanks to its memorable characters, expansive worlds, and excellent music. Grant Kirkhope’s soundtrack features several variations for the different areas of each world, with seamless cross-fades that haven’t been matched since.

It’s whimsical, joyful, and will bring you right back to your childhood. Choose this one when you need some upbeat study music.

12. Cuphead (XBO, PC; 2017)

Cuphead is a run-and-gun game that feels like playing a 1930s cartoon. The graphics, character designs, and even menus all look like something out of an early Disney work, with gorgeous hand-drawn animations and backgrounds.

The soundtrack is nearly three hours of live jazz, big-band, and ragtime music. It’s bombastic and oozes quality and charm, making it a significant part of this stellar game.

13. Animal Crossing (GameCube; 2001)

Animal Crossing is a peaceful social simulation game where you control human living in a village full of animals. The game runs in real time, with unique music for each hour of the day.

Thanks to the game’s variety of tunes that play inside various buildings and events during the year, the full soundtrack is over seven hours. If you’d like something a little shorter, you can listen to a full day’s music in just under an hour.

Animal Crossing is a relaxing series, with a chilled-out soundtrack to match. Check out the other Animal Crossing soundtracks if you enjoy it, or play Animal Crossing: Pocket camp on mobile.

14. Sonic Mania (Multi-Platform; 2017)

Though Sega’s mascot has had some missteps, you can always count on a solid soundtrack in Sonic games. Indeed, you could put pretty much any Sonic game on this list.

We chose Sonic Mania because it’s a collection of some remixed classic favorites along with a few new tracks. There’s something for everyone to love in this collection of funky, fast, and cool music celebrating the Blue Blur.

15. Super Smash Bros. for Wii U (Wii U; 2014)

Smash Bros. is a celebration of Nintendo’s biggest franchises, with characters, stages, items, and music coming from dozens of game series. The latest entry packs an incredible 15 hours of tunes, including remixes and originals from Donkey Kong, Star Fox, Pokémon, Fire Emblem, and many more.

The OST has a ton of variety, making it a great way to discover new game music you might love. If you’ve got a long night of studying ahead of you, spin this up and don’t look back.

16. Undertale (Multi-Platform; 2015)

Undertale became a cult classic upon its launch. Acting as a one-man team, developer Toby Fox crafted the entire game, including the music. It was universally praised for its gameplay, story, and themes, as it turned several game clichés on their heads.

The soundtrack is masterful, with a variety of moods expressed. A lot of it is chiptune, but not all.

One word of caution: Undertale is a game best experienced without spoilers, and the soundtrack names can give away some plot points. Do yourself a favor and play this as soon as you can—without any foreknowledge.

17. Secret of Mana (SNES; 1993)

One of the most beloved RPGs of the SNES era, Secret of Mana set itself apart from similar games with a few key differences. It featured an action-based battle system instead of the traditional turn-based one, as well as seamless drop-in co-op for up to three players.

Of course, being a Square RPG from the early ’90s, it has a classic soundtrack to match.

18. Super Mario Odyssey (Switch; 2017)

Like Sonic, it would be easy to put most Mario games on this list. Mario Odyssey injected some much-needed freshness into the series, with vast open worlds, a ton of objects to collect, and the ability for Mario to control his enemies.

It’s also got a kicking soundtrack, with the game’s varying locales offering fantastic tracks. From the irresistible “Jump Up, Super Star” (with vocals, which is a first for the Mario series) to the epic orchestral “Cascade Kingdom”, this is one for the ages. It’s a must-play for Switch owners.

19. Metroid Prime (GameCube; 2002)

Metroid Prime took the formula from the popular Super Metroid (a world that gradually opens up as you collect new abilities) and translated it perfectly into 3D. The game makes you feel alone in the wild lands of Tallon IV, and the music plays a big part in that.

From eerie atmospheric background pieces to intense boss fights, this soundtrack will have you ready to explore other planets.

20. Persona 5 (PS3, PS4; 2017)

Persona 5 is an RPG for the ages. It features a memorable cast of characters, a slick art style, fantastic dungeons, and an incredible 100+ hour runtime. The game’s soundtrack carries acid jazz influences, making it funky and upbeat. You’ll also find somber, introspective tracks, rock, and a whole lot more.

If you enjoy RPGs, you simply must experience this phenomenal work of art. But if you can’t spare the time, at least enjoy the OST.

The Best Video Game Music Is Worth Celebrating

You now have hours of game music to listen to while you work or study. Of course, dozens of other games could have made the list, but we selected these for their variety and exceptional quality. Be sure to check out soundtracks for other games in a series if you enjoyed one of these.

We’ve highlighted full-game soundtracks here, but YouTube is a great place to find mixes too. Have a look at the channel Luigi, which features mixes of relaxing music from various series.

If you love these soundtracks and want to hear more, hop over to Rainwave, the best video game music radio site. It hosts thousands of game tracks, lets you vote and keep track of your favorites, and even has a cooldown system to make sure there’s always something fresh playing.

Read the full article: The 20 Best Video Game Soundtracks for Studying or Relaxing


Read Full Article

Photomyne raises $5 million for its A.I.-powered photo scanning app


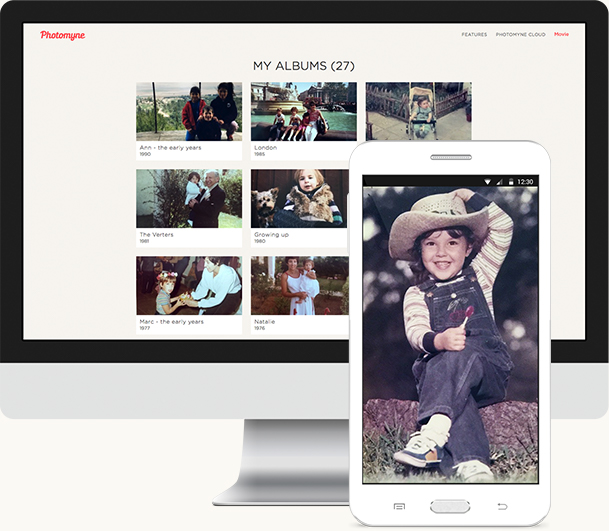
Tel Aviv-based Photomyne, an A.I.-powered app that helps you bring your old photo prints online, has been benefitting from the subscription app boom to the tune of $5 million in Series A funding. Today, the app is used by a million people every month, and 250,000 people pay the $20 annual subscription for the expanded service. This adds a handful of additional features, including the option to build a family website where all your photos are uploaded immediately after being scanned.

There is something of a limited lifetime for apps that convert physical media to digital – at some point, everyone who wants to transition their old media to the web will have done so. Another issue is that some people will make scanning photos a one-time project. They’ll then save all their photos to their own device and cloud storage, and cancel their subscription.

And as those users drop off, physical media will continue to die out.

For those reasons, Photomyne will eventually need to expand into other areas – perhaps scanning other things beyond photos. As it has a couple of patents for things like scanning business cards, documents, and sticky notes, it’s clearly thinking about this, too.

But in the meantime, there’s still an audience of self-appointed family historians, who are making old photos available to their extended families, as well as older folks who grew up in the pre-smartphone era and now want to bring their memories online, too.

By leveraging A.I. technology which runs locally, in real-time, on mobile devices, Photomyne is able to speed up the fairly tedious process of photo scanning using a handheld device. That is, instead of having to focus on one photo – as with Google’s PhotoScan, for example – Photomyne lets you scan multiple photos in a single shot as you flip through the pages of old albums.

It then breaks those up into individual photos by auto-detecting the boundaries.

It also auto-rotates sideways photos, crops the photos, corrects the photo perspective, and saves them in a digital album where you can further filter them, share, or – with the subscription – save locally, backup to the cloud, sync to other devices, or publish to a family website.

The ability to scan more photos in one shot makes the app appealing to those who want to upload their entire collection of old photos to the web, instead of picking and choosing specific photos to import.

In addition, the app’s A.I.-based technology improves over time the more you use it, says Photomyne’s co-founder and CFO Yair Segalovitz.

And soon, the company plans to roll out other advanced features, too, he notes.

“We are focused on a new set of exciting features that we expect to release in the very near future. We intend to offer automatic color correction – such as fixing color decay – and the ability to search interesting photos in our 70 million-plus photo archive,” says Segalovitz.

To date, Photomyne has been downloaded 7 million times and is largely used in the U.S. and in Western Europe, though it’s starting to see growth in China, too.

The Series A round was led by Luxembourg-based Maor, a co-investment tech fund from Philippe Guez and Eric Elalouf. It also included participation from Israeli investors and others from its seed round a couple of years ago. 

With the new funding, the company plans to expand its team of 16 to around 25 and scale the business in Japan and South East Asia, in particular.

Photomyne is a free download on iOS and Android, but the full range of feature is only available to subscribers.


Read Full Article

Irony Definition


Irony Definition

Is the iPhone X Screen Really the Best of All Smartphone Screens?


iphone-x-best-screen

When you’re in the market for a new phone, which features are most important to you?

Many people make their decision based on operating system, overall battery life, and the manufacturer. But what about the screen? If you’re a smartphone addict, it’s arguably the most important aspect to consider.

These days, the common belief is that the iPhone X’s screen is the best one out there. But is that true? Let’s take a closer look.

The iPhone X’s Screen and Display

We’re going to focus on the specifications and underlying technology in leading smartphones’ screens.

As such, we won’t be discussing the divisive notch and virtual home button on the iPhone X. You can let us know what you think about those in the comments section.

So, why does the iPhone X’s screen receive such rave reviews?

Well, the iPhone X is Apple’s first OLED phone. For those who don’t know what OLED means, it stands for “organic light-emitting diode.” In practice, it means every pixel on the screen produces light. That differs from a typical LED screen, which instead uses a backlight.

As a result, users can expect to see deeper blacks, more vibrant colors, a greater brightness range, and improved contrast. OLED screens also help battery life; black pixels don’t need to produce any light. It means iPhone X owners can enjoy an average of two hours of additional battery life when compared to the iPhone 8.

But OLED screens are nothing new; top-of-the-line Android phones have been using them for a while. There must be something else that lets the iPhone X screen garner such praise, then.

And there is! It’s the resolution. The iPhone X’s display boasts an incredible resolution of 2436×1125, giving it a pixel density of 458PPI. Apple calls it “Super Retina,” but as a user, all you need to know is that it’s really, really crisp.

But wait, there’s more! DisplayMate—the leading company for testing, evaluating, and comparing phone displays—came up with a list of areas in which the iPhone X screen set or met existing records.

All the tests were conducted under laboratory conditions, and the results found the iPhone X had:

  • Highest absolute color accuracy
  • The highest full-screen brightness for OLED smartphones
  • Highest full-screen contrast rating in ambient light
  • Highest contrast ratio
  • Lowest screen reflectance
  • Smallest brightness variation with viewing angle

But what about the competition? After all, the iPhone X isn’t brand-new anymore. Several flagship models from other manufacturers have since come to market.

Compare to Samsung Galaxy S9’s Screen and Display

In March 2018, the Samsung Galaxy S9 hit the shelves. You can argue about which phone offers the best features and overall package, but remember, we’re only interested in comparing the screens.

And in the battle of the screens, the Samsung Galaxy S9 wins. Seriously, it’s better than the iPhone X.

Don’t believe us? Let’s refer back to our good friends at DisplayMate. Here’s what the company said about the Galaxy’s screen:

“Based on our extensive Lab Tests and Measurements, the Galaxy S9 has an impressive display that establishes many new display performance records, earning DisplayMate’s Best Performing Smartphone Display Award, and receiving our highest ever A+ grade.”

The phone set two new records:

For “Highest Absolute Color Accuracy,” its 0.7 JNCD (Just Noticeable Color Difference) beat the iPhone’s 0.9 JNCD. The S9 also won “Smallest Shifts in Brightness and Color with Viewing Angle.” The review even went as far as the call the color accuracy “visually indistinguishable from perfect.”

The Galaxy S9’s screen also introduced three new features that were previously unseen on any smartphones:

  • Luminance independence: A peak brightness that does not interfere with lower average picture levels when used in ambient light.
  • User-adjustable white point: The idea of adjusting a screen’s color temperature is nothing new, but the S9 allows you to only set the temperature of white pixels, leaving the rest untouched. You can set the temperature to between 6,800K and 8,600K.
  • Vision accessibility display modes: Designed to help people with visual impairments, a new color lens mode offers 12 types of color filtering with selective transparency. Meanwhile, the color adjustment mode lets the user adjust colors interactively based on their visual similarity.

Elsewhere, it offers 529PPI and a resolution of 2220×1080 pixels.

Perhaps none of this should come as a surprise. In its iPhone X review, DisplayMate praised Samsung for developing and manufacturing the OLED hardware in the device. The S9 merely took the next step.

Compare to OnePlus 6’s Screen and Display

The only other phone screen that can come close to rivaling the iPhone X and Samsung Galaxy S9 is the OnePlus 6. It was released in May 2018.

There’s no denying that this phone’s screen is incredible. It’s a considerable step up on every other flagship phone that’s available today. But alas, it’s not as good as its two competitors.

However, in the interests of completion, let’s take a quick look at what it offers.

The 2280×1080 resolution offers a pixel density of 402PPI. That’s less than the S9 (529) and the iPhone X (458), but it still marks an upgrade on previous OnePlus models.

It also lags behind the other two phones when it comes to viewing angle. According to independent testing, you’re liable to experience color fringing when using the screen at a closer-than-typical distance. Broadly speaking, pixels are unresolvable past 12 inches.

The phone also struggles with color temperature. Whereas the S9 earned praise for its adjustable white point, the OnePlus’ sRGB and DCI-P3 display profiles show whites at 6276K. That’s too warm; 6504K is considered the standard for white.

Unfortunately, the repercussion of the excessively warm OnePlus display is skewed color accuracy. The upper half of the red saturation range is below average.

The iPhone X’s Screen Is Good, But Not the Best

If you’re buying a phone based solely on screen quality, the clear winner is the Samsung Galaxy S9. The iPhone X is the runner-up, with the OnePlus 6 in a distant third. However, all three models are significantly better than any other flagship phone on the market.

If you’d like to compare other areas of the Android vs. iPhone debate, check out which mobile operating system is best for gaming and which phone OS is best for security.

Read the full article: Is the iPhone X Screen Really the Best of All Smartphone Screens?


Read Full Article

A Beginner’s Guide to Python Object-Oriented Programming


beginner-python-programming

Python is used in everything from the Raspberry Pi to machine learning. If you want to work on any large project however, you’ll need to know how Python works with object-oriented programming (OOP). This article will cover the very basics you need to know.

If you’re not actually into programming, why not take a look at these best Monty Python sketches instead? They did inspire the language, after all!

Wait, Python’s Not a Real Language?

Let’s get one thing clear: Python IS a real programming language, it’s popular, and it’s rapidly growing. Just because it reads like pseudocode and you can code Minecraft on the Pi with it, that doesn’t mean you should discount it as a lesser language.

OOP is the cornerstone of modern software development, and Python is more than capable of keeping up. It may do one or two things differently than other mainstream languages, but don’t let that put you off.

object-oriented programming guide for python

This tutorial will assume a basic knowledge of Python, but we’ll cover all the complex stuff along the way. If you’re new to Python, why not look at these tricks to learning a new programming language, or what about a simple project such as reading and writing to Google Sheets with Python?

Python Prerequisites and Setup

Before getting started, you may wish to get your Python development environment setup. We’ll be using Python 3.6.5, and while you can use older versions, you’ll have less problems following along if you’re using a fairly new version.

You’ll want to create a virtual environment if you don’t have one already, and install PIP for Python if that’s not installed (it comes with most modern installs of Python though). Once you got those setup, you’ll be good to go. Let’s get started!

The Basics of Python: Classes

A class is the basic building block of OOP. A class is like a plan or blueprint. They define characteristics of an object. If you have a car class, for example, it may state that there are four wheels, at least one seat, and an engine.

Here’s how to make a class in Python:

class Vehicle:
  """ This class defines vehicles. """
  pass

Simple right? There’s a few things going on here. Notice the comment at the top of the class. This is a special comment called a docstring. It should explain a bit about your code. By using the triple quotes (“””), you’re telling Python that this is a docstring.

The pass keyword tells Python do to nothing. It’s a special word, and you can think of it like a todo. It will make your code run, but it doesn’t actually do anything.

If you run this code, you’ll see that nothing happens. You need to instantiate you class. This effectively means to go and build an object based on the plan defined in the class. You can create as many copies as you like, each with different properties. Here’s how you do that:

red_car = Vehicle()

If you run this again, you’ll see that nothing happens. The code is working correctly, but you’ve not told it to do anything noticeable. The Vehicle class defines blueprints for a vehicle, and this latest line creates a vehicle object, and gives it a name of red_car.

It’s possible to make as many objects as you like:

red_car = Vehicle()
green_car = Vehicle()
blue_car = Vehicle()

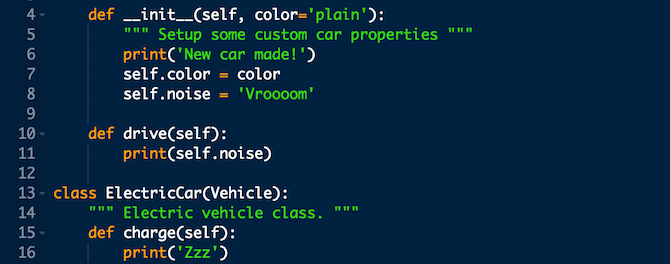
Let’s add some more code. Add a method called __init__ to the Vehicle class:

class Vehicle:
  """ This class defines vehicles. """

  def __init__(self, color='plain'):
  """ Setup some custom car properties """
  print('New car made!')
  self.color = color

red_car = Vehicle()
green_car = Vehicle()
blue_car = Vehicle()

Pay special attention to this __init__ method. It must begin and end with two underscores. This is a special method in Python. It gets called automatically when you create a new object. Running this code will show the words “New car made!” three times.

object-oriented programming guide for python

Finally, __init__ takes a custom argument called color. The equals sign and string immediately following tell Python to set the color to “plain” if not specified. You can modify your instances to setup your car color at creation:

red_car = Vehicle(color='red')
green_car = Vehicle(color='green')
blue_car = Vehicle(color='blue')

If you print the car color, you’ll see that each instance has a different color, even though all three were made to the same specification (the class). Python allows you to access nearly any variable or object—not many other languages allow you to do this:

print(red_car.color)
print(green_car.color)
print(blue_car.color)

object-oriented programming guide for python

This works because you assigned color to self.color. Self is another special keyword in Python, and it refers to each specific instance of a class. Whenever you use self, you can set or access data unique to that instance. The red car has a color of red, for example.

Modify your __init__ method to store the car noise in a variable:

self.noise = 'Vroooom'

To print the car noise, you could just access the noise variable, like you did with color, but this isn’t the best idea. What if, when you drive a car, you want some other code to run at the same time, maybe code that you haven’t written yet? Or what if you want to change how a car drives in the future? By creating a function (also known as a method), you can tightly control how things work. Add this below your __init__ method:

def drive(self):
  print(self.noise)

You can call this method quite simply:

red_car.drive()

object-oriented programming guide for python

Whenever you call the drive method, Python will print the sound. You can expand this to perform all manor of tasks, but leave it as is for now.

Well done! By now you should have a firm grip on the basics. You should be able to create and use your own classes, each with their own unique abilities and functions.

What About Private Variables in Python?

Private objects are very common in most other languages. They are simply variables or functions that cannot be accessed outside the class. They may be code that requires special conditions to be met before use, or simply designed for internal use only. Whatever the reason, instances cannot access private members… unless you’re coding in Python.

Python does not have private members. Instead, Python relies on an honor system: “We are all consenting adults.” Python programmers understand that you may want to tinker with the sensitive internals of a class, and that’s okay, so nothing should ever be truly inaccessible.

However, Python does have an accepted convention for marking certain variables as “private” in the sense of “This variable is for internal use and you probably don’t need to touch it.” The convention is to prefix variable names with an underscore:

_some_secret_variable = 42

This acts as a warning to other programmers. Python won’t stop you accessing this, but the underscore advices you that this was not designed to be used this way, and you should continue at your own risk.

It’s sometimes the Python way to tinker with hidden stuff, but you run the risk that things may not work properly.

Understanding Inheritance in Python

Inheritance is another way to reduce duplication and reuse code. Thinking of a parent and child relationship, inheritance allows the child to share common code with the parent. Let’s implement an electric car, which inherits from the parent.

Add this code below your Vehicle class:

class ElectricCar(Vehicle):
  """ Electric vehicle class. """
  def charge(self):
  print('Zzz')

electric_car = ElectricCar()
electric_car.charge()
electric_car.noise = 'Whoosh'
electric_car.drive()

object-oriented programming guide for python

After the ElectricCar is defined, the Vehicle class is specified inside two brackets. This tells Python that ElectricCar is a child of Vehicle. This gives it access to all the data and methods provided in Vehicle.

The electric car has its own special methods. It can charge (something that other vehicles cannot do). By changing the car noise, and then driving, you can see that the electric car makes a different sound, and you didn’t have to define the drive method. This is because drive is inherited from the parent.

Expand Your Python Knowledge Even Further

These examples have shown just how easy OOP can be in Python. We’ve only just covered the very basics, but once you’ve got those down, the rest is easy.

If you’re looking to continue learning Python, or perhaps put these OOP skills into practice, why not have a look at arrays and lists in Python, or what about getting Python and JavaScript to communicate?

If all of this has left you wanting more, then don’t forget to check out these best websites to learn Python.

Read the full article: A Beginner’s Guide to Python Object-Oriented Programming


Read Full Article

What Is Target Disk Mode? How and When to Use It on Your Mac


target-disk-mode-mac

Every Mac can use a variety of boot modes and startup key combinations. One of these is Target Disk Mode, which essentially turns your Mac into an external hard drive.

By connecting two Macs together in this way, you can quickly transfer files, migrate your data to a new Mac, or access your startup disk when macOS refuses to boot. While regular backups are always essential, Target Disk Mode provides added peace of mind in case disaster strikes.

Let’s take a deeper look at what Target Disk Mode is and the different ways you can use it to your benefit.

What Is Target Disk Mode?

Target Disk Mode is a boot mode which allows you to browse and transfer files to and from a Mac’s internal drive without booting macOS. Volumes mount virtually and instantly, and the use of a cable means that transfers are significantly faster than equivalent wireless methods.

Target Disk Mode Starting Mac

You cannot use the target Mac while it is in Target Disk Mode. Your Mac essentially becomes an enclosure for your internal drive. In order to use your Mac again, you’ll need to disconnect and reboot as normal.

Target Disk Mode was first introduced with the PowerBook 100 in 1991 and has made it into most Mac models since then. Exceptions include the tray-loading iMac, Power Macintosh G3 and G4, models of iBook G3 without FireWire, the first MacBook Air (2008-2009), and old unibody MacBook.

What You Need to Use Target Disk Mode

You’ll need two compatible Mac computers in order to use Target Disk Mode, each with a FireWire or Thunderbolt interface. You’ll also need a cable and any necessary adapters (like Thunderbolt to FireWire, or Thunderbolt 2 to Thunderbolt 3).

FireWire and Thunderbolt logos

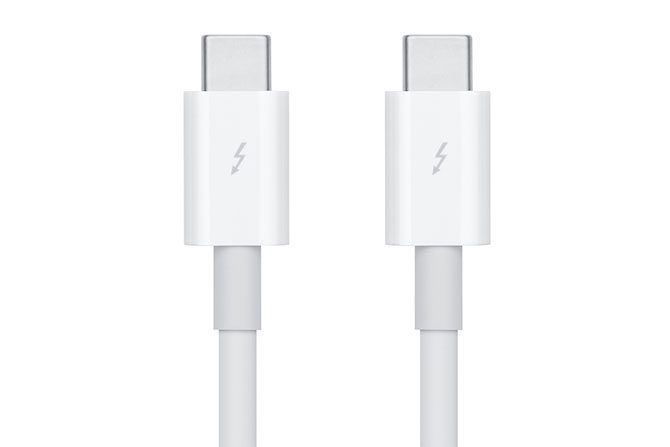
You cannot use plain old USB type-A connectors (not even USB 3.0), but old Thunderbolt and FireWire connections play nicely with the latest standards. Be aware that Thunderbolt cables aren’t cheap. Apple is currently asking $39 for a 2.6-foot-long Thunderbolt 3 cable.

If you’re using a recent Mac, like the post-2017 MacBook Pro or slim iMac, make sure you pick a genuine Thunderbolt 3 cable and not a new-shape USB cable (or Apple’s charger). We’ve put together a guide to help you understand the differences between USB type-C and Thunderbolt cables.

How to Use Target Disk Mode on Mac

When using Target Disk Mode, each Mac takes on a different role:

  • Target: This is the Mac that contains the disk you want to access. You won’t be able to do anything using this Mac, since it will remain in Target Disk Mode for the duration of the operation.
  • Host: This is the Mac which will be accessing the drive. It will boot into macOS as normal so you can transfer files.

1. Connect Your Two Machines

Take your cable and connect both computers via the relevant Thunderbolt or FireWire ports. Connect any adapters you need for older machines. If you’re performing this operation on a MacBook, make sure it has enough power for the duration of the transfer or connect it to a power source.

Apple Thunderbolt 3 cable

2. Start the Target Mac in Target Disk Mode

You can do this two ways:

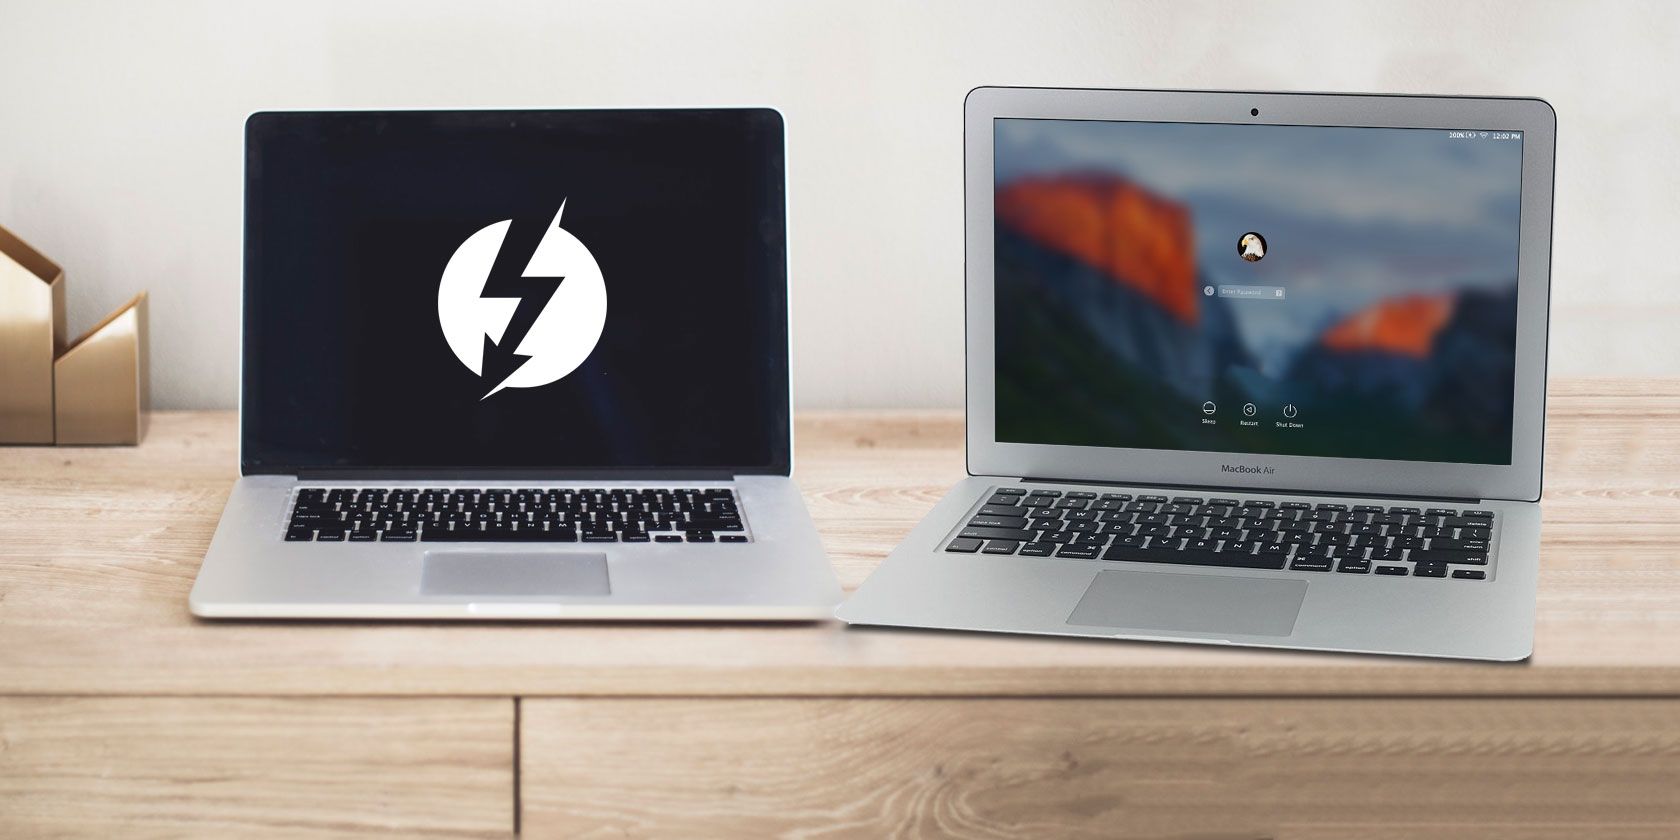
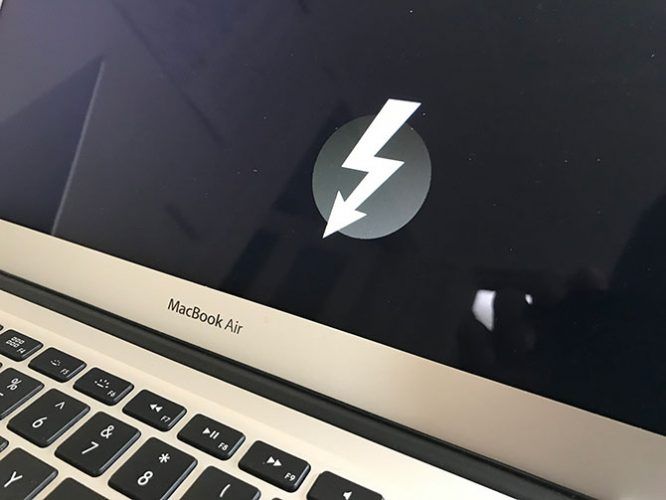
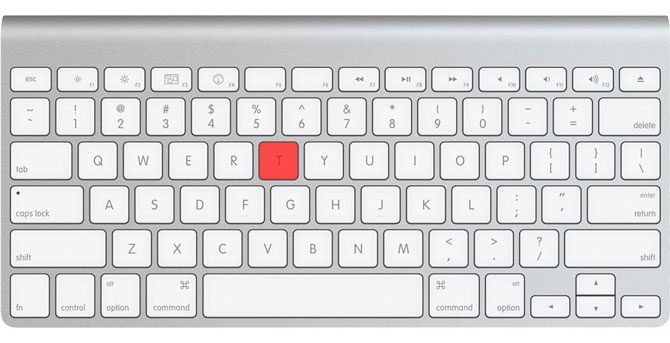
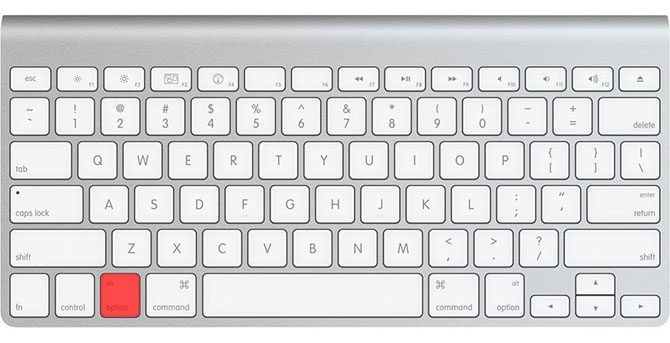
  • Shut down your target Mac, hit the power button, then press T and hold it while your Mac boots. You can let go when you see a Thunderbolt or FireWire icon on screen.
  • If your target Mac is already running, head to System Preferences > Startup Disk and click on Target Disk Mode to force a restart into Target Disk Mode. No need to hold any keys down here.

Apple Smart Keyboard Hold T

3. Decrypt and Access Your Drive

Wait for macOS to detect your target Mac’s drive. If your target drive is encrypted with FileVault, you’ll need to enter your password when you start up the target Mac. Wait for the drive to decrypt, then it should show up like any other external drive.

4. Copy, Transfer, and Disconnect

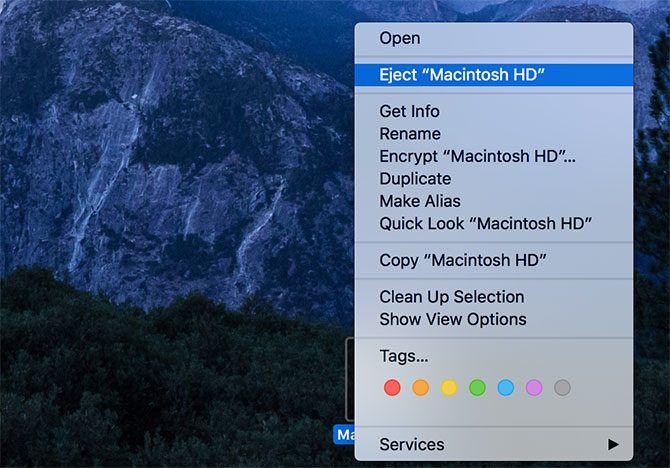
Use Finder to browse files, copy to and from the drive, and then safely eject your drive. You can do this by dragging your target Mac’s drive icon over the Trash can, or by right-clicking the drive and selecting Eject.

Eject Drive macOS

On your target Mac, press the power button to power down the machine. You can now restart this machine as normal, if you want.

When to Use Target Disk Mode on Mac

Now that you know how to use target disk mode, you should familiarize yourself with some of the applications for this boot mode.

Quick Wired File Transfers

If you’re used to transferring files between computers using intermediary media like an external hard drive, why not use Target Disk Mode instead? There’s no need to copy from your Mac to a USB volume, then from the USB volume to your destination—simply move from Mac to Mac.

This is most useful for large files like videos, media libraries, disk images, and so on. A wired transfer via Thunderbolt is much faster than a similar wireless transfer using the notoriously buggy AirDrop.

Transferring Data With macOS Migration Assistant

If you’ve bought a new Mac, you’re going to want to transfer your old data to it. There’s no faster way to achieve this than with Target Disk Mode. In this scenario, your new Mac (which you’re transferring data to) is the host and your old Mac (which you want to pull data from) is the target.

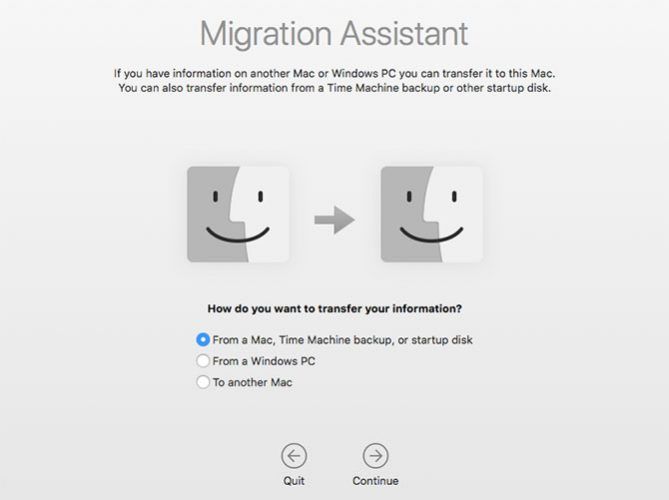
Connect the target and host, boot the target into Target Disk Mode as normal, then on the host launch Migration Assistant under Utilities. Select From another Mac, PC, Time Machine backup, or other disk then select From a Mac, Time Machine backup, or startup disk.

Migration Assistant in macOS

When prompted, select your target Mac’s drive and hit Continue to start the transfer process.

Recovering Files When macOS Won’t Boot

Operating system failures happen to the best of us. Whether it’s the result of a botched macOS upgrade, or a dodgy kernel extension that’s preventing your system from booting, connect your problem Mac in Target Disk Mode and breathe easy.

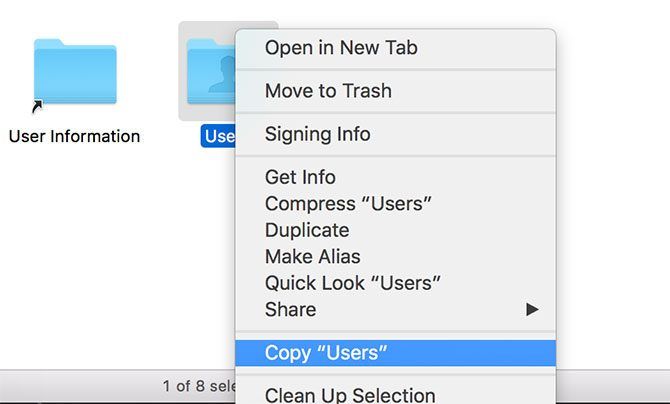
Once you’ve mounted your Mac’s drive, you can start to copy the important files, media libraries, and work documents you forgot to back up. If you’ve got enough space, you could grab your entire /Users/ folder!

Copy Users folder

Run a Target Mac’s Operating System on the Host

What if you have a MacBook with a broken screen or dodgy keyboard? Using Target Disk Mode, you can use a host Mac to boot a target’s operating system. This will restore access to your damaged Mac so you can recover files, wipe the hard drive, and do anything else you need to do.

Connect the two machines as normal, and launch your broken (target) Mac in Target Disk Mode. Now reboot the host machine and enter Startup Manager by holding Option as your host Mac boots. You’ll see your target Mac’s drive appear in the boot menu. Select it, and your host will boot your target’s drive as normal.

Apple Smart Keyboard

You’ll need to know the FileVault password in order to decrypt the drive if you’re using it. From here, it’s possible to recover files, run applications, and prepare your machine for repair.

Limitations of Target Disk Mode on Mac

Target Disk Mode offers real peace of mind and some everyday benefits—you’ll just have to remember to use it! But if you’ve really trashed your target Mac, this can’t help fix your problems.

This is because Target Disk Mode will only work if your drive is operational. If you have a faulty drive, be prepared for some issues. Damage to Thunderbolt and FireWire ports will also make this tricky, as well as logic board issues that might prevent normal operation of these ports.

Read the full article: What Is Target Disk Mode? How and When to Use It on Your Mac


Read Full Article

Google’s Datally app adds more ways to limit mobile data usage


In November, Google introduced Datally, a data-saving app largely aimed at emerging markets where users often rely on prepaid SIM cards, and don’t have access to all-you-can-eat unlimited data plans. The app lets users granularly control which apps can use data, which resulted in a 30% savings on data usage during pilot testing and now saves users 21%, on average. Today, Google is giving Datally an upgrade with several new features that will help users cut data usage even further.

One key feature is the introduction of daily limits, which allow you to control your data usage on a per-day basis. This one is more about creating better habits around data consumption, so you don’t accidentally burn through too much data in a day, then end up without any data left before the month ends.

This also ties into to Google’s larger push to give users more insights into their own behavior when using mobile devices, and more tools to combat the addictive nature of smartphones.

The company in May announced new time management features for Android users, as well as new features to help users silence their phones and wind down at bedtime. It also has software for parents to limit screen time for their children.

While the Datally feature is primarily about conserving data, it acknowledges that it’s often easy to get sucked into your smartphone and lose track of how much time – and then, consequently, how much mobile data – you want to spend.

Another new Datally feature lets you enable a guest mode where you control how much data someone borrowing your phone can use – helpful in those situations where phones are shared among family members.

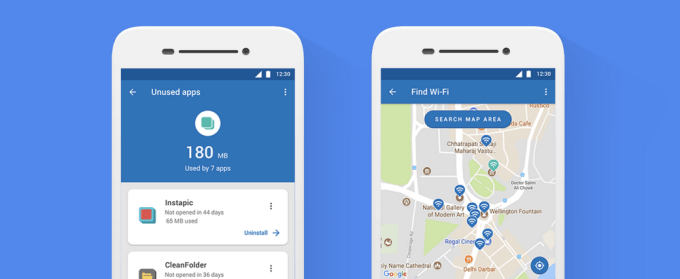
The “Unused Apps” feature, meanwhile, highlights those apps you’ve stopped using but could still be leaking data. Google notes that, for many people, 20 percent of mobile data is from apps using data in the background that haven’t been opened for over a month. Unused Apps will find those culprits so you can uninstall them, it says.

And finally, a new Wi-Fi Map shows all the nearby Wi-Fi networks so you can find those with a good signal and stop using your mobile data.

Though Datally is aimed at helping the “Next Billion Users” come online, it’s not limited to emerging markets. Anyone concerned with data usage can give it a shot.

The new additions are rolling out to Datally today, says Google.

The Android app, which has been downloaded over 10 million times, is free on Google Play.


Read Full Article

20 Productivity Add-Ins for Microsoft Office You Should Install


ms-office-addons-productivity

Microsoft Office is already the leading package of productivity apps, but you can supercharge the suite even more by using a selection of specially-designed plugins.

However, there are hundreds to choose from. If you’re feeling overwhelmed by the selection, you’ve come to the right place.

Here are 20 productivity add-ins for Microsoft Office that you should install right now.

1. Boomerang

Boomerang won a host of prizes at the 2017 Office App Awards, including third-place in the Best Overall Add-in category.

It’s geared towards Outlook users. You can schedule emails for the future, follow up on messages, snooze emails, schedule appointments, and a whole lot more. It even has an AI assistant that’ll help you to craft better emails.

The add-in is free and comes with a 14-day trial of the Pro version.

2. IFTTT

IFTTT lets you link a near-endless number of apps together so that an event in one app will trigger an action in another.

The official Microsoft applet page has 46 free recipes ready to use. And remember, if you can’t find what you’re looking for, you can create your own instead.

3. Translator for Outlook

best productivity add-ins for microsoft office

We live in a globalized world but—unless you were lucky enough to be raised in a bilingual household—learning a foreign language is difficult.

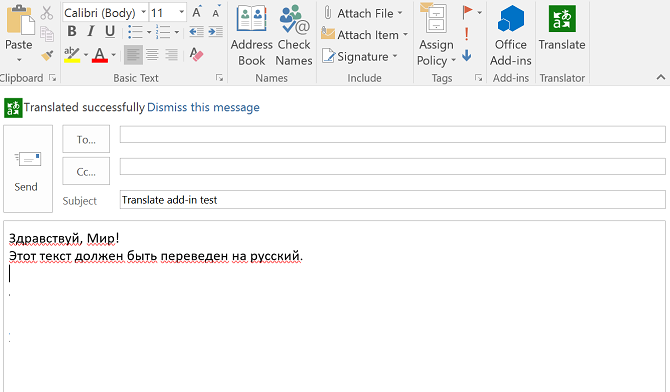
The free Translator for Outlook can help. It uses the official Microsoft Translator API to translate content between more than 60 languages.

4. PayPal for Outlook

PayPal for Outlook is the fastest way to send money to family, friends, and businesses. You’ll never need to log into the PayPal online portal again; just fire up the add-in and enter the recipient’s email address. The app will take care of the rest.

The add-in is free to download and use.

5. DocuSign for Word

Remember the dream of a paperless office?! Well, that never materialized, but DocuSign for Word at least helps you to bring the idea closer to reality.

You can access the add-in via the ribbon in Microsoft Word, meaning you can drag-and-drop any necessary signatures into place or add tags to show other people where they need to sign.

The free version of the add-in provides five free documents if you have a Microsoft account and 10 free documents if you have an Office 365 account. Thereafter, you will need to upgrade to the $10 per month Pro plan.

6. Zoho CRM for Microsoft Office 365

best productivity add-ins for microsoft office

Zoho offers one of the best cloud-based CRM systems. It’s a worthy rival to the more well-known Salesforce.

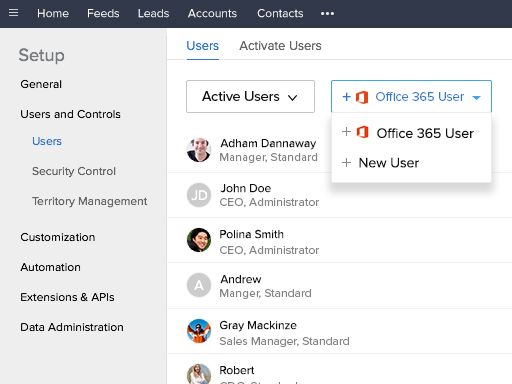
The Zoho CRM add-in works across the complete Microsoft Office 365 suite. It can synchronize users, calendar events, documents, and sales data instantly, thus increasing efficiency and boosting you SME’s productivity.

The basic version of Zoho is free to downloand and use, but the company also offers a range of Pro versions if you need extra functionality.

7. Grammarly

Let’s face it, Microsoft Word’s native spellchecker is rubbish. It misses lots of errors and constantly throws up false positives.

For a better experience, use Grammarly. In addition to checking for typos and other fundamental grammar errors, it can also point out more complex issues such as dangling modifiers and passive voice.

Over time, it will even learn to recognize your writing style and adjust its recommendations accordingly.

Grammarly for Word is free.

8. Wikipedia

It doesn’t matter whether you’re writing a college essay, a high-school homework assignment, or a business proposal—there’s a good chance Wikipedia’s web page is never more than a click or two away while you’re working.

Instead of constantly jumping between your browser and Office, why not just install the free official Wikipedia add-in? You can search the encyclopedia and get the results in a task pane. It will even help you correctly reference quotes and images taken from the service.

9. Random Generator

best productivity add-ins for microsoft office

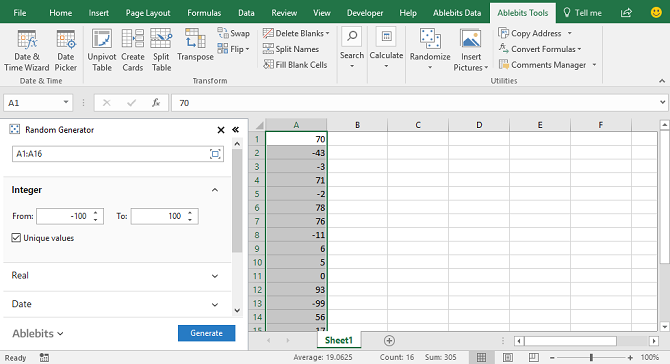
Random Generator is an add-in for Microsoft Excel that can fill a spreadsheet with random values. It’s great for both creating example data and checking your spreadsheet for calculation errors.

The free add-in can fill your sheet with real and integer numbers, dates, and random true/false Booleans.

10. Google Drive

The Google Drive add-in is far from being the most complicated item on this list, but it is one of the most useful.

It adds a Google Drive option to all the Office apps’ Save As menu. Using the option, you can open documents from your drive, save documents into your drive, and share Office files in your drive with other users.

11. Email Recovery

Who hasn’t accidentally deleted an important email before? If you’re trying to chase the Zen-like tranquility of inbox zero, it has probably happened more often than you care to admit.

Email Recovery can scan Outlook’s deleted email’s folder and recover any important messages. It also has a purge feature that’ll delete emails for good.

12. Abbreviation List

As any college student will tell you, there’s a very specific way of referencing abbreviations in a piece of text.

We’re not going to get into the nuances of the rules now, but suffice to say, this add-in will make sure you’re doing it correctly. It can produce a table of abbreviations in your document, as well as draw your attention to any undefined ones.

The add-in is free.

13. Pickit

Pickit is the first Microsoft PowerPoint specific add-in on the list. It provides a vast library of royalty-free stock images that you can drop into your slideshow.

It’s a massive step up on the native tool, which only lets you search Bing and restricts you to use any images you find at whatever size they were uploaded at.

It’s free to use, but for $1.99 per month you can upgrade to the Pro plan. It adds HD images, a way to save images, and an ad-free experience.

14. Office Tabs

best productivity add-ins for microsoft office

Tabbed browsing revolutionized the way we search the web, but Microsoft appears steadfast in its refusal to introduce any tabbed features into the rest of its apps and services. Indeed, tab-friendly apps feature heavily in our list of best alternative file explorers for Windows.

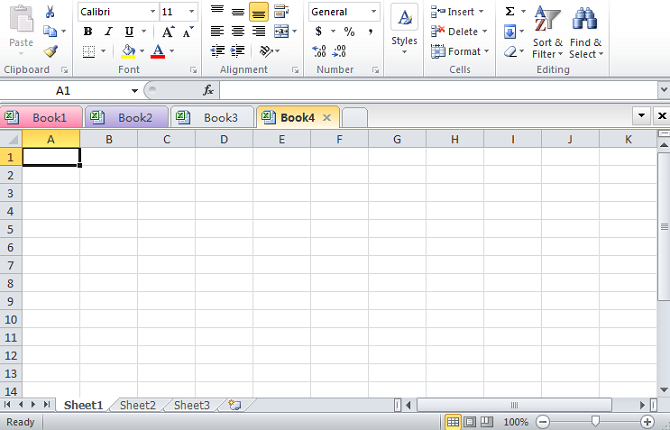
As the name suggests, Office Tabs bring the tab experience to Office. The free add-in adds a bar below the ribbon that lets you jump between any documents you’re working on.

15. Workload Timer

There are lots of ways to squeeze more productivity out of the time you have available; at MakeUseOf, we’re big fans of trying the Pomodoro technique.

However, if the Pomodoro technique sounds like too much hassle, perhaps a trusty old stopwatch will do? Workload Timer fulfills that role; you’ll be able to account for every second of your day more effectively.

The add-in is free.

16. Vertex42 Template Gallery

All the Microsoft Office apps come with hundreds of templates you can use, but they’re not great. They lack sparkle and are all a bit “samey.”

If you want something to stand out, check out Vertex42’s free selection of 300 Microsoft Word and Microsoft Excel templates. You’ll find templates for budgeting, templates for invitations, templates for presentations, and a whole lot more.

17. Sticky Text

Are you fed up with writing the same text over and over again, either for your job or your studies? Sticky Text could be the answer. It lets you save words, phrases, and paragraphs that you use frequently, then drop them into your document whenever you need them with a click of your mouse.

The add-in is free.

18. MyScript Math Sample

Microsoft Word does have a native way of adding equations to documents, but not the easiest tool to use.

MyScript Math Sample simplifies the process. It lets you write equations directly into a Word document using a stylus, your finger, or a mouse. It supports more than 200 mathematical symbols.

19. Duplicate Remover

If you have an Excel sheet with thousands of cells, identifying rogue duplicate content can be a near-impossible task.

The free Duplicate Remover will find the duplicated data and offers six different ways to deal with the offending cells. You can mark duplicates with a color or a status column, copy or move them to another sheet, clear repeating values, or delete the entire row that contains the results.

20. FindTime

FindTime is an official add-in for Microsoft Outlook. It’s a meeting organizer which shows which times will work best for everyone in a given group.

The add-in also has a voting feature which allows you to propose multiple slots and garner a consensus on which time is most suitable.

The add-in is free.

Take Your Pick of Microsoft Office Add-ons

These 20 add-ins have only scratched the surface of what’s available.

If you’d like to learn more, check out our guides on Microsoft Word plug-ins and Microsoft Office add-ins.

Read the full article: 20 Productivity Add-Ins for Microsoft Office You Should Install


Read Full Article

This simple robot offers more cowbell


Fellas, you’re gonna want that cowbell. And what better way to get that cowbell than with an automatic cowbell-playing robot that uses simple components to create a musical experience like no other. The system, built over at Adafruit, includes a simple Arduino controller, a potentiometer to control the speed of the cowbell hammer, and a few audio systems to play back some BÖC and the immortal words of The Bruce Dickinson: “More cowbell.”

It even includes a controller to activate a fog machine for a little extra rock and roll.

You can download the code for the system here and there is a full build guide here. Ultimately this is one of the silliest DIY projects I’ve seen in a while but, as you may recall, the only prescription for certain fevers is obviously more cowbell.


Read Full Article

Sell Your Gadgets With Decluttr for an Easy Payday


sell-gadgets-decluttr

Used technology is a huge market. Whether you want to sell your old electronics to pick up some extra cash or want to buy used to save money, you need a reliable service to do so.

That’s where Decluttr comes in. It’s the best place for selling gadgets you no longer use, and you should check it out next time you have something to offload. Here’s why.

What Is Decluttr?

Open Decluttr’s homepage and you’ll see two big buttons: Start Selling and Start Shopping. Click the one that applies to you.

Selling on Decluttr

On the Selling page, you’ll see three tabs for selling tech, LEGO, and CDs/DVDs/games/books. Depending on the item you want to sell, you’ll need to input different information.

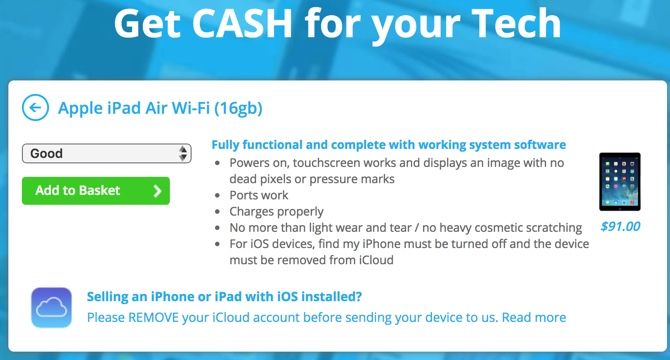
  • Tech: Enter the name of your item (such as iPhone 7 or PS4) and hit Enter. You’ll see a list of matching items below. Select the one that matches your device. Choose its condition (Good, Poor, or Faulty) and you’ll get a quoted price.
  • CDs, Games, and more: Enter the barcode for the media you want to sell. If you have issues entering it, you can use the Decluttr app for Android or iOS to scan it easily.
  • LEGO: Place all your LEGO pieces in a bag, weigh it, and select the nearest weight.

Decluttr-Sell-Item

You can add all the items you want to sell in one transaction. Choose Add to basket as you complete each one, and you’ll see it reflected in your Total Value in the bottom-right corner. Click Complete Order once you’re done adding items, then you’ll need to sign into an account and complete the process.

Buying on Decluttr

If you’re looking to shop at a discount, you can take advantage of Decluttr and buy some of the items others have sold. Open the Decluttr storefront and you’ll see current deals. Choose a category like Cell Phones, Tech, or Gaming at the top based on what you want to buy.

Decluttr-Shop

Decluttr has tons of items for sale, including unlocked phones, tablets, CDs, video games, and more. Simply add the items you want to your cart and check out when you’re ready to order.

Why We Like Decluttr

Why sell your electronics or shop on Decluttr? It offers plenty of perks:

  • Free shipping: The site will send you a free shipping label when you sell. Simply attach it to your box and drop it off where convenient. You’ll also enjoy free tracked shipping on all purchases.
  • Fair prices: Selling your device to Decluttr provides a great price; you can expect to get around 33% more than you’d get from selling your phone to your carrier.
  • Next day payments: Once Decluttr receives your shipped goods, you’ll receive payment the next day.
  • No-questions asked return policy: If you aren’t satisfied with an item you’ve purchased, simply return it within 14 days without hassle.
  • Warranty included: All tech sold through Decluttr includes a 12-month limited warranty.

How to Try Decluttr Today

If you have any old tech or media to sell, or want a great price on used tech, Decluttr is the place to get it. Don’t bother with trying to set up a sale in person or worry about auctions. Get a fair and instant quote with Decluttr, ship your goods for free, and get paid quickly. It’s that simple.

Image Credit: belchonock/Depositphotos

Read the full article: Sell Your Gadgets With Decluttr for an Easy Payday


Read Full Article

How to Enable Case-Sensitive File Names on Windows


never-touch-windows-folders

Most UNIX and Linux-based operating systems use case-sensitive file and folder names, but historically, it’s never been an option on Windows.

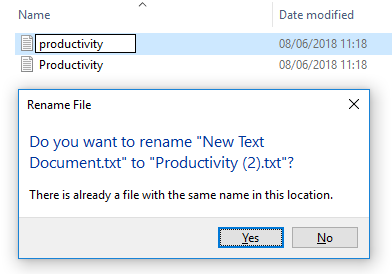
What do we mean by “case-sensitive file names”? Well, if I create a file in Windows called “Productivity.txt,” I could not create another file in the same folder called “productivity.txt” even though they’re technically different. Windows will throw out an error message saying “There is already a file with the same name in this location”:

By enabling this optional new feature, you can remove this limitation and Windows 10 will see “Productivity.txt” and “productivity.txt” as two separate files.

How to Enable Case-Sensitive File Names on Windows

You need to activate case-sensitive file names on a directory-by-directory basis. And unfortunately, at the time of writing, there is no way to do it through a user interface; instead, you need to use the command line. Follow the instructions below to activate case-sensitive file names on Windows.

Note: Close any Linux apps before continuing.

  1. Right-click on the Start menu.
  2. Select PowerShell (Administrator) on the pop-up menu.
  3. Type fsutil.exe file setCaseSensitiveInfo C:\folder enable, replacing C:\folder with the destination you want to change.
  4. If the folder you want to edit has a space in its name, put quotation marks around the name (for example, fsutil.exe file setCaseSensitiveInfo “C:\my documents” enable.

Unfortunately, you can only do one folder at a time, and subfolders do not inherit their parent folder’s settings. As such, you will need to repeat the fsutil.exe command for every folder in which you want to enable case-sensitive names.

Lastly, to reverse your changes, head back to PowerShell and type fsutil.exe file setCaseSensitiveInfo “C:\folder” disable (again, replace “C:\folder” with the location in question.

PowerShell is an amazing app, by the way, and it lets you perform lots of advanced tasks on Windows. Learn more about it if you want to kick your Windows administration skills and productivity up several notches.

Read the full article: How to Enable Case-Sensitive File Names on Windows


Read Full Article

How to Make a Graph Paper Template in Microsoft Word


You already know that Microsoft Word templates can save you a lot of time. Microsoft Word also offers a clutch of templates you can re-purpose for your needs, but none of them are for graph paper or grid designs.

That’s fine, though. If you need one, you can just design your own graph paper template in Microsoft Word.

How to Make a Graph Paper Template in Word

A graph paper template can be useful for practicing things other than maths. For instance, you can work on your two-dimensional drawing skills or even use it on a home renovation project. Though grid-lined Word templates are available, learning to create your own is a quick process.

  1. Open Microsoft Word. Launch a new document.
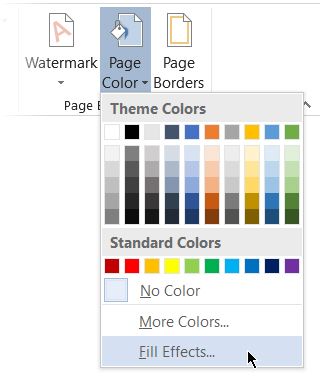
  2. Go to Ribbon > Design tab. Then, click the Page Color button and choose Fill Effects from the dropdown.
    Add Fill Effects
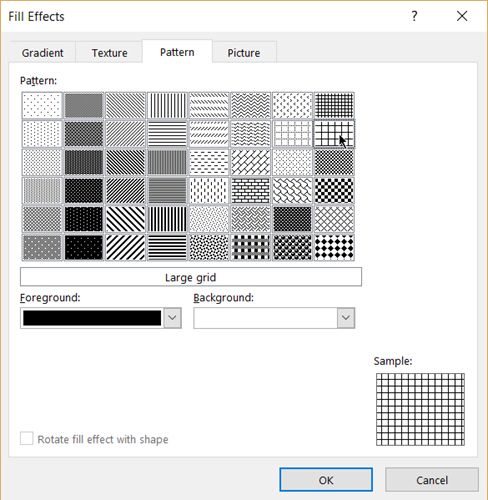
  3. Click the Pattern tab to display the design choices available to you. For a typical graph paper look, you can choose the Small grid or Large grid pattern. Select the pattern tiles and see its name displayed in the box above the color chooser menu.
    Choose a Pattern
  4. Use the default black and white foreground and background color. You can also choose a color for the two to give the paper your own unique look.
  5. Click OK.

You can now print your own graph paper or use the layout within Microsoft Word itself for interesting instructional projects or even play a game of Battleships. Graph paper can meet varied needs. I find them useful for brainstorming and mind mapping.

Read the full article: How to Make a Graph Paper Template in Microsoft Word


Read Full Article

How to Remove “Articles for You” in Chrome on Android

The Ultimate Beginner’s Guide to Microsoft PowerPoint: From Newbie to Master


powerpoint-guide

Microsoft PowerPoint has been a staple for creating presentations for many years. But like anything, not everyone is an expert right off the bat. You have to start somewhere, right? So, let this beginner’s guide to PowerPoint be that first step.

This guide is available to download as a free PDF. Download The Ultimate Beginner’s Guide to Microsoft PowerPoint: From Newbie to Master now. Feel free to copy and share this with your friends and family.

For those beginner’s who are using PowerPoint for the first time, haven’t used it in a while, or just want a simple reference for the basics, this your guide to the desktop version. And, many of these same features apply if you use it online. So, if you are still deciding between PowerPoint Online and PowerPoint 2016, this guide can come in handy either way.

What Is Microsoft PowerPoint?

Microsoft PowerPoint is basically a presentation creation tool. You can make slideshows with text, images, shapes, animations, audio, and much more. Then, pop your presentation onto the big screen to display it to others or save it as a visual document for yourself.

From Microsoft:

“PowerPoint is a slideshow presentation program that’s part of the Microsoft office suite of tools. PowerPoint makes it easy to create, collaborate, and present your ideas in dynamic, visually compelling ways.”

For business, educational, and personal situations, PowerPoint offers the flexibility to make the simplest presentations stand out with its host of features.

General Uses for PowerPoint

  • Business presentations for products and services
  • Educational slideshows for classrooms and lectures
  • Personal visuals such as mind maps and family photo slideshows
  • Sales and marketing materials
  • Event presentations like weddings, anniversaries, or family reunions
  • Project, budget, and financial presentations
  • Certificates, calendars, reports, diagrams, and charts for any industry

You can create almost any type of visual in PowerPoint. But first, you should become familiar with the general terms of the application.

Basic Terms Used in PowerPoint

You will see many words and terms used frequently throughout this guide. So, taking a moment to review them will help you follow the processes and explanations much easier.

Slideshow and Presentation: When talking about PowerPoint, you may see these two terms become interchangeable. They each represent the overall document you create in the application.

Slides: Each slideshow in PowerPoint contains slides, just like with a physical slideshow. You can think of slides as pages that you can add to your presentation and then move through them one-by-one.

Animations: Animations are visual effects that can give your slide a unique appearance. They allow you to add movement and pizzazz to the elements on your slide.

Transitions: Transitions are also visual tools, but you will see as one slide moves to the next. By using a transition, you can make your presentation stand out to your audience or use it to create a dramatic effect.

The Ribbon and Tabs in PowerPoint

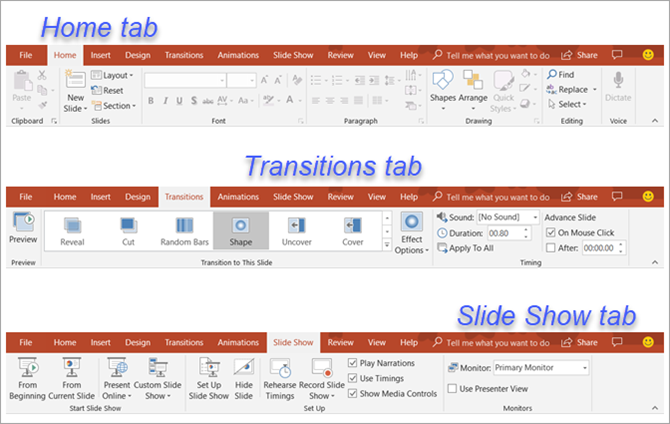
Just like with other Microsoft Office applications, the PowerPoint ribbon contains the buttons that you will use inside tabs. You can customize the ribbon to remove or add both tabs and buttons. But, you will likely see the tabs below by default.
Beginner's Guide to Microsoft PowerPoint - Tabs and Ribbons

Here is a brief description of what each one is for and which tab group you can see.

  • File: Create a new presentation, open an existing one, save, print, and share slideshows.
  • Home: Control the clipboard, slides, font, paragraph, drawing, and editing.
  • Insert: Insert slides, tables, images, illustrations, links, comments, text, and media.
  • Design: Select a theme, pick a variant, customize slides, and get design ideas.
  • Transitions: Choose a transition, preview it, adjust the effects, and add timing.
  • Animations: Pick an animation, preview it, adjust the effects, use advanced features, and add timing.
  • Slide Show: Start a slideshow, set one up, pick a monitor, and use presentation view.
  • Review: Use tools for proofreading, accessibility, language, comments, and comparisons.
  • View: Change the presentation view, adjust the master views, zoom in or out, select colors, and work with windows and macros.

You should also see the Help tab and Tell me what you want to do box. If you need assistance or want more information on a feature, just open Help or enter the keyword into the Tell me box and view your results.

The PowerPoint Quick Access Toolbar

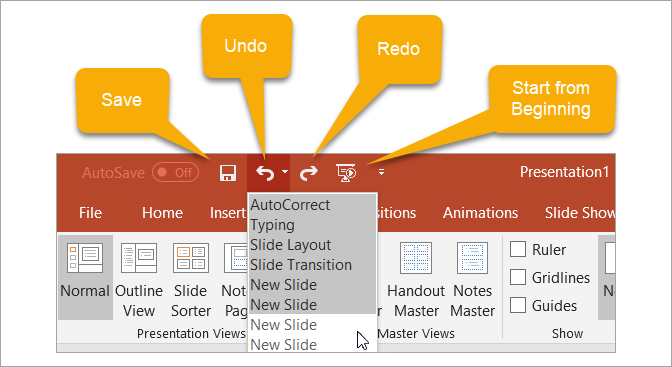
Like the tabs and ribbon with other Microsoft Office products, you also have the Quick Access Toolbar. You might already be familiar with this handy tool, but if not, this is the toolbar at the very top left of the PowerPoint window. As the name implies, this feature allows you to perform quick actions.
Beginner's Guide to Microsoft PowerPoint - Quick Access Toolbar

The Save button lets you easily save the file you are working on with the current file name.

If you make a mistake and want to undo it, just click the Undo button. If you click it once, it will undo the last action you took. If you keep clicking it, it will undo each previous action by moving backward. Alternatively, you can click the arrow next to the Undo button and highlight all actions you want to undo.

If you undo an action with the button, the Redo button will then be clickable. This lets you redo what you have just undone. Like the Undo button, you can redo your last action with one click or use the arrow next to the Redo button to redo multiple actions.

The Presentation button lets you start your slideshow as it will be viewed by others. It should take up your entire screen for a nice view of the presentation at any time during your creating or editing processes.

You can select the arrow on the right of the Quick Access Toolbar to add or remove buttons from it easily. You can also see more commands available or move the toolbar below the ribbon.

How to Work With PowerPoint Slides

Slides are the foundations of your slideshows. So knowing the ins and outs of how to work with them effectively can have a big impact on your creation. Here are the basics you should know to work with your PowerPoint slides.

Add a PowerPoint Slide

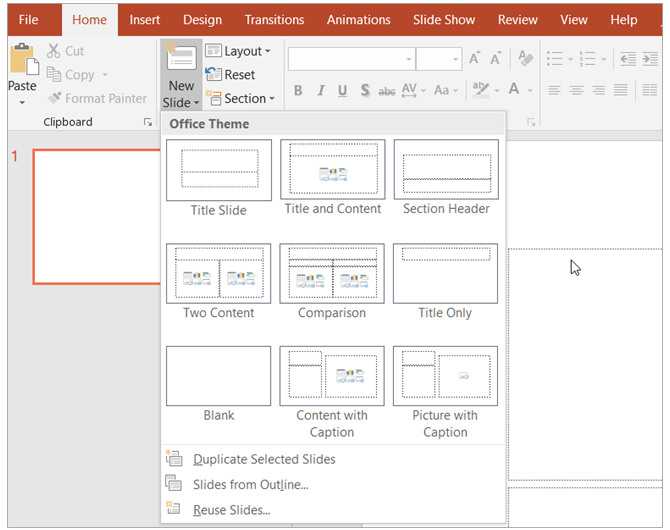
On the Home tab, you should see a section on the ribbon for Slides. You can quickly add a slide by clicking the New Slide button. This will add a slide just like the one you have currently selected.

Alternatively, you can click the arrow on the New Slide button. This allows you to choose which type of slide you want to add such as a blank slide, a title with content, or a picture with caption.
Beginner's Guide to Microsoft PowerPoint - Add Slide

Change the Layout of a Slide

The Layout button on your ribbon lets you change the type of the currently selected slide. So you can easily change a title slide to one with a title and content or a picture with caption slide to a content with a caption.

Slide Icons

Some slide types are easy to understand right from the start. For instance, if you choose a title slide, you will see the text areas instructing you to click to add your title and subtitle. But other slide layouts, like those that let you add media, contain icons for you to insert your content.

If you use this type of slide, just click the corresponding icon to insert your item.

  • Insert Table: Create a table by choosing the number of columns and rows.
  • Insert Chart: Create a chart with a variety of options like line, pie, bar, and area.
  • Insert SmartArt graphic: Create a visual like a matrix, pyramid, or process diagram.
  • Pictures: Insert an image from your computer.
  • Online Pictures: Insert an image from the gallery or search the web for one.
  • Insert video: Insert a video from a file, YouTube, or embed code.
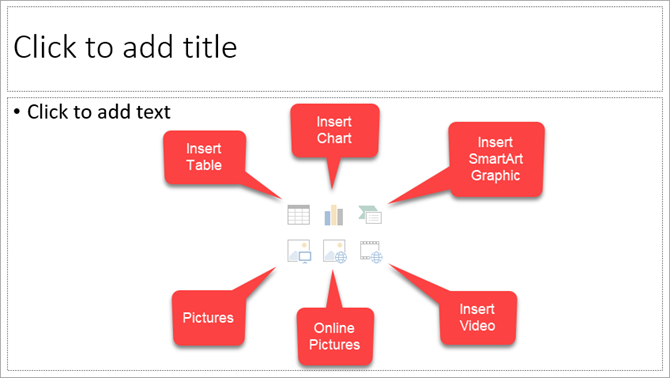
Beginner's Guide to Microsoft PowerPoint - Slide Icons

You can also get more details on embedding YouTube videos or adding music to your PowerPoint presentations.

Delete a Slide

If you want to delete a slide, the simplest way is to select it and click Delete on your keyboard. You can also right-click on the slide and choose Delete Slide from the context menu.

Using PowerPoint Sections

You might want to organize your slideshow into different sections. Click the Section button, select Add Section, and then give it a name. You can then add slides separately within each section. The Section button arrow lets you also remove, rename, collapse, and expand sections.
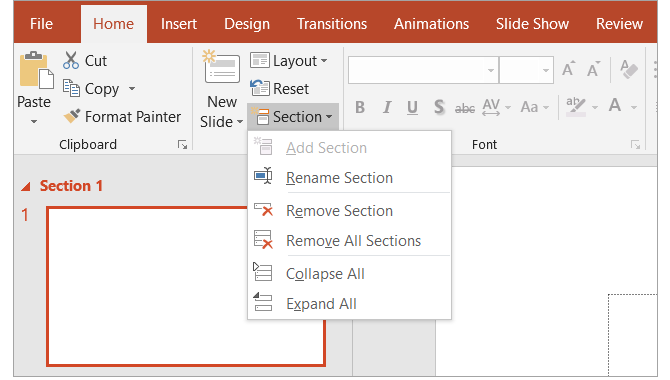
Beginner's Guide to Microsoft PowerPoint - Section Options

Other Common Slide Actions

  • Easily rearrange slides with a drag-and-drop action.
  • Duplicate slides or create them from an outline using the New Slide button arrow or right-clicking and using the context menu.
  • Return a slide to its default layout by clicking the Reset button or right-clicking and using the context menu.

Work With Presentation Notes

PowerPoint offers a terrific speaker note feature that can come in handy. You can add a note to a slide for your own reference or for speaking to your audience during a presentation. The note section appears directly below each slide within PowerPoint.

If you cannot see it, just click the Notes button in the task bar at the bottom of your PowerPoint window. Or, open the View tab and click the Notes button on your ribbon. Then, simply click inside the note section to add yours.
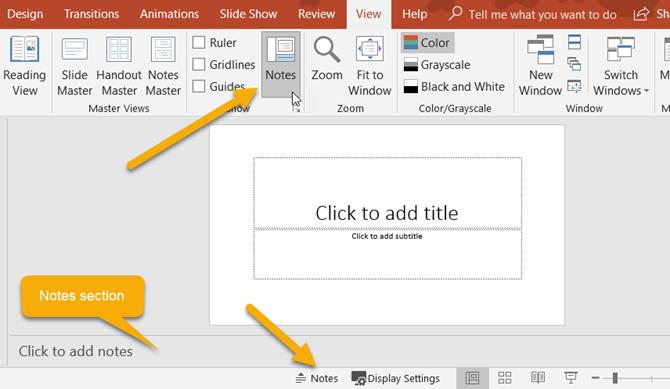
Beginner's Guide to Microsoft PowerPoint - Notes

Using Notes in Your Presentations

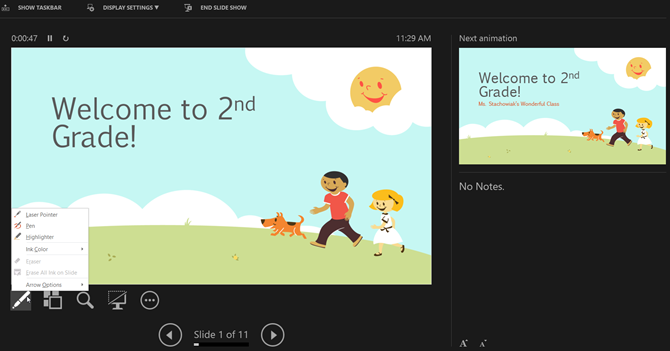
When you present your slideshow to an audience, only you can see your notes. This makes it a great tool to hold your descriptions, explanations, or instructions as you present your slideshow. Here is the view that you will see containing your notes as you display your presentation.
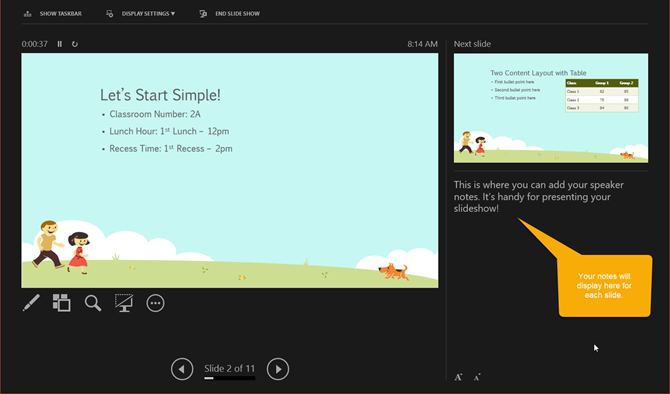
Beginner's Guide to Microsoft PowerPoint - Notes in Presenter View

Printing Your Presentation Notes

If you print your presentation so that your audience has a reference, you can include your notes if you like. To see how it will look, click the View tab and then Notes Page in the Presentation Views section of the ribbon.

If you would like to change how your notes look when you print them, click the Notes Master button in the Master Views section of the ribbon. This allows you to select the design, layout, and page setup options. Also, note the Handout Master button directly to the left which lets you customize the entire handout appearance as well.
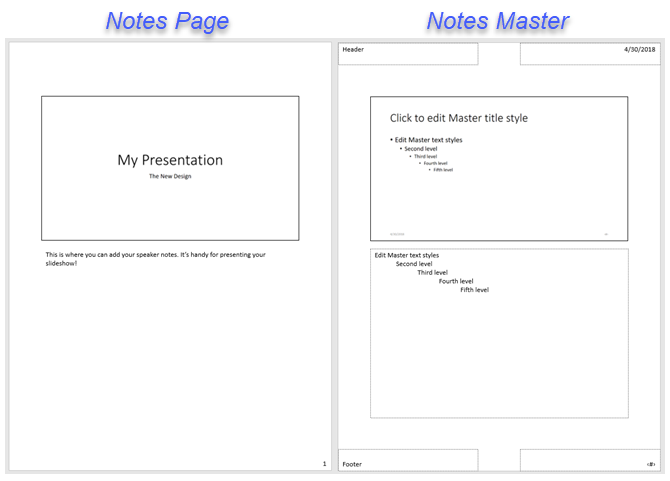
Beginner's Guide to Microsoft PowerPoint - Notes Page and Master

Add Animation to PowerPoint

If you are considering adding animations to your slides, it’s super easy to do. Animations can be effective for slideshows you create for education like classroom presentations or college lectures. They can also give your presentation a fun effect for personal slideshows like a family reunion or wedding display.

Animation Options

These are the basic features available on the Animations tab.

  • Animation: Choose from a variety of options by clicking the arrow in the Animation You can apply an animation to an element when it enters or exits the slide, use it for emphasis, or give it a motion path.
  • Effect Options: Different animations have extra options for you to pick from. For instance, the Wheel animation lets you pick the number of spokes while the Spin options lets you select the direction and amount of spins.
  • Advanced Animation: Here you can add an animation, open the Animation Pane for more working room, set up a trigger, or use the Animation Painter. But for simple slideshow animations, the basic features should suit you fine.
  • Timing: Decide how you want your animations to appear on the slide. They can start when you click during the presentation or right after or with the previous animation. You can also pick a duration time, delay time, and reorder your animations.
  • Preview: Once you add an animation you can see a quick view of how it will look without exiting the editing mode or opening the presentation view.
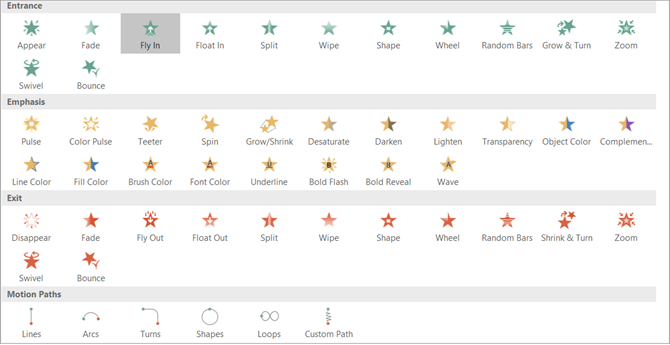
Beginner's Guide to Microsoft PowerPoint - Animations

Create Your First PowerPoint Animation

First, select the slide and then the element on the slide that you want to animate. Then, just pick the type from the Animation box. It’s that easy! You can then use the tools described above to add effects, advanced items, or timing if you like.

Notice that when you add an animation to an element, a number appears next to it. Each animation you add will be numbered sequentially so that you can easily identify it, work with it, or reorder it. Remember to think of each animated element on its own. This means you can have multiple animations with their own effects all on the same slide.
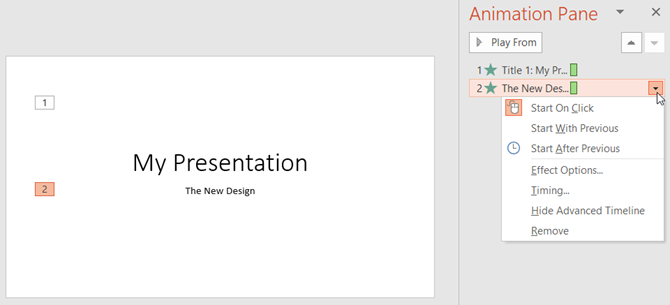
Beginner's Guide to Microsoft PowerPoint - Animations Pane and Numbers

If you use the Animation Pane on the right, the numbers make it simple to see one animation at a time. There, you can add the same types of effects that you see on the ribbon. Just click the arrow corresponding to the animation and a dropdown menu will appear.

And if you are inserting Excel charts into your presentation, you can animate those too.

Apply PowerPoint Transition Effects

Inserting transitions between your slides can be another effective way to keep your audience’s attention, similar to animations. You can apply a unique visual, with or without sound, as you move through the slides of your presentation.

Transition Options

These are the basic features available on the Transitions tab.

  • Transition to This Slide: Pick from the transition options by clicking the arrow in the box. You can apply a transition that is subtle, exciting, or dynamic. Keep in mind that this is the effect for transitioning to the current slide.
  • Effect Options: Different transitions have extra options that you can apply. For example, the Wipe, Wind, and Orbit transitions let you pick the direction.
  • Timing: Here you can add a sound to go with your transition, pick a duration time, and apply these items to all slides. In addition, you can decide to advance to the next slide upon your mouse click or automatically after a certain period of time.
  • Preview: Once you add a transition you can see a quick view of how it will look without exiting the editing mode or opening the presentation view.

Beginner's Guide to Microsoft PowerPoint - Transitions

Create a Slide Transition

This works basically much the same way as the animation only with one step less. Simply select the slide and pick the transition. You can then optionally apply any of the above-described effects that you would like. Pretty easy, right?

While transitions, like animations, may not have their place in every type of slideshow, they can be eye-catching for casual gatherings or fun events. Even for business presentations, a simple Fade effect can eliminate a clunky transition between slides.

Use Different Presentation Views

Not everyone works the same way when it comes being creative. Luckily PowerPoint offers different built-in views to accommodate this. Just select the View tab and take a look at the ways in which you can work with your slideshow.

The Presentation Views section holds five unique ways to create or edit your slideshow. One of those is the Notes Page which you read about above. And, here are the other four with brief explanations.

  1. Normal: As you can probably guess, this is the basic, normal view. You should see your slides on the left as numbered thumbnails and the current slide in the largest section to the right. This view works well if you prefer to jump between slides visually.
  2. Outline View: For those who prefer to write or create using outlines, this view is ideal. You can write directly within the outline pane on the left or paste an existing outline from Microsoft Word directly in. Here again, the current slide is in the largest section to the right.
  3. Slide Sorter: This is a terrific way to see all of your slides at a glance. Taking up the entire center window, you can see each slide and can reorder them easily with a drag-and-drop action.
  4. Reading View: If you want to see your entire presentation without switching to full-screen mode, then just click this button. You can view your slideshow with animations and transitions easily.
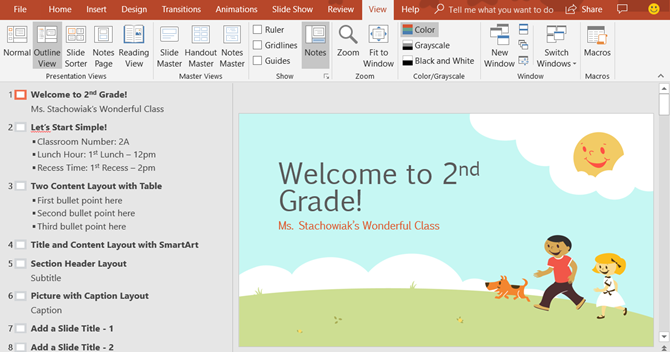
Beginner's Guide to Microsoft PowerPoint - Outline View

Along with the Slide Sorter view, the Normal and Outline Views allow you to quickly reorder your slides. Just select one and then drag it to its new location.

Collaborate on PowerPoint Presentations

Like other Microsoft Office applications, you have features to easily collaborate with others on your PowerPoint presentations. So if your sales team, fellow educators, or classmates will work on the slideshow together, you have a few options.

Share your slideshow as a PowerPoint presentation saved to OneDrive or as a PDF. Just click the Share button from the menu on the upper right corner. Then, invite others in the sidebar that opens, send the slideshow as an attachment, or obtain a link to share.

Let others make notes on the presentation with the Comments button which is right next to the Share button on the menu. (Assuming your collaborators open the presentation in PowerPoint.) You can view their comments, pop in a reply, move, and delete comments.
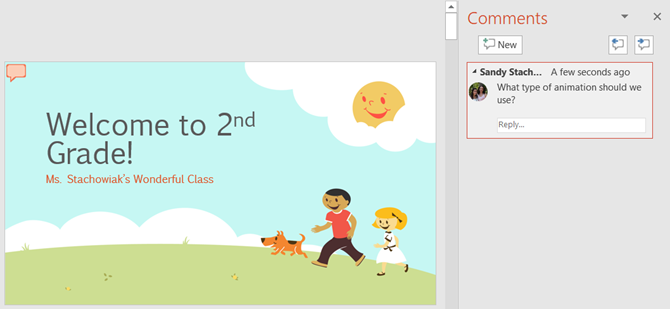
Beginner's Guide to Microsoft PowerPoint - Comments

View the version history once you start collaborating. If your collaborators are able to make edits to the presentation, you can see the previous versions. A button will appear in the menu in between the Share and Comments buttons. You can then open previous versions of the slideshow if needed.

Slideshow Options

Once your presentation is complete, it’s time to review and set up your slideshow. Head over to the Slide Show tab and check out the following options.

Beginner's Guide to Microsoft PowerPoint - Slide Show Tab

Start Slide Show

  • From Beginning: Watch your slideshow from the first slide as your audience will see it.
  • From Current Slide: Watch your slideshow start from the slide you select.
  • Present Online: Use the Office Presentation Service to view your slideshow in a browser.
  • Custom Slide Show: Create a custom presentation with the slides in a particular order.

Set Up

  • Set Up Slide Show: Choose the show type, show options, which slides to display, how to advance the slides, and any multiple monitor options you need.
  • Hide Slide: This hides any slide that you select from the presentation.
  • Rehearse Timings: You can practice presenting your slideshow and see the amount of time you spend on each slide and the slideshow in total. You also have an option to save your timings which is helpful for improving the presentation time if needed.
  • Record Slide Show: Easily record your slideshow from the beginning or a specific slide. This is ideal for distributing to others who could not attend the presentation.
  • Enable or Disable narrations, timings, and media controls with the convenient checkboxes.

Monitors

Select a connected monitor from the dropdown box for where your presentation should display. You can also enable or disable Presenter View.

Presenter View provides you with a different view of your slideshow. This allows you to see your presentation with speaker notes on one screen while your slideshow displays on another. In addition, you can control your presentation in this view.

  • Change the display settings or duplicate the slideshow.
  • Access tools like a laser pointer, pen, or highlighter to use throughout your presentation.
  • Zoom in on a slide.
  • Black or unblack the slideshow.
  • Advance to another slide.
  • End the slideshow.

Beginner's Guide to Microsoft PowerPoint - Presenter View

Start the PowerPoint Slideshow

Once you have the above options set for your slideshow, have rehearsed it, and are ready to start, the rest is easy.

Open PowerPoint on your computer, select which monitor to use, and then present it. You can start the slideshow with either the From Beginning button on the Slide Show tab or with the Start from Beginning button on the Quick Access Toolbar. This is the same process you would have followed when you reviewed your presentation.

If you decide to use the Presenter View during your slideshow, then you already know the tools you have at your fingertips to control the show. But if you choose not to or are only working with one monitor, you can still maneuver your presentation.

Simply right-click on the slideshow once it begins to open the context menu. You can then see all of the slides, zoom in, adjust the screen or printer options, and end the show.
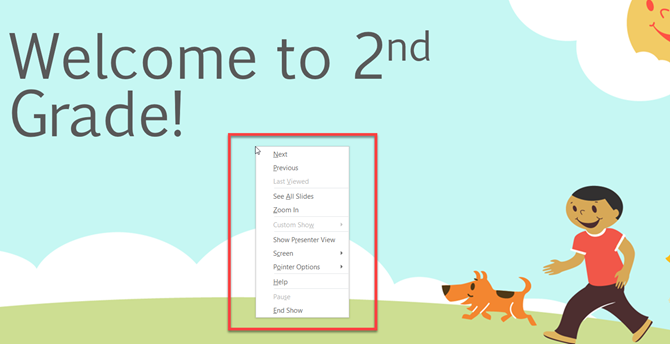
Beginner's Guide to Microsoft PowerPoint - Slideshow Context Menu

Design With Powerpoint Templates

One final part of this beginner’s guide is the templates you can use to boost your productivity in PowerPoint. Using a template, you can get a head start on your presentation. PowerPoint offers a variety of built-in templates and you can find those from online third-parties.

Use Featured PowerPoint Templates

To view options within PowerPoint, click File > New. You will then see a number of featured templates you can use along with categories you can pick from and a search box if you want something in particular.
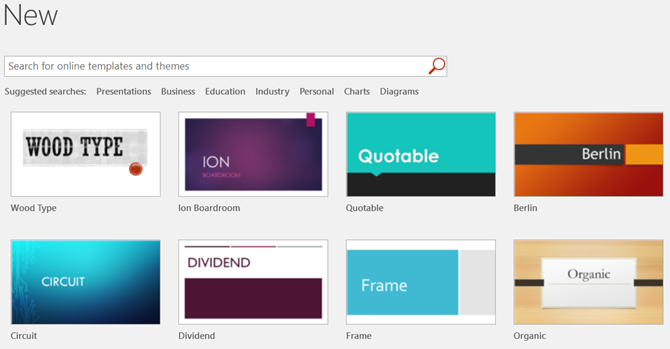
Beginner's Guide to Microsoft PowerPoint - Templates and Search

The built-in templates range from basic business cards and diagrams to lengthy and detailed presentations for most any industry.

If you see a template you would like to check out, click on it and then review its description and download size in the popup window. If you want to use it, click the Create button.

Use Third-Party PowerPoint Templates

While templates for Microsoft Word or Microsoft Excel seem to be more plentiful, you can still check out these great suggestions for third-party options that include Microsoft PowerPoint templates.

Let the PowerPoint Presentation Begin

If you have never used it before, then this beginner’s guide to Microsoft PowerPoint should give you a great start to a wonderful slideshow. Whether you are preparing your first professional presentation or just want to get creative with family photos, these basics should have you covered.

Read the full article: The Ultimate Beginner’s Guide to Microsoft PowerPoint: From Newbie to Master


Read Full Article