03 April 2018

5 iPhone Camera Apps That Recreate the Feeling of Shooting Film


For many of us, the blemishes and imperfections that come with shooting film are a distant memory. While the fundamentals of shutter speed and aperture setting persist, the process of shooting and sharing an image has changed massively.

It makes sense, then, that there exists a subset of camera apps designed to recreate the experience of shooting film. Here are five of the best.

1. Huji Cam

Shot with Huji Cam

Huji Cam is a faithful recreation of a disposable camera from 1998, right down to the date stamped on your images. Film simulation is fairly convincing, with light leak effects, color fringing, and an overall contrasty look reminiscent of a roll of cheap ISO 400.

The free version is a camera, and only a camera. In order to process an image with Huji, you’ll need to shoot the image with Huji. You can’t later import your own images and process them, nor can you reprocess images you’ve already taken without a $1 in-app purchase.

You can adjust the date format so that it reads correctly, or pretend like it’s 1998 and use default settings. It’s up to you whether or not you enable or disable light leaks, set a timer, opt for low-quality images, or shoot with the front-facing camera.

Download: Huji Cam (Free with in-app purchase)

2. Gudak

Gudak for iPhone

If you’re desperate to recreate the entire process of shooting with disposable film cameras, Gudak is the app for you. Unlike the other apps on this list, this one really limits what you can do with a strict set of rules.

Gudak shoots virtual rolls of film, and you’ll get 24 exposures on each roll. When you finish a roll, you’ll have to wait an hour before you can load another and begin shooting again. In order to see your images, you’ll have to hit the “develop” button and wait three days.

By doing so, the app reintroduces a long-lost element of surprise. By the time your photos are ready, you probably won’t remember exactly what it was you were shooting. The developers have gone to considerable lengths to stop you from cheating by changing your device’s date and time too.

The photos are fine, but it’s the experience that really shines. Gudak limits your view to a tiny viewfinder, removes focus and exposure control, and basically strips photography back to its point-and-shoot basics.

Download: Gudak ($1)

3. CALLA

iPhone CALLA Photo

If Gudak and Huji Cam are disposable film cameras, CALLA is a cheap but purpose-built 35mm point-and-shoot. The app itself is heavily stylized, and a bit confusing to use due to unconventional button placement and a mixture of Korean and English languages.

The app includes a few different types of film, but you only get one for free. The images I shot with this preset looked pretty good, with a softness to the image reminiscent of cheap plastic lenses. The colors are warm, and there’s a fair amount of grain, but no light leaks.

There’s a full set of photo controls, including touch-to-focus and expose. You can also manually control your focus using the ring near the shutter button (it’s a lot of fun). Additionally, the app supports importing your Camera Roll images into CALLA and processing them.

There are in-app purchases to unlock more looks, with the option of watching ads instead (but that will take a while).

Download: CALLA (Free with in-app purchases)

4. KD Pro

Shot with KD Pro for iPhone

Not only is KD Pro free, it also includes three entirely separate film-like looks: Kudak (Kodak), Kuji (Fujifilm), and a black and white preset. If you want, you can also enable the date stamp and light leaks.

The app allows you to choose your own development time, whether it’s instant, an hour, or a day. To me, this is pointless because I’m always going to choose the instant option. I prefer Gudak’s method of forcing me to wait, since I have little self control.

Overall, KD Pro does a great job of creating some heavily stylized photos. You can mix film styles in a roll simply by changing the filter in your app’s settings. Unless you upgrade to premium ($1), you can’t reprocess anything after you’ve taken it nor can you import images from your Camera Roll.

Download: KD Pro (Free with in-app purchase)

5. Thirty Six

Shot with Thirty Six for iPhone

Probably my favorite app of its kind, Thirty Six strikes a perfect balance between the film look, the analog process, and digital convenience. The app includes several different looks, including square format 12 exposure films, and color or black and white 36 exposure films.

Once you’ve chosen a look, you can’t change it until you’ve developed the current roll of film. If you want to develop a film before you’ve finished it, you’ll see a warning that you still have exposures left. When your film is developed, you’ll be able to choose your favorites on a contact sheet then enlarge them for a proper look.

Controls are basic, but not stylized to imitate a disposable camera. You can tap to focus/expose and enable the flash—that’s it. The images, particularly the high contrast black and whites, are some of the best I’ve seen from these kinds of apps.

For the price, it’s worth a shot.

Download: Thirty Six ($2)

Toys or Tools? It Doesn’t Matter

These apps are arguably toys, but there’s nothing wrong with that. They offer not just filters and styles, but the chance to step out of your comfort zone and approach photography from another perspective. Believe it or not, this one of the best ways to improve your photography.


Read Full Article
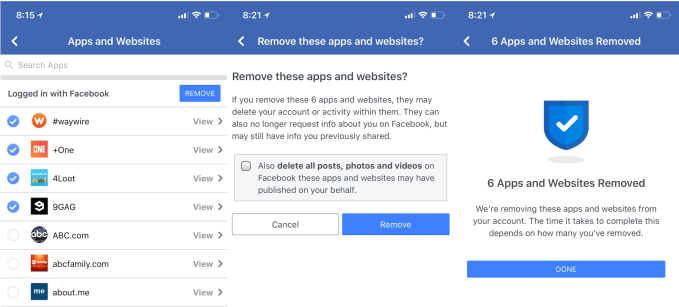
Facebook launches bulk app removal tool amidst privacy scandal


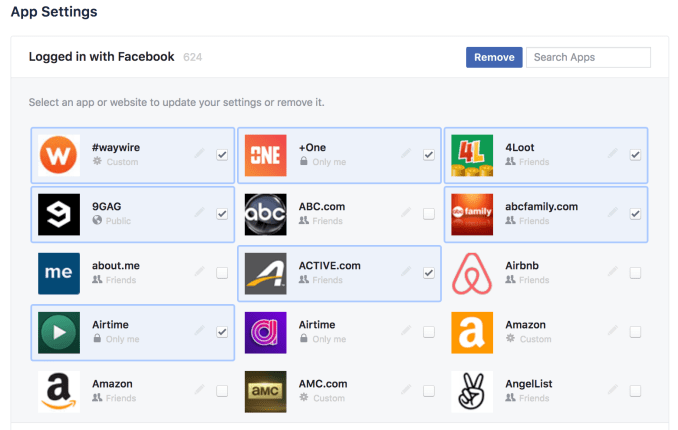
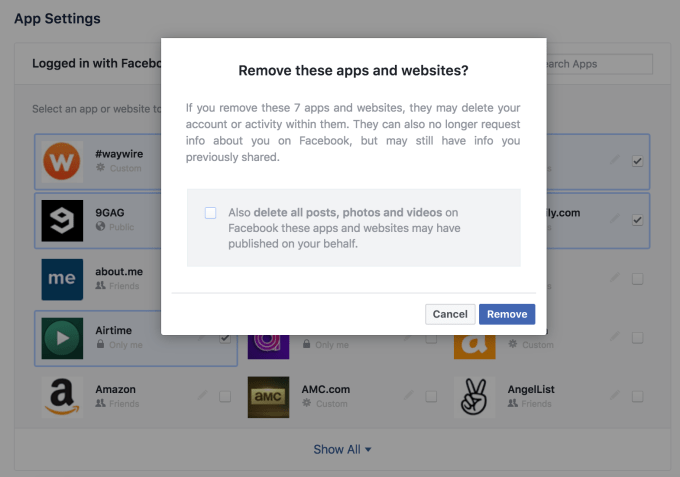
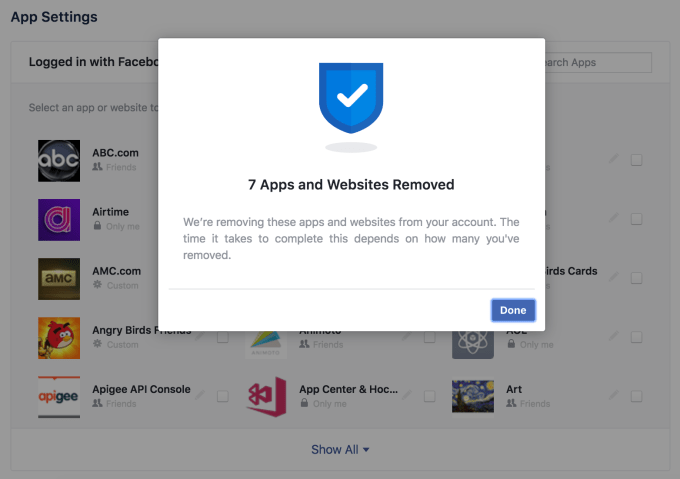
Following the Cambridge Analytica scandal, users have flocked to their Facebook privacy settings to sever their connection to third-party apps that they no longer wanted to have access to their data. But deleting them all took forever because you had to remove them one by one. Now Facebook has released a new way to select as many apps as you want, then remove them in bulk. The feature has rolled out on mobile and desktop, and Facebook also offers the option to delete any posts those apps have made to your profile.

Facebook confirmed the launch to TechCrunch, pointing to its Newsroom and Developer News blog posts from the last few weeks that explained that “We already show people what apps their accounts are connected to and control what data they’ve permitted those apps to use. In the coming month, we’re going to make these choices more prominent and easier to manage.” Now we know what “easier” looks like. A Facebook spokesperson told us “we have more to do and will be sharing more when we can.” The updated interface was first spotted by Matt Navarra, who had previously called on Facebook to build a bulk removal option.

Facebook stopped short of offering a “select all” button so you have to tap each individually. That could prevent more innocent, respectful developers from getting caught up in the dragnet as users panic to prune their app connections. One developer told me they’d been inundated with requests from users to delete their data acquired through Facebook and add other login options, saying that the Cambridge Analytica scandal “really hurt consumer trust for all apps…even the good guys.” The developer chose to change its Terms of Service to make users more comfortable.

The bulk removal tool could make it much easier for users to take control of their data and protect their identity, though the damage to Facebook’s reputation is largely done. It’s staggering how many apps piggyback off of Facebook, and that we gave our data without much thought. But at least now it won’t take an hour to remove them all.


Read Full Article

Facebook launches bulk app removal tool amidst privacy scandal


Following the Cambridge Analytica scandal, users have flocked to their Facebook privacy settings to sever their connection to third-party apps that no longer wanted to have access to their data. But deleting them all took forever because you had to remove them one by one. Now Facebook has released a new way to select as many apps as you want, then remove them in bulk. The feature has rolled out on mobile and desktop, and Facebook also offers the option to delete any posts those apps have made to your profile.

Facebook confirmed the launch to TechCrunch, pointing to its Newsroom and Developer Blog posts from the last few weeks that explained that “We already show people what apps their accounts are connected to and control what data they’ve permitted those apps to use. In the coming month, we’re going to make these choices more prominent and easier to manage.” Now we know what “easier” looks like. A Facebook spokesperson told us “we have more to do and will be sharing more when we can.” The updated interface was first spotted by Matt Navarra, who had previously called on Facebook to build a bulk removal option.

Facebook stopped short of offering a “select all” button so you have to tap each individually. That could prevent more innocent, respectful developers from getting caught up in the dragnet as users panic to prune their app connections. One developer told me they’d be inundated with requests from users to delete their data acquired through Facebook and add other login options, saying that the Cambridge Analytica scandal “really hurt consumer trust for all apps…even the good guys.” The developer chose to change its Terms Of Service to make users more comfortable.

The bulk removal tool could make it much easier for users to take control of their data and protect their identity, though the damage to Facebook’s reputation is largely done. It’s staggering how many apps piggyback off of Facebook, and that we gave our data to without much thought. But at least now it won’t take an hour to remove them all.


Read Full Article

How to Manage, Improve, and Fix Sound Quality in Windows 10


Sound might not be something you think about too much, but Windows 10 has many options to customize it to its full potential. We’re going to show you all sorts of tips and tricks to make your sound experience better.

From quickly switching between audio devices to enabling sound enhancements, hopefully, you’ll learn something new here. Be sure to let us know in the comments afterward if you have any of your own suggestions.

1. Change Sound Effects

sound quality guide windows 10 - change sound effects

You can customize all sounds in Windows to get a personalized experience. To get to the area where you do this, press Windows key + I to open Settings and navigate to Personalization > Themes > Sounds. Alternatively, right-click the speaker icon on your taskbar tray and click Sounds.

Use the Sound Scheme dropdown to switch between the default Windows options. You can choose No Sounds if you want to mute all sounds.

Alternatively, click an item on the Program Events list and use the Sounds dropdown or Browse… to select a different sound. Be sure to click OK when you’re done.

See our guide for spicing up your Windows sound effects if you want some great resources for downloading free sounds.

2. Adjust Individual App Sounds

sound quality guide windows 10 - adjust individual app sounds

Clicking the speaker icon in your taskbar tray will let you adjust your overall system volume. However, that’s not very useful when you want to control an application’s individual volume. To do this, right-click the speaker icon, click Open Volume Mixer and adjust the sliders accordingly.

If you want to do this quicker and with the help of an enhanced Windows interface, download EarTrumpet from the Microsoft Store. Once installed, open it and it’ll automatically go into your expanded taskbar tray. Left-click and drag the icon onto the taskbar to keep it there permanently.

If you want to remove the standard speaker icon and use only EarTrumpet, right-click the taskbar and click Taskbar settings. Click Turn system icons on or off and slide Volume to Off.

3. Quickly Switch Audio Devices

sound quality guide windows 10 - switch audio devices

If you have multiple audio devices, like speakers and a headset, you’ll find yourself constantly switching back and forth between them. To do this, click the speaker icon in your taskbar tray. Click your current audio device name and it will bring up a list of the other options. Simply click the audio device that you want to change to.

An even better way to do this is with a free and lightweight program called Audio Switcher. With this, you can assign audio devices (playback and recording) to any keyboard combination you desire. This is great for quickly switching between audio devices, especially when you’re using a full screen application.

The program’s Playback and Recording tabs will show you all your tabs. Right-click any of them to perform actions like setting it as your Default Device or Set Hot Key.

I’d recommend going to the Settings tab and ticking Start when Windows starts and Start minimized.

4. Update Your Audio Drivers

sound quality guide windows 10 - update audio drivers

If you’ve been having trouble with your audio, you should try updating your audio drivers. To do this, press Windows key + X and click Device Manager. Double click Audio inputs and outputs. Find the troublesome audio device, right-click it and select Update driver. Click Search automatically for updated driver software and follow the wizard through.

If this doesn’t work, repeat the steps above, but click Uninstall device rather than Update. Restart your system and Windows will attempt to automatically reinstall the driver. If that’s still problematic, head to the manufacturer’s website and grab it directly from there.

If your audio problems continue, right-click the speaker icon in your taskbar tray and click Troubleshoot sound problems. Follow the wizard and it’ll attempt to automatically resolve any issues that it finds.

Still no luck? See our guide for fixing Windows 10 audio issues for even more advice.

5. Enable Sound Enhancements

sound quality guide windows 10 - enable sound enhancements

Windows has a number of built-in sound enhancements that you can apply to your playback devices. To get going, right-click the speaker icon in your taskbar tray and click Playback devices.

Double-click the playback device you want to alter. Switch to the Enhancements tabs. To have it applied immediately, so you can quickly test out the options, tick Immediate mode.

Now you can tick which sound enhancement you would like, such as Virtual Surround or Loudness Equalization. If you click one, it’ll give you a description of what it does.

And… Buy New Speakers

best-desktop-speakers

If there’s one thing that’s sure to improve your audio quality, it’s buying better speakers. That’s probably not an option if you’re on a portable device, but it’s definitely recommended for desktops. Also, you’re mistaken if you think you’ll have to break the bank to get the best.

Before you do that, consider reusing any old speakers you might have. See our creative projects to repurpose old speakers to put them to good use, whether they’re in working condition or not.

But if that’s not enough, and if you’re looking for advice on what speakers to get, check out our guide for the best desktop speakers. You don’t need to go for the full 7.1 surround sound experience, but get a seat that has a subwoofer if you want decent bass.

Get the Best Sound Quality Out of Your PC

Hopefully, you’ve learned something new about how to get the best out of audio on Windows 10. These are all easy and quick things to do, but they’ll make your Windows experience even better.

But it doesn’t have to stop there! Windows 10 has a hidden feature that will give you virtual surround sound in a few clicks. Set up the spatial surround sound feature called Windows Sonic and perfect your audio experience.


Read Full Article

MobileNetV2: The Next Generation of On-Device Computer Vision Networks


Last year we introduced MobileNetV1, a family of general purpose computer vision neural networks designed with mobile devices in mind to support classification, detection and more. The ability to run deep networks on personal mobile devices improves user experience, offering anytime, anywhere access, with additional benefits for security, privacy, and energy consumption. As new applications emerge allowing users to interact with the real world in real time, so does the need for ever more efficient neural networks.

Today, we are pleased to announce the availability of MobileNetV2 to power the next generation of mobile vision applications. MobileNetV2 is a significant improvement over MobileNetV1 and pushes the state of the art for mobile visual recognition including classification, object detection and semantic segmentation. MobileNetV2 is released as part of TensorFlow-Slim Image Classification Library, or you can start exploring MobileNetV2 right away in coLaboratory. Alternately, you can download the notebook and explore it locally using Jupyter. MobileNetV2 is also available as modules on TF-Hub, and pretrained checkpoints can be found on github.

MobileNetV2 builds upon the ideas from MobileNetV1 [1], using depthwise separable convolution as efficient building blocks. However, V2 introduces two new features to the architecture: 1) linear bottlenecks between the layers, and 2) shortcut connections between the bottlenecks1. The basic structure is shown below.
Overview of MobileNetV2 Architecture. Blue blocks represent composite convolutional building blocks as shown above.
The intuition is that the bottlenecks encode the model’s intermediate inputs and outputs while the inner layer encapsulates the model’s ability to transform from lower-level concepts such as pixels to higher level descriptors such as image categories. Finally, as with traditional residual connections, shortcuts enable faster training and better accuracy. You can learn more about the technical details in our paper, “MobileNet V2: Inverted Residuals and Linear Bottlenecks”.

How does it compare to the first generation of MobileNets?
Overall, the MobileNetV2 models are faster for the same accuracy across the entire latency spectrum. In particular, the new models use 2x fewer operations, need 30% fewer parameters and are about 30-40% faster on a Google Pixel phone than MobileNetV1 models, all while achieving higher accuracy.
MobileNetV2 improves speed (reduced latency) and increased ImageNet Top 1 accuracy
MobileNetV2 is a very effective feature extractor for object detection and segmentation. For example, for detection when paired with the newly introduced SSDLite [2] the new model is about 35% faster with the same accuracy than MobileNetV1. We have open sourced the model under the Tensorflow Object Detection API [4].

Model
Params
Multiply-Adds
mAP
Mobile CPU
MobileNetV1 + SSDLite
5.1M
1.3B
22.2%
270ms
4.3M
0.8B
22.1%
200ms

To enable on-device semantic segmentation, we employ MobileNetV2 as a feature extractor in a reduced form of DeepLabv3 [3], that was announced recently. On the semantic segmentation benchmark, PASCAL VOC 2012, our resulting model attains a similar performance as employing MobileNetV1 as feature extractor, but requires 5.3 times fewer parameters and 5.2 times fewer operations in terms of Multiply-Adds.

Model
Params
Multiply-Adds
mIOU
MobileNetV1 + DeepLabV3
11.15M
14.25B
75.29%
2.11M
2.75B
75.32%

As we have seen MobileNetV2 provides a very efficient mobile-oriented model that can be used as a base for many visual recognition tasks. We hope by sharing it with the broader academic and open-source community we can help to advance research and application development.

Acknowledgements:
We would like to acknowledge our core contributors Menglong Zhu, Andrey Zhmoginov and Liang-Chieh Chen. We also give special thanks to Bo Chen, Dmitry Kalenichenko, Skirmantas Kligys, Mathew Tang, Weijun Wang, Benoit Jacob, George Papandreou and Hartwig Adam.

References
  1. MobileNets: Efficient Convolutional Neural Networks for Mobile Vision Applications, Howard AG, Zhu M, Chen B, Kalenichenko D, Wang W, Weyand T, Andreetto M, Adam H, arXiv:1704.04861, 2017.
  2. MobileNetV2: Inverted Residuals and Linear Bottlenecks, Sandler M, Howard A, Zhu M, Zhmoginov A, Chen LC. arXiv preprint. arXiv:1801.04381, 2018.
  3. Rethinking Atrous Convolution for Semantic Image Segmentation, Chen LC, Papandreou G, Schroff F, Adam H. arXiv:1706.05587, 2017.
  4. Speed/accuracy trade-offs for modern convolutional object detectors, Huang J, Rathod V, Sun C, Zhu M, Korattikara A, Fathi A, Fischer I, Wojna Z, Song Y, Guadarrama S, Murphy K, CVPR 2017.
  5. Deep Residual Learning for Image Recognition, He, Kaiming, Xiangyu Zhang, Shaoqing Ren, and Jian Sun. arXiv:1512.03385,2015


1 The shortcut (also known as skip) connections, popularized by ResNets[5] are commonly used to connect the non-bottleneck layers. MobilenNetV2 inverts this notion and connects the bottlenecks directly.

How the Snapchat Score Works and How to Get Your Score Up


Do you know your Snapchat score? Chances are, you’ve seen the random number by your username at least once. Maybe you’ve even tried to increase your Snapchat score in the past.

But do you know what your Snapchat score means? Like many frustrating Snapchat features, your score appears to be illogical. But don’t worry, and we’re here to tell you what your Snapchat score is and how to improve it.

What Is a Snapchat Score?

snapchat-score

Snapchat isn’t exactly forthcoming about its score feature. The image below shows all of the official information that the help section of Snapchat’s website offers about your score. Helpful, right?

Essentially, your Snapchat score is a running tally of your activity on the app, including snaps sent, snaps received, users added, stories you send, and more. Many users compare Snapchat scores as a way to compete with each other or add trophies to their Snapchat Trophy Case.

How to Find Your Snapchat Score

If you’ve never looked for your Snapchat score before, it can be a bit difficult to find (especially after the unpopular new Snapchat update).

To start, head over to your Profile screen on the Snapchat app (tap your Bitmoji’s face or the circle icon in the top left of your screen).

The top of your Profile page will show your Snap code. Underneath your Snap code will be your display name, and then three grey pieces of information: your username, your snap score, and your zodiac sign.

find snapchat score

Tapping on your snap score will reveal two other numbers. The number on the left is the number of snaps you’ve sent since creating your account, and the number on the right is the number of snaps you’ve received.

How to Find Someone Else’s Snapchat Score

Do you want to see how your score compares to a specific friend or celebrity (such as the Snapchat share price-scaring Kylie Jenner)? While there is no public leaderboard for Snapchat scores, you can check an individual’s score with very little effort.

Simply swipe right on the user whose score you want to check, opening a chat window. Then, press the icon with three lines at the top left of the screen. A page will open showing you their display name, with their username and snap score underneath in grey text.

How Does Snapchat Score Work?

You may notice after doing some quick math that simply adding together your number of Snaps sent and Snaps received results in a number that’s less than your Snapchat score.

Welcome to the “couple other factors” that Snapchat mentions. While no one knows what exactly these factors are, there are some solid theories. Based on our research, these are the likely contributors to your score:

  • Snaps Sent
  • Snaps Received
  • Number of users added
  • The number of stories you post
  • Maintaining Snap Streaks with friends
  • Bonus points when you start using the app again after not using it for a while

How to Get Your Snapchat Score Up

Snapchat isn’t trying to pull the wool over anyone’s eyes. If you want to increase your score, you need to use the app.

So your best bet for increasing your Snapchat score is to use the app as much as possible. With some dedication, you’ll be breaking records in no time.

With that being said, it’s important to know some of the common misconceptions about adding to your Snapchat score.

  1. Your Snapchat score will only increase by sending photo and video snaps! Text messages sent through the Snapchat app do not count.
  2. You don’t get extra points for sending the same snap to multiple users. You need to send a unique snap in order to get a point.

What Trophies Can You Get With Your Snapchat Score?

snapchat trophies

One of Snapchat’s fun features is its Trophy Case page. The app awards trophies to users based on the different ways that they use the app. As you increase your score, you gain access to seven different trophies (as shown in the image below).

You can see your current trophies by pressing the Trophies icon on your profile page.

Can I Raise My Snapchat Score Online?

There are a lot of websites out there that promise you they will add hundreds of thousands of points to your Snapchat score. They make promises that sound too good to be true, and guarantee that you will watch your Snapchat score increase in minutes.

Don’t be fooled! All of these websites and apps are scams.

Your Snapchat score cannot be modified by third party apps or websites. You can only increase your Snapchat score by using the app—there are no easy workarounds or cheat codes for this feature.

My Snapchat Score Isn’t Updating: What Do I Do?

If you’ve been using the app regularly but haven’t noticed a change in your Snapchat score, don’t panic! Here are some steps you can take to make sure all your effort isn’t wasted:

  1. Make sure your app is updated to the most recent version available
  2. Wait a few hours—it may just be a glitch!
  3. Talk to Snapchat support. In a worst-case scenario, they might be able to help troubleshoot your individual situation.

How High Can Your Snapchat Score Go?

Given how popular Snapchat is, it may come as no surprise that many users have Snapchat scores in the hundreds of thousands. Of course, this does raise a question: do you really want to have a systematic measure of how much time you’ve wasted on this app?

Like with any social media tool, you’re likely going to enjoy Snapchat the most if you focus on using it to communicate with your friends. They’ll enjoy it more too—no one wants to receive 1,000 selfies of someone who is just trying to increase their score.

OK, so that’s your Snapchat Score sorted, but do you still have questions about Snapchat? If so check out these Snapchat tips and tricks to be sure that you’re using all the best features.


Read Full Article

Google rolls out a better way to search for movies


Google is rolling out a new feature today that will help you better plan your night at the movies. While the company has supported displaying movie showtimes within Google Search results following the closure of its standalone movie site in 2016, this update will help you narrow down your options more efficiently, thanks to the additions of drop-down filters in the Movies Showtimes interface that appears at the top of Google’s search results.

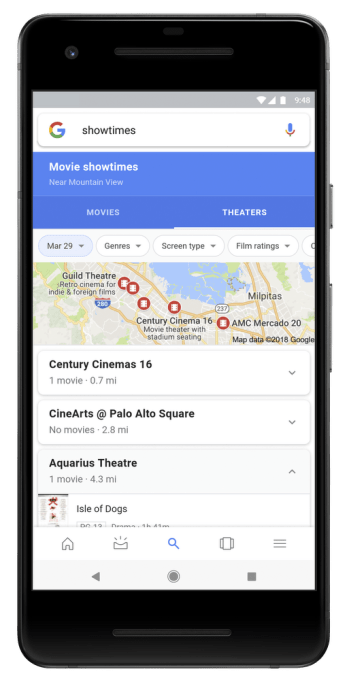
After you perform a search for “showtimes” and are directed to Google’s Movies Showtimes screen as usual, you’ll notice a new set of drop-down filters at the top.

You can use these to filter the movies near you by a number of factors, including screen type (e.g. 3D or IMAX), the movie’s genre, ratings, the critic scores, language, and preferred chains. That way you could click a few buttons to do a very specific search for something like “Family” movies rated “PG” or “G” at Cobb or AMC theaters in the afternoon on Sunday, for example. Or “R” rated “Dramas” with a critics’ score of 70% or higher on Rotten Tomatoes.

The Critics’ Score filter supports reviews from Metacritic and IMDb, as well.

Once the filters are applied, you’ll be shown all the matching results that meet your exact criteria. When you’re ready to go, you can then click on the showtime you want to purchase your ticket using Fandango, MovieTickets.com, AMC Theatres, or Atom Tickets.

In addition to the showtime search filters, you can also now tap over to the “Theaters” tab to see what’s playing at your favorite theaters, that also matches your requirements.

Google says the update is rolling out to the Google Search app on Android in the U.S. and India in Hindi and English, as well as in mobile search in the browser, and soon, the Google Search app for iOS.


Read Full Article

Messenger adds support for sharing HD video, 360-degree photos


Perhaps aiming to snag some attention away from Snapchat’s big group video call update out this morning, Facebook also announced an update to its chat app Messenger, which will now allow users to share 360-degree videos and HD quality video (720p). In both cases, you’ll have to capture the photo or video outside the Messenger app, the company notes.

The update follows another that rolled out last fall, allowing users to share high-resolution photos through Messenger – something that Facebook said was the result of its significant investments in helping people “communicate visually.”

The idea that mobile messaging is often a camera-first experience isn’t unique to Facebook Messenger, of course – it’s the premise of the Snapchat experience and, these days, Instagram too.

Unfortunately for Facebook, news of improved media-sharing capabilities comes at a time when the company is under siege for its mishandling of user data, and, most recently, another reveal that it had been retaining videos that users believed to be deleted. The broader effect of this news cycle around Facebook’s approach to privacy, is an increased general mistrust of Facebook’s products as the place to share – including sharing through Messenger, which isn’t as distanced from the core product as Facebook-owned Instagram and Whatsapp are.

Facebook says if you want to share a 360-degree photo, you’ll need to first snap it with your camera or another 360-photo app before uploading it to Messenger where it will then be converted to an immersive experience that can be navigated through by the recipients via either tapping and dragging on mobile, or clicking and dragging on Messenger.com.

Similarly, HD videos will need to be first captured from the phone, or re-shared from the Facebook Newsfeed or other messages.

The rollout of the HD feature is limited to select markets for now, including Australia, Belgium, Canada, Denmark, Finland, France, Hong Kong, Japan, Netherlands, Norway, Romania, Singapore, South Korea, Sweden, Switzerland, Taiwan, the U.K. and the U.S. on iOS and Android.

360 photos, however, are available worldwide on iOS and Android.


Read Full Article

8 Basic iPhone Photo Editing Tasks You Should Know How to Do

Messenger adds support for sharing HD video, 360-degree photos


Perhaps aiming to snag some attention away from Snapchat’s big group video call update out this morning, Facebook also announced an update to its chat app Messenger, which will now allow users to share 360-degree videos and HD quality video (720p). In both cases, you’ll have to capture the photo or video outside the Messenger app, the company notes.

The update follows another that rolled out last fall, allowing users to share high-resolution photos through Messenger – something that Facebook said was the result of its significant investments in helping people “communicate visually.”

The idea that mobile messaging is often a camera-first experience isn’t unique to Facebook Messenger, of course – it’s the premise of the Snapchat experience and, these days, Instagram too.

Unfortunately for Facebook, news of improved media-sharing capabilities comes at a time when the company is under siege for its mishandling of user data, and, most recently, another reveal that it had been retaining videos that users believed to be deleted. The broader effect of this news cycle around Facebook’s approach to privacy, is an increased general mistrust of Facebook’s products as the place to share – including sharing through Messenger, which isn’t as distanced from the core product as Facebook-owned Instagram and Whatsapp are.

Facebook says if you want to share a 360-degree photo, you’ll need to first snap it with your camera or another 360-photo app before uploading it to Messenger where it will then be converted to an immersive experience that can be navigated through by the recipients via either tapping and dragging on mobile, or clicking and dragging on Messenger.com.

Similarly, HD videos will need to be first captured from the phone, or re-shared from the Facebook Newsfeed or other messages.

The rollout of the HD feature is limited to select markets for now, including Australia, Belgium, Canada, Denmark, Finland, France, Hong Kong, Japan, Netherlands, Norway, Romania, Singapore, South Korea, Sweden, Switzerland, Taiwan, the U.K. and the U.S. on iOS and Android.

360 photos, however, are available worldwide on iOS and Android.


Read Full Article

Twitter to live stream weekly MLB games in renewed deal


Major League Baseball games are coming to Twitter as a result of a renewed partnership. This Thursday, Twitter will live stream the Texas Rangers versus the Oakland Athletics at 3:35 PM ET. The game will be the first of the weekly day-game live streams of out-of-market MLB games in the weeks ahead, during the 2018 season.

The MLB will announce the games that will air on Twitter ahead of each month’s slate, usually via a tweet.

Twitter has worked with the MLB before. As the company was ramping up its live streaming efforts in 2016, it announced it would begin streaming weekly MLB games, along with those from other sports organizations like the NHL and NFL. It then aired weekly games from April through October 2017.

Now it will be a home to weekly games, available to U.S. users to stream for free from April through September 2018.

Fans can watch the games on live.twitter.com/MLB online and on connected devices, and they don’t need to login to a Twitter account in order to do so. However, the games will not be exclusive to Twitter. The company notes that each stream is a simulcast with a participating team’s local TV broadcast, and that Twitter will be offering advertising packages for the content to be made available to sponsors.

There is a rev share on those ad deals, but Twitter declined to comment on how the revenue is split.

Twitter is not the only online home to MLB games. Facebook recently scored an exclusive deal to live stream 25 afternoon games – which means they won’t be available elsewhere.

The MLB has been busy making its games available on newer streaming services, too. For example, YouTube TV announced last month a multi-year deal to be the presenting sponsor for the World Series, which includes plans to heavily market its service with in-stadium signage, TV ads, on-air callouts, and more. And ESPN+, the Disney-owned streaming service arriving this month, will air over 180 MLB games, with the option to view more by purchasing the MLB.TV out-of-market package.

In addition to the games, the MLB will again be making real-time highlights available via its @MLB Twitter account throughout the season, with Spanish highlights available from @LasMayores during 2018, says Twitter.  And Twitter has partnered with the MLB on hashtag-triggered emoji for all 30 MLB teams.

The April schedule of games is available below:


Read Full Article

7 Vital Windows Maintenance Tasks You Should Do More Often


Owning a computer is fun, but you should take the time to perform some basic maintenance to make sure it runs at its best. Otherwise, the few minutes you save here and there could result in hours of unnecessary work in the future.

Let’s look at the Windows 10 maintenance tasks every PC owner should do regularly. Thankfully, there are some free PC maintenance tools that can make this easier.

1. Update Windows and Software

Windows computer maintenance -Update Windows 10

Windows 10 is great about updating itself, but you should still check in from time to time and make sure it’s not hung up on something. Head to Settings > Update & Security > Windows Update and click Check for Updates.

Windows will tell you if it finds any updates and should install them automatically. Some, but not all, updates require a restart.

While you’re installing updates, it’s a good idea to make sure all your installed software is updated. Some programs do this automatically, like Chrome and Firefox. Other programs will prompt you for an update when you open them. You can check for updates on most software by visiting Help > Check for Updates or Options > Check for Updates.

2. Manage Your Email

computer maintenance - Email Unsubscribe

Email piles up quickly if you don’t stay on top of it. When your inbox is full of automated flyers and junk you don’t want, finding messages that are actually important takes longer.

You should regularly reduce your incoming email by unsubscribing from newsletters you never read. Then set up email filters so only important messages hit your inbox. Your inbox will become such a much more pleasant place.

3. Back Up Your Data

computer maintenance - backing up data

Backing up data is usually a set-and-forget operation, but it’s wise to occasionally confirm your backup is operational. Otherwise, you could be in for a nasty surprise if your PC fails.

Most backup software shows you the status and/or last backup time right on its home screen. Open your software of choice and make sure everything is working properly. If you use the File History backup in Windows, go to Settings > Update & Security > Backup and select More options to see the most recent backup time.

There’s no excuse for not backing up your data—if you haven’t set up a backup yet, now’s the perfect time. Check out our ultimate Windows backup guide for everything you need to get going.

4. Delete Unnecessary Files and Programs

computer maintenance - Windows 10 Disk Cleanup

Seasoned Windows users know how the OS builds up cruft over time. You can’t prevent some of this, but it helps to clean up old data that you’re not actively using. Freeing up space can also improve your PC’s performance if you’re running low.

Consult our step-by-step guide to cleaning out files and our checklist for cleaning for more details.

5. Perform Maintenance Scans

You should perform a few scans in Windows once in a while just to make sure there isn’t a problem you’re overlooking.

One of them is an antivirus scan. You hopefully use a solid antivirus that doesn’t nag you all the time, which should scan automatically. But it’s a good idea to get a second opinion from a dedicated anti-malware program once in a while.

Malwarebytes is still the best at this. The free version only lets you scan on-demand, but that’s all you need for an occasional check. Hopefully, it doesn’t find anything on your system, but it’s worth a look because it will find what other antivirus software doesn’t.

You should also perform an SFC scan occasionally. This command, short for System File Checker, is a Windows utility that checks for damaged system files and repairs them if needed. Type cmd into the Start Menu, then right-click it and choose Run as administrator. Enter the following line to start the scan, which might take a while:

sfc /scannow

6. Double-Check Important Settings

computer maintenance - Windows 10 Settings Panel

Windows 10’s regular stream of updates means that it’s always changing. While this results in lots of new features, it also means that Windows has more chances to introduce more options that affect how your computer works.

After you install a major update (like the Fall Creators Update), you should check the new options and make sure they’re set the way you want. And if you’ve never tweaked the default Windows 10 settings, definitely take a look at those.

Another setting you should check regularly is the startup items in the Task Manager. As you install more software, you’ll likely build up a ton of programs that run as soon as you boot. Check in on this sometimes and make sure it’s under control.

7. Clean Your Hardware

computer maintenance - Clean laptop monitor

Nobody really enjoys cleaning their computer, but it’s an important step to keep it running at its best. Plus, it gets pretty gross over time. You should at least wipe down your keyboard and screen, and clean the dust out of your computer, a few times per year.

We’ve written a guide to cleaning your laptop and much of the same advice applies for desktops. While you’re under the hood, make sure your setup isn’t suffering from any mistakes such as poor ventilation.

Computer Maintenance Is No Fun, But It’s Vitally Important

We’ve reviewed seven important chores you should make a point to complete every once in a while. There’s no need to obsess over them, but neglecting these will lead to problems down the road. Keeping your computer in good repair saves you time and money, so you’ll be glad you kept up with these.

While you’re working on these, make sure you don’t make any big maintenance mistakes.


Read Full Article