25 June 2020

Google finally brings group calling to the Nest Hub Max


Video chat has long been one of the chief selling points of smart screens like the Amazon Echo Show and Google’s Nest Hub Max (the regular Hub is still lacking a camera, mind). But until today, the latter only offered users the option for one-on-one calls. That’s all well and good for the most part, but as so many of us have found ourselves cut off from our friends and families, group chat has become something of a lifeline.

That’s meant big business for conferencing apps like Zoom. Once almost exclusively the domain of business meetings, these sorts of services have become increasingly popular for casual chats. Google has, no doubt, spotted potential, and today announced that it’s finally bringing group chats to the Hub Max through Duo.

The new feature allows for chats of up to 32 and utilizes the smart screen’s auto-framing capabilities (similar to those found in Facebook’s competing displays) to keep the subject in the picture. It also will be arriving on a number of third-party Google-ready smart screens, including those by LG, JBL and Lenovo. The feature requires the user to create a group on Duo through a connected mobile app. Once that’s done, it can be triggered via voice.

There’s a more professionally focused element to this as well. These companies have long explored the potential of smart screens in the workplace, but now that home is the office for so many, it makes sense to offer business meetings on these products. Those enrolled in the G Suite with Google Assistant beta program will be able to join business meetings through Google Meet.

That feature is rolling out in coming weeks.


Read Full Article

Apple Maps to tell you to refine location by scanning the skyline


With iOS 14, Apple is going to update Apple Maps with some important new features, such as cycling directions, electric vehicle routing and curated guides. But the app is also going to learn one neat trick.

In dense areas where you can’t get a precise location, Apple Maps will prompt you to raise your phone and scan buildings across the street to refine your location.

As you may have guessed, this feature is based on Look Around, a Google Street View-inspired feature that lets you … look around as if you were walking down the street. It’s a bit more refined than Street View as everything is in 3D so you can notice the foreground and the background.

Look Around is only available in a handful of U.S. cities for now, such as San Francisco, New York, Chicago, Washington, DC, and Las Vegas. But the company is still expanding it with Seattle coming on Monday and major Japanese cities this fall. Some areas that are only accessible on foot will also be available in the future.

When you scan the skyline to refine your location, Apple doesn’t send any data to its servers. Matching is done on your device.

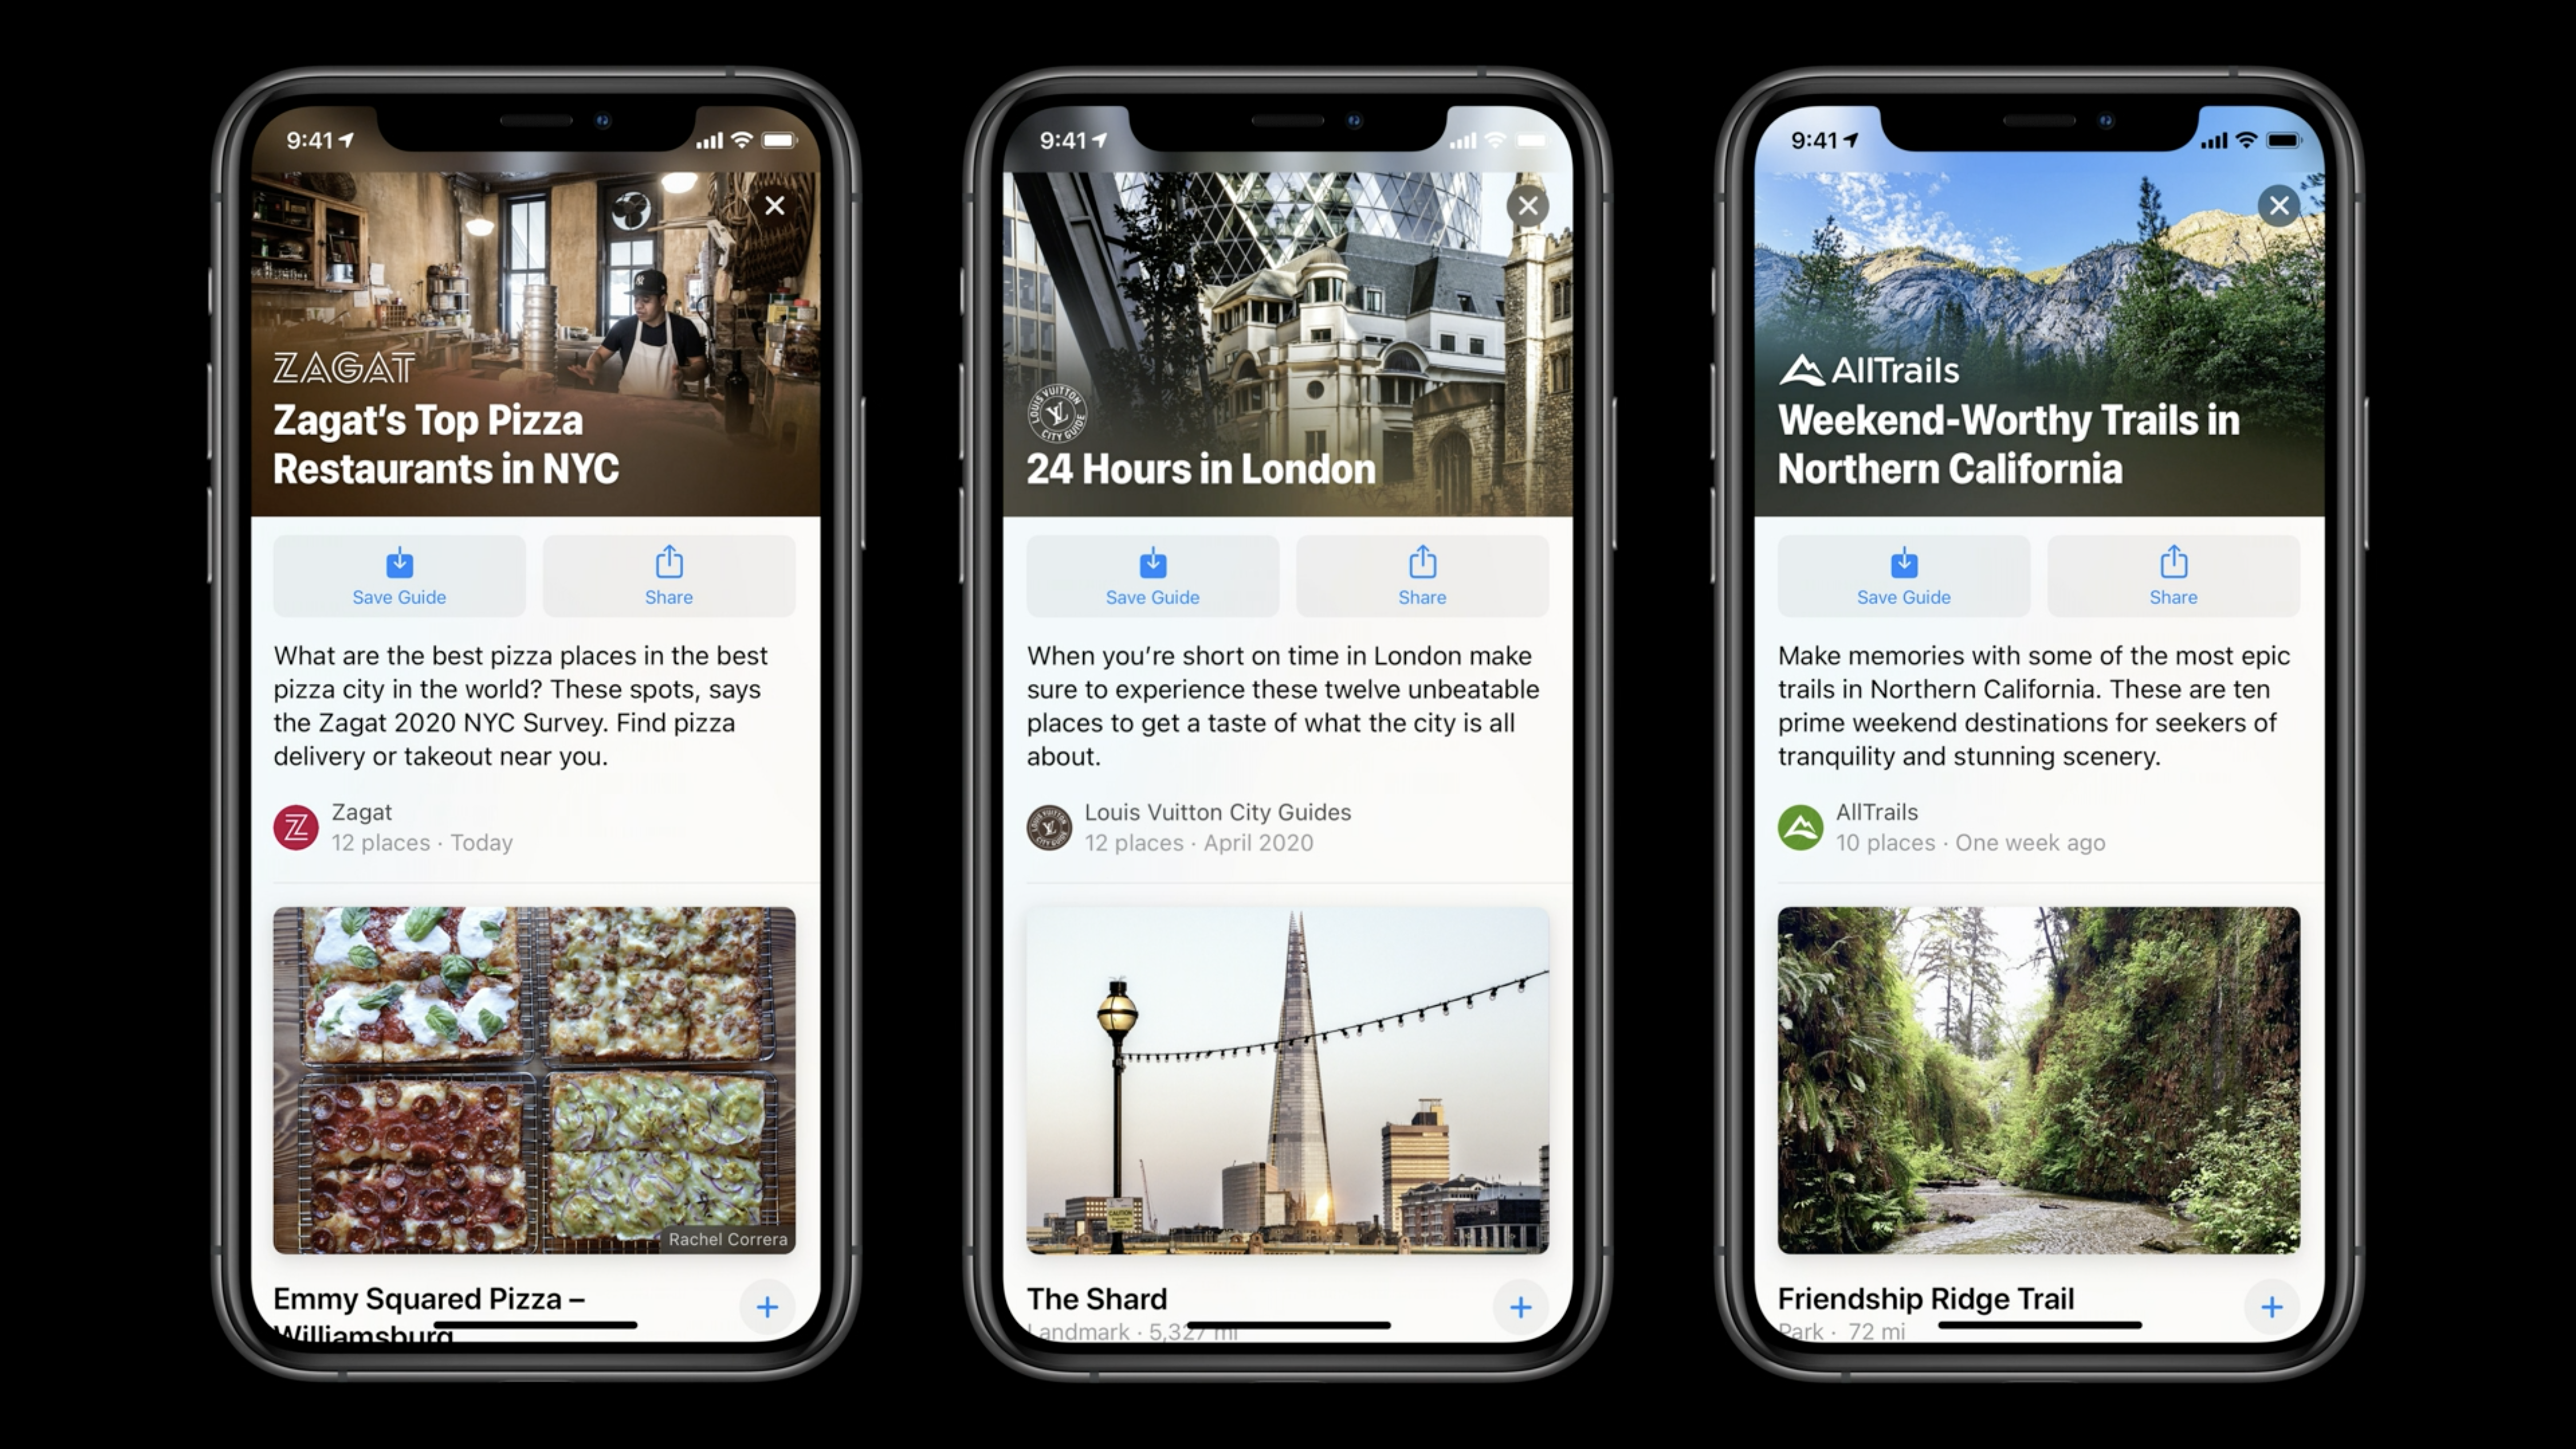
When it comes to guides, Apple has partnered with AllTrails, Lonely Planet, The Infatuation, Washington Post, Louis Vuitton and others to add curated lists of places to Apple Maps. When you tap on the search bar and scroll down on the search card, you can see guides of nearby places.

When you open a guide, you can see all the places on the map or you can browse the guide itself to see those places in a list view. You can share places and save them in a user-made guide — Apple calls it a collection in the current version of Apple Maps.

You can also save a curated guide altogether if you want to check it out regularly. Places get automatically updated.

Image Credits: Apple

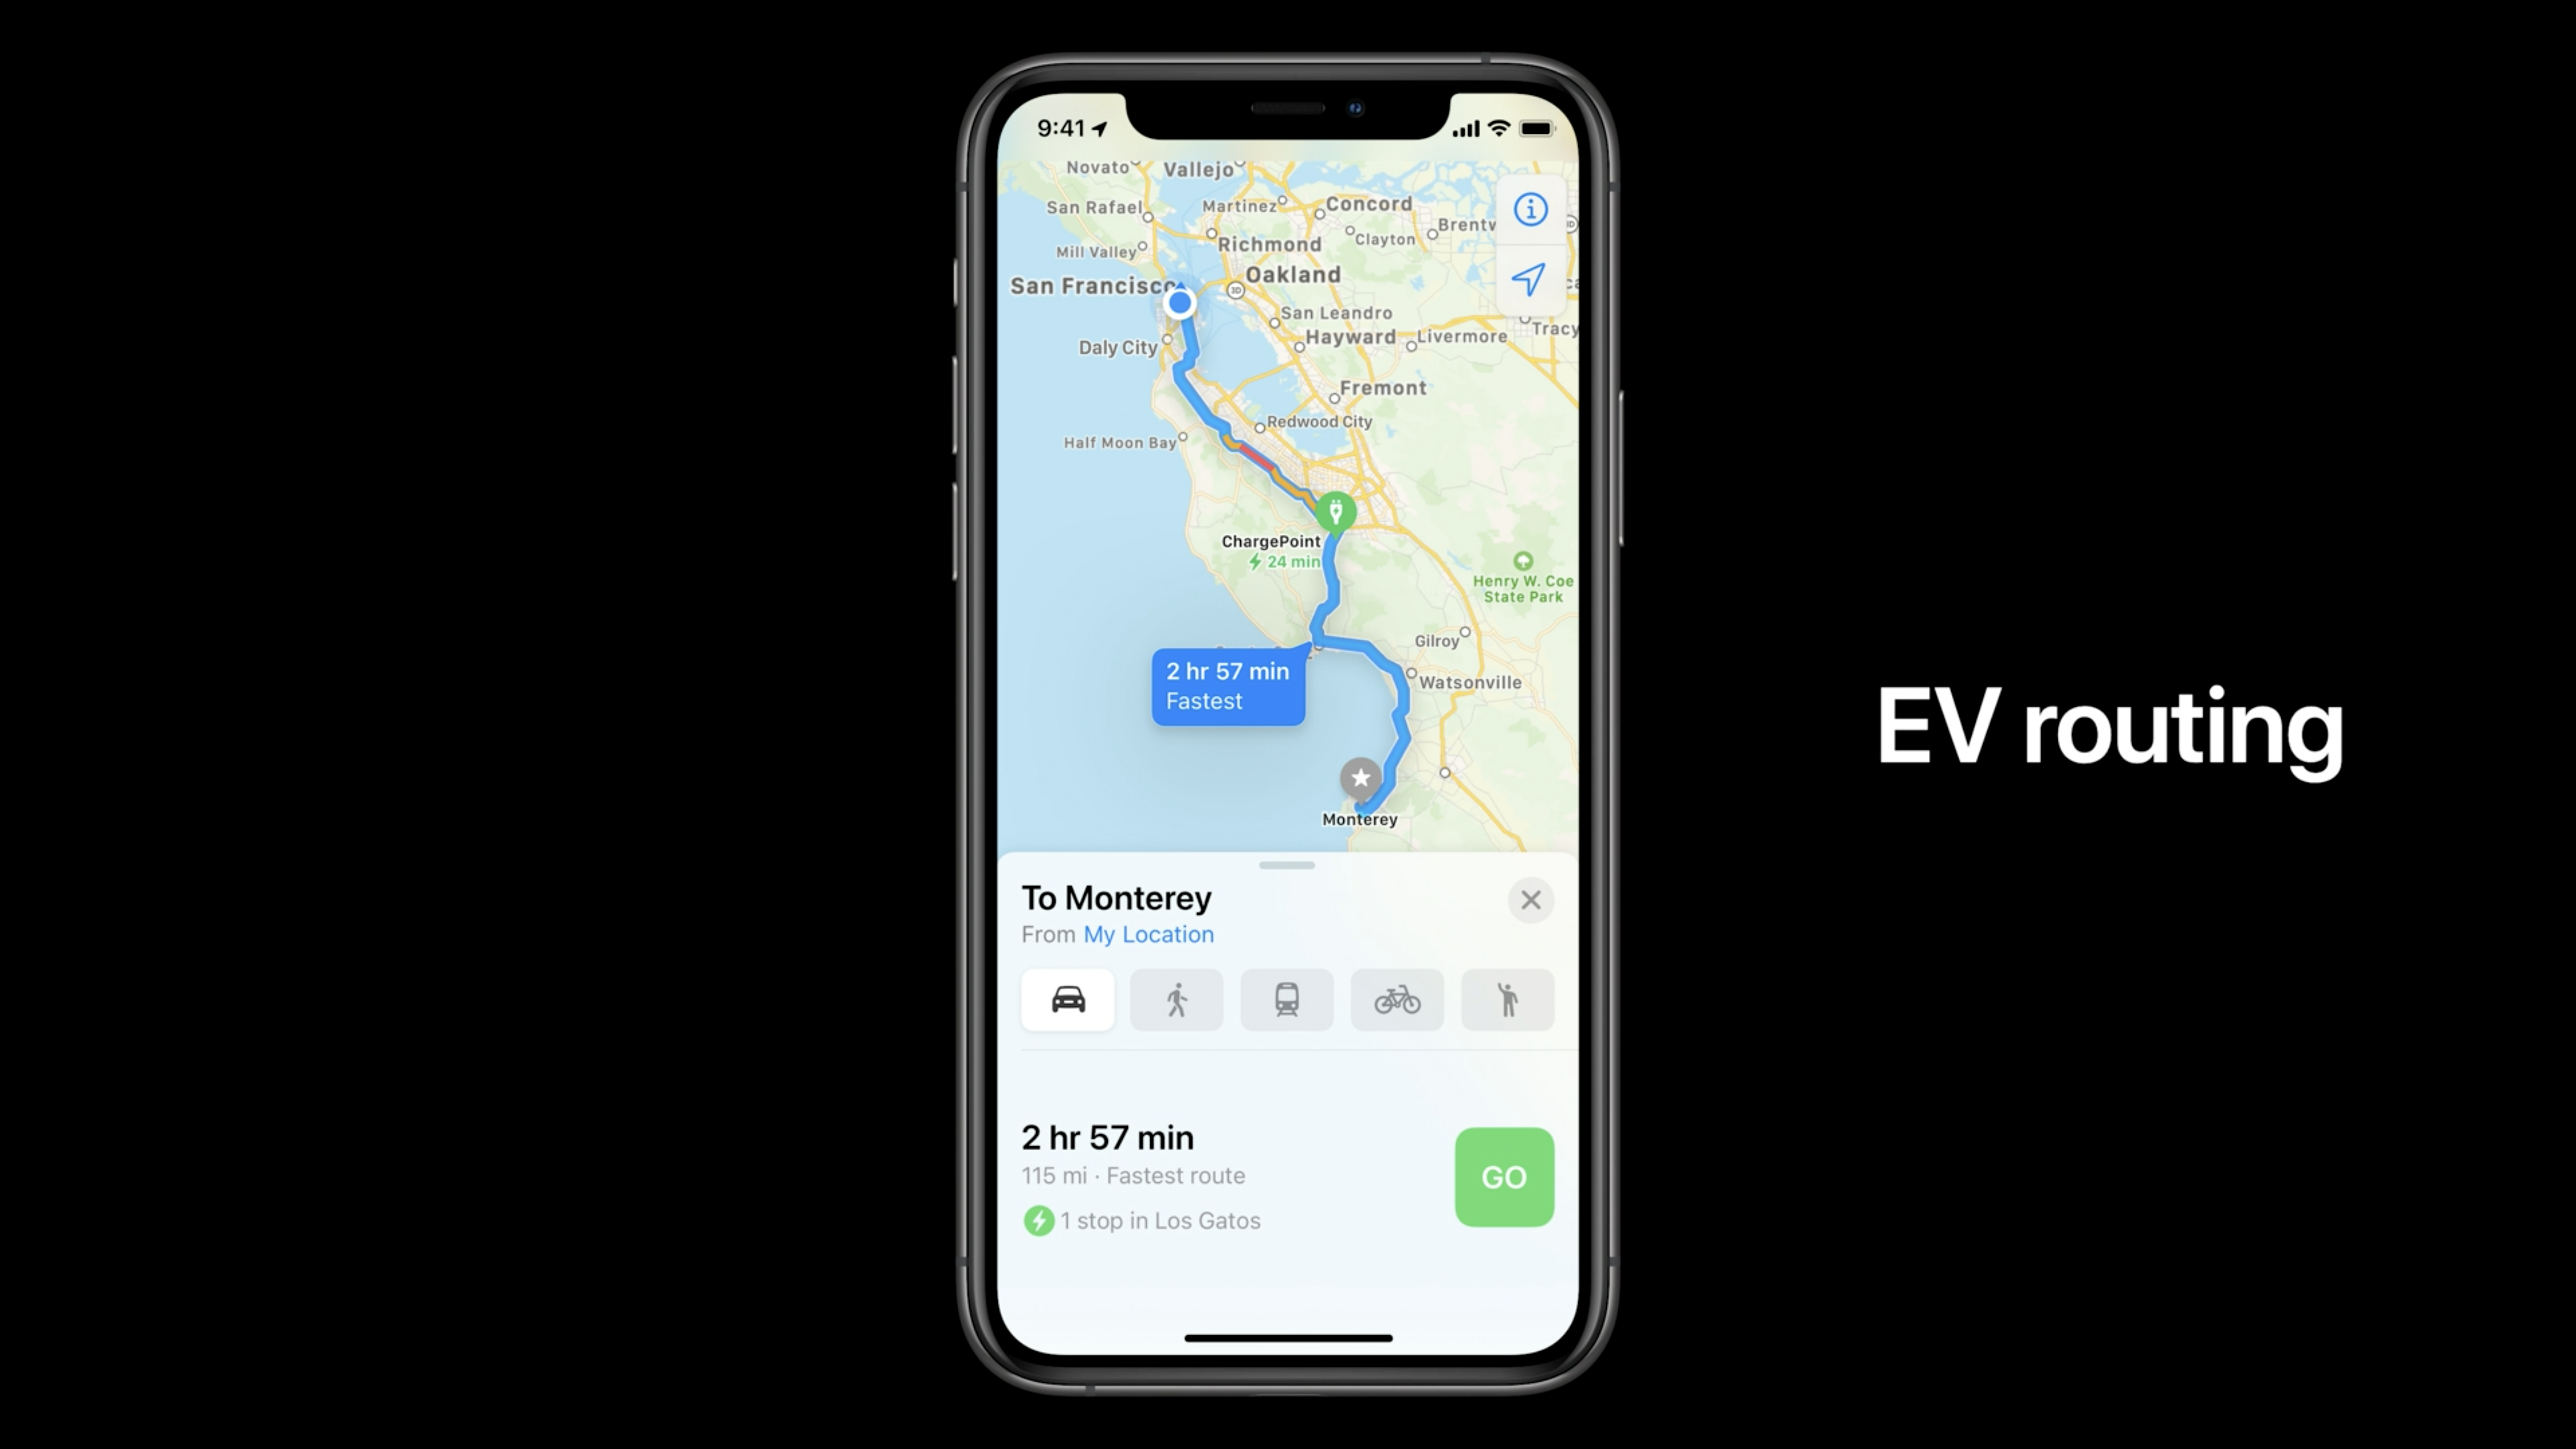
As for EV routing, Apple Maps will let add your car, name it and choose a charger type — Apple has partnered with BMW and Ford for now. When you’re planning a route, you can now select the car you’re going to be using. If you select your electric car, Apple Maps will add charging spots on the way. You can tap on spots to see if they are free or paid and the connector type.

Waze users will also be happy to learn that Apple Maps will be able to warn you if you’re exceeding the speed limit. You can also view speed and red light cameras on the map.

In some cities with congestion zones and license plate access, you’ll be able to add your license plate. The information is kept on the device. It’ll refine directions for those cities.

Image Credits: Apple

Finally, my favorite new feature is cycling directions. It’s only going to be available in New York City, Los Angeles, San Francisco, Shanghai and Beijing at first. Apple ticks all the right boxes, such as taking into consideration cycling paths and elevation. Turn-by-turn directions look slightly different from driving directions with a different framing and a more vertical view.

Google Maps also features cycling directions, but they suck. I can’t wait to try it out to see whether cycling directions actually make sense in Apple Maps. The new version of Apple Maps will ship with iOS 14 this fall.

Image Credits: Apple


Read Full Article

Facebook will show users a pop-up warning before they share an outdated story


Facebook announced Thursday that it would introduce a notification screen warning users if they try to share content that’s more than 90 days old. They’ll be given the choice to “go back” or to click through if they’d still like to share the story knowing that it isn’t fresh.

Facebook acknowledged that old stories shared out of their original context play a role in spreading misinformation. The social media company said “news publishers in particular” have expressed concern about old stories being recirculated as though they’re breaking news.

“Over the past several months, our internal research found that the timeliness of an article is an important piece of context that helps people decide what to read, trust and share,” Facebook Vice President of Feed and Stories John Hegeman wrote on the company’s blog.

Image Credits: Facebook

The notification screen is an outgrowth of other kinds of notifications the company has experimented with recently. Last year, Instagram introduced a pop-up notification to discourage its users from sharing offensive or abusive comments with a similar set of options, allowing them to click through or go back. The company said that its initial results with the experiment showed promise in shaping users toward better behavior.

In a blog post announcing the new feature, Facebook said that it is now considering other kinds of notification screens to reduce misinformation, including pop-ups for posts about COVID-19 that would provide context about source links and steer users toward public health resources.


Read Full Article

Google will start paying publishers to provide content for a ‘new news experience’


Google announced today that it’s working on a “new news experience” that will launch later this year, for which it will pay publishers to license their content.

Axios broke the news, with Google’s Brad Bender offering more details in a blog post, in which he said the project will first launch on Google News and Discover, and will “help participating publishers monetize their content through an enhanced storytelling experience that lets people go deeper into more complex stories, stay informed and be exposed to a world of different issues and interests.”

The extent to which the large internet platforms generally — and Google specifically — pay publishers has often been a contentious topic. Both Facebook and Google have bankrolled sizable news initiatives that combine directing funding for journalism with new products, research and partnerships. However, some publishers and regulators have also pressed Google to pay for including snippets of news content in search results.

“While we’ve previously funded high-quality content, this program is a significant step forward in how we will support the creation of this kind of journalism,” Bender said. “To start, we have signed partnerships with local and national publications in Germany, Australia and Brazil.”

The blog post mentions Germany’s Spiegel Group, Australia’s InQueensland and InDaily and Brazil’s Diarios Associados as some of the participating publishers. Apparently Google is also offering to pay publishers to provide free access to otherwise paywalled content.

“We are always keen to explore innovative ways to attract readers to our high-quality content,” says Spiegel Group Managing Director Stefan Ottlitz in a statement. “This interesting new partnership with Google will allow us to curate an experience that will bring our award-winning editorial voice into play, broaden our outreach and provide trusted news in a compelling way across Google products.”


Read Full Article

The case to infect volunteers with COVID-19 to accelerate vaccine testing | Nir Eyal

The case to infect volunteers with COVID-19 to accelerate vaccine testing | Nir Eyal

Conventional vaccine testing is a slow, years-long process. As thousands of people continue to die each day from COVID-19, bioethicist Nir Eyal proposes a radical idea that could dramatically accelerate the vaccine development timeline: "human challenge trials," in which scientists would deliberately expose volunteers to the virus to more quickly determine a vaccine's efficacy. (This virtual conversation, hosted by head of TED Chris Anderson, was recorded June 15, 2020.)

Click the above link to download the TED talk.

5 Interactive YouTube Games That Still Work


Watching YouTube with friends

When you think of YouTube, interactive games probably aren’t the first thing that come to mind. However, clever creators once came up with many games you can play on YouTube. Similar to classic “choose your own adventure” books and interactive fiction games, interactive YouTube games let you make choices to move the story forward.

Unfortunately, YouTube made a change that renders almost all of these videos unplayable. Let’s examine why, then look at the interactive YouTube games you CAN still play today.

Interactive YouTube Games Died Without Annotations

Unfortunately, most interactive YouTube games no longer function correctly. This is due to YouTube retiring the annotations feature.

If you’re not familiar, annotations were text boxes that creators could add to their videos. They were often used to link to a related video, note a correction, or make a joke. However, annotations didn’t show on YouTube’s mobile apps.

This, combined with declining use, led the company to discontinue them in 2017. And then later, in January 2019, YouTube completely removed annotations from all videos.

While YouTube now offers features like cards and end screens to replace some of this functionality, the fact that annotations no longer appear means that many interactive videos simply don’t work. They relied on annotations to provide links that you clicked to progress the narrative.

A few creators have replaced annotations with the newer cards or end screens, but this isn’t the case for most of them. As many of the popular games were years old, the creators might not actively manage their channels any more. You can see an example of this below; the interactive card trick video simply doesn’t work as intended without annotations.

Chad, Matt & Rob’s Interactive Movies

As it turns out, there is one notable YouTube channel that still features working interactive games: chadmattandrob. While this channel isn’t active these days, it features some of the best-known interactive movies on the site. The first one was uploaded all the way back in 2008.

While these videos initially relied on annotations, the endings have been reworked to use modern ending screens. Thus, this channel is your best bet for interactive YouTube experiences.

Let’s quickly look at the premise for each of these experiences so you know what to expect. We’ve linked the starting videos for each one, so begin with those and your choices will take you through the narrative.

1. The Time Machine

Chad, Matt & Rob’s first adventure was also one of the first of its kind on YouTube. In this experience, your goal is to get the guys to a meeting safely. Along the way, they discover a time machine and travel to different time periods while trying to stay ahead of the authorities.

2. The Murder

During this adventure, Chad, Matt, and Rob are witness to a murder while filming. Compared to The Time Machine, this one features extra branching paths and more possible scenes to see.

3. The Birthday Party

Join our heroes for their third adventure, where they must get to their boss’s birthday party unscathed. During the journey, they encounter a lot of wild scenarios you might not expect.

4. The Teleporter

The channel marks The Teleporter as a “mini-adventure.” It’s notable for being a branded video; the story features AXE products. Aside from that, it centers on the guys running away from a UFO.

5. The Treasure Hunt

The final interactive adventure tasks the group with facing off against a veteran treasure hunter as they look for an ancient treasure. It was uploaded in 2011.

Interactive YouTube Games Are a Thing of the Past

As we’ve seen, games that you can play on YouTube almost completely died out when YouTube killed annotations. Thankfully, you can still enjoy the Chad, Matt & Rob videos, so at least they aren’t all gone.

There’s more good news too: interactive movies are alive and well outside of YouTube. As you can see with our list of interactive movies you can control online.

Read the full article: 5 Interactive YouTube Games That Still Work


How to Use Google Forms to Get Updates From Your Remote Team


google-forms-updates-team

Google Forms is a terrific and intuitive tool for gathering information from clients, customers, and employees. You can easily create and customize a form, share it in a few different ways, and then analyze the answers.

If you’re in a work situation where you have a remote team, Google Forms can be an effective method for obtaining updates. You can use it for a specific project or simple work updates that you request daily or weekly.

Start a New Form

Google Forms offers a nice selection of templates that can help you get started. Click the Template gallery at the top to review templates for Work, Personal, and Education. If you see one that has the basics you need, such as the questions types, click it to use it.

If not, you can start from scratch by clicking the Blank option under Start a new form. This is what we’ll be using for this tutorial.

The first thing you should do when you create a new form is to name it. Since Google Forms saves your work as you go, you’ll always know which is the correct form if you name it upfront. Optionally, you can also add a description.

Google Forms Name and Description

If you enter the name on the form itself, that name will pop into the spot on the top left by default. But you can change that name as well as select a location for it within Google Drive if you like.

Google Forms Name and Location

Add Your Form Questions

Google Forms gives you several question types that should cover any situation. From short answers and paragraphs to multiple choice, checkboxes, and dropdowns, you have all the flexibility you want.

Basic Details

The most sensible questions to begin a team update form with are name, date, and optionally time. Whether you use a template or the blank form, you’ll have a question already there to get you started. So you can simply change that question type if necessary and then click the plus sign to add more questions.

Google Forms Basic Detail Questions

For your team member’s name, select Short answer as the question type. Then add the name of the question and turn on the toggle for Required.

For the date your team member is completing the form, click the plus sign to add a question, and pick Date in the dropdown box for the question type. Then add the question name, such as Date, and make the question required.

If you’d like your team member to enter the time they’re completing the form, click the plus sign to add a question and select Time for the type. Don’t forget to add the question name and make it required if you like.

Multiple Choice or Dropdown for Department or Area

If you are sending the update form to many people, you may want to add questions for things like department or area. Multiple choice and dropdown question types work perfectly for these types of questions. Plus, you can have the responder move automatically to other questions based on their answers.

Google Forms Department Multiple Choice

For department or area, you can use the Multiple choice question type if there are only a few answers to pick from and the Dropdown type to conserve some space if there are many possible answers. Choose your question type and then add each answer. We’ll use Multiple choice.

Now, depending on the answer the responder picks, we want to move them to a certain section with specific questions. This is a very handy feature in Google Forms because you can eliminate the need for the responders to skip questions that don’t apply to them and go directly to the ones that do.

On the bottom right of the question, click the More button (three dots) and mark Go to section based on answer. You’ll then see the question update with a spot to add the section next to each answer.

Google Forms Go To Section

If you already have your sections created, you can select each using the dropdown boxes. If not, continue below to create a section and then come back to complete this part.

Google Forms Go To Section List

Use Separate Sections for Each Department or Area

To create a section, click the bottom button in the floating toolbar for Add section. You’ll see the section appear and can give it its own name and description. In this how-to, we’re going to create a section for those who select Information Technology for their department.

Google Forms New Section

We’ll add a question for the current project(s). This allows us to see which projects the responder is currently working on and checkboxes allow them to pick more than one. So, you can pick Checkboxes for the type, or you can take this question a step further.

Maybe for each project they select, you want to know their progress for it. This is where the Checkbox grid type is ideal. You can enter each phase in the Rows section and each project in the Columns section (or vice versa).

If you do lay the answers out as we describe, you can then click the More button and pick Limit to one response per column. This way, the responder can only pick one phase per project, which would make sense.

Google Forms Checkbox Grid Limit

So, this allows the responder to not only tell you which projects they are working on, but which phase they are on for each; all with one checkbox grid question.

Google Forms Checkbox Grid

You can then create additional sections and the questions the same way.

Another type of question you may want to add is a Paragraph for feedback. This lets the responder type in any issues, questions, or other feedback they have with plenty of space.

Google Forms Paragraph Feedback

Check Your Responses

Viewing the responses from your form couldn’t be easier. Just open your form on Google Forms and hit the Responses tab at the top. You’ll see a summary, can view responses by question, or look at individual answers.

Google Forms gives you text responses as well as colorful graphs and charts for your forms. And you can export the responses for offline viewing.

For additional information on viewing responses or creating forms in general, check out our extensive guide to Google Forms.

Send Email Reminders

If you enable the option to collect email addresses for your form, you can then send reminders to those who don’t complete the form. This is extremely convenient; however, there are a few things to do and keep in mind for it to work correctly.

First, set up your form to collect the addresses. Click the Settings button (gear icon) on the top right and pick General in the popup window. Check the first box for Collect email addresses and hit Save.

Google Forms Collect Emails

An email address question will automatically pop onto your form which you cannot remove, and it is a required question.

Google Forms Email Question

Next, you must send your form to the participants via email. Click Send and use the Email tab. Enter the addresses of those you want to complete the form, separated by commas, and hit Send.

Now that Google Forms knows who you sent the form to, it can determine if responses are received from those responders. To send email reminders to those who haven’t responded, follow these steps.

  1. Open your form and click the Responses tab at the top.
  2. You’ll see sections for Who has responded? and Waiting for X responses.
  3. In the latter, click Send email reminder.

Google Forms Send Email Reminder

The same window you saw when you initially sent the form will display, prepopulated with those email addresses you are waiting for responses from. This lets you send them a polite reminder to complete your update form.

Copy and Reuse Your Form

If you plan to send your team update form regularly with minor changes to project names or work duties, as examples, you can simply copy your form and adjust it as needed.

Open your form and click More (three dots) on the top right. Pick Make a copy, give your copied form a name, and click OK to save it. You’ll also notice you have the option to share it with the same people, which is handy. You can then make your adjustments and send it.

Google Forms Copy Form

Consistent Updates Are Easy With Google Forms

It might seem like a bit of work to create a team update form using Google Forms at first. But if you do, you’ll get the updates and information you actually need because they’re answering questions you create. Plus, you can easily copy and reuse the form over and over.

For more, take a look at how to create a free website contact form with Google Forms or other ways you can use Google Forms for your business.

Read the full article: How to Use Google Forms to Get Updates From Your Remote Team


What Is Windows 10X and How to Give It a Try


windows-10x

Have you heard about a new version of Windows 10? Are you unsure if those rumors are true? Well, wonder no longer.

Here’s what you need to know about Windows 10X, and how you can take Windows 10X for a trial run right now.

What Is Windows 10X?

windows 10x home page dual screen

Windows 10X is a new version of the Windows 10 operating system aimed primarily at dual-screen devices. Even though the focus is on dual-screen devices, the operating system will also feature on single-screen devices, too.

The original plan was for the dual-screen version of Windows 10X to launch first. However, due to setbacks in the development of dual-screen devices set to run Windows 10X, such as the upcoming Microsoft Surface Neo, the full launch is now set for 2021.

However, the single-screen version of Windows 10X will now take center-stage. Some of the design features of Windows 10X will also make the cross-over into the main version of Windows 10.

So, here’s what you can expect from the new version of Windows 10X, what changes might come to the main Windows 10 version, and how you can give Windows 10X a try.

1. Dual-Screen Optimization

Windows 10X focus is on dual-screen devices, despite setbacks in production and development. In the Windows 10X test environment (more on this below), you can transition Windows apps from screen to screen and try out the dual-screen version of Windows 10.

Part of the dual-screen optimization lies with the interface, as you might expect. You can drag and drop windows between screens, specify which screen you want an app to open on, or drag an app to the center of the dual-screen and release it so that it spans both screens.

2. Windows 10X App Containers

As well as the dual-screen optimization, Windows 10X will run Windows 10 apps and programs, just like regular Windows 10. In addition, the apps will run in an individual container environment, meaning they are isolated from the operating system. The app isolation should help stability, reduce the chance of random crashes, and improve device security.

3. New Start Menu, New Taskbar, No Live Tiles

windows 10x start menu live tiles

Windows 10X has a shiny new flat Start Menu—without any Windows Live Tiles, either. Screenshots of the flat Windows 10X Start Menu appeared a while back and received a lot of positive feedback.

Another major change is that the Windows 10X Start Menu does not use any form of Live Tile. Like them or loathe them, Microsoft is deciding to remove them.

There’s also the addition of a new Taskbar, too. The adaptive taskbar spans both screens when you use Windows 10X with a dual-screen device, using a new set of app icons, too. The apps center on the Windows 10X taskbar, which is a nice change and fits with the dual-screen operating system. But if you prefer the more traditional left-aligned location for your apps, you can do that too.

The new style is smart and a much more basic approach to the Start Menu, which is a welcome addition.

4. New Windows 10X Action Center, Compose Mode for Working

Animated GIF - Find & Share on GIPHY

The Windows 10 Action Center isn’t great. It isn’t awful, either, but the design is lacking functionality. Thankfully, it appears Microsoft is aware of this, and Windows 10X comes with a remodeled Action Center.

The Windows 10X action center brings in several quick actions, with a focus on making changes direct from the panel.

The new Action Center also contains a Windows 10X dual-screen specific feature: Compose Mode.

You open the Action Center, tap Compose Mode, and your screen rotates 90°, turning one panel into an on-screen keyboard. The idea is that you only need a single-button process to switch between work and play.

5. Improved Windows Update in Windows 10X

I haven’t had a chance to see this working, but Windows 10X promises much faster updates than Windows 10. Microsoft will silently install and prepare updates in the background before requiring you to restart. Then, the update should install painlessly and quickly.

The change to the Windows Update for Windows 10X looks makes the process similar to a Chromebook. The operating system informs you that there is an update, you restart your system as normal, and then continue working.

Hopefully, Microsoft can begin implementing this streamlined update system in the regular Windows 10 build as well as Windows 10X.

How to Test Out Windows 10X

You can take Windows 10X for a test drive using the Microsoft Emulator and an early Windows 10X preview build. You should note that this is a work in progress, and the preview builds are designed primarily for developers to begin ensuring app compatibility. You may encounter bugs, crashes, and other issues.

1. Install Microsoft Emulator

First up, you need to install the Microsoft Emulator. The Microsoft Emulator is available from the Microsoft Store and is a free download.

Download: Microsoft Emulator for Windows 10

Open the Microsoft Store using the link above, select Get, and allow the installation to complete.

2. Download the Windows 10X Emulator Image

Now, open the Microsoft Emulator. The Microsoft Emulator will scan automatically for a new preview build on the Microsoft Store. When it finds a preview build, select the latest version, then Install.

windows 10x download emulator image

You’ll have to input your Microsoft account password to confirm the download and accept the EULA. Then, the Windows 10X preview will download.

3. Check Hyper-V is Installed

Before hitting the Start button, make sure Windows Hyper-V is enabled.

First, open the Start Menu and type command, then select Command Prompt (Admin). Now, input the following command:

systeminfo.exe

Scroll down and find the Hyper-V Requirements section. If the requirements say Yes, you can proceed to the next section, #4. If the requirements say No, continue reading this section to install Hyper-V.

The easiest way to make sure Hyper-V installs correctly is using PowerShell. (What’s the difference between PowerShell and the Command Prompt?) There is also an option to install Hyper-V using Windows Features, but this doesn’t always work properly.

Type powershell in your Start Menu search bar, right-click the Best match on top, and select Run as Administrator. Now, input the following command:

DISM /Online /Enable-Feature /All /FeatureName:Microsoft-Hyper-V

After the command completes successfully, save any work you have open, then restart your system. Once your system reboots, you will find options for Hyper-V in the Start Menu.

4. Start the Windows 10X Emulator

Once Hyper-V is installed, you can boot the Windows 10X preview build in the Microsoft Emulator. Select the preview build and hit Start. You’ll see a dual-screen smartphone configuration appear, followed by the spinning orbs indicating that Windows 10X is booting up.

windows 10x microsoft emulator

From here, you’re free to explore the Windows 10X preview build. Remember, this is a preview build for the dual-screen version of the operating system, and the Microsoft Emulator works accordingly.

Will Windows 10X Replace Windows 10?

At the current rate, no. Windows 10X will not replace the main Windows 10 desktop version you currently use.

However, you could well see the transition of certain features from Windows 10X into Windows 10. For example, the Windows 10X Start Menu would be a welcome addition to Windows 10, as would the streamlined Windows Update process.

Now you have read about Windows 10X, Microsoft’s statement regarding the last Windows operating system ever seem clearer. Here’s why Windows 10 isn’t the last Microsoft operating system ever.

Read the full article: What Is Windows 10X and How to Give It a Try

5 Interactive YouTube Games That Still Work


Watching YouTube with friends

When you think of YouTube, interactive games probably aren’t the first thing that come to mind. However, clever creators once came up with many games you can play on YouTube. Similar to classic “choose your own adventure” books and interactive fiction games, interactive YouTube games let you make choices to move the story forward.

Unfortunately, YouTube made a change that renders almost all of these videos unplayable. Let’s examine why, then look at the interactive YouTube games you CAN still play today.

Interactive YouTube Games Died Without Annotations

Unfortunately, most interactive YouTube games no longer function correctly. This is due to YouTube retiring the annotations feature.

If you’re not familiar, annotations were text boxes that creators could add to their videos. They were often used to link to a related video, note a correction, or make a joke. However, annotations didn’t show on YouTube’s mobile apps.

This, combined with declining use, led the company to discontinue them in 2017. And then later, in January 2019, YouTube completely removed annotations from all videos.

While YouTube now offers features like cards and end screens to replace some of this functionality, the fact that annotations no longer appear means that many interactive videos simply don’t work. They relied on annotations to provide links that you clicked to progress the narrative.

A few creators have replaced annotations with the newer cards or end screens, but this isn’t the case for most of them. As many of the popular games were years old, the creators might not actively manage their channels any more. You can see an example of this below; the interactive card trick video simply doesn’t work as intended without annotations.

Chad, Matt & Rob’s Interactive Movies

As it turns out, there is one notable YouTube channel that still features working interactive games: chadmattandrob. While this channel isn’t active these days, it features some of the best-known interactive movies on the site. The first one was uploaded all the way back in 2008.

While these videos initially relied on annotations, the endings have been reworked to use modern ending screens. Thus, this channel is your best bet for interactive YouTube experiences.

Let’s quickly look at the premise for each of these experiences so you know what to expect. We’ve linked the starting videos for each one, so begin with those and your choices will take you through the narrative.

1. The Time Machine

Chad, Matt & Rob’s first adventure was also one of the first of its kind on YouTube. In this experience, your goal is to get the guys to a meeting safely. Along the way, they discover a time machine and travel to different time periods while trying to stay ahead of the authorities.

2. The Murder

During this adventure, Chad, Matt, and Rob are witness to a murder while filming. Compared to The Time Machine, this one features extra branching paths and more possible scenes to see.

3. The Birthday Party

Join our heroes for their third adventure, where they must get to their boss’s birthday party unscathed. During the journey, they encounter a lot of wild scenarios you might not expect.

4. The Teleporter

The channel marks The Teleporter as a “mini-adventure.” It’s notable for being a branded video; the story features AXE products. Aside from that, it centers on the guys running away from a UFO.

5. The Treasure Hunt

The final interactive adventure tasks the group with facing off against a veteran treasure hunter as they look for an ancient treasure. It was uploaded in 2011.

Interactive YouTube Games Are a Thing of the Past

As we’ve seen, games that you can play on YouTube almost completely died out when YouTube killed annotations. Thankfully, you can still enjoy the Chad, Matt & Rob videos, so at least they aren’t all gone.

There’s more good news too: interactive movies are alive and well outside of YouTube. As you can see with our list of interactive movies you can control online.

Read the full article: 5 Interactive YouTube Games That Still Work


Read Full Article

Programming Burnout: How to Regain Your Lost Motivation


programming-burnout

Have you lost the passion that you once had for programming? Is it affecting your motivation to get things done? Are you falling behind on all your projects and finding it difficult to catch up? If you feel burned out, here’s the good news: you can beat it.

Programming burnout is very real. The real challenge with burnout is figuring out the different reasons why you may find yourself lacking motivation. Finding the cause will help you recharge and come back stronger.

There are numerous ways to rekindle the flame, finding the one that you respond to is the challenge. It won’t necessarily be easy, but it’s certainly achievable. Here are some ways to tackle programmer burnout and regain your lost motivation.

Read Apprenticeship Patterns

Apprenticeship Patterns Apprenticeship Patterns Buy Now On Amazon $27.40

It bears repeating: you are not the first programmer to lose their fire, nor will you be the last. You are not alone in this struggle. Millions of other coders have dealt with this problem and many of them made it through to the other side. The best thing you can do is to learn from their experiences.

That’s why I highly recommend Apprenticeship Patterns by Dave Hoover and Adewale Oshineye. This ebook is full of wisdom for programmers. It walks through the phases of programming expertise from newbie to veteran and the challenges that pop up along the way.

The underlying reason for burnout can vary from person to person. Were your expectations of programming different from reality? Are you rushing towards mastery and being overwhelmed by it all? Do you feel like you’re stagnating and not learning anything new?

Depending on your answers, you should check out the sections named “Sustainable Motivations,” “The Long Road,” and “Rubbing Elbows,” respectively.

Find Motivation With Programming Peers

Let’s be clear about one thing: this has nothing to do with whether you’re strong enough to pull yourself through. Being unmotivated doesn’t mean you’re weak. It’s important to keep yourself grounded in reality, which is hard to do when you can’t see an outside perspective.

When you’re feeling indifferent and bored, the worst thing you can do is to suffer through it on your own. If you aren’t already surrounded by like-minded programmers, you would do well to seek some community. In-person conversations are ideal, but online communities have benefits as well.

The goal of peer-to-peer interaction is to find common ground with programmers who may be having the same struggle that you are. The objective is to share your concerns, vent a little bit, and ultimately pinpoint what might be killing your inspiration.

Get Inspired Learning Something New

In a lot of cases, programming burnout stems from boredom. If you’ve been grinding as a company software developer for over a decade, you might feel like you’re stuck in a dead-end job with no opportunity. Maybe the code you maintain is trivial and doesn’t challenge you. None of which even makes mention of other habits that can contribute to exhaustion at work.

What do you do then? You have to switch gears. Some of the enjoyment of programming comes from creative problem-solving. Without that, programming is little more than mindless busywork day in and day out – especially if you consider your day-to-day coding projects to be easy.

Code projects for programmers

Depending on the flexibility of your workplace, ask your superiors if you can transfer to another project. If you can afford the risk, it may even be worth switching to another field  (e.g. if you’ve been writing academic software on Windows, it could be exciting to try writing a social app on the web).

You can also pick up hobby projects that involve areas of programming that you’ve never explored. For example, try making a mobile game in your free time.

When you can’t get away from your primary programming responsibilities, you’d be surprised how much inspiration these personal projects can stoke within you. Just make sure you pick something that ignites your interest.

Improve Health to Beat Burnout

A lack of motivation could be a sign of health problems. These can be physical health concerns like dehydration, or mental health concerns like depression. Improving health can go a long way toward recovering motivation.

Don’t be hesitant to try an app that promotes positivity to recharge your mental health.

For computer-heavy activities like programming, there are three steps you can take to stay healthy.

  1. Exercise regularly (if time is an issue, you can try exercising at your desk while you work).
  2. Take steps to minimize computer fatigue.
  3. Enforce proper sleeping habits.

Routines can strain your mental health. If you’re staring at the same four walls every single day, it could grow monotonous. Monotony can lead to boredom and increased levels of stress.

You can remedy this by changing your scenery; whether that means rearranging your furniture, working from a new location, or something as small as changing your computers’ wallpaper. If you want to incorporate some exercise into your workflow, a standing desk can help.

Lastly, if your lack of motivation is closely tied to issues of procrastination, one thing I’ve found extremely helpful is the Pomodoro technique. This technique breaks up your workday into alternating periods of work, rest, work, rest. Never tried it before? Give it a go for a week or two. You might be pleasantly surprised by the results.

Step Away And Refresh

It’s great to find a solution to burnout that helps you become a better programmer. However, programming is a mentally taxing career and at a certain point changing the way you program might not be enough to fix your burnout.

Sometimes the best way to refresh your programming is to stop programming!

Step away from the computer, give your keyboard rest, and get offline. Find a hobby that motivates you. Maybe that’s learning music or getting outdoors for a hike. There’s no shortage of hobbies that don’t involve any programming. Visit your friends, get out on the town, go see a movie or concert. Burning the candle on both ends is great for productivity but terrible for your mental health. Take some time to switch your brain off; stop thinking about algorithms.

When you take time off frequently, you have a better chance of keeping your mind fresh and avoid losing motivation.

Revive Your Motivation to Program

I’ve been there more often than I’d like to admit. Programming is fun! Programming is boring. It’s fun again!  These steps are the kinds of actions that have proven most effective for me over the years. Hopefully one or more of these tips can help you recover the motivation that sustains you.

Keep your energy strong by separating work from your personal life. Positive forms of entertainment are encouraged, find what works for you. For some that may be as simple as a playlist you enjoy or as engaging as one of these creative hobbies that can make you a happier person.

Read the full article: Programming Burnout: How to Regain Your Lost Motivation


Read Full Article

5 Awesome Laptop Decoration Ideas: Stickers, Cases, and More


You’ve probably noticed that most laptops look the same. The rectangular devices have cosmetic differences and sometimes feature the company’s branding. However, there’s little that differentiates your laptop from all the others.

Whether you need to identify your laptop in a crowd or let your personality shine through, there are plenty of ways to pimp your laptop.

Here are five of the best ways to customize your laptop.

1. Cases & Skins

itsaskin1 Laptop Skin itsaskin1 Laptop Skin Buy Now On Amazon $11.88

When you last bought a smartphone, the first thing you likely did was to put your new device in a case. It may seem counter-intuitive to cloak your expensive new phone in cover, hiding the aesthetically-pleasing hardware and branding. However, we use cases to protect our devices, but also as a way to express ourselves.

The same is true of laptop cases and skins. Hardshell cases add some level of protection to your laptop were it to fall or get knocked. Ultimately, though, the main reason you choose a case is to decorate your laptop. Cases come in a wide variety of styles to suit all needs, like the LuvCase MacBook Pro Hard Shell Case. There are cases in solid colors, neon shades, and some even with artwork, cartoons, or other graphic designs.

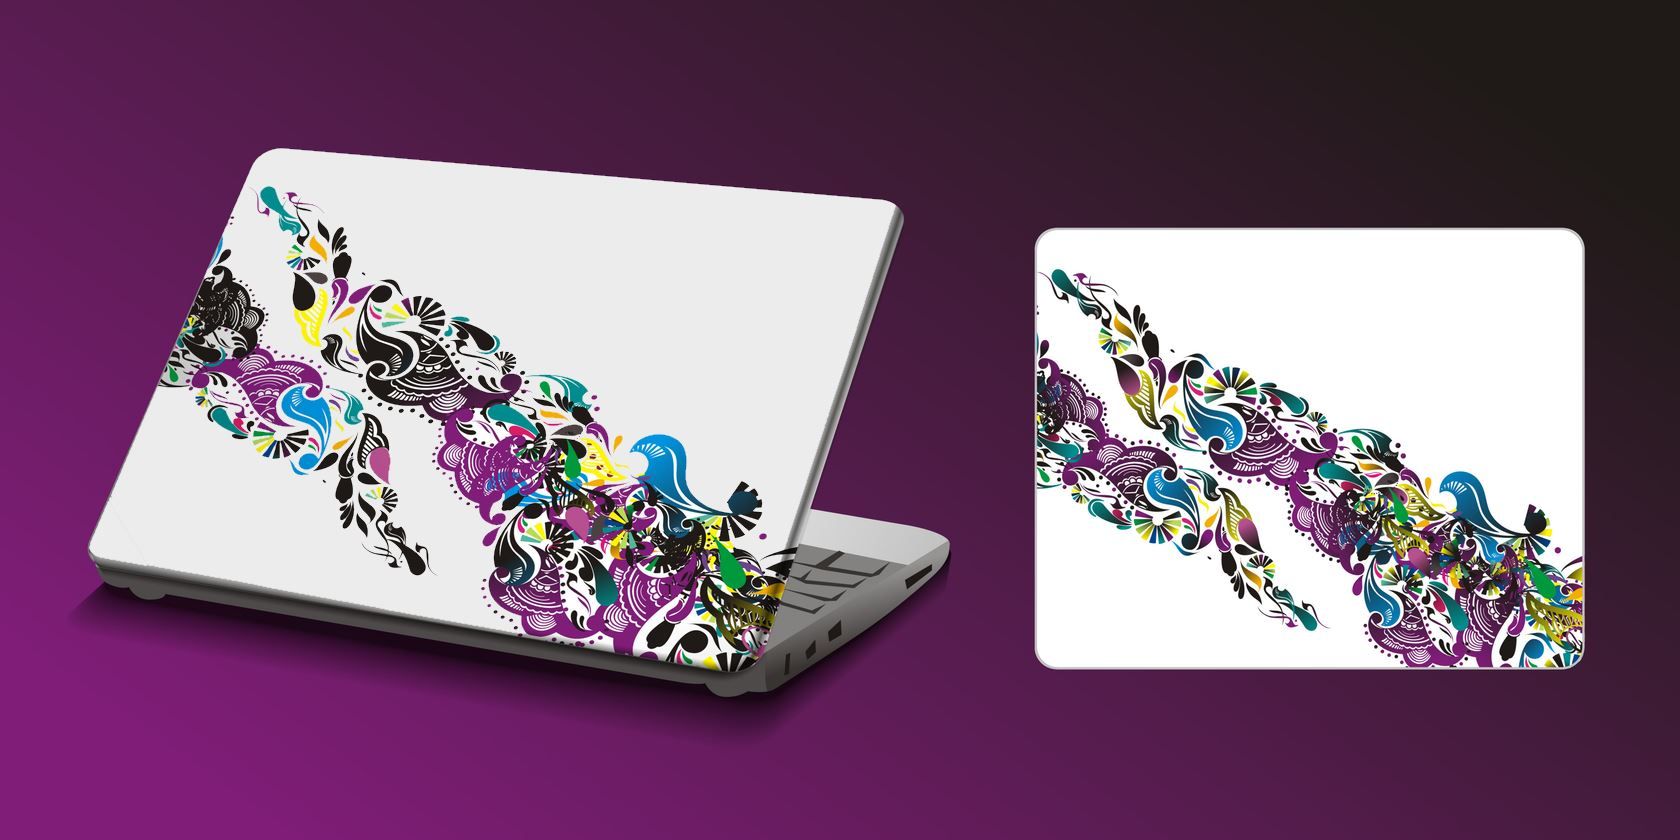
Laptop skins offer similar possibilities but integrate better with your laptop. That’s certainly true of the itsaskin1 Laptop Skin. The idea of a skin is to look as though it is the laptop’s original design, rather than a third-party add-on. Skins are often coated to add extra grip and to fit tightly onto your laptop. They are also ideal if you don’t intend to change your laptop’s overall look that often, and many companies can even produce custom skins as well.

2. Webcam Privacy Covers

EYSOFT Webcam Covers EYSOFT Webcam Covers Buy Now On Amazon $8.99

If you’ve watched a movie or TV show where one of the characters was written to be the computer geek, you’ll have noticed that there’s an entire aesthetic that accompanies it. They are often suspicious of authority and prefer to control their tech, opting for open-source software, Linux operating systems, and customizable devices.

They may even mention the Edward Snowden leaks and campaign for privacy and security. You can mark yourself out as a security-conscious laptop user by installing a webcam privacy shield, like the EYSOFT Webcam Covers.

These inexpensive products protect your privacy by adding a physical cover to your webcam. Using the sliding mechanism, you can easily open and close the shutter. Webcam covers are dual-purpose; they protect your privacy, but also make a visual statement about who you are and the issues that matter to you. If online rights are essential to you, consider supporting the Electronic Frontier Foundation by opting for a pack of EFF Camera Covers.

3. Decals and Stickers

Minecraft Laptop Stickers Set Minecraft Laptop Stickers Set Buy Now On Amazon $8.95

For many years, stickers have been a great way to express your interests, beliefs, and hobbies—there’s a reason Apple includes a decal of their logo in every purchase. Decorating your laptop with stickers and decals is an inexpensive and interchangeable way to pimp your laptop.

Stickers are opaque designs stuck to a surface with a light glue, like the Minecraft Laptop Sticker Set. They are relatively cheap to produce, and, as a result, are often given away for free at events, meetups, and other gatherings. Partly, this is a relic of the experience, but it’s also a handy bit of marketing. In many ways, they are an analog version of the “People who enjoyed this also liked…” recommendations.

Apple aside, decals aren’t often given away for free. These (usually) transparent designs aren’t attached with much glue, relying on the material and some static to stick to a surface, like with the G Ganen MacBook Decal. Given the more complex design, they are also slightly more expensive. Adding a decal to your laptop shows that you care enough about the design, company, or topic to spend money on it.

4. Headphones

Apple AirPods Pro Apple AirPods Pro Buy Now On Amazon $208.11

Despite appearances, Apple isn’t a technology company; it is a lifestyle brand. Its products are a part of a marketing campaign designed to show how your life could be better and easier if you invest in Apple devices. The relative merits of the tech aside, there’s a reason that people often go all-in on the Apple ecosystem.

Combining your laptop with some well-matched tech accessories and gadgets is a great way to make your laptop look cool. For instance, if you have a MacBook, you could either opt for the Apple AirPods Pro or Beats headphones. There’s a wide range of well-designed headphones that could make the perfect companion to your Windows laptop, too.

While style plays a part in the overall look, so do the features. Noise-canceling headphones, like the Jabra Elite 85h, suggest you don’t want to be disturbed while you’re working. In-ear or true wireless headphones make it clear you want to remain engaged with the outside world, but may also take a lot of calls or video chats.

5. USB Accessories and Peripherals

Logitech MX Master Wireless Mouse Logitech MX Master Wireless Mouse Buy Now On Amazon $52.66

The previous laptop customization ideas we’ve covered focus on how your electronics look, both to you and others. However, pimping your laptop is also about optimizing it for your needs. Although, in theory, laptops are complete devices, including screens, touchpads, and keyboards, they are designed for portability, not experience.

You can customize your laptop by adding peripherals and USB accessories that make your life easier. For instance, not everyone finds a touchpad simple to use, and some prefer a dedicated mouse, like the Logitech MX Master Wireless Mouse, instead. Likewise, your laptop’s limited keyboard may not suit your needs either, so a wireless keyboard could be an option.

Outside of those replacement accessories, you can further improve your setup with other USB accessories. For example, during the hot summer months, you may find it useful to have the KEYNICE USB Fan by your side to keep cool. Alternatively, USB hubs, laptop docks, and cable tidies can make your experience that much easier.

The Best Ways To Decorate Your Laptop

We express ourselves online through our choice of social network, profile pictures, and the sites that we visit. But once the screen is off, little of who we are remains physically on the laptop. Using one of these laptop decoration ideas, you can display your interests, hobbies, and personality in the offline world.

Once you’ve physically customized your laptop, it’s time to personalize your digital experience, too. If you use Microsoft’s operating system, you can change the look and feel of your Windows 10 desktop.

Read the full article: 5 Awesome Laptop Decoration Ideas: Stickers, Cases, and More


Read Full Article

What Is Windows 10X and How to Give It a Try


windows-10x

Have you heard about a new version of Windows 10? Are you unsure if those rumors are true? Well, wonder no longer.

Here’s what you need to know about Windows 10X, and how you can take Windows 10X for a trial run right now.

What Is Windows 10X?

windows 10x home page dual screen

Windows 10X is a new version of the Windows 10 operating system aimed primarily at dual-screen devices. Even though the focus is on dual-screen devices, the operating system will also feature on single-screen devices, too.

The original plan was for the dual-screen version of Windows 10X to launch first. However, due to setbacks in the development of dual-screen devices set to run Windows 10X, such as the upcoming Microsoft Surface Neo, the full launch is now set for 2021.

However, the single-screen version of Windows 10X will now take center-stage. Some of the design features of Windows 10X will also make the cross-over into the main version of Windows 10.

So, here’s what you can expect from the new version of Windows 10X, what changes might come to the main Windows 10 version, and how you can give Windows 10X a try.

1. Dual-Screen Optimization

Windows 10X focus is on dual-screen devices, despite setbacks in production and development. In the Windows 10X test environment (more on this below), you can transition Windows apps from screen to screen and try out the dual-screen version of Windows 10.

Part of the dual-screen optimization lies with the interface, as you might expect. You can drag and drop windows between screens, specify which screen you want an app to open on, or drag an app to the center of the dual-screen and release it so that it spans both screens.

2. Windows 10X App Containers

As well as the dual-screen optimization, Windows 10X will run Windows 10 apps and programs, just like regular Windows 10. In addition, the apps will run in an individual container environment, meaning they are isolated from the operating system. The app isolation should help stability, reduce the chance of random crashes, and improve device security.

3. New Start Menu, New Taskbar, No Live Tiles

windows 10x start menu live tiles

Windows 10X has a shiny new flat Start Menu—without any Windows Live Tiles, either. Screenshots of the flat Windows 10X Start Menu appeared a while back and received a lot of positive feedback.

Another major change is that the Windows 10X Start Menu does not use any form of Live Tile. Like them or loathe them, Microsoft is deciding to remove them.

There’s also the addition of a new Taskbar, too. The adaptive taskbar spans both screens when you use Windows 10X with a dual-screen device, using a new set of app icons, too. The apps center on the Windows 10X taskbar, which is a nice change and fits with the dual-screen operating system. But if you prefer the more traditional left-aligned location for your apps, you can do that too.

The new style is smart and a much more basic approach to the Start Menu, which is a welcome addition.

4. New Windows 10X Action Center, Compose Mode for Working

Animated GIF - Find & Share on GIPHY

The Windows 10 Action Center isn’t great. It isn’t awful, either, but the design is lacking functionality. Thankfully, it appears Microsoft is aware of this, and Windows 10X comes with a remodeled Action Center.

The Windows 10X action center brings in several quick actions, with a focus on making changes direct from the panel.

The new Action Center also contains a Windows 10X dual-screen specific feature: Compose Mode.

You open the Action Center, tap Compose Mode, and your screen rotates 90°, turning one panel into an on-screen keyboard. The idea is that you only need a single-button process to switch between work and play.

5. Improved Windows Update in Windows 10X

I haven’t had a chance to see this working, but Windows 10X promises much faster updates than Windows 10. Microsoft will silently install and prepare updates in the background before requiring you to restart. Then, the update should install painlessly and quickly.

The change to the Windows Update for Windows 10X looks makes the process similar to a Chromebook. The operating system informs you that there is an update, you restart your system as normal, and then continue working.

Hopefully, Microsoft can begin implementing this streamlined update system in the regular Windows 10 build as well as Windows 10X.

How to Test Out Windows 10X

You can take Windows 10X for a test drive using the Microsoft Emulator and an early Windows 10X preview build. You should note that this is a work in progress, and the preview builds are designed primarily for developers to begin ensuring app compatibility. You may encounter bugs, crashes, and other issues.

1. Install Microsoft Emulator

First up, you need to install the Microsoft Emulator. The Microsoft Emulator is available from the Microsoft Store and is a free download.

Download: Microsoft Emulator for Windows 10

Open the Microsoft Store using the link above, select Get, and allow the installation to complete.

2. Download the Windows 10X Emulator Image

Now, open the Microsoft Emulator. The Microsoft Emulator will scan automatically for a new preview build on the Microsoft Store. When it finds a preview build, select the latest version, then Install.

windows 10x download emulator image

You’ll have to input your Microsoft account password to confirm the download and accept the EULA. Then, the Windows 10X preview will download.

3. Check Hyper-V is Installed

Before hitting the Start button, make sure Windows Hyper-V is enabled.

First, open the Start Menu and type command, then select Command Prompt (Admin). Now, input the following command:

systeminfo.exe

Scroll down and find the Hyper-V Requirements section. If the requirements say Yes, you can proceed to the next section, #4. If the requirements say No, continue reading this section to install Hyper-V.

The easiest way to make sure Hyper-V installs correctly is using PowerShell. (What’s the difference between PowerShell and the Command Prompt?) There is also an option to install Hyper-V using Windows Features, but this doesn’t always work properly.

Type powershell in your Start Menu search bar, right-click the Best match on top, and select Run as Administrator. Now, input the following command:

DISM /Online /Enable-Feature /All /FeatureName:Microsoft-Hyper-V

After the command completes successfully, save any work you have open, then restart your system. Once your system reboots, you will find options for Hyper-V in the Start Menu.

4. Start the Windows 10X Emulator

Once Hyper-V is installed, you can boot the Windows 10X preview build in the Microsoft Emulator. Select the preview build and hit Start. You’ll see a dual-screen smartphone configuration appear, followed by the spinning orbs indicating that Windows 10X is booting up.

windows 10x microsoft emulator

From here, you’re free to explore the Windows 10X preview build. Remember, this is a preview build for the dual-screen version of the operating system, and the Microsoft Emulator works accordingly.

Will Windows 10X Replace Windows 10?

At the current rate, no. Windows 10X will not replace the main Windows 10 desktop version you currently use.

However, you could well see the transition of certain features from Windows 10X into Windows 10. For example, the Windows 10X Start Menu would be a welcome addition to Windows 10, as would the streamlined Windows Update process.

Now you have read about Windows 10X, Microsoft’s statement regarding the last Windows operating system ever seem clearer. Here’s why Windows 10 isn’t the last Microsoft operating system ever.

Read the full article: What Is Windows 10X and How to Give It a Try

Read Full Article

How to Use Google Forms to Get Updates From Your Remote Team


google-forms-updates-team

Google Forms is a terrific and intuitive tool for gathering information from clients, customers, and employees. You can easily create and customize a form, share it in a few different ways, and then analyze the answers.

If you’re in a work situation where you have a remote team, Google Forms can be an effective method for obtaining updates. You can use it for a specific project or simple work updates that you request daily or weekly.

Start a New Form

Google Forms offers a nice selection of templates that can help you get started. Click the Template gallery at the top to review templates for Work, Personal, and Education. If you see one that has the basics you need, such as the questions types, click it to use it.

If not, you can start from scratch by clicking the Blank option under Start a new form. This is what we’ll be using for this tutorial.

The first thing you should do when you create a new form is to name it. Since Google Forms saves your work as you go, you’ll always know which is the correct form if you name it upfront. Optionally, you can also add a description.

Google Forms Name and Description

If you enter the name on the form itself, that name will pop into the spot on the top left by default. But you can change that name as well as select a location for it within Google Drive if you like.

Google Forms Name and Location

Add Your Form Questions

Google Forms gives you several question types that should cover any situation. From short answers and paragraphs to multiple choice, checkboxes, and dropdowns, you have all the flexibility you want.

Basic Details

The most sensible questions to begin a team update form with are name, date, and optionally time. Whether you use a template or the blank form, you’ll have a question already there to get you started. So you can simply change that question type if necessary and then click the plus sign to add more questions.

Google Forms Basic Detail Questions

For your team member’s name, select Short answer as the question type. Then add the name of the question and turn on the toggle for Required.

For the date your team member is completing the form, click the plus sign to add a question, and pick Date in the dropdown box for the question type. Then add the question name, such as Date, and make the question required.

If you’d like your team member to enter the time they’re completing the form, click the plus sign to add a question and select Time for the type. Don’t forget to add the question name and make it required if you like.

Multiple Choice or Dropdown for Department or Area

If you are sending the update form to many people, you may want to add questions for things like department or area. Multiple choice and dropdown question types work perfectly for these types of questions. Plus, you can have the responder move automatically to other questions based on their answers.

Google Forms Department Multiple Choice

For department or area, you can use the Multiple choice question type if there are only a few answers to pick from and the Dropdown type to conserve some space if there are many possible answers. Choose your question type and then add each answer. We’ll use Multiple choice.

Now, depending on the answer the responder picks, we want to move them to a certain section with specific questions. This is a very handy feature in Google Forms because you can eliminate the need for the responders to skip questions that don’t apply to them and go directly to the ones that do.

On the bottom right of the question, click the More button (three dots) and mark Go to section based on answer. You’ll then see the question update with a spot to add the section next to each answer.

Google Forms Go To Section

If you already have your sections created, you can select each using the dropdown boxes. If not, continue below to create a section and then come back to complete this part.

Google Forms Go To Section List

Use Separate Sections for Each Department or Area

To create a section, click the bottom button in the floating toolbar for Add section. You’ll see the section appear and can give it its own name and description. In this how-to, we’re going to create a section for those who select Information Technology for their department.

Google Forms New Section

We’ll add a question for the current project(s). This allows us to see which projects the responder is currently working on and checkboxes allow them to pick more than one. So, you can pick Checkboxes for the type, or you can take this question a step further.

Maybe for each project they select, you want to know their progress for it. This is where the Checkbox grid type is ideal. You can enter each phase in the Rows section and each project in the Columns section (or vice versa).

If you do lay the answers out as we describe, you can then click the More button and pick Limit to one response per column. This way, the responder can only pick one phase per project, which would make sense.

Google Forms Checkbox Grid Limit

So, this allows the responder to not only tell you which projects they are working on, but which phase they are on for each; all with one checkbox grid question.

Google Forms Checkbox Grid

You can then create additional sections and the questions the same way.

Another type of question you may want to add is a Paragraph for feedback. This lets the responder type in any issues, questions, or other feedback they have with plenty of space.

Google Forms Paragraph Feedback

Check Your Responses

Viewing the responses from your form couldn’t be easier. Just open your form on Google Forms and hit the Responses tab at the top. You’ll see a summary, can view responses by question, or look at individual answers.

Google Forms gives you text responses as well as colorful graphs and charts for your forms. And you can export the responses for offline viewing.

For additional information on viewing responses or creating forms in general, check out our extensive guide to Google Forms.

Send Email Reminders

If you enable the option to collect email addresses for your form, you can then send reminders to those who don’t complete the form. This is extremely convenient; however, there are a few things to do and keep in mind for it to work correctly.

First, set up your form to collect the addresses. Click the Settings button (gear icon) on the top right and pick General in the popup window. Check the first box for Collect email addresses and hit Save.

Google Forms Collect Emails

An email address question will automatically pop onto your form which you cannot remove, and it is a required question.

Google Forms Email Question

Next, you must send your form to the participants via email. Click Send and use the Email tab. Enter the addresses of those you want to complete the form, separated by commas, and hit Send.

Now that Google Forms knows who you sent the form to, it can determine if responses are received from those responders. To send email reminders to those who haven’t responded, follow these steps.

  1. Open your form and click the Responses tab at the top.
  2. You’ll see sections for Who has responded? and Waiting for X responses.
  3. In the latter, click Send email reminder.

Google Forms Send Email Reminder

The same window you saw when you initially sent the form will display, prepopulated with those email addresses you are waiting for responses from. This lets you send them a polite reminder to complete your update form.

Copy and Reuse Your Form

If you plan to send your team update form regularly with minor changes to project names or work duties, as examples, you can simply copy your form and adjust it as needed.

Open your form and click More (three dots) on the top right. Pick Make a copy, give your copied form a name, and click OK to save it. You’ll also notice you have the option to share it with the same people, which is handy. You can then make your adjustments and send it.

Google Forms Copy Form

Consistent Updates Are Easy With Google Forms

It might seem like a bit of work to create a team update form using Google Forms at first. But if you do, you’ll get the updates and information you actually need because they’re answering questions you create. Plus, you can easily copy and reuse the form over and over.

For more, take a look at how to create a free website contact form with Google Forms or other ways you can use Google Forms for your business.

Read the full article: How to Use Google Forms to Get Updates From Your Remote Team


Read Full Article