10 April 2019

How to Unblock Live TV Streaming When You’re Abroad


unblock-live-streaming

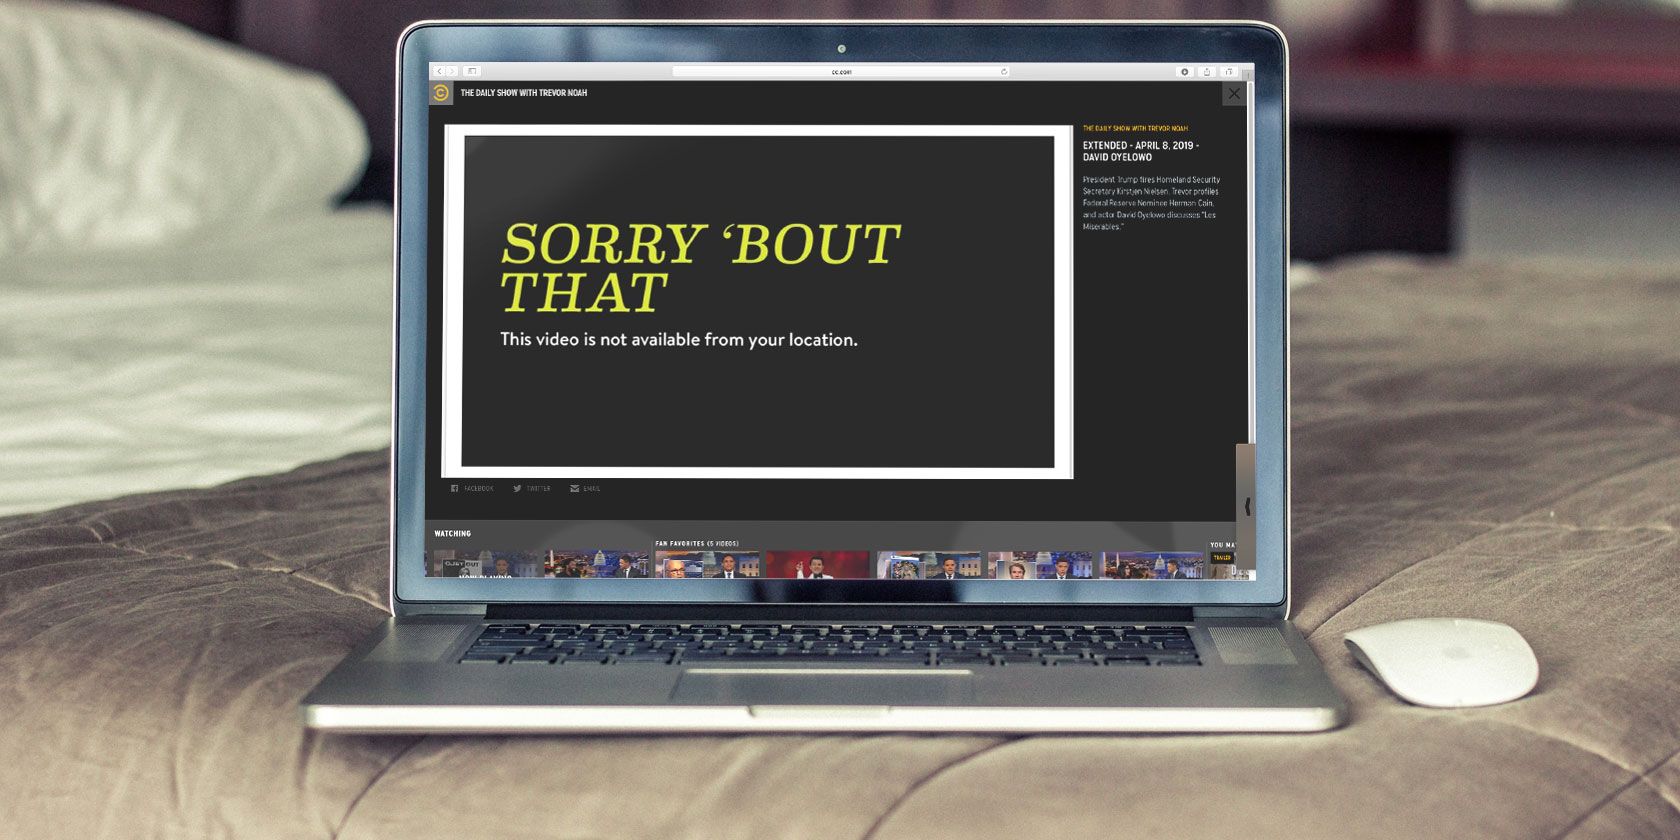
We can all understand why TV channels like the BBC and Comedy Central are blocked when you’re abroad, but that doesn’t mean it’s not frustrating. Thankfully, it’s relatively easy to unblock streaming services.

As an expat for more than a decade, unblocking streaming services has been an ongoing battle for me. I’ve tried various VPNs, smart DNS providers, and (to my discredit) endless other not-necessarily-legal approaches.

Recently, I’ve settled on CyberGhost. The VPN makes it super easy to access international versions of Netflix, BBC live streams outside the U.K., and any other geo-restricted service you want to watch.

Here’s how to use CyberGhost to unblock streaming services.

How to Sign Up for CyberGhost

muo cyberghost price

In this article, I’m going to use CyberGhost to unblock streaming apps and services around the world. If you want to follow along, you need to go ahead and open an account.

MakeUseOf readers can receive a special rate of just $2.75/month if you sign up to a three-year plan. A month-by-month plan costs $12.99.

To make an account, head to the CyberGhost website and select the plan you want. At the bottom of the page, you will be prompted to choose your payment method (a credit card, PayPal, or BitPay), and then to enter your user details.

And in case you thought the deal needed any more sweetening, CyberGhost has recently opened new dedicated servers for Sky Go, BBC One, Player.pl, ORF, and Comedy Central, as well as new server locations in Strasbourg, Berkshire, and Barcelona.

Download Apps to Unblock Streaming Services

To demonstrate the power of CyberGhost, we’re going to show you how to watch a Comedy Central live stream, a BBC One live stream, and an international version of Netflix.

However, before you can dive in and start binge-watching all your favorite TV, you need to download the apps onto your various devices.

Almost every major platform you can think of is supported, including Windows, Mac, Linux, Chrome, Android, iOS, Android TV, and Fire TV. Apple TV is the notable exception.

How to Unblock Streaming Services

The process for unblocking streams from the U.S. or elsewhere varies depending on which platform you use.

We’re going to look at the method on Windows.

How to Watch a Comedy Central Live Stream

OK, let’s suppose you want to watch a Comedy Central live stream on Windows while you’re on holiday outside of the U.S. What’s the process?

First, you need to fire up the dedicated CyberGhost Windows app. But wait, don’t actually connect to a VPN server yet. First, you need to dive into the Settings menu. Just click on the small yellow arrow on the left-hand side of the CyberGhost app.

A new window will open. In the left-hand panel, you can access a list of all CyberGhost’s servers or click on one of the subcategories. To make your search for the perfect server easier, head straight to the For Streaming menu item.

comedy central server highlighted

You should now see a list of all the available streaming servers. For each server, you can see its location (as determined by the flag) and which streaming app or website that the server is optimized for.

In our example, we want to watch the U.S. version of Comedy Central. Scroll down through the list of servers until you find the appropriate entry. You can also use the Search box in the upper left-hand corner of the app.

When you’re ready, double click on the server’s name and the CyberGhost app will automatically connect. The connection process can take several seconds to complete. Once it’s successful, you will see a pop-up notification.

comedy central website live

Finally, head to the Comedy Central website and either choose an on-demand show or enter your TV provider’s username and password to watch live television. If you don’t have a cable TV subscription, you can sign up for an online streaming company that carries Comedy Central like Sling or PlayStation Vue.

(Note: Click the Star next to a server’s name to add it to your Favorites. Your favorites will sync across all your apps.)

How to Unblock a BBC One Live Stream

iplayer cyberghost

It’s even easier to watch a BBC One live stream. You don’t need to have a subscription with a TV provider to sign in (though you do need to make an account).

Instead, you can watch any BBC channel from outside the U.K. using the BBC iPlayer. It is available on the web and as a standalone app.

If you want to use the standalone app on Android TV, for example, you will need to sideload the APK file. It is not natively available to people outside of the U.K.

Of course, if you want to watch in a browser, it’s as simple as navigating to the BBC iPlayer website and choosing the live stream or on-demand video you prefer.

To access iPlayer content, use the app to connect to CyberGhost’s dedicated iPlayer server based in the U.K.

How to Access International Versions of Netflix

Probably the most commonly-requested geo-blocked service is Netflix. The app has wildly different TV shows and films available depending on the country you are in.

If you want to watch the U.S. version of Netflix, CyberGhost can once again help you.

Open the CyberGhost app and type Netflix in the Search box. At the time of writing, three Netflix servers are available, one in each of the United States, Germany, and France. If you want to watch the U.S. edition, double-click on the U.S. server.

netflix cyberghost

Sometimes, you might need to clear the cookies and data from your browser or Netflix app and sign in fresh in order for Netflix to recognize the VPN connection.

If you do watch international Netflix, be aware that you are breaking the company’s terms of service. Which means that, while it’s unlikely, the company could disable your account.

Other Reasons to Choose CyberGhost

CyberGhost isn’t only useful for streaming live TV when you’re out of the country. It has several other standout features that make it a great VPN.

They include simultaneous connections for up to seven devices with one subscription, unlimited data, safety features that can block malicious websites and user tracking, and a location outside of the five-eyes jurisdiction.

And if you’re not sure whether the service is the best way for you to unblock streaming services, you’re entitled to a 45-day money back guarantee if you’re not completely satisfied.

So, what are you waiting for? Sign up for CyberGhost today.

Read the full article: How to Unblock Live TV Streaming When You’re Abroad


Read Full Article

The Insta360 One X Feels Like Magic

10 IFTTT Google Assistant Recipes to Boost Productivity


ifttt-google-assistant

Staying productive is hard. Often, the sheer number of tools that we choose to use in the name of efficiency has a detrimental effect.

That’s why services like IFTTT are so essential. They can remove the need for manual input, instead letting you automate large parts of your workflow.

Today, it’s time to put Google Assistant under the microscope. How can IFTTT and Google Assistant work in tandem to make you more productive? Let’s take a look at 10 Google Assistant recipes on IFTTT.

1. Create an iPhone Calendar Entry

ifttt iphone calandar recipe

Google and Apple don’t exactly have a history of playing nicely together, but that hasn’t stopped Google creating its own IFTTT recipe. It lets you create an event on your iPhone’s calendar using your Google Home system.

The recipe lets you give the event a title, along with specifying the time and date. Just say “Ok Google, Add to my iOS Calendar” to get started.

2. Add a Task to Todoist

Todoist is well-established as one of the best task manager apps you can use. It’s multi-platform and offers a diverse number of features for all use cases.

If you pair Google Assistant with IFTTT, you can make new tasks in the Todoist app using nothing more than your voice. You just need to say “Ok Google, add a task [task]” to create a new item.

Remember—although there is a free version of Todoist, you will need to pay $3 per month to unlock all the features.

3. Add a New Item in the iPhone’s Reminders App

Anyone who has tried to use Apple and Google services at the same time knows that it’s not necessarily a straight forward process.

If you fall into that camp, you should consider using the IFTTT integration with the iPhone reminder app as well as the aforementioned calendar recipe.

It lets you instantly add reminders to the iPhone’s Reminders app using any Google Home-enabled device. Say “Ok Google, add a reminder to my iPhone [reminder]” to start the process.

4. Send a Text

ifttt send a text

Need to quickly get a message out to a friend, colleague, or family member, but you haven’t got any free hands, or you don’t have time to find your phone?

The solution could be to use Google Assistant’s texting recipe. If you have an Android phone, you can use it to send a message to any of your contacts with your voice.

After you have configured the recipe, you need to say, “Ok Google, message [name]” to your Google Home device to initiate the sending process.

5. Create a Wunderlist Item

Microsoft has bought Wunderlist, and many of its functions are now among the best features on the Microsoft To-Do app.

Nonetheless, there are still a lot of holdouts using the old app. If you’re one of them, you should check out this recipe.

Ok Google, add [item] to Wunderlist” is the phrase you’ll need.

6. Create a Note in Evernote

Evernote is yet another of the world’s leading task management apps. Although most of the app’s best features are now hidden behind a paywall, it’s still hugely popular.

If you install this Google Assistant IFTTT recipe, you will be able to add new notes to Evernote while you’re on-the-go and you don’t have a device to hand.

The title of the note will be the timestamp. The recipe even lets you create your own activation phrase.

7. Post a Tweet With Google Assistant

ifttt twitter post tweet

If you need to use Twitter as part of your job—perhaps because you’re a social media manager or because you’re trying to grow awareness of your personal brand—the ability to post tweets on Twitter without needing to use the company’s (terrible) app is undoubtedly going to be useful.

This recipe is made by Twitter rather than Google. To post a tweet, you just need to say, “Ok Google, tweet [message].”

Contrary to the recipe’s description, it does support Twitter’s new 280-character message limit.

8. Email a List of Notes to Yourself

One of the keys to becoming more productive is to do more things in a shorter amount of time.

To that end, you don’t want to waste time faffing around with notetaking apps on your mobile. By the time you’ve unlocked your phone, opened the app, typed your note, added a reminder, saved it, and put your phone back in your pocket, you can easily lose a couple of minutes.

Extrapolate that out over 10 or 15 notes every day, and it’s is easy to see the time slipping away.

Why not tell Google Assistant to take your notes instead, then get IFTTT to email you a list of said notes at the end of every day? This recipe lets you do just that.

9. Get Google Search Results on Your Phone

Google Assistant is a great way to look up information. You can ask it everything from math questions to capital cities, and you’ll get an answer in seconds.

Of course, behind the scenes, Google Assistant is pulling that information from Google Search. And as we all know, there are times when Google Search simply can’t provide the answers you’re looking for.

You can’t use an alternative search engine, so if the worst happens, you can activate this recipe to get a list of search results for your Google Assistant query sent directly to your phone.

10. Send a Note on Slack

We end with an IFTTT recipe that integrates Slack with Google Assistant.

Slack, of course, needs no introduction. Over the last few years, it’s become one of the most widely-used business tools on the planet.

If you enable this recipe, you will be able to dictate Slack notes using your voice. It’s a great way to quickly let your colleagues know you’re running late for a meeting or stuck in traffic on the way to work.

Other IFTTT Recipes You Should Try

The 10 IFTTT recipes for Google Assistant that we’ve looked at in this article should all help you become more productive.

However, if you’re looking for even more IFTTT recipes, we have got you covered. Check out our articles on IFTTT recipes to automate your Android phone and IFTTT recipes for every Instagram addict.

Read the full article: 10 IFTTT Google Assistant Recipes to Boost Productivity


Read Full Article

How to Quickly Create an Online Store Using Shopify


create-online-store

As daunting as it may seem, learning how to create an online store using Shopify isn’t as complicated as you think. Whether you’re trying to make some quick cash by dropshipping on Shopify, or you have a fantastic product that you want to sell, setting up a store using Shopify is one of your easiest options.

Shopify’s array of features makes it perfect for both professionals or beginners, and most people can set up their store in under a day. Are you ready for your store to go live? Let’s get started.

1. Sign Up for Shopify

Shopify Sign Up Page

It’s fairly simple to sign up for Shopify—all you need is your email and the name of your store. Keep in mind that Shopify won’t let you move on from this step if you don’t have a completely original store name. You might have to change the name of your store a few times before you find one that no one else has.

Shopify will then ask a few questions about whether you own an established business, or if you just started. To continue to your main dashboard you’ll also have to fill out a billing address.

Shopify Sign Up Questions

Like most good things, Shopify isn’t free. You’ll get a 14-day free trial, which helps you set up your website before you start getting charged. When the trial ends, you have to choose a monthly plan depending on the size of your business. The most basic plan starts at $29 per month and the price (unfortunately) goes upwards from there.

2. Add Products

Now that you’ve signed up, Shopify will immediately prompt you to add a product to your store. If you already have pictures of your product and a quick description, this will make your setup process go a whole lot faster.

There are two ways you can add products to your store:

  • Manually input products.
  • Import them with a CSV file.

For now, let’s just stick with the basics and manually add them.

Basic Product Information

Simply enter your product’s name in the Title bar and add any key information about your product in the Description box.

Shopify Product Title Description

Scroll down to find a section where you can insert a picture of your product. Either drag and drop a picture of your choice or simply select Upload an image. You might need some basic digital photography skills if you decide to take your own photos, but the beautiful results are worth it.

Product Pricing and Inventory

Here, you can add the price of a product. The section labeled Compare at price will display your price as a markdown.

Shopify Product Pricing Options

For example, if you sell a discounted item for $20, and its original price is $50, type $50 into the Compare at price section to show the price difference on your store. You can use for a sale at your Shopify store.

If you don’t want to display a markdown, enter the same value into the Price and Compare at price sections.

Shopify can also keep track of your inventory as long as you have the proper barcodes, SKU, and know how many products you have on hand.

Shopify Product Inventory Management

Adding Variants

The Variants section displays the different variations that your product may have. Variations can include anything from size, color, weight, and more.

Let’s say I’m selling a white t-shirt in various sizes. I’d input “Size” under Option name and then add every size option under Option values.

Shopify Variants Sizes Example

As you type in values, you’ll notice that you can change the price of each variant as well. Shopify lets you set a specific price for different colors, sizes, etc.

Shopify Product Variant Options

Incorporating SEO

SEO is one of the most crucial components when starting an online store, so you should definitely take advantage of the Search engine list preview section. Add any SEO keywords in the Meta description and come up with an SEO-friendly title to attract more customers.

Shopify SEO Web Description

3. Create Collections

How can your customers find a product on your store without scrolling through your entire catalog? Creating collections makes shopping much easier for your customers.

Collections are groups of products that belong in the same category. For example, you would place t-shirts in a collection titled “Short-Sleeve Shirts,” and you’d put discounted items in a collection called “Clearance.” When your customers are looking for something in a specific category, they can select a collection instead of endlessly scrolling through your site.

To create a collection, navigate to the left sidebar menu, find Products, and then click on Collections. As you can see, Shopify has already created a collection for you titled “Home page.” These are the featured products that your customers will see on the home page of your shop. You’ll want to add more collections than this, so click on the blue Create collection button.

Shopify Collections Home Page

You can create collections manually or automatically. Automatically creating collections is a lot easier, especially if you have a lot of products.

However, for Shopify to automatically generate collections, you have to add a condition. Input a certain tag, title, or vendor, that differentiates each product from one another.

Shopify Collections Types and Conditions

For instance, if you want to create a t-shirt collection, you need to tag each product with “T-shirt.”

4. Choose a Shopify Theme

Now it’s time to find the right theme for your Shopify store. Under the Sales Channel heading in the sidebar menu, go to Online Store > Themes. Shopify starts you off with a very basic theme called Debut.

Shopify Theme Debut Example

You don’t have to stick with this theme, so scroll down and hit Visit Shopify Theme Store. Shopify’s Theme Store includes both free and paid themes. From here, you can check out the most popular themes and find a theme based on your personal taste. While you can dish out $100 or more for a fancy theme, Shopify offers free themes that are just as good.

Shopify Themes Store

Find one you like? Click on it, select Add theme, and Shopify will install it to your dashboard (but it doesn’t activate the theme).

Shopify Simple Theme Themes Store

You’ll have to enable the theme yourself, so head back to Online Store > Themes and scroll down to the More themes section. Find the name of the theme you just installed, hit the Action dropdown menu and then select Publish.

5. Customize Your Theme

Shopify Theme Customization

If you don’t like the way your site is set up, don’t worry. You can change the layout of your store by customizing your theme. Take a look at other Shopify sites to gain some inspiration for your own.

Start by adding a photo to your home page that represents your company. Either upload your own photo or use one from Shopify’s free, high-quality stock image library. Pair the photo with some text that captures your brand and draws people into your store.

Shopify Theme Customization Home Page

Your home page has several different features that you can incorporate. Add an image gallery, slideshow, featured product, newsletter, testimonial, video, and more.

To edit the other pages in your store, navigate to the dropdown menu at the top of the screen that reads Home page. Select it to display your site’s pages, and begin customizing your product pages, collection pages, 404 page, cart, and blog.

Shopify Theme Customization Edit Pages

6. Create a Domain

No one wants their store’s website to end with “myshopify.com.” It looks unprofessional, and just doesn’t scream “legit.” That’s why you’ll need to create a domain for your website and find a host.

Luckily, Shopify makes this really easy. While you can take the time to research the best web hosting services, why bother when Shopify has an all-in-one web hosting and domain plan? Head to Online Store > Domains and click on Buy new domain.

Shopify Domains Pricing Options

Type in your desired domain to check if it’s available. You’ll probably want a “.com” extension, and Shopify will charge you $14 per year for that.

7. Set Up Payments

Shopify gives you quite a few options when it comes to payments. To adjust your payments, go to Settings on the left menu bar in your dashboard, and select Payment Providers.

Shopify Payment Options PayPal Amazon Pay

You can choose to stick with Shopify, PayPal, and Amazon Pay or opt for one of the several other payment options. Each payment service comes with a price—the most basic Shopify plan takes 2.9% of each transaction plus 30 cents.

8. Go Live With Shopify

If you got through all of these steps, then you’re ready to open up your shop!

By default, your store is password-protected, meaning no one can access your shop without entering a keyword. Disable this by heading to Online Store > Preferences and uncheck the box that says Enable password. You can only do this if you’ve already chosen a Shopify plan.

Shopify Store Password Protection

Congratulations; your store is now live!

Shopify Simplified

You’ll find that the most time-consuming aspects of setting up your shop have to do with uploading products and customizing your theme. Fortunately, the simplicity of Shopify allows you to keep moving forward towards debuting your store.

After you finally finish your store, you’ll need a way to stay secure. For more information, check out our article on the best Shopify apps to secure your store and protect your customers.

Read the full article: How to Quickly Create an Online Store Using Shopify


Read Full Article

Why You Should Never Watch Movies on Your Smartphone

Build Your Own Amazon Alexa Smart Speaker With a Raspberry Pi


build-amazon-alexa-raspi

Suddenly, everybody’s talking to their tech. Smartphones, TVs, even lightbulbs—all capable of being controlled with a home assistant. As the Internet of Things takes over your home, you’ll find more devices are suddenly capable of responding to your voice, thanks to virtual assistants like the Amazon Alexa.

If you’ve got a spare Raspberry Pi handy, you don’t need to buy an Amazon Alexa device like the Echo or the Echo Dot, because you can build your own. This tutorial will explain how you can set up the Alexa home assistant on your Raspberry Pi.

Hardware You’ll Need

Before you start building your DIY Raspberry Pi Alexa, you’ll need:

  • Raspberry Pi with Raspbian installed onto a micro-SD card
  • A suitable power supply (5V @ 2.5A recommended)
  • A USB microphone
  • A speaker
  • A PC to set up an Amazon Developer account and with an SSH client

Before you start, and if you haven’t already, you’ll need to enable SSH connections to your Raspberry Pi. If you’d prefer, you can set your Raspberry Pi up using a keyboard, mouse, and monitor. You’ll need a microphone, but if you don’t have one, a USB webcam with a mic will do the same job.

Under normal circumstances, I’d recommend installing Raspbian Lite to keep resource usage down. The script you need to install Alexa fails to install on a standard Raspbian Lite installation, however. To work around this, install GStreamer, a Linux media framework, to allow it to install by running the following via SSH or at a terminal screen:

sudo apt update && sudo apt upgrade
sudo apt install libgstreamer1.0-0 gstreamer1.0-plugins-base gstreamer1.0-plugins-good gstreamer1.0-plugins-bad gstreamer1.0-plugins-ugly gstreamer1.0-libav gstreamer1.0-doc gstreamer1.0-tools gstreamer1.0-x gstreamer1.0-alsa gstreamer1.0-pulseaudio

Step 1: Create an Amazon Developer Account and Security Profile

Before you can install the Alexa software, you’ll need to create an Amazon developer account. If you’ve got an existing Amazon account, you can log in and register for an Amazon developer account that way.

Once you’re signed in, go to Alexa on the nav bar, then Alexa Voice Service. Click Get Started, then Products > Create Product.

Amazon Developer Account Registration Process Screen

Give your device a name and a product ID. Choose Device with Alexa built-in and select No to the companion app question. Select Other from the Product category dropdown menu and type Raspberry Pi in the provided box below it. Give it a brief description, such as “Sample Raspberry Pi Alexa build”.

Choose Touch-initiated and Hands-free for end user interactions. You don’t need to worry about choosing an image. Choose No to the four final questions, then click Next.

At the next screen, you’ll be required to create an Amazon security profile to link your security data to your Raspberry Pi Alexa. Click Create New Profile. Choose a name and description, similar to mine below.

Amazon Developer Account Security Profile Registration

At the next step, choose Other devices and platforms, then insert a client ID name (this can be anything you like), agree to the terms and conditions and click Generate ID. You’ll then see a pop up telling you that your product has been created.

Next, enable your profile. Go to the Login with Amazon developer page and select your profile from the dropdown menu, then click Confirm.

Insert a domain like raspberrypi.local into the box provided, then click Save.

Step 2: Download the Amazon Assistants Pi Script

To install Amazon Alexa onto your Raspberry Pi easily, you’ll be using a script called Assistants Pi. This provides an easy method for you to install Alexa without needing to build the SDK manually.

To start, you’ll need to install Git to grab the files you need from the script developer. Connect to your Raspberry Pi using an SSH client or, if you’re not running your Pi headless, open up a terminal and type:

sudo apt install git

Once Git is installed, clone the files you need by typing:

git clone https://github.com/shivasiddharth/Assistants-Pi

You’ll need to make the script files executable. Do that by typing:

cd /home/pi/Assistants-Pi/scripts/
sudo chmod +x installer.sh prep-system.sh service-installer.sh audio-test.sh

Step 3: Pre-Configuration Before Installation

Before you can run the initial Assistants Pi scripts before you can install Alexa, you’ll need to install PIP for Python on your Raspberry Pi. Check it’s installed with the following:

pip --version

You should get a response confirming your version. If you don’t, reinstall PIP using apt.

Python PIP Version Check Terminal Command
If PIP is installed correctly, your next stage is to run the Assistants Pi preparation script, pre-system.sh. Run the following:

sudo /home/pi/Assistants-Pi/scripts/prep-system.sh

This will begin installing any necessary packages for you, as well as check that Raspbian is up-to-date.

Assistants Pi Preparation Terminal Script

Once everything is installed, you’ll be given six options to choose from for your audio and mic config. Most people will need to choose USB-MIC-ON-BOARD-JACK, so hit 3 and press enter. Choose this option if you’re using a USB microphone with a speaker attached to the audio port.

Reboot your Raspberry Pi at this stage by typing:

sudo reboot

Once it’s rebooted, check your audio setup is correct by running the following:

sudo /home/pi/Assistants-Pi/scripts/audio-test.sh

This will run a check of your speaker and mic to make sure your Raspberry Pi works with both.

Step 4: Run the Installation Script

Assuming you had no problems with either the mic or the speaker during your audio test, run the following command to install Alexa to your Raspberry Pi:

sudo /home/pi/Assistants-Pi/scripts/installer.sh

You’ll be given the option to choose to install either Alexa, the Google Home Assistant, or both. The script requires additional steps for the Google Assistant to be installed here, so it’s best to skip this. Choose option to install Alexa only.

Assistants Pi Terminal Script Assistant Installer Menu

You’ll need to enter your client ID. Go back to the Alexa developer portal to find this by clicking on your “product” name. Take note of your Product ID.

Click your product name, click Security Profile, then Other devices and platforms. Use the Client ID found here, then type in your Product ID, before agreeing to the terms and conditions. Type AGREE and hit enter.

Raspberry Pi Alexa SDK Conditions Agreement

The script will run through its installation, installing any other necessary packages it needs. This may take some time to complete. You may need to accept a license or two; just read through and hit Y to any confirmation menus.

Step 5: Final Configuration and Testing

Once the script has finished the installation, you have one final script to run:

sudo /home/pi/Assistants-Pi/scripts/service-installer.sh

Run the following, just to be sure the service starts and is enabled:

sudo systemctl enable alexa.service
sudo systemctl start alexa.service

You’ll then need to register and authorize your Pi. Type the following:

sudo /home/pi/Assistants-Pi/Alexa/startsample.sh

You’ll need to type in a code shown in the terminal screen on a page at the Amazon developer site. Type in the code, click Continue, then Allow.

Amazon Developer Product Access Authorization Page

Assuming your Pi authorization went okay, you should see the sample Alexa script running. Test out your DIY Raspberry Pi Alexa device by saying Alexa followed by a command. For example, Alexa, tell me the time.

Reboot one final time and test your device again by issuing another command, to be sure everything works.

A DIY Amazon Alexa for Your Home

You don’t need to buy an expensive new device for your home to enjoy the benefits of a smart speaker. A spare Raspberry Pi makes for a perfect DIY home assistant, whether you’re building a DIY Alexa or if you want to build your own DIY Google Home instead.

If a smart speaker for your home doesn’t take your fancy, maybe head outdoors and build some rugged Raspberry Pi projects instead.

Read the full article: Build Your Own Amazon Alexa Smart Speaker With a Raspberry Pi


Read Full Article

The right way to do AI in security


Artificial intelligence applied to information security can engender images of a benevolent Skynet, sagely analyzing more data than imaginable and making decisions at lightspeed, saving organizations from devastating attacks. In such a world, humans are barely needed to run security programs, their jobs largely automated out of existence, relegating them to a role as the button-pusher on particularly critical changes proposed by the otherwise omnipotent AI.

Such a vision is still in the realm of science fiction. AI in information security is more like an eager, callow puppy attempting to learn new tricks – minus the disappointment written on their faces when they consistently fail. No one’s job is in danger of being replaced by security AI; if anything, a larger staff is required to ensure security AI stays firmly leashed.

Arguably, AI’s highest use case currently is to add futuristic sheen to traditional security tools, rebranding timeworn approaches as trailblazing sorcery that will revolutionize enterprise cybersecurity as we know it. The current hype cycle for AI appears to be the roaring, ferocious crest at the end of a decade that began with bubbly excitement around the promise of “big data” in information security.

But what lies beneath the marketing gloss and quixotic lust for an AI revolution in security? How did AL ascend to supplant the lustrous zest around machine learning (“ML”) that dominated headlines in recent years? Where is there true potential to enrich information security strategy for the better – and where is it simply an entrancing distraction from more useful goals? And, naturally, how will attackers plot to circumvent security AI to continue their nefarious schemes?

How did AI grow out of this stony rubbish?

The year AI debuted as the “It Girl” in information security was 2017. The year prior, MIT completed their study showing “human-in-the-loop” AI out-performed AI and humans individually in attack detection. Likewise, DARPA conducted the Cyber Grand Challenge, a battle testing AI systems’ offensive and defensive capabilities. Until this point, security AI was imprisoned in the contrived halls of academia and government. Yet, the history of two vendors exhibits how enthusiasm surrounding security AI was driven more by growth marketing than user needs.


Read Full Article

Daily Crunch: Meet the new CEO of Google Cloud


The Daily Crunch is TechCrunch’s roundup of our biggest and most important stories. If you’d like to get this delivered to your inbox every day at around 9am Pacific, you can subscribe here.

1. Google Cloud’s new CEO on gaining customers, startups, supporting open source and more

Thomas Kurian, who came to Google Cloud after 22 years at Oracle, said the team is rolling out new contracts and plans to simplify pricing.

Most importantly, though, Google will go on a hiring spree: “A number of customers told us ‘we just need more people from you to help us.’ So that’s what we’ll do.”

2. Walmart to expand in-store tech, including Pickup Towers for online orders and robots

Walmart is doubling down on technology in its brick-and-mortar stores in an effort to better compete with Amazon. The retailer says it will add to its U.S. stores 1,500 new autonomous floor cleaners, 300 more shelf scanners, 1,200 more FAST Unloaders and 900 new Pickup Towers.

3. Udacity restructures operations, lays off 20 percent of its workforce

The objective is to do more than simply keep the company afloat, according to co-founder Sebastian Thrun. Instead, Thrun says these measures will allow Udacity to move from a money-losing operation to a “break-even or profitable company by next quarter and then moving forward.”

Photo By Bill Clark/CQ Roll Call via Getty Images

4. The government is about to permanently bar the IRS from creating a free electronic filing system

That’s right, members of Congress are working to prohibit a branch of the federal government from providing a much-needed service that would make the lives of all of their constituents much easier.

5. Here’s the first image of a black hole

Say hello to the black hole deep inside the Messier 87, a galaxy located in the Virgo cluster some 55 million light years away.

6. Movo grabs $22.5M to get more cities in LatAm scooting

The Spanish startup targets cities in its home market and in markets across Latin America, offering last-mile mobility via rentable electric scooters.

7. Uber, Lyft and the challenge of transportation startup profits

An article arguing that everything you know about the cost of transportation is wrong. (Extra Crunch membership required.)


Read Full Article

Innovation Endeavors debuts Deep Life, an incubator focused on the intersection of life science and computer science


Innovation Endeavors, the fund backed by Google’s Eric Schmidt, has for years now been taking a novel approach to working on difficult and still-evolving problems, like cybersecurity and food shortages: it sets up incubators that bring together different stakeholders to identify, develop and fund ways of tackling these issues. Today, Innovation unveiled the latest of these: a new project called Deep Life, which aims to identify tricky problems in the world of life sciences, and figure out how to use computer science — specifically innovations in areas like machine learning — to help fix them.

Target areas will include therapeutics, diagnostics and industrial life sciences in biology, chemistry and other fields; and Deep Life will provide startups with “investment capital across all stages of growth; access to experts, including scientists and decision-makers; proprietary data sets; early feedback on product; identification of market needs; initial customers and potential partners. In exchange for their startup support, Deep Life member organizations gain access to emerging technologies and hard-to-find talent,” according to a blog post introducing the new project penned by Innovation Endeavors’ co-founder Dror Berman.

Deep Life will unveil the first fruits of its efforts during a pitch day on May 30, and it’s accepting applications for places as of right now.

Alternately called an “ecosystem” and “collective,” Deep Life — in the words of Berman — is “taking inspiration” from Farm2050 and Team8, the two other incubators that the firm helped create in past years. The model is to bring in a number of big names and then — in addition to building on ideas — fund startups to productise them. Eventually, they are spun out as independent companies that get acquired (here and here) or continue to operate independently.

As with these two other incubators, Deep Life is harnessing collective knowledge from a number of existing stakeholders in the life sciences ecosystem. The list includes LEO Pharma, a Danish pharmaceutical company focusing on pioneering dermatology; Mount Sinai HospitalNovozymes, a producer of industrial enzymes and microorganisms for a broad range of industries; Schmidt Futures; Clalit Health Services & Research Institute in Israel; and academics, entrepreneurs and others, including Aviv Regev, a computational biologist and faculty chair of the Broad Institute of MIT and Harvard.

Additionally, Innovation Endeavors says that it will be tapping learnings from startups it has already backed, including Bolt Threads, Color, Freenome, GRO Biosciences, Karius, Vicarious Surgical, Viz.ai and Zymergen.

In all, it’s not clear how much funding is going into Deep Life, and whether the two lists above also become financial backers of the project. Separately, Innovation Endeavors last summer announced a $333 million fund and plans to contribute a sizeable amount of backing itself to Deep Life, from what I understand.

The intersection between tech and life sciences is, of course, not a completely new area. Tech has been a cornerstone of how science has developed and how applications of it are delivered, for example in medicine.

What’s a little different here is the much closer focus on the role that tech is playing in the very germination of ideas and building knowledge, rather than just enabling the efficient operation of a service.

Among the areas that Deep Life tells me it hopes to cover are the use of experimental design (active learning) to uncover biological knowledge; generating data sets that are more effective than current approaches; the application of simple measurements to generate complex, high-content readouts through generative models; combining data modalities (e.g. molecular and imaging-based complex phenotypes); simplifying data readouts to help predict outcomes (using AI); adding to the molecular vocabulary of cells, host organisms and their subcomponents; and building data platforms for biology growing from distributed, asynchronous efforts into an open source whole.


Read Full Article

Google’s managed database service to support Microsoft SQL Server


It’s not every day that you read a headline with both Google and Microsoft. Google is announcing today that its managed database service Cloud SQL will soon support Microsoft SQL Server. The company showed a sneak preview at its Google Cloud Next conference.

The message is clear — if your company uses Microsoft SQL Server database, you don’t have to use Microsoft Azure. Your database will work just fine on Google’s Cloud SQL.

Google already supported Microsoft SQL Server in traditional virtual machines — so you had to manage it yourself. If you have a license and you want Google to manage your database for you, Cloud SQL will be able to do it. No backup, no manual replication, no patch, etc.

Many enterprise customers still rely heavily on a traditional on-prem server infrastructure. Google is trying to remove all the obstacles you could find when moving to the cloud.

In other Cloud SQL news, customers who use PostgreSQL can now use version 11 of PostgreSQL. Amazon RDS also supports version 11.

Finally, Google’s managed NoSQL database service Cloud Bigtable now supports multi-region replication. That feature was already available in beta. You can now safely read and write your NoSQL data from multiple regions at the same time.


Read Full Article

DroneBase raises capital and partners with FLIR Systems to train pilots on thermal imaging tech


Publicly traded sensor technology developer FLIR Systems is investing in a strategic round of funding for the outsourced drone imaging company, DroneBase.

The two companies are also partnering to provide FLIR’s thermal imaging technology and training services to DroneBase’s stable of pilots.

Terms of the investment were not disclosed.

“Our investment in DroneBase helps expand the adoption of FLIR thermal imaging technology by putting it in the hands of more pilots who fly drones every day,” said Jim Cannon, the president and chief executive of FLIR, in a statement. “DroneBase’s enterprise pilot network will receive training by professional thermographers, enabling DroneBase to offer specialized thermal inspection services for customers on a wider scale, and creating an opportunity for FLIR to incorporate additional service offerings through DroneBase in the future.”

Los Angeles-based DroneBase has contracted pilots to complete more than 100,000 commercial missions in 70-plus countries for residential and commercial real estate, insurance, telecommunications, construction and media companies, according to a statement.

Through FLIR’s Infrared Training Center, FLIR and DroneBase will develop a specialized training program that will be certified exclusively by DroneBase.

“Through FLIR’s strategic investment in DroneBase, we are now able to offer scalable thermal solutions to enterprises of any size,” said Dan Burton, founder and chief executive of DroneBase, in a statement. “This access to valuable data will allow stakeholders to make better decisions about their most critical assets. Like myself, many DroneBase pilots relied on FLIR products when they served in the military. This integration will offer military veterans a chance to work with FLIR again and leverage their training in their civilian lives.”


Read Full Article

Google Cloud Data Fusion lets you see all your data sets before ingesting them in BigQuery


Google is announcing several updates to its data analytics products at its Google Cloud Next developer conference today. The company wants to make it easier to move data to Google’s cloud, manipulate data and turn this data into insights.

First, Google wants to make it easier to access all your data from Google’s platform. The company is launching Cloud Data Fusion in beta. As the name suggests, this service lets you aggregate all your data sets in a single interface.

Even if your data is hosted on other cloud services, you can view it from the Cloud Data Fusion interface. You can then figure out which data set you’ll need to process in BigQuery for instance — BigQuery is Google’s cloud-based service for analyzing large amounts of data using SQL queries.

After selecting your data sets, you need to make sure BigQuery can ingest all this data. You might need to transfer some data to Google’s cloud.

Even if you already store data on Google Cloud Storage, chances are your data is spread out across multiple systems and data formats. For instance, you could already be uploading terabytes of raw data to Google’s servers, but it’s no use if you can’t process it with data in Salesforce or Workday.

The company already lets you transfer data automatically using the BigQuery Data Transfer Service. And Google says that this service now supports over 100 SaaS applications, including Salesforce, Marketo, Workday and Stripe.

This service already lets you transfer your data warehouse data. So if you want to switch from Amazon Redshift or Teradata, you can migrate everything.

Now that all your data is available, you need to visualize it. Google already lets you create interactive dashboards and reports in Google Data Studio. That service is powered by BigQuery BI engine. Google says that many complex queries now take less than a second to process.

Soon, Google will open up BigQuery BI Engine to other data visualization services, such as Looker and Tableau. BigQuery BI Engine will run behind the scene to process your data.

If you don’t want to learn SQL queries, chances are you use Microsoft Excel or Google Sheets to sort and process data. Google already lets you connect BigQuery with Google Sheets. The company goes one step further by creating a new type of infinite spreadsheet — connected sheets. Even if you have billions of rows of data, Google Sheets can now display your BigQuery-powered spreadsheet.

Last year, Google introduced BigQuery ML. That service lets customers build models on top of their data warehouse using SQL. Google is adding AutoML tables in beta. It lets you build machine learning models in a few clicks instead of a few lines of code.

Finally, Google is launching a metadata management service called Data Catalog. I’m sure telecom companies are going to love this. Customers will be able to restrict access to sensitive data assets using Google’s Cloud IAM interface.

And that’s it for Google’s data analytics news at Google Cloud Next.


Read Full Article

Google launches new security tools for G Suite users


Google today launched a number of security updates to G Suite, its online productivity and collaboration platform. The focus of these updates is on protecting a company’s data inside G Suite, both through controlling who can access it and through providing new tools for prevening phishing and malware attacks.

To do this, Google is announcing the beta launch of its advanced phishing and malware protection, for example. This is meant to help admins protect users from malicious attachment and inbound email spoofing, among other things.

The most interesting feature here, though, is the new security sandbox, another beta feature for G Suite enterprise users. The sandbox allows admins to add an extra layer of protection on top of the standard attachment scans for known viruses and malware. Those existing tools can’t fully protect you against zero-day ransomware or sophisticated malware, though. So instead of just letting you open the attachment, this tool executes the attachment in a sandbox environment to check if there are any security issues.

With today’s launch, Google is announcing the beta launch of its new security and alert center for admins. These tools are meant to create a single services that features best practice recommendations, but also a unified notifications center and tools to triage and take actions against threats, all with focus on collaboration among admins. Also new is a security investigation tool that mostly focuses on allowing admins to create automated workflows for sending notifications or assigning ownership to security investigations.


Read Full Article