20 July 2019

Become a Superstar Communicator With This FREE Ebook!


templates-meetings

One of the most important skills you can possess in your career, and in life in general, is effective communication. And luckily, this skill can be taught, practiced, and improved.

This free ebook teaches you the basic principles of effective communication to help you have honest and open conversations in any environment. This includes communicating using words, symbols, pictures, graphics, voice, tone, facial expressions, clothing, and body language.

Even if you already consider yourself an effective communicator, this ebook will have something to teach you, so you can further build empathy and trust with others while adapting your communication style to any situation you find yourself in.

Download This Ebook for Free!

Effective Communication free ebook

Inside, you will learn how to:

  • Determine your own preferred communication style.
  • Use this information to develop and enhance your communication skills.
  • Identify and respond appropriately to other people’s emotions.
  • Apply the six components of the RESULT communications principle.
  • Overcome the most common barriers to successful communication.

Want to download your free copy? Simply click here to download Effective Communication from TradePub. You will have to complete a short form to access the ebook, but it’s well worth it! But hurry! This offer won’t be available for long!

Read the full article: Become a Superstar Communicator With This FREE Ebook!


Read Full Article

5 Sites for Space Geek to Celebrate and Relive the First Moon Landing


July 20, 2019, marks the 50th anniversary of the day man first stepped on the moon. Relieve this historical moment through live recreations, virtual museums, documentaries, and other cool web tools.

The moon mission, while orchestrated by Americans, was a global event that tied all of humankind together. Google has already kicked off celebrations with a Google Doodle narrated by Michael Collins, the third astronaut accompanying Neil Armstrong and Edwin “Buzz” Aldrin. These sites and apps only enhance the enjoyment.

And yes, we are now long past the point of getting into ridiculous debates about whether the event was real or not. There are enough online resources to debunk “fake moon landing” conspiracy theories.

1. NASA’s Apollo 50th (Web): Official Videos, Images, Transcripts, and More

NASA's Apollo 50th anniversary site has official photos, videos, and audio of first moon landing

Unsurprisingly, NASA has the best resources for everything you want to know about the Apollo 11 mission. Celebrating 50 years of Apollo missions, you can find all the official videos, images, transcripts, mission details, and other tidbits. Be sure to also check out the Apollo 11 mission page or other NASA pages.

For the 50th anniversary, NASA has released 45 previously unseen photographs from the moon exploration, by stitching them together as panoramas. The full Apollo Panoramas gallery is available on Flickr, and shows the lunar surface like never before.

Meanwhile, the main NASA homepage is releasing new tidbits throughout the week to celebrate the Apollo 11 mission, which will go on till July 24 when the astronauts returned. NASA TV is also airing footage throughout this period.

2. A Giant Leap for Mankind (Web): Google’s Virtual Museum, and Explore Google Moon

Explore Neil Armstrong and Buzz Aldrin's path on the moon with Google Moon

Apart from the Google Doodle, the internet giant also created a virtual museum tracing each step of the Apollo 11 mission. And over at Google Moon, its extra-terrestrial equivalent of Google Maps, you can explore the area that Armstrong and Aldrin walked on.

A Giant Leap for Mankind is like a virtual coffee table book. With large inspiring photos and short bursts of text, Google walks you through why we went, the science and the earlier ten missions, the liftoff, how the astronauts lived in space, and the people who made all of this happen. It’s an incredible, inspiring story which you can get lost in for hours.

But don’t waste so much time there because the cool part is Google Moon’s Apollo 11 mission. The 18 plot points on the surface of the moon chart the path of the first two explorers, and what they did. It’s one of the coolest interactive exhibits for the moon landing.

3. Apollo 11 in Real Time (Web): Real-Time Journey of the Mission

Apollo 11 in Real Time is a live recreation of the mission

In 1969, the whole world was glued to television sets and radios, wherever they were. What was the whole environment like? Apollo 11 in Real Time looks to recreate the experience of following Apollo 11 through a web tool.

You can join at one minute to launch, and follow through in real time. It’s nine whole days worth of audio and video files, along with some photography, so you’ll want to fast forward a bit. Thankfully there’s a handy timeline of every single noteworthy event.

The on-screen control room can be a bit overwhelming at first, but you’ll get the hang of it soon. Transcript and Mission Milestones are the important buttons. The video and audio files keep playing as you click different points in the transcript and the milestones.

It’s kind of surreal to experience what the astronauts, and the mission control room, was experiencing back then.

4. First Men on the Moon (Web): Relive the Landing on the Moon

First Men on the Moon shows what the world saw and heard on TVs and in the control room when Apollo 11 lunar module landed on the moon's surface

A whole lot is made about Neil Armstrong’s “One small step for man” statement, but space geeks have more love for a different quote: “The Eagle has landed.” The impact of Armstrong and Aldrin successfully landing on the moon was unlike anything else.

If you find the Apollo 11 in Real Time app to be too overwhelming, try out First Men on the Moon. It’s a simpler app that recreates the touchdown, as experienced live across the universe.

A pane on the left shows the air-to-ground loop for astronauts and engineers on earth, while the flight director’s loop shows what the Mission Control Room is talking about (and who is). The Lunar Module’s pitch angle is shown as well, while the big screen shows the images being beamed back.

There are handy bookmarks on the timeline to jump ahead if you want to, but I’d advise being patient and using a good set of speakers. It’s glorious.

5. Chasing the Moon (Web): Documentaries About Moon Mission

The most recent big documentary film about the moon missions, Chasing The Moon by Robert Stone is a three-part series on PBS. It’s free to stream in the US, while people outside that region will need a VPN to watch it.

But this isn’t the only one you should spend time on. There are several documentaries about Apollo 11 and the moon missions that are worth a watch. One Giant Leap for Mankind is a one-hour documentary that you can watch on YouTube. The Daily Wire put together a three-part series titled Apollo 11: What We Saw which traces the roots of the moment from the time the Space Race started.

Many consider For All Mankind to by Al Reinart to be the finest documentary on the subject, which can be streamed on The Criterion Channel. And a new documentary, Apollo 11 by Todd Douglas Miller, is currently playing in theaters, and should be available to stream soon.

The New Space Race

The successful landing of the Lunar Module was pretty much the culmination point of the Space Race. Sure, there were more missions and more oneupmanship, but it wasn’t with the same vigor or determination. Armstrong’s step united all of mankind, so who were you really competing against?

Nonetheless, 50 years later, we find ourselves entering a new race. So what’s this one all about? Who are the countries vying for a spot, and what are the objectives? Here’s what’s new about the new Space Race.

Read the full article: 5 Sites for Space Geek to Celebrate and Relive the First Moon Landing


Read Full Article

Google is adding Find My Device and battery features to Fast Pair headphones


Introduced a few I/Os back, Fast Pair is Google’s attempt to make its own mark on the post-AirPod headphone landscape. Many of the features are similar to Apple’s offerings, but Google’s got a leg up in one key way: third-party hardware. Like Android, the company’s focused on bringing Fast Pair to as many manufacturers as possible.

That list now includes Libratone, Jaybird, JBL (four models), Cleer, LG (four models), Anker (one pair of headphones and speaker) and, of course, Google’s own Pixel Buds. This week, the company announced a number of key features coming to Fast Pair headphones.

New this time around is Find My Device functionality, aimed at helping owners locate missing headsets. The app will show the time and location they were last in use, and will send out a chime from buds that are still in Bluetooth range.

Also new is individual battery life for buds and case. Opening up the case near a paired handset will pop up that information. All of the above features will arrive on the 15 or so headphones that currently sport the feature.


Read Full Article

How to Disable UEFI Secure Boot to Dual Boot Any System


disable-uefi-ddual-boot

Have you ever tried to install a second operating system alongside Windows? Depending on the OS, you might have encountered the UEFI Secure Boot feature.

If Secure Boot doesn’t recognize the code you’re trying to install, it will stop you. Secure Boot is handy for preventing malicious code running on your system. But it also stops you booting some legitimate operating systems, like Kali Linux, Android x86, or TAILS.

But there is a way around it. This short guide will show you how to disable UEFI Secure Boot to let you dual boot any operating system you like.

What Is UEFI Secure Boot?

Let’s take a second to consider precisely how Secure Boot keeps your system safe.

Secure Boot is a feature of the Unified Extensible Firmware Interface (UEFI). UEFI itself is the replacement for the BIOS interface found on many devices. UEFI is a more advanced firmware interface with many more customization and technical options.

Computer Security, UEFI, BIOS, Dual Boot

Secure Boot is something of a security gate. It analyzes code before you execute it on your system. If the code has a valid digital signature, Secure Boot lets it through the gate. If the code has an unrecognized digital signature, Secure Boot blocks it from running, and the system will require a restart.

At times, code that you know is safe, and comes from a reliable source, might not have a digital signature in the Secure Boot database.

For example, you can download numerous Linux distributions directly from their developer site, even verifying the distribution checksum to check for tampering. But even with that confirmation, Secure Boot will still reject some operating systems and other types of code (such as drivers and hardware).

How to Disable Secure Boot

Now, I don’t advise disabling Secure Boot lightly. It really does keep you safe (check out the Secure Boot vs. NotPetya Ransomware video below, for example), especially from some of the nastier malware variants like rootkits and bootkits (others would contend it was the security measure to stop Windows pirating). That said, sometimes it gets in the way.

Please note that turning Secure Boot back on may require a BIOS reset. This does not cause your system to lose any data. It does, however, remove any custom BIOS settings. Moreover, there are some examples where users are permanently no longer able to turn on Secure Boot, so please bear that in mind.

Okay, here’s what you do:

  1. Turn your computer off. Then, turn it back on and press the BIOS entry key during the boot process. This varies between hardware types, but is generally F1, F2, F12, Esc, or Del; Windows users can hold Shift while selecting Restart to enter the Advanced Boot Menu. Then select Troubleshoot > Advanced Options: UEFI Firmware Settings.
  2. Find the Secure Boot option. If possible, set it to Disabled. It is usually found in the Security tab, Boot tab, or Authentication tab.
  3. Save and Exit. Your system will reboot.

You have successfully disabled Secure Boot. Feel free you grab your nearest previously unbootable USB drive and finally explore the operating system. Our list of the best Linux distributions is a great place to start!

How to Re-Enable Secure Boot

Of course, you might want to turn Secure Boot back on. After all, it does help protect against malware and other unauthorized code. If you directly install an unsigned operating system, you’ll need to remove all traces before attempting to turn Secure Boot back on. Otherwise, the process will fail.

  1. Uninstall any unsigned operating systems or hardware installed when Secure Boot was disabled.
  2. Turn your computer off. Then, turn it back on and press the BIOS entry key during the boot process, as above.
  3. Find the Secure Boot option and set it to Enabled.
  4. If Secure Boot doesn’t enable, try to Reset your BIOS to factory settings. Once you restore factory settings, attempt to enable Secure Boot again.
  5. Save and Exit. Your system will reboot.
  6. In the event the system fails to boot, disable Secure Boot again.

Troubleshooting Secure Boot Enable Failure

There are a few small fixes we can try to get your system booting with Secure Boot enabled.

  • Make sure to turn UEFI settings on in the BIOS menu; this also means making sure Legacy Boot Mode and equivalents are off.
  • Check your drive partition type. UEFI requires GPT partition style, rather than the MBR used by Legacy BIOS setups. To do this, type Computer Management in your Windows Start menu search bar and select the best match. Select Disk Management from the menu. Now, find your primary drive, right-click, and select Properties. Now, select the Volume. Your partition style is listed here. (If you need to switch from MBR to GPT there is only one option to change the partition style: back up your data and wipe the drive.)
  • Some firmware managers have the option to Restore Factory Keys, usually found in the same tab as the other Secure Boot options. If you have this option, restore the Secure Boot factory keys. Then Save and Exit, and reboot.

Computer Security, UEFI, BIOS, Dual Boot

Trusted Boot

Trusted Boot picks up where Secure Boot stops, but really only applies to the Windows 10 digital signature. Once UEFI Secure Boot passes the baton, Trusted Boot verifies every other aspect of Windows, including drivers, startup files, and more.

Much like Secure Boot, if Trusted Boot finds a corrupted or malicious component, it refuses to load. However, unlike Secure Boot, Trusted Boot can at times automatically repair the issue at hand, depending on the severity. The below image explains a little more about where Secure Boot and Trusted Boot fit together in the Windows boot process.

Computer Security, UEFI, BIOS, Dual Boot

Should You Turn Off Secure Boot?

Disabling Secure Boot is somewhat risky. Depending on who you ask, you’re potentially putting your system security at risk.

Secure Boot is arguably more useful than ever at the current time. Bootloader attacking ransomware is very real. Rootkits and other particularly nasty malware variants are also out in the wild. Secure Boot provides UEFI systems with an extra level of system validation to give you peace of mind.

Read the full article: How to Disable UEFI Secure Boot to Dual Boot Any System


Read Full Article

How to Take Perfect Noise-Free Photos Every Time


noise-free-photography

Image noise is a problem for every photographer. Those tiny dots of color or grain can spoil even the most perfectly composed image, and sometimes it seems unavoidable.

Luckily, there are many ways to tackle noise in photos. To learn how to reduce noise in pictures, either when shooting or editing, keep reading!

1. Shoot at Low ISO

Noise most commonly occurs when you shoot at high ISO settings.

ISO determines how sensitive the sensor is to light. It’s used in conjunction with shutter speed and aperture to the control the exposure of a photo. Together, these form the so-called “exposure triangle”. Take a look at our photography tips for beginners for a full explanation.

When you double the ISO value, the sensitivity of the sensor also doubles. So, a camera will draw in four times as much light at ISO 1600 as it does at ISO 100. However, the more sensitive it is the more prone to noise it will be.
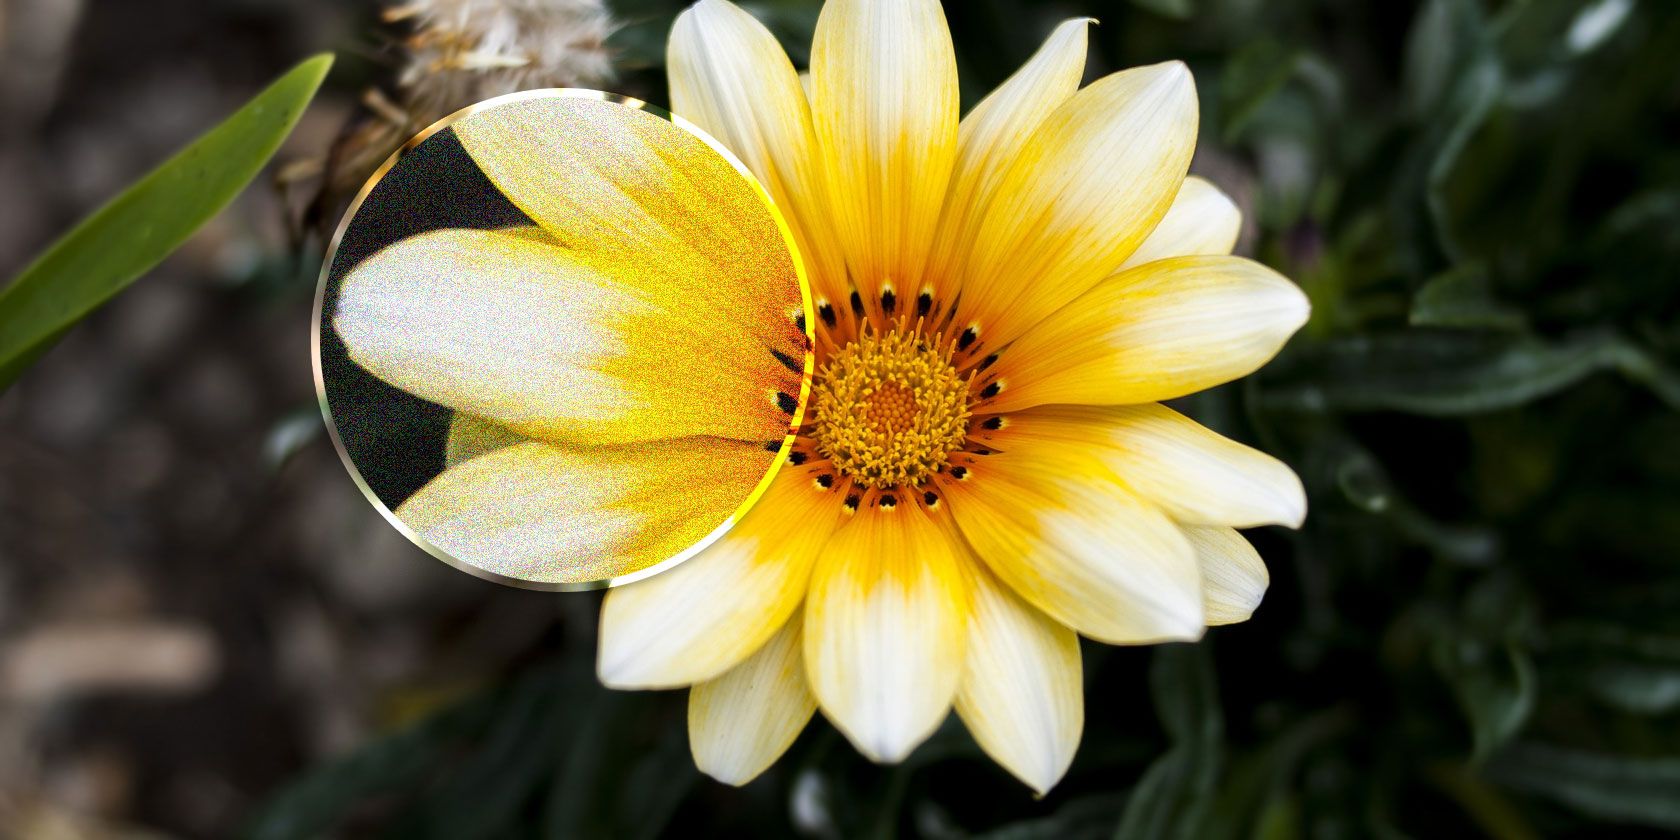
how to reduce noise - ISO setting

Modern DSLR and mirrorless cameras can shoot with relatively little noise at up to ISO 1600. Small sensor cameras and smartphones might start to show noise at ISO 400 and beyond.

To achieve ISO noise reduction, always keep the ISO setting as low as possible. This is easy in good light, while in low light set a slower shutter speed and select a larger aperture first. Only start bumping the ISO to a level beyond what your camera is comfortable with as a last resort.

Sometimes your pictures can be grainy even at low ISO. This can have many causes. It can come from the sensor getting hot with long exposures, the sensor being too small for the lighting conditions you’re using, or you’ve brightened the image too much in Photoshop.

2. Use Faster Lenses

As we mentioned, setting your lens to shoot at a larger aperture is a good way of keeping the ISO low.

The aperture is the hole at the back of the lens that controls how much light is able to hit the sensor. A larger aperture, indicated by a smaller f-number, increases the amount of light.

how to reduce noise - camera aperture

Every lens is restricted in the maximum aperture it offers, so switching to one with a larger maximum (often referred to as a faster lens) can be hugely beneficial. For instance, a prime lens with an f/1.8 aperture lets in twice as much light as a zoom does at f/3.5. That’s the equivalent of switching from a potentially noisy ISO 1600 to a clean and crisp ISO 400.

Obviously, buying a new lens is an expensive solution to this problem. But if you shoot in low-light conditions often, it is well worth the investment.

3. In-Camera Noise Reduction

A quick and easy solution for how to reduce noise in camera would seem to be to your camera’s built-in settings. Logic states that you should turn this on and set it to the maximum level to get noise free images.

But wait!

In-camera noise reduction can be a rather blunt instrument. It works by smoothing the image to blend in the noise. But it can also end up smoothing out fine details, or giving skin a fake, waxy looking texture.

how to reduce noise - in-camera reduction

Experiment with your camera’s settings to find the level you’re happy with. As a general rule, if you post-process your images in Lightroom then keep it set low. Lightroom can handle noise reduction far better. But if you upload your photos directly to Instagram or elsewhere you can afford to set it a little higher.

4. Long Exposure Noise Reduction

Long exposure photos are highly susceptible to noise because the sensor can get very warm while they’re being shot. This causes hot pixels in the image, resulting in noise at low ISO.

Cameras that can shoot with long exposures, especially DSLR and mirrorless cameras, have a long exposure noise reduction option to fix this. What’s different about it is that it usually works when you’re shooting in RAW, too.

Long exposure noise reduction works by shooting two frames. The first is your intended shot; the second is a “dark frame” shot as if you’d left the lens cap on. The dark frame captures nothing but the hot pixels, which the software then uses as a map to remove them from the original image.

This feature does mean your long exposures take twice as long to shoot, but otherwise there’s no downside to turning it on. It can help you shoot incredible night time photos, and it’s good tool for taking sharp pictures.

5. Reduce Noise in Camera Raw or Lightroom

If you’ve tried to minimize noise while shooting but are still left with some to clean up, where do you go next?

Shoot in RAW and process in Camera Raw or Lightroom. It’s how many professionals gets their photos to look tack-sharp.

Both editors have the same noise reduction tools. They’re simple yet powerful, and tackle the two types of noise.

Remove Color Noise

Color noise is seen as specs of random color dotted throughout the image. It’s ugly, and you’ll always want to remove it. Fortunately, it’s a trivial fix, and you might not even need to do anything.

how to reduce noise - colors

You remove color noise by desaturating those random dots. Lightroom automatically applies a setting of 25 on the Color Noise slider to every RAW image, and more often than not that’s enough.

You can increase it if you need to, but don’t go too far or you might start smudging the other colors. On the whole, color noise reduction shouldn’t degrade your image quality in any noticeable way.

Remove Luminance Noise

Luminance noise is random pixels that are brighter or darker than they should be. Not all luminance noise is bad, as it can sometimes look like film grain, giving your image a nice texture. It’s harder to fix fully, though.

Luminance noise is removed by softening the image. This has the effect of removing fine detail, and if you push it too far natural textures will start to look artificial.

how to reduce noise - luminance

Ultimately, it’s about finding the balance between reducing noise and retaining detail. We’d always recommend prioritizing the latter.

To get started, zoom fully into your image. Then get to work on the three noise reduction sliders:

  • Luminance: This is the main tool. Drag it to the point where you find a good balance between noise and detail.
  • Detail: This allows you to recover some fine detail, but the effect is very subtle. It’s set to 50 by default. Increase it to add more detail, but beware of introducing unwanted artifacts to the image.
  • Contrast: This slider lets you recover some of the local contrast that may been smoothed away by the Luminance slider. A value of around 10-20 often works well.

You can also apply local noise reduction in Lightroom using tools like the Adjustment Brush or Graduated Filter. You get less control on the settings, though, and it only works with Luminance noise.

Once you’re done you’ll probably need to sharpen the photo. This can increase the noise once more. Noise reduction can sometimes feel like a game of whack-a-mole.

6. How to Reduce Noise in Photoshop

When you’re shooting on a tripod you can minimize noise by using slower shutter speeds. But you won’t be able to get rid of it entirely.

Photoshop, and other major photo editing apps like Affinity Photo, have an ingenious fix that solves the problem automatically.

how to reduce noise - exposure stacking

It’s called exposure stacking, and it works by blending multiple images that are essentially identical. If they’re shot together, from a tripod, the only differences will be the dots of noise that are distributed randomly on each frame.

The software identifies those differences as noise, and discards them.

The process for Photoshop goes like this:

  1. Shoot between three and six images (without moving the camera in between).
  2. Open Photoshop and go to File & Scripts > Open Files into Stack.
  3. In the Load Layers box that opens, check the options labelled Attempt to Automatically Align Source Images and Create Smart Objects After Loading Layers then hit OK.
  4. Go to Layer & Smart Objects & Stack Mode & Median.

That should be it.

HDR mode on smartphones use the same process. They shoot multiple frames in succession and combine them. It’s primarily designed to maximize the dynamic range of the camera, but also serves to reduce noise and help you take sharper photos on your phone.

If your phone has an HDR mode, turn it on.

7. Be Careful When Post-Processing

As we’ve seen, it’s easy to learn how to reduce noise in pictures. What’s also easy is to accidentally add noise when you’re post-processing your shots. Too much color correction or over-sharpening can cause it.

But the biggest problem is when you brighten an image too much, and reveal masses of color noise in the shadows.

The answer is to learn how to lighten dark images properly. This will give you perfectly exposed photos without ruining the quality.

Read the full article: How to Take Perfect Noise-Free Photos Every Time


Read Full Article

Buying a Refurbished Mac? 10 Things You Need to Know


Everyone knows Mac computers are expensive. Whether the hardware justifies the price is an argument for another day, but one fact is clear: the high cost makes Macs unaffordable for a huge number of people.

If you want to use a Mac but don’t have the money to buy a new machine, a refurbished model is definitely worth considering. But there are a few points you need to keep in mind before you part with your cash. Keep reading to learn more.

1. Refurbished Macs vs. Used Macs

If you are thinking about buying a refurbished Mac, make sure that you don’t accidentally end up buying a used Mac instead.

There are only a limited number of places to buy official refurbished Macs. Apple itself has a store for refurbished hardware, but you can also check out sites like Mac of All Trades, Other World Computing, and PowerMax. You can even find some great deals at stores like Best Buy.

Some sites that sell refurbished Mac also sell used Macs—so pay careful attention to the product description before you hit the button to buy.

Remember, a refurbished Mac will be as good as new internally. If any of the computer’s components were not at the functional standard of a new device, Apple (or a trusted party) will have replaced them.

2. You Have Less Choice

Refurbished products can only come onto the market when newer offerings become available.

For common devices, such as old entry-level MacBook Air laptops, that’s not an issue. But if you want a fancier model, you might have to wait for a refurbished version to hit the stores. And remember, you could be competing with other people who have their eye on the same machine.

Similarly, you’re going to struggle to find the newest Mac versions. There just aren’t that many people selling Apple laptops that are less than a year old.

3. Refurbished Macs Are Cheaper

If you want to save money on buying a Mac, refurbished devices are the way to go. You can typically expect savings between 10 and 30 percent, depending on the age of the laptop and the condition it’s in. In some cases, the savings could be as much as 50 or 60 percent if the device is quite old.

Used, non-refurbished laptops are even cheaper. However, they do not have refreshed replacement parts and will not have any buyer protections, such as warranty periods.

4. Refurbished Macs Are Not in Perfect Condition

Typically, Apple will not replace a laptop’s chassis while undertaking the refurb work. As such, you cannot expect the device to be in the same condition as a new computer. Remember that someone has already used it before you, to some extent.

When you look at a store that sells refurbished Macs, each listing will let you know about the condition of the item. You can expect to see a rating system that goes something like Good > Very Good > Excellent.

The ratings are subjective, and there will naturally be a range within each band. No two refurbished Macs will ever be in the same condition.

5. Expect Shorter Warranties

refurb mac listing warranty 90 days

If you buy a refurbished Mac from a reputable seller, it will come with a warranty period. But be warned, the warranty periods are shorter than those you’d receive if the Mac were brand-new. In many cases, the warranty can be as short as 90 days.

Some sellers will offer extended warranties for refurbished hardware, but you’ll need to pay extra if you want it.

You should avoid any seller who does not provide a warranty period. Refurbished Macs might be cheaper than their new counterparts, but they still cost a decent amount of money. Buying a refurbished computer without a warranty period puts you at risk of losing your investment.

6. All Refurbished Macs Are Fully Tested

Apple has a stringent testing process for all its refurbished Macs. Both the hardware and the software will be put through its paces.

Should a part fail the test, Apple will either replace or fix it, depending on the severity of the problem.

7. All Refurbished Mac Are Fully Cleaned

Macbook_Pro_13

Of course, you’d expect the exterior of a second-hand Mac to receive a buffing prior to receiving it. However, what’s less-known is that the refurb process also cleans the internals.

This removes dust from fans, drives, and CPUs, and cleans dirt away from ports. Additionally, the cleaner will scrape away any gunk that accumulated under the keyboard keys.

Naturally, the machine also goes through sterilization to kills germs and other nasty bacteria.

8. The Drive Contains No Old User Data

When a company prepares a refurbished Mac, it completely wipes the storage disk. And we’re not talking about merely deleting the user accounts—they format the entire drive and reinstall the operating system.

Aside from the privacy issues, this is also important from a legal standpoint. You don’t want to find yourself on the hook because a previous, unknown owner was doing something unlawful with his or her machine.

9. Look for Factory Certification

Make sure the refurbished Mac you want to buy has official Apple certification. There are too many unscrupulous online stores and individual sellers who will claim a product has been refurbished, when in practice, they only did a quick fix-up job in their bedroom.

Only use trusted sellers or the official Apple refurbished store.

10. Check Your Credit Card Terms

Many credit cards automatically offer additional warranty periods for any purchases you make on your account.

If you rely on those offers, make sure you check with your card provider about whether refurbished items are covered under its terms. In many cases, refurbished electronics are specifically excluded.

Learn More About Using Refurbished Electronics

There’s nothing wrong with buying refurbished products. As long as you do your research and understand the pros and cons, it’s possible to find some great deals that offer better value than a new device. For lots of people, buying a refurbished Mac makes more sense than buying a new one.

If you would like to learn more, make sure you also read our guides on refurbished vs. pre-owned vs. used terminology and the best places to buy a refurbished iPhone.

Read the full article: Buying a Refurbished Mac? 10 Things You Need to Know


Read Full Article

The Windows System32 Directory: What It Is and Why You Can’t Delete It


windows-system32-directory

Spend some time on the internet, and you’ll probably come across a jokester telling you to delete the Windows System32 folder on your computer. But what is this mysterious Windows folder, and why would someone tell you to delete it?

And what would happen if you actually deleted System32? Here are the facts.

What Is System32?

System32 is a folder included in every Windows version since Windows 2000. It’s located at C:\Windows\System32 and includes all sorts of files and folders that are vital to keep Windows functioning properly.

There are far too many files in System32 to discuss individually, though a user on Symantec’s forums has explained a lot of them if you’re interested. In general, you can break the majority of System32’s contents into two groups:

  • DLL (Dynamic Link Library) files allow programs to access parts of Windows and perform standard tasks. For instance, one DLL file might allow the computer to play audio, while another could enable automatic Windows Updates. Many DLLs start as soon as you boot your computer. Windows couldn’t start without them, which is why fixing DLL errors is such a pain.
  • EXE (Executable) files are software applications and utilities. You start an executable every time you open software like Word or Chrome. But the EXE files in System32 are more important: aside from Windows utilities like the Event Viewer (eventvwr.exe), these include executables for vital Task Manager processes like winlogon.exe. Without this, you couldn’t even sign into your PC.

Aside from these, System32 also contains a drivers folder (the contents of which let your computer interface with various hardware), language files, and more.

How to Delete the System32 Folder on Windows

Despite the jokes online, deleting System32 isn’t a one-click affair. Since it’s a protected system folder, Windows will deny you access if you try to delete it. This is enough to deter inexperienced users from accidentally deleting the folder.

However, if you’re persistent, you can continue along your path of destruction. Taking ownership of the folder lets you attempt to delete it, but Windows blocks this again since it’s actively using many files inside System32.

To get around this, you could start deleting individual files inside System32, or use the Command Prompt for more efficient deletion. If you did this, Windows would let you delete files that weren’t currently in use.

What Happens When You Delete System32?

If you proceed with deleting random files in System32, your computer will begin a slow collapse. Basic functions, like launching programs, searching via the Start Menu, and opening Windows utilities won’t work anymore since you deleted the files that they depend on. There’s no single exciting moment where System32 “goes bang”—it crumbles over a short time instead.

Depending on what you delete, you probably won’t even be able to shut down your computer normally. Once you do a hard shutdown and reboot, you’ll likely find that Windows won’t boot without those critical DLLs. Obviously, your Windows installation is toast at this point.

If you went this far, you’d have to reinstall Windows to get everything working properly again. Functions like System Restore would likely be ruined by your actions, so you’d have to reinstall from scratch.

Looking at all this, it’s obvious that Windows protects this folder for a reason. If it wasn’t protected and someone didn’t know better, they might try to delete the folder to save space and end up with a nasty surprise.

System32 vs. SysWOW64: What’s the Difference?

System32 and SysWOW64

On 64-bit versions of Windows, you’ll notice a few folder differences, like the separate Program Files (x86) directory. Something similar occurs with System32. In the C:\Windows folder on a 64-bit system, you’ll find a folder called SysWOW64 in addition to System32.

Take a look, and you’ll see that the two folders contain many files with identical names. Like Program Files (x86), Windows includes these two separate directories for compatibility with 32-bit programs. If a 32-bit program tried to load a 64-bit DLL, it would crash.

But what’s strange is that on 64-bit systems, System32 has 64-bit files, while SysWOW64 contains 32-bit files. As it turns out, WoW64 stands for Windows 32-bit on Windows 64-bit. This is a service that allows the OS to properly run 32-bit programs, even on a 64-bit system.

Part of how it accomplishes this is by automatically redirecting 32-bit processes to use the proper folders. A 32-bit program, not even knowing that 64-bit software exists, will naturally try to access the System32 folder. But WoW redirects it to use the SysWOW64 instead. The same happens with Program Files.

Since many old 32-bit programs were hard-coded to access System32 and Program Files, this redirecting method allows 32-bit and 64-bit programs to both work on one system with ease. It’s a bit confusing, but now you know the reason for it.

What About System32 Viruses?

It’s possible that a virus or other malware infection could hide in System32. A rootkit may try to invade the folder and disguise itself as a legitimate process, which you might notice due to unusually high CPU usage.

If you suspect you have a System32 virus, you shouldn’t try to delete or modify any affected files. You have a better chance of accidentally damaging your system than you do cleaning the infection that way.

Instead, you should scan with a trusted antivirus program, then follow up with an anti-malware scanner like Malwarebytes.

Getting Acquainted With System32 on Windows

Now you know all about System32, what it does, and what would happen if you deleted it.

If you don’t remember anything else, just know that System32 contains a collection of vital files that Windows needs to work properly. You can’t delete System32 without intentionally circumventing built-in protections, and you’ll almost certainly need to reinstall Windows if you trash the folder.

For more like this, check out solutions for confusing Windows mysteries.

Read the full article: The Windows System32 Directory: What It Is and Why You Can’t Delete It


Read Full Article

The 9 Best USB MIDI Controllers for Musicians

Don’t Buy Philips Hue Lightstrips Until You’ve Seen These!

The Best Candy Crush Friends Saga Cheats and Tips

TikTok tests an Instagram-style grid and other changes


Short-form video app TikTok, the fourth most downloaded app in the world as of last quarter, is working on several new seemingly Instagram-inspired features — including a Discover page, a grid-style layout similar to Instagram Explore, an Account Switcher, and more.

The features were uncovered this week by reverse-engineering specialist Jane Manchun Wong, who published screenshots of these features and others to Twitter.

A TikTok spokesperson declined to offer further details on the company’s plans, but confirmed the features were things the company is working on.

“We’re always experimenting with new ways to improve the app experience for our community,” the spokesperson said.

The most notable change uncovered by Wong is one to TikTok’s algorithmically generated “For You” page. Today, users flip through each video on this page, one by one, in a vertical feed-style format. The updated version instead offers a grid-style layout, which looks more like Instagram’s Explore page. This design would also allow users to tap on the videos they wanted to watch, while more easily bypassing those they don’t. And because it puts more videos on the page, too, the change could quickly increase the amount of input into TikTok’s recommendation engine about a user’s preferences.


Another key change being developed is the addition of a “Discover” tab to TikTok’s main navigation.

The new button appears to replace the current Search tab, which today is labeled with a magnifying glass icon. The Search section currently lets you enter keywords, and returns results that can be filtered by users, sounds, hashtags or videos. It also showcases trending hashtags on the main page. The “Discover” button, meanwhile, has a people icon on it, which hints that it could be helping users find new people to follow on TikTok, rather than just videos and sounds.

This change, if accurately described and made public, could be a big deal for TikTok creators, as it arrives at a time when the app has gained critical mass and has penetrated the mainstream. The younger generation has been caught up in TikTok, finding the TikTok stars more real and approachable than reigning YouTubers.  TikTokers and their fans even swarmed VidCon this month, leading some to wonder if a paradigm shift for online video was soon to come.

A related feature, “Suggested Users” could also come into play here, in terms of highlighting top talent.

Getting on an app’s “Suggested” list is often key to becoming a top creator on the platform. It’s how many Viners and Twitter users initially grew their follower bases, for instance.

However, TikTok diverged from Instagram with the testing of two other new features Wong found which focused on popularity metrics. One test shows the “Like” counts on each video on the Sounds and Hashtags pages, and another shows the number of Downloads on the video itself, in addition to the Likes and Shares.

This would be an interesting change in light of the competitive nature of social media. And its timing is significant. Instagram is now backing away from showing Like counts, in a test running in a half dozen countries. The company made the change in response to public pressure regarding the anxiety that using its service causes.

Of course, in the early days of a social app, Like counts and other metrics are tools that help point users to the breakout, must-follow stars. They also encourage more posting as users try to find content that resonates — which then, in turn, boosts their online fame in a highly trackable way.

TikTok is also taking note of how integrations with other social platforms could benefit its service, similar to how the Facebook, Instagram, WhatsApp and Messenger apps have offered features to drive traffic to one another and otherwise interoperate.

A couple of features Wong found were focused on improving connections with social apps, including one that offered better integration with WhatsApp, and another that would allow users to link their account to Google and Facebook.

A few other changes being tested included an Instagram-like Account switcher interface, a “Liked by Creator” comment badge, and a downgrade to the TikCode (QR code) which moves from the user profile the app’s settings.

Of course, one big caveat here with all of this is that just because a feature is spotted in the app’s code, that doesn’t mean it will launch to the public.

Some of these changes may be tested privately, then scrapped entirely, or are still just works in progress. But being able to see a collection of experiments at one time like this — something that’s not possible without the sort of reverse engineering that Wong does — helps to paint a larger picture of the direction an app may be headed. In TikTok’s case, it seems to understand its potential, as well as when to borrow successful ideas from others who have come before it, and when to go its own direction.


Read Full Article

Google’s SMILY is reverse image search for cancer diagnosis


Spotting and diagnosing cancer is a complex and difficult process even for the dedicated medical professionals who do it for a living. A new tool from Google researchers could improve the process by providing what amounts to reverse image search for suspicious or known cancerous cells. But it’s more than a simple matching algorithm.

Part of the diagnosis process is often examining tissue samples under a microscope and looking for certain telltale signals or shapes that may indicate one or another form of cancer. This can be a long and arduous process because every cancer and every body is different, and the person inspecting the data must not only look at the patient’s cells but also compare them to known cancerous tissues from a database or even a printed book of samples.

As has been amply demonstrated for years now, matching similar images to one another is a job well suited to machine learning agents. It’s what powers things like Google’s reverse image search, where you put in one picture and it finds ones that are visually similar. But this technique has also been used to automate processes in medicine, where a computer system can highlight areas of an X-ray or MRI that have patterns or features it has been trained to recognize.

That’s all well and good, but the complexity of cancer pathology rules out simple pattern recognition between two samples. One may be from the pancreas, another from the lung, for example, meaning the two situations might be completely different despite being visually similar. And an experienced doctor’s “intuition” is not to be replaced, nor would the doctor suffer it to be replaced.

Aware of both the opportunities and limitations here, Google’s research team built SMILY (Similar Medical Images Like Yours), which is a sort of heavily augmented reverse image search built specifically for tissue inspection and cancer diagnosis.

A user puts into the system a new sample from a patient — a huge, high-resolution image of a slide on which a dyed section of tissue is laid out. (This method is standardized and has been for a long time — otherwise how could you compare any two?)

smilygif

Once it’s in the tool, the doctor can inspect it as they would normally, zooming in and panning around. When they see a section that piques their interest, they can draw a box around it and SMILY will perform its image-matching magic, comparing what’s inside the box to the entire corpus of the Cancer Genome Atlas, a huge database of tagged and anonymized samples.

Similar-looking regions pop up in the sidebar, and the user can easily peruse them. That’s useful enough right there. But as the researchers found out while they were building SMILY, what doctors really needed was to be able to get far more granular in what they were looking for. Overall visual similarity isn’t the only thing that matters; specific features within the square may be what the user is looking for, or certain proportions or types of cells.

As the researchers write:

Users needed the ability to guide and refine the search results on a case-by-case basis in order to actually find what they were looking for…This need for iterative search refinement was rooted in how doctors often perform “iterative diagnosis”—by generating hypotheses, collecting data to test these hypotheses, exploring alternative hypotheses, and revisiting or retesting previous hypotheses in an iterative fashion. It became clear that, for SMILY to meet real user needs, it would need to support a different approach to user interaction.

To this end the team added extra tools that let the user specify much more closely what they are interested in, and therefore what type of results the system should return.

First, a user can select a single shape within the area they are concerned with, and the system will focus only on that, ignoring other features that may only be distractions.

Second, the user can select from among the search results one that seems promising and the system will return more like it, less closely tied to the original query. This lets the user go down a sort of rabbit hole of cell features and types, doing that “iterative” process the researchers mentioned above.

refinements

And third, the system was trained to understand when certain features are present in the search result, such as fused glands, tumor precursors, and so on. These can be included or excluded in the search — so if someone is sure it’s not related to this or that feature, they can just sweep all those examples off the table.

In a study of pathologists given the tool to use, the results were promising. The doctors appeared to adopt the tool quickly, not only using its official capabilities but doing things like reshaping the query box to test the results or see if their intuition on a feature being common or troubling was right. “The tools were preferred over a traditional interface, without a loss in diagnostic accuracy,” the researchers write in their paper.

It’s a good start, but clearly still only an experiment. The processes used for diagnosis are carefully guarded and vetted; you can’t just bring in a random new tool and change up the whole thing when people’s lives are on the line. Rather, this is merely a bright start for “future human-ML collaborative systems for expert decision-making,” which may at some point be put into service at hospitals and research centers.

You can read the two papers describing SMILY and the doctor-focused refinements to SMILY here; they were originally presented at CHI 2019 in Glasgow earlier this year.


Read Full Article