A blog about how-to, internet, social-networks, windows, linux, blogging, tips and tricks.
12 October 2018
Facebook bans hundreds of clickbait farms for ‘coordinated inauthentic behavior’
Facebook has announced a relatively small but significant purge of bad actors from the platform: 810 pages and accounts that have “consistently broken our rules against spam and coordinated inauthentic behavior.” It may not seem like a lot, but it sounds like the company is erring on the side of disclosure even if the news isn’t particularly hard-hitting.
These were not, as far as Facebook could tell, part of an organized nation-state effort or political interference campaign, like the Iranian and Russian groups previously highlighted in these ban alert posts. These are pages that use networks of fake accounts and pages to drive traffic to clickbait articles strictly for the purpose of ad revenue.
810 can’t be much more than a drop out of the bucket of fake accounts on Facebook — of which there are millions — but the company’s focus right now isn’t individual bad actors but coordinated ones.
A few hundred accounts working together to do a bit of ad fraud produces a sort of digital footprint that might look similar to a a few hundred accounts working together to push a political narrative or sow discontent. And one can turn into the other quite easily.
There are patterns of logins, likes, visits, account creation, and so on that Facebook has been working hard to identify — recently, at least. Although they’ve designed their net to catch the nation-state actors and large-scale operations that have previously been uncovered, small fry like these spammers are getting tangled up as well. Not a bad thing.
“Given the activity we’ve seen — and its timing ahead of the US midterm elections — we wanted to give some details about the types of behavior that led to this action,” the company wrote on its blog.
No doubt they also want to give the impression that there is indeed a cop on the beat. Expect more announcements like this through the midterms as Facebook strives to make it clear that it is working round the clock to keep you, its valuable product users, safe.
Read Full Article
Dead USB Port? Here’s How to Diagnose and Fix It

Ever connected a USB drive or other device into your computer, only to find later that it won’t work? There’s a good chance that the USB port has a problem.
But what can you do about it? Here’s how to diagnose and fix a suspect USB port.
USB Port Not Working? Give a Physical Examination
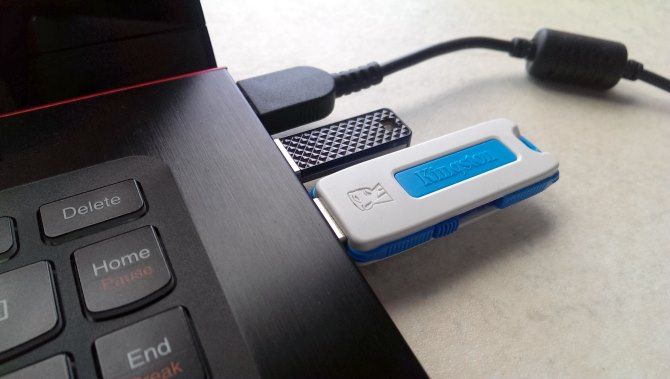
Before proceeding, note that you’ll need to be sure that it is the port that is faulty, rather than the device you’re connecting.
To establish which is the problem, connect the device to another USB port. If it works, then the problem is the first port; if the device remains undetected, then you have a faulty device. If you can’t reformat the USB drive, it will need replacing.
If there’s a problem with your USB port, you’ll notice it thanks to either of these things:
- The device fails to be detected
- Your operating system displays an error message relating to the device (removing and replacing the device might solve this)
Either way, you should investigate the state of the USB port. Has it been damaged in any way? The safest way to find out is to shut down your PC or laptop.
Next, look at the USB port. Is it clean and dust free? If you’re using a desktop, or the USB port is at the back of a PC tower, there’s a chance that dirt, dust, and general detritus might have become embedded in the port.
Dust will reduce airflow, causing your system to overheat. It is particularly damaging to laptops, where overheating can reduce performance in seconds. Clean out the drive with a can of compressed air. A vacuum cleaner might also prove handy here.
Finally, grab a USB cable (or flash drive, whatever) and gently wiggle it around. If the drive is moving and feels loose—typically this will be up and down—then you have a problem.
Fix Broken USB Hardware
We’ll look at some software fixes in a moment, but first, what if the USB port is loose?
The ports are soldered to a board within your computer. This may be the motherboard, but is typically a secondary printed circuit board (PCB). With regular use, ports can become movable, at times completely unattached.
Often, this is down to the shape of the connected USB devices. While small Wi-Fi, Bluetooth, and even new USB flash memory are unlikely to put any significant strain on the port’s physical connection, older “stick” memory drives are a different story. So are USB cables. Their size and associated weight act as a sort of lever, contributing to USB ports working loose.
Replacing a USB port isn’t easy. On a desktop computer, you may be able to find a replacement board that can be slotted in without too much effort. However, if you’re using a laptop, it’s going to take a soldering iron. Here’s an example of what you might need to go through to re-solder the USB connector back into your laptop:
Of course, you could take this to an expert for repair, but there will be associated costs with this. If you want to do it yourself, make sure you know how to solder. If you’re not sure, check out the software fixes first.
Can Restarting a Computer Fix Broken USB Ports?
“Have you tried turning it off and back on again?”
This old tech support standby is well-known for a reason: it works!
With your unrecognized USB device correctly inserted into the suspect USB port, restart your computer. Once the operating system has rebooted, it should detect the USB device. If not, it’s worth looking at the device in the Windows device manager.
Check Device Manager on Windows 10
Begin by right-clicking on the Start menu and selecting Device Manager.
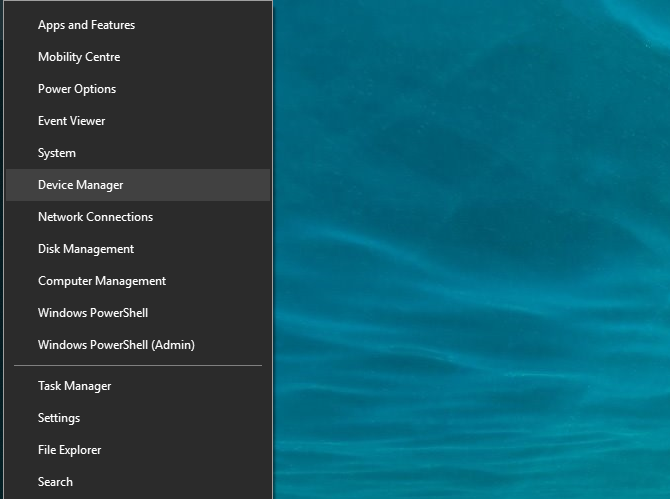
The Device Manager lists the devices attached to your computer, grouped into categories. It’s arranged alphabetically, so you should find Universal Serial Bus controllers towards the end of the list.
Expand the list, and look for the USB Host Controller. The device you’re trying to find may have a longer title, but it will feature those three words.
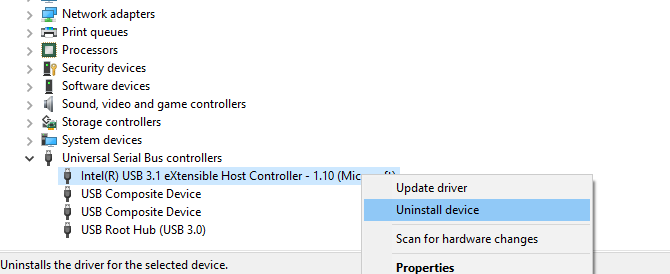
No USB Host Controller? This may explain why your USB device doesn’t work. To fix this, click on the Scan for hardware changes button on the toolbar. This will commence a check of all connected hardware, and in most cases will detect the USB port and anything connected to it.
If this still hasn’t worked, it’s worth taking the time to reinstall the USB Host Controllers. Right click on the USB Host Controller items in turn, and select Uninstall on each. Wait while they’re uninstalled, then reboot your computer.
As Windows restarts, the USB Host Controllers will be automatically reinstalled. This “refresh” can help to fix problems with the USB port.
Note that if you’re using a USB mouse or one with a USB receiver, it will be disabled while the USB Host Controllers are uninstalled.
Try Disabling the USB Selective Suspend Feature
If power management settings are overriding your USB controller, this will impact the detection of devices. This is particularly relevant if you use a laptop. If you’re keen to keep power usage low, you might have set a low power option on your Windows 10 desktop.
USB Selective Suspend is a power saving setting that cuts power to the USB device, thereby reducing battery use.
The feature usually works well, but at times makes it look as if there is a problem with your USB ports.
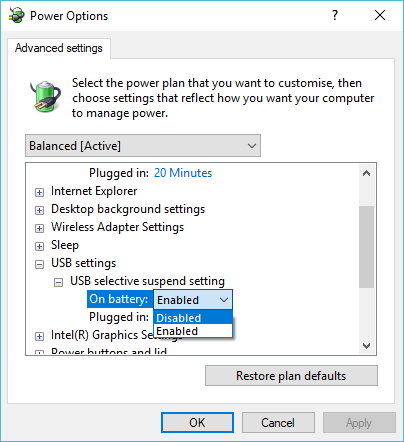
Fix this by opening the Windows Control Panel (it’s still in use… for now). This is best done by clicking Start and typing control panel. Click the corresponding result, then Hardware and Sound > Power Options. Here, click Change plan settings, then Change advanced power settings.
Here, find USB Settings and expand this to find USB selecting suspend setting. Change the drop-down menu to Disabled, then click Apply and OK to confirm. Reboot your PC to ensure this change is applied.
You’ve Fixed Your Broken USB Port!
As you can see, you have several options for repairing an unresponsive USB port. In most cases, it won’t be dead, and you’ll be able to fix it. Remember, when your USB port is not working, you need to:
- Make a physical check
- If necessary, make a physical repair to the port
- Reboot Windows
- Check the Device Manager, uninstall the USB Host Controller
- Disable USB Selective Suspend power saving option
USB ports aren’t the only potential weak spots on your computer. Looking after your hardware will reduce potential failures, and you can save a lot of money if you know how to test your PC for failing hardware.
Read the full article: Dead USB Port? Here’s How to Diagnose and Fix It
Read Full Article
Facebook breach saw 15M users’ names & contact info accessed, 14M’s bios too
Facebook has now detailed what was potentially stolen in the breach it revealed two weeks ago. 30 million users, not 50 million as it initially estimated, had their access tokens stolen by hackers. Users can check Facebook’s Help Center to find out if their information was accessed, and Facebook will send customized alerts to those impacted detailing what was accessed from their account and what they can do to recover. It’s currently not clear if all the information accessed was necessarily scraped.
15 million of the 30 million users had their name plus phone number and/or email accessed. 14 million had that info plus potentially more biographical info accessed, including “username, gender, locale/language, relationship status, religion, hometown, self-reported current city, birthdate, device types used to access Facebook, education, work, the last 10 places they checked into or were tagged in, website, people or Pages they follow, and the 15 most recent searches”. The remaining 1 million users’ information wasn’t accessed.
Facebook’s other apps including Messenger, Messenger Kids, Instagram, WhatsApp, Workplace, and Pages, as well as its features for payments, third-party apps, advertisers, and developers were not accessed.
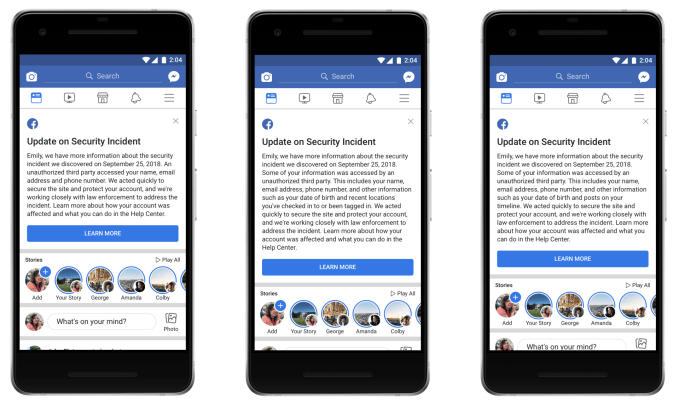
Unlike most breaches, this one appears to have turned out to be less severe then initially expected. Users seem to already be forgetting about the breach after a short hiccup where they had to log back in to Facebook. It’s possible that that could impact Facebook’s user counts slightly in its Q3 earnings report. But unless a truly nefarious use case for the accessed data is revealed, the breach could fade into the noise of non-stop cybersecurity failures across the web, including Google+’s breach that was covered up and has now prompted the Facebook competitor’s shut down.
Read Full Article
Zyl is now a nostalgia-powered photo app
AI-powered photo management app Zyl is going back to the drawing board with a streamlined, more efficient redesign. The app is now focused on one thing only — resurfacing your old memories.
Taking photos on a smartphone is now a daily habit. But what about looking back at photos you took one year, three years or even eight years ago? It can pile up quite quickly. Zyl thinks there’s emotional value in those long-forgotten photos.
Before this update, Zyl helped you delete duplicates, create smart photo albums based on multiple criteria and collaborate on photo albums. In other words, it was a utility app.
But when the company started talking with some of their users, they realized that one feature stood out and had more value than the rest.
Applying those AI-powered models to your photo library is a great way to find interesting photos. But nobody was really looking at them.
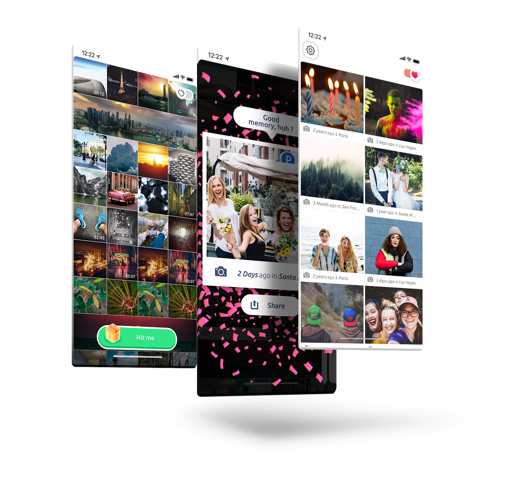
When you open the app, you get a view of your camera roll with your last photos at the bottom. There’s also a big green button at the bottom. When you tap on it, Zyl creates a satisfying animation and unveils an important photo.
If you took multiple photos to capture this moment, the app stitches together those photos and create a GIF. You can then share this Zyl with a friend or family member.
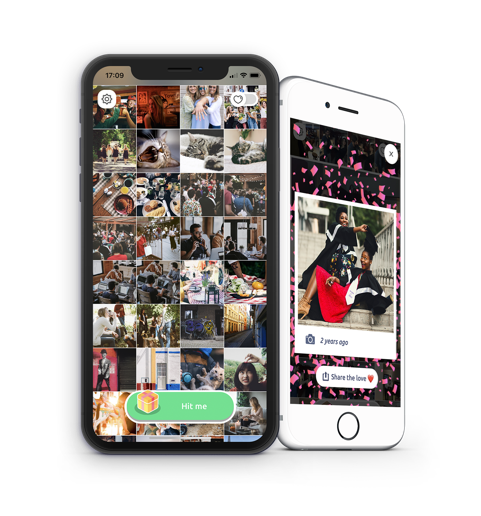
But the true magic happens if you try to get another Zyl. You have to wait 24 hours to unlock another photo. The next day, the app sends you a notification when your photo is ready. You can always open the app again and look at your past Zyls in a new tab with your most important photos.
Unlike Timehop or Facebook’s “On This Day” feature, Zyl doesn’t look at your social media posts and focuses on your camera roll. Zyl isn’t limited to anniversaries either.
Just like before, Zyl respects your privacy and leaves your photos alone. They’re never sent to the company’s server — Zyl uses the same photo database as the native one on your iPhone or Android phone so it doesn’t eat up more storage.
Over time, the app could give you more options by leveraging facial recognition and the intrinsic social graph of your photo library. Maybe you want to see more photos of your brother as his wedding is coming up.
And that notification can be a powerful nudge. I keep opening the app and sharing old photos. Zyl is a good example of the combination of something that you care about combined with an element of surprise.
Read Full Article
Applying Deep Learning to Metastatic Breast Cancer Detection
Posted by Martin Stumpe, Technical Lead and Craig Mermel, Product Manager, Healthcare, Google AI
A pathologist’s microscopic examination of a tumor in patients is considered the gold standard for cancer diagnosis, and has a profound impact on prognosis and treatment decisions. One important but laborious aspect of the pathologic review involves detecting cancer that has spread (metastasized) from the primary site to nearby lymph nodes. Detection of nodal metastasis is relevant for most cancers, and forms one of the foundations of the widely-used TNM cancer staging.
In breast cancer in particular, nodal metastasis influences treatment decisions regarding radiation therapy, chemotherapy, and the potential surgical removal of additional lymph nodes. As such, the accuracy and timeliness of identifying nodal metastases has a significant impact on clinical care. However, studies have shown that about 1 in 4 metastatic lymph node staging classifications would be changed upon second pathologic review, and detection sensitivity of small metastases on individual slides can be as low as 38% when reviewed under time constraints.
Last year, we described our deep learning–based approach to improve diagnostic accuracy (LYmph Node Assistant, or LYNA) to the 2016 ISBI Camelyon Challenge, which provided gigapixel-sized pathology slides of lymph nodes from breast cancer patients for researchers to develop computer algorithms to detect metastatic cancer. While LYNA achieved significantly higher cancer detection rates (Liu et al. 2017) than had been previously reported, an accurate algorithm alone is insufficient to improve pathologists’ workflow or improve outcomes for breast cancer patients. For patient safety, these algorithms must be tested in a variety of settings to understand their strengths and weaknesses. Furthermore, the actual benefits to pathologists using these algorithms had not been previously explored and must be assessed to determine whether or not an algorithm actually improves efficiency or diagnostic accuracy.
In “Artificial Intelligence Based Breast Cancer Nodal Metastasis Detection: Insights into the Black Box for Pathologists” (Liu et al. 2018), published in the Archives of Pathology and Laboratory Medicine and “Impact of Deep Learning Assistance on the Histopathologic Review of Lymph Nodes for Metastatic Breast Cancer” (Steiner, MacDonald, Liu et al. 2018) published in The American Journal of Surgical Pathology, we present a proof-of-concept pathologist assistance tool based on LYNA, and investigate these factors.
In the first paper, we applied our algorithm to de-identified pathology slides from both the Camelyon Challenge and an independent dataset provided by our co-authors at the Naval Medical Center San Diego. Because this additional dataset consisted of pathology samples from a different lab using different processes, it improved the representation of the diversity of slides and artifacts seen in routine clinical practice. LYNA proved robust to image variability and numerous histological artifacts, and achieved similar performance on both datasets without additional development.
In our second paper, 6 board-certified pathologists completed a simulated diagnostic task in which they reviewed lymph nodes for metastatic breast cancer both with and without the assistance of LYNA. For the often laborious task of detecting small metastases (termed micrometastases), the use of LYNA made the task subjectively “easier” (according to pathologists’ self-reported diagnostic difficulty) and halved average slide review time, requiring about one minute instead of two minutes per slide.
With these studies, we have made progress in demonstrating the robustness of our LYNA algorithm to support one component of breast cancer TNM staging, and assessing its impact in a proof-of-concept diagnostic setting. While encouraging, the bench-to-bedside journey to help doctors and patients with these types of technologies is a long one. These studies have important limitations, such as limited dataset sizes and a simulated diagnostic workflow which examined only a single lymph node slide for every patient instead of the multiple slides that are common for a complete clinical case. Further work will be needed to assess the impact of LYNA on real clinical workflows and patient outcomes. However, we remain optimistic that carefully validated deep learning technologies and well-designed clinical tools can help improve both the accuracy and availability of pathologic diagnosis around the world.
Zyl is now a nostalgia-powered photo app
AI-powered photo management app Zyl is going back to the drawing board with a streamlined, more efficient redesign. The app is now focused on one thing only — resurfacing your old memories.
Taking photos on a smartphone is now a daily habit. But what about looking back at photos you took one year, three years or even eight years ago? It can pile up quite quickly. Zyl thinks there’s emotional value in those long-forgotten photos.
Before this update, Zyl helped you delete duplicates, create smart photo albums based on multiple criteria and collaborate on photo albums. In other words, it was a utility app.
But when the company started talking with some of their users, they realized that one feature stood out and had more value than the rest.
Applying those AI-powered models to your photo library is a great way to find interesting photos. But nobody was really looking at them.
When you open the app, you get a view of your camera roll with your last photos at the bottom. There’s also a big green button at the bottom. When you tap on it, Zyl creates a satisfying animation and unveils an important photo.
If you took multiple photos to capture this moment, the app stitches together those photos and create a GIF. You can then share this Zyl with a friend or family member.

But the true magic happens if you try to get another Zyl. You have to wait 24 hours to unlock another photo. The next day, the app sends you a notification when your photo is ready. You can always open the app again and look at your past Zyls in a new tab with your most important photos.
Unlike Timehop or Facebook’s “On This Day” feature, Zyl doesn’t look at your social media posts and focuses on your camera roll. Zyl isn’t limited to anniversaries either.
Just like before, Zyl respects your privacy and leaves your photos alone. They’re never sent to the company’s server — Zyl uses the same photo database as the native one on your iPhone or Android phone so it doesn’t eat up more storage.
Over time, the app could give you more options by leveraging facial recognition and the intrinsic social graph of your photo library. Maybe you want to see more photos of your brother as his wedding is coming up.
And that notification can be a powerful nudge. I keep opening the app and sharing old photos. Zyl is a good example of the combination of something that you care about combined with an element of surprise.

Read Full Article
Facebook’s gaming hub Fb.gg launches into beta on Android
This summer, Facebook launched Fb.gg, its online gaming hub and Twitch competitor, designed to attract game streamers and their fans to watch videos on Facebook instead of on rival sites. The destination shows videos based on which games and streaming celebrities users follow, plus Liked Pages and Groups, and other featured suggestions of what to watch. Now, Fb.gg is expanding to mobile with its launch on Android.
The new app, first spotted by Sensor Tower, arrived just a few days ago and is currently in beta testing.
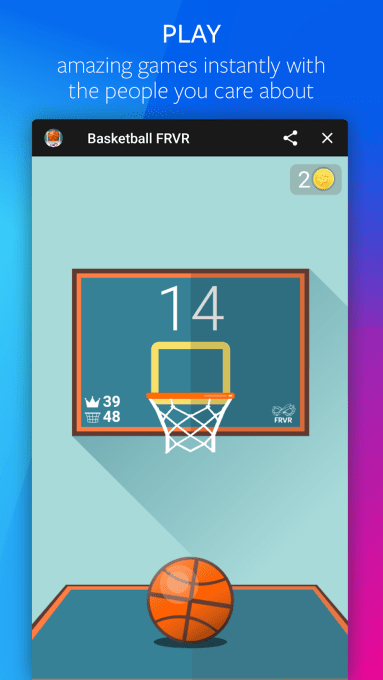
According to its description on Google Play, the app allows gamers and fans to discover a “universe of gaming content,” connect with creators and join communities, and play instant games like Everwing, Words with Friends, Basketball FRVR, and others.
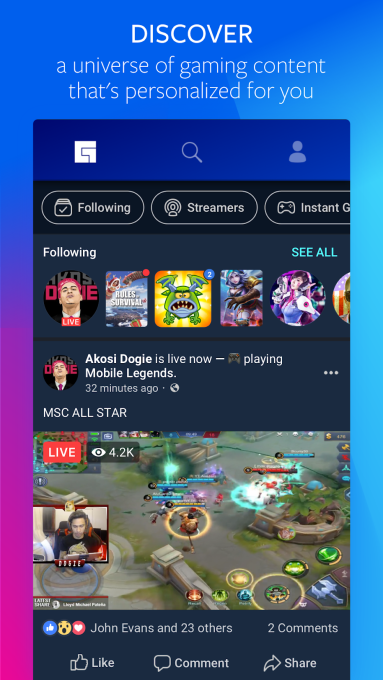
From the screenshots, you can see how the Fb.gg app lets users tap navigation buttons at the top to find streamers to watch, or to view those streamers they’re already following, among other things. They can also participate in live conversations during gameplay with other viewers. Here, they can react to the stream using Facebook’s standard emoticon set of likes, hearts, haha’s and others.
Another section lets gamers jump into simple and popular mobile games. These titles are among those who were early participants in Facebook’s other gaming efforts in the past, like Instant Games on Facebook and Messenger.

Facebook has been trying to woo the gaming community for some time, to better compete against Amazon’s Twitch and Google’s YouTube. There’s a large and growing market for game streaming and viewing, with young viewers tuning in an average of 3+ hours a week to watch, as TechCrunch previously noted.
Facebook’s efforts to directly challenge Twitch and others kicked off in earnest this year, with the launch of its own version of Twitch’s Partner Program. Facebook’s gaming creator pilot program, as it’s called, allows viewers to tip their favorite gamers. And with the arrival of Fb.gg in June, the virtual currency involved in those tips was being referred to as Facebook Stars, with each star equating to $0.01.
Facebook said it takes a cut of fans’ purchases of stars, ranging from 5%-30%, depending on what size pack is bought.
Facebook also recently began testing a monthly subscription option with game streamers, similar to what’s offered by YouTube and Twitch.
Of course, to truly compete with Twitch and YouTube, Facebook needs to go mobile as well – especially since the upcoming Messenger redesign will hide away extraneous features, like mobile gaming. That’s where Fb.gg’s app comes in.
The Android version of the Fb.gg beta app launched on October 9, and already has over 10,000 installs, according to Google Play.
We’ve reached out to Facebook for comment on the launch.
Read Full Article
10 Nightmarish Netflix Movies Full of Jump Scares

Jump scares are those moments in films where everything has gone quiet and dark, and a sudden sound or movement jolts you out of your seat. Jump scares can provide cheap thrills or genuine frights, but no matter how they’re used, they’re always entertaining.
Some horror filmmakers abhor the tactic and instead focus on building atmospheric tension. But most are happy to embrace the technique, giving the audience the uncontrollable shriek they are waiting for.
There are some great horror films on Netflix, but this list is all about those nightmarish movies full of jump scares designed to keep you at the edge of your seat…
1. The Babadook
Children often ask us about the monster under the bed or tell tales about the man in the cupboard. As adults, we do our best to convince them it’s just their imagination. But what if the vivid dreams of a child about a mysterious dark force are true? What would you do if the Babadook, a sinister shadow-like creature, is really coming after you?
That’s the question single mom Amelia has to face. Should she believe her son Samuel and his violent dreams, or should she remain rational?
This is likely to make our list of cult favorites on Netflix in the future. The Babadook had a lukewarm reception when it first released in Australia, but it has since garnered critical acclaim and a strong following among horror buffs.
2. V/H/S/2
The “found footage” genre is a favorite in horror movies, popularized by the likes of The Blair Witch Project. If that’s what you’re in the mood for, V/H/S/2 might be perfect for you.
The film attempts something unique. It has seven different directors shooting seven short segments, all of which tie together to make one narrative. This includes some big names, like the director of The Raid, the writer of Grindhouse, and so on. Subsequently, V/H/S/2 struggles to build an atmosphere of terror. But it delivers jump scares in spades.
3. The Conjuring
The Conjuring is already being touted as a classic horror flick, even though it wasn’t released that long ago. Director James Wan delivers the perfect treatment on one of the oldest storylines in horror movies: a family movies into a new farmhouse in the middle of nowhere, and creepy things start to happen. As usual, people who know about the supernatural (paranormal investigators, in this case) come to their rescue.
While it’s not a typical “jump scare” movie, Wan uses the classic trick to good effect throughout the film. There are a dozen such moments, according to Where’s The Jump, but I’m pretty sure you’ll be frightened more often than that. It’s what makes this one of the best scary movies on Netflix.
4. The Lazarus Effect
After making a documentary like Jiro Dreams of Sushi, you wouldn’t expect director David Gelb to dive into horror. But he is full of surprises in The Lazarus Effect, which is as creepy as they come.
Olivia Wilde and Mark Duplass star as medical researchers who have figured out how to resurrect dead animals. But a terrible accident claims Wilde’s life, and in his grief, Duplass decides to bring her back to life. It’s a success. Only the being that has come back to life seems to be losing Wilde’s soul and possessed by something much, much darker.
5. Creep
Sometimes, the scariest thing in the world isn’t a demon or a monster or a ghost. It’s a human. A man who anyone would think is normal if you saw him walking down the road. Mark Duplass and Patrick Brice write and star in Creep, which lives up to its name.
Josef is dying of a terminal illness and wants to record messages for his soon-to-be-born son. He puts out an ad on Craigslist to find a videographer. A guy named Aaron shows up. What follows is a slow unravelling of Josef’s life, that gets creepier and creepier, while Aaron continues to shoot. The jump-scare dial is turned up to 11 in this one.
6. Friend Request
Laura is a typical popular college student. She gets tons of friend requests on Facebook, and she’s happy to add everyone. But it’s one acceptance too many, and she unfriends Marina for being creepy. Laura didn’t expect how creepy things would get, as Marina commits suicide, and mysterious videos start appearing on Laura’s profile. Things get worse when Laura’s friends start dying.
The plot of Friend Request is quite silly, but it’s the perfect sort of movie to watch with your friends for a jump-scare delight. It was never going to win any Oscars, but if you can’t have fun with something like this, you might want to go for one of the other best horror films for geeks where technology takes an evil twist.
7. Viral
Emma and her little sister Stacey’s day starts off with unexpected freedom when their town is quarantined for an infection, with their parents outside the border. But the revelry soon turns sour when the virus starts affecting their friends and family. Emma has to do everything she can to keep Stacey safe, and that means everything.
Everything about Viral is something you’ve seen before if you’re a fan of horror movies. But that’s part of the fun. The jump scares are telegraphed way in advance, but if you love your jump scares, give in to the moment and let them hit you.
8. Hush
Do you want to stay awake all night? Watch Hush with the lights out and the curtains open. You’ll wait up all night with a baseball bat, lest a man wearing a freaky mask shows up at your window.
When deaf writer Maddie sees one such man, she needs to figure out how to survive. She’s in the middle of nowhere, surrounded by woods, and this psychopath serial killer has made his intentions quite clear. Hush is a creepy experience of the hunter-prey game, where the prey is disadvantaged with a hearing disability that you, as a viewer, start empathizing with as you watch.
Count the number of times you’ll be jolted out of your seat. If it’s under 10, you’re a braver soul than most.
9. Demonic
It’s well known that you shouldn’t go to the Livingston House. Evil resides there. But that doesn’t stop six idiots from performing a seance in the place. In the course of events that followed, three died, one survived, and two went missing. It’s now to up Detective Mark Lewis and psychologist Dr. Elizabeth Klein to figure out what happened, rescue the missing people, and ensure that the house does not claim any more lives.
Demonic tries to go beyond the usual plotline by including a few twists and turns, including a surprise ending. It won’t work for everyone, but you get plenty of jump scares along the way to keep you entertained.
10. Last Shift
A new police officer, Jessica Loren, has to stay alone at the station while waiting for a team to collect some bio-hazardous material. The station is the infamous location where a cult leader and his followers killed themselves, and now haunt the premises. It’s about to be the worst shift of Loren’s life.
Last Shift gets a lot of love from jump scare movie fans, and for good reason. The plot, dialog, and acting isn’t much to write about. But the jump scares are handled as perfectly as you’d want: a slow build-up, creepy silence, followed by a genuine fright. Even when you know the jump scare is coming, you’ll still get that jolt.
It’s Not Just Scary Movies Any More
Jump scare movies are made for Halloween. If you want a spooky night on All Hallow’s Eve, grab a tub of popcorn, switch off the lights, and start streaming one of these films on Netflix.
However, a movie only gives you an hour or two of frights. Those who are ready to stay up all night need more than that. Which is where the scariest TV shows to binge-watch prove their worth.
Read the full article: 10 Nightmarish Netflix Movies Full of Jump Scares
Read Full Article
The Best New Windows 10 Features in the October 2018 Update

Windows 10 releases a major update roughly twice a year, usually in April and October. The latest release brings us the plainly titled Windows 10 October 2018 Update. As expected, it brings improvements large and small.
Let’s take a look at some of the new features and updates in the latest version of Windows. We’ve kept an archive of notable features from previous updates, in case you’re interested. Feel free to jump ahead to any section.
Jump to an update:
The October 2018 Update
You’ll eventually get the October 2018 Update through Windows Update, just like any other. Microsoft deploys major feature updates in batches, so you might not get it right away. When it’s time, you’ll see a prompt letting you know there’s a big update pending.
If you want to expedite the process, head to Settings > Update & Security > Windows Update and click Check for updates. Doing so lets Windows know you want the latest update now, so it should start downloading. If this doesn’t work, head to the Download Windows 10 page and click Update now to prompt the download.
Just make sure you take precautions before updating Windows 10.
Your Phone App
After its failed Windows Phone platform, Microsoft has embraced Android (and iOS to a lesser extent) with apps and cross-platform compatibility with Windows. The Your Phone app in Windows 10 takes this even further.
It allows you to text and access photos on your Android phone (7.0 or later) right from your PC. You can even drag a photo from your phone right onto your PC to open it in an app. iPhone users don’t get all that functionality, but they can still send webpages from their phone to computer.
While you have many third-party options for connecting Android and Windows, seeing more built-in tools is always welcome.
Improved Screenshot Tool
The basic Snipping Tool handles simple screenshot needs, but it’s lacking any power user features. In the October Update, you can check out the new Snip & Sketch tool as a replacement.
Press Win + Shift + S to bring up the window and capture a screenshot. At the top, you can switch between the rectangle and freeform capture modes, or grab a full-screen shot. Once you capture an area, it’s available immediately on your clipboard.
Click the resulting notification, and you can make basic edits to your screenshots like drawing and cropping. From there, you can save it, copy to your clipboard, or open it in another app for further edits.
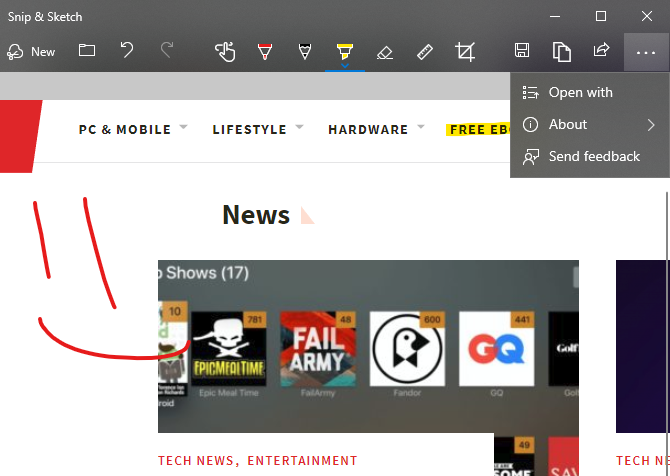
This won’t replace the best Windows screenshot apps, but it gets the job done in a pinch.
File Explorer Dark Theme
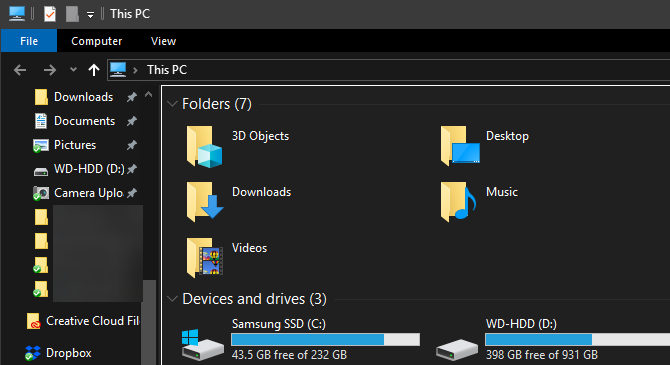
Windows 10 has included a dark theme for some time, but it was previously limited to Store apps. Now, enabling the Dark mode at Settings > Personalization > Colors also gives your File Explorer a dark makeover.
It’s not quite as amazing as macOS Mojave’s dark mode, but it’s a welcome option if you like dark themes or often use your PC at night. Enabling this also makes your right-click menu in File Explorer and desktop dark.
Improved HDR Support
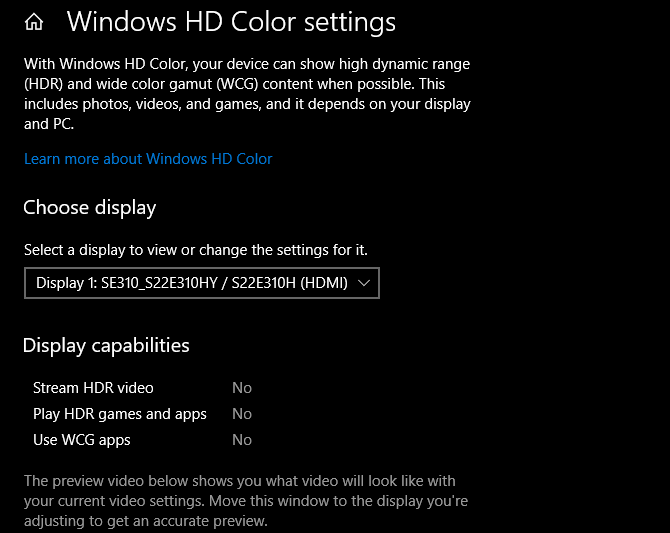
As 4K monitors with more powerful display options become mainstream, Windows 10 is making it easier to enable HDR if you have compatible hardware. Windows 10 has supported HDR in the past, but it wasn’t always convenient to set up.
Now, you can head to Settings > System > Display and click Windows HD Color settings to configure HDR. You’ll see whether your connected displays support HDR features and can adjust them if so.
Start Menu Search Improvements
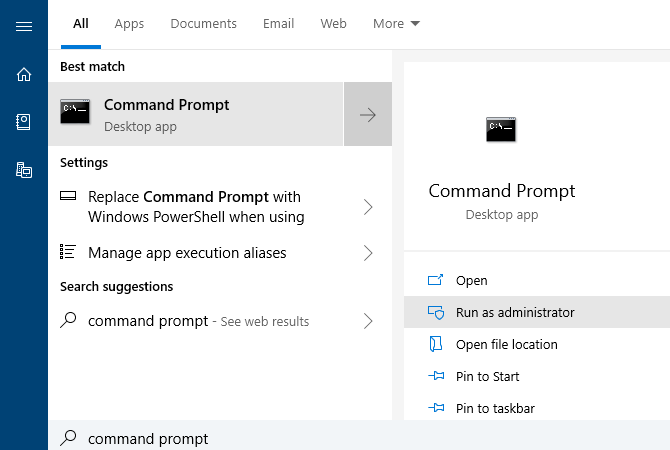
The search function on the Start Menu has always been a quick way to find apps, files, settings, and more on your PC. In the latest update, it’s even easier to get to the content you want quickly.
When you search for something, the menu will display a preview panel that illustrates the best results for your search. This might be Bing results for a web search, options like opening as administrator if you search for software, or previews of documents.
Clipboard Improvements and History
A new shortcut for the clipboard in Windows 10 lets you copy and paste across devices without any extra apps. Just press Win + V and you’ll see the new clipboard window.
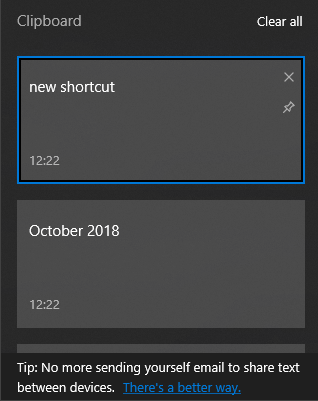
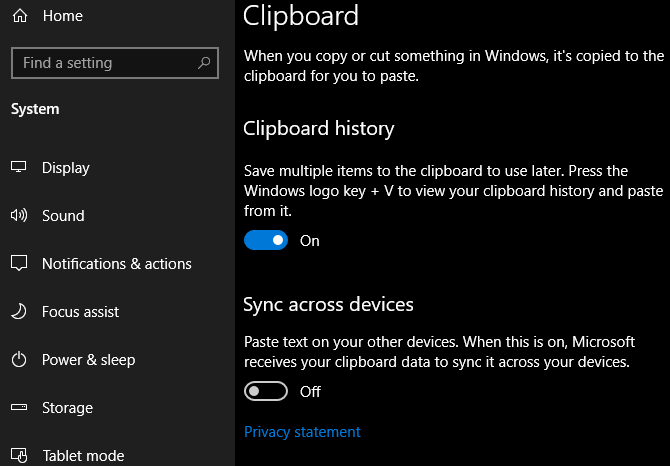
This gives you a native clipboard manager, letting you can paste something you copied even if it’s not the most recent item. You can also pin clips you use often for easy access. Plus, Windows links your clipboard across any device you use running the October 2018 Update or later.
To configure this, take a look at Settings > System > Clipboard.
Power Usage in Task Manager
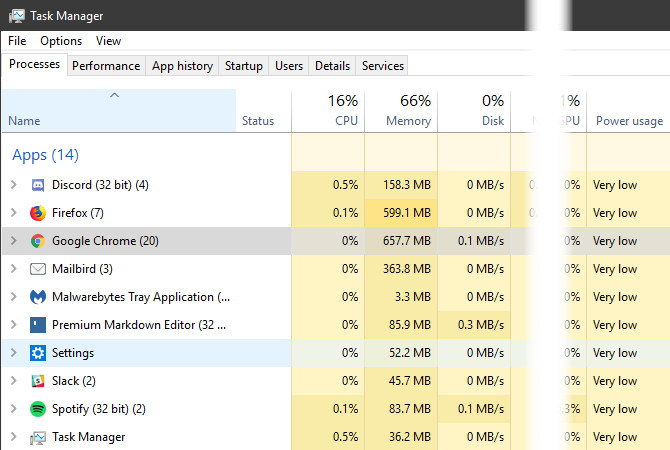
If you want to get more battery life out of your Windows laptop, you might wonder how much power apps pull. Now in the Task Manager (Ctrl + Shift + Esc), you can see a Power usage entry on the Processes tab.
This, along with the Power usage trend field, lets you know how much energy apps use. Limit how much you use them and you should see improved battery life.
Bluetooth Battery Levels
You can now see the battery life of connected Bluetooth devices (if they’re supported) at Settings > Devices > Bluetooth & other devices.
Override Regional Settings
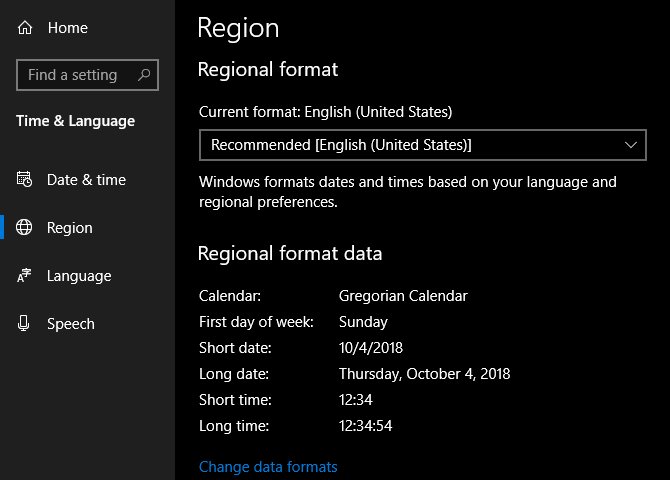
Windows 10 sets some display options, like the date format and first day of the week, based on your region. Now you can override these if you like. Visit Settings > Time & Language > Region and click Change data formats to adjust them.
Make Text Bigger
Windows 10 now allows you to increase the size of text across the OS without scaling. Open Settings > Ease of Access > Display and drag the Make text bigger slider as you wish.
Better Windows Update Automation
Windows Update tries to detect when you’re not using your PC and automatically installs updates during those times. In prior versions, this wasn’t too smart and would sometimes install an update when you simply stepped away for a moment.
Thankfully, the October 2018 Update makes this smarter. Windows will now understand when you’ve stepped away for a short time or longer period better now. This should result in fewer inopportune updates.
Game Bar Improvements
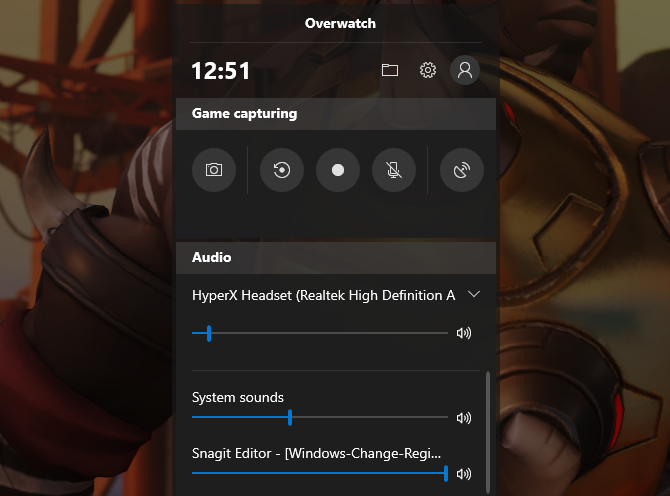
Windows 10’s Game bar is now its own app and comes with some improvements. Now you can adjust audio options right from the bar. Plus, you can see a chart showing game stats like FPS along with CPU and other hardware usage.
Enable the Game bar at Settings > Gaming >Game bar.
The Fall Creators Update
People App
Microsoft is ramping up their social game with the People application. A new addition to the Taskbar, People allows users to contact individuals via email and Skype directly from the Taskbar. To enable, right-click the Taskbar and check the Show People button option.
You can use the People app to share fun content with family and friends or to manage business contacts and projects. Whether it’s a document, PowerPoint, picture, or video, just drag and drop content directly from your PC to a specific contact.
Perhaps the most useful component of the People app is cross-application communication, meaning users will be able to view communication across multiple chats and messages within a single desktop application. While only a few select applications are available for the People app, namely Xbox, Email, and Skype, Microsoft has laid the groundwork for possible Facebook and Twitter integration as well. That makes People a potentially fantastic default application.
Mixed Reality
In the original Fall Creators Update, Microsoft teased 3D editing and 3D smartphone camera modeling. Now, they’ve expanded their 3D program into an entire mixed reality platform for Windows 10.
How? Windows 10’s Microsoft Edge browser was the first to fully support WebVR which allows users to access and interact with virtual reality projects online via the Edge browser. While this may not seem all that impressive, it’s really forward thinking from Microsoft: in some circles, the future of web development exists in 3D space.
Not interested in VR projects? Why not browse Edge on a VR room wall using Microsoft’s Mixed Reality Portal (MRP). MRP allows users to integrate a 3D experience into their desktop using Microsoft’s HoloLens.
Microsoft has also developed an answer to the growing popularity of social media’s AR (augmented reality) integrations, most notably Snapchat’s face filters and 3D World Lens technology. Don’t want to spring for the HoloLens? Enjoy Microsoft’s Mixed Reality Viewer, where all you’ll need is a webcam to enjoy the augmented reality goodness Windows 10 has to offer. Simply click on your Start Menu, type mixed reality, and select the Mixed Reality Portal option to get started.
It’ll be interesting to see where a tech behemoth like Microsoft will take this newfangled form of media.
OneDrive On-Demand
While OneDrive is installed by default on most Windows 10 machines, few users utilize its full potential. That may change with Windows 10’s On-Demand Sync. While most online repositories only allow users to upload and download files using one’s account, One-Drive now allows users to save files locally, upload them to the cloud, and share view links by default.
That means you can upload, delete, edit, and download a variety of files and formats using OneDrive cloud storage. This saves precious local storage space and provides you peace of mind concerning the storage of your most important documents.
Phone Link
In this day and age, cross-device interaction (phone to PC, TV to phone, etc.) is absolutely paramount. Microsoft has decided the close the gap even further, now providing users with the ability to link iOS and Android devices to their Windows 10 machines.
To enable phone linking, type link phone into your Start Menu and click the Link your phone option. Then, enter your phone number in the following window.
Linking your phone currently only allows users to share websites from their smartphone’s Edge browser to your PC via the browser’s share option. Additionally, in case you didn’t know, you can also choose to view phone notifications on your Windows 10 desktop using Cortana’s smartphone application!
Though the phone notification feature was released before the Windows 10 Fall Creators Update, these two quiet features show Microsoft is devoted to closing the gap between mobile and desktop.
Emoji Panel
That’s right, Windows 10 is now finally equipped with its own default emoji keyboard. You can access your emoji keyboard in Windows 10 using the keyboard command Windows key + Period (.) and Windows key + Semicolon (;).
While somewhat unexpected, kudos to Microsoft for giving users the Windows emoji feature they’ve long desired.
The new emoji keyboard isn’t without its failings, though. For now, it only allows users to input one emoji at a time before exiting by default. Let’s hope Microsoft recognizes that and fixes this issue in the updates to come.
Microsoft Edge Improvements
The Windows Fall Creators Update packs a lot into Microsoft Edge’s feature list. For one, pinning websites is as easy as heading to the website and selecting the Pin this page to the Taskbar option in your Edge browser settings panel. You can also pin websites to your Start Menu using the same process.
Other aspects of Edge not previously available before include: PDF text-to-speech, enhanced PDF editing, managing permissions, bookmark importing, editing favorite (bookmark) URLs for easier lookup, and browsing on your phone and continuing on with your PC.
While Edge’s new features aren’t exactly shock-and-awe, they do show Microsoft is still committed to creating a serious contender for the browser market.
If Microsoft keeps this up, Edge may even become your new browser of choice! That is, if it’s not already.
Story Remix
Microsoft is venturing into the world of movie making (yet again) with their latest experiment, Story Remix. Story Remix is a feature in the Windows 10 Photos application which lets users create, edit, and score short films using pictures and video clips of whatever they desire.
Like most other features in the Fall Creators Update, this application is for both personal and professional use. Run a dog grooming business and want to send customers a custom-made video of their dog’s grooming process? All you have to do is create a folder of images and videos using your Photos application and Windows will create a fantastic short film in seconds with minor interaction. Best of all, no video editing knowledge is required!
This may sound like your run of the mill automatic video creating service, but it’s not. Microsoft has taken steps in integrating AI and deep learning within Story Remix, allowing users to do things like featuring select people from an aggregate selection of videos automatically. You can also add text or drawings to these videos for an added, personal flair.
Not only can you add flat text to a video, you can also integrate 3D models into videos as well. The most impressive thing about Story Remix is its integration of 3D objects and animations into the captured video. Story Remix allows users to integrate 3D models (most of which have been released by Microsoft, themselves) seamlessly into your video, allowing users to edit and create quasi-CGI short movies without any 3D modeling or video editing experience.
While not the most blatant feature of the Fall Creators Update, it’s marvelous to note Microsoft isn’t simply giving users 3D capabilities. They’re allowing users the ability to play with and learn about 3D modeling and AG integrations using software and models they provide.
GPU Stats
If you’re an overclock aficionado, you know how vital vitals of your PC components are. Microsoft understands this and has taken a small step in appeasing tech geeks by having your beloved Task Manager provide real-time GPU stats for users.
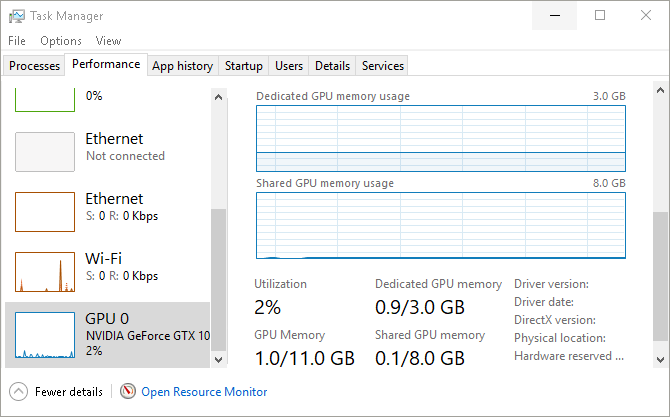
Keep in mind, you won’t be able to modify functions like fan speed via your Task Manager. You can, however, view your GPU’s utilization percentage, memory stats, driver versions, and more.
A considerate move by Microsoft on behalf of PC gamers and hardware tinkerers everywhere.
Fluent Design
Users have long awaited Windows 10 UI overhaul. Slowly but surely, the wait is coming to an end. Say hello to the humble beginnings of Microsoft’s Fluent Design System, a sleek and subtle UI design project hinted at in the recent Fall Creators Update.
Fluent Design promises to offer users a different type of UI experience, bringing with it such features as subtly blurred window transparency (officially named “Acrylic material design”), interactive window sections, light-based color schemes, and an overall sleeker program/controller relationship.
Scale, Depth, Light are the ways in which Microsoft chooses to brand their new design. Judging from what little has been released, it seems Microsoft is moving on to bigger, better, smoother, and more integrated UI design.
As it stands, you can already view a few aspects of the UI in the latest version of Windows with small applications like the Windows 10 Calculator and the newly released People app.
Keep an eye out for further bits and pieces of Fluent Design being released for Windows 10 in the near future. If you can’t wait, consider signing up for the Windows Insider Preview program.
Linux Integration
In another big move for Microsoft, the Windows 10 Fall Creators Update now allows users to install Linux distributions directly from the Microsoft Store and onto their Windows machines.
Keep in mind, this feature doesn’t equal a dual boot. You won’t be able to use the mouse and keyboard version of Ubuntu, for example. Instead, the Fall Creators Update allows users to run Bash commands using different Linux distros directly within the Windows 10 environment.
To install Ubuntu on Windows, click on your Start Menu and type windows features. Click on the Turn Windows features on or off option. In the following window, locate and check the Windows Subsystem for Linux option.
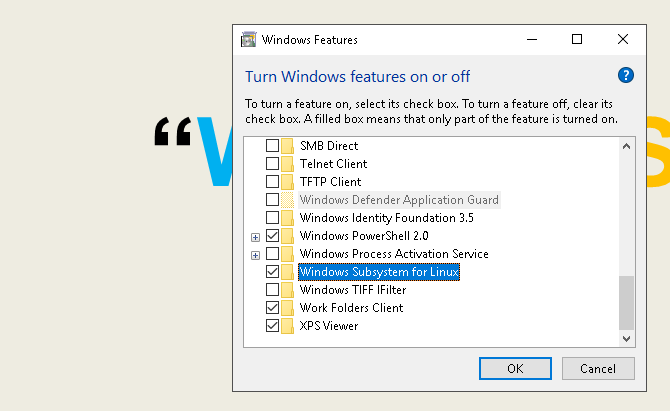
Click OK. You’ll be prompted to restart your PC. Once restarted, head to your Microsoft Store by clicking your Start Menu, typing store, and selecting the Microsoft Store option. Search for linux within this window. You’ll see a prompt mentioning Linux distributions. Click Get the apps and proceed to install your favorite.
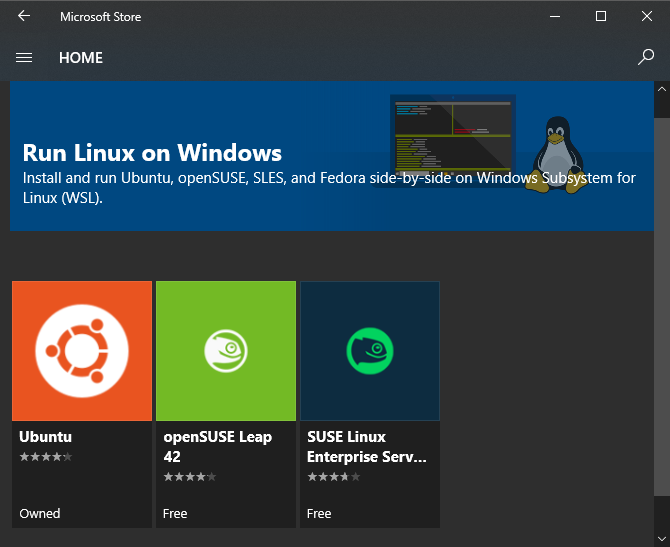
That’s it, you’re officially running a fully fledged Linux distribution right alongside Windows 10!
It’s Only the Beginning for Windows 10
Microsoft is making strides like never before when it comes to improvements to user interface, developer features, and general maintenance. We’ll update this article any time a new major update is released.
Windows 10 is the final version number, of course, so it’s all or nothing. But this is just the beginning of what Microsoft has in store for Windows 10!
Read the full article: The Best New Windows 10 Features in the October 2018 Update
Read Full Article
With TodayTix Presents, TodayTix is starting to produce its own live shows
Mobile ticketing app TodayTix is getting into the show production business with the launch of a new program called TodayTix Presents.
While TodayTix is sometimes described as the mobile version of the TKTS booth where you can pick up last-minute tickets to Broadway shows, CEO Brian Fenty said that he sees the service’s real competitors as “anything you can do with your night, outside of work — that’s Netflix and ‘Orange is the New Black,’ that’s post-season baseball, that’s a pitcher of margarita.”
At the same time, Fenty said after driving a total of $250 million in sales and to 4.6 million customers, the company has built a rich trove of data about people’s cultural interests. So with that in mind, it made sense for TodayTix to follow Netflix’s footsteps with “the same ethos that they had, to develop and to nurture programming and content that’s intimately connected to what users and what customers want to see.”
This doesn’t mean TodayTix is going to be producing spectacular Broadway productions. Instead, Fenty pointed to the TodayTix Live concert in Brooklyn last month as the first of these shows.
That concert, which celebrated TodayTix’s five-year anniversary and was hosted by Darren Criss, featured (mostly) Broadway stars like Matthew Morrison and Ariana Debose, who (mostly) performed pop standards.
Fenty said future TodayTix Live events won’t follow the exact same format, but the idea is to continue featuring popular artists in intimate settings — he compared it to “MTV Unplugged.” In fact, he suggested that with 300 attendees, last month’s concert was about as big as these shows will get.
And because these are small, one-off events, Fenty said they’re noc competitive with the big shows that TodayTix works with.
“[Our partners] are doing longform, high-budget, highly developed shows that take years to develop and are fully baked,” he said. “Really what TodayTix Presents is supposed to be is a work-in-progress, an intimate way to see an artist.”
TodayTix already has plans for another New York City event in November, and then two in December. Fenty said “the cadence should roughly be a few events per quarter to start,” and that there will be shows across the service’s 13 markets.
Read Full Article
Half of all devices now run iOS 12
Half of all devices are now running the latest version of the iOS mobile operating system, iOS 12, according to figures shared by Apple. On devices introduced in the last four years, that number is as high as 53 percent. And iOS 12 adoption is taking place more quickly than the last release did, Apple also notes.
As we previously reported, it took until November 6, 2017 for iOS 11 reach 52 percent of all current iPhones and iPads. iOS 12 achieved that milestone in mid-October.
Apple’s new figures, available here on its Apple Developer website, also confirm a third-party report released last week, which claimed to show a similar trend. According to Mixpanel’s findings, then roughly 47.6 percent of all iOS devices were running iOS 12, while 45.6 percent were running iOS 11. The remaining devices were running an older version, it had said.
Apple’s data backs this up, too, showing iOS 12 at 53 percent on all devices introduced since September 2014, followed by iOS 11 at 40 percent, then the remaining 7 percent running an earlier version of iOS.
In terms of all iOS devices, Apple’s figures are: iOS 12 at 50 percent, iOS 11 at 39 percent, with 11 percent running an earlier iOS version.
The adoption rates related to the new version of Android look far different, by comparison. The latest release, Android Oreo (8.0 and 8.1), runs on just 19.2 percent of devices. Nougat, Marshmallow, Lollipop, and KitKat still have large install bases as well, at 20.3 percent, 21.6 percent, 18.3 percent, and 7.8 percent, respectively.
But Apple has an advantage when it comes to distributing its mobile OS. While Google pushes out updates to its own supported Pixel, Nexus and Android One devices, Android updates, for the most part, are handled by OEMs and carriers.
The new data on iOS 12 adoption rates follow another third-party report, this one from CIRP, which claims Apple is catching up to Android loyalty rates in Q3 and is seeing retention rates that are at an all-time high. CIRP’s reporting is based on survey data, however, not direct measurements like Mixpanel and Apple’s figures are.
Read Full Article
How to Use a VPN With Your Apple TV
You can’t install a VPN natively on your Apple TV, but there are workarounds you can use to enjoy the same functionality. Apple neglected to put VPN functionality in tvOS, the modified version of iOS designed for the big screen.
This is probably down to the fact that many use VPN connections to circumvent the region locks imposed by so many of the content providers that conduct business on the platform. Services like Netflix, free to air catch-up services, and live TV streaming apps abound.
VPNs and DNS Tunnels on Apple TV
There are two methods of using a VPN to access region-locked content, and a third less-reliable method that uses DNS tunneling. Neither is guaranteed to work with every service you try, so your mileage may vary. But if you’re already paying for a VPN, you’ve got nothing to lose by trying.
Here we’ll look at the following methods:
- Using a router to connect your network directly to a VPN, then accessing services using your Apple TV as normal.
- Configuring a virtual router to connect your Apple TV to a computer that’s already configured with VPN access.
- Using DNS tunneling to make your Apple TV appear as if it’s in the same country your content is locked to.
Method 1: Using a VPN Router

In order to connect your router to a VPN, you’ll need a router or router firmware that supports this ability. If your router was supplied by your Internet Service Provider (ISP), there’s a good chance it won’t include this feature. ISPs tend to provide cheap hardware that does the bare minimum required of the service.
Some routers may lack this feature, but by installing custom firmware this feature can be added. This is a bit risky since you’re removing the manufacturer’s default firmware and replacing it with third party code, so be prepared just in case something goes wrong.
One of the best examples of third party router hardware is DD-WRT. This open source Linux-powered router firmware replacement is compatible with a wide range of network hardware. Check whether your router is compatible on the DD-WRT supported hardware list.
OpenWrt is another open source firmware replacement, also based on Linux, with a modular package-based approach. It allows you to pick the packages you want, rather than providing features you don’t necessarily need.
If you’re using ExpressVPN, you can use ExpressVPN firmware on your router to make connecting to various VPN connections even easier. If you’ve taken the plunge and upgraded to a modern mesh router system, you likely already have VPN client compatibility (and can administer it using your smartphone).
To find out if your router is compatible, check the manual, or login to your router’s control panel and hunt for the “VPN client” feature.
Connecting Your Router to Your VPN
There’s no single method for connecting your router to your chosen VPN. First you need to head to your router’s control panel, the address of which is usually listed on the side of the device. Common addresses include 192.168.0.1 and 10.0.0.1.
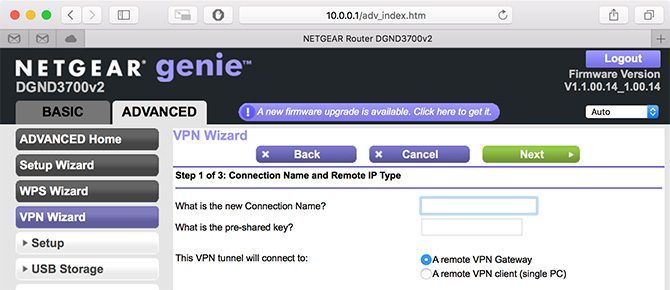
Add a new connection for your chosen server. You’ll need to get this information from your VPN provider, and add a new connection for each server you wish to use. Make sure you use a good description so you know where each server is located.
Activate that connection to route all of your network traffic to that server. Every device on your network—including your Apple TV—will now be routed through your chosen VPN connection. You can disable this connection (or switch to another server) whenever you need to using your router’s control panel.
A Good Solution, But Not Perfect
The biggest problem with this solution is that it’s an all-or-nothing approach. Other members of your household can’t watch local content on catch-up TV while you’re trying to stream the contents of another country’s Netflix catalog.
This also slows down your entire network, so playing multiplayer games on your PlayStation 4 while watching international catch-up TV services will result in a dreary gaming experience. You will have to log in to your router and fiddle with the settings each time you want to disable or change your VPN settings.
On the plus side, from a security standpoint the entirety of your network is protected. Add a local server for regular use and you won’t notice a huge drop in speed, nor will you need to set up VPN access on every device in your household.
Method 2: Using a Virtual VPN Router
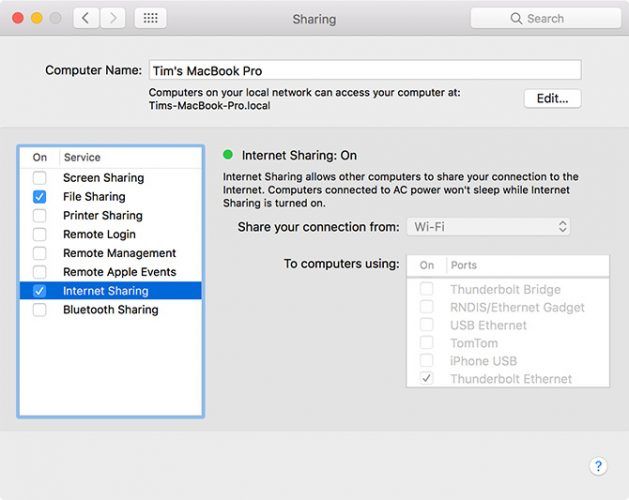
This method is very similar to the last, except instead of using a router connected to a VPN, you’re routing your Apple TV (and any other connected devices) through another device that’s already connected to a VPN.
This means you can route only the devices you want through your VPN of choice, without affecting the whole network. Other members of your household can still stream local live TV services in another room, while you’re watching international content through your Apple TV.
Sharing Your Computer’s VPN Connection
This is pretty easy to do, whether you’re using a Mac or Windows computer. You can also achieve results using Linux (check our our guide to using a VPN on Linux), but sharing your connection will require a little more tinkering and work depending on which distro you are using.
Both macOS and Windows 10 include support for connecting to a VPN with no additional software necessary. Some providers provide their own software to make this easy, but you don’t really need it. Check out how to install a VPN on Windows 10.
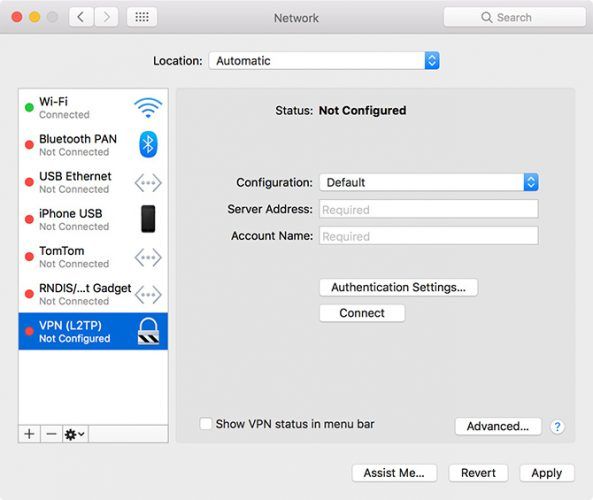
On a Mac you can head to System Preferences > Network and click on the plus button to add a new connection, then choose VPN. From here use your provider’s credentials to create the connection and click Connect. You can also grab one of these free third party Mac VPN clients if you want to use another protocol (like OpenVPN).
The final step is to share your internet connection. You can have one active network type and one shared network type at any time. That means if you connect your computer to your router via Ethernet, you can create a shared Wi-Fi connection. You can’t share the Wi-Fi connection you’re already using as another wireless hotspot, unless you have a spare USB Wi-Fi adapter.
The best method is to connect your computer directly to your router and create a Wi-Fi hotspot, since you can connect multiple devices to one shared Ethernet connection. Check our our guide to creating a Wi-Fi hotspot with Windows, or our tutorial for sharing your Mac’s internet connection.
A Customizable Approach to Sharing a VPN
This method allows you to restrict your VPN to your Apple TV and any other streaming devices, rather than re-routing all of your network traffic. It’s more of a temporary solution, especially if your network equipment is in an awkward location (for which you’ll need a laptop).
It’s easy enough to set up though, and switching your VPN on or off, or changing the server you’re connected to is pretty straightforward. You can even install your VPN provider’s own software to make this part easy.
For MacBook users in particular this solution will require an investment in a Thunderbolt to Ethernet adapter, since Apple hasn’t included an Ethernet port on MacBooks for some time now.
Method 3: DNS Tunneling
The final method doesn’t involve a VPN at all. Many VPN services provide DNS tunneling services as part of their VPN packages, whereas others sell this service separately. Some services sell DNS tunneling separately, many services refer to it by a different name like ExpressVPN’s MediaStreamer.
Some services like ExpressVPN will require the use of free dynamic DNS (DDNS) providers in order to keep your IP address up to date. Others, like UnoTelly, simply require you to login to your control panel to update your address manually.
Once you’ve signed up for an account that supports DNS tunneling and configured DNS where required, head to Settings > Network on your Apple TV and choose either Wi-Fi or Ethernet to configure that particular network. Scroll down to DNS and input the relevant IP address as per your provider’s instructions.
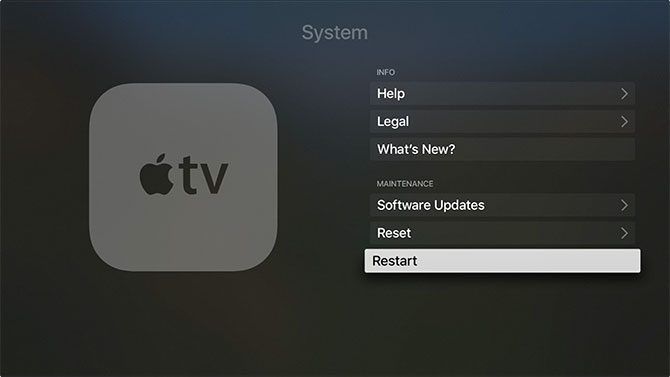
From here simply restart your Apple TV under Settings > System > Restart and region-locked content should (hopefully) now be available to you. Your provider should handle most of the relevant back-end stuff, though it’s often possible to fine-tune your location to unlock specific local services.
Easy to Use, But Easily Defeated
DNS tunneling used to be the best method of accessing region locked content. Unlike VPN connections, you can access content at the maximum speed your internet connection will allow. There’s also no need to connect to different networks for different content, since the provider handles this on a service-by-service basis.
But heavy hitters like Netflix and BBC iPlayer started cracking down on DNS tunneling a few years ago, and introduced better protections against it. Many applications now perform custom DNS lookups to circumvent even OS-level DNS tweaks.
The Best Method for Using a VPN on Apple TV
The use of a VPN means better security, and more reliable access to region locked content. The cost is speed, since your overall speed will be limited by the speed of the VPN connection. By comparison, DNS services are lightning fast but often fall short since content providers can now easily circumvent them.
For many users, the second method (using a virtual router) provides the most flexibility. You won’t lose internet speed across your whole network, and the VPN connection is likely to work a lot better for region-locked content than a DNS server would.
If security is your number one priority, the first method is also ideal. Not having to set up a VPN on every device makes it easy to secure everything in one quick step. Provided the server is relatively close to you, your internet speed hopefully won’t take too much of a hit.
Still looking for a VPN? You may be interested in the best VPNs according to Reddit, but we personally recommend ExpressVPN. Use this link to save 49% on ExpressVPN today!
Read the full article: How to Use a VPN With Your Apple TV
Read Full Article


