29 December 2018

The Internet Answers Your Craziest Hypothetical Questions


Who would win in a fight between Elsa from Frozen and Spider-man from the Marvel universe? What would happen if we made an entire planet out of legos? The internet has all the answers to such ridiculous but intriguing questions.

There are astrophysicists weighing in on things like how many calories superheroes burn. There are heated discussions between self-proclaimed experts on what the future holds, as well as what the past would have been like if history was a little different.

There are no silly questions here. Only amazing, crazy, ridiculous, madcap answers. Have fun.

What-If (Web): XKCD’s Scientific Takes On Ridiculous Questions

xkcd's what if gives scientific answers to weird questions

The webcomic XKCD is tremendously popular among geeks, since creator Randall Munroe loves to deep-dive into scientific theories. “What If” is a book by Munroe as well as a web series where he tries to deliver scientific answers to weird questions.

In Munroe’s typical style, it’s a humorous and light-hearted take on the question. That said, the science behind it is well-researched and authoritative. Munroe also intersperses the answers with plenty of illustrations, making it easier to understand.

There are over 150 silly questions and answers available to read. You can also send Munroe your own questions, and if it’s interesting enough for him, you’ll get an answer. And feel free to jump into the XKCD What If message boards for further discussions.

Quarks and Coffee (Web): Astrophysicist Tackles Silly Questions

Astrophysicist matt answers strange questions logically at quarks and coffee

What cool thing could be built if all seven billion people on the planet made something together? If we divided everything up equally among everyone, what is our “fair share”? If a person bit by a vampire turns into a vampire after they die, how long till the whole world is only vampires?

Astrophysicist Matt doesn’t shy away from such vexing questions that keep you up at night. The responses, usually about 500-1000 words, acknowledge the silliness of the question, and Matt is unafraid to have fun with it. At Quarks and Coffee, he uses math, science, research, and logic to come up with a plausible answer to just about anything you think of.

Quarks and Coffee isn’t updated as regularly as it used to be, but it still has plenty of great reads to go through.

WWWF Grudge Match (Web): The Original “Who Would Win”

hypothetical grudge matches at world wide web fights

We’ve all spent many hours discussing who would win a fight between two people we’re fans of. World Wide Web Fights’ (WWWF) Grudge Match is the internet’s original and favorite resource for silly matchups taken seriously.

The site shut down a while ago, but the 248 completed matches are classics. There are some ridiculously fascinating matches here, like Forrest Gump vs. Rainman, Tarzan vs. Aquaman, Scooby Doo vs. X-Files, and much more. Naturally, they’re hilarious and take the technicalities of each side far too seriously, but that’s part of the fun of it.

r/WhoWouldWin (Web): The Current “Who Would Win”

subreddit for "who would win in a fight between"

Grudge Match may have retired, but questions continue to trouble netizens. In this time of need, the Reddit community gathered together to discuss these problems at r/WhoWouldWin.

From simple one-on-one matchups to specific scenarios, you’ll find everything here. Be warned that there’s some offensive language and crude content here. That’s natural with the no-holds-barred approach to ridiculous questions like “Who would win in a fight between 12 average-sized 12-year-old boys and an adult male?”

As usual, it’s best to read the subreddit’s rules and etiquette before you dive in. Sort by “Top” of “All Time” for the most popular Q&As. And if you’re new to Reddit, we always recommend reading our awesome guide to Reddit.

Alternate History (Web): What If The Past Was Different…

Alternate History discusses different historical timelines

One tiny change in history can have ripple effects across ages, and the world as we know it today may not exist. Or would it? Alternate History ponders what would happen if a major historical event played out differently.

Alternate History is the older of the two forums and encourages more detailed and thorough posts from its users. You will find entire timelines of major events, like what would happen if ancient Egypt survived until the present day.

The Finished Timelines and Scenarios sub-forum is better if you’re looking for fun reads without actively participating in a question. Otherwise, hop into the other parts of the forum to angrily discuss why you’re right and they’re wrong.

r/HistoryWhatIf, r/FutureWhatIf, and r/WhatIf (Web): Reddit’s What If Discussion Forums

r/FutureWhatIf has hypothetical discussions about the future

For an answer to almost any other question you have ever wondered about, head to one of the major “what if” subreddits. If it isn’t already answered, you can ask it. But chances are, someone else has already discussed it.

Of these, r/HistoryWhatIf and r/FutureWhatIf are the most active. The former discusses hypothetical events of the past, and the latter wonders how tomorrow will play out. The standalone r/WhatIf isn’t as active as the others, but it’s a fun place to discuss weird ponderings anyway.

For More Weirdness…

If these sites haven’t given you enough of a dose of the weird and wonderful side of the web, fret not, there’s more. Whether you seek history, science, or humanity, there is a little for everyone.

Check out Wikipedia’s official unusual articles as well as other websites with funny, weird, and fascinating stories. It’s a guaranteed good time.

Read the full article: The Internet Answers Your Craziest Hypothetical Questions


Read Full Article

8 Ways to Email Large Attachments


Many email servers prevent you from sending (or the recipient from receiving) messages over a certain size. When this problem happens most users don’t know how to send large files. To send large files via email, you can either upload your attachment to cloud storage and get a link to email the recipient or use a file sharing service.

Whatever method you choose, in the long run, you won’t be restricted by size limits and you can reduce the clutter from your inbox too. We’ll show you some easy ways to send large files for free.

1. Google Drive: Use With Gmail

With Gmail, you can send attachments limited to 25MB and receive files of up to 50MB. It makes sense to use the built-in Google Drive to send big files. Open your Gmail account and click the Compose button. Click the Google Drive icon at the bottom of the compose window.

click the google drive icon to attach files

The Insert files using Google Drive window appears. Select the files you want to attach. At the bottom of the page, decide how you want to send the file.

  • Drive link works for any files stored in Drive, including files created using Google Docs, Sheets, Slides, or Forms.
  • Attachment only works for files that weren’t built using Docs, Sheets, or Slides.

Then click Insert.

insert files using google drive

Gmail checks to see if your recipients have access to the file. If they don’t, it’ll prompt you to change the sharing settings of your file stored in Drive before sending the message. You can set permissions to prevent the file from getting misused and send them to selected recipients.

2. OneDrive: For Outlook and Outlook.com

When you try to attach one or more files that are over 33MB in size, Outlook.com will prompt you to upload the files to your OneDrive account. If you follow this prompt, the file gets uploaded to the OneDrive Email attachments folder. The recipient will receive a link to the file instead of the file. You can also share a file from OneDrive with a limit of 2GB.

upload attachment with onedrive

Once the file gets uploaded, choose if people can edit the file or only view it. Select Change permissions and decide what you want to do with a file you just shared. There are two options you can choose from.

  • Recipient can view: Others can copy or download your file without signing in.
  • Recipient can edit: Others can edit, add or delete files in a shared folder.

change permission of the file in onedrive

3. Dropbox: Integrate With Gmail

If you use Dropbox, then the Dropbox for Gmail Chrome extension can let you send, preview files and links without leaving your Gmail window. The extension adds a Dropbox icon to the compose window. Click the Dropbox icon and choose the file from your Dropbox account. A link gets attached, instead of a file in the email message.

As a recipient, you get rich previews of all Dropbox links shared in emails. Just like attachments, you can use these links to download the files directly from Gmail or add it to your Dropbox. With a free Dropbox account, you get a maximum file size limit of only 2GB.

send large files with dropbox

If your file transfer fails, then it could be due to multiple reasons— your shared link or request could have generated a large amount of traffic or exceeded the bandwidth and download limits. For more details, see the Dropbox bandwidth restrictions page.

4. iCloud Mail Drop: Use With Apple Mail

If you want to send large files via email, you can use iCloud Mail Drop feature. When you send an email of size more than 20MB, Mail Drop automatically kicks in. Instead of sending the file through the Apple email server, it uploads the file to iCloud and posts a link or preview to your recipients. The link is temporary and will expire after 30 days.

use mail drop for attaching large files in apple mail

If the recipient also has macOS 10.10 or later, the attachment gets quietly auto-downloaded in the background. And if you’re sending it to another email provider, the message contains an indication of the file’s expiration date and a Click to Download link.

With Mail Drop, you can send big files up to 5GB in size. You can send them from Apple Mail, the Mail app on iOS, and iCloud.com on Mac and PC. Mail Drop support every file types and attachments don’t count against your iCloud storage. For more details, see Apple’s Mail Drop limits page.

5. Firefox Send: Use With Any Web Browser

Firefox Send is a useful option to transfer big files with people who don’t want to rely on Google, Microsoft, or Apple. It lets you upload and encrypt large files (up to 1GB) to share online. To use Firefox Send, you don’t have to install an add-on. Point your web browser to the Firefox Send homepage and click the Select a file to upload button.

upload files with firefox send

Once the uploading gets completed, Send creates a link which you can then send it via email. At a time, you can send a link to 20 recipients (one download per recipient). You can also set a password to encrypt the file. Each link created by Send will expire after 24 hours. The file also gets deleted from the Mozilla server and leaves no traces.

sharing files with firefox send

6. pCloud Transfer: Simple Encrypted File Transfer

pCloud Transfer is a part of the pCloud storage that lets you send large files for free without any registration. Go to pCloud Transfer page and add your files using the Click here to add files option.

You can email large files up to 5GB, and every single file should not exceed 200MB. Then click Encrypt Your Files option and set a password.

share files with pcloud transfer

pCloud will not send the password to your recipient on your behalf. You can share your files with 10 recipients at once. Type in their email addresses in the Send to field. Type an optional message and click Send Files. Your recipients will receive an email link after a few hours. The link remains valid for seven days. You’ll get a reminder a day before the expiration date.

7. DropSend: Send Large Files From Any Device

DropSend allows you to quickly send large files from its homepage without signing up. Type the recipient’s and your email address, browse to the file location, and click the Send Your File button.

Before sending the file, make sure to complete the verification procedure. The free plan gives you a maximum file size limit of 4GB and five sends per month. The link remains valid for seven days.

share files with dropsend

The premium plan increases the limit to 8GB with 15–45 sends per month. There is no limit on the downloads, and you can specify the validity of the link from 1–14 days. DropSend uses 256-bit AES security to keep your files secure.

The paid plan also gives you access to DropSend Direct. It’s a nifty drag-and-drop uploader for Mac and PC to upload and send large files. DropSend also offers Outlook plugin and mobile apps for Android and iOS.

8. SendThisFile: End-to-End Encrypted Transfers

SendThisFile is a different kind of file sharing service. It places limits on the number of transfers you do rather than on the individual file size itself. Create a free account and click the Send Files button to start uploading files. Type in the recipient email address and click Send. The free plan lets you send files up to 2GB with unlimited file transfer.

share large files with sendthisfile

The premium plan starts with 25GB encrypted file transfer and remains valid for six days. The paid plan also includes Outlook plugin, option to use password protected download capabilities, and embed files on your website with access control features. All plans include AES–256 encryption and 128-bit TLS encryption for end-to-end-transmission.

Managing Large Email Attachments

When you want to send large files via email, it’s always wise to rely on specialized, secure cloud storage and transfer tools. The services discussed in this article are some of the best ways to send large files without any issues and for basic use they’re free.

Also, remember that emails travel across multiple servers on its way to the recipient. An attachment you send from an email service can get rejected by another email provider. If you use Apple Mail, make sure to read this piece on how to avoid common issues with attachments.

Image Credit: Fenton/Depositphotos

Read the full article: 8 Ways to Email Large Attachments


Read Full Article

The 10 Best Places to Find Your Next iPhone Wallpaper

Google’s Game of the Year Tests Your Knowledge of 2018


How well do you think you know what trended in 2018? If you think you have your finger on the pulse of popular culture you should play Google’s Game of the Year 2018. This short and simple quiz tests you on what people searched for on Google through 2018.

2018 has been a rather strange year, with Trump’s tweets, Musk’s meltdown, Facebook’s failings, and more besides. Lots of people, places, objects, and phrases have also trended upwards. And it’s all on show in Google’s Game of the Year for 2018.

Play Google’s Game of the Year 2018

The quiz is conducted by a virtual host, which is nothing more than a set of colored shapes. However, you can customize the unnamed host by changing the speed and pitch of his voice before you start. Doing so will elicit a series of sarcastic responses.

Google’s Game of the Year is a series of questions related to what people searched for in 2018. You’ll be asked up to 20 questions, plus play some bonus rounds. However, you only have three lives, so once you’ve answered three questions incorrectly you’re out.

Google's Game of the Year 2018 Score

The questions all pitch various things together and ask you to identify which one people searched for more in 2018 than in 2017. And it’s a lot harder than you might imagine, especially when Google asks you to choose from more than just two things.

Once you’ve been knocked out you’ll be awarded a score, and Google will invite you to share it on Facebook or Twitter. I’d recommend playing the quiz a few times first though, as you’re bound to score more highly the second or third time of playing.

Google’s Top Searches of 2018

If you play Google’s Game of the Year 2018 and score badly, you should check out Google’s top searches of 2018 before giving it another go. After all, who better to know what was trending in 2018 than Google itself. Because Search is literally its business.

Read the full article: Google’s Game of the Year Tests Your Knowledge of 2018


Read Full Article

How to Read a Mac Formatted Drive in Windows: 6 Methods


sharing-windows-mac

Do you need to read a Mac drive on Windows? Unfortunately, it’s not a straightforward process; you can’t just connect the Mac drive and expect it to work. Here’s everything you need to know to get it working.

Why Can’t Windows Read Mac Drives?

Windows and macOS use different file systems. Windows uses the NTFS file system for its internal drives, whereas Apple replaced HFS+ with its successor—Apple File System (APFS)—in early 2017. Today, APFS is used on Macs, iPhones, iPads, and Apple TVs.

External hard disks and USB drives are generally formatted with the Windows FAT32 file system for maximum compatibility. Most devices, including Macs, can read and write from FAT32 devices. There’s even a way to make a Mac read an NTFS drive.

All new Macs will be formatted with APFS. Older Mac drives may still be formatted with the HFS+ file system. Windows can’t read either file system by default.

We’ll show you how to access your Mac-formatted APFS or HFS+ drive on Windows.

How to Read APFS on Windows

Firstly, let’s look at how to read the newer Apple File System format on Windows. All these apps will allow you to read drives from any updated Apple device, not just Macs.

1. MacDrive

macdrive home screen

MacDrive has been one of the go-to apps for a long time. The first version was released way back in 1996. If you’re prepared to spend some money, you don’t need to look elsewhere.

The app works with APFS drives and HFS+ drives.

Unlike some of the options we’ll discuss later, MacDrive lets you read and write data to your Mac-formatted drive directly from Windows.

The app is focussed around the freshly redesigned Disk Management Window. It acts as a hub for all the Mac drives connected to Windows.

You will also be able to see your APFS or HFS+ drive directly within File Explorer, allowing easy integration with the rest of the Windows operating system.

Other useful features include the ability to create and partition Mac disks direct from your PC, a powerful disk repair feature, and robust security tools.

The standard version costs $49.99. There’s also a Pro version. It adds several extra features, including automatic file defragmentation, support for RAID setups, and a way to create Mac ISO files.

A five-day free trial is available.

Download: MacDrive ($49.99)

2. Paragon APFS for Windows

paragon apfs windows hard drive mounted

Paragon APFS for Windows is another paid app. It is the main competitor of MacDrive.

The app provides read and write access to APFS-formatted partitions, read and write access to compressed and cloned files, and read-only support for encrypted volumes.

It supports disk auto-mounting at start-up, but doesn’t have MacDrive’s partition tools.

MacDrive has one big advantage over Paragon’s app: HFS+ support. Paragon APFS for Windows only supports APFS-formatted drives. If you have some older Mac drives lying around that are still running HFS+, you would need to separately purchase Paragon HFS+ for Windows. MacDrive, therefore, is a more economical option.

One license—which costs $49.95—works on three Windows PCs.

Download: Paragon APFS for Windows ($49.95)

3. UFS Explorer Standard Access

UFS Explorer Standard Access exploring mac drive windows

Our third and final recommendation for reading APFS drives on Windows is UFS Explorer Standard Recovery. Once again, it’s a paid option. The app will cost you €21.95.

UFS Explorer Standard Recovery is the most versatile app on this list. It can read the two formats we care about—APFS and HFS+—as well as NTFS, FAT, FAT32, exFAT, SGI XFS, Linux JFS, Unix/BSD, UFS/UFS2, and VMware VMFS.

As such, this is the app you should choose if you find yourself hopping between lots of different operating systems during your day.

UFS Explorer Standard Recovery also comes with RAID support as standard. The app has a built-in RAID builder, so you can customize it for your array.

There is a free version of the app with no time limits, but it will only let you copy files smaller than 256KB in size.

Download: UFS Explorer Standard Access (€21.95)

How to Read HFS+ on Windows

If your Mac-formatted drive is still running HFS+, use one of these three methods instead.

1. Install Apple HFS+ Drivers

If you only need read access, you can install the Apple HFS+ drivers for Windows. Be sure to remove Paragon or MacDrive before proceeding.

Download the correct Windows driver package, then follow these steps:

  1. Copy the ApplsHFS.sys and AppleMNT.sys files to C:\Windows\System32\drivers
  2. Merge the Add_AppleHFS.reg file with your Windows registry.
  3. Restart your system.

The video above also demonstrates the process.

After restarting, your Mac-formatted drive should show up under This PC. This method only gives you read access to the drive. If you would like to edit or delete files, try one of the alternative methods below.

2. HFSExplorer

hfsexplorer mac drive on windows

HFSExplorer is completely free. You can use it to access Mac file systems from Windows without paying a dime. The developer hasn’t updated it since October 2015 due to the arrival of APFS, but it still works on older systems.

HFSExplorer requires Java. We generally recommend against having Java installed, but it’s necessary here unless you want to spend money. You also need to run the app as an Admin.

This tool is simple to use. Connect your Mac-formatted drive to your Windows system, open HFSExplorer, and click File > Load File System From Device. HFSExplorer can automatically locate any connected devices with HFS+ file systems and open them. You can then extract files from the HFSExplorer window to your Windows drive.

Note that HFSExplorer is read-only, so you can’t modify or delete files on your Mac drive. It also doesn’t integrate with Windows File Explorer—files are available in the HFSExplorer application and you must copy them elsewhere.

Download: HFSExplorer (Free)

3. Paragon HFS+ for Windows

paragon hfs plus mac volume

Paragon HFS+ for Windows is a paid application, but it distinguishes itself with additional features.

Unlike HFSExplorer, Paragon HFS+ for Windows provides full read/write access to Mac drives and promises high performance. It even integrates HFS+ file systems with Windows Explorer or File Explorer on Windows. Any Windows program can read from or write to the Mac drive.

The app costs $19.95, but it also offers a 10-day free trial. If you just need to recover files from a drive, 10 days is plenty of time to install this file system driver, copy your files over, and uninstall it.

Paragon HFS+ doesn’t need Java to work.

Download: Paragon HFS+ for Windows ($19.95)

Or Format the Mac Drive for Windows

If you have a Mac drive lying around and you no longer have a Mac, you’re not stuck with the Mac file system forever. After recovering the files from your drive with one of the tools above, you can then format the drive and convert it to a standard FAT32 partition that will work with most devices.

Formatting will erase all the files on your drive, so make sure you have backed up your files. To format the drive, just use the dialog that appears when you connect the drive to your computer.

Check out our guide to learn more about using FAT32.

Read the full article: How to Read a Mac Formatted Drive in Windows: 6 Methods


Read Full Article
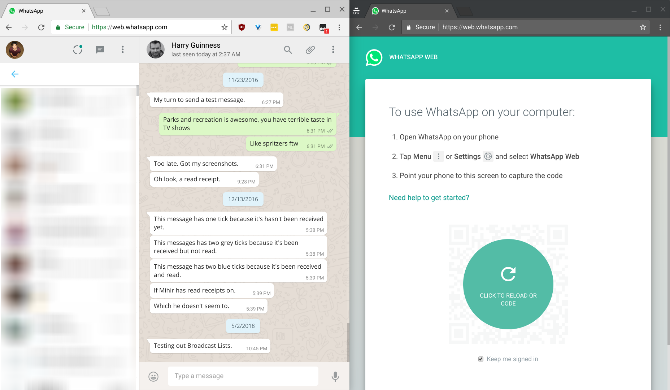
WhatsApp Web: How to Use WhatsApp on Your PC


whatsapp-web-everything

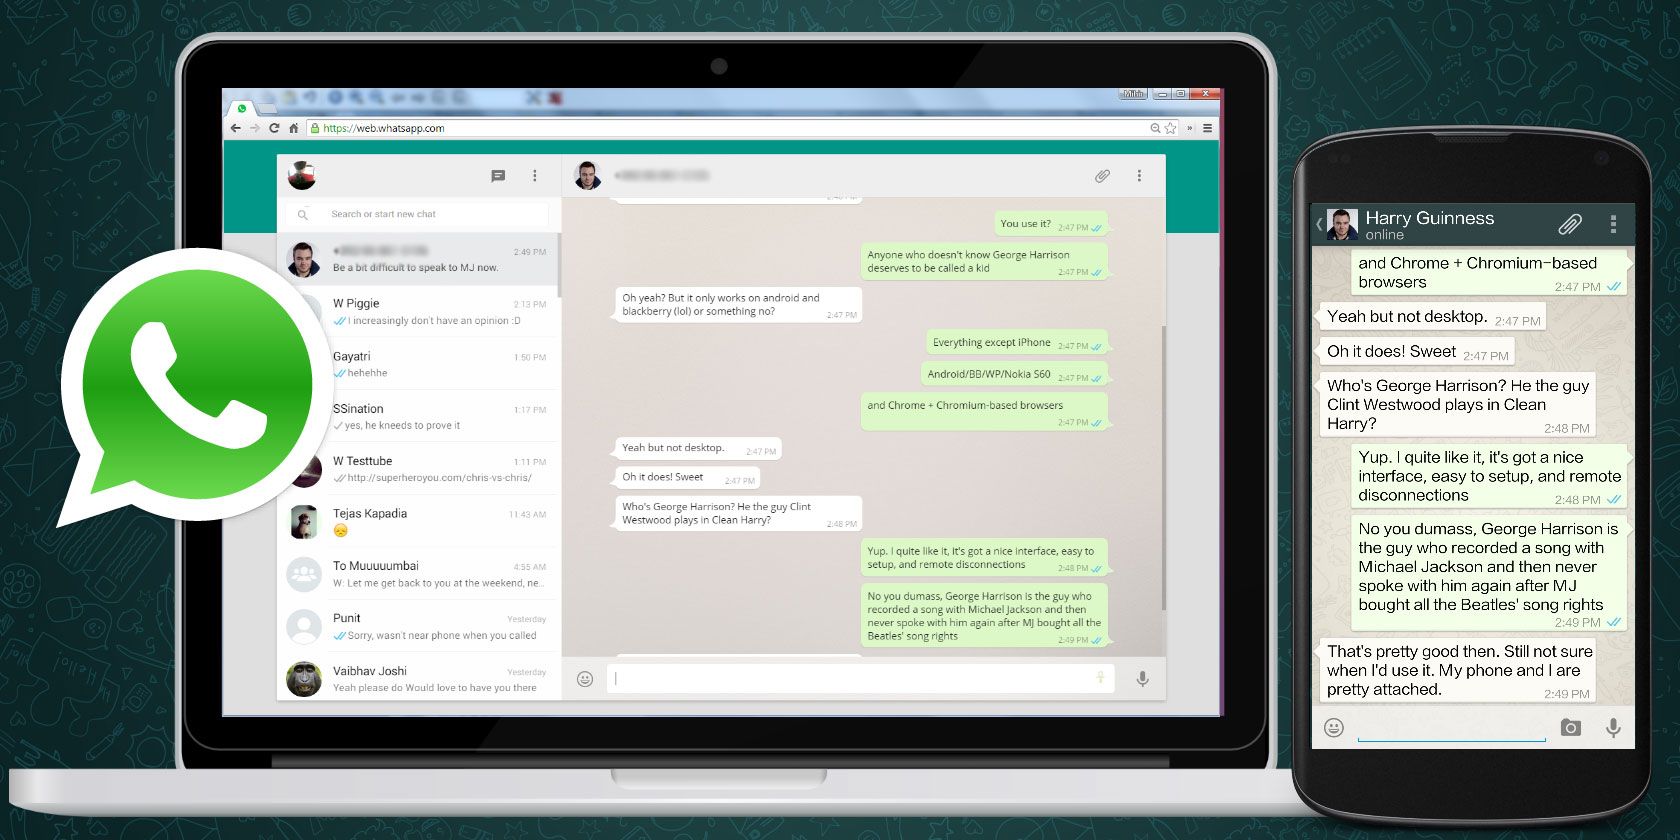
WhatsApp Web is a quick and easy way to use WhatsApp messages on your computer. It gives you most of the features of WhatsApp that you love, but on your desktop or laptop.

Here’s how to use WhatsApp Web on your PC.

What You Will Need

Largely speaking, it’s a simple process and you’ll have the necessary items at hand. But for the sake of thoroughness, here’s the list.

  1. An Android phone or an iPhone with a working rear camera.
  2. A laptop or desktop computer with any modern web browser, like Google Chrome.
  3. An active internet connection for both your phone and your PC.
  4. The updated latest version of WhatsApp.

Download: WhatsApp for Android | iOS (Free)

How WhatsApp Web Works

official screenshot of whatsapp web

WhatsApp Web does not have all the features of the mobile app. In fact, it can’t work without the mobile app. You will need your phone to connect, and then to use it.

This is, in essence, a clone or a mirror of what’s happening on your phone. If a message comes to your phone, you’ll see it in WhatsApp Web. If your phone doesn’t get a message because it doesn’t have an active connection or it’s switched off, then you won’t see it in WhatsApp Web either.

This is inferior to other chat apps, but in some ways, it also makes the app more secure.

How to Set Up WhatsApp Web

Animated GIF - Find & Share on GIPHY

Once you have these elements ready, setting up WhatsApp Web is a snap.

  1. Open the browser on your PC and go to web.whatsapp.com.
  2. On your WhatsApp mobile app, tap Menu > WhatsApp Web to start the QR code reader.
  3. Point your phone’s rear camera to the QR code on your PC screen.

As soon as WhatsApp reads the QR code, it will connect the phone to the PC. In a jiffy, WhatsApp Web and WhatsApp mobile will be synced.

What You Can Do With WhatsApp Web

  • Use your keyboard to type.
  • Access media (photos, videos, audio) in-line. You can also download any media directly to your PC.
  • Start a new conversation with any contact, or search for existing conversations.
  • View contact info.
  • Start a new group chat, talk in group chats, and view group info.
  • Connect multiple computers to your phone and save them for future. You can also remotely disconnect any browser from your phone.
  • Get or mute desktop alerts and sounds.
  • Share photos and videos, documents, and contacts.
  • Send emojis, GIFs, and stickers, as well as voice notes.
  • View WhatsApp Status updates from any contact.
  • Select multiple messages, and clear messages.
  • Reply, forward, star, or delete messages.
  • Change your profile.

What You Can’t Do With WhatsApp Web

  • You can’t send a WhatsApp Broadcast.
  • You can’t make or receive WhatsApp Voice calls nor WhatsApp Video calls.
  • You can’t post new WhatsApp Status updates.
  • You can’t share maps or your current location.
  • You can’t change media download settings, so all photos and videos sent to you are downloaded automatically.
  • You can’t use two browsers at the same time. While you can add multiple browsers/PCs to your phone, you can only use one at a time.
  • Settings are limited to notifications through WhatsApp Web and chat wallpapers.

Using Multiple WhatsApp Accounts

You can use multiple accounts with WhatsApp Web on one computer

Some folks have two numbers associated to two different WhatsApp accounts. You can still use them both on a single PC.

To do that, you will need to open WhatsApp Web in two different browsers, such as Chrome and Opera. Alternately, you can open WhatsApp Web in an incognito window, but that logs out after an hour.

What Makes WhatsApp Web Special

WhatsApp Web is special because of keyboard

So why should you use WhatsApp Web when it’s more limited than the phone? Because of the keyboard, of course.

If you want to engage in long conversations with someone, it’s easier to type on the keyboard. In fact, WhatsApp Web also works with WhatsApp Business, and you’ll be glad that you can take care of multiple customers through it.

You can use keyboard shortcuts too. The most useful two to remember are Ctrl + Shift + [ to go to the previous chat, and Ctrl + Shift + ] to go to the next chat.

How Safe Is WhatsApp Web?

While it initially got some flak for its lack of security, WhatsApp now boasts end-to-end encryption for all its messages. This extend to WhatsApp Web as well.

Still, it’s a good idea to employ the best security practices for WhatsApp, whether you’re using it on the web or on your mobile. For example, if you have to use WhatsApp Web on a different computer, then open it through an incognito window.

How to Log Out of WhatsApp Web

how to log out of all devices connected to whatsapp web

If you are using WhatsApp Web on your own computer, you can stay logged in even when you are done. It’s convenient.

If you are using it on someone else’s computer, then it’s best to log out after you are done. It’s best to do this on both the computer and your mobile app.

  1. To log out of WhatsApp Web on desktop, go to Menu > Log out.
  2. To log out of WhatsApp Web from all devices that your phone is connected to, go to Menu > WhatsApp Web > Log out from all devices.

More WhatsApp Web Tips and Tricks

The more you know about WhatsApp Web, the more astounded you will be by what you can achieve with it. In fact, we prefer it to official desktop apps for WhatsApp since WhatsApp Web is more feature-filled, and even offers extensions.

And finally, here’s one hack that you’ll love. You can actually read messages without marking them with blue ticks. It’s a sneaky one, but if you want to learn how to do that and more, check out the best WhatsApp Web tips and tricks.

Read the full article: WhatsApp Web: How to Use WhatsApp on Your PC


Read Full Article

What Is 5G? Here’s How It’ll Make Mobile Internet Faster and Better

6 Fun Ways to Personalize Your iPhone and Help It Stand Out

Megabit (Mb) vs. Megabyte (MB): We Make It Less Confusing


megabyte-megabit

Do you know the difference between a megabit (Mb) versus a megabyte (MB)?

While the two sound the same and have the same abbreviation, they’re actually very different. And they’re both quite important, as they determine the speed of data, such as your internet connection (that you’re paying big bucks for) and the size of data on storage devices, like hard drives.

Yes, it’s a little confusing, but today we’re going to explain everything you need to know about the megabit (Mb) and the megabyte (MB).

What Is a Megabit and a Megabyte?

Binary Bits of Data

First, we need to go back to the piece that starts it all—the bit. A bit is a binary digit, which is a very small unit of digital, computerized data. Eight of these bits composes a byte. A megabit contains about 1 million of those bits, and eight (8) megabits makes up a single megabyte.

For the most part, data sizes for hard drives and files are usually measured with “bytes,” whereas data for broadband goes by “bits.”

You may be more familiar with gigabytes (GB) or even terabytes (TB), as they are more commonly used these days in terms of data storage. A gigabyte holds about 1000 megabytes of data, and a terabyte is 1000 gigabytes.

When you look at it that way, a terabyte is just a lot of bits in one place. Pretty crazy when you think about it, right?

What’s the Difference Between the Abbreviations?

The abbreviations are also very important to take note of. Since a megabit is a smaller unit than a megabyte, it features the lowercase “b,” making it’s abbreviation “Mb.” Megabyte is larger, therefore it gets the capital “B” in “MB.”

Both megabits and megabytes are commonly used to indicate the data transfer speed of something, such as hard drives or internet connections. If you’re just referring to hard drives, then the abbreviation remains “Mb” or “MB.”

But in terms of internet speeds, you refer to the amount of megabits or megabytes that are transferred each second, thus creating the abbreviations “Mbps” and “MBps,” with the “ps” standing for “per second.”

Why You Should Know Both Megabit and Megabyte

megabit does not equal megabyte

We all need internet access at home, and these days, it’s always about broadband from the cable company. Often times, they feature packages where you can get speeds of “up to 50Mbps” or “100Mbps” and the like. It’s important to know what exactly you’re paying for.

You may think that a 100Mbps package sounds like super fast speeds, and while you won’t be wrong (it’s still plenty fast), don’t expect to just download a 100MB file in a second.

That’s because when internet Service Providers (ISP) sell you an “up to 100Mbps” connection, that is actually referring to 100 megabits per second, and not 100 megabytes per second. In fact, we even have a whole guide on understanding internet speeds, because it’s a tricky topic.

Ookla Speed Test Results

In fact, if you have a 100Mbps connection, that’s actually a 12.5MBps, which doesn’t sound as impressive. You get this calculation from dividing 100 by 8, since eight bits go into one megabit. I have a 400Mbps connection at home, which translates to 50MBps. Again, the first number is a lot more impressive than the smaller one, right?

Marketing Tactics

ISPs use megabits as a marketing tactic to make their packages sound more enticing to potential customers. That’s because these numbers are larger, and look more monumental than the smaller counterparts.

They also say that you can get up to those speeds, so it’s not guaranteed all the time, especially during peak hours.

Services like SpeedTest provide you with a simple test of your internet speed, and they always deliver results in Mbps, since it’s standard of the industry. However, you can change the setting of your speed test service to have it say MBps instead of Mbps.

Say you’re wanting to download a 750MB file. This file is also the same as 6000Mb (6000 divided by 8 is 750). If you have a 50Mbps connection, that file would be downloaded in two minutes. A slower connection, say 10Mbps, would take 10 minutes to download the same file.

Hard drive

Buying a New Hard Drive

If you are in the market for a new hard drive for your computer, or perhaps even an external hard drive or other storage device, then you should also pay attention to the capacity. However, for drive sizes, few display the capacity as megabytes as most use gigabytes nowadays.

When you shop for drives, you’ll usually find sizes like 256GB, 500GB, 750GB, 1TB, and so on. With these numbers, they translate into 256000MB, 500000MB, and 750000MB, respectively.

Since 1TB is 1000GB, that means about 1000000MB. The formula for finding out how many megabytes something holds is to multiply the gigabyte value by 1000.

Usually, to talk about how fast a connection is, you just use bits (Mb for most internet speeds). Bytes (MB, GB, TB, etc.) are used mostly when you are referring to storage and file sizes.

How Do I Calculate Megabit and Megabyte Again?

It’s simple enough to remember: a megabyte (MB) contains eight (8) megabits (Mb). Whenever you see something in MB, just multiply that by eight to find how many megabits it is.

For the purpose of conversions, let’s make x stand for MB and y represent Mb.

xMB x 8 = yMb

If you want to convert megabits (Mb) into megabytes (MB), then divide it by eight.

yMb / 8 = xMB

To figure out how long it should take to download a file (based on the speed cap you pay for), try this formula, where p stands for the speed you’re paying for and t is your download time.

(xMB x 8) / pMbps = t (in seconds)

Then of course, you’ll want to convert those seconds into minutes for a better representation of how long it will take.

If you’re going from gigabytes to megabytes, times the gigabyte number (let’s go with a for gigabyte) by 1000 to find out how many megabytes that is.

aGB x 1000 = xMB

It’s highly recommended to use Google’s search engine to convert digital storage units too, if you’re not good with math.

Megabits and Megabytes Are Not the Same

Yes, it’s slightly confusing when you see Mb and MB used often, and you thought they were interchangeable. It couldn’t be farther from the truth. Hopefully you now understand the differences between a megabit (Mb) and megabyte (MB), and can convert them easily.

Memory sizes can be tricky to explain, but we’ve covered them all, as well as their context, too!

Read the full article: Megabit (Mb) vs. Megabyte (MB): We Make It Less Confusing


Read Full Article

Microsoft Remote Desktop: How to Access Windows From Your Mac


widnows-remote

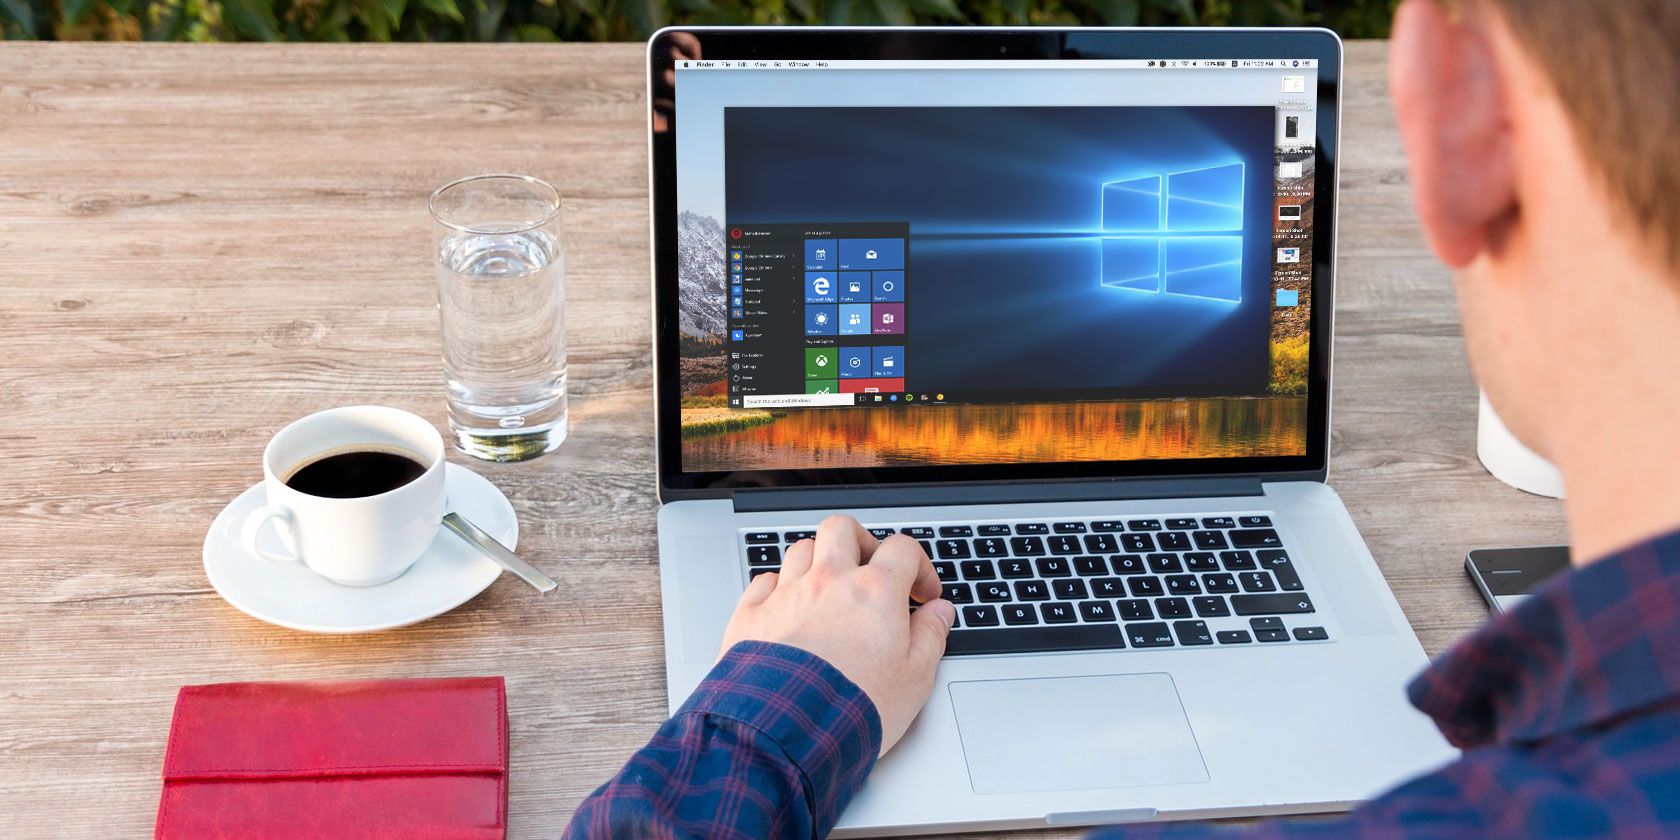
It’s easy to access and work on your Windows PC from a Mac. Microsoft offers a free tool to do the job. Read on to learn how to set up and use Microsoft Remote Desktop for Mac.

Remote Desktop for Mac is relatively simple to set up. It lets you use your Windows apps, work with files, or doing anything else you’d normally do on Windows directly from your MacBook or other macOS machine.
Step 1: Prepare Your Windows PC

Microsoft Remote Desktop requires Windows 10 Pro or Enterprise, or Windows Server. The software runs on Microsoft’s proprietary RDP protocol, which isn’t available on the standard Windows 10 Home Edition. If you need to connect to a PC running Home, one of the best remote access tools will help you out.

The first steps to set up Remote Desktop for Mac occur on your Windows computer.

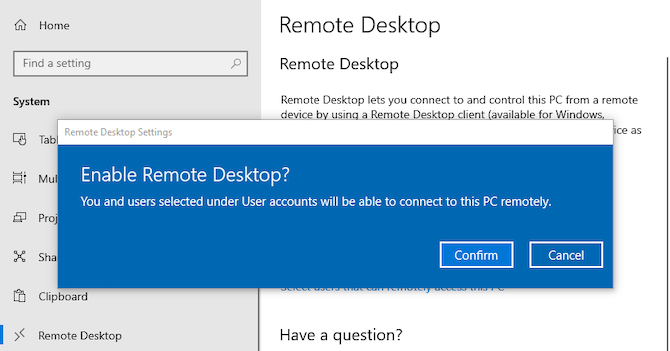
On your Windows 10 machine, open the Start menu and go to Settings > System > Remote Desktop. Set Enable Remote Desktop to On, and click Confirm when prompted.

enable remote desktop on Windows 10

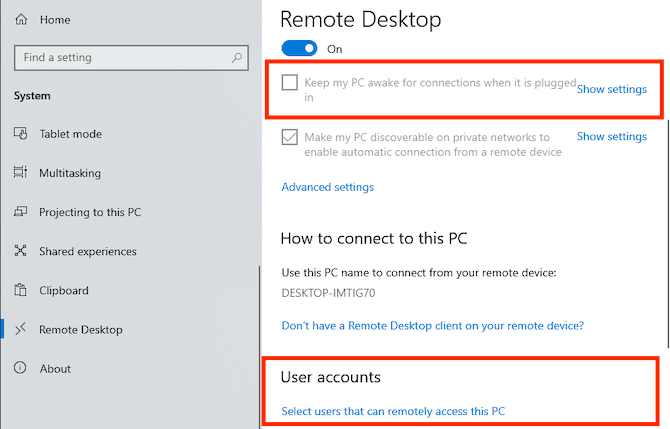
Your PC needs to be on and awake for you to connect remotely. You might therefore want to activate the Keep my PC awake option. To do this, click Show settings alongside it and set Sleep to Never. You should probably only do this if you need constant remote access to the computer. If you don’t, then allowing it to sleep is wise.

Next, scroll down to User accounts. By default, the account you’re logged into will automatically have remote access permissions. To allow other users to log in remotely, click Select users to add their usernames.

remote desktop settings keep awake

Get Your PC Name and IP Address

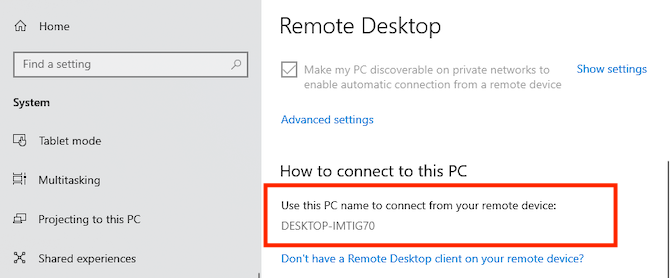
Finally, you need to grab a couple of pieces of info before you switch over to your Mac. On the same Remote Desktop menu, under How to connect to this PC, make a note of your PC name.

If the current name is generic and you’d like to make it something that’s easier to remember, switch to the About tab and click Rename this PC.

find pc name windows

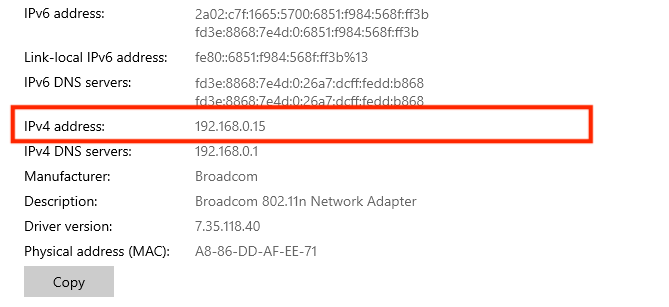
Next, you need to find your computer’s IP address on your network. Go to Settings > Network & internet. Select Wi-Fi (or Ethernet if you using a wired connection), then click on the network you’re connected to.

This opens the network connection properties screen. Scroll to the bottom of the page and locate the IPv4 address in the list. Make a note of this number.

find ip address windows

Step 2: Install Microsoft Remote Desktop for Mac

Now, switch to your Mac and install Microsoft Remote Desktop, available free in the Mac App Store. Microsoft also offers versions of the app for iOS and Android.

The instructions for those platforms are the same as the ones we use here.

Step 3: Add Your PC to Microsoft Remote Desktop

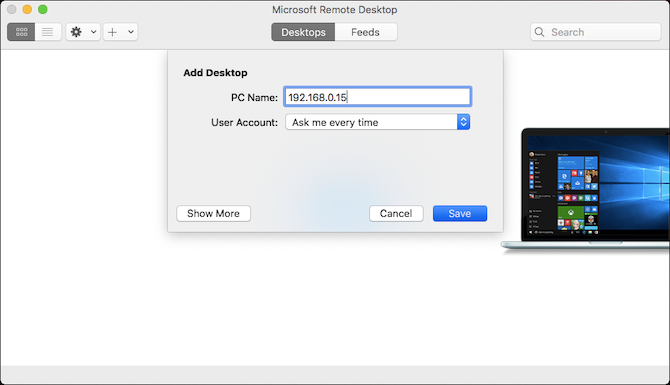
Launch the Remote Desktop client on your Mac. Click Add Desktop to begin.

In the dialog box that opens, type in the PC Name that you checked earlier. If you find that you’re unable to connect with this name, use the IP address you made note of instead.

add desktop mac

By default, User Account is set to Ask me every time. This means it will prompt you for a username and password each time you connect. If you don’t want this, click the dropdown list and select Add account.

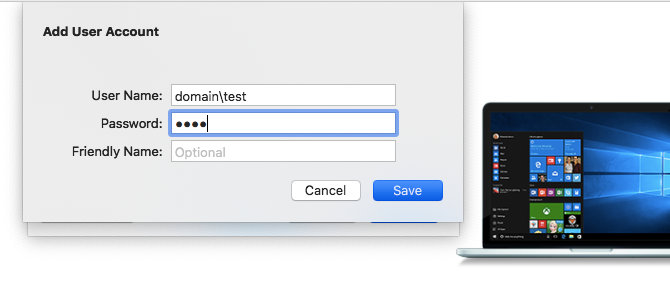
Add your username in the format domain\[username]. You can add your password as well, for an automatic login. Leave it blank and you’ll get a prompt to enter it each time.

That’s all you need to do to set up a connection. Click Save and you can connect. However, you might want to adjust a few other settings before you go any further.

add windows user account mac

Step 4: Configure Your Remote Connection

Click Show More to change your settings. Here, you’re able to configure how your remote connection works:

  • In the General tab, add a Friendly Name to make a computer recognizable if you’ve got more than one connection set up.
  • Under the Display tab, click Fit session to window if you aren’t planning on using the remote connection in full screen mode. Also, set Optimize for Retina Displays if you’re working on a high-res monitor.
  • In the Sound tab, choose which computer should play sound (if either), and whether you want to be able to use your Mac’s microphone.

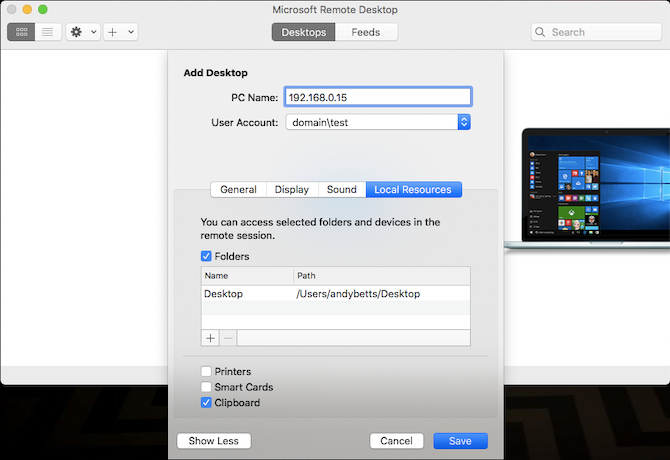
However, the most important option is Local Resources.

add local resources

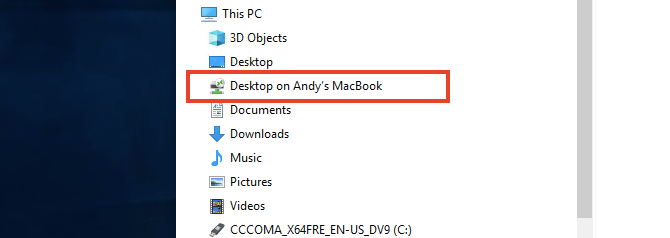
This enables you to make certain folders on your Mac accessible within your remote Windows session. You can access these folders through the Windows File Explorer, where you’ll find them under This PC. You can work on files stored on your Mac in a Windows app, or copy files between the machines.

shared local resource

It’s all contained within the remote session, however. Sharing a folder in this way does not make the folder accessible on the physical Windows computer.

Click Save to finish setting up your connection.

Step 5: Connect!

You’re now ready to connect. Your PC must be turned on and awake, and connected to the same network as your Mac.

The Remote Desktop app will list your computer, with a thumbnail preview, under Saved Desktops. Double-click it to connect.

If you didn’t change the settings, you’ll need to enter your username and/or password now. Remember, the username must be in the format domain\[username]. Click OK.

Security Warning

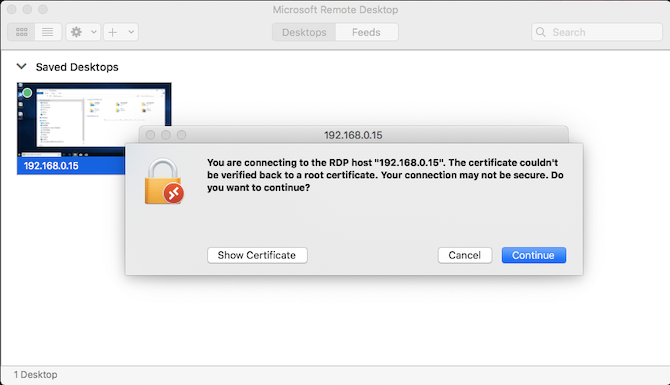
certificate warning remote desktop mac

You’ll now see a security warning relating to an unverified certificate. If you’re at home, or working on a small business network, you can click Continue and ignore the message. If you’re on a large network with public access, be wary about doing this.

Once You’re Connected

When your Mac establishes the remote desktop connection, your Windows PC will lock and switch to the login screen. If anyone tries to use the PC, your remote session will end. You can’t have two people using the same computer at once.

Using Windows on Your Mac

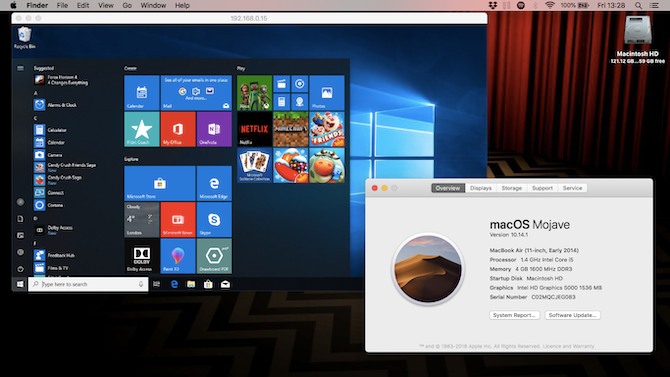
windows remote desktop mac

Unless you changed the setting, your remote desktop session opens in full screen. To use it in a window instead, move your mouse pointer to the top of the screen and click the green window button at the top-left.

Using Windows through Remote Desktop is pretty much the same as using it on a dedicated computer. One of the few changes—and a possible point of confusion—is that the app maps the keyboard shortcuts for cut, copy, and paste to the ones used in macOS, using the Command key. However, some other shortcuts continue to use the Control key as they do in Windows.

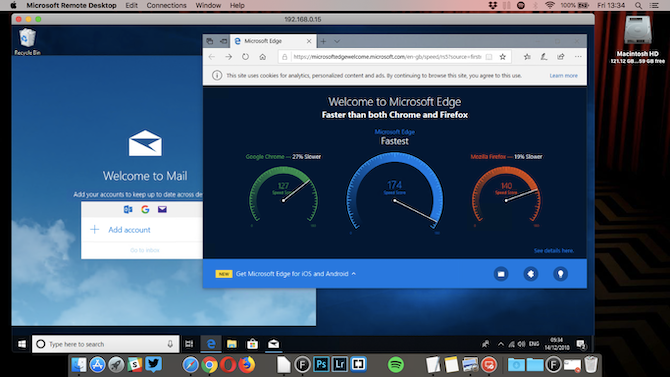
You can launch apps, work on files, or even play games if you want to. There may be a little lag during heavy use, but most of the time it’s fast and responsive.

use windows apps with remote desktop

You can’t drag and drop files between Mac and Windows. They share the clipboard by default, though, so you can copy and paste between them instead.

For a greater level of file sharing, set up a shared folder using the Local Resources setting, as we outlined above.

Disconnecting and Deleting Your Desktop

To disconnect and end the session, simply close the Remote Desktop window on your Mac. You can edit your settings at any time by hovering your mouse over the thumbnail in Saved Desktop and clicking the Pen icon.

To delete a desktop, right-click on it and select Delete.

Remotely Access Your Computer From Anywhere

Microsoft Remote Desktop is an easy way to access Windows from a Mac. But what if you need to do it the other way around, or perhaps need to bring a Linux computer or a Chromebook into the mix?

The quickest solution here is to set up Chrome Remote Desktop, Google’s remote access tool that runs on any desktop computer that has Chrome installed. We’ve also shown how to remote access your Mac from any platform.

Read the full article: Microsoft Remote Desktop: How to Access Windows From Your Mac


Read Full Article