A blog about how-to, internet, social-networks, windows, linux, blogging, tips and tricks.
02 July 2018
Try Newton Mail and Love Email Again

You’d think that as common as email is, it would already be perfected by now. But for most users, email has a lot of pain points.
If you’re searching for a better way to use email on all your devices, Newton Mail may be for you. Let’s see how the team behind it has built a better email client.
Meet Newton Mail
Newton Mail is a modern email client. You can download the app for your devices from Newton’s website, and get started with a free 14-day trial.
Let’s look at some of Newton’s top features to introduce you.
Full Sync and Device Support

An email client isn’t much good if it doesn’t work on all your devices. Thankfully, Newton delivers in this. It’s available on all the platforms you use: iPhone, iPad, Android, Mac, and Windows.
Newton supports many popular mail clients, including Gmail, Outlook, Yahoo, Office 365, and iCloud. If you use another email service, you can connect it via IMAP.
No matter your device or email provider, you can expect a reliable email experience with fast push notifications.
Built-In Read Receipts

Read receipts help you keep track of whether recipients actually read what you sent. With Newton, read receipts are built into every message. You’ll see two gray ticks turn blue once your message was read.
Even better, you can turn on notifications for important emails and get a ping when the recipient reads your message. This helps you make sure no important message goes unread.
Sender Profiles
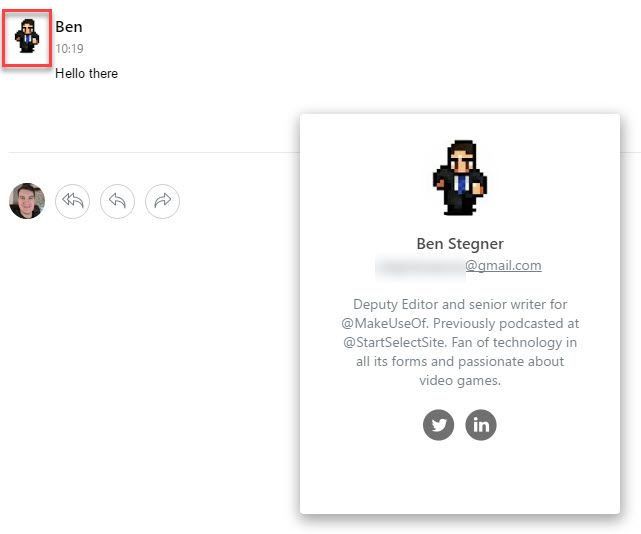
Have you ever received an email and knew nothing about the person who sent it? You can always Google their name, but that requires opening a separate window and takes time. Newton streamlines this by adding a profile to everyone who sends you a message.
Just click on the user’s contact photo, and you’ll see their job title, social profiles, and some basic information about them. Flip the card to see information about their organization. This lets you know whom you’re talking to without hunting anything down.
True Inbox and Tidy Inbox
Ever since conversation style became standard in email, there hasn’t been much of a reason to open your Sent folder. The only exception to this was finding an email you sent to someone that hadn’t received a response yet.
Newton Mail kills off the Sent folder with True Inbox. This creates a new conversation in your inbox as soon as you send a message. It’s front and center until the person replies, helping you to remember it.
Tidy Inbox is a smart feature that weeds out unimportant emails like newsletters. Once enabled, such emails go into a new Low Priority folder, keeping your inbox open for important messages only. You can always move messages between these folders to show Newton what’s important to you.
Even More Newton Mail Features
Newton Mail has additional features that make it worth trying out. It connects with your favorite productivity apps, like Evernote, Trello, and more, for exporting email tasks. Snoozing lets you deal with an email later, or the next time you’re on your desktop.
Meanwhile, scheduled messages help your messages arrive at the right time, and undo send prevents embarrassing mistakes. If your current email app is lackluster, Newton could be just what you’re looking for—more than 40,000 subscribers think so.
Try Newton free for 14 days on all devices. It’s just $49.99 per year after that, or $4.99/month if you don’t want to commit to a year. That gets you a smooth email service with a slick interface, plenty of smart features, and no nonsense.
Read the full article: Try Newton Mail and Love Email Again
Read Full Article
Facebook rolls out more API restrictions and shutdowns
Following the Cambridge Analytica data misuse scandal and the more recent discovery of a Facebook app that had been leaking data on 120 million users, Facebook is today announcing a number of API changes aimed at better protecting user information. The changes will impact multiple developer-facing APIs, including those used to create social experiences on the site, as well as those for media partners, and more.
Some of the APIs are being shuttered for low adoption, while others will require app reviews going forward, Facebook said.
The company said the following API restrictions were now being put into place:
- Graph API Explorer App: Facebook will deprecate its test app today. Developers will need to use their own apps’ access tokens to test their queries on the Graph API Explorer going forward.
- Profile Expression Kit: This let developers build apps that allowed people to jazz up their profile photos or create profile videos. This one seems to be lumped in the group of shutdowns not because of misuse potential, but because it had low adoption. It will shut down October 1st.
- Media Solutions APIs: On August 1, Facebook is shutting down Topic Search, Topic Insights and Topic Feed and Public Figure APIs due to low usage. It already deprecated the Trending API and Signal tool for journalists, the Trending Topics product, and the Hashtag Voting for interactive TV experiences. Going forward, Facebook says public content discovery APIs will be limited to page content and public posts on certain verified profiles.
- Pages API: Developers can search using the Pages API again, but will need feature permissions to Page Public Content Access, which can only be obtained through the app review process.
- Marketing API: Developers will have to go through an app review before they can use this API.
- Leads Ads Retrieval: Facebook is introducing new app review permissions for this, too.
- Live Video APIs: Will also have new app review permissions.
The changes were detailed in a post published the Facebook Newsroom, which hinted they would not be the last.
The company has been auditing its app ecosystem in an effort to find other apps that may have been leaking data. Related to this effort, it previously announced a series of other API changes aimed at getting a better handle on how Facebook apps can access and use people’s information.
This latest batch of API changes doesn’t include some of the higher-profile APIs – like when Facebook made changes to Facebook Login, Groups, Events and other APIs back in April. However, it does indicate that the developer platform review process is still underway, and more APIs will likely still be addressed in the future.
Read Full Article
Original Stitch’s new Bodygram will measure your body
After years of teasing, Original Stitch has officially launched their Bodygram service and will be rolling it out this summer. The system can scan your body based on front and side photos and will create custom shirts with your own precise measurements.
“Bodygram gives you full body measurements as accurate as taken by professional tailors from just two photos on your phone. Simply take a front photo and a side photo and upload to our cloud and you will receive a push notification within minutes when your Bodygram sizing report is ready,” said CEO Jin Koh. “In the sizing report you will find your full body measurements including neck, sleeve, shoulder, chest, waist, hip, etc. Bodygram is capable of producing sizing result within 99% accuracy compared to professional human tailors.”
[gallery ids="1666969,1666970,1666971,1666972,1666973,1666974"]The technology is a clever solution to the biggest problem in custom clothing: fit. While it’s great to find a service that will tailor your clothing based on your own measurements, often these measurements are slightly off and can affect the cut of the shirt or pants. Right now, Koh said, his team offers free returns if the custom shirts don’t fit.
Further, the technology is brand new and avoids many of the pitfalls of the original body scanning tech. For example, Bodygram doesn’t require you to get into a Spandex onesie like most systems do and it can capture 40 measurements with only two full-body photos.
“Bodygram is the first sizing technology that works on your phone capable of giving you highly accurate sizing result from just two photos with you wearing normal clothing on any background,” said Koh. “Legacy technologies on the market today requires you to wear very tight fitting spandex suit, take 360 photos of you, and require a plain background to work. Other technologies gives you accuracy with 5 inches deviation in accuracy while Bodygram is the first technology to give you sub 1-inch accuracy. We are the first to use both computer vision and machine learning techniques to solve the problem of predicting your body shape underneath the clothes. Once we predicted your body shape we wrote our proprietary algorithm to calculate the circumferences and the length for each part of the body.”
Koh hopes the technology will reduce returns.
“It’s not uncommon to see clothing return rate reaching in the 40%-50% range,” he said. “Apparel clothing sales is among the lowest penetration in online shopping.”
The system can also be used to measure your body over time in order to collect health and weight data as well as help other manufacturers produce products that fit you perfectly. The app will launch this summer on Android and iOS. The company will be licensing the technology to other providers who will be able to create custom fits based on just a few side and front photos. Sales at the company grew 175% this year and they now have 350,000 buyers who are already creating custom shirts.
A number of competitors are in this interesting space, most notably ShapeScale, a company that appeared at TechCrunch Disrupt and promised a full body scan using a robotic scale. This, however, is the first commercial use of standard photos to measure your appendages and thorax and it’s an impressive step forward in the world of custom clothing.
Read Full Article
Instagram’s Do Not Disturb and “Caught Up” deter overgramming
Instagram is turning the Time Well Spent philosophy into features to help users avoid endless scrolling and distraction by notifications. Today, Instagram is rolling out its “You’re All Caught – You’ve seen all new posts from the past 2 days” warning in the feed which TechCrunch broke the news about in May. Past that notice will only be posts that iOS and Android users have already seen or that were posted more than 48 hours ago. This will help Instagram’s 1 billion monthly users stop fiendishly scrolling in search of new posts scattered by the algorithm. While sorting the feed has made it much better at displaying the most interesting posts, it can also make people worry they’ve missed something. This warning should give them peace of mind.

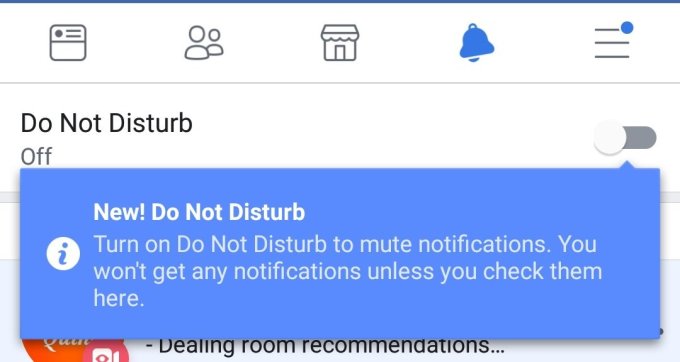
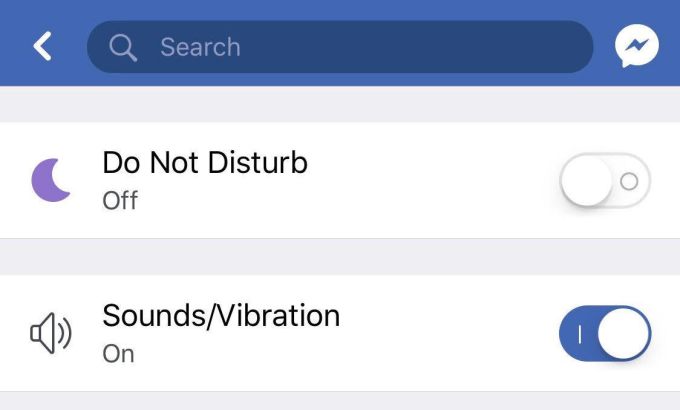
Meanwhile, TechCrunch has learned that both Facebook and Instagram are prototyping Do Not Disturb features that let users shut off notifications from the apps for 30 minutes, 1 hour, 2 hours, 8 hours, 1 day, or until they’re turned back on manually. WhatsApp Beta and Matt Navarra spotted the Instagram and Facebook Do Not Disturb features. Facebook is also considering allowing users to turn off sound or vibration on its notifications. Both apps have these Do Not Disturb features buried in their code and may have begun testing them.

Both Facebook and Instagram declined to comment on building new Do Not Disturb features. “You’re All Caught Up” could prevent extra scrolling that doesn’t provide much value that could make Instagram show up atop your list of biggest time sinks. And an in-app Do Not Disturb mode with multiple temporary options could keep you from permanently disabling Instagram or Facebook’s

We referenced Instagram Do Not Disturb our scoop about Instagram building a Usage Insights dashboard detailing how much time you spent on the app. Both Facebook and Instagram are preparing these screens that show you how much time you’ve spent on their apps per day, in average over the past week, and that let you set a daily limit after which you’ll get a notification reminding you to look up from your screen.
When we first reported on Usage Insights, Instagram CEO Kevin Systrom has tweeted a link to the article, confirming that Instagram was getting behind the Time Well Spent movement. “It’s true . . . We’re building tools that will help the IG community know more about the time they spend on Instagram – any time should be positive and intentional . . . Understanding how time online impacts people is important, and it’s the responsibility of all companies to be honest about this. We want to be part of the solution. I take that responsibility seriously.”
Now we’re seeing this perspective manifest itself in Instagram’s product. Instagram’s interest conveniently comes just as Apple and Google are releasing Screen Time and Digital Well-Being tools as part of the next versions of their mobile operating systems. These will show you which apps you’re spending the most time in, and set limits on their use. By self-policing now, Instagram and Facebook could avoid being out by iOS and Android as the enemies of your attention.
In other recent Instagram news:
Read Full Article
Instagram’s Do Not Disturb and “Caught Up” deter overgramming
Instagram is turning the Time Well Spent philosophy into features to help users avoid endless scrolling and distraction by notifications. Today, Instagram is rolling out its “You’re All Caught – You’ve seen all new posts from the past 2 days” warning in the feed which TechCrunch broke the news about in May. Past that notice will only be posts that iOS and Android users have already seen or that were posted more than 48 hours ago. This will help Instagram’s 1 billion monthly users stop fiendishly scrolling in search of new posts scattered by the algorithm. While sorting the feed has made it much better at displaying the most interesting posts, it can also make people worry they’ve missed something. This warning should give them peace of mind.

Meanwhile, TechCrunch has learned that both Facebook and Instagram are prototyping Do Not Disturb features that let users shut off notifications from the apps for 30 minutes, 1 hour, 2 hours, 8 hours, 1 day, or until they’re turned back on manually. WhatsApp Beta and Matt Navarra spotted the Instagram and Facebook Do Not Disturb features. Facebook is also considering allowing users to turn off sound or vibration on its notifications. Both apps have these Do Not Disturb features buried in their code and may have begun testing them.

Both Facebook and Instagram declined to comment on building new Do Not Disturb features. “You’re All Caught Up” could prevent extra scrolling that doesn’t provide much value that could make Instagram show up atop your list of biggest time sinks. And an in-app Do Not Disturb mode with multiple temporary options could keep you from permanently disabling Instagram or Facebook’s


We referenced Instagram Do Not Disturb our scoop about Instagram building a Usage Insights dashboard detailing how much time you spent on the app. Both Facebook and Instagram are preparing these screens that show you how much time you’ve spent on their apps per day, in average over the past week, and that let you set a daily limit after which you’ll get a notification reminding you to look up from your screen.
When we first reported on Usage Insights, Instagram CEO Kevin Systrom has tweeted a link to the article, confirming that Instagram was getting behind the Time Well Spent movement. “It’s true . . . We’re building tools that will help the IG community know more about the time they spend on Instagram – any time should be positive and intentional . . . Understanding how time online impacts people is important, and it’s the responsibility of all companies to be honest about this. We want to be part of the solution. I take that responsibility seriously.”
Now we’re seeing this perspective manifest itself in Instagram’s product. Instagram’s interest conveniently comes just as Apple and Google are releasing Screen Time and Digital Well-Being tools as part of the next versions of their mobile operating systems. These will show you which apps you’re spending the most time in, and set limits on their use.
By self-policing now, Instagram and Facebook could avoid looking like the enemies of your attention.
In more recent Instagram news:
Read Full Article
7 WhatsApp Web Tips and Tricks All Users Should Know

WhatsApp Web is the easy way to use WhatsApp on any computer in the world, as long as you have your phone to sign in. Once you set WhatsApp Web up on your PC, these tips and tricks will make it better.
We have already covered the basics of using WhatsApp Web, what it can and can’t do, and everything you need to know about WhatsApp Web. Now it’s time to enhance WhatsApp Web with some simple tips and tricks.
1. Learn WhatsApp’s Keyboard Shortcuts

To take full advantage of using WhatsApp on your computer, you need to learn some keyboard shortcuts. These can make you a typing ninja, and able to do everything a bit faster. Here’s a list of keyboard shortcuts that work in WhatsApp Web:
- Ctrl + N: Start new chat
- Ctrl + Shift + ]: Next chat
- Ctrl + Shift + [: Previous chat
- Ctrl + E: Archive chat
- Ctrl + Shift + M: Mute chat
- Ctrl + Backspace: Delete chat
- Ctrl + Shift + U: Mark as unread
- Ctrl + Shift + N: Create new group
- Ctrl + P: Open profile status
Apart from these, you can also employ all of the universal Windows keyboard shortcuts, such as Ctrl + Shift + Equals to zoom and enlarge text. That goes for Mac keyboard shortcuts too, of course.
2. Type and Search Emojis With a Keyboard
Instant messaging feels incomplete without emojis. But it takes forever to change from the keyboard to the mouse, click the emoji icon next to the text box, and then find the right emoji. There’s a quicker way for keyboard warriors.
While in the regular text box, type colon (Shift + ;/: Key) followed by the first two letters of the emotion you want to express. You will get a prompt of matching emojis that change with each letter you type.
:th will show this:

:thu will show this:

Use the keyboard’s arrow keys to switch back and forth between the emojis displayed. Press Enter to accept. It’s a much faster way to type, and it will help if you familiarize yourself with the emoji to english dictionary.
3. Auto-Change Emoticons to Emojis (or Not)
Some emojis don’t need the colon-and-type trick above. WhatsApp will auto-convert them from the classic text emoticons. A helpful redditor extracted the full list of auto-converted emoticon from WhatsApp’s javascript:
![]()
That said, this auto-conversion can be annoying for some people, so there’s an easy fix to keep them as emoticons. All you need is a userscript called WhatsApp Emoticon Preserver.
- Install Tampermonkey, a cross-platform userscript manager, on your browser of choice.
- Go to WhatsApp Emoticon Preserver.
- Click the blue Install button.
- Refresh the WhatsApp Web tab in your browser.
4. Use Multiple WhatsApp Accounts on the Same PC

Some people have two phones with separate WhatsApp accounts, or maybe you use a dual-SIM phone with multiple WhatsApp apps. Whatever the reason, if you want to run two WhatsApp Web accounts on your computer, it’s a bit tricky. You can’t just open two tabs in Chrome and sign in separately.
Solution 1: The best way is to open an incognito window or different browser. So if you have one account signed into Chrome, start a new window in Incognito Mode, or fire up Opera (Opera is better than Chrome anyway) and go to WhatsApp Web through that. Log in as you normally would, using your other account to read the QR code.
Solution 2: If you want to stick with one browser and no incognito windows, there’s an alternative method. Open a new tab and visit dyn.web.whatsapp.com. It’s a proxy of the main WhatsApp Web app, is perfectly safe, and is verified by Scam Adviser. The only issue is that it malfunctions at times. Also, you can only use two accounts with this trick, not three or more.
5. Read Messages Without Blue Tick Notifications

As long as you have those blue tick marks enabled, people can see the exact time you read their text. You can switch off the Read Receipt on your phone if you want to disable this, but WhatsApp Web has something better.
If you are talking with someone and want to read their messages without them getting a read receipt, here’s what you do:
- Open the chat in your WhatsApp Web window.
- Open a Notepad file (or any other window), and change its size so that you can see the full WhatsApp Web chat in the background.
- Click in the Notepad file and keep your cursor there. This is the critical step, as the computer thinks you are working in a different window.
- Messages will load in the background chat window, which you can read, without being marked as read with the blue ticks. Right now, they will be double grey ticks, meaning the messages are received by you, but not read.
- When you’re okay with marking them as read, click the WhatsApp Web chat window and those ticks will instantly turn blue.
The limitation of this method is that you can only read the content of one chat at a time. But how often do you really need to use this trick anyway?
6. Get WAToolkit Extension for Message Previews
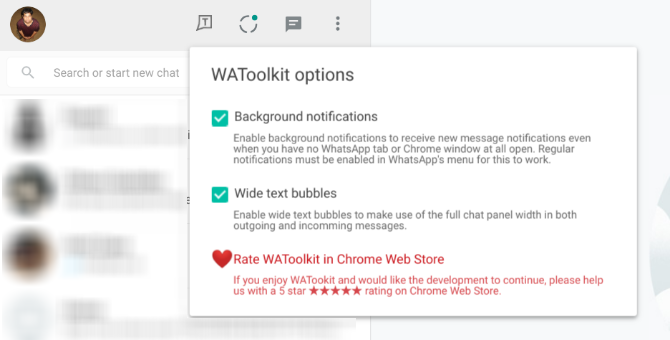
In WAToolkit, Chrome users have an excellent extension to add extra features to WhatsApp Web. It adds two cool tricks, including one that lets you again read WhatsApp Web conversations without the Read Receipt.
- Background Notifications: When you get a new message in WhatsApp, you no longer need to switch to the WhatsApp Web tab to read it. The WAToolkit icon’s badge shows how many unread messages you have. Hover over the icon and you’ll be able to preview the messages, without registering as read in your main chat.
- Full-Width Chat Bubbles: By default, WhatsApp doesn’t stretch a person’s chat bubble across the full width of the chat window. That’s why you get multi-line texts when it would easily fit in a single line of your wide desktop window. WAToolkit fixes this by turning the text bubbles full-width.
Remember, you can also use Chrome extensions in Opera and other browsers.
Download: WAToolkit for Chrome (Free)
7. Increase Volume or Change Audio Playback Speed

Unlike the regular WhatsApp, WhatsApp Web doesn’t let you make voice calls. However, you can send voice messages. But what do you do if that voice message is a little too soft, or perhaps a little too long?
Zapp is a WhatsApp Web extension for Chrome that lets you adjust both factors. You can increase the volume of the audio message you just got, or change the playback speed. You can go up to 2X for playback speed, and boost the volume by almost 100 percent.
Download: Zapp for Chrome (Free)
How to Use WhatsApp Web on Your iPad
All of these tips and tricks require you to use WhatsApp Web on a desktop computer, ideally with the Google Chrome browser.
However, you can also trick your Apple devices into working with WhatsApp Web, so here’s how to use WhatsApp Web on your iPad or iPod.
Read the full article: 7 WhatsApp Web Tips and Tricks All Users Should Know
Read Full Article
Mobile phone filmmaking
My friends and I collaborate on independent films in our spare time to break the monotony of daily routine. It’s a daunting task, but it’s a labor of love, even when the end result isn’t an epic piece of cinema.
Equipment, however, is expensive, and often we found ourselves improvising, like using $5 IKEA lamps and frosted shower curtains to light scenes. And now with Apple touting iPhone X’s video camera capabilities and a slew of companies making gimbals and lenses for them, filmmaking has become even more accessible to the average person.
Freefly sent us a Movi gimbal to test out for a week. Instead of a straight review, the video team thought it would be fun to make a movie. By “make a movie,” I mean, we grabbed a bunch of gear from the studio and shot a short scene in the park (see above).
The experience
First of all, dogs are finicky little monsters, and we could’ve used a script supervisor, but on to the gear. We used:
- iPhone X
- Moment portrait lens
- Freefly Movi gimbal
- Zoom recorder
- Sennheiser boom microphone
- generic boom pole from Amazon (though, if you’re on a super-tight budget, you can substitute with a tree branch, duct tape and hair ties — I successfully tried this in college)
Mounting the Moment lens on the iPhone X was a cinch, but balancing the Movi took a little practice. The Movi also included an app for adjusting the camera and gimbal settings. We weren’t able to use the Moment wide lens with the Movi because you can see the gimbal in the shot. Sliding it out of frame set the camera off balance, so we stuck with the portrait lens. We were later told Moment made counterweights to fix this issue.
Video quality was… adequate. We weren’t able to lock down the same exposure for every shot on the iPhone X, so a lot of time was spent in Premiere Pro matching shots. Since we won’t be able to get our hands on the Moment anamorphic lens until later this month, we faked the 2:39:1 with some black bars, tossed on a LUT and added a little After Effects magic.
People sometimes forget how important audio is, especially in our case, when we decided to shoot outdoors. Our windscreen wasn’t sufficient for harsh Bay Area wind. We should’ve picked up a dead cat windshield, but still, the Sennheiser shotgun did pretty well compared to iPhone X’s onboard recorder.
Ultimately, we probably could’ve put in a little more effort in pre-production, but it was fun getting out of the office for an afternoon. Video quality was decent enough for a web series, but we’re not quite ready for Sundance or Cannes.
Read Full Article
How to Search the Web Like a Pro Using Alfred for Mac

You probably search the web and your Mac dozens of times per day, but do you do so efficiently?
Using a keyboard shortcut or a keyword, the ever-popular Mac app Alfred provides a quick way to search the web and your computer with tons of power. We’ll show you how to use Alfred to become a search maestro.
Use Default Web Searches
The Web Search feature makes it easy to quickly launch web searches from Alfred. It provides a wide range of default web searches including Facebook, Google, Twitter, Amazon, Wikipedia, and more. To begin a search, prepend your search term with a keyword.
For instance, to search Wikipedia, prepend wiki to the search term. Prepend YouTube to search for videos. You don’t have to remember these keywords; use them regularly and Alfred will automatically suggest them.

Pressing Enter will open a new page in your default web browser with the results for your search. To see the complete list of supported keywords and configuration details, go to Preferences > Features and click Web Search to view the list in the right pane.
Those keywords are fully customizable. Double-click a keyword and type in a new one to replace it. While it’s not possible to delete the default search, you can disable it. Just uncheck the Enabled box.
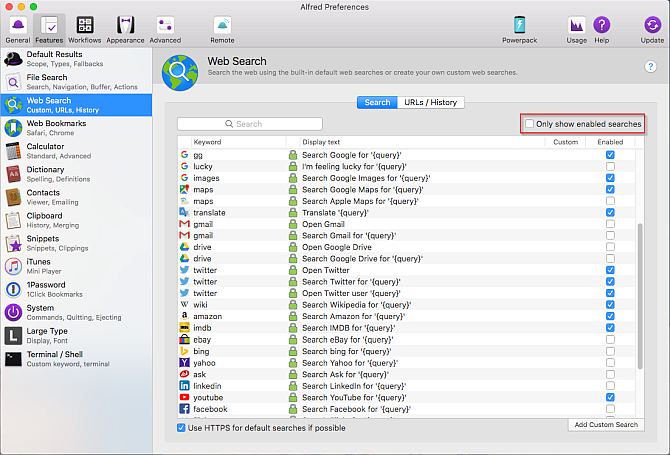
Use Custom Web Searches
Alfred also lets you set up search queries for content on specific websites. These sites are not the part of the default web search, so you must create them. To do this, you first need to find out the search URL for that site. Let’s create a custom search for MakeUseOf to explain.
Go to Preferences > Features and click Web Search. Click the Add Custom Search button located in the bottom right-hand corner of the screen. Perform a search on MakeUseOf, then copy and paste the search URL from your browser’s address bar to the Search URL box.
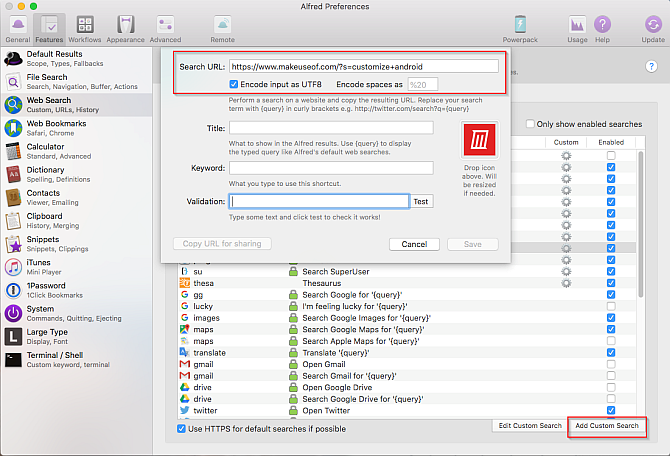
Replace your search term with {query} (in curly brackets). Tick the Encode input as UTF8 option to ensure that the custom searches accept international characters. The default Encode spaces as %20 should work, though this encoding option may vary from site to site. Some might use a plus symbol between the search characters instead.
Enter a Title to set the display text of your keyword; this will show up in Alfred’s results page. Set the keyword you want to use for the custom search as well. Now type in any text and click the Test button to check that you’ve got the correct custom search URL.
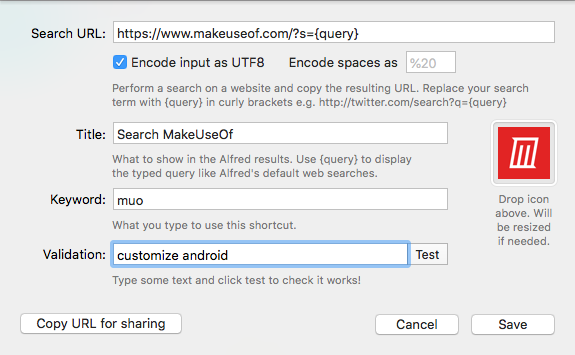
A Second Custom Search Example
Let’s take another example. If you’re familiar with the best Google search tricks, you probably know about the filetype: operator to search for files of a specific type. Open Google and search for filetype:pdf [Your Query].
Google converts this search into a long and messy URL. If you want to use another site, you may need to experiment with the URL, since every website is different.
The trick is to find the query structure after q=[Your Query] and the URL pattern. Paste the URL into a text editor like TextEdit and remove all the other unnecessary UTM and analytics code.
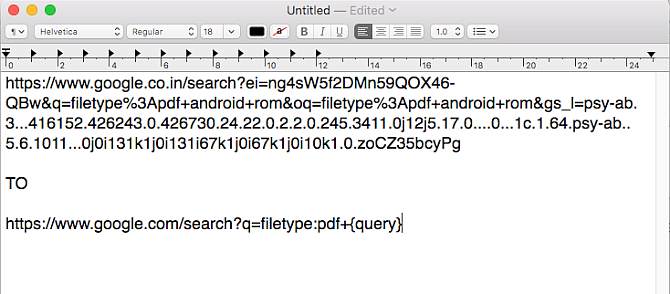
Now paste this clean URL into the Search URL box. Fill in all the details including title, encode options, and keyword as described above. Use the Test button to check the custom search URL you’ve created.
You can also add a logo to the custom search box. It lets you visually scan the result for more efficiency.
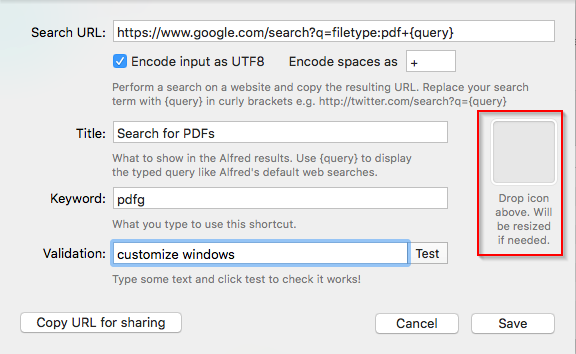
Once you create the custom search, you can share it with others. Click the Copy URL for sharing button to copy the custom search and paste it into any document. It includes all the search parameters, title, and keyword. Another user just has to click the unique URL starting with alfred:// to import the custom search.
Websites will change and evolve, so searches that work now have issues in the future. To solve this, take a look at the website’s custom search and follow the steps again.
More Custom Search Examples
Once you set up a custom search, you don’t have to waste time searching for content on specific sites. Just type a keyword followed by your query.
Here are some more search URLs for popular sites to get you started. Fill in the title and keyword fields with whatever you’d like.
- Google Scholar: A simple way to search for research papers, patents, and citations.
- https://ift.tt/2Nf6vg6
- PubMed: Comprised of more than 28 million citations for biomedical literature, life science journals, and online books.
- https://ift.tt/2ILYdZF
- Elsevier: Contains a vast content of journals, books, and patents for health science, core science, and more.
- https://ift.tt/2tOqpGL
- StackOverflow: Part of the Stack Exchange network, this is a question and answer site for programmers.
- https://ift.tt/2KBKYg1
- Mozilla Developer Network: A learning platform for web technologies.
- https://ift.tt/2tMmoTn
- Hacker News: A social news website focusing on computer science, programming, data science, entrepreneurship, and more.
- https://ift.tt/2IJhwTG
- Reddit: A news aggregation and discussion website.
- https://ift.tt/2tMFCrQ
- MacUpdate: Simplifies finding, buying, and installing apps for Mac.
- https://www.macupdate.com/find/mac/{query}
- Portable Freeware: A website full of free apps collection for Windows.
- https://ift.tt/2KDiN01
Search the Dictionary
Alfred provides access to the default macOS dictionary to help you quickly spell a word or define its meaning. Use the keywords define or spell followed by a word to give it a try. As you type, Alfred will start guessing the word. Press Enter to open the word in Dictionary app.

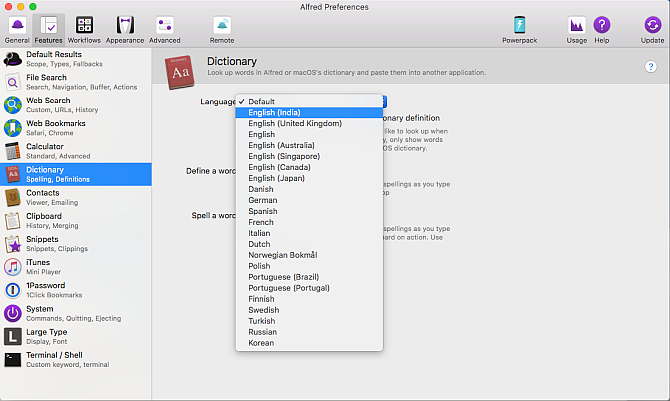
To change the Alfred dictionary, go to Preferences > Features and click Dictionary. In the right pane select a new language from the Language section.
To search the thesaurus, open the Thesaurus tab within the Dictionary app. The define keyword will then take you straight to a list of applicable synonyms and antonyms. Alternatively, you can setup a custom search for Thesaurus.com. Set the search URL as https://www.thesaurus.com/browse/{query}.
Do More With Alfred Workflows
Alfred’s most basic form has more search options than Spotlight. It lets you perform basic web searches with different search engines. You can also set up keywords to search content on the websites you use regularly.
But with the Powerpack add-on available for $25, you can extend Alfred in a variety of ways. One of the most powerful is Workflows. In comparison to web search, these integrate with your favorite Mac apps and web services and display results inline.
Here are a few of the best.
Movie and TV Show Search
This lets you search for a movie or TV show and displays the movie ratings and score inline.
To use this workflow, type movie, then a movie title. Press Enter to get the information about that movie. In the same way, type TV, then a TV show title.

Search GitHub
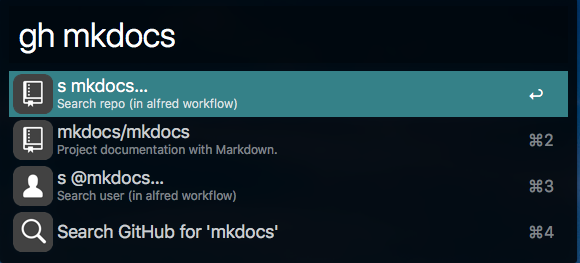
With this workflow, you can search through GitHub. You need to log in before using it, though. Type gh > login to authenticate your account. Then you can use various commands to search GitHub.
It has commands for specific repositories, users, your GitHub account, and special workflow commands.
Search Any Website
This workflow is true to its name. Type web followed by a prefix to signify the scope of the search, much like DuckDuckGo’s Bangs.
For example, when you type web r: it will search all subreddits. Meanwhile, web t: will search Google Translate. See the download page for details on expanding these.

Search Homebrew and Cask
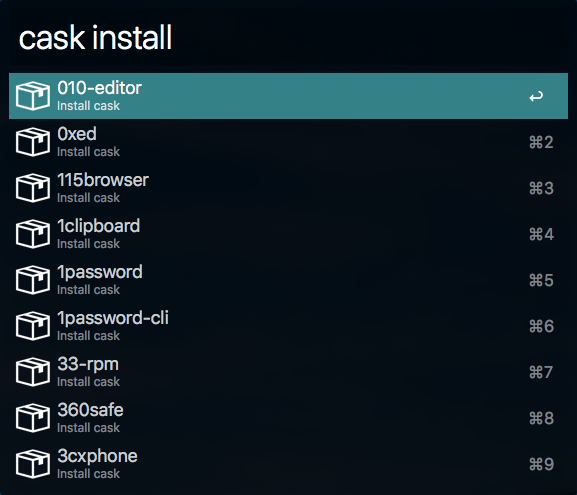
This workflow lets you efficiently manage Homebrew and Cask packages without using the Terminal. It supports commands like doctor, info, install, list, uninstall, search, and more.
Type brew or cask and select the command you wish to invoke. You can see and install packages right from Alfred.
Alfred Puts Powerful Mac Searches in Your Hands
Alfred is the Spotlight search bar on steroids. With a bit of work, you can expand the free version to search your favorite websites. And search masters can get a ton of use of what the Powerpack add-on unlocks.
Once you start using Alfred, you can save both time and effort while searching the web. Just like how Alfred can replace Spotlight, take a look at other Mac apps you can substitute with powerful alternatives.
Read the full article: How to Search the Web Like a Pro Using Alfred for Mac
Read Full Article
This could be Apple’s next iPhone USB-C fast charger
Right now, the cable that comes with a new iPhone does not plug into a new MacBook Pro without a dongle. #donglelife is for real. If this leak is correct, though, that wrong might soon be righted.
Photos have surfaced showing what is an engineering prototype of an Apple 18 W USB-C charger, which is supposedly to be bundled with the next iPhone. If correct, this will let owners take advantage of the iPhone’s fast charging capabilities without purchasing anything else. Plus, it will let users connect the iPhone to a MacBook Pro out of the box.
This rumor surfaced last year, too, though no photos ever surfaced to back up the claim.
If true, this adapter will mark the first major change in the iPhone’s wall charger. Apple has long bundled a 5W charger with the iPhone. It works fine, but does not supply the phone with the necessary power to charge at its fastest possible speed. Even if the photos here show something other than an official Apple product, chances are Apple is readying something similar. Previous leaks show something similar.
Apple included fast charging in the iPhone 8, iPhone 8 Plus and iPhone X but didn’t include the necessary charger to take advantage of the technology. Owners have to buy a third party charger of the $50 30W charger from Apple.
Read Full Article
