14 June 2019

How to make remote work work


Every time I see a “the future of work is remote” article, I think to myself: “How backwards! How retro! How quaint!” That future is now, for many of us. I’ve been a fully remote developer-turned-CTO for a full decade. So I’m always baffled by people still wrestling with whether remote work is viable for their company. That jury rendered its verdict a long time ago.

One reason companies still struggle with it is that remote work amplifies the negative effects of bad practices. If everyone’s in one place, you can dither, handwave, vacillate, micromanage, and turn your workplace into an endless wasteland of unclear uncertainty, punctuated by ad-hoc last-second crisis meetings — and your employees will probably still conspire against your counterproduction to get something done, albeit much less than what they’re capable of.

If they’re remote, though, progress via conspiracy and adhocracy is no longer an option. If they’re remote, you need decisive confidence, clear direction, iterative targets, independent responsibilities, asynchronous communications, and cheerful chatter. Let me go over each of those:

Decisive confidence. Suppose Vivek in Delhi, Diego in Rio, and Miles in Berlin are all on a project. (An example I’m drawing from my real life.) It’s late your time. You have to make a decision about the direction of their work. If you sleep on it, you’re writing off multiple developer-days of productivity.

Sometimes they have enough responsibilities to have other things to work on. (More on that below.) Sometimes you don’t have to make the decision because they have enough responsibility to do so themselves. (More on that below.) But sometimes you have to make the business-level decision based on scant information. In cases like this, remember the military maxim: “Any decision is better than no decision.”


Read Full Article

Applying AutoML to Transformer Architectures


Since it was introduced a few years ago, Google’s Transformer architecture has been applied to challenges ranging from generating fantasy fiction to writing musical harmonies. Importantly, the Transformer’s high performance has demonstrated that feed forward neural networks can be as effective as recurrent neural networks when applied to sequence tasks, such as language modeling and translation. While the Transformer and other feed forward models used for sequence problems are rising in popularity, their architectures are almost exclusively manually designed, in contrast to the computer vision domain where AutoML approaches have found state-of-the-art models that outperform those that are designed by hand. Naturally, we wondered if the application of AutoML in the sequence domain could be equally successful.

After conducting an evolution-based neural architecture search (NAS), using translation as a proxy for sequence tasks in general, we found the Evolved Transformer, a new Transformer architecture that demonstrates promising improvements on a variety of natural language processing (NLP) tasks. Not only does the Evolved Transformer achieve state-of-the-art translation results, but it also demonstrates improved performance on language modeling when compared to the original Transformer. We are releasing this new model as part of Tensor2Tensor, where it can be used for any sequence problem.

Developing the Techniques
To begin the evolutionary NAS, it was necessary for us to develop new techniques, due to the fact that the task used to evaluate the “fitness” of each architecture, WMT’14 English-German translation, is computationally expensive. This makes the searches more expensive than similar searches executed in the vision domain, which can leverage smaller datasets, like CIFAR-10. The first of these techniques is warm starting—seeding the initial evolution population with the Transformer architecture instead of random models. This helps ground the search in an area of the search space we know is strong, thereby allowing it to find better models faster.

The second technique is a new method we developed called Progressive Dynamic Hurdles (PDH), an algorithm that augments the evolutionary search to allocate more resources to the strongest candidates, in contrast to previous works, where each candidate model of the NAS is allocated the same amount of resources when it is being evaluated. PDH allows us to terminate the evaluation of a model early if it is flagrantly bad, allowing promising architectures to be awarded more resources.

The Evolved Transformer
Using these methods, we conducted a large-scale NAS on our translation task and discovered the Evolved Transformer (ET). Like most sequence to sequence (seq2seq) neural network architectures, it has an encoder that encodes the input sequence into embeddings and a decoder that uses those embeddings to construct an output sequence; in the case of translation, the input sequence is the sentence to be translated and the output sequence is the translation.

The most interesting feature of the Evolved Transformer is the convolutional layers at the bottom of both its encoder and decoder modules that were added in a similar branching pattern in both places (i.e. the inputs run through two separate convolutional layers before being added together).
A comparison between the Evolved Transformer and the original Transformer encoder architectures. Notice the branched convolution structure at the bottom of the module, which formed in both the encoder and decoder independently. See our paper for a description of the decoder.
This is particularly interesting because the encoder and decoder architectures are not shared during the NAS, so this architecture was independently discovered as being useful in both the encoder and decoder, speaking to the strength of this design. Whereas the original Transformer relied solely on self-attention, the Evolved Transformer is a hybrid, leveraging the strengths of both self-attention and wide convolution.

Evaluation of the Evolved Transformer
To test the effectiveness of this new architecture, we first compared it to the original Transformer on the English-German translation task we used during the search. We found that the Evolved Transformer had better BLEU and perplexity performance at all parameter sizes, with the biggest gain at the size compatible with mobile devices (~7 million parameters), demonstrating an efficient use of parameters. At a larger size, the Evolved Transformer reaches state-of-the-art performance on WMT’ 14 En-De with a BLEU score of 29.8 and a SacreBLEU score of 29.2.
Comparison between the Evolved Transformer and the original Transformer on WMT’14 En-De at varying sizes. The biggest gains in performance occur at smaller sizes, while ET also shows strength at larger sizes, outperforming the largest Transformer with 37.6% less parameters (models to compare are circled in green). See Table 3 in our paper for the exact numbers.
To test generalizability, we also compared ET to the Transformer on additional NLP tasks. First, we looked at translation using different language pairs, and found ET demonstrated improved performance, with margins similar to those seen on English-German; again, due to its efficient use of parameters, the biggest improvements were observed for medium sized models. We also compared the decoders of both models on language modeling using LM1B, and saw a performance improvement of nearly 2 perplexity.
Future Work
These results are the first step in exploring the application of architecture search to feed forward sequence models. The Evolved Transformer is being open sourced as part of Tensor2Tensor, where it can be used for any sequence problem. To promote reproducibility, we are also open sourcing the search space we used for our search and a Colab with an implementation of Progressive Dynamic Hurdles. We look forward to seeing what the research community does with the new model and hope that others are able to build off of these new search techniques!

Chernobyl


Chernobyl

5 Instagram Photo Editors to Create Better Pictures

Anker’s Nebula Capsule 2 Is the BEST Portable Projector We’ve Ever Used

How to Recolor Images and Objects in Google Slides


recolor-images-google-slides

Google Slides is a great tool to help you create a professional looking presentation. The most important things you can include in your presentation are images, to add visual interest.

Using the wrong pictures or having them in the wrong place can be distracting. To avoid this, here’s how to recolor, format, and adjust your images in Google Slides to keep things looking professional.

Step 1: Know Your Format Options

Image Editing in Google Slides Format Options

The first thing you’ll want to do is open up the presentation you’re working on. The presentation I have open is actually from an earlier tutorial I started, How to Create a Presentation in Google Slides. I’ve decided I want to keep adding to it.

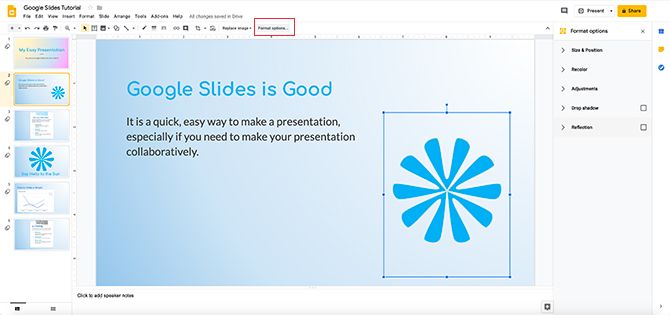
As you can see, I’ve placed an image I made here already: it looks a bit like a flower. To add an image to your own slide, go to the top of your workspace and click Insert > Image.

To adjust your image, click on it so its bounding box is active. Then go to the top of your screen and click on Format options, seen here in red.

When you click on it, your Format options menu will pop up on the right side of your screen. With these options, you can adjust your image.

Step 2: Size and Position

Image Editing in Google Slides Size and Position

In your list of Format options, you’ll see the category Size & Position. If you click on the arrow beside it, another menu will emerge.

Here you can format your image within its bounding box. You can change the width and height, lock its aspect ratio, and rotate it.

Whenever you click on one of these options, Google Slides will automatically update your presentation and save the changes, so no manual saving is necessary.

To undo these changes, press the undo arrow key in the top left-hand corner of your screen.

Step 3: Adjustments

Image Editing in Google Slides Adjustments

Next, click on the dropdown menu Adjustments. You’ll see the option to reduce or increase the Transparency, Brightness, and Contrast of your image.

Transparency tells your image how much of the background will show through it. The higher your transparency is, the more see-through your image will appear.

Image Editing in Google Slides Adjustments Brightness

Brightness is how bright you want your image to be. If you push this option all the way to the right, it washes out the color and turns your picture white—the lightest and brightest “value” that you can find on the spectrum.

Image Editing in Google Slides Adjustments Contrast

Contrast is how you adjust the contrast of your image and make the colors that are already there appear more vivid.

If I pull this slider all the way to the right, for example, it changes my previously mid-range blue to an eye-searing neon.

Image Editing in Google Slides Adjustments Reset

Let’s say you make a lot of adjustments to your image, but when you get to the end you decide you don’t like any of them.

Google Slides has a quick fix to revert your image to its previous state.

To revert your image, press the reset button at the bottom of the Adjustments menu. It will strip your image of its new changes within this section.

Step 4: Drop Shadow and Reflection

Image Editing in Google Slides Drop Shadow

Under the Drop shadow menu, you’ll have the option to add a drop shadow to your image. This gives it a more 3D effect.

Like Adjustments, you can change the color of the drop shadow, the transparency, the angle the shadow comes from, and the blur radius. By adjusting these settings you can make sure the effect blends seamlessly into the rest of your picture.

Image Editing in Google Slides Reflection

Under Reflection you can add a reflection to your picture. It sort of looks like a mirrored image that you would see in the water. You can adjust its transparency, its distance to the original image, and its size.

Step 5: Recolor Your Images

Image Editing in Google Slides Recolor

Recolor is probably one of the coolest things that Google Slides does. It takes your image and applies a color filter to it to make it match the rest of your presentation. Recolor works great if you’ve got an image that you really like the content of, but in terms of color it doesn’t match.

To recolor your image, click on the picture that you want to recolor so its bounding box is active. Then click on Format options > Recolor > No Recolor. It will pull up your recolor options.

As you can see from this list we’ve pulled up, there are lots of colors that Google Slides has chosen for us. Each small picture is a preview. Choose the one you want.

Image Editing in Google Slides Recolor Image

Once you choose your new color, Google Slides automatically applies it to your image like a filter.

If you’re not happy with that color, no problem. Simply click on the dropdown menu beneath Recolor, and choose No Recolor. This sets it back to normal.

Step 6: Final Adjustments

Image Editing in Google Slides Replace Image

Lastly, you might want to make some final changes to your overall image. Let’s say you’ve adjusted this picture and you like the position of it on your page, but you actually don’t want to use this image anymore. Maybe you want to replace it with a new one.

Well, Google Slides will let you swap it out.

To swap your image out, click on it so the bounding box is active. Then click on Replace Image, seen here in red.

Choose your new file from your computer, the web, your Google Drive, or your camera. However, if you’re pulling an image from the web, however, make sure you have permission to use it.

Image Editing in Google Slides Reset Image

What if you’ve made a ton of changes to the image you have, but you’ve decided you like your original more?

To quickly get back to your original, right-click on your picture and choose Reset image. Google Slides will revert it to its original state.

Make Your Slideshows Look Great

Now that you’ve learned how to edit your images, you’re well on your way to creating a stunning slideshow.

Images are not the only visual element that you can use, however. If you’re looking for more info, here are some Google Slides tips you should know before your next presentation.

Read the full article: How to Recolor Images and Objects in Google Slides


Read Full Article

A Guide to Using Tor on Android: Apps, Privacy, and More

6 Windows Apps That Automatically Organize Files for You


windows-apps-organize-files

The only way to overcome information overload is to put everything in its place on arrival. But you don’t want to spend all your time organizing files on Windows 10. Why not take a smart and lazy approach! After all, the better organized your files, the faster you can retrieve what you need from them.

But how do you get started? We’ll show you some excellent apps that let you organize different types of files in Windows automatically.

1. File Juggler

organize files with file juggler

If you’re having trouble in organizing your files, consider using an automation utility app. File Juggler monitors changes to folders and performs an action based on a set of rules. The app uses conditional if-and-then statements just like IFTTT. With File Juggler, you can rename, move, copy, extract, and more.

Before using the app, make a plan on what you want to do with files. Click the Add button and type in a brief description. Add a folder for which you want to take action in the Monitor section. In the If section add a condition.

Check out the conditions page for more information. At last, choose an action you wish to take on your files in the Then box.

Unique Features:

  • File Juggler lets you move and rename files based on the content of a searchable PDF. Use it to organize invoices, credit card bills, and snippets of information.
  • The app lets you create variables to organize different types of content with precision. Variables include file name, path, date, file properties, and more.
  • After organizing a file, you can tell File juggler to upload the file in Evernote. Select the notebook you want and add tags to the notes.
  • There is a separate tab called Log to help you keep track and check if it’s working correctly or not.

Download: FileJuggler (Free Trial for 30 days, $40)

2. DropIt

organize files and folders using dropit

DropIt is open source and works on the same principle of File Juggler. To organize files, you have to create rules and actions. Right-click the floating icon and choose Associations. Click the Plus button to create rules. Then, drag-and-drop files or folders into the DropIt icon to start processing them.

And like File Juggler, you can define a watch folder or activate the SendTo integration to process files and folders. You can define how to filter your content by name, date, size, property, and associate one of the 21 available actions. They include upload, rename, encrypt, compress, change properties, and more.

The Rules field is a powerful feature in DropIt to define filters. It’s superior to File Juggler. With different types of characters, abbreviations, and regular expression, you can selectively decide how to filter files according to the name, extension, or type.

Unique Features:

  • Group associations in different profiles. For example, you can set an association for office computer and another one for home. You can easily switch between the profiles.
  • There are some exclusive actions, including a feature to split and join files, create a list of files as HTML, create a playlist, send files through email, and more.
  • You can set a timer to monitor folders at set intervals. DropIt will also show you a progress window for monitored folders.
  • The app also supports the use of environment variables in the Destination field. For example, you can include file abbreviation with their paths, date abbreviation with the creation or modified date, and more.

Download: DropIt (Free)

3. PhotoMove

organize photos with photomove

Photo organizer apps like Adobe Lightroom make it incredibly easy to organize your photos by their EXIF data. If you don’t use these kinds of apps, then cataloging and sorting all these photos to a folder is a headache. With limited support of metadata, organizing photos in your PC is a manual and tedious task.

PhotoMove is an app that uses EXIF data to automatically move (or copy) and sort the photos into folders based on the actual date. To get started, choose the source folder containing your photos. Then, set the destination folder.

Click either Move or Copy button to process your files. Optionally, go to settings and decide the folder structure, duplicate file handling, file types, and more.

Unique Features:

  • PhotoMove works perfectly with NAS. If you have a vast photo collection, you can directly move and sort photos in the NAS itself.
  • Choose a different type of folder structure to organize pictures. In the free version, you can organize photos by (Yr, Month, Date). The pro version has ten different options.
  • PhotoMove supports command line syntax. You can use the command prompt or batch file to organize your photo collection.
  • If your photos don’t have EXIF data, you can use the file date or sort photos with no EXIF data to a different folder.

Download: PhotoMove (Free, Pro Version: $9)

4. TagScanner

organize music with tagscanner

Anyone having a massive collection of music knows the pain of renaming or managing a poorly tagged library. While a file name is essential, it’s the metadata that holds all the critical information, including artist, album, year of release, cover art, and more. Editing the metadata is a time consuming and challenging task.

TagScanner is an app that lets you organize and manage music collections. It includes an array of built-in configuration settings for editing tags of various audio formats.

Click the Browse for folder button to load the audio files. The app will read the metadata and display them according to the sorting mode.

Unique Features:

  • It supports advanced text replacement and transformation function in tags and file names.
  • The app can rename and reorganize audio files in bulk. You can create a new folder structure based on the tag structure.
  • TagScanner lets you preview tags and cover art from online databases before applying them into mp3 files.
  • You can create playlists and export information as CSV, HTML, M3U, and more.

Download: TagScanner (Free)

5. FileBot

organize movies and tv shows with filebot

Poorly named files, missing subtitles, episode names, and incomplete information is a common problem for people who like to watch movies or TV shows. FileBot is a utility app that can automate the task of organizing and renaming media files.

FileBot has a two-sided interface. Drag and drop the media folder into Original Files panel. Under the New Names panel, click the Fetch Data button. The app will try to automatically match your files with data from various online databases. They include The TVDB, AnDB, TheMovieDB, TVmaze, and more. Once you verify the information, click Rename.

Unique Features:

  • FileBot can scan the file names to figure out which show, season, and episodes the videos contain. How you choose to name the media files and organize them is up to you.
  • It also lets you see the complete list of every episode a TV series has ever broadcast. Just search for your show, pick a source, and sorting order.
  • The app also lets you manually search and download subtitles, preview them, and fix encoding problems in different languages.
  • Fetch cover art, poster images, and create NFO files for your media library. If you use Kodi, FileBot can fix various metadata related issues.

Download: FileBot (Paid, $6/year)

6. Listary

listary integration with open and save file dialog box

The automation apps discussed above will help you organize files. Once you get them sorted, you’ll need a search tool. Listary is an excellent search utility app to quickly find files.

On the first launch, Listary will ask you to set up keyboard shortcuts.

Go to Options > Hotkeys and enter the shortcut. When you press the hotkey, Listary search bar will pop up on the screen. Listary’s Fuzzy Search recognizes suffix, prefix, or any part of the file’s name. The results are instantly shown in the search box.

Unique Features:

  • Listary seamlessly integrates with Open and Save Dialog Box to quickly open and save files. You can search for files to open within any app that uses the Open File dialog.
  • Use the Quick Switch hotkey to instantly jump to the folder of the file you’re working with. Open files faster without manually navigating the Open File dialog.
  • You can set custom keywords for any number of folders. Search for files only in that folder.
  • Create shortcuts to files, folders, and apps you use frequently.

Download: Listary (Free, Pro Version for $20)

Ideas for Managing Your Files

Organizing files on Windows is a tedious job. But if you don’t spend time on this, it will lead to loss of productivity and frustration when files pile up.

With these apps discussed above, you can organize files and take control of the entire process without too much effort. Get on to this digital habit with some more great ideas for managing your computer files.

Read the full article: 6 Windows Apps That Automatically Organize Files for You


Read Full Article

How to Make Your Photos Sharper Using Adobe Photoshop


make-sharper-photoshop

One of the most common mistakes when taking a photo is that it ends up looking blurry. This is either because you moved, the object moved, or your camera didn’t focus properly.

Don’t worry. Depending on the level of blurriness involved, this is something that can be fixed. All you need is Photoshop. Here’s how to make your photos sharper using Photoshop.

Step 1: Open Up Your Photo

How to Sharpen Photos in Photoshop Filter Smart Sharpen

When you’re sharpening pictures, the overall changes will be subtle. Photoshop is there to make minor adjustments, not rebuild your image from the ground up.

If a photo is so blurry you can’t make out any of the shapes, then it’s probably not fixable. However, if you have a photo that’s still discernible but fuzzy around the edges, then it’s a good candidate for improvement.

For this tutorial, I’ve used a photo of some flowers that I took during my recent vacation to Victoria. I love the details in this photograph, but the flowers are a bit blurry.

There’s a couple of different ways that you can sharpen an image in Photoshop. For this tutorial, however, we’re going to focus on the most versatile of these options—the Smart Sharpen tool. It’s a feature that comes with Photoshop CC.

Once you have your own photo open, go to Filter > Sharpen > Smart Sharpen. You’ll see it clustered together with the other sharpening tools.

Step 2: Learn How to Use the Smart Sharpen Tool

How to Sharpen Photos in Photoshop Smart Sharpen Window

When you click Smart Sharpen, a new window will pop up.

Your window might be smaller than mine or be in a different place, but that’s fine. You can make your window larger and reposition it on the screen to give you a bigger area to work with, as I have done in this example.

To make your window larger, click and drag on one of the corners to resize it. Click and drag on the pale grey bar at the top of the window to move it around the screen.

Along the right side of the Smart Sharpen window you’ll see your settings. At the top is the Preview window checkbox, which should be turned on.

Next is the Preset menu, your general settings, and your Shadows and Highlights. Let’s take a look at all of these categories.

Step 3: Your Preset Menu

How to Sharpen Photos in Photoshop Preset Menu

You’ll see your Preset menu at the top of your settings. This is where you can load a sharpening preset, save a preset, or create a custom one.

An interesting thing to note is that Photoshop automatically sets you to Default if you haven’t used this tool before. The minute that you start changing the settings, it will switch your Preset to Custom.

Step 4: Your General Functions

How to Sharpen Photos in Photoshop General Settings

After you’re done with your Preset menu, it’s time to move down and explore your general settings. This is where you can adjust the sharpness of your image. When you sharpen an image, it increases the contrast between the items in your picture.

Amount means the overall sharpening that you’ve applied to your image. The higher the percentage, the more sharpening there will be.

Radius is the area around the sharpened edge that will be affected. The higher the percentage, the larger the affected area.

Reduce Noise helps you reduce image artifacts in your picture.

All three of these options are great. If you push these settings too high, however, your image can start to look jagged or pixelated due to the high contrast.

When this happens, it’s best to reduce these settings to add a bit of blurriness back.

At the bottom of these settings, you’ll see a dropdown menu called Remove. In this menu you can choose to remove three different types of blur that may be affecting your image.

Gaussian Blur comes from an overall blurry image. This might be affecting your picture if it was taken at dusk, for example, when visibility was poor.

Lens Blur occurs when you’ve moved, but the object didn’t.

Motion Blur occurs when the object in your pictures were moving. If you choose to remove Motion Blur, you’ll see the little circular “dial” beside it become active. This dial allows you to change the direction of the motion blur removal.

Step 5: Shadows and Highlights

How to Sharpen Photos in Photoshop Shadows Settings

Under your general settings, you’ll see your Shadows section. This section works the same way as the previous area, but unlike your general settings it focuses specifically on the dark areas of your picture.

Play around with this setting and see what works best for you. Each image will have a slightly different level of blurriness, so the settings I required to calibrate my photo might be different from yours.

How to Sharpen Photos in Photoshop Highlights Settings

Under the Shadows section, you’ll see Highlights. This section works the same as the other two, but focuses on the brighter areas in your image.

Step 6: Save Your Preset and Check Your Work

How to Sharpen Photos in Photoshop Save Preset

A cool way that you can check out the changes in your Smart Sharpen window—before you apply them—is to click and hold on the image in your preview window. Drag it a bit. When you do, Photoshop will show you what your images looked like before you applied the changes.

Let go of your mouse, and it reverts to the new changes.

If you’re happy with how your image looks, you can press OK and apply the settings immediately. You can also choose to save the settings first.

To save the settings as a preset, go back to your Preset dropdown menu and choose to Save Preset.

Once that’s done, click OK. Photoshop will apply the changes and exit the Smart Sharpen window.

How to Sharpen Photos in Photoshop New Sharper Preset

Once you go back to your main workspace, you’ll see your image with its changes applied.

Because these changes are going to be subtle, it’ll be hard to see what’s different at first glance. Let’s compare the new and old images side-by-side:

How to Sharpen Photos in Photoshop Compare Old and New

As you can see, the new edges on the left are much cleaner.

If you don’t like the changes you’ve made to your own image, no problem. Just go File > Undo Smart Sharpen to undo the changes you’ve made.

Once you’re done with your tweaks, save your picture and its updates by going to File > Save.

You can also go to File > Save As if you want to keep a copy of the original, unaltered picture.

If you’re looking to perform a few more image edits before you save your file, check out our article explaining how to change the background of a photo in Photoshop.

Step 7: Tips to Keep in Mind

How to Sharpen Photos in Photoshop Other Options

A few more things to keep in mind when sharpening your photos using Photoshop:

  1. When sharpening, it’s best to sharpen your image in small amounts. Too much at once can result in image artefacts instead of having a nice, natural looking effect.
  2. Under Filter > Sharpen, you will see other sharpening tools you can use. These work well, but unfortunately they do not have as much versatility as the Smart Sharpen tool.

Fixing Your Photographs

Photoshop is a great editing tool, whether it’s for photographs or graphic design. With this basic introduction to the Smart Sharpen tool you might even be able to save some of your photos from the junk pile.

Are you looking for more ways to fix your photos in post? Then here’s how to crop your images using Photoshop.

Read the full article: How to Make Your Photos Sharper Using Adobe Photoshop


Read Full Article

The 6 Best Comic Readers for Android

16 Essential Gmail Terms and Features You Should Know About


essential-gmail-terms

Where are the folders in Gmail? Are labels the same as folders? How are both different from categories?

Unlock the "Most Useful Gmail Keyboard Shortcuts" cheat sheet now!

This will sign you up to our newsletter

Enter your Email

You might have questions like these about the web version of Gmail if you’re new to it. To help you get familiar with Gmail terms, we’ll list the key features of Gmail you should really know about.

1. Conversation View

conversation-view-gmail

You know this as an email thread. Conversation View packs an email and all replies to it into a single view to ensure that you get the context when you’re reading any of the messages. Each message in the group gets its own collapsible section.

To turn on this Gmail feature, visit Settings > General. There, under the Conversation View section, select the radio button for Conversation view on.

2. Importance Markers

important-markers-gmail

These are visual cues that highlight emails Google thinks might be important to you. You’ll see them as yellow-colored tags next to certain emails once you enable the Show markers option under Settings > Inbox.

How does Gmail decide which emails you’re likely to consider important?

It relies on the way you process email. Gmail pays attention to which emails you open and reply to, which ones you archive or delete, which contacts you communicate with, and so on.

When Gmail mistypes an email as important, you can correct it by clicking on the marker to disable it. Likewise, you can enable a marker for an email that you consider important but Gmail has failed to mark as such. In both cases, Gmail learns from your actions to improve its accuracy.

3. Hover Actions

Hover actions in Gmail on the web

Hover actions let you process an email without having to select it first. You can snooze, archive, or delete an email, or even mark it as read/unread in a snap thanks to these action buttons that show up when you hover over an email. Of course, for advanced actions like labeling and filtering, you still have to select the email first as usual.

If you find hover actions annoying, you can turn them off from Settings > General—under Hover actions, select the radio button next to Disable hover actions.

4. Undo Send

undo-send-gmail

As its name suggests, Gmail’s Undo Send feature lets you pull back an email you’ve hit Send on. You have a ten-second window to do it though, and you can tweak this interval by a few seconds under Settings > General > Undo Send.

Gmail enables the feature by default, and right after you send an email, you’ll see the Undo option right below the search box.

5. Labels

labels-gmail

Labels are the signature Gmail feature. They’re text-based, color-coded identifiers to help you find the right emails faster. The items you see in the sidebar like Inbox, Trash, and Drafts happen to be labels that Gmail has already set up for you.

Labels behave somewhat like folders and somewhat like tags. You’re better off thinking of them as tags though. Read our power user guide to Gmail to understand them better. (Note that Gmail doesn’t have actual folders or tags.)

6. Categories

categories-gmail

These are a set of default labels that show up as tabs in Gmail. You have four of them: Social, Promotions, Updates, and Forums.

Categories add context to your emails. They keep automated messages like social media updates and promotional mailers out of your primary inbox.

Thanks to the category tabs, you can find specific types of emails faster. For example, if you’re looking for a password reset email, you can jump right to the Updates tab because that’s where it’s programmed to show up.

If you want to stick with the Primary tab only, turn off the category tabs via the Configure inbox option hidden behind the gear or Settings icon.

7. Filters

filters-gmail

Filters are rules you set up to teach Gmail to process your emails for you based on various criteria.

You can use filters to stop automated emails, find emails with large attachments, and mark emails as read. You can also use them to label, delete, and organize emails automatically. Start by setting up smart Gmail filters to deal with the bulk of your email.

8. Snooze

Snooze options in Gmail on the web

Snooze is one of the new Gmail features and works as it does in other email clients—it lets you hide an email until you’re ready to deal with it.

When you hit the Snooze toolbar button (the one that resembles a clock) on an email, you can tell Gmail when you want the email to reappear in your inbox. Pick from one of the preset schedules available or set a custom date and time.

9. Smart Replies

Smart replies are the predictive suggestions Gmail comes up with when you’re replying to certain emails. Gmail bases these suggestions on your previous replies. You won’t see them for every email, and the suggestions you see are usually simple answers to simple questions.

You’ll see similar suggestions when you’re typing an email, too. That’s the Smart Compose feature in action.

While some people find these predictive responses helpful, some others find them annoying. If you fall in the latter camp, you can disable the Smart Compose feature as well as smart replies from Settings > General.

10. Nudges

Gmail nudges remind you to reply to important emails by pushing them to the top of your inbox. Need similar reminders to help you follow up on sent emails that haven’t received a reply? Nudges have got you covered there too. Gmail enables this feature automatically. If you decide you don’t want it after all, you can turn nudges off along with other AI-based features in Gmail.

11. Confidential Mode

Confidential mode settings in Gmail on the web

Confidential mode lets you set an expiration date while sending an email containing sensitive information. You can further protect the email with a passcode and also  revoke access to the email anytime, even before the expiration date is up. The email recipient won’t be able to copy, download, forward, or print the email. Keep in mind that he can still take a screenshot of it.

To enable confidential mode for an email, click on the Turn confidential mode on / off toolbar button in the Compose window. (Look for the briefcase icon inset with a clock.)

The confidential mode is missing from G Suite as of now.

12. Preview Pane

preview-pane-gmail

This time-saving Gmail feature displays the content of an email right next to the message list. Essentially, you get a split-pane view that ensures you don’t have to open a message to read it.

To toggle the Preview Pane feature, visit Settings > Advanced. When the feature is enabled, you can tell Gmail to display email previews either below or beside your inbox. Click on the icon next to the Settings icon for options to toggle between the two views.

13. Multiple Inboxes

multiple-inboxes-gmail

Multiple Inboxes are a set of up to five inbox panes stacked below your primary inbox. The beauty of it is that you get to decide what kind of emails should go in each pane.

For example, you can have one pane for messages with a certain label and another one for starred messages. Throw in a third pane for emails that match a particular search query. It’s all up to you.

To configure what you want to see in each custom inbox, you’ll have to visit Settings > Multiple Inboxes. You’ll see this section only after you enable the Multiple Inboxes feature under Settings > Advanced.

14. Canned Responses

Happy Birthday Email Template

Canned responses are nothing but email templates. Set them up to save yourself the hassle of having to type the same stuff over and over. For repetitive business emails, season’s greetings and such, start with a canned response and tweak its details.

Like the two Gmail features above, you can enable or disable canned responses from Settings > Advanced.

15. Priority Inbox

priority-inbox-gmail

This is a special Gmail view to ensure that the right messages bubble to the top in your inbox. By the right messages we mean the unread ones, the ones marked as Important, and your starred messages. Everything else comes second.

To switch to the Priority Inbox view, hover on Inbox in the sidebar and click on the tiny down arrow that shows up. You should now see a popup menu with a list of views or Inbox Types to choose from. You know what you have to select!

It’s handy that you can customize the kind of messages you see in the priority inbox. To get started, go to Settings > Inbox > Inbox sections.

16. Gmail Offline

Enable offline mail in Gmail on web

As you might have guessed, this is Gmail’s way of giving you offline access to your email. It allows you to read, organize, search, delete, archive, compose, and queue emails for sending—all without an internet connection. It’s a pity that you can take advantage of this Gmail feature only if you use Google Chrome.

To start accessing your Gmail inbox when you’re offline, select the Enable offline mail checkbox under Settings > Offline. After tweaking the corresponding settings as you see fit, click on the Save Changes button beneath the settings.

Learn the Ins and Outs of Gmail

If you’ve got yourself a brand new Gmail account or if you’ve always favored a desktop client to use Gmail, the web version can take a bit of getting used to. The Gmail way of doing things can even feel illogical or complex to you.

But that’s only until you get the hang of the best features your Gmail account, which you will sooner or later. Check out our ultimate guide to Gmail for more tips!

Read the full article: 16 Essential Gmail Terms and Features You Should Know About


Read Full Article