30 August 2018

The Google Assistant is now bilingual 


The Google Assistant just got more useful for multilingual families. Starting today, you’ll be able to set up two languages in the Google Home app and the Assistant on your phone and Google Home will then happily react to your commands in both English and Spanish, for example.

Today’s announcement doesn’t exactly come as a surprise, given that Google announced at its I/O developer conference earlier this year that it was working on this feature. It’s nice to see that this year, Google is rolling out its I/O announcements well before next year’s event. That hasn’t always been the case in the past.

Currently, the Assistant is only bilingual and it still has a few languages to learn. But for the time being, you’ll be able to set up any language pair that includes English, German, French, Spanish, Italian and Japanese. More pairs are coming in the future and Google also says it is working on trilingual support, too.

Google tells me this feature will work with all Assistant surfaces that support the languages you have selected. That’s basically all phones and smart speakers with the Assistant, but not the new smart displays, as they only support English right now.

While this may sound like an easy feature to implement, Google notes this was a multi-year effort. To build a system like this, you have to be able to identify multiple languages, understand them and then make sure you present the right experience to the user. And you have to do all of this within a few seconds.

Google says its language identification model (LangID) can now distinguish between 2,000 language pairs. With that in place, the company’s researchers then had to build a system that could turn spoken queries into actionable results in all supported languages. “When the user stops speaking, the model has not only determined what language was being spoken, but also what was said,” Google’s VP Johan Schalkwyk and Google Speech engineer Lopez Moreno write in today’s announcement. “Of course, this process requires a sophisticated architecture that comes with an increased processing cost and the possibility of introducing unnecessary latency.”

If you are in Germany, France or the U.K., you’ll now also be able to use the bilingual assistant on a Google Home Max. That high-end version of the Google Home family is going on sale in those countries today.

In addition, Google also today announced that a number of new devices will soon support the Assistant, including the tado° thermostats, a number of new security and smart home hubs (though not, of course, Amazon’s own Ring Alarm), smart bulbs and appliances, including the iRobot Roomba 980, 896 and 676 vacuums. Who wants to have to push a button on a vacuum, after all.


Read Full Article

Twitter announces new policy and certification process for ‘issue ads’


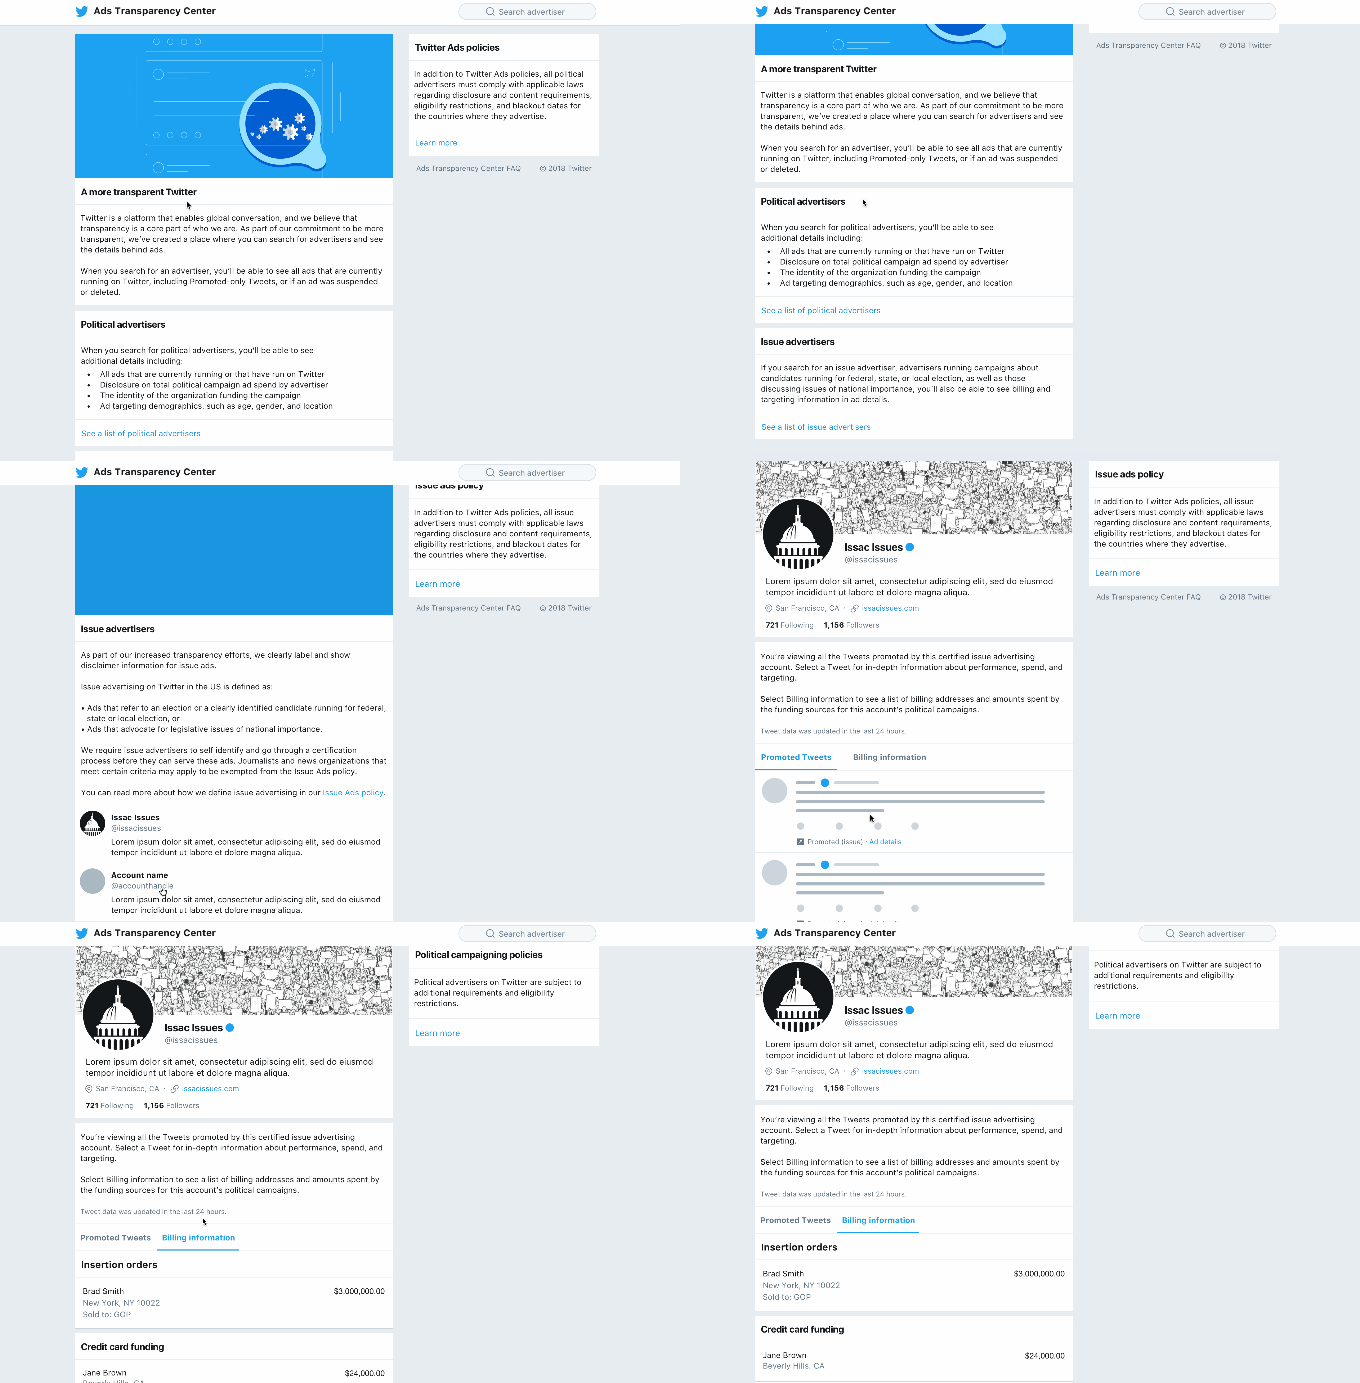
Twitter continues to roll out new policies aimed at increasing transparency, particularly around political advertising.

Amidst ongoing concerns about Russian election interference and misinformation on social media, the company recently announced political ad guidelines and launched an Ads Transparency Center where you can find more information about advertisers.

Initially, however, Twitter’s stricter standards were limited to ads for U.S. federal election candidates and campaigns. Now it’s announced a policy around the broader category of “issue ads.”

In a blog post, Twitter’s vice president of trust and safety Del Harvey and its general manager of revenue product Bruce Falck said the policy affects two categories:

* Ads that refer to an election or a clearly identified candidate, or
* Ads that advocate for legislative issues of national importance

In both cases, advertisers will need to apply for certification, which involves verifying their identity and location in the United States. Like election ads, issue ads will be labeled as such in the Twitter timeline, and they’ll allow users to click through and learn more about the advertiser. They’ll also be included in the Ads Transparency center.

Twitter Issue Ads

As examples of the kinds of issues that would be covered, Harvey and Falck cited “abortion, civil rights, climate change, guns, healthcare, immigration, national security, social security, taxes, and trade,” though they also said that list will likely evolve over time.

News organizations that want to run ads around their political coverage can apply for an exemption. (Since the definition of what is and isn’t a news organization can be blurry, there are specific criteria that they’d need to meet, like providing editorial staff information online and not being “dedicated to advocating on a single issue.”)

“We don’t believe that news organizations running ads on Twitter that report on these issues, rather than advocate for or against them, should be subject to this policy,” Harvey and Falck wrote.

Twitter says it will start enforcing the policy (which, to be clear, is currently U.S.-only) on September 30.


Read Full Article

3 Ways to Edit the boot/config.txt File on Raspberry Pi


edit-config-raspi

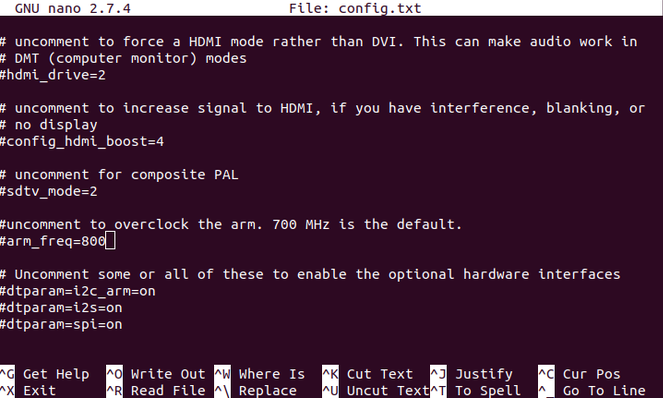
You’re in the middle of a Raspberry Pi project, when all of a sudden you realize there’s something wrong: fixing it means editing the config.txt file, which is found in the /boot/ directory.

But what is the easiest way to access this file while the Raspberry Pi is still running? And if you have to shut down to retrieve the microSD card, how should you edit it? Here’s everything you need to know.

Why You Need config.txt on Raspberry Pi

Edit config.txt on the Raspberry Pi

The Raspberry Pi’s default operating system (and most of the alternatives) rely on some configuration parameters that are read when the computer boots from the microSD card. These are stored in the config.txt document, found in the /boot/ folder.

Such instructions might adjust the way the display is detected and the desktop displayed; config.txt can even be used to overclock your Raspberry Pi (or return to default clock settings).

Both of these settings are logged in config.txt as neither can be changed on a running Raspberry Pi. If the display isn’t detected, you cannot alter any desktop settings.

Similarly, if the Pi has been overclocked and won’t boot, or repeatedly restarts, you won’t be able to access raspi-config to reset it. Instead, config.txt is provided to give you the option of resetting your Raspberry Pi’s clock speed.

It’s also possible to alter the USB boot mode from within config.txt, just as it is to tweak audio settings.

1. Access config.txt From Within Raspbian

If you need to edit the config.txt file while Raspbian is running, you should be able to browse to it. You’ll find the /boot/ folder in the root directory of the microSD card. Once you’ve found it, simply double click to open, and edit it in your default text editor.

However, if you’re planning to edit the file, it’s a good idea to retain the original. Make a copy of the file using your file manager, giving it a different, but descriptive name. Once you’ve done this, you’ll easily be able to restore the original should run into trouble with the edited version.

You can also create a copy in the terminal using

mv config.txt backupconfig.txt

Again, give your copy a meaningful name. Note that when editing the config.txt file, no changes will be applied until you reboot your Raspberry Pi.

2. Edit config.txt Remotely

Rarely connect a keyboard to your Raspberry Pi? As long as the computer is on the network, you should be able to edit the config.txt file remotely. Do this by connecting via SSH (or VNC or RDP) and browsing to the /boot/ directory. You’ll need to use the

cd /

command to step up a level from the default /home/ directory in Raspbian. Here, use

ls

to list the contents of the root directory. Find /boot/ then

cd /boot

open it, again listing the contents. Here, you should find config.txt. To read or edit the text file, use the nano text editor, which comes preinstalled (although others are available).

sudo nano config.txt

Once the changes have been made, press Ctrl + X to save and exit. Remember to reboot your Raspberry Pi after making changes.

sudo reboot

3. Edit config.txt on Your PC

Linux, Windows, and macOS computers should be able to access the config.txt file via the microSD card. This means shutting down your Raspberry Pi (safely, in order to avoid data corruption) and ejecting the SD card. Insert it into your computer’s card reader to check the contents.

Edit config.txt on Linux PC

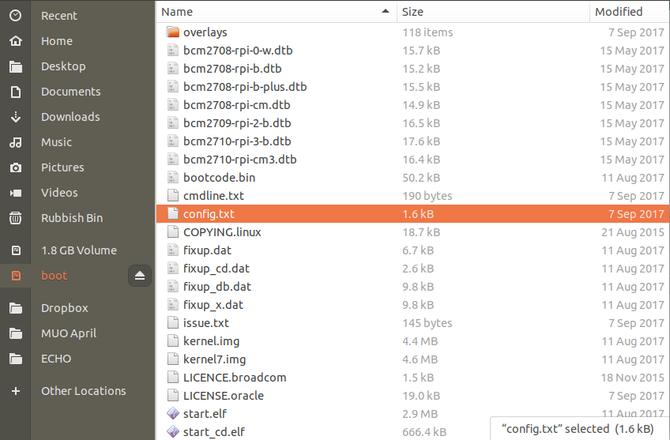
If you need to edit the config.txt file on a Linux PC, find the disk listed in your default file manager when inserted. It should be listed as two devices, the main volume (typically “1.8GB Volume” as per the size of the default Raspbian partition), and boot.

Edit Raspbian's config.txt file on a Linux PC

As you might have guessed, this is the volume you need to access. It is essentially the /boot/ directory mounted as a drive. Open this to find config.txt. Save any changes you make in your default text editor, then use the Eject button in the file manager to safely eject the SD card.

Edit config.txt on Windows 10

Inserting the Raspberry Pi’s SD card on a Windows computer should result in it being instantly mounted, and accessible via Windows Explorer. However, while two partitions will be displayed on the device, only one, boot, will be accessible in Windows.

Select this, then find config.txt. Use the default Notepad text editor to make edits (or an alternative, such as Notepad++), then save and exit when you’re done.

To safely eject the SD card, right-click the drive in My Computer, and select Eject.

Edit config.txt on macOS

If you’re using a Mac, you should find the card appears on your desktop when it is detected. Use the Finder to browse the contents, looking for a file called config (without the TXT file extension). Read and edit the file in the TextEdit app, ensuring that any changes you make are saved when you exit. To eject the card, drag the desktop icon to the Trash, or click Eject in Finder.

Whichever method you use to edit the config.txt from the microSD card read on your PC, remember to safely eject the device before returning it to your Raspberry Pi.

Tweaking Your Raspberry Pi Even Further

The config.txt file is just one of several ways to edit your Raspberry Pi’s general configuration. You’re probably already aware of the raspi-config screen, accessed via the terminal. There’s even a desktop-based Raspberry Pi Configuration Tool, found in the Preferences menu on Raspbian Jessie and Raspbian Stretch.

Tweaking the Pi’s configuration can save a lot of time if you get it right. To help ensure the computer is set up as you intend, why not take a look at the PiBakery? This is a software tool that uses a block-based approach to help you preconfigure various Raspberry Pi settings in Raspbian, from the Wi-Fi SSID and password to running custom scripts.

Read the full article: 3 Ways to Edit the boot/config.txt File on Raspberry Pi


Read Full Article

Teaching the Google Assistant to be Multilingual


Multilingual households are becoming increasingly common, with several sources [1][2][3] indicating that multilingual speakers already outnumber monolingual counterparts, and that this number will continue to grow. With this large and increasing population of multilingual users, it is more important than ever that Google develop products that can support multiple languages simultaneously to better serve our users.

Today, we’re launching multilingual support for the Google Assistant, which enables users to jump between two different languages across queries, without having to go back to their language settings. Once users select two of the supported languages, English, Spanish, French, German, Italian and Japanese, from there on out they can speak to the Assistant in either language and the Assistant will respond in kind. Previously, users had to choose a single language setting for the Assistant, changing their settings each time they wanted to use another language, but now, it’s a simple, hands-free experience for multilingual households.
The Google Assistant is now able to identify the language, interpret the query and provide a response using the right language without the user having to touch the Assistant settings.
Getting this to work, however, was not a simple feat. In fact, this was a multi-year effort that involved solving a lot of challenging problems. In the end, we broke the problem down into three discrete parts: Identifying Multiple Languages, Understanding Multiple Languages and Optimizing Multilingual Recognition for Google Assistant users.

Identifying Multiple Languages
People have the ability to recognize when someone is speaking another language, even if they do not speak the language themselves, just by paying attention to the acoustics of the speech (intonation, phonetic registry, etc). However, defining a computational framework for automatic spoken language recognition is challenging, even with the help of full automatic speech recognition systems1. In 2013, Google started working on spoken language identification (LangID) technology using deep neural networks [4][5]. Today, our state-of-the-art LangID models can distinguish between pairs of languages in over 2000 alternative language pairs, using recurrent neural networks, a family of neural networks which are particularly successful for sequence modeling problems, such as those in speech recognition, voice detection, speaker recognition and others. One of the challenges we ran into was working with larger sets of audio — getting models that can automatically understanding multiple languages at scale, and hitting a quality standard that allowed those models to work properly.

Understanding Multiple Languages
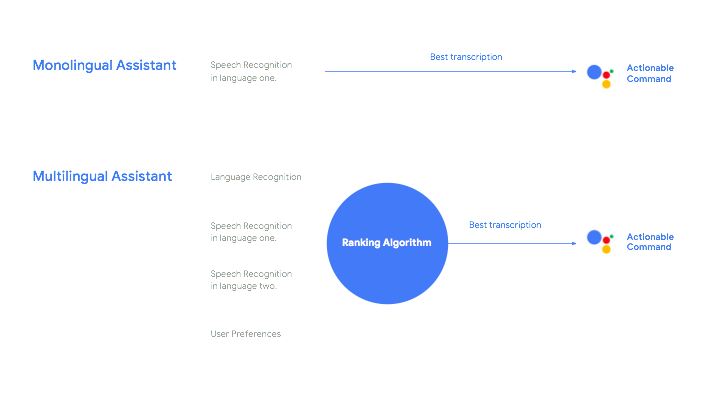
To understand more than one language at once, multiple processes need to be run in parallel, each producing incremental results, allowing the Assistant not only to identify the language in which the query is spoken but also to parse the query to create an actionable command. For example, even for a monolingual environment, if a user asks to “set an alarm for 6pm”, the Google Assistant must understand that "set an alarm" implies opening the clock app, fulfilling the explicit parameter of “6pm” and additionally make the inference that the alarm should be set for today. To make this work for any given pair of supported languages is a challenge, as the Assistant executes the same work it does for the monolingual case, but now must additionally enable LangID, and not just one but two monolingual speech recognition systems simultaneously (we’ll explain more about the current two language limitation later in this post).

Importantly, the Google Assistant and other services that are referenced in the user’s query asynchronously generate real-time incremental results that need to be evaluated in a matter of milliseconds. This is accomplished with the help of an additional algorithm that ranks the transcription hypotheses provided by each of the two speech recognition systems using the probabilities of the candidate languages produced by LangID, our confidence on the transcription and the user’s preferences (such as favorite artists, for example).
Schematic of our multilingual speech recognition system used by the Google Assistant versus the standard monolingual speech recognition system. A ranking algorithm is used to select the best recognition hypotheses from two monolingual speech recognizer using relevant information about the user and the incremental langID results.
When the user stops speaking, the model has not only determined what language was being spoken, but also what was said. Of course, this process requires a sophisticated architecture that comes with an increased processing cost and the possibility of introducing unnecessary latency.

Optimizing Multilingual Recognition
To minimize these undesirable effects, the faster the system can make a decision about which language is being spoken, the better. If the system becomes certain of the language being spoken before the user finishes a query, then it will stop running the user’s speech through the losing recognizer and discard the losing hypothesis, thus lowering the processing cost and reducing any potential latency. With this in mind, we saw several ways of optimizing the system.

One use case we considered was that people normally use the same language throughout their query (which is also the language users generally want to hear back from the Assistant), with the exception of asking about entities with names in different languages. This means that, in most cases, focusing on the first part of the query allows the Assistant to make a preliminary guess of the language being spoken, even in sentences containing entities in a different language. With this early identification, the task is simplified by switching to a single monolingual speech recognizer, as we do for monolingual queries. Making a quick decision about how and when to commit to a single language, however, requires a final technological twist: specifically, we use a random forest technique that combines multiple contextual signals, such as the type of device being used, the number of speech hypotheses found, how often we receive similar hypotheses, the uncertainty of the individual speech recognizers, and how frequently each language is used.

An additional way we simplified and improved the quality of the system was to limit the list of candidate languages users can select. Users can choose two languages out of the six that our Home devices currently support, which will allow us to support the majority of our multilingual speakers. As we continue to improve our technology, however, we hope to tackle trilingual support next, knowing that this will further enhance the experience of our growing user base.

Bilingual to Trilingual
From the beginning, our goal has been to make the Assistant naturally conversational for all users. Multilingual support has been a highly-requested feature, and it’s something our team set its sights on years ago. But there aren’t just a lot of bilingual speakers around the globe today, we also want to make life a little easier for trilingual users, or families that live in homes where more than two languages are spoken.

With today’s update, we’re on the right track, and it was made possible by our advanced machine learning, our speech and language recognition technologies, and our team’s commitment to refine our LangID model. We’re now working to teach the Google Assistant how to process more than two languages simultaneously, and are working to add more supported languages in the future — stay tuned!


1 It is typically acknowledged that spoken language recognition is remarkably more challenging than text-based language identification where, relatively simple techniques based on dictionaries can do a good job. The time/frequency patterns of spoken words are difficult to compare, spoken words can be more difficult to delimit as they can be spoken without pause and at different paces and microphones may record background noise in addition to speech.


The Google Assistant is now bilingual 


The Google Assistant just got more useful for multilingual families. Starting today, you’ll be able to set up two languages in the Google Home app and the Assistant on your phone and Google Home will then happily react to your commands in both English and Spanish, for example.

Today’s announcement doesn’t exactly come as a surprise, given that Google announced at its I/O developer conference earlier this year that it was working on this feature. It’s nice to see that this year, Google is rolling out its I/O announcements well before next year’s event. That hasn’t always been the case in the past.

Currently, the Assistant is only bilingual and it still has a few languages to learn. But for the time being, you’ll be able to set up any language pair that includes English, German, French, Spanish, Italian and Japanese. More pairs are coming in the future and Google also says it is working on trilingual support, too.

Google tells me this feature will work with all Assistant surfaces that support the languages you have selected. That’s basically all phones and smart speakers with the Assistant, but not the new smart displays, as they only support English right now.

While this may sound like an easy feature to implement, Google notes this was a multi-year effort. To build a system like this, you have to be able to identify multiple languages, understand them and then make sure you present the right experience to the user. And you have to do all of this within a few seconds.

Google says its language identification model (LangID) can now distinguish between 2,000 language pairs. With that in place, the company’s researchers then had to build a system that could turn spoken queries into actionable results in all supported languages. “When the user stops speaking, the model has not only determined what language was being spoken, but also what was said,” Google’s VP Johan Schalkwyk and Google Speech engineer Lopez Moreno write in today’s announcement. “Of course, this process requires a sophisticated architecture that comes with an increased processing cost and the possibility of introducing unnecessary latency.”

If you are in Germany, France or the U.K., you’ll now also be able to use the bilingual assistant on a Google Home Max. That high-end version of the Google Home family is going on sale in those countries today.

In addition, Google also today announced that a number of new devices will soon support the Assistant, including the tado° thermostats, a number of new security and smart home hubs (though not, of course, Amazon’s own Ring Alarm), smart bulbs and appliances, including the iRobot Roomba 980, 896 and 676 vacuums. Who wants to have to push a button on a vacuum, after all.


Read Full Article

Girls Who Code brings in $1M from Lyft rider donations


Girls Who Code, an organization focused on closing the gender gap in tech, has raised $1 million from Lyft riders since the ride-hailing company added the non-profit organization to its Round Up & Donate program last year.

The program allows participating charities, which has included Habitat for Humanity and World Wildlife Fund, to receive small donations from Lyft riders, who can opt-in by visiting the Round Up & Donate tab within settings in the Lyft app. Launched in May 2017, the feature rounds up your trip payments to the nearest dollar and donates the difference.

“We couldn’t be more excited to be celebrating the $1 million milestone with our friends at Lyft,” Girls Who Code founder and CEO Reshma Saujani said in a statement. “And the moment is made even more special knowing that this was made possible by the riders themselves.”

Girls Who Code has received a lot of support from the tech industry, with backing from Amazon, Pivotal Ventures, GM, AppNexus, Google, Dell and more.

Uber has also provided financial support. The company donated $1.2 million to Girls Who Code as part of a partnership announced last August that had Uber’s former chief brand officer Bozoma Saint John join the organization’s board of directors. Saint John has since left Uber but remains on Girls Who Code’s board.

Uber was working feverishly to support non-profits, especially those focused on diversity, as part of its effort to clean up its reputation following numerous reports that Travis Kalanick, Uber’s former CEO, had fostered a culture of discrimination and harassment during his tenure. One of the organizations they tried to donate to was Black Girls Code, but the non-profit turned down the cash, explaining at the time that they weren’t interested in what they believed was only a PR stunt.

“Their past history and ‘political’ nature of maneuvering is and was troubling,” Black Girls Code founder Kimberly Bryant told TechCrunch at the time.

Black Girls Code has, however, accepted donations from Lyft via its Round Up & Donate feature. Bryant has said it’s because Lyft’s mission more closely aligns with Black Girls Code: “We look very closely at prospective partners with that in mind and pay special attention to those that believe in the power of community to affect change. Through the work they’ve done over the years, we know Lyft embodies these same attributes.”

Black Girls Code was founded in 2011, the same year as Girls Who Code. Both organizations encourage young women to code through programming like immersion summer camps and after-school programs.

Fewer than 1 in 4 computer scientists are women, a number that may only be decreasing. According to Girls Who Code, 37 percent of computer scientists were women in 1995, though that number fell to 24 percent in 2017 and is projected to drop to 22 percent by 2027.

New data out this week, however, says that the number of young women taking the AP Computer Science exam rose 39 percent this year, per Code.org.


Read Full Article

The Best Ultrabooks for Lightening Your Load

10 Hidden Features of Microsoft Outlook That Are Rarely Used


declutter-outlook

If you use Outlook, you already know it’s a useful program for managing your email and includes a lot of great features. Today we’re going to cover some lesser known Outlook features that could help improve your workflow.

1. Change the Number of Lines in Message Previews
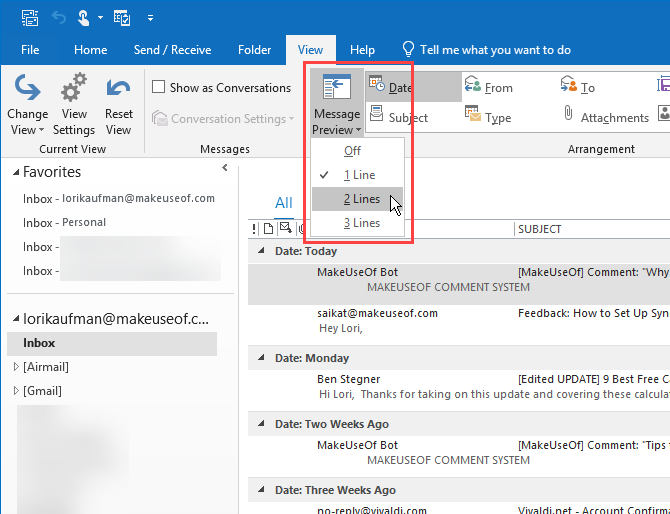
Outlook Message Preview

In the list of email messages, Outlook displays a preview of each message. This includes the sender and the subject line on the first line and then one line from the email message body below that by default.

You can change the number of lines from the message that displays in the list of messages.

Go to the View tab and click the Message Preview button. Then, select 1 Line (default), 2 Lines, or 3 Lines. Or select Off if you don’t want any of the email message displayed in the list.

You’ll be asked if you want to apply this setting to only This folder or All mailboxes.

The number of lines you select does not include the sender and subject line. So if you select 2 Lines, you ‘ll see three lines total: the sender and subject on the first line and then two lines of the email message body below that.

2. Choose Which Folder Displays on Outlook Launch
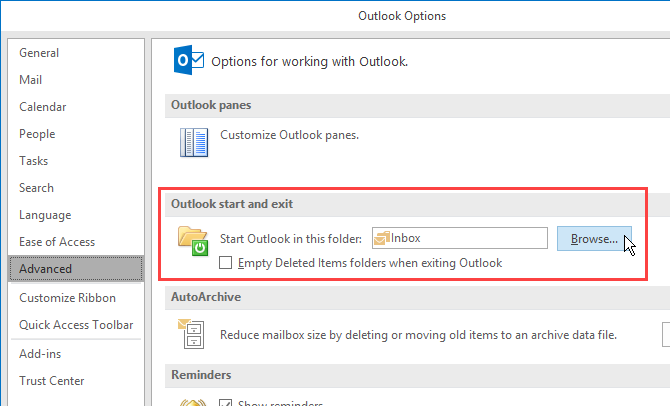
Change which folder opens when you start Outlook

If you have multiple email accounts in Outlook, you can select which email account inbox you want displayed by default when you open Outlook. Or you can select another folder besides the inbox if you want.

Go to File > Options and click Advanced in the left pane on the Outlook Options dialog box.

In the Outlook start and exit section, click Browse. On the Select Folder dialog box, find the account you want and select the Inbox, or other folder you want to start Outlook in.

We found that this setting doesn’t always stick. Let us know in the comments if it worked for you.

3. Create a Search Folder
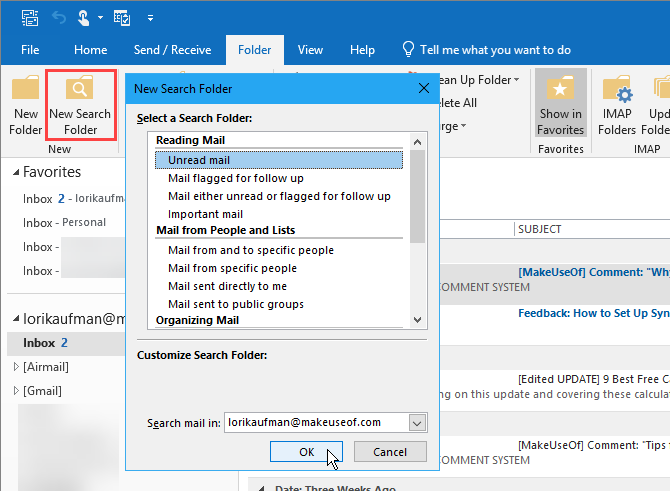
Outlook Search Folder

If you search for the same words and phrases in Outlook often, you can set up a virtual Search Folder that shows you a list of all items that match certain search criteria. Outlook provides some templates for Search Folders or you can create your own.

For example, the Unread Mail Search Folder shows you all your unread mail in one folder, even if they’re in different folders in your email account. The messages are not moved to the Search Folder, they’re only shown there. The original messages remain in their respective folders.

To create a new Search Folder, click New Search Folder in the New section on the Folder tab. Select a ready-made Search Folder template from the list or select Create a custom Search Folder under Custom at the bottom of the list.

If you’re creating a custom Search Folder, click Choose on the New Search Folder dialog box.

Then, enter a Name for the Search Folder on the Custom Search Folder dialog box. Click Criteria and specify the details of the search on the Search Folder Criteria dialog box.

If this is not working for you, we have some methods you can use fix Outlook Search.

4. Clean Up a Folder
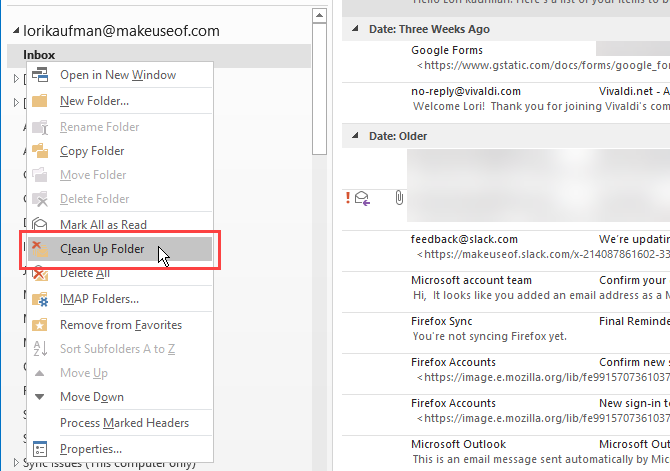
Clean Up Folder in Outlook

Outlook’s Clean Up Folder feature removes redundant messages in a thread or folder. Redundant messages are previous messages in a thread also quoted in the replies. Long email threads could end up with several copies of earlier messages that are quoted in each reply.

The Clean Up Folder command moves the redundant messages in the selected folder and its subfolders to the Deleted Items folder by default.

To use this command, right-click on the folder you want to clean up and select Clean Up Folder.

You can set the options for the Clean Up Folder command by going to File > Options > Mail > Conversation Clean Up. Select the folder you want the cleaned-up items to be moved to and enable or disable any other clean-up options you want.

5. Send an Email at a Future Date
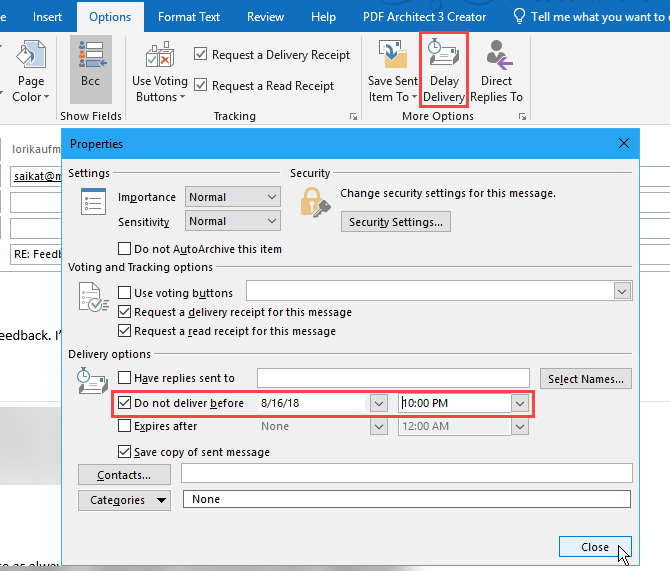
Delay Delivery of an email in Outlook

Sometimes you need to write an email but not send it until a later time. Outlook’s Delayed Delivery feature allows you to easily do this.

First, write your new email or reply to an email. Then, click Delay Delivery in the More Options section on the Options tab in the message window.

Under Delivery options, check the Do not deliver before box and select a date and time.

Select any other options you want and click Close.

Outlook stores scheduled email messages in your Outbox until they are sent when they are moved to your Sent folder.

If you change your mind and need to cancel the delayed delivery or change it to a different date and time, go to your Outbox and open the email message. Click Delay Delivery on the Options tab again and change the date and time for the Do not deliver before option or uncheck the box to disable delayed delivery.

6. Use Quick Steps
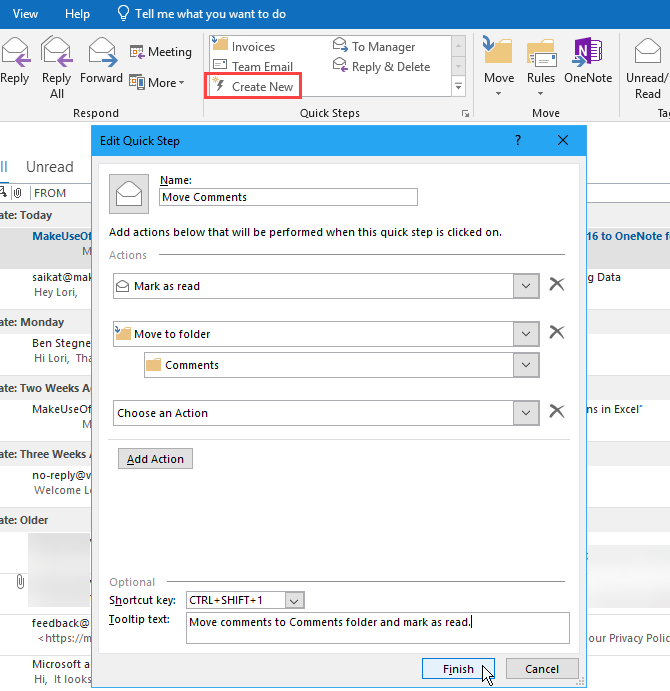
Quick Steps in Outlook

The Quick Steps section of the Home tab in Outlook provides one-click access to common actions. Microsoft provides some initial Quick Steps to start with, but you can also create your own.

To create a custom Quick Step, click Create New in the Quick Steps section. On the Edit Quick Step dialog box, Name your Quick Step.

Then, select an action from the dropdown list and click Add Action. Keep adding other actions you want to take in the same Quick Step, clicking Add Action after each one.

For example, you can set up a Quick Step to mark selected email messages as read and then move them to a certain folder.

7. Open Multiple Outlook Windows
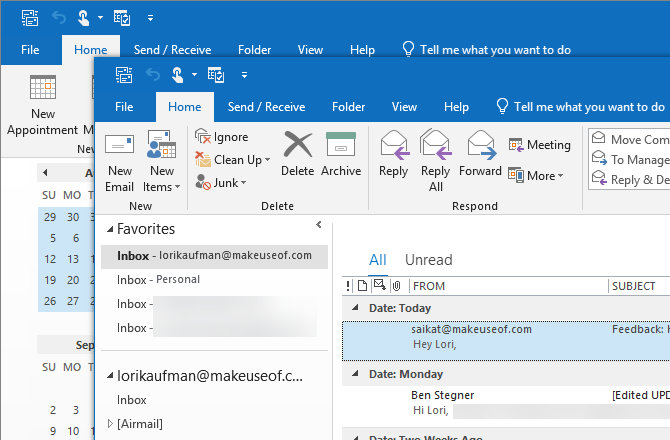
Multiple Outlook windows

If you use Outlook for email, scheduling, and tasks, you might want to open multiple Outlook windows. That allows you to see your email, calendar, and tasks at the same time instead of using the navigation buttons to keep switching views.

To open another Outlook window, right-click on the Outlook icon on the Taskbar and select Outlook 2016. Position the windows how you want.

When you close Outlook, go to File > Exit on any of the open windows. Do not click the X in the upper-right corner of any of the windows. Outlook will open the next time with the same number of windows and in the same position they were in when you exited Outlook.

8. Create and Manage Rules
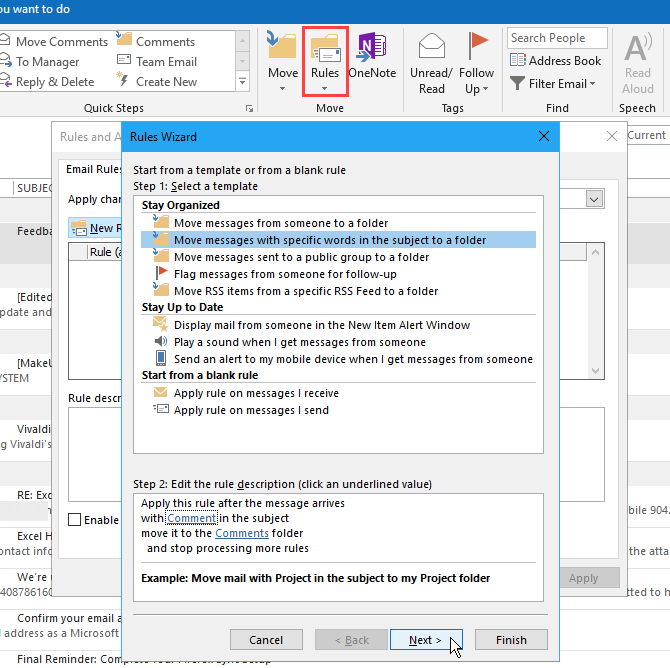
Outlook Rules Wizard

You may not always like playing by the rules, but rules in Outlook can be very useful. They allow you to set up specific events to happen automatically based on actions that occur.

For example, you may want to move messages with specific words in the subject line or from a specific person to a folder and mark the messages as read at the same time. You can create a rule to do all that at once as you receive messages.

To create or manage rules, click Rules in the Move section on the Home tab and select Manage Rules & Alerts. The Rules and Alerts dialog box allows you to create, change, and manually run rules.

Click New Rule to create a rule and then follow the steps in the Rules Wizard.

One feature lacking in Outlook is the ability to automatically BCC yourself on emails. But you can get around this limitation using rules.

9. Change Your Account Name
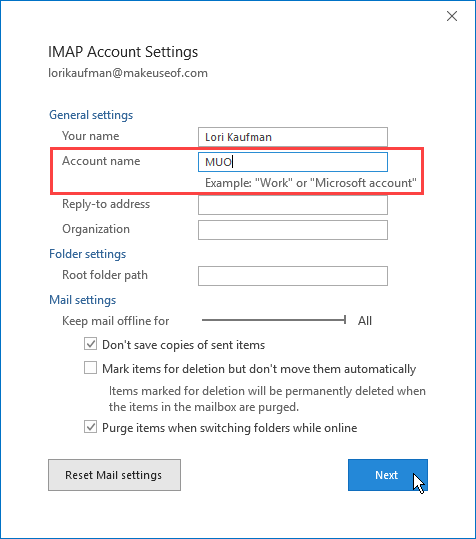
Change an account name in Outlook

When you add an email account to Outlook, the default name for the account is your email address, which displays in the left pane. But you can change the account name to a more descriptive one that would make it faster to spot the account you’re looking for. Helpful if you have a lot of email accounts in Outlook.

To change an account name, right-click on the current account name in the left pane (not the Inbox for the account) and select Account Properties. Or go to File > Info (the Account Information screen).

Then, go to Account Settings > Account Settings and make sure the Email tab is active on the Account Settings dialog box. It should be by default.

Select the account in the list you want to change the name for (if it’s not already selected) and then click Change.

Change the Account name under General Settings on the Account Settings dialog box. Click Next and then click Done.

10. Use Outlook Command Line Switches
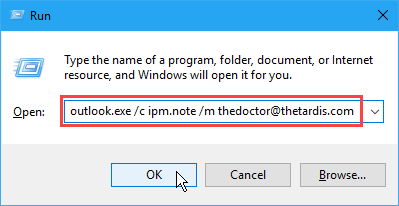
Outlook command line switches

Outlook provides command line switches that allow you to perform various operations. If you prefer using the keyboard rather than the mouse, you can speed up operations in Outlook using the command line switches. They can also help you troubleshoot problems in Outlook.

We’ve covered 25 Outlook 2016 command line switches you should know.

For example, you can create a new email message with a recipient by opening the Run dialog box (Windows key + R) and entering the following command in the Open box, replacing the email address with your recipient’s address.

outlook.exe /c ipm.note /m thedoctor@thetardis.com

Tools to Make Outlook Even More Useful

If all the great features in Outlook, even the lesser known ones, are not enough for you, we’ve covered some useful third-party Outlook tools that add functionality to Outlook or improve existing features.

Also, don’t forget that alongside the great features there are many Outlook shortcuts that can help you save time.

Read the full article: 10 Hidden Features of Microsoft Outlook That Are Rarely Used


Read Full Article

How to Find Insanely Cheap Flights Using a VPN


cheap-flights-vpn

Planning a trip aboard has never been easier. You can check out car hire, hotels, excursions, and importantly, your flights, all online. Most of us now head to a flight comparison site, plug in our destination and begin poring over results; everyone likes insanely cheap flights.

You check the flights once, and the fare seems good. But each time you check again, the price has crept up. It’s almost like the airlines are tracking your interest and raising the prices.

Is it just a trick of the mind? Or is it real? Read on to find out how you can use a VPN to find those super cheap airline tickets.

Airlines Don’t Use Cookies to Increase Prices

The idea that airlines and the comparison sites are using cookies to track our interest in specific routes isn’t new. Understandably, no airline has ever confirmed that this practice is real. Similarly, no price comparison site will confirm that they actively gouge their customers—it would be a savage act of terrible PR.

In fact, the world’s most popular flight comparison sites, Momodo, and Skyscanner both maintain documents stating the opposite. You can read the Momondo page here, and the Skyscanner page here. Both pages comprehensively deny that they use cookies to refine flight prices. Other sources corroborate the flight comparison sites.

“If the airlines were to raise prices because of browser cookies (targeted individually) there would be air travel whistle-blowers and senators running to microphones for legislation to prevent it,” says FareCompare CEO Rick Seaney. “What people see when they shop multiple times, and prices are changing is a reflection of inventory changes, data caching techniques and the fact that prices generally get more expensive closer to departure date, even within a day.”

It doesn’t always feel like that though. Prices appear to change within minutes, much to the chagrin of consumers on the hunt for insanely cheap flights.

Airlines Do Use Dynamic Pricing and User Profiling

For all the airlines like to deny how cookies are used against potential customers, there are some strong indications otherwise.

For instance, in 2018, airline revenue management software provider, PROS, confirmed that many of their clientele now use dynamic pricing. Dynamic pricing structures do consider user location, customer accounts, previous flight data, shopping trends, and more, to create specialized individual flight prices that differ from customer to customer. PROS clientele includes Lufthansa, Virgin Atlantic, Qantas, Emirates, Southwest, and many more.

Currently, each airline has just 26 fare classes. That’s one for each letter of the alphabet (literally). Airlines can update the prices for each fare class four times per day for domestic flights, and hourly for international flights. The current flight pricing structure was put into place in 1978, after The Airline Deregulation Act. However, airlines are finding it difficult actually to shift from that system—but that time is now.

“2018 will be a very phenomenal year in terms of traction,” said John McBride, director of product management for PROS. “Based on our backlog of projects, there will be a handful of large carriers that move toward dynamic pricing science.”

Flight Route Profiling

Flight route profiling has existed for a long time. For instance, a flight from London to Lanzarote is primarily marked for leisure. Airlines know that demand during school holiday periods will dramatically increase. They also know that parents will look to find the best deals months in advance and as such, prices around those periods remain high, despite the number of available seats and current demand.

A switch to dynamic profiling is unlikely to change this scenario. It could, however, impact in other ways. If you’re checking out flights on a high-end Mac, in San Francisco, the dynamic pricing might assume you have higher income and show you higher prices. How about checking prices for a return overnight trip from New York to Chicago? Dynamic pricing might assume you’re a business person, check your previous flight purchase history, and show you price knowing that you will pay it regardless of cost.

Using a VPN to Find Cheaper Flight Prices

If the airlines use dynamic profiling, you can fight back by using a VPN to change your location. For instance, you can use ExpressVPN (save 49% on ExpressVPN using this link) to change your IP address as to appear from one of 94 countries.

Here are a few examples of price differences I found using ExpressVPN, with the locations and the differences. I ran the same price comparisons using a fresh Lubuntu Linux installation, with a completely new browser.

Our test flights are:

  • New York JFK to London Heathrow
  • Miami International to Paris Charles de Gaulle
  • Tokyo Narita to San Francisco International

All departing on September 11th and all returning on September 18th, using the exact same flights for each flight price check site. Check out the difference in price between Skyscanner, Momondo, and Google Flights using the scenarios. (Note: I had to use Google’s ATX Matrix for the ExpressVPN Hong Kong server as Google Flights are unavailable in Hong Kong—it returns the same prices though.)

Prices below are from Skyscanner, Momondo, and Google Flights, respectively.

Round 1: Lubuntu VM, Firefox Browser

  • New York JFK to London Heathrow: $343 | $347 | $366
  • Miami International to Paris Charles de Gaulle: $666 | $738 | $754
  • Tokyo Narita to San Francisco International: $1,369 | $1,384 | $1,393

Round 2: Lubuntu VM, Firefox Browser, ExpressVPN

ExpressVPN location set to “Netherlands—The Hague.”

  • New York JFK to London Heathrow: $350 | $345 | $366
  • Miami International to Paris Charles de Gaulle: $654 | $661 | $752
  • Tokyo Narita to San Francisco International: $1,321 | $1,327 | $1,391

Round 3: Lubuntu VM, Firefox Browser, ExpressVPN

ExpressVPN location set to “Hong Kong – 4.”

  • New York JFK to London Heathrow: $348 | $348 | $366
  • Miami International to Paris Charles de Gaulle: $718 | $707 | $753
  • Tokyo Narita to San Francisco International: $1,364 | $1,383 | $1,391

Round 4: Lubuntu VM, Firefox Browser, ExpressVPN

ExpressVPN location set to “Norway.”

  • New York JFK to London Heathrow: $328 | $328 | $366
  • Miami International to Paris Charles de Gaulle: $729 | $725 | $752
  • Tokyo Narita to San Francisco International: $1,344 | $1,343 | $1,391

Does Using a VPN Make Your Flights Cheaper?

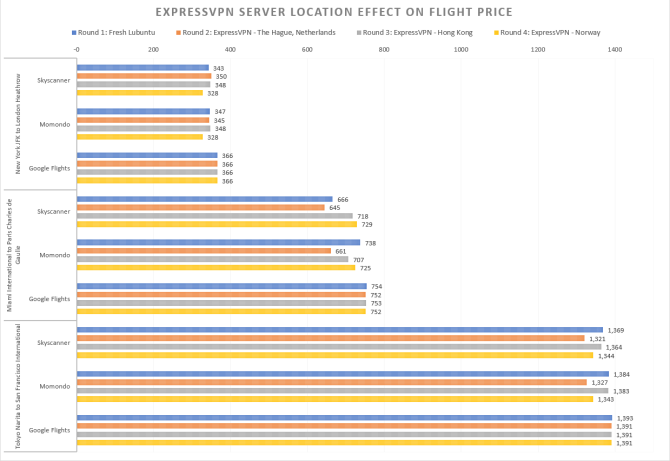
You can see the data above, but it’s a little difficult to read through. Check out the chart below for a better overview of the experiment.

expressvpn flight price

There are a few things immediately clear.

  1. Google Flight prices remain extremely constant regardless of location.
  2. Using a VPN uncovered significant discounts when booking cheap airlines flights from the Netherlands.
  3. For the most part, discounts are only in tens of dollars, with one or two notable exceptions. However, if you’re booking cheap flights for several family members, these savings do add up.
  4. Using a VPN doesn’t always create a discount situation.

What do you conclude from this? Check all of your options, at all times, and always double-check across the cheap flight ticket comparison sites. Otherwise, you should check out our rules for finding cheap airline tickets—it’s guaranteed to help!

Read the full article: How to Find Insanely Cheap Flights Using a VPN


Read Full Article
Panasonic to move its European HQ out of the UK because Brexit


Chalk up yet another Brexit deficit: Japanese electronics firm Panasonic will be moving its European headquarters from the UK to Amsterdam in October because it’s worried about the tax implications if it stays, the Nikkei Asian Review reports.

The company is concerned it could face tax liabilities if the UK shifts its corporate tax regime as a result of Brexit.

Laurent Abadie, CEO of Panasonic Europe, told the publication Japan could treat the U.K. as a tax haven if the country lowers its corporate rate — as the government has indeed suggested it will to try to make itself a more attractive destination for businesses once it’s outside the European Union’s trading bloc.

In November 2016 the UK Prime Minister announced a review of the country’s corporate tax rate — saying the government could move to substantially cut the rate below the current 20%.

Prior to that, former chancellor George Osborne pledged to cut the rate to below 15%.

At the same time as announcing the rate review, the PM unveiled a package of business-focused measures — intended to try to quell fears around Brexit. Although a rate cut evidently isn’t friendly to every business.

In the case of Panasonic, it’s concerned that if the U.K. gets designated a tax-haven by Japan it could be saddled with back taxes back home. So moving to stay regionally headquartered within the European Union removes that risk.

Abadie also told the Nikkei Asian Review that moving its regional HQ to continental Europe will help it avoid any barriers to the flow of people and goods thrown up by Brexit.

The shape of any deal — or even whether there will be a deal between the UK and the EU, post-Brexit — still remains to be seen just a few months before the UK is scheduled to exit the EU, in March 2019. So businesses are having to make key decisions based on possible or potential outcomes.

Meanwhile the UK’s regulatory influence in the region continues to be diminished…


Read Full Article

Taking a spin with Garmin’s vivosmart 4 activity tracker, out today


Garmin continues to go head-to-head with Fitbit with the launch of its latest offering — the vivosmart 4 activity tracker. This sleek new wristband not only tracks steps, activities and gives you the weather but also comes with a blood oxygen sensor and will tell you how much energy you have saved up for your next full throttle burn session.

That new body battery energy calculator estimates the body’s energy reserves to help you figure out when you feel more rundown and why. You simply swipe through the menu on the display to get to your energy levels or a number of other data offerings like steps, heart rate, stress levels and stairs climbed. The blood oxygen sensor will tell you how well oxygen is being pumped from your heart to the farthest regions of your body and can help you figure out if you are getting a good sleep in.

I took the new vivosmart 4 for a spin this week and was not disappointed in the upgrades. First off, this is a very nice looking piece of jewelry. Its slim, fashionable design fits neatly on the wrist and comes in berry with gold bezel, powder grey with rose gold bezel, azure blue with silver bezel, and black with slate bezel. It also feels good to wear. The material is smooth, soft and lightweight, slipping on easily.

The new model comes equipped with a newly redesigned wrist-based heart rate sensor, VO2 max and tracker for various activities like running, strength training and yoga.

One other interesting feature includes stress level measurement tool that will remind you to relax and take a breath throughout your busy work day.

Like its predecessor, the vivosmart 3, the 4 comes with the ability to check the weather, play music, and receive text message updates. It is safe to use under water so it can be worn in the shower or if you want to go for a swim.

The battery life is also strong enough to stay charged for up to a week at a time. Compare that to the Fitbit HR and Charge 2, which last up to five days.

The body energy feature is also a nice touch. The tracker figures out your energy levels using a combination of data including heart rate, sleep, stress levels and activity from the previous few days so it will likely take a while to figure out how much output you’ve got before a workout.

Overall, I’d say it’s a nice watch to hang on your bod. However, there are some drawbacks. The display is hard to work with. I found I had to tap several times, not just twice, as the instructions indicate. It’s also not very intuitive to maneuver and doesn’t pick up immediately that you are trying to swipe through the menu at times. You’ll need to take some time playing around with it to get the hang of it.

This is an activity tracker I would like to recommend for the fitness and life balance oriented individual, except for the difficulty in navigating the screen. That is one area that could be vastly improved by the manufacturer and would put it at the top of my list for trackers instead of somewhere in the middle.

For those interested, the vivosmart 4 will retail for about $130 and can be found online or at a sports gear shop near you.


Read Full Article

Facebook pulls post by Anne Frank Center after seeing only nudity in a photo of the Holocaust


Facebook moderators temporarily removed a post by the Anne Frank Center which was seeking to raise awareness about the Holocaust, after the company was unable to distinguish between historical genocide and child nudity.

The post included an archive photograph of Jewish children who had been stripped and starved by Nazi Germany.

Between 1941 and 1945 the German state imprisoned and murdered millions of Jews in concentration and death camps — the child Anne Frank, who the Center is named after, being just one of them.

Frank died in 1945, aged 15, after her hiding place in Amsterdam had been uncovered. She was taken to the Bergen-Belsen concentration camp where, seven months later, she died of typhus.

In school history class as a teenager I remember being shown similar footage of the emaciated bodies of Jewish people starved and murdered during the Holocaust.

It’s not the kind of imagery you forget. It is terrible. Haunting. It is a shame of history, not pornography.

Facebook moderators apparently cannot tell the difference.

Around six hours after the Center complained on Twitter that the post had been taken down, Facebook reinstated it.

In a tweet replying to the Center’s complaint the company explains its actions, saying “we don’t allow nude images of children”, before ending with an apology for making the wrong decision in this case — owing to the image having “important historical significance”.

It wrote: “We put your post back up and sent you a message on FB. We don’t allow nude images of children on FB, but we know this is an important image of historical significance and we’ve restored it. We’re sorry and thank you for bringing it to our attention.”

If you’re getting an acute sense of deja-vu that’s because Facebook has similarly failed to understand historical context before — when, for example, in 2016 its moderators took down an iconic war photo of a child fleeing a napalm attack in Vietnam in 1972.

The violence had also stripped that child — clothing her with terror.

Again Facebook’s moderators simply couldn’t tell. So they scrubbed historical record from the platform. An outcry was necessary to reinstate it.

Called on that crime against history, Facebook described its moderating decision as a mistake — saying “we intend to do better”.

Two years later there’s no sign it’s living up to that stated intent.

Running the world’s biggest content platform without editorial oversight and with woefully under-resourced moderation is indeed a very hard problem. One that AI cannot hope to solve in any near or short term framework — if ever. Context is king for a reason.

The kicker here is that company founder Mark Zuckerberg continues to choose to provide a platform for Holocaust deniers on Facebook.

He could choose to ban Holocaust denial — which is, after all, an attack on both history and the Jewish people. But he prefers not to. He’s not for banning, unless it’s nudity. (Classic art nudes included, at times.)

And so we arrive at the tragi-ridiculous pass of true historical imagery of the Holocaust being scrubbed from Facebook — while vicious lies about the Holocaust are allowed to stand and swirl and take root via Facebook.

That’s what running a content platform without a moral compass looks like.

We asked Facebook to explain why it took down a post by the Anne Frank Center that was seeking to raise awareness about the Holocaust yet refuses to take down posts by Holocaust deniers who are seeking to undermine historical truth.

A company representative pointed us to its earlier response to the Center — but did not engage with our question.

Update: The Center has now sent us the following statement regarding Facebook’s actions:

Our original post was to draw attention to the fact that the Holocaust
is woefully undertaught across the USA and that ignorance on what
happened is a direct result of this. We have been working with
numerous state representatives across the nation to mandate K-12
Holocaust education through our 50-State Genocide Education project.

While Facebook removes the AFC’s post promoting the need to educate on
the past, it continues to allow pages and posts that directly deny the
reality of the deaths of more than six million people.

Holocaust denial dehumanizes people. It makes thousands feel unsafe.
It violates the very standards Facebook lays out for it users. Yet
these hate-filled propaganda pages remain.

We have written to Facebook previously offering to work with them to
tackle the spread of Holocaust denial and hate on its platform and to
promote education.

If Facebook is serious about its community standards it should start
tackling Holocaust denial and not the organizations who are trying to
educate people on discrimination, facts, and history.

We understand the difficulty in assessing the context of potentially
controversial content. That said, it shouldn’t have taken us publicly
calling out Facebook to restore our post. Hopefully, Facebook can
revise their protocols.

We understand that the Center’s post was originally published on Facebook on August 21, and taken down by Facebook moderators on August 27 — before it was subsequently reinstated by Facebook after the Center complained.


Read Full Article

How to Download All the Data LinkedIn Has About You


LinkedIn was one of Microsoft’s biggest buys. So, the two platforms get connected at the hip when you link LinkedIn to your Microsoft apps. The information LinkedIn has about you support several Microsoft services. For instance, you can see LinkedIn information on the Resume Assistant in Microsoft Word and profile cards in Outlook.

But this raises a question: How can I see the data LinkedIn has about me?

How to Download the Data LinkedIn Has About You

LinkedIn has a well thought out privacy policy. It gives you control and access to all your data through the Privacy tab in the account settings. Apart from the usual advertising opt-outs and sharing controls, LinkedIn also allows you to download all your data in a machine-readable format.

  1. Sign into LinkedIn. Click your Profile picture at the top of the LinkedIn page.
  2. Select Settings & Privacy from the dropdown.
  3. Click the Privacy tab at the top of the page. Go down to the How Linkedin uses your data section.
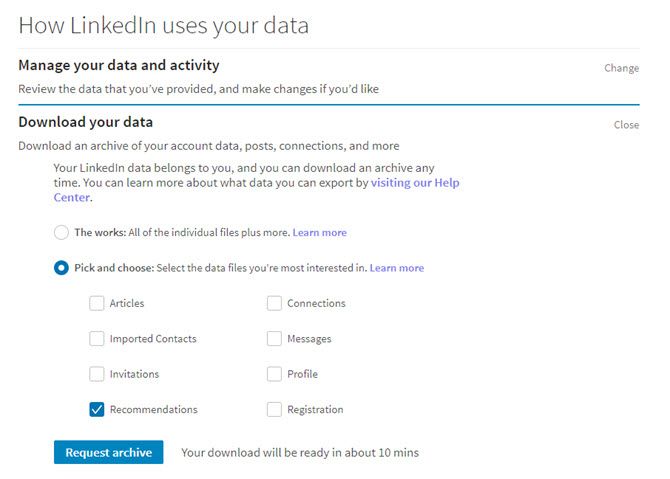
    Data Export in LinkedIn
  4. Select the specific checkboxes for the data you wish to download. For instance, you can download your entire LinkedIn archive or pick only articles and/or messages to download.
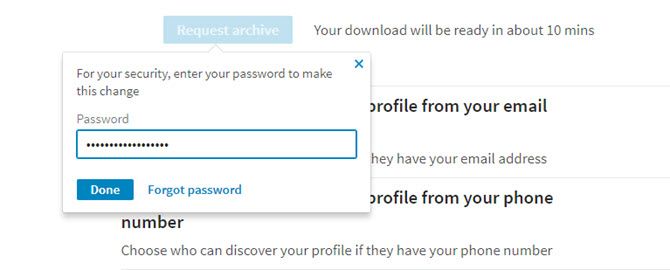
  5. LinkedIn tells you how long it will take to prepare the archive for download. It will then prompt you to re-enter your password again.
    Enter your LinkedIn password here
  6. Linkedin then will send you an email when the download is ready. Selected categories are quicker to archive then your full bank of LinkedIn data which may take about 24 hours.

You will notice that the section has grayed out. This indicates that the download is pending and you cannot make another request till this process is complete. LinkedIn also provides a data access request form for any personal information that is not included in the above archives.

Downloading your entire personal history from LinkedIn is a vital step if you ever decide to close and delete your LinkedIn account.

Read the full article: How to Download All the Data LinkedIn Has About You


Read Full Article
How to Add Animated Text to GIFs


While its pronunciation is still hotly debated, there’s no questioning the popularity of GIFs on the web. If you want to add your own brand of humor or personalization to GIFs that you share, there’s an easy way to add animated text to your GIF using an online tool.

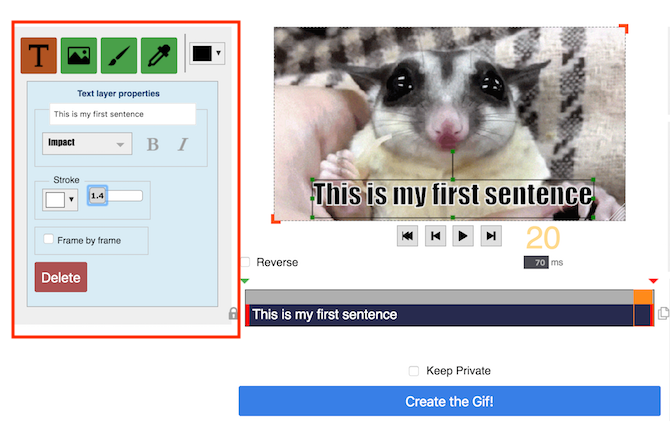
Gifntext offers a very easy-to-use interface, allowing you to add text, images, and brush strokes to your GIFs. Here’s how to add text:

  1. Click the Text (T) icon.
  2. Add your text, select the font, size, stroke, and color.
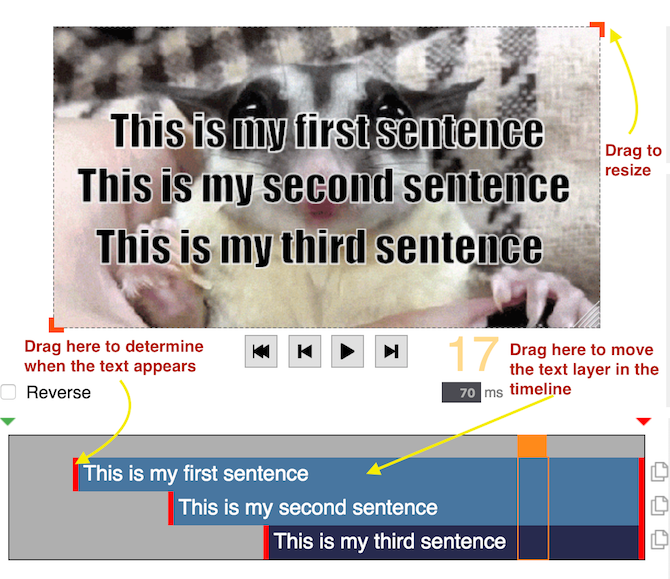
  3. To determine where the text will appear on the GIF, click and drag the text on the GIF itself to the position you want it to appear.
  4. To determine when the text will appear on the GIF, you can drag the bar in the timeline layers beneath the GIF. Click and drag the red bar at either end of the timeline to determine how long the text will appear. Click on the blue bar and drag to determine when it will appear
  5. Repeat steps 1 to 3 until you’ve added all of your text.
  6. You can delete text by clicking on the text and hitting the delete button on your keyboard. You can also duplicate text layers by clicking the Paste icon next to the layer in the timeline.
  7. If you don’t want to share the GIF in the Gifntext gallery, check Keep Private and click Create GIF.
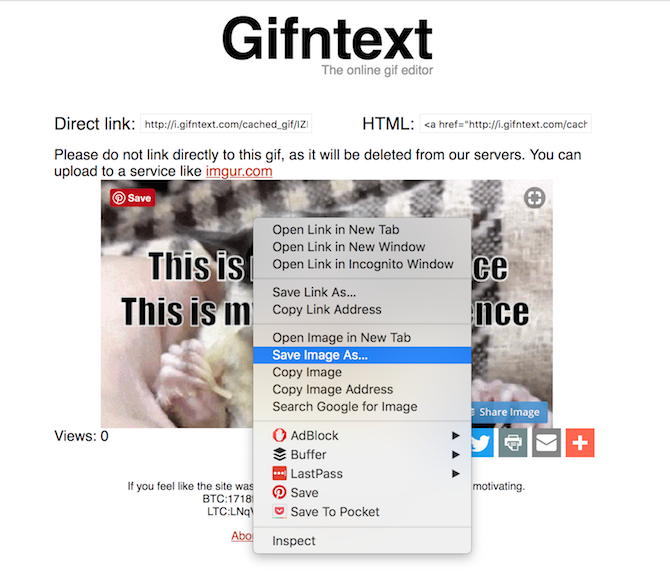
  8. Once the GIF is rendered, right click it and click Save image as to save it to your computer.

The only thing to keep in mind when using Gifntext is that you can’t upload GIFs that are larger than 100MB in size.

If you want more granular control over when the text appears on your GIF, you can consider using a site like EZGif where you can designate frame-by-frame when the text will appear on your GIF.

Once your GIF is ready you can share it privately with friends or you can share your GIF on Facebook or convert your GIF to upload to Instagram.

Read the full article: How to Add Animated Text to GIFs


Read Full Article
How to Track How Long You’ve Spent Editing a Microsoft Word Document


microsoft-word-auto-update

Microsoft Word is the standard for many people when creating and editing documents. Depending on how you use Word, you might need to keep track of how much time you spend working in it.

Did you know that Word has a hidden feature that tracks how much time you’ve spent working on a document? This lets you keep track of your hours at work, or improve your own productivity by seeing how long a task takes you.

How to Track Time Spent Editing a Word Document

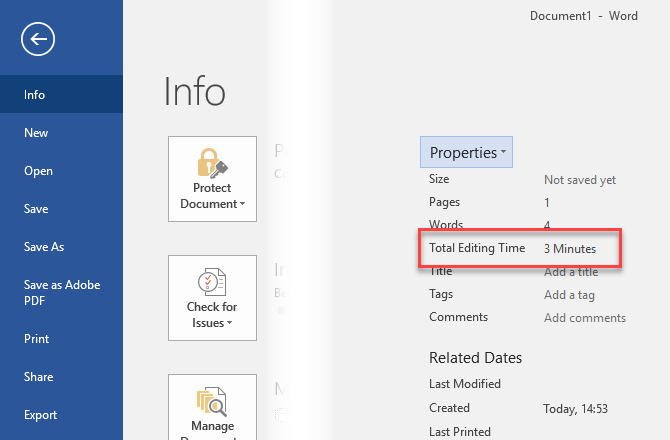
After you’ve spent some time editing a Word document, click the File button in the upper-left corner. From here, make sure you’re on the Info tab.

On the right side, you’ll see a Properties header with some information about your document. One of these is Total Editing Time, which shows the number of minutes you’ve spent working on the document.

Word-Total-Editing-Time

You can access additional information by clicking Properties > Advanced Properties here. On the Statistics tab, you’ll also see the number of revisions, who last edited the document, when it was printed, and some counts of characters.

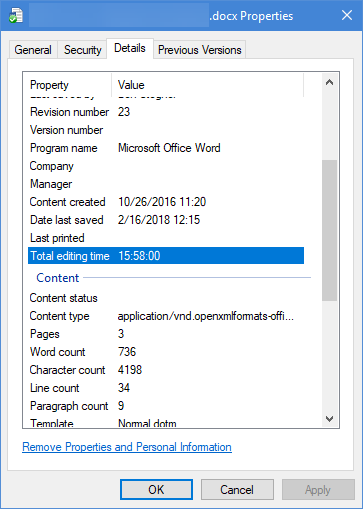
To access the editing time without opening Word, you can right-click a Word document in File Explorer and choose Properties. On the Details tab, you’ll see a Total editing time field.

Word-Total-Editing-Time-Properties

This can help you figure out how efficiently you’re working, or how much time you’re spending on office tasks.

Unfortunately, this timer doesn’t only count the time you were actively working in Word. It runs as long as you have the document open, even if it’s idle. We suggest you look at some other time-tracking software if you want more accurate information.

For more tips, check out how to create professional documents in Word.

Read the full article: How to Track How Long You’ve Spent Editing a Microsoft Word Document


Read Full Article