08 October 2019

How to Block Internet Explorer From Accessing the Internet


internet-explorer-11

Internet Explorer, the web’s favorite punching bag, has been relegated to an afterthought for most users. While it’s still included in Windows 10 for legacy enterprise purposes, Microsoft now includes Edge as the default Windows browser.

Despite this, you may still wonder how to disable Internet Explorer (IE). Maybe you don’t want other users on your system working in the clunky browser, or just hate it and want to block Internet Explorer from your system.

1. How to Block Internet Explorer From Accessing the Internet Through Windows Firewall

Windows includes a built-in firewall that allows you to control how programs communicate with the internet. You can set up a new rule here to block all connections through Internet Explorer.

To start, search for Windows firewall and open Windows Defender Firewall with Advanced Security. Click Outbound rules on the left panel, then select New Rule from the right side.

Windows Firewall Add Rule

On the resulting Rule Type window, choose Program and hit Next. You’ll then need to browse to the executable file for Internet Explorer.

On a 64-bit installation of Windows 10, you’ll find folders for Internet Explorer in both the Program Files and Program Files (x86) folders. In our testing, blocking the version of IE inside Program Files had no effect, yet blocking the file inside Program Files (x86) blocked both executables from running.

As a result, you should block the following file if you’re on 64-bit Windows:

C:\Program Files (x86)\Internet Explorer\iexplore.exe

If you’re using 32-bit Windows, this will be in the following location:

C:\Program Files\Internet Explorer\iexplore.exe

Internet Explorer Location Windows Firewall

Moving on, choose to Block the connection and set it to apply to all three of the available location types. Finally, give it a descriptive Name like Block Internet Explorer. You can also set a description if you want.

Once you confirm this, Internet Explorer won’t be able to access anything on the internet.

2. How to Completely Disable Internet Explorer

In case just blocking Internet Explorer from accessing the internet isn’t enough, let’s cover the nuclear option. You can completely disable Internet Explorer on your system, preventing anyone from using it.

As it turns out, you can’t uninstall Windows Internet Explorer like a normal program, since it’s considered part of Windows. Instead, you’ll have to turn it off from the Windows Features menu.

Search for Windows features in the Start menu and select the Turn Windows features on or off entry. This will bring you to a panel with a list of optional features in Windows. Here, uncheck the box for Internet Explorer 11 and click OK.

Remove Internet Explorer Windows 10

Windows will take a moment to remove Internet Explorer, then it will prompt you to restart your computer to complete the process. After a reboot, you won’t see any trace of Internet Explorer on your system.

If you ever need to access IE again, simply repeat this process and check the box for Internet Explorer 11 to re-enable it.

3. Block Internet Explorer Using a Fake Proxy

This is the “classic” method of blocking internet access for Internet Explorer. Windows supports the use of a proxy server to connect to the internet. You can take advantage of this to block all network traffic by pointing your computer to a dummy proxy server.

Unfortunately, this trick has a major drawback. Nearly all other browsers (including Chrome and Firefox) use the proxy settings you’ve chosen for Internet Explorer, meaning that doing this will prevent you from getting online with other browsers too. It’s thus almost too effective, as you’ll need to remove the setting when you want to get online.

To change your proxy settings in Windows 10, head to Settings > Network & Internet > Proxy. Here, disable the Automatically detect settings slider at the top of the page.

Next, go to the bottom and enable Use a proxy server. Set the Address to a dummy value; 0.0.0.0 will work fine. Leave the Port as 80 and click Save.

Windows 10 Change Proxy Settings

After saving, these changes should take effect immediately. To reverse them so you can get back online, just disable the Use a proxy server slider.

Prevent Others From Changing the Proxy

It would be an issue if someone could jump into the Settings app and disable the proxy options you’ve set up. To prevent this, you can block access to these settings.

If you’re using Windows 10 Pro, you can do this using the Group Policy Editor. Type gpedit.msc into the Start menu to open it, then browse to the following object:

User Configuration > Administrative Templates > Windows Components > Internet Explorer > Prevent changing proxy settings

Set this to Enabled and it will block access to the Settings page used above, as well as the proxy settings in the old-school Internet Options section of the Control Panel.

Windows Proxy Settings Blocked

Those without Windows 10 Pro should look at how to access the Group Policy Editor in Windows Home. While you can make similar changes via Registry edits instead, they’re a bit clunky for this due to the proxy settings being available in both the Control Panel and Settings app.

4. Use Windows 10’s Family Parental Controls

Windows 10 includes parental control options under the umbrella of “family.” This allows you to restrict what your children can do on the computer. One of the tools it provides is the ability to whitelist and blacklist certain websites using Internet Explorer and Edge.

Windows 10 Parental Control Websites

If you check the Only allows these websites box, you can restrict them to only browsing those pages. Combine this with a blank list, and you’re effectively blocked Internet Explorer from accessing the internet. Of course, this only works for the child’s account, but it’s still useful.

See our guide to Windows 10’s parental controls to get started with setting up a family.

Setting Up the Right User Account

The above methods are the main ways to disable Internet Explorer and prevent it from getting online. Once you’ve set one of them up, it’s important to make sure the users that you don’t want accessing Internet Explorer can’t change these settings and get right in.

To do that, you’ll want to make sure those account are set up as Standard users, not administrators. Head to Settings > Accounts > Family & other users to review the user accounts on your system and make sure they’re set as Standard accounts.

Windows 10 Change Account Type

Make sure you also understand User Account Control on Windows. With UAC, admin accounts only run programs as an administrator when necessary. Standard users can’t make system-level changes (such as adjusting firewall rules) without providing administrator credentials.

You’ll know a feature is restricted by UAC when you see the blue and yellow shield next to it. Unfortunately, these aren’t really present in the Settings app, as they mostly appear in the aging Control Panel.

Windows UAC Shields

With the proper methods set up and the right restrictions on user accounts, you’ll have Internet Explorer fully blocked. And there won’t be an easy way for someone else to undo your changes. See our guide to locking down Windows user accounts for more ideas.

Blocking Internet Explorer: Success!

We’ve looked at how to block Internet Explorer from accessing the internet. The firewall method is the best choice for most people, while outright removing it from Windows works too. Whatever you choose, make sure you have the accounts locked down that you don’t want accessing IE in the first place.

Remember that most of these tips are pretty narrow in focus. You may want to review our full guide to parental controls for protection on other platforms.

Read the full article: How to Block Internet Explorer From Accessing the Internet


Read Full Article
The 5 Best Portable Web Browsers for Your USB Drive


Most computers you use every day will have a web browser pre-installed. However, there are times when you might need to use a portable browser instead.

Download our FREE Firefox shortcuts cheat sheet to boost your productivity 10x!

But which are the best portable web browsers? We’re going to introduce you to five standalone browsers that you can put on a USB drive and take anywhere.

Why Use a Portable Web Browser?

The use cases are more varied than you might think. For example, perhaps your school or office does not allow you to install browser extensions. If you want to use an ad-blocker or a browser-based VPN, that can be a problem.

Or perhaps you like using a niche browser that’s not typically available on public machines. Again, a portable version of the browser might provide the solution.

And remember, portable browsers will still work on all machines which do not allow you to install your own software.

Which Is the Best Portable Browser?

Convinced you about the benefits of keeping a lightweight, portable browser close by on a flash drive? Good. But which one is the best?

Let’s take a look at our top five favorite portable browsers.

1. Opera Portable

Available on: Windows, macOS

Opera offers an easy-to-use standalone portable browser for Windows.

There are no differences between the desktop version and the portable version. That means you can enjoy all Opera’s best features such as ad-blocking, personal newsreader, and the battery saver. All your bookmarks, extensions, and data will only save to your profile on the USB drive, not to the host computer.

You can also make Opera work as a portable web browser for macOS, but it’s a bit trickier to set up:

  1. Download and mount the image of the regular version of Opera for macOS.
  2. Drag Opera from the disk image to your USB drive.
  3. Open the Terminal app and type /Contents/MacOS/Opera -createsingleprofile.
  4. Press Enter.

There is no portable version of Opera for Linux, though you can use Wine to get the app to work.

Download: Opera Portable for Windows | Opera for macOS (Free)

2. Firefox

firefox standalone browser

Available on: Windows, Linux (with Wine)

A portable version of Firefox for Windows has been available since 2004. It was the first app to become available on the now popular PortableApps.com website. You cannot download it from the main Firefox page.

Most of the best Firefox features are available, including extensions and automatic updating. Due to speed issues when updating an app on a USB drive, you can turn on the update prompt if you wish. The portable version of the browser also lets you access your own bookmarks and preferred settings.

Some of the key differences between the desktop version of Firefox and the standalone browser include the addition of a default profile, the removal of the default browser check at start-up, a location prompt for every download, and the removal of the disk cache.

Firefox Portable will work with Wine on UNIX systems.

Download: Firefox Portable for Windows (Free)

3. Vivaldi Standalone

vivaldi portable web browser usb

Available on: Windows

Vivaldi can be deployed as a portable browser on a USB drive. This time, however, the option to create a standalone version of the browser has been coded into the main app’s installer; there is no separate download.

To set up a portable version of Vivaldi, you first need to grab the app from the company’s official website. Once you’ve downloaded it, follow the step-by-step instructions below.

  1. Run the Vivaldi installer.
  2. On the first window, select Advanced.
  3. In the Installation type dropdown menu, select Install standalone.
  4. Choose a destination folder. You can run it on a USB drive, CD, or even in another Windows directory if you want two versions of the app on your operating system. Do not select the Program Files folder.
  5. Hit Accept.

Unlike some of the other browsers on this list, your Vivaldi extensions will not be transferred to the portable version of the app. They are encrypted with a computer-specific key.

Download: Vivaldi Standalone for Windows (Free)

4. Avant Browser USB Disk Version

avant usb browser

Available on: Windows

Avant Browser USB Disk Version is one of the most lightweight portable web browsers. You will struggle to find any browser on the Windows operating system with lower memory usage.

Some of the browser’s other key features include:

  • Video Sniffer: You can download a video off any webpage with a single click.
  • Split View: Both the desktop and portable version of Avant offer the Split View feature. You can use it to view—and browse—two different sites at the same time.
  • Synced Bookmarks: Your bookmarks will be available on all your Avant apps.
  • RSS Reader: If you’re looking for a native and reliable RSS reader, Avant offers a solid solution.

The only significant difference between the desktop browser and the portable browser is where user profiles are saved. On the portable version, they are in the same folder as the Avant app.

Download: Avant Browser USB Disk Version for Windows (Free)

5. Comodo IceDragon

comodo portable web browser

Available on: Windows

Comodo IceDragon is based on Firefox. It has a full desktop version and a portable browser version for Windows.

Of course, Comodo is best known for its anti-virus software, so it’s no surprise to find the browser packed with security features.

The most appealing feature is arguably its secure DNS service. All users can access Comodo’s DNS servers for free. Aside from faster browsing, Comodo’s DNS users will also benefit from malware domain filtering, a real-time block list of harmful websites, and a reduction in DNS poisoning attacks.

In terms of installation, Comodo takes the same approach as Vivaldi. You need to download the regular version of the app, then tick the box labeled Portable version (user profile is stored in destination folder) during the setup process.

Download: Comodo IceDragon for Windows (Free)

Warning: Avoid the Chromium Portable Web Browser

We used to recommend Chromium as one of the best portable browsers; many sites still do. Sadly, it’s no longer a good idea. It hasn’t been updated since July 2017 and runs on Chromium version 61. No further updates are planned.

Older browsers are notorious for being security nightmares. If you run a browser that’s several years old, you’re asking for trouble.

The Best Portable Browser for USB Drives

So, which is the best portable browser? For us, it’s a toss-up between Opera and Firefox. For Windows users, the easy-to-run USB version of Opera is appealing, but long-time Firefox users might struggle to pull themselves away.

To learn more about portable apps, check out our other article on the best portable apps that don’t require installation and our explanation of how portable apps can make your life easier.

Image Credit: karandaev/Depositphotos

Read the full article: The 5 Best Portable Web Browsers for Your USB Drive


Read Full Article

The 6 Best Cashback Apps That Reward You for Shopping


chashback-apps

Who doesn’t want to earn money for making purchases? It might seem unrealistic to actually make money from shopping, but cashback apps make it possible.

Cashback apps reward you for shopping—so the more you shop, the more cash, coupons, and rewards you receive. If you’re ready to start putting money back in your wallet, check out these awesome cashback apps that will pay you based on what you spend.

1. Ibotta

If you want access to cashback at most major retailers and restaurants, download Ibotta—you’ll earn $20 just for signing up! Just check your Ibotta app before your next shopping trip.

The app displays the cashback you can earn by purchasing specific items. For example, if you buy a dozen eggs at any of Ibotta’s partners (like Walmart, Target, and CVS, among others), you’ll receive $0.25 cashback. While that may not seem like a lot of money, it all adds up.

You can also search for cashback offers by store. Once you complete your shopping trip, simply take a photo of your receipt and upload it to the app. Conversely, you can also pay with Ibotta to instantly earn cashback.

If you want to earn even more cash, head to the Earn more tab. Complete enough challenges, and you’ll get bonuses. When you’re ready to cash out, you can receive your hard-earned money through PayPal, Venmo, or gift cards. You can also use Ibotta from your browser, making it one of the best cashback sites around.

Download: Ibotta for Android | iOS (Free)

2. Checkout51

Checkout51 only offers cashback at grocery stores, but that doesn’t make it any less awesome. Unlike other cashback apps, it doesn’t always limit you to specific stores; most offers allow you to spend them at any grocery store. On the other hand, some deals are only for certain stores like CVS, Target, Walmart, Kroger, Safeway, Publix, Babies R Us, and more.

Each week, Checkout51 updates its offers. Instead of cutting coupons, you can claim offers, buy those items, and upload a photo of your receipt. The next time you create your shopping list, make sure to include the app’s featured items!

You can claim most offers up to five times, giving you even more bang for your buck. Turn on your location when you’re shopping, and Checkout51 will instantly provide you with any in-store offers.

Download: Checkout51 for Android | iOS (Free)

3. GetUpside

Tired of paying full price for your gas? GetUpside offers cashback opportunities at the pump. While it does offer cashback at restaurants and grocery stores, those offers are only available in select cities and states. GetUpside is best used for fuel, and it can save you a lot of money in the long run.

GetUpside automatically detects your location and shows you offers at nearby gas stations—you can end up saving up to 25 cents per gallon. Once you claim an offer, you only have three hours to redeem it, so make sure you don’t claim it until you’re ready. After you pump gas, grab your receipt and upload it to the app.

GetUpside doesn’t only work when filling up your tank. You can also receive some money back from car washes and certain services. Cash out at any time, and receive your money through PayPal, a check, or an e-gift card.

Download: GetUpside for Android | iOS (Free)

4. Belly

Belly is an all-in-one rewards card. Instead of functioning as a regular rewards card for a big-box store, it works as a rewards system for local shops. The only catch is that the stores you shop at, and the services you receive, have to be associated with Belly.

You can find participating stores on Belly’s map. When you arrive at the location, simply scan your app on the iPad it has. This will send loyalty points straight to your app.

After you rack up enough points, you can redeem them for awesome rewards at the locations you frequent most. Just keep in mind that if you live outside of a large city, you might not have as many participating shops.

Download: Belly for Android | iOS (Free)

5. Dosh

Dosh functions a lot like Ibotta, except it allows for in-person and online cashback deals. Simply link your card to the app, shop at your favorite retailers and restaurants, and earn cashback.

Dosh supports deals for locations like JCPenney, Denny’s, Forever 21, Sephora, and more. To view the full list of retailers, you’ll have to download the app. You’ll be surprised at the opportunities it offers—you can even get money back by booking a hotel!

The app gives you the chance to earn up to 10 percent cashback for spending at retailers, while you can earn up to 40 percent cashback by making a hotel reservation. All this cash will appear in your Dosh wallet, which you can redeem at any time.

Download: Dosh for Android | iOS (Free)

6. Shopkick

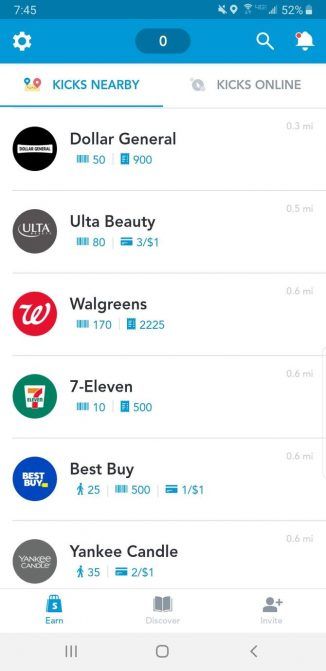
Shopkick doesn’t give send cold hard cash back to your wallet, but it does provide you with plenty of gift cards in exchange for shopping in-store and online. So far, the app has rewarded its users with a total of $78 million in the form of gift cards.

With Shopkick, you don’t earn points; you earn “kicks.” All you have to do is download the app, and you’ll immediately receive a $5 gift card. From there, you can start getting more kicks by opening the app in stores, scanning the barcodes of the items on the app, purchasing those items, and scanning your receipt.

Shopkick will also present you with daily shopping challenges that send you on a scavenger hunt for kicks. You can redeem your kicks at several popular stores and restaurants. Using the gift cards you earn from this app will help you save money and shop smarter at Amazon, Target, Walmart, and more.

Download: Shopkick for Android | iOS (Free)

Earn Money While You Shop

Before going on your next shopping spree, make sure to download some of these cashback apps. Doubling up on them definitely doesn’t hurt, as it’ll help you maximize your cashback rewards.

Keep in mind that a cashback app isn’t the only easy way to earn money. You can also get more cash by filling out online surveys. Check out some legitimate survey sites that will pay you for your opinion.

Read the full article: The 6 Best Cashback Apps That Reward You for Shopping


Read Full Article

Take Better Smartphone Movies, with the FeiyuTech Vimble2 Gimbal


Our verdict of the FeiyuTech Vimble 2:
The Vimble 2 is a competent little gimbal. It's affordable, easy to use, and comes in a variety of colors. What more do you need from a smartphone gimbal?
910

Gimbals are everywhere now. They used to be big heavy devices limited to the domain of professional filmmakers, but heavy competition has driven prices down and made smooth videography accessible to all. FeiyuTech is no stranger to the gimbal market, and the Vimble 2 represents a culmination of years of design and development. Retailing for $89, is this smartphone gimbal a hidden gem, or should you look elsewhere? Here’s what we think.

Don’t forget to enter our giveaway contest at the end of this review, where we have a Vimble 2 you could win to make smooth smartphone videos of your own.

Specifications

Vimble 2 main motors

The Vimble 2 features:

  • 7oz (200g) maximum payload
  • Measures 4.64 x 4.35 x 12.71 inches (118 x 110.5 x 323mm)
  • Weighs 15oz (428g)
  • 5 hour battery life (9.62 Wh)/2 hour charging time
  • Automatic balancing

Vimble 2 Design and Style

Vimble 2 with stand

The Vimble 2 is a 3-axis stabilized handheld gimbal for smartphones. It’s not pocket-sized, but it will fit into a small bag without much trouble. On the surface, the Vimble 2 looks like any other gimbal. It features an adjustable clamp to hold your phone, a handle to grab on to, and a smattering of electronic controls. On the front, you’ll find a joystick for positioning the motors, along with a power button, shutter button (to start or stop recordings), and a lens zoom control.

Vimble 2 main control joystick

The Micro-USB charging port is on the left of this main control panel, and it’s possible to operate this gimbal while it is charging if you use a portable power bank. Finally, the rear of the main handle contains a trigger, which you can hold to change the operation of the gimbal. The bottom houses a standard 1/4-20 tripod mount—just like you’ll find on any camera.

Vimble 2 rotated camera

The phone holder is able to accommodate phones as large as the Huawei P9 or Google Pixel 3 XL, providing you remain within the weight limit. This spring-loaded clamp grips your phone, ensuring a stable grip in all but the harshest of movements. It can rotate and “lock” through 90 degrees, enabling you to shoot photos and videos in either portrait or landscape mode. The motors are angled in such a way that you can see the screen at all times, and use either the front or rear cameras.

If you’re after a gimbal to match your outfit, then the Vimble 2 is exactly what you need. It comes in a choice of four colors, including Space Gray, Sakura Pink, Snow White, and Dark Black. If that’s not enough, it comes with a semi-rigid foam case, a mini tripod that attaches to the bottom, and a wrist strap. No mains charger is included, however.

Vimble2 Extended mode

The Vimble 2 is hiding a special party trick. Inside this ordinary looking gimbal is a selfie stick of sorts. By pulling the motors and phone mount away from the main controller, you expose the telescopic extension. This extends the gimbal an extra 7 inches (180mm). This lets you get the perfect angle for selfies, low-angle videos, or cinematic shots peering over walls. iPhone 11 Slothie anyone?

The best feature of the Vimble 2 is balancing—you don’t need to do it! Gimbals operate through a balancing act between camera/smartphone, and the electrical trickery provided by the accelerometer and the brushless motors. Gimbals designed for cinema cameras, DSLRs, or even mirrorless cameras need perfect precision with your camera placement, and the slightest change such as removing the lens cap is often enough to upset the delicate balance.

vimble 2 front view with phone

This gimbal is so easy to use because you don’t have to think about the balance. Providing you don’t mount your smartphone at an extreme angle, the motors are powerful enough to handle any phone you can fit on it. This makes setting up and using the gimbal so much more enjoyable than other gimbals and means you are more likely to use it. We wish all gimbals had this feature.

Using the Vimble 2

Once you’ve installed your mobile phone and fired up your camera app of choice, you’re ready to get started. Vimble 2 is very simple to use. Simply by pointing at things you want to film produces smooth results. Far smoother than those possible by holding your phone yourself. This lightweight gimbal is perfect for vlogging (when paired with a suitable microphone). Gone are the days of shaky video, and this affordable device won’t leave you tired after a day of filming.

While pointing a camera at stuff can produce good results, you can get some excellent footage by planning your shots first, and by taking advantage of the unparalleled freedom of movement offered by this wonder-contraption. By moving around subjects in the foreground, or angling the camera ultra-low to get an interesting perspective, you can begin to elevate your videos from good to great. When combined with these cinematic camera tricks, a gimbal can make your videos shine.

Vimble 2 joystick

By using the joystick on the front you can manipulate the angle of the motors, but I wouldn’t recommend this. These forced motor movements are are rarely smooth. It takes great skill to ramp up to speed and then back down. If you’re not careful, the movement starts and then stops, in a very mechanical and forced looking way. This isn’t the Vimble’s fault. While this problem is less visible on higher-end models ($500+), it still plagues most gimbals. It looks and feels unnatural, and should be avoided at all costs.

The strategically positioned trigger lets you lock one axis. This is perfect for moving the camera vertically or horizontally while restricting movement on one axis. Triggers are making their way into many gimbals now such as the Moza Air 2. To find a trigger on a sub-$100 gimbal is impressive.

Vimble 2 extended

Moving on to the telescopic selfie bar, you may be disappointed. It’s not terrible, but it introduces an extra wobble which is not present normally. The flexibility offered for group selfies, extra-low videos or spying over fences may be worth it to you. Due to the slimline nature of the telescopic parts, it’s more unstable than the rest of the product. Still, it’s a nice feature to have.

Should You Buy the FeiyuTech Vimble 2?

The Vimble 2 is one capable little gimbal. While the extension bar is little more than a gimmick, it’s very affordable, and instantly improves your video quality, no matter how modern your camera is, or how experienced you are. It does not need balancing, has a good battery life, and is well made. There is very little to dislike about the Vimble 2. We recommend this to anyone looking to buy a gimbal for the first time.

Vimble 2 motors

If you’d like to win a Vimble 2, then all you have to do is enter our giveaway contest below. Make sure you read all the rules for the chance to enter more than once, and good luck!

Enter the Competition!

FeiyuTech Vimble2 Gimbal Giveaway

Read the full article: Take Better Smartphone Movies, with the FeiyuTech Vimble2 Gimbal


Read Full Article

3 Ways to Stream Music to Your Sonos Speaker


stream-music-sonos

Sonos is a company that makes not only speakers but also software for linking those speakers together and playing music through them. If you’ve just set up your new Sonos speaker, we’ll show you how you can use it to play music from a variety of sources, controlled through a smartphone app.

1. Play Music From Streaming Services

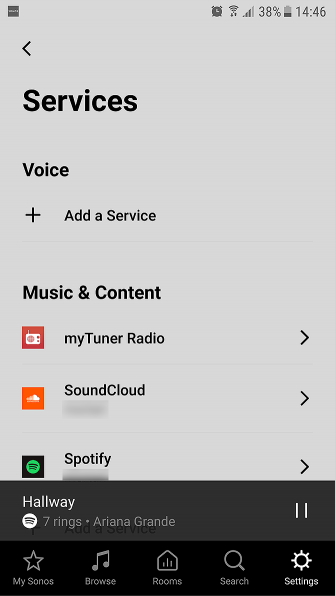
The most common use for a Sonos speaker is playing music from streaming services. To get the most from your Sonos speaker, it’s best if you have an existing account for a streaming service like Spotify. To add a streaming service to your Sonos system, open up the Sonos app and choose Settings from the menu at the bottom.

Now go to Services. Look in the Music & Content section, and click on Add a Service.

Here you’ll find options for services that work with Sonos, including Spotify, Amazon Music, Apple Music, Audible, Google Play Music, Last.fm, SoundCloud, Stitcher, and many more.

Tap on the name of a service to bring up more information about it and click on Add to Sonos to use the service with Sonos. Once the service is installed, you can log in with the usual name and password you use for the service. Then your music will be available to play via Sonos.

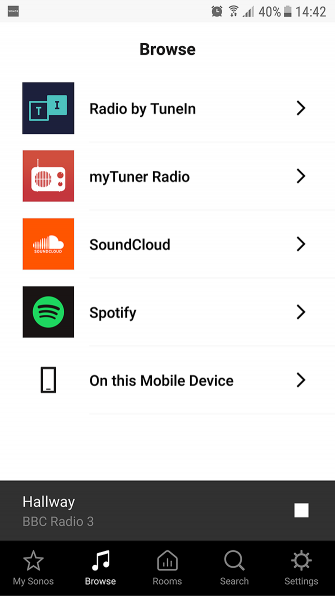
To play music via Spotify, for example, go to Browse in the main menu, then choose Spotify. From here, you can see Spotify playlists like charts, new releases, and genres. Or you can select Your Music to see the music that is saved to your Spotify account including your playlists.

To start playing, find the album, song, or playlist that you want. Then click Play or Shuffle and the music will begin playing over your Sonos system.

You’ll also find that options from your services are added to your Sonos home screen. When you start using Spotify, you’ll find options like playlists and recently played tracks appear in the Spotify section of My Sonos. You can tap one of these entries to play albums or playlists again.

2. Play Music From Your Storage or Hard Drive

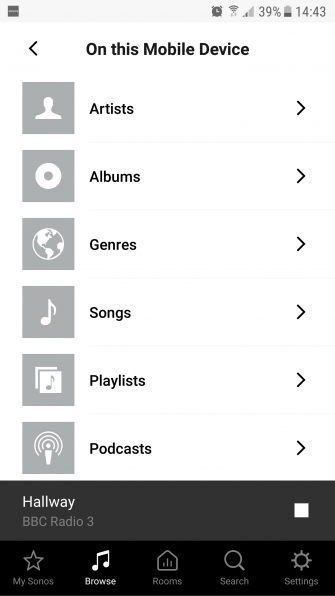
You can also use your Sonos speaker to play music which you have saved on one of your devices. This is handy if you have music saved on your phone, for example, and you want to play it in good quality over the speaker. To do this, open up the Sonos app on the device which has the music you want to play and go to Browse option in the bottom menu.

At the bottom of the menu you’ll see an option for On this Mobile Device. Click this and you’ll see all the music saved on your phone, organized into categories like Artists, Albums, Genres, Playlists, and Podcasts. Find the album, artist, or track that you want to play and click on the title.

Now the music from your phone will start playing through your Sonos, and you can control the playback using the app the same way you control music from streaming services.

3. Listen to the Radio on Sonos Using TuneIn

If you enjoy listening to the radio, then Sonos has a massive range of radio stations from all over the world that you can listen to via the internet. By default, Sonos comes with the TuneIn radio service already installed.

To find a radio station to listen to, you can use the Search function from the menu at the bottom of the app to search for a specific station. Almost all radio stations have an online version now, even small local stations, so you should be able to find whatever you’re looking for.

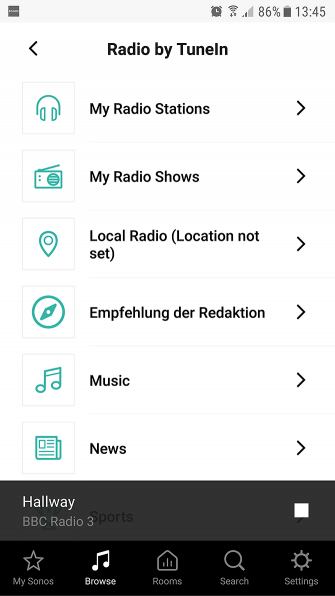
Or to browse for radio stations, choose the Browse option from the bottom menu. Now select Radio by TuneIn. From here you can look for Local Radio (if you set your location or enable location services on your device) or you can browse through categories like Music, Sports, or Talk.

When you find a station you want to listen to, just tap on its name to begin playing.

You can also add the station to My Radio Stations by clicking the three dots next to the station name, then choosing More. From here, you can choose Add to My Radio Stations. This way, the station will appear in the My Radio Stations section of the TuneIn service.

How to Add Favorites to Your Sonos Home Screen

If there’s a radio station, album, artist, show, or playlist that you listen to regularly, you can add it to your Sonos favorites. That way, it will appear on your Sonos app home screen for easy access.

When you’re browsing and you find an artist that you’d like to add to your favorites, for example, look for the three vertical dots in the top right of the page. Click on this and choose Add Artist to My Sonos. Now, when you open the Sonos app you’ll see that artist in the My Sonos home screen.

You can do the same thing with currently playing tracks using the three vertical dots to the right of the track name, and you can add favorites from sources like Spotify or TuneIn Radio as well as from your music library.

How to Play Music Though Different Speakers in a Multi Room Setup

One of the best features of Sonos is that you can link together multiple different speakers which are spread throughout your home. Once you’ve used your first speaker to set up your Sonos system, you can add additional speakers or soundbars to any room where you want to play music.

When you’re playing music or a radio station through Sonos, you’ll see an icon of a square with an arrow in the bottom right. Clicking on this brings up the names of all your speakers throughout your system. To change which speaker is playing the current music, just tick or untick the box next to a speaker name.

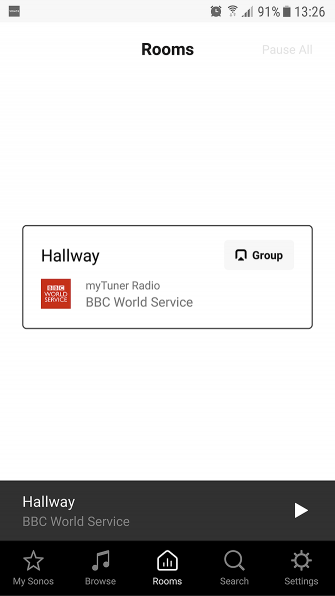
You can play the same music on multiple speakers by checking the boxes next to all the speakers you want to play. You can also click the Rooms item from the menu at the bottom of the app to bring up a list of all the speakers in your system. In the system shown in the images, there is only one speaker, but if you have multiple speakers they will show up here.

From here you can “group” two or more of the speakers so that they play together, as well as using the Pause all function in the top right to stop all the music currently playing in your house.

Use Sonos Speakers to Play Music Throughout Your Home

Using these methods, you can play music from almost anywhere through your Sonos system. If you’re thinking about expanding your Sonos setup, you might be interested in our review of the Sonos One, which could be one smart speaker to rule them all.

Read the full article: 3 Ways to Stream Music to Your Sonos Speaker


Read Full Article