20 February 2019

Daily Crunch: Google tries to explain that secret microphone


The Daily Crunch is TechCrunch’s roundup of our biggest and most important stories. If you’d like to get this delivered to your inbox every day at around 9am Pacific, you can subscribe here.

1. Google says Nest’s secret microphone was ‘never intended to be a secret’

When Google announced earlier this month that its Nest Secure smart home hub would double-up as a Google Assistant, the news sparked anger, since Google hadn’t told anyone that the security hub had a microphone inside to begin with.

Now Google is trying to explain itself, claiming there’s absolutely, positively nothing to worry about: “The on-device microphone was never intended to be a secret and should have been listed in the tech spec. That was an error on our part.”

2. SoundCloud adds a music distribution service to its premium subscriptions

With SoundCloud Premier distribution, artists can upload their tracks to all major music services — including Amazon Music, Apple Music, Spotify, Tencent, YouTube Music and even Instagram — directly from SoundCloud.

3. This is the best VR headset I’ve ever demoed

The “I” in question is our VR reporter Lucas Matney. And the headset? The VR-1 from Finland-based Varjo.

4. How to watch Samsung unveil the Galaxy S10

Today’s the day we finally see the Galaxy S10. The fun starts at 11am Pacific — and of course we’ll round up the news in tomorrow’s newsletter.

5. EF raises $115M new fund, aiming to create another 300-plus startups in the next three years

Entrepreneur First, the London-headquartered “talent investor” that recruits and backs individuals pre-team and pre-idea to enable them to found startups, has raised a new fund of its own to continue scaling globally.

6. eMarketer predicts digital ads will overtake traditional spending in 2019

The research firm is predicting that U.S. digital ad spend will increase 19.1 percent this year, to $129.3 billion, while traditional advertising will fall 19 percent, to $109.5 billion.

7. Get to know Extra Crunch

A one-week-later reminder: Extra Crunch is a toolkit to help you build a better startup, offering exclusive access to analysis of successful startups, resources on company building, lists of verified experts in key services, enhanced reader tools, conference calls and more.


Read Full Article

Google’s managed hybrid cloud platform is now in beta


Last July, at its Cloud Next conference, Google announced the Cloud Services Platform, its first real foray into bringing its own cloud services into the enterprise data center as a managed service. Today, the Cloud Services Platform (CSP) is launching into beta.

It’s important to note that the CSP isn’t — at least for the time being — Google’s way of bringing all of its cloud-based developer services to the on-premises data center. In other words, this is a very different project from something like Microsoft’s Azure Stack. Instead, the focus is on the Google Kubernetes Engine, which allows enterprises to then run their applications in both their own data centers and on virtually any cloud platform that supports containers.As Google Cloud engineering director Chen Goldberg told me, the idea here it to help enterprises innovate and modernize. “Clearly, everybody is very excited about cloud computing, on-demand compute and managed services, but customers have recognized that the move is not that easy,” she said and noted that the vast majority of enterprises are adopting a hybrid approach. And while containers are obviously still a very new technology, she feels good about this bet on the technology because most enterprises are already adopting containers and Kubernetes — and they are doing so at exactly the same time as they are adopting cloud and especially hybrid clouds.

It’s important to note that CSP is a managed platform. Google handles all of the heavy lifting like upgrades and security patches. And for enterprises that need an easy way to install some of the most popular applications, the platform also supports Kubernetes applications from the GCP Marketplace.

As for the tech itself, Goldberg stressed that this isn’t just about Kubernetes. The service also uses Istio, for example, the increasingly popular service mesh that makes it easier for enterprises to secure and control the flow of traffic and API calls between its applications.

With today’s release, Google is also launching its new CSP Config Management tool to help users create multi-cluster policies and set up and enforce access controls, resource quotas and more. CSP also integrates with Google’s Stackdriver Monitoring service and continuous delivery platforms.

“On-prem is not easy,” Goldberg said, and given that this is the first time the company is really supporting software in a data center that is not its own, that’s probably an understatement. But Google also decided that it didn’t want to force users into a specific set of hardware specifications like Azure Stack does, for example. Instead, CSP sits on top of VMware’s vSphere server virtualization platform, which most enterprises already use in their data centers anyway. That surely simplifies things, given that this is a very well-understood platform.


Read Full Article

How to watch Samsung unveil the Galaxy S10


Today’s the day we finally see the Galaxy S10 — well, officially, at least. As is the tradition with Samsung product launches, the news has already been leaking out at a furious pace. Here’s a decent breakdown of what we expect from the new flagship — though to be fair, plenty more leaks have surfaced since then, including an ad for the S10 and Galaxy Buds.

We also just got a name for the foldable phone we expect to debut alongside numerous new S10 models. That’s the Galaxy Fold, to you.

Of course, Samsung always announces a lot — so there are bound to be some surprises. Heck, the company didn’t splinter off from Mobile World Congress this year for nothing.

All will be revealed at this link, tomorrow, starting at 11AM PT (2PM ET). Meantime, here’s the official teaser to whet your collective appetites.


Read Full Article

Google says Nest’s secret microphone was ‘never intended to be a secret’


Google said there’s absolutely, positively, nothing to worry about the secret microphone in your Nest Secure smart home hub that it didn’t tell you about. Nope, not at all. Just an oversight, said Google. No need to be alarmed. Everything is just fine.

When Google announced earlier this month that its Nest Secure would double-up as a Google Assistant, it sparked anger. Google hadn’t told anyone that the security hub had a microphone inside to begin with. There was no mention of the microphone on the initial list of tech specifications, nor was it mentioned after the company announced Google Assistant integration. (It’s there now.)

After Google, which owns Nest, realized its customers didn’t like being deceived or having their privacy violated, the company swallowed its pride and admitted fault

“The on-device microphone was never intended to be a secret and should have been listed in the tech specs,” said Google spokesperson Nicol Addison in an email to TechCrunch. “That was an error on our part. The microphone has never been on and is only activated when users specifically enable the option.”

Business Insider first reported the news.

Google said that security systems “often use microphones to provide features that rely on sound sensing and included the microphone so it could “potentially offer additional features to our users in the future, such as the ability to detect broken glass.”

No doubt it’s a smart, if not terribly executed idea.

You can forgive a company for not wanting to drop the ball on its own future product line-up announcements, but not disclosing the inclusion of a microphone in a device that sits in your home just looks bad. And it couldn’t come at a worst time for tech giants, as they try to clamber back any ounce of respect they have from privacy-conscious consumers.

It makes you wonder how many other devices you have in your home — and out in the world — that could be used to spy on you.

Just this week, Singapore Airlines landed itself in hot water after passengers discovered cameras embedded in the in-flight entertainment systems. The airline said in a tweet that the cameras were included as standard by the original manufacturer and that it has “no plans to enable or develop any features using the cameras.”

No plans doesn’t mean “never.” And, just like the Nest device, the customer would have no way of knowing if it was in use anyway.


Read Full Article

How to Use Firefox Sync to Keep Your Browsing Data Synchronized

What Is Amazon Prime Reading? Everything You Need to Know


amazon-prime-reading

Book lovers are stuck in a neverending quest to find more material. You could subscribe to a service like Kindle Unlimited—but it might be unnecessary, especially for casual readers.

Instead, why not check out Amazon Prime Reading? It has lots of benefits compared to other rival services.

But what exactly is Amazon Prime Reading? Who can use the service? Which books are available? And how much does Prime Reading cost? Keep reading to find out everything you need to know.

What Is Amazon Prime Reading?

Prime Reading is an online digital library from Amazon. It was created in October 2016 and provides access to a curated list of literature.

Users can “rent” up to 10 books at a time. If you hit the limit, you will need to return one book before you can download any more. Returning a book is as simple as clicking an on-screen button.

Unlike a regular library, you can keep a book for as long as you want; there’s no deadline and no late fees.

What Content Is Available on Prime Reading?

prime reading books list

At any given time, there are about 1,000 titles available on Amazon Prime Reading.

But even if you’re a fast reader, you don’t need to worry about running out of stuff to enjoy. The library is highly dynamic; Amazon’s editors are constantly updating the content available. New titles arrive every month.

Within the library itself, you will find a mix of books (both fiction and non-fiction), magazines, comics, children’s literature, and audiobooks.

The books aren’t all new releases or obscure titles. You will find a healthy mix of literary classics and modern bestsellers. The magazine catalog is extensive and provides many current issues across a range of topics.

How to Download Books From Prime Reading

Contrary to popular belief, you do not need to own a Kindle device to use Amazon Prime Reading.

You can download and read the books using the Kindle app for Android and iOS. There’s also a Windows app. And if you have an Amazon Fire tablet, Prime Reading is already integrated with the operating system.

You can browse the Prime Reading library from any Kindle app or device, and also from the web. To see what is available, head to amazon.com/primereading and check it out.

Who Can Use Amazon Prime Reading?

Prime Reading is not yet available worldwide. At the time of writing, it is available in nine countries: the United States, the United Kingdom, Germany, Spain, Australia, China, France, Italy, and Japan.

You also need to be an Amazon Prime subscriber to gain access. The cost of Amazon Prime varies between countries, but you can typically expect to pay the equivalent of about $10/month.

Prime Reading is available as an Amazon Household benefit; you can share your plan with parents, siblings, and offspring. Each household member can download their own books individually from each other. To share Prime Reading with a member of your Household, go to Your Account > Account Settings > Manage Your Household >  Add an Adult.

If you like music, books, TV series, movies, or shopping, Amazon Prime is a no-brainer. For the monthly subscription, you get access to an amount of content that’s unrivaled elsewhere. Check out our list of all of Amazon’s features and services if you would like to learn more.

Integration With Audiobooks

Amazon is investing an increasing amount of its resources into audiobooks; in recent years, the sector has grown considerably.

About 30 percent of the books in the Prime Reading library have Audible narration included. As with the rest of the library, they change on a monthly basis.

Better still, you can seamlessly jump between the audio and text, with the service capable of remembering your progress between sessions.

All the latest generations of the Kindle ereaders support audiobooks, as do the smartphone apps.

Amazon Prime Reading vs. Kindle Unlimited

People naturally make comparisons between Prime Reading and Amazon’s other big literary offering, Kindle Unlimited. The comparison is not necessarily a fair one.

Kindle Unlimited is an entirely separate subscription-based service. It costs $10/month in the United States; you do not need to have a Prime membership to take advantage.

The Unlimited service has more than one million books to choose from, as well as thousands of audiobooks. Unlike Prime Reading, there is no limit on the number of books you can download and read in any given month.

You can access Kindle Unlimited on any of your Kindle devices and the Kindle smartphone apps.

But before you run away and sign up for Kindle Unlimited, you need to be aware that the service does have some downsides. To learn more about the negatives, read up on why Kindle Unlimited might not be worth the money.

Amazon Prime Reading vs. Kindle Owners’ Lending Library

Prime Reading also differs from the Kindle Owners’ Lending Library.

The Kindle Owners’ Lending Library is another service that’s available through your Amazon Prime subscription. If you have a Kindle eBook reader, Fire tablet, or Fire phone, you can download one book per month from the library. You cannot download books onto the smartphone or desktop Kindle apps.

Obviously, the one-book-per-month limit isn’t ideal for people who read a lot. However, on the flipside, the Kindle Owners’ Lending Library has a much more extensive selection of content than Prime Reading. There are more than 100 New York Times bestsellers and several thousand books in total. The books you borrow have no due date.

Is Amazon Prime Reading Right for You?

The question of suitability is a hard one to answer. If you’re a bookworm who doesn’t currently subscribe to Prime, you might see more value for money if you sign up to Kindle Unlimited.

On the other hand, for casual readers who digest a book or two every month, Prime Reading is a fantastic solution, especially when you consider the other benefits included in your Amazon Prime plan as standard.

Don’t have Amazon Prime yet? Use this link to start a free 30-day trial of Amazon Prime and get a taste to see if it’s right for you!

If you would like to learn more about Amazon Prime, check out our article asking whether Amazon Prime is worth the money. And remember, you can always download ebooks for free too.

Read the full article: What Is Amazon Prime Reading? Everything You Need to Know


Read Full Article

What’s the Difference Between GTK+ and Qt?

How to Turn a Raspberry Pi Into a VPN-Secured Travel Router


raspi-travel-router

Would you write your password on a piece of paper and stick it to your forehead? Probably not. Yet connecting to a public Wi-Fi network is almost as foolish.

You might not have any choice, however, if you’re on the road and want to stay connected. A VPN can keep you safe, but each device has to connect separately, unless you’re using a travel router as a go-between.

Don’t have one handy? Don’t worry, you can build one with a Raspberry Pi. It’s the perfect choice for a DIY VPN travel router, so let’s walk you through how to build one.

What You’ll Need

To get started building a Raspberry Pi VPN travel router, you’ll need:

  • Raspberry Pi (Pi 3 or Raspberry Pi Zero W preferred) with case
  • A single USB Wi-Fi adapter (two, if you’re using an older Raspberry Pi)
  • A microSD card with at least 8GB storage
  • An SD card reader
  • A high-quality power supply
  • PC with an SSH client installed
  • A VPN subscription with OpenVPN support

It’s possible to use Pi models without built in Wi-Fi , but you’ll need two USB Wi-Fi adapters, or one capable of running in both managed/access point mode and client mode.

Instead of a standard Linux distribution, you’ll need to install OpenWRT onto your SD card to turn it into a fully fledged router. You can use another Linux distro if you prefer, but OpenWRT provides a handy web interface for configuration when you’re away from home.

If you’re using Windows, you’ll also need to install PuTTY or another SSH client for Windows before you get started.

Step 1: Install OpenWRT

Etcher SD Flashing Tool Screen

First, download the OpenWRT firmware for your model of Raspberry Pi. You can find the most up-to-date images from the OpenWRT wiki.

Unzip the downloaded file using 7zip or another suitable file archive manager, then flash the IMG file to your card with Etcher.

This tool should detect your SD card automatically; you just need to select your image file, select the correct drive by letter, and then click Flash.

Once it’s done, place your microSD card back into your Raspberry Pi and let it boot.

Step 2: Initial Configuration

By default, OpenWRT defaults to a static IP address of 192.168.1.1, which is the default gateway IP for many routers. You’ll need to change this to prevent conflicts. Connect your Pi to your PC using an Ethernet cable; you may need to set a static IP on your PC first.

Rather than handle the configuration using LuCI, OpenWRT’s web interface, you’re going to do it manually to ensure that the configuration is set correctly. Load up PuTTY or your SSH client and connect to 192.168.1.1 first, with the username root. 

You’ll get an initial security warning on your first connection; just click Yes and proceed. It’s a good idea at this stage to set a password; do that by typing in passwd at the terminal window.

Configure the Network and Firewall Settings

You need to edit two files—/etc/config/network and /etc/config/firewall—before you can proceed any further. Start by typing the following to edit the file:

vim /etc/config/network

Next, tap I to edit the text and include the following:

config interface 'loopback'
option ifname 'lo'
option proto 'static'
option ipaddr '127.0.0.1'
option netmask '255.0.0.0'

config interface 'lan'
option type 'bridge'
option ifname 'eth0'
option force_link '1'
option proto 'static'
option ipaddr '192.168.38.1'
option netmask '255.255.255.0'
option ip6assign '60'

config interface 'wwan'
option proto 'dhcp'
option peerdns '0'
option dns '8.8.8.8 8.8.4.4' ## Google DNS servers

config interface 'vpnclient'
option ifname 'tun0'
option proto 'none'

Once you’re done, hit the Esc key and type:qw to save and quit. Then switch attention to the firewall config file:

vim /etc/config/firewall

Tap I to edit, then find (or add) a zone for the WAN section, which should look like this:

config zone
option name wan
option network 'wan wan6 wwan'
option input ACCEPT
option output ACCEPT
option forward REJECT
option masq 1
option mtu_fix 1

Type reboot and wait as the Raspberry Pi reboots with a new IP address: 192.168.38.1.

Step 3: Update and Install Packages

Next, you’ll need to update OpenWRT. To do that, you’re going to borrow the Pi’s internal Wi-Fi and set it initially to connect to your existing Wi-Fi network. You may need to change your static IP address to 192.168.38.2 or a similar address in that range to allow you to connect.

Once connected, type the IP address of your Raspberry Pi into your browser to access the OpenWRT admin dashboard. Use your username and password to gain access, then go to Network > Wireless. You should only see one Wi-Fi device at present, so click Scan to find your Wi-Fi network, then Join Network when you find it.

You’ll need to enter your Wi-Fi password under WPA Passphrasebefore hitting Submit.

You should now see the connection settings for your Wi-Fi connection. Go to Advanced Settings and set your Country Code to match your location; your Wi-Fi might not work otherwise.

Reconnect to your Pi using new IP address over SSH (accepting the RSA security key warning). You’ll need to update your device first by typing:

opkg update

Keep an eye on this, tapping Y when prompted.

Installing the USB Wi-Fi Drivers

Once you’ve installed all the updates install any drivers you need for your USB Wi-Fi adapter. This is required to connect to Wi-Fi hotspots when you’re on the go. You’ll also be installing the tools you’ll need for VPN connections using OpenVPN, as well as nano, an easier-to-use terminal file editor.

This is where your method may vary; I had a RT2870 chipset Wi-Fi adapter, so the following commands should work if you do, too:

opkg install kmod-rt2800-lib kmod-rt2800-usb kmod-rt2x00-lib kmod-rt2x00-usb kmod-usb-core kmod-usb-uhci kmod-usb-ohci kmod-usb2 usbutils openvpn-openssl luci-app-openvpn nano
ifconfig wlan1 up
reboot

If you don’t have an RT2870 chipset Wi-Fi adapter, or you’re unsure, plug in your Wi-Fi adapter and type the following into the SSH terminal:

opkg install kmod-usb-core kmod-usb-uhci kmod-usb-ohci kmod-usb2 usbutils
lsusb

Once the files have installed, you’ll see a list of connected devices. Find any that refer to a wireless adapter, and search for the relevant installation instructions for your device.

OpenWRT Putty Terminal Window Screen

Step 4: Set Up Wi-Fi Access Point

If your USB Wi-Fi adapter is connected, you can now set up both Wi-Fi connections. Return to the LuCI dashboard, under Wireless, and remove both network connections. The device radio0 is your in-built Wi-Fi, while radio1 is your USB Wi-Fi adapter.

Set up your in-built Wi-Fi by clicking Add. Ensure the following:

  • Mode is set to Access Point
  • ESSID is set to a network name of your choosing; default is OpenWRT
  • Network is set to lan
  • Under Wireless Security, Encryption is set to WPA2-PSK
  • Key is set to a suitable password

Once you’re done, hit Save then return to the Wireless menu. Follow the instructions from earlier for the initial connection to set the radio1 device (your USB Wi-Fi adapter) to your existing network. This is also where you’ll need to scan and change networks when you’re in a new location.

OpenWRT LuCI Dashboard Wireless Menu

You should now have two Wi-Fi connections running, one as an access point for your Wi-Fi devices, and one acting as the internet connection for your device to your existing Wi-Fi network. Try out the connection to your Pi at this stage with your smartphone or laptop to confirm it works.

If it works, disconnect your Pi from the Ethernet connection with your PC.

Step 5: Connect to VPN and Final Changes

You will need an OpenVPN configuration file (OVPN) to connect your Pi to your chosen VPN provider and server. If you have one, upload it to your Pi using an SCP client like WinSCP where you can connect with your admin username and password.

Rename the file to vpnclient.ovpn and upload it into the /etc/openvpnfolder. Complete the instructions found on the OpenWRT website to set your Pi up for VPN connections. The only slight change will be under section 4 for the VPN client profile setup, where you won’t need to use the initial cat tool to insert your vpnclient.ovpn file, as it’s already in place.

As soon as you complete this, your VPN connection should activate automatically. Check your outgoing IP address has changed; if it hasn’t, reboot your Pi and check your connection is active.

Find this by going to the OpenVPN section of LuCI, listed under Services at the top of the dashboard. If it’s connected, vpnclient will be listed as yes under the Started column.

OpenWRT LuCI Dashboard OpenVPN Menu

Step 6: Register Your Device on Public Wi-Fi

Your Pi is nearly ready at this stage, but if you’ve ever connected to a public Wi-Fi network, you’ll know that you’ll typically need to authenticate using a captive portal, either to pay or register your device. Because your Pi is now set up to automatically connect via VPN (and should prevent connection otherwise), these portals will usually get blocked.

To get around this, set your USB Wi-Fi adapter to match the MAC address with a device that you can use to connect and authenticate with a public Wi-Fi network first, such as your smartphone. Once you have this, type:

nano /etc/init.d/wan-changer

In the editing window, add the following (replacing the placeholder XX for your MAC) and hit Ctrl + X, followed by Y to save.

#!/bin/sh /etc/rc.common

START=10

start() {
 uci set wireless.@wifi-iface[1].macaddr='XX:XX:XX:XX:XX:XX'
 uci commit network
}

Finally, run the following commands to set the script to run automatically when your Pi starts:

chmod +x /etc/init.d/wan-changer
/etc/init.d/wan-changer enable

Reboot to check everything works okay. You should also check for any DNS leaks to make sure your VPN connection is working correctly. Most VPN providers offer a tool that will help with this.

Secure Wi-Fi Wherever You Go, Guaranteed

Your Raspberry Pi should now be set up and ready to go as a VPN travel router, meaning you’re safe to surf in any hotel or cafe you visit. Thanks to the LuCI dashboard, you can connect to any new Wi-Fi network with ease through your web browser.

See our list of the best VPN services to find a VPN service that suits your needs.

Read the full article: How to Turn a Raspberry Pi Into a VPN-Secured Travel Router


Read Full Article

Learn New Skills, Shop Safe With Wish, & Find Free Domain Names


Learn New Skills

Learning a new skill is easier than you think. This week’s Really Useful Podcast takes a look at several of the places you can go online to find your way to developing new skills and insights.

And that’s not all.

We take a look at whether it’s safe to shop on Wish, and investigate the magic of “portable” Windows apps.  We also show you where to find free domain names.

Really Useful Podcast Season 2 Episode 3 Shownotes

Our topics this week are:

The Really Useful Podcast Season 2 Episode 3 is hosted by MakeUseOf deputy editor Christian Cawley and contributor Gavin Philips. You can follow them on Twitter:

You’ll find the Really Useful Podcast on Spotify, and you can subscribe via iTunes for the latest weekly show direct to your device.

As ever, please share the podcast with anyone you know who would benefit from our straight, no-nonsense approach to using technology.

Read the full article: Learn New Skills, Shop Safe With Wish, & Find Free Domain Names


Read Full Article

UK’s extended 5km airport drone ‘no-fly’ zones in force next month


The UK’s Department for Transport has said today that an expansion of drone ‘no-fly’ zones to 5km around airport runways will come into force on March 13.

Anyone caught and convicted of flying a drone inside the restricted zones could face a fine and years in prison.

Last month the government said it would tighten restrictions on drones flights around airports, after the existing 1km limit was criticized for being inadequate — saying it believes expanded no-fly zones will help protect airports from drone misuse.

The 1km drone exclusion zone around airports, and a 400ft drone flight height restriction rule, only came into force last July. But ministers came in for sharp criticism following the Gatwick Airport drone fiasco when a spate of drone sightings near the UK’s second busiest airport caused a temporary shutdown of the runway and travel disruption for thousands of people right before Christmas.

Heathrow, the UK’s busiest airport, also briefly halted departures after further sightings of drones last month.

“The law is clear that flying a drone near an airport is a serious criminal act. We’re now going even further and extending the no-fly zone to help keep our airports secure and our skies safe,” said transport secretary, Chris Grayling, in a statement today.

“We are also working to raise awareness of the rules in place. Anyone flying their drone within the vicinity of an airport should know they are not only acting irresponsibly, but criminally, and could face imprisonment.”

The government and the Civil Aviation Authority have announced a partnership with online retailer Jessops to help raise public awareness about the new drone rules — and encourage what they dub “responsible drone use” — as part of a national awareness campaign.

The government added that work is continuing on a new Drones Bill — although the planned legislation is already almost a year behind schedule and is still only slated for introduction “in due course”.

The bill will give police officers powers to stop and search people suspected of using drones maliciously above 400ft or within 5km of an airport.

The government added that it will also give additional new powers to the police to clamp down on those misusing drones and other small unmanned aircraft, including the power to access electronic data stored on a drone with a warrant.

The additional powers for police were trailed back in 2017 when the drone bill was first floated by the government.

It re-announced its intention to beef up police powers to tackle drone misuse last month following the Gatwick fiasco.

The Home Office is also still reviewing the UK’s approach to countering the malicious use of drones, with the government writing today that it will “consider how best to protect the full range of the UK’s critical national infrastructure — including testing and evaluating technology to counter drones”.

In related news this month, drone maker DJI announced upgrades to its geofencing systems across Europe — applying stricter and more detailed restrictions around airports and other sensitive sites after switching its mapping data provider from US based AirMap to UK based Altitude Angel.


Read Full Article

Xiaomi’s Mi 9 includes a triple lens rear camera and wireless charging


Mobile World Congress, the mobile industry’s annual shindig, is next week but Xiaomi can’t wait reveal its newest top-end phone. The Chinese company instead picked today to unveil the Mi 9.

Once again Xiaomi’s design ethic closely resembles Apple’s iPhone with a minimal bezel and notch-like front-facing camera but Xiaomi has gone hard on photography with a triple lens camera.

There are two models available with the regular Mi 9 priced from RMB 2999, or $445, and the Mi 9SE priced from RMB 1999, or $300. A premium model, the Transparent Edition, includes beefed-up specs for RMB 2299, $342.

The phone runs on Qualcomm’s Snapdragon 855 chipset and the headline feature, or at least the part that Xiaomi is shouting about most, is the triple lens camera array the back of the device. That trio combines a 48-megapixel main camera with a 16-megapixel ultra-wide-angle camera and a 12-megapixel telephoto camera, Xiaomi said. The benefits of that lineup is improved wide-angle shots, better quality close-up photography and performance in low-light conditions, according to the company.

The premium Mi 9 model, the Transparent Edition, sports 12GB of RAM and 256GB internal storage and features a transparent back cover

There’s also a ‘supermoon’ mode for taking shots of the moon and presumably other night sky images, while Xiaomi touts an improved night mode and, on the video side, 960fps capture and advanced motion tracking. We haven’t had the chance to test these out, which is worth noting at this point.

Xiaomi also talked up the battery features of the Mi 9, which ships with an impressive 3300mAh battery that features wireless charging support and Qi EPP certification meaning it will work with third-party charging mats. Xiaomi claims that the Mi 9 can charge to 70 percent in 30 minutes, and reach 100 percent in an hour using 27W wired charging.

Alongside the Mi 9, it unveiled its third three wireless charging products — a charging pad (RMB 99, $15), a car charger (RMB 169, $25) and a 10,000mAh wireless power bank (RMB 149, $22.)

Xiaomi, as ever, offers a range of different options for customers as follows:

  • Mi 9 with 6GB and 128GB for RMB 2999, $445
  • Mi 9 with 8GB and 128GB for RMB 3299, $490
  • Mi 9 with 12GB and 256GB for RMB 3999, $595
  • Mi 9SE with 6GB and 128GB for RMB 1999, $300
  • Mi 9SE with 6GB and 128GB for RMB 2299, $342 (Transparent Edition)

Notably, the Mi 9 goes on sale February 26 — pre-orders open this evening — with the SE version arriving on March 1. As expected, the launch market is China but you can imagine that India — where Xiaomi is among the top players — and other global launches will follow.

Xiaomi said it plans to announce more products on Sunday, the eve of Mobile World Congress. It recently teased a foldable phone so it’ll be interesting to see if it will follow suit and join Samsung, which had its first foldable phone outed by a leak.


Read Full Article

eMarketer predicts digital ads will overtake traditional spending in 2019


This is the year when the money spent on digital advertising will finally overtake spending on traditional ads — at least according to the latest forecast from eMarketer.

The research firm is predicting that U.S. digital ad spend will increase 19.1 percent this year, to $129.3 billion, while traditional advertising will fall 19 percent, to $109.5 billion. That means digital will account for 54.2 percent of the total, while traditional will only represent 45.8 percent.

Not surprisingly, most of the digital ad money is going to Google and Facebook. However, eMarketer says Google’s share of the market will actually decline, from 38.2 percent last year to 37.2 percent this year, and Facebook’s share will only grow slightly, from 21.8 percent to 22.1 percent.

emarketer forecast

Apparently, Amazon is the main beneficiary here, with its U.S. ad business set to expand by more than 50 percent, accounting for 8.8 percent of total spend.

“The [Amazon] platform is rich with shoppers’ behavioral data for targeting and provides access to purchase data in real-time,” said eMarketer forecasting director Monica Peart in a statement. “This type of access was once only available through the retail partner, to share at their discretion. But with Amazon’s suite of sponsored ads, marketers have unprecedented access to the ‘shelves’ where consumers are shopping.”

The firm also forecasts that by 2023, digital will account for more than two-thirds of total ad spending.


Read Full Article

You Can Now Try the CERN Web Browser From 1990


CERN (the European Organization for Nuclear Research) has rebuilt what was essentially the first web browser in the world. This means you can now see what surfing the World Wide Web was like back in 1990, using an application fittingly called WorldWideWeb.

Tim Berners-Lee Created the World Wide Web

As most people already know, the web was born in a lab at CERN. In 1989, Tim Berners-Lee wrote a proposal for “a large hypertext database with typed links”. By the end of 1990, all of the necessary elements we still use today were in place.

This included HTTP, HTML, server software, a web server, and the first web pages. And to navigate it all was an application called WorldWideWeb: a web browser and web editor. And now, to celebrate the 30th anniversary, CERN has rebuilt WorldWideWeb.

CERN Recreates the WorldWideWeb Application

You can try WorldWideWeb for yourself right from within the browser you’re currently using. Just open this page and you’ll see what Tim Berners-Lee and his colleagues were faced with in 1990. Except there were only a handful of pages to actually visit then.

What’s immediately obvious is the lack of color. There are also no images of any kind, let alone the videos, GIFs, and emojis we all take for granted these days. Most strikingly, there’s no address bar, so you’ll have to jump through some hoops before surfing the web.

It’s actually not that difficult once you know how. Just launch WorldWideWeb, select “Document” from the left-hand sidebar, click “Open from full document reference”, type the URL you want to visit into the “Reference” field, and then click “Open”. Et, voila.

If trying the first web browser ever created whets your appetite, CERN has more resources for you to explore. There’s a potted history of the technology, a timeline of development, a guide to using the browser, and a look at the code underpinning it all.

The Incredible Evolution of the Web Browser

It should go without saying that the first web browser isn’t a patch on today’s modern browsers. You can certainly see the through line connecting WorldWideWeb to Chrome and Opera, but the evolution of the browser over the course of 30 years is astonishing.

While technology is continually progressing in a forward direction, it’s important to look back occasionally. With that in mind, once you stop playing with WorldWideWeb, why not read about the history of other geeky things, and visit old websites from the 1990s.

Read the full article: You Can Now Try the CERN Web Browser From 1990


Read Full Article

These hyper-efficient solar panels could actually live on your roof soon


The clean energy boffins in their labs are always upping the theoretical limit on how much power you can get out of sunshine, but us plebes actually installing solar cells are stuck with years-old tech that’s not half as good as what they’re seeing. This new design from Insolight could be the one that changes all that.

Insolight is a spinoff from the École Polytechnique Fédérale de Lausanne, where they’ve been working on this new approach for a few years — and it’s almost ready to hit your roof.

Usually solar cells collect sunlight on their entire surface, converting it to electricity at perhaps 15-19 percent efficiency — meaning about 85 percent of the energy is lost in the process. There are more efficient cells out there, but they’re generally expensive and special-purpose, or use some exotic material.

One place people tend to spare no expense, however, is in space. Solar cells on many satellites are more efficient but, predictably, not cheap. But that’s not a problem if you only use just a tiny amount of them and concentrate the sunlight on those; that’s the Insolight insight.

Small but very high-efficiency cells are laid down on a grid, and above that is placed a honeycomb-like lens array that takes light and bends it into a narrow beam concentrated only on the tiny cells. As the sun moves, the cell layer moves ever so slightly, keeping the beams on target. They’ve achieved as high as 37 percent efficiency in tests, and 30 percent in consumer-oriented designs. That means half again or twice the power from the same area as ordinary panels.

Certainly this adds a layer or two of complexity to the current mass-manufactured arrays that are “good enough” but far from state of the art. But the resulting panels aren’t much different in size or shape, and don’t require special placement or hardware, such as a concentrator or special platform. And a recently completed pilot test on an EPFL roof was passed with flying colors.

“Our panels were hooked up to the grid and monitored continually. They kept working without a hitch through heat waves, storms and winter weather,” said Mathiu Ackermann, the company’s CTO, in an EPFL news release. “This hybrid approach is particularly effective when it’s cloudy and the sunlight is less concentrated, since it can keep generating power even under diffuse light rays.”

The company is now in talks with solar panel manufacturers, whom they are no doubt trying to convince that it’s not that hard to integrate this tech with their existing manufacturing lines — “a few additional steps during the assembly stage,” said Ackermann. Expect Insolight panels to hit the market in 2022 — yeah, it’s still a ways off, but maybe by then we’ll all have electric cars too and this will seem like an even better deal.


Read Full Article

Orai raises $2.3M to make you a better speaker


Orai, a startup building communication coaching tools, is announcing that it’s raised $2.3 million in seed funding.

CEO Danish Dhamani said that he co-founded the company with Paritosh Gupta and Aasim Sani to address a need in his own life — the fact that he was “held back personally and professionally” by lackluster “communications skills and public speaking skills.”

Dhamani said he attended Toastmasters International meetings hoping to improve those skills, where he concluded that he could build an algorithm to analyze your speaking abilities and give tips for how to improve.

To be clear, Orai isn’t necessarily trying to replace groups like Toastmasters, or individual speaking coaches. However, Dhamani said the “status quo” involves a “one-to-one” approach, where a human coach gives feedback to one person. Orai, on the other hand, can coach “entire IT teams, entire student bodies.”

“I am a big advocate of personalized, one-on-one coaching as well fine time as well,” he said. “Orai not replacing that, it’s enhancing that if used together.”

The startup has created iOS and Android smartphone apps to demonstrate the technology, which offer focused lessons and then assess your progress by analyzing recordings of your voice. (I did the initial assessment, and although I was praised for not using any “filler words,” I was told that I need to slow down — something I hear a lot.)

The real business model involves selling the tools to businesses, who can then assign Orai lessons to salespeople or other teams, create their own lessons and track everyone’s progress.

Attendees of TechCrunch’s Disrupt SF hackathon may recognize the team, which presented a body language analyzer called Vocalytics — so you can probably guess that Dhamani’s plans go beyond audio.

The funding was led by Comcast Ventures — Orai was one of the startups at Comcast’s LIFT Labs Accelerator in Philadelphia. (Currently accepting applications for its second class!) In addition to announcing the funding, Orai has signed up famed speaking coach Nancy Duarte as an advisor.


Read Full Article

Cybersecurity 101: Five settings to secure your iPhone or iPad


iOS 12, Apple’s latest mobile software for iPhone and iPad, is out. The new software packs in a bunch of new security and privacy features you’ve probably already heard about. Here’s what you need to do to take advantage of the new settings and lock down your device.

1. Turn on USB Restricted Mode to make hacking more difficult

This difficult-to-find new feature prevents any accessories from connecting to your device — like USB cables and headphones — when your iPhone or iPad has been locked for more than an hour. That prevents police and hackers alike from using tools to bypass your lock screen passcode and get your data.

Go to Settings > Touch ID & Passcode and type in your passcode. Then, scroll down and ensure that USB Accessories are not permitted on the lock screen, so make sure the setting is Off. (On an iPhone X, check your Face ID settings instead.)

2. Make sure automatic iOS updates are turned on

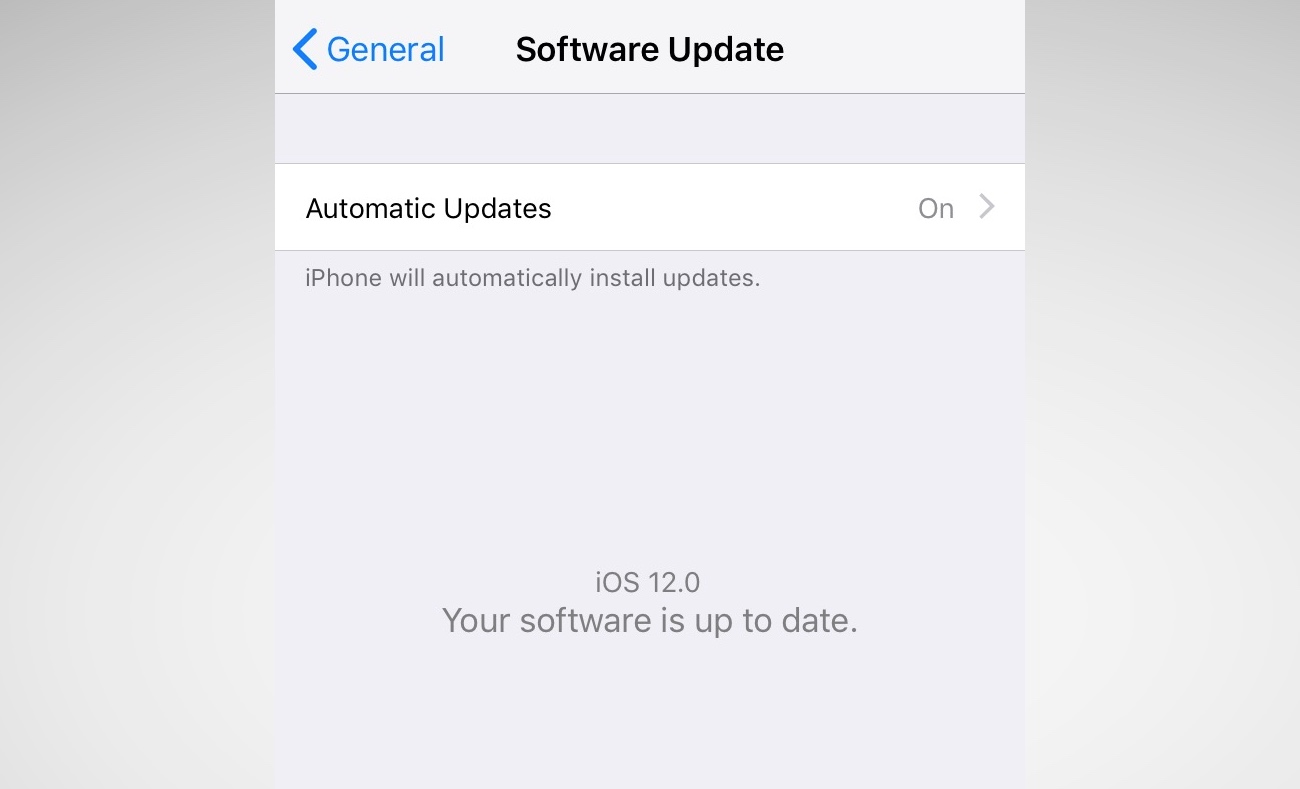
Every time your iPhone or iPad updates, it comes with a slew of security patches to prevent crashes or data theft. Yet, how often do you update your phone? Most don’t bother unless it’s a major update. Now, iOS 12 will update your device behind the scenes, saving you downtime. Just make sure you switch it on.

Go to Settings > General > Software Update and turn on automatic updates.

3. Set a stronger device passcode

iOS has gotten better in recent years with passcodes. For years, it was a four-digit code by default, and now it’s six-digits. That makes it far more difficult to run through every combination — known as brute-forcing.

But did you know that you can set a number-only code of any length? Eight-digits, twelve — even more — and it keeps the number keypad on the lock screen so you don’t have to fiddle around with the keyboard.

Go to Settings > Touch ID & Passcode and enter your passcode. Then, go to Change password and, from the options, set a Custom Numeric Code.

4. Now, switch on two-factor authentication

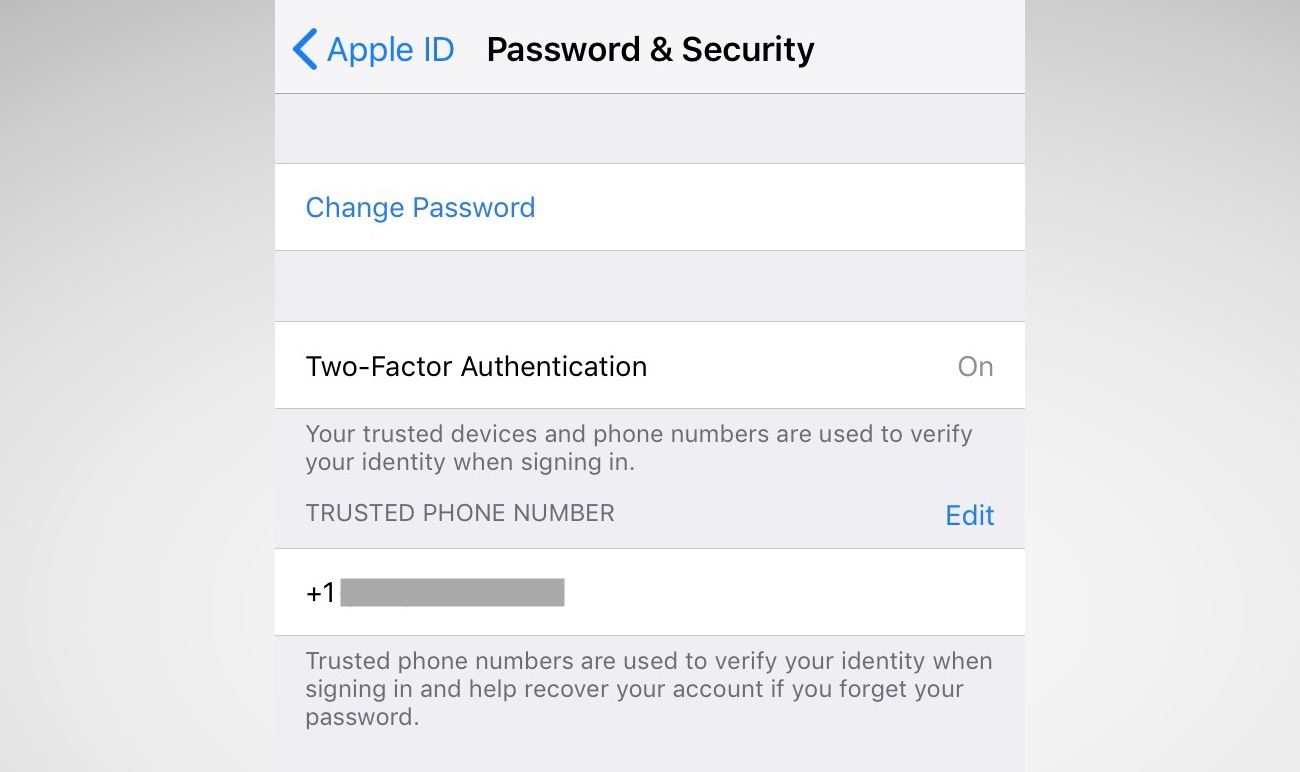
Two-factor is one of the best ways to keep your account safe. If someone steals your password, they still need your phone to break into your account. For years, two-factor has been cumbersome and annoying. Now, iOS 12 has a new feature that auto-fills the code, so it takes the frustration step out of the equation — so you have no excuse.

You may be asked to switch on two-factor when you set up your phone. You can also go to Settings and tap your name, then go to Password & Security. Just tap Turn on Two-Factor Authentication and follow the prompts.

5. While you’re here… change your reused passwords

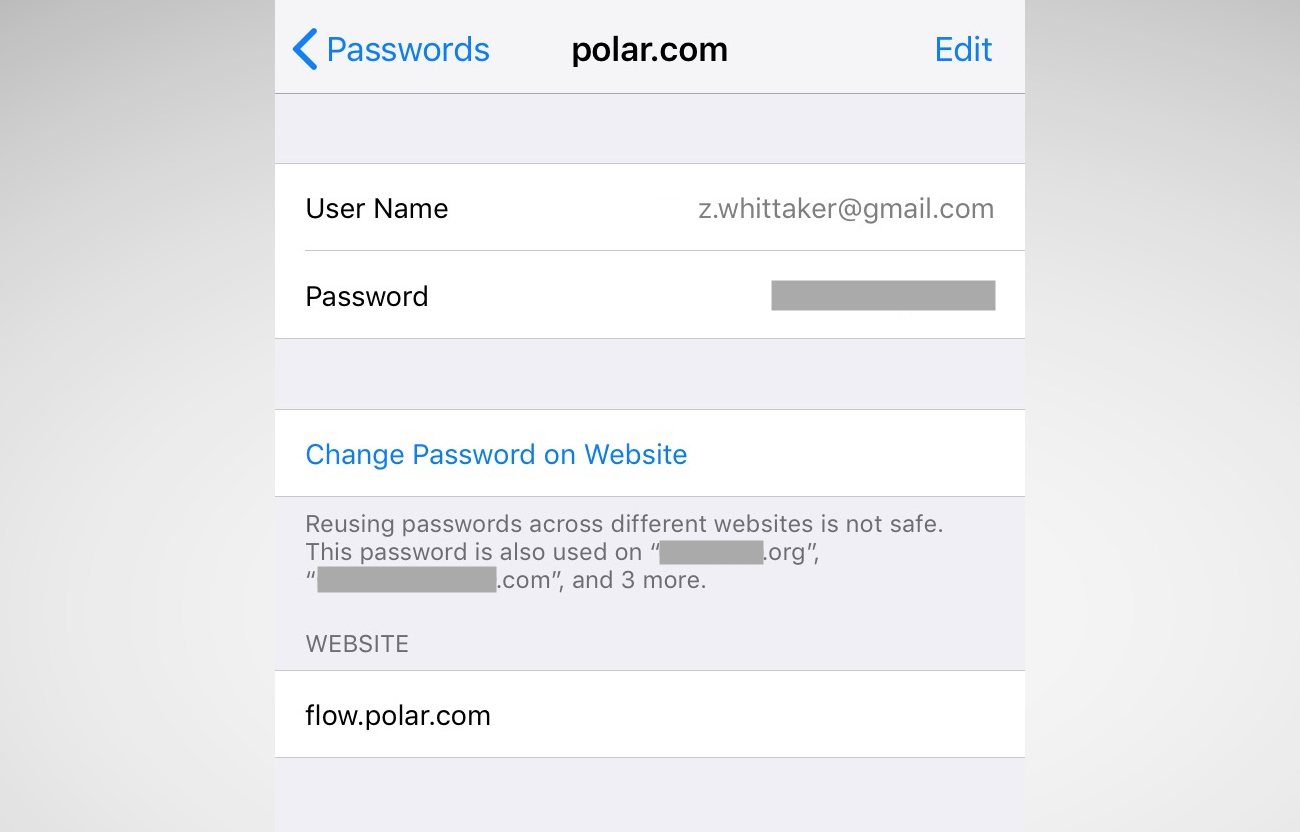
iOS 12’s password manager has a new feature: password auditing. If it finds you’ve used the same password on multiple sites, it will warn you and advise you to change those passwords. It prevents password reuse attacks (known as “credential stuffing“) that hackers use to break into multiple sites and services using the same username and password.

Go to Settings > Passwords & Accounts > Website & App Passwords and enter your passcode. You’ll see a small warning symbol next to each account that recognizes a reused password. One tap of the Change Password on Website button and you’re done.

Cybersecurity 101 - TechCrunch


Read Full Article