13 July 2018

How to Create Your Own Minecraft Mod


create-mod-minecraft

What happens if you get bored of playing Minecraft? Modding is the answer! From cookies to rockets, mods alter anything and everything in the Minecraft game, but wouldn’t it be fun to create your own mod?

By following these simple steps, you can get started on your own path to creating custom Minecraft mods.

Getting Started With MCreator

Advertised as “The Best Minecraft Mod Maker Ever,” MCreator is a free tool for making your own Minecraft mods. You don’t have to write any code—although you can if you’d prefer to.

Get started by visiting the MCreator download page and downloading a version to match your current version of Minecraft.

The download page details which version of MCreator you need, but if you’re running Minecraft version 1.12.2, then you’ll need MCreator version 1.7.9.
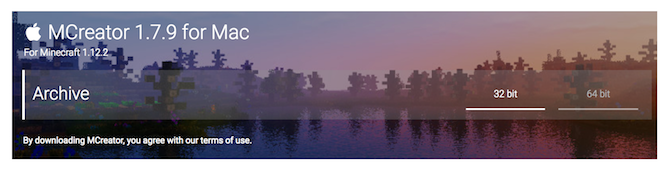
MCreator for Mac

Once you’ve chosen a version, go ahead and download MCreator for your operating system. The Windows, Mac, and Linux operating systems are all supported.

If you’re running Windows, download and run the executable file (EXE). If you’re using Mac or Linux, the installation is a bit tougher, but the MCreator installation guide contains detailed install steps.

Once up and running, MCreator will need a bit of time to get things in order. It needs to download the Minecraft Forge Development Kit, and download dependencies and compile. This may take some time depending on your computer and internet speed, but once it’s completed for the first time, it won’t need to do it again.

Launching the MCreator app

Once configured, MCreator will ask if you’d like to sign in with your Pylo account. Go ahead and press Skip if you don’t have one.

Everything is now ready to go. The screen you see is the main menu for MCreator. You can import or export current settings, install mods developed by other people, or start writing your own mods.
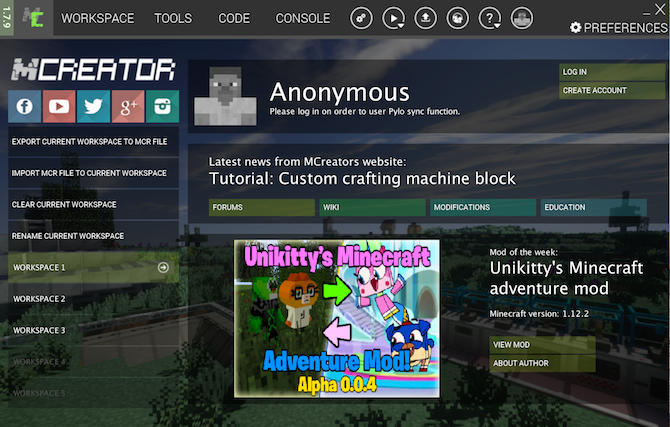
The main screen in MCreator

Writing Your First Minecraft Mod

For this example mod, we’re going to produce a super diamond ore, which will produce a vast quantity of diamonds when mined, instead of the usual one or two.

To get started, you need a texture for your new block. This is an image which defines what your block looks like. This could be stone, wood, or any custom artwork. This example will use the diamond ore, but you can use any art you want.
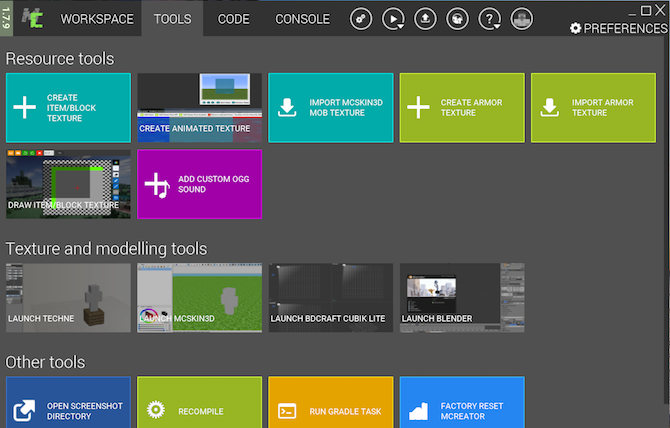
Build your first mod with MCreator

From the top of the main menu, select Tools. Choose Create item/block texture. This will open the Texture Maker, where you can create your own texture, based on existing Minecraft artwork.
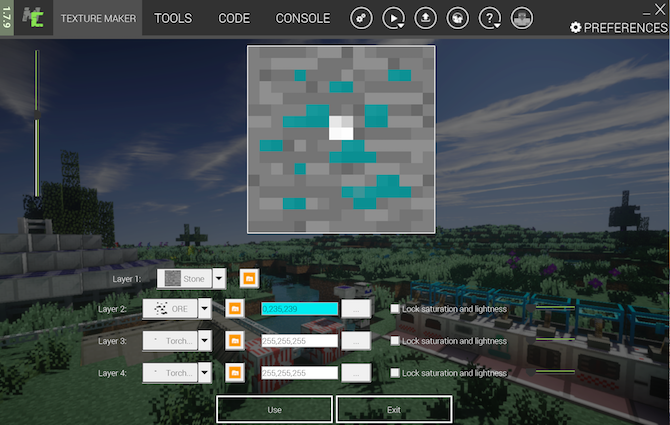
Create textures in MCreator

The texture maker contains contains four layer controls. These allow you to choose artwork and a color, which all get combined into your final texture.

Minecraft textures have multiple layers

Except for Layer 1, the layer controls contain the same three settings. From left to right, these are:

  1. Artwork selector: Use the drop down menu or popout interface to select a piece of artwork.
  2. Color picker: Select the three dots to choose a color for this layer.
  3. Lock saturation and brightness: These limit the layer color brightness. Play around to see what you like.
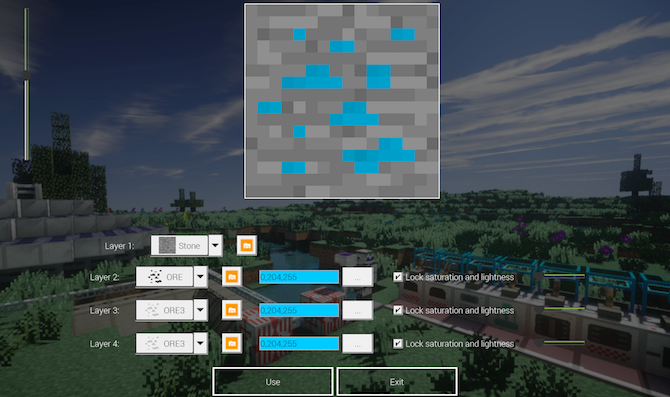
MCreator displays a preview of the texture as you develop.

Once you’ve designed your artwork, select Use at the bottom, and then Block for the texture type. Choose Exit to go back to the Workspace page. The workspace page will now list your texture.

From the left hand menu of the Workspace tab, select Mod Elements. This is where you will create your mod using your texture.
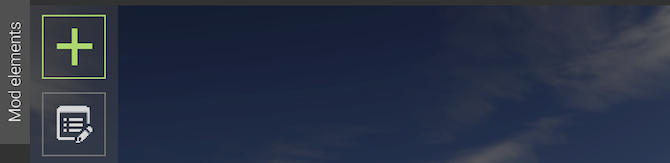
Create a Minecraft mod in MCreator

Select the New mod element button from the top left, which looks like a large plus.
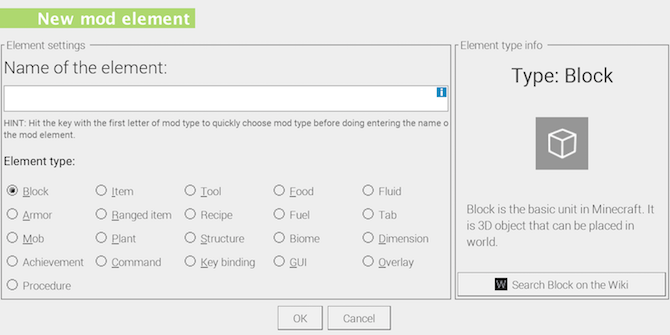
Mod elements should be given a descriptive name

This New mod element page may look overwhelming, but it’s a simple tool to use.

For Name of the element, enter a unique name. This isn’t seen in Minecraft, it’s used as an identifier in MCreator and the Minecraft code.

For the element type, you can choose what type your new element is. For this super diamond, the default of Block will do. If you’re working on a different mod, such as a mob, command, or tool, then select the appropriate type.

Select OK to go back to the Texture page. This is where you can assign your texture to the block, as well as configuring transparency, and the block dimensions.
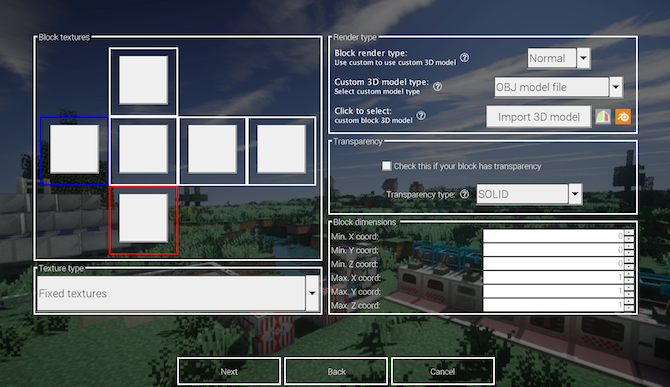
Assign your texture to a Minecraft block

On the left is the Block textures area. The six squares represent each side of your block. It’s possible to use a different texture for each side, but for this example, they will all use the same texture.

Click each square, choose your texture, and then press Ok. Leave all the other options at their defaults, and then choose Next.
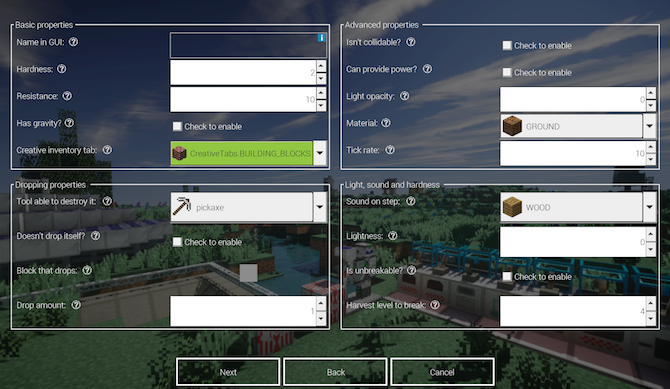
Set properties for a custom Minecraft block

There are various settings on this screen but start with Name in GUI. This is the name of the block in your inventory. Any name will do, but make sure it’s descriptive. For this block, “super diamond” is a suitable name.

If you’re not sure what a parameter does, select the small question mark next to the name. This will load the MCreator documentation.

To make this block drop a different block when mined, tick the box next to Doesn’t drop itself. Next to Block that drops, press the small rectangle. This will load the Block/item selector. Use this menu to search for and choose the block you want to be dropped.
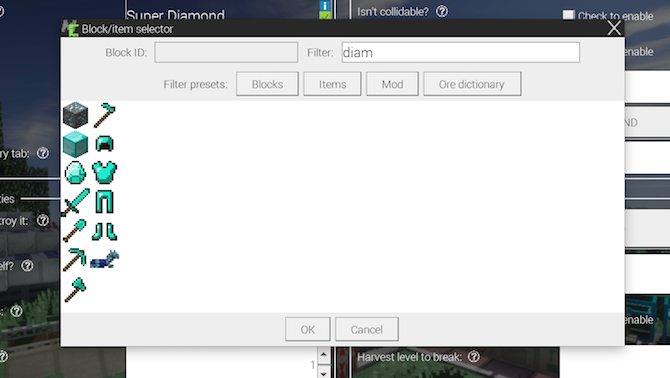
Configure how the Minecraft mod block appears in the game

Finally, change Drop amount to a suitable number. As we want the super diamond to yield a large number of diamonds, 10 is a good place to start.

Select Next to go to the Particle settings. This is where you can change the block animation. Feel free to experiment here, but this isn’t required for this super diamond mod.

Leave the Block’s inventory settings at their default, and choose Next. The Procedures page allows you to customize what happens when any event occurs involving this block. This isn’t required for this mod, so press the Next button.
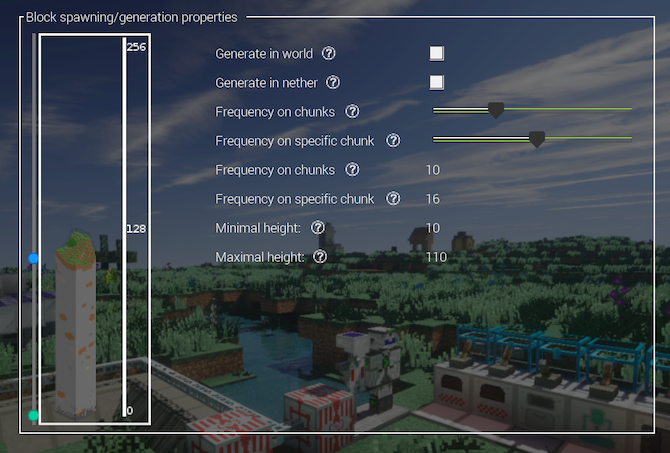
Manage spawning properties for your Minecraft mod

Finally, the Block spawning/generation properties page allows you to configure when, where, and how often your new block spawns. If you’d like your modded block to spawn in the game, then tick Generate in world.

The other settings can stay at their default values, or you can customize them to make your modded block more or less common.

Exporting Your Minecraft Mod

Once you have produced your mod, you need to export it ready for Minecraft to use.

From the bottom left of the Workspace toolbar, choose the Export workspace into mod file button. This will bundle your mod up into its own package, ready for Minecraft to import. If you modified more than one block, then all will show up in your mod.
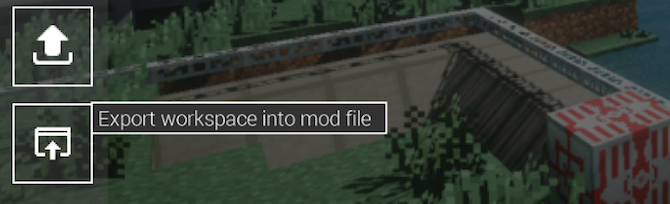
When you're done, export the mod into Minecraft

Note: If you’d like to work on several mods at the same time, switch to a different workspace from the main menu.

The Mod details menu provides options for packaging your mod. You can enter a name, a version, description, and creator details. Upload an image if you want to. The most important of these options is the File extension. Leave this on the default option of .JAR.
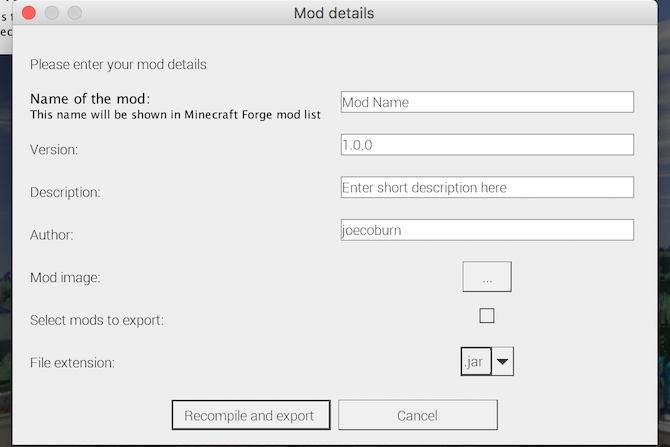
Specify meta data for the Minecraft mod

When you’re ready, press Recompile and export. This will package up your mod, but it may take some time depending on your computer, and the number of things you have changed.
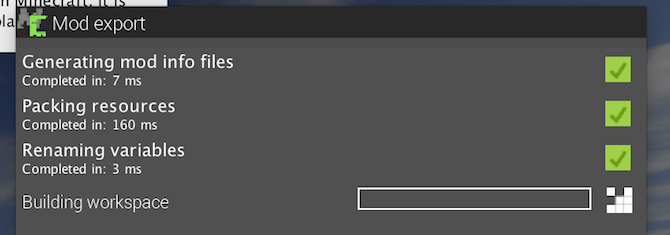
The MCreator mod export screen

You will need to agree to the terms of use, but once compiled, finish up by choosing a location on your file system to store your completed mod.

Importing Minecraft Mods With Minecraft Forge

Now that your mod is complete, all that’s left to do is import it into Minecraft.

To install this mod, or any other mod, you need to install Minecraft Forge. Forge provides a simple and easy way to install custom mods into Minecraft itself.

From the Forge home page, download an installer suitable for your operating system and Minecraft version. Run the installer, and when prompted, choose Install client.
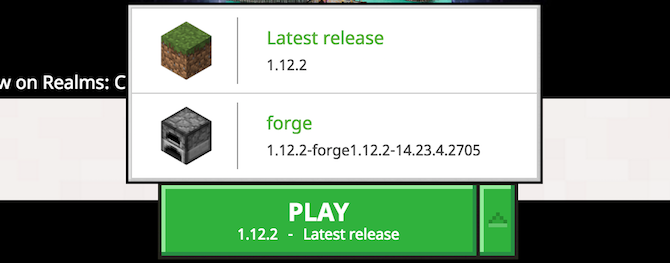
Make mod importing easy with Minecraft Forge

Once installed, launch or restart Minecraft. From the Minecraft Launcher, press the up arrow to the right of the play button at the bottom. Select Forge. This will load Minecraft with Forge, so you will need to do this everytime you want to use your mod.
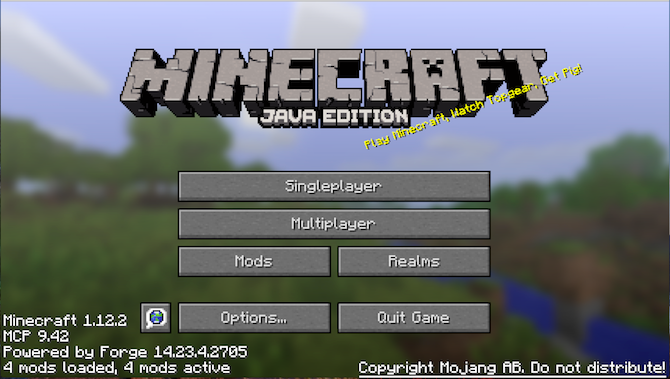
Launching Minecraft after installing Minecraft Forge

When in Minecraft, things will look different with Forge running. There’s some extra text at the bottom, along with a Mods button.

Choose the Mods button, and you’ll see that your mod is not visible. You need to install your mod into Forge/Minecraft. Installation involves copying and pasting your mod into the mods folder of Minecraft.

  • On Windows, this is in AppData/.minecraft/
  • On Mac, this is in Library/Application Support/minecraft/

You may need to restart Minecraft if you’ve pasted your mod while it is running. Enter the mods menu, and your mod will show up, complete with description, title, picture, and creator information. Well done!
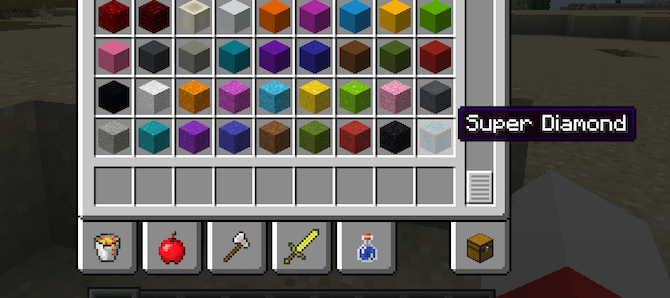
Your mods now appear in Minecraft!

For this example, the “super_diamond” is now visible alongside all the other blocks.

Where Will Your Minecraft Mods Take You?

Modding Minecraft is an excellent way to add some variety to the game, but it’s even better if you make the mod yourself. Once you have learned these basic building blocks, you can begin to make more complex mods.

If you’d like to customize Minecraft, but want something quicker and easier to change, take a look at how to create and install custom Minecraft textures.

If you’re up for a bigger challenge, follow our Minecraft Pi modding guide, which bridges the gap between Minecraft and the real world. Alternatively, these awesome Minecraft projects for kids are excellent and tons of fun.

Read the full article: How to Create Your Own Minecraft Mod


Read Full Article

12 July 2018

Waymo-branded Jaguar I-Pace vehicles hit the streets of San Francisco


Waymo’s next phase in self-driving cars has begun.

The former Google self-driving project that spun out to become a business under Alphabet has received its first three all-electric I-Pace crossover sport utility produced by Jaguar Land Rover. These I-Pace EVS — the first on U.S. roads outside of JLR’s own fleet — can be seen driving around the San Francisco Bay Area.

These aren’t operating autonomously just yet. For now, Waymo is testing the vehicle’s performance on roads to generate self-driving system design requirements and develop durability tests, the company told TechCrunch.

Waymo announced in March a strategic partnership with Jaguar Land Rover to develop a self-driving electric I-Pace for a driverless transportation service. The plan is for the electric SUV to become part of Waymo’s driverless fleet beginning in 2020.

Ultimately, up to 20,000 modified I-Pace vehicles will join Waymo’s soon-to-be-launched driverless ride-hailing service in the first two years of operation.

The Jaguar I-Pace SUVs are a piece of Waymo’s larger plan to build a self-driving system to be used in ride-hailing, delivery and logistics such as trucking, connecting rides with public transit and licensing the technology with automakers for personally owned vehicles.


Read Full Article
The 10 Best Educational Apps for Kids on Every School Subject


best-educational-apps-kids

Most parents know that kids shouldn’t spend too much time in front of a smartphone or tablet. Indeed, several studies have linked excessive screen time with expressive speech problems.

That’s why you need to limit your child’s screen time, and when they do have screen time, make sure they spend it in the best possible way.

So rather than playing purely entertaining games for hours on end, why not help your kid’s development by engaging them with some of these educational apps for kids instead?

1. Best Reading App for Kids: Hooked on Phonics

There’s no shortage of high-quality reading apps and websites for kids. With a bit of digging, you can find something that perfectly matches your child’s interests and abilities.

An excellent all-around app for young learners is Hooked on Phonics. It’s aimed at kids between the ages of three and seven. It uses interactive learn-to-read tools developed in conjunction with the US Children’s Reading Foundation.

The 200 songs, games, ebooks, and lessons correspond with federal reading proficiency standards, so you’ll be able to make sure your child is on track.

Download: Hooked on Phonics for Android | iOS (Free, subscription available)

2. Best Math App for Kids: DragonBox Algebra 5+

The ultimate goal of these apps is to teach a child new concepts without them realizing it. If an app is too educational, kids are likely to lose interest sooner.

DragonBox Algebra meets those requirements. It teaches kids aged five and older the basics of addition, subtraction, division, and multiplication.

The app makes players manipulate on-screen cards to complete puzzles. As the game progresses, the app slowly reveals the operators needed to isolate the board’s “Dragon Box.”

Download: DragonBox Algebra 5+ for Android | iOS ($5)

3. Best Science App for Kids: My Incredible Body

An educational app should be both informative and visually stunning. My Incredible Body meets these requirements.

You can take a rocket ride around the body to see how everything works. All videos and images are medically accurate. At any time, you can stop the ride and watch the body in action. For example, you can see a video of what happens to the lungs while breathing or how the heart functions while you’re exercising.

Questions on specific topics are available through in-app purchases, thus letting your kid test themselves on what they’ve learned. There are nine topics to choose from, including Brain and Nerves, Lungs and Air, Kidneys and Urine, and Puberty and Human Reproduction.

Download: My Incredible Body for Android | iOS ($25)

4. Best Music App for Kids: Easy Music

Easy Music App for Kids

Designed by an Ear Training Professor, Easy Music aims to introduce children to music theory from a young age. It’s suitable for kids aged three and older.

Your child will learn about notes, pitch, rhythm, and melody through the use of virtual instruments, genres of music, and everyday objects.

The app offers two modes: Practice and Compose. Once the player has the basics of the theory nailed down, they can move into the compose mode and try to create their own musical masterpiece.

Download: Easy Music for Android | iOS ($4)

5. Best History App for Kids: Timeline Eons

Timeline Eons History App for Kids

Lots of history apps focus on specific eras such as the Roman Empire, Medieval Europe, or the two World Wars.

However, if you want an all-around app that deals with the entirety of history, grab Timeline Eons. It’s impossible to convey how much information is included—it deals with all natural and human history since the very beginning.

You can zoom in and out of the timeline for more detailed breakdowns of particular times. At its most zoomed in, the scrollable timeline is longer than the circumference of the Earth.

You can even use the data to create your own timelines; it’s useful if you’re trying to engage your kids with a specific topic or age.

Download: Timeline Eons for Android | iOS ($3)

6. Best Geography App for Kids: GeoBee Challenge

GeoBee Challenge Geography App for Kids

GeoBee Challenge is developed by the National Geographic Society and is based on its National Geographic Bee competition. The competition is open to kids in grades four to eight, but the questions are challenging for older kids too.

There are two rounds of gameplay: multiple-choice and map challenge. The app offers more than 1,300 multiple choice questions, all featured at some point in the National Geographic Bee. In the map round, kids need to identify locations.

Download: GeoBee Challenge for Android | iOS (Free)

7. Best Spanish App for Kids: Spanish School Bus

Spanish is arguably the most practical language for English-speaking westerners to learn. It’s the second most widely-spoken language in the world after Mandarin, and more than a sixth of the people in the United States are now fluent in it.

If you want to give your kid a head start, download Spanish School Bus. It uses the Montessori-based learning approach to introduce children to 300 common Spanish words across topics such as colors, animals, food, and travel.

There’s also a healthy dose of Spanish and Latin culture, with introductory information about historical figures, landmarks, music, and art.

Download: Spanish School Bus for Android | iOS (Free, premium version available)

If you want to learn alongside your child, check out our list of unusual ways to learn a foreign language using technology.

8. Best Art App for Kids: Art of Glow

For a drawing app that’s specifically geared towards kids, check out Art of Glow. It lets kids create brightly-colored neon artwork using finger swipes. You can also make art into a short video. Your kid’s creations will instantly come to life.

The moving, vivid colors on the black background are guaranteed to keep a child entertained for hours.

Download: Art of Glow for Android | iOS (Free)

For something more advanced, perhaps your child could learn to use drawing software such as Autodesk SketchBook.

9. Best Coding App for Kids: codeSpark Academy

In the technological age, all kids should have some rudimentary programming knowledge. In our opinion, it’s a disgrace that programming is still not part of the core curriculum.

codeSpark Academy is for children between the ages of four and nine. The app introduces kids to the fundamental principles of coding, then lets them practice what they’ve learned. The practice takes place across drag-and-drop games, puzzles, game design, creative projects, and even offline printables.

The entire app was developed in conjunction with experts from MIT, Princeton, and Carnegie Mellon, so you know you’re using a quality piece of software.

Download: codeSpark Academy for Android | iOS (Free trial, $8/month subscription required)

10. Best Finance App for Kids: FamZoo

Another glaring omission from the core curriculum is finance and money management. It’s never too early to establish the basics of saving with your kids, and you can introduce more complex financial principles as they get older.

FamZoo is the solution. It acts as a centralized, parent-run bank for kids. You can assign monetary values to chores, add pocket money to kids’ accounts, instigate financial penalties, and pay interest.

As your kid becomes older, you can add a pre-paid card to the account. You can load the money onto the card, then keep track of which stores your child is spending it in. You can even block certain stores and merchants.

Download: FamZoo for Android | iOS (Free trial, $6/month subscription required)

Other Apps, Games, and Resources for Kids

Mobile apps are just one part of a parent’s educational armory; you should not exclusively rely on them. Make sure you take your kids outdoors, into museums, and on trips—they’ll all help to give your child a balanced education.

And remember, you have many more techie ways of learning that aren’t necessarily app-based. You could play some educational Chrome games, 3D-printed educational toys, or even a selection of older educational game classics.

Image Credit: NatashaFedorova/Depositphotos

Read the full article: The 10 Best Educational Apps for Kids on Every School Subject


Read Full Article
Automating Drug Discoveries Using Computer Vision


“Every time you miss a protein crystal, because they are so rare, you risk missing on an important biomedical discovery.”
- Patrick Charbonneau, Duke University Dept. of Chemistry and Lead Researcher, MARCO initiative.

Protein crystallization is a key step to biomedical research concerned with discovering the structure of complex biomolecules. Because that structure determines the molecule’s function, it helps scientists design new drugs that are specifically targeted to that function. However, protein crystals are rare and difficult to find. Hundreds of experiments are typically run for each protein, and while the setup and imaging are mostly automated, finding individual protein crystals remains largely performed through visual inspection and thus prone to human error. Critically, missing these structures can result in lost opportunity for important biomedical discoveries for advancing the state of medicine.

In collaboration with researchers from the MAchine Recognition of Crystallization Outcomes (MARCO) initiative, we have published “Classification of Crystallization Outcomes using Deep Convolutional Neural Networks” in PLOS One (ArXiv preprint), in which we discuss how we used some of the most recent architectures of deep convolutional networks and customized them to achieve an accuracy of more than 94% on the visual recognition task of identifying protein crystals. In order to spur further research in this area, we have made the data freely accessible, and open-sourced our model as part of the TensorFlow research model repository, and available to researchers as a Cloud ML Engine endpoint.
Image of protein crystal, courtesy of the MARCO repository (CC-BY-4.0 license)
The MARCO initiative is a joint project between several pharmaceutical companies and academic research centers to pool and host a large repository of curated crystallography images, and make them available to the community to help develop better image analysis tools. When a member of the initiative reached out to Google with a well-defined problem, and half a million labelled images, we embraced the challenge of trying to apply the recent advances in deep learning to the problem.

Due to the large variability between imaging technologies and data acquisition approaches, coming up with a single approach to the visual recognition problem may appear daunting. Crystals can be very small, which makes them rare structures in a large image containing otherwise undifferentiated visual clutter.
Samples from the MARCO repository, illustrating the degree of variability between data sources.
Fortunately, given sufficient training data, modern deep convolutional networks are well suited to handle extreme variability in visual appearance. We modified the basic Inception V3 model to handle larger images while still being able to be trained quickly. The model achieves a level of precision and recall that makes its use practical in automated assessment pipelines.

This work is a great example of the effectiveness of multi-institutional collaborations aimed at solving problems that require data in amounts and level of diversity that no single collaborator has access to. We invite researchers to take advantage of these resources that are the result of this work and share what they learn. This research was conducted as a personal 20% project by the author. To learn more about this work, please see our paper here and read the recent Duke Research Blog post.

YouTube Gets Its Very Own Incognito Mode


YouTube now has its own in-built Incognito Mode, just like Google Chrome. YouTube’s Incognito Mode lets you watch YouTube videos without your activity being logged. Essentially it’s like pulling a cloak over you and your smartphone while watching YouTube.

YouTube Gets Its Own Incognito Mode

As anyone who has ever used Chrome’s Incognito Mode will know, using the feature gives you a certain level of privacy. YouTube’s Incognito Mode does the same thing, meaning the videos you watch won’t show up in your history or inform future recommendations.

This means you can finally click on those controversial videos you’ve always wanted to watch without the risk of them informing your recommendations from now on. Because YouTube cannot fathom what you watch for fun and what you watch out of intrigue.

YouTube’s Incognito Mode will also prove handy when passing your phone to someone else. Once it has been enabled, only the Home and Trending sections can be accessed. Your Subscriptions, Inbox, and Library are all hidden while in Incognito Mode.

As good as YouTube’s Incognito Mode is, Google does warn that “your activity might still be visible to your employer, school, or internet service provider.” In other words, don’t assume everything you do in Incognito Mode is free from prying eyes.

How to Turn On YouTube’s Incognito Mode

To turn on YouTube’s Incognito Mode, open the YouTube app, click on your profile picture in the top right-hand corner, and tap “Turn on Incognito”. Your profile picture will disappear, and the bar at the bottom will inform you “You’re incognito”. Simples.

YouTube’s Incognito Mode is currently only available on Android, and while YouTube hasn’t yet indicated if and when it will be rolled out to iOS it’s surely only a matter of time. Until then, if you’re an iOS user you’ll have to be careful about what you watch.

Image Credit: Marco Verch/Flickr

Read the full article: YouTube Gets Its Very Own Incognito Mode


Read Full Article
How to Fix the WHEA Uncorrectable Error on Windows 10


whea-uncorrectable-error-fix

Windows has a long and beautiful (read: painful) history of blue-screen error messages. Affectionately known as the Blue Screen of Death, these error screens also contain important information regarding the sudden demise of your system.

Some Windows crash errors are more cryptic than others and therefore more difficult to troubleshoot. The WHEA Uncorrectable Error is one of those.

In this article, we explain how to fix the WHEA Uncorrectable Error and how to stop it from happening again.

What is the WHEA Uncorrectable Error?

WHEA_UNCORRECTABLE_ERROR (Windows stopcode 0x0000124) is a hardware error. There are several common causes for a WHEA_UNCORRECTABLE_ERROR (we’ll abbreviate it as WUE), most of which directly relate to your system hardware:

  • Corrupt hardware (Damaged hard drives, GPU, CPU, PSU, corrupt RAM, etc.)
  • Driver compatibility issues
  • Heat and voltage issues (Overclocking and voltage changes)
  • Corrupt Windows system files or registry files

Although it isn’t always the source, voltage issues are a very common cause of this particular Windows error. The WUE message and 0x0000124 stopcode give us an indication as to the nature of the error, but a look at the error dump file will provide further information. Your error dump file (.DMP) is found at C:/Windows/Minidump and will have a timestamp.

Unfortunately, we cannot offer solutions for every issue, but the following fixes should alleviate your WHEA_UNCORRECTABLE_ERROR.

How to Fix the WHEA Uncorrectable Error

Remember the list of common system hardware issue that triggers WHEA_UNCORRECTABLE_ERROR? The following section expands on some of those hardware aspects and illustrates a few potential fixes.

Step 1: Run CHKDSK

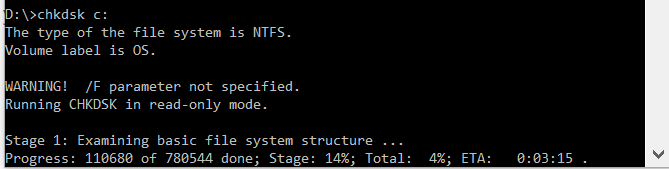
First, before making any specific hardware alterations, try running Windows Check Disk from the Command Prompt. CHKDSK is a Windows system tool that verifies the file system and with certain settings, fixes issues as it runs.

Type command prompt in your Start menu search bar, then right-click the best match and select Run as administrator. (Alternatively, press Windows Key + X, then select Command Prompt (Admin) from the menu.) Next, type chkdsk /r and press Enter. The command will scan your system for errors and fix any issues along the way.

how to fix whea uncorrectable error in windows 10

Step 2: Check Your System Hardware

The WHEA_UNCORRECTABLE_ERROR closely relates to your system hardware. Before progressing with system resets and memory tests, physically double-check your system hardware.

Check if the cooling systems are fully functioning, your RAM is secure in its slots, and the CPU has mystifyingly not come loose, and so on.

Step 3: Reset System Overclocking

If you have overclocked your system in search of higher speeds, there is a chance you’ll run into the WHEA_UNCORRECTABLE_ERROR. The easiest way to cross this off the list is to reset your system BIOS and remove the effects of any overclocking.

You need to enter your system BIOS or UEFI menu. To do this, turn off your system. Next, turn your system back on, pressing your BIOS/UEFI menu access key (common keys include F1, F2, F10, DEL, and ESC).

BIOS and UEFI settings vary by manufacturer, but menu titles are usually similar. You are looking for an Overclocking option. For the most part, overclocking options are found under the Advanced, Performance, Frequency, or Voltage menu.

Find the menu and reset your overclocking options. Resetting will return your system to its out-of-box state—but could also remove WHEA_UNCORRECTABLE_ERROR in the process.

Step 4: Reset Your BIOS/UEFI Settings

If clearing your BIOS/UEFI overlock settings, try resetting your entire BIOS. Somewhere amongst the BIOS menu, there is an option to complete a full BIOS settings reset or load the default BIOS setup. Find the option and select it.

Step 5: Update Your BIOS/UEFI Settings

Again, this process varies heavily depending on your system’s motherboard manufacturer. Some BIOS/UEFI settings can automatically download and update using desktop utility. Other manufacturers require you to download the BIOS update and flash the firmware yourself.

Unsure what motherboard you have? Download and run CPU-Z. Open the Mainboard tab and find your motherboard manufacturer and model. You can find your BIOS brand and version on this tab, too.

Armed with this knowledge, complete an internet search for “[your motherboard manufacturer + model] bios update.” For instance, I would search for “gigabyte b75md3p bios update” for my system. You should find instructions, tutorials, and if you’re lucky, even a video or two.

Step 6: Check Your Drivers

Sometimes new drivers have an adverse effect on your system. In this day and age, it is becoming rarer as Windows 10 handles most driver updates. However, that doesn’t mean a dodgy driver cannot upset your system. Thankfully, Windows 10 lists any driver updates in the Windows Update section, so you can rapidly figure out where the issue stems from.

Press Windows Key + I to open the Settings panel, then select Update & Security > View update history. You can find any driver updates here. Now, type device manager in the Start menu search bar and select the best match. Head down the list and check for an error symbol. If there is nothing, your driver status is likely not the source of the issue.

That said, you can use a third-party tool to update all of your system drivers simultaneously. Check out this list of free tools you can use to fix the majority of Windows problems. The first two options—IOBit’s Driver Booster and Snappy Driver Installer—do exactly this.

Step 7: Check Your RAM Using MemTest86

Windows has an integrated memory checker, called Windows Memory Diagnostic. Unfortunately, it doesn’t have a great reputation and regularly misses issues found using another excellent tool: MemTest86.

MemTest86 is a free, standalone memory testing tool for x86 machines. You boot MemTest86 from a USB flash drive (or bootable disc) and leave it to check your system RAM. Now, a MemTest86 RAM check takes a long time to complete; a single pass takes hours depending on the amount of RAM you have installed.

To get the full MemTest86 experience you should run at least two passes (that’s two complete cycles). However, by most reports, MemTest86 should expose a serious RAM issue after a short amount of time.

Head to the MemTest86 download page and download the Image for creating bootable CD (ISO format). Next, you need to write the MemTest86 ISO to a USB flash drive. Check out this list of ten free tools to make a bootable USB flash drive.

Burn MemTest86 using the tool of your choice, then shut-down your system. Reboot the system while pressing the button for your Boot Selection menu (usually F10, F11, DEL, or ESC), then select the bootable MemTest86 USB flash drive. The memory test will start automatically.

If it does return RAM errors, complete an internet search for the error code and type to discover your next course of action.

Step 8: Reset Windows 10 (Last Resort)

If nothing else works, you can use the Windows 10 Reset function to refresh your system.

Windows 10 Reset replaces your system files with a completely fresh set of files and will theoretically clear any lingering issues relating to WHEA_UNCORRECTABLE_ERROR while keeping the majority of your important files intact.

Head to Settings > Update and Security > Recovery, then under Reset this PC select Get started.

Your system restarts as soon as you hit the button, so make sure you to backup any important files beforehand. Your system will restart, then you may select Keep my files or Remove everything.

WHEA Uncorrectable Error Cleared!

Bluescreen errors are frustrating. Even more so if you genuinely don’t understand which piece of hardware is causing the issue. The fixes above will fix your WHEA_UNCORRECTABLE_ERROR, but remember, playing with your hardware could cause it to come back.

Another handy bluescreen error code tool is Nirsoft’s BlueScreenView. It helps you understand error codes so you can better isolate issues!

Read the full article: How to Fix the WHEA Uncorrectable Error on Windows 10


Read Full Article

Project Loon and Project Wing graduate from Google X


Google X projects Loon and Wing have left the nest and graduated to independent companies under Google’s parent company Alphabet, Google X Captain of Moonshots, X Astro Teller wrote in a Medium post yesterday.

“Today, unlike when they started as X projects, Loon and Wing seem a long way from crazy — and thanks to their years of hard work and relentless testing in the real world, they’re now graduating from X to become two new independent businesses within Alphabet: Loon and wing,” Teller wrote in the post.

Loon and Wing, which respectively launched in 2013 and 2014, have both seen substantial progress from the moonshot ideas they were proposed as.

Loon, a fleet of internet enabling balloons that patrol the skies to connect remote and technologically undeserved areas, played a role in connecting those affected by flooding in Peru last summer and assisted those devastated by Hurricane Maria in Puerto Rico this past fall.

Meanwhile, Wing, an autonomous drone delivery service aimed at reducing CO2 emissions, has tested its drones remote reach through burrito deliveries in Australia. This May, the U.S. Department of Transportation selected Wing as one of ten teams to push the limits of drone technology in the Unmanned Aircraft Systems Integration Pilot Program.

In his statement, Teller announced that Alastair Westgarth will be stepping in as Loon’s new CEO and Wing will welcome James Ryan Burgess as its new CEO along with Adam Woodworth as CTO.

Loon and Wing will now join the ranks of X’s four fellow graduates, including the self-driving car company Waymo and the cybersecurity analytics platform Chronicle, as well as competitors like SpaceX’s prototyped system of internet satellites and Amazon’s long discussed drone delivery system.

The skies ahead are far from clear, but with the backing of Alphabet these bright-eyed new companies have a solid start.


Read Full Article

10 Cool Raspberry Pi + Windows 10 IoT Core Projects

5 Common Keychain Problems on Mac and How to Fix Them


mac-keychain-issues

Having trouble with Keychain Access, the stock password management app on your Mac? You’re not alone. A few login keychain problems are actually quite common.

In this article, we explore five of the most persistent Mac Keychain issues and their most viable solutions.

1. macOS Keeps Asking for Login Keychain Password

change-keychain-password-mac

You might encounter this problem on macOS versions older than High Sierra. It occurs when you have changed the password for your macOS user account.

The reason for this is that the login keychain still works with your old password. As a result, macOS prompts you to enter that when any function requires access to the keychain.

A Note About macOS High Sierra

When you change the user account password on High Sierra, macOS creates a new keychain for you. Your old one sticks around; you’ll find it under ~/Library/Keychains, with the word renamed in its name.

This automatic keychain creation is only partially helpful. Even if the keychain password now matches your account password, your password entries are gone. You’ll have to import them from the old keychain.

Now let’s get back to the original problem. The solution here is to update the keychain password to match the new password of your user account. Of course, you’ll need to know the old password as well to make this tweak.

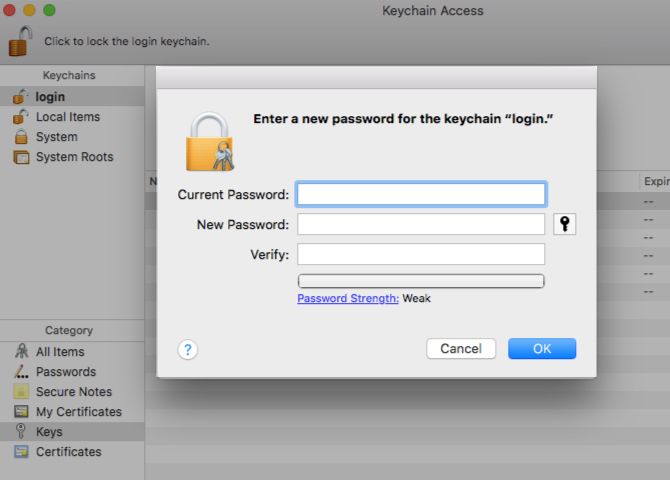
To get started, open the Keychain Access app from Applications/Utilities or bring it up with Spotlight. Now, under Keychains in the sidebar, select login.

Next it’s time to bring up the dialog box for changing the password. For this you’ll need to click on Edit > Change Password for Keychain “login”.

In the prompt that appears, enter the requisite password fields and hit the OK button. If you want the app to generate a password for you, click on the key icon next to the New Password field.

2. You Forgot the Password to Your Mac Keychain

create-new-keychain

There’s no straightforward solution for this problem. The best you can do is create a new keychain, which means losing all the data from the old one.

The app will repopulate the new keychain as you go about your work. So expect fresh authentication prompts when you log into applications and services.

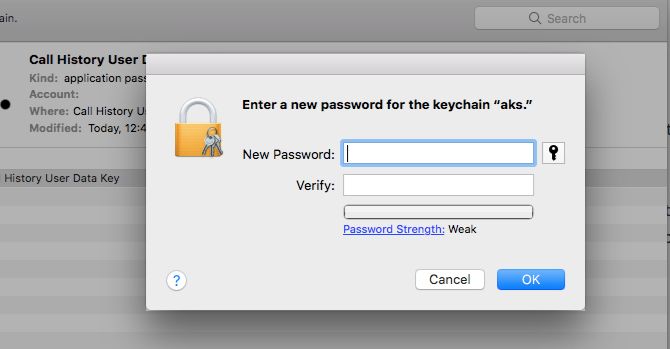
To create a new keychain, click on File > New Keychain and follow the on-screen prompts. When it’s time to enter a new password, type in your current user account password. If you pick a different password, you might run into the problem we discussed above.

3. You Forgot a Wi-Fi, Service, or Application Password

show-password-keychain-access-mac

These passwords are easy to retrieve. All you need to remember is your user account password.

Let’s say you have forgotten the password of your Wi-Fi network at home and want to retrieve it to connect another device to the network.

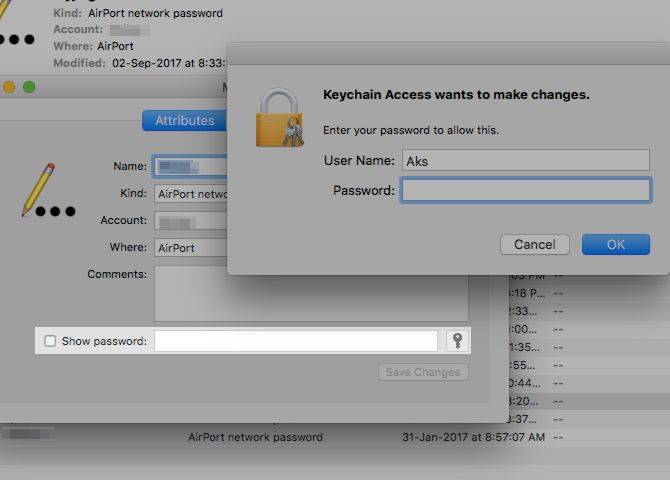
In that case, open the Keychain Access app and find the item whose password you have forgotten. When you double-click on that item, a dialog box shows up, with the Attributes tab selected.

Under this tab, select the checkbox to the left of Show password. This prompts you to enter your keychain password. Once you do, you should see the password you’re looking for in the Show password field.

4. The Mac Keychain App Is Full of Clutter

sort-entries-by-date-keychain-mac

Your login keychain can seem messy at a glance. It probably contains passwords for accounts and services that you gave up on a long time ago.

For the most part, this clutter is harmless and you can leave it alone. But when Keychain insists on saving both old passwords and their updated counterparts in some cases, you might run into authentication problems.

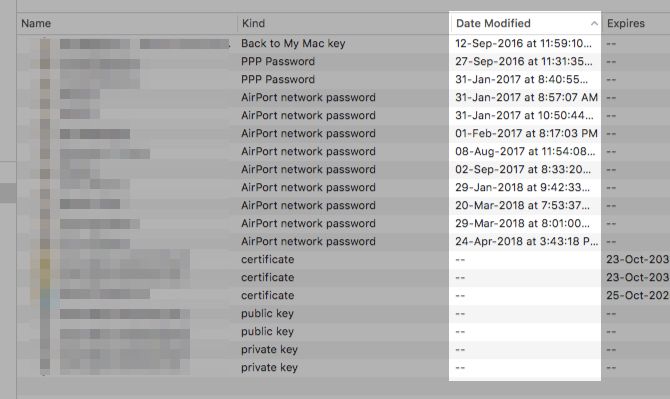
You’ll have to declutter the keychain yourself using the Delete context menu item for entries. If you need some help finding all the really old passwords, click on the Date Modified column header to line up the oldest entries first.

Be extremely careful while deleting passwords! Check that you aren’t throwing away a current password entry or any other important ones. Use the method shown above to take a peek at passwords so you can confirm if they’re current.

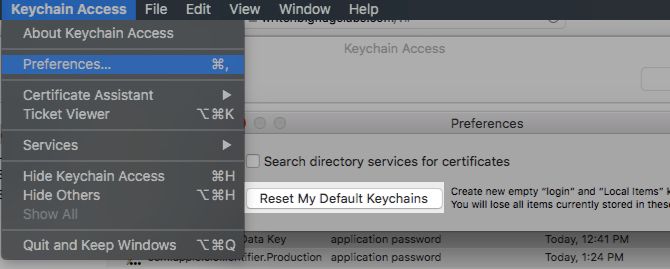
Would you rather delete everything and start from scratch instead of decluttering? Try the Reset My Default Keychains option then. It’s hidden under Keychain Access > Preferences.

reset-keychain-mac

As an alternative, you can create a new keychain as discussed in the section 2 above, and port a select few entries to it from the old keychain. Feel free to drag and drop the items you want to move. But keep in mind that you’ll have to enter the old keychain password for each entry.

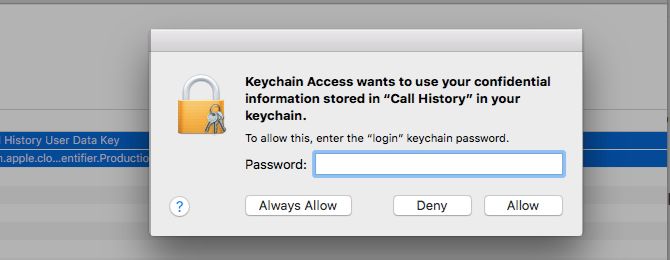
If you click on the Always Allow button, you get to permit the change for all entries at once. But despite that, sometimes you have to get through more than one authentication prompt.

move-passwords-keychain-mac

5. You Forgot Your iCloud Keychain’s Security Code

If you use iCloud keychain to back up your credentials to your iCloud account, you get a security code to go with it while setting up the sync.

Now, you might have forgotten this code and would like to retrieve it. While there’s no direct way to do that, you can generate a new code from your Mac or iPhone if the device has iCloud keychain enabled on it.

To get started, visit System Preferences > iCloud and click on the Options button next to Keychain.

Note: You won’t see the Options button if you have enabled two-factor authentication (2FA) for your Apple ID. You’ll have to turn off the feature from appleid.apple.com, reset the security code, and then turn on 2FA once again.

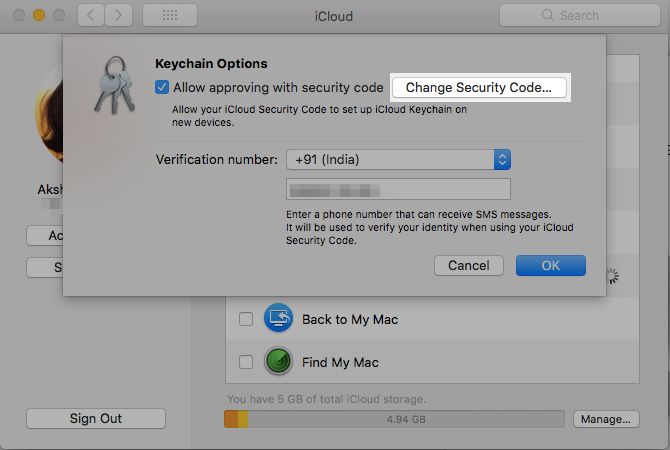
In the prompt that appears next, click on the Change Security Code button and type in a new code. Once the change is in place, you can use the new code to set up iCloud Keychain on other devices.

change-security-code-icloud-keychain

This solution comes in handy if you have gotten locked out of your iCloud Keychain because you entered the wrong security code too many times.

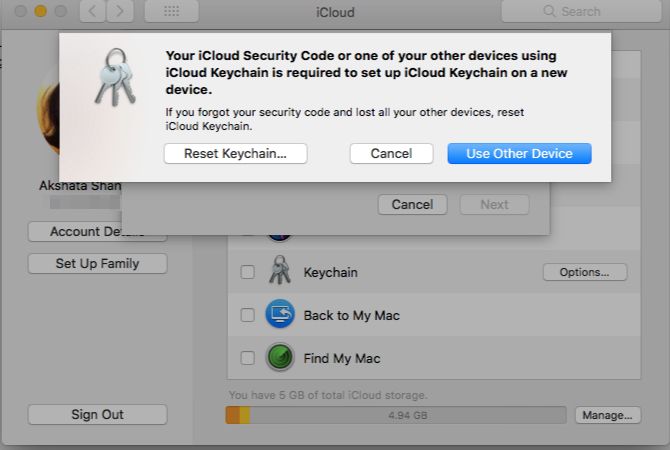
If you don’t have a device capable of generating a new security code, you have no option but to reset your iCloud keychain. You can do this from your Mac via System Preferences > iCloud.

First select the checkbox for Keychain and log in with your Apple ID password. Once you click on the Use Code button in the dialog that appears, you get access to a Forgot Code? option. After clicking on this, you’ll find the button that allows you to reset the keychain.

reset-icloud-keychain

We’ve discussed solutions for many other iCloud problems if you’re running into similar issues.

Fix That Keychain and Get Things Working Again

The Keychain Access app stays out of your way for the most part. But occasionally it might trouble you with an issue or malfunction.

Now you know how to fix the most common keychain problems if you encounter any. Our solutions for other common macOS problems will help you keep your Mac free of troubles too.

Read the full article: 5 Common Keychain Problems on Mac and How to Fix Them


Read Full Article

Goodwall gets $10.8M to expand its ‘LinkedIn for students’


Goodwall, a US-focused student and graduate professional network which aims to connect young people with college and employment opportunities, has closed a $10.8 million Series A funding raise.

The round was led by Randstad Innovation Fund, a strategic corporate VC fund that focuses on recruitment, and Swiss private equity firm Manixer. Additional investors include Francis Clivaz, Zurich Cantonal Bank and Verve Capital Partners.

The 2014 founded startup says it will be using the new funding to grow the professional network, which has a core demographic of 14-24 year-olds, and more than one million members at this stage.

“Our main initiative with this round of funding is hiring new talent in New York to support our expansion,” says Taha Bawa, co-founder and CEO. “The funding will be used to grow our product team to provide better features for our two demographics: Highschool and college students. We are growing our sales team as well, to handle the demand that enterprises have shown in our talent.”

“The United States is our current focus and will continue to be the focus throughout 2018. We will be growing with our students and serving them in college,” he adds.

We intend to widen the appeal to the college/post-grad segment by focusing on driving value in terms of being found easily (via a mobile-first experience) by the companies that are interesting to them, whether they be startups or larger companies, for internships or first jobs. Beyond this, as with high school students, we will provide current college students the ability to connect and support each other.”

Goodwall’s business model is based on generating revenue from colleges and enterprises looking to recruit students on the platform. For its target young people, the pull is an online platform where they can connect with fellow students and try to get ahead by showcasing their skills and experience, networking, and learning about education and employment opportunities.

Goodwall says it matches its college student and graduate users to employers for job and internship opportunities, while its high school students get connected to colleges and scholarships.

The startup is competing with traditional college and larger job boards but Bawa argues that its matching process offers an advantage to employers because it’s screening candidates so they get more relevant applications, rather than scores of irrelevant ones which they then have to sift themselves.

The platform generally offers employers a way to source, connect and engage with a pool of motivated students and graduates — with employers able to pay Goodwall to get their brand in front of the types of students or recruits they’re looking for.

“The typical Goodwall user is an English speaking, aspirational go-getter that is either college-bound or in college,” says Bawa. “Goodwall does not aim to only serve the 1% in terms of grades and achievements, though we have many students in this category, from Robotics Fairs winners to Olympic Champions. Rather we strive to serve all ambitious, hardworking students and bring their uniqueness to light via our comprehensive profiles.

“In high school these go-getters may not always be the best students academically, or at the college level, they may not necessarily be enrolled at top ranking institutions. Ultimately, these are the type of students we are looking to work with and the type of talent our partner universities and companies are looking to recruit.”

At the highschool level, Goodwall is also competing with scholarship and college matching websites but Bawa argues it also offers kids additional value — given the platform’s focus on building a community around achievements, connections and mutual support.

The network is also of course competing with LinkedIn — certainly at the older end of its age range. But because Goodwall offers tools for high school students it’s hoping to get in early and build a relationship that lasts right through college and users’ early career path, by acting as “the first resume they build”.

“We grow with them,” is how Bawa puts it. 

While the startup is taking VC funding now to focus on further building its network in the US, he confirms it would be open to an exit to a larger professional or student focused network in the future, saying: “We’d like to continue growing with our members.”

Commenting on the Series A in a statement, Paul Jacquin, managing partner at Randstad Innovation Fund, added: “We’re excited to support the Goodwall team in building a new segment with college and graduate demographics after their success in creating a unique and positive community to gain support, receive guidance and opportunities. The level of engagement on Goodwall has been impressive and unique in its community aspect. We are thrilled to bring the platform to its next chapter of growth.”


Read Full Article

7 Automated Android Settings You Should Be Using to Save Time

How to Buy a Kindle Book as a Gift for More Than One Person


Books make wonderful gifts. So, why shouldn’t ebooks be enjoyed with the same shared pleasure? It was always possible to gift a Kindle ebook, but now you can also buy a single Kindle book as a gift for more than one person.

Let’s look at just how you can spot the book that qualifies as a gift for a group or a team.

How to Buy Kindle Books for More Than One Person

Buy for Others on Kindle

The Buy for others feature is part of the Amazon US Kindle Store. Keep this in mind because Amazon says that if you do not live in the same country as your recipient, the book may not be available for your recipient due to any country or copyright restrictions.

When a book qualifies for the Buy for others feature, you will spot a yellow widget close to the buy button. So, search for the book you want to gift first.

  1. Go to the Kindle book’s product detail page on Amazon.
  2. Check if the Buy for others button is visible. Select the quantity and click the Buy for others button.
  3. Complete your order details, and click Place your order.
  4. Amazon will send you Redemption links which can also be accessed from your Digital Orders page.
  5. Locate your order and click View Redemption Links.
  6. Now you can send emails with redemption links one by one to your group. Alternatively, you can use a spreadsheet template that Amazon provides on the Digital Orders page.

This feature can make for thoughtful last minute gifts. It also does not require any shipping. So, this just might give you another reason to use the Kindle to its full potential.

Read the full article: How to Buy a Kindle Book as a Gift for More Than One Person


Read Full Article

How to Download Apple’s GarageBand Artist Lessons for Free


GarageBand-alternatives

GarageBand’s latest updates not only bring a little something for experienced musicians, but also a little something for those of you who are just getting started. In addition to over 1,000 new loops and sound effects, Apple has completely dropped the $4.99 price on Artist Lessons.

If you aren’t familiar: GarageBand’s Artist Lessons come from actual musicians, from John Legend and Norah Jones to Fallout Boy and Rush. Artist Lessons are divided into two main categories—piano and guitar—and come in three levels of difficulty: easy, medium, and advanced.

The lessons are often conversational, and the artists walk you through and explain each part of their songs. They also give you insight into the stories behind songs.

To take advantage of the piano lessons on your laptop, GarageBand recommends using a USB or MIDI-compatible keyboard that you can plug into your computer. But you could always follow along and use any piano, or even follow along using the keyboard available in the iOS version of GarageBand on an iPad.

How to Download Apple’s GarageBand Lessons

If you’re ready to start learning from your favorite singers, here’s how to download the lessons:

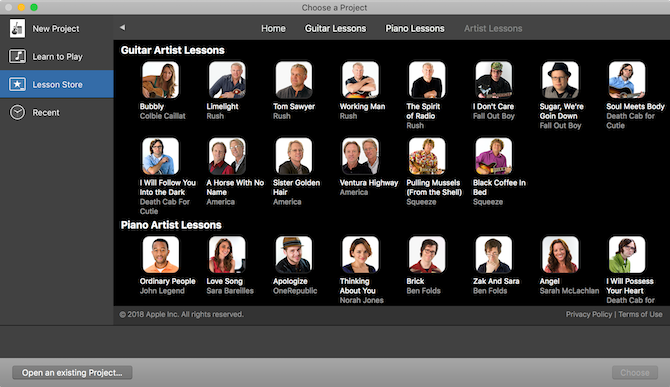
  1. When you first open up GarageBand, you should see a menu in the left sidebar. Click Lesson Store. 
  2. Click Artist Lessons
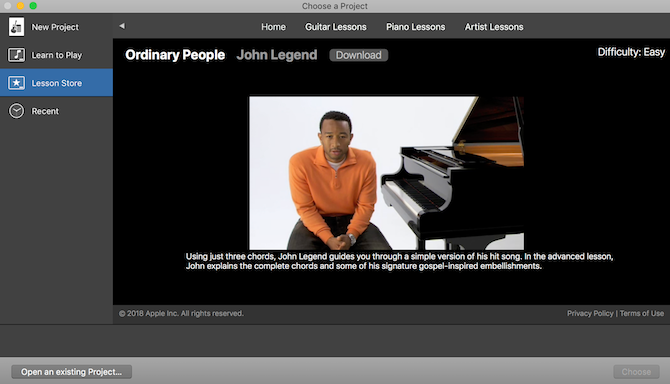
  3. You’ll see a series of 15 guitar lessons and eight piano lessons. Click the icon for the lesson you want to download. 
  4. Click the Download button next to the artist name. 

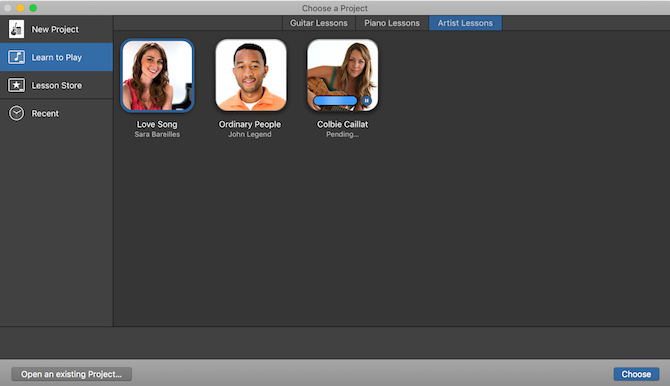
You can access all your downloaded lessons (from artists or otherwise) by clicking the Learn to Play button in the menu in the sidebar and clicking on the Artist Lessons tab.

If you find the Artist Lessons overwhelming, it might be better to start with the basic Guitar and Piano lessons available before moving on to your favorite songs.

And if you’re brand new to GarageBand, be sure to check out our step-by-step guide to GarageBand which breaks down everything you need to know about using the music app to its full potential.

Read the full article: How to Download Apple’s GarageBand Artist Lessons for Free


Read Full Article
How to Install Amazon Alexa on Any Windows 10 PC


install-alexa-windows-10

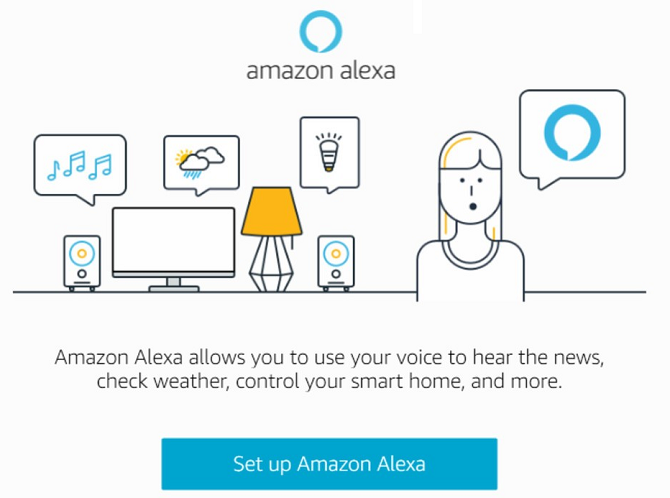
Amazon Alexa is slowly rolling out on Windows 10. It brings serious competition to the solid, if slightly underwhelming, Cortana. However, Alexa comes with a caveat: it’s only offered natively on new computers built by HP, Lenovo, and Acer.

But if you don’t have a computer that meets the requirements, don’t fret. There’s still a way to run Amazon Alexa on your current machine. Let’s take a closer look at how to do this.

How to Install Amazon Alexa on Windows 10

You can add Amazon to any Windows 10 computer if you follow the step-by-step instructions below.

  1. Grab the Amazon Alexa installer from Dropbox.
  2. Run the EXE file and follow the on-screen instructions.
  3. Once the installation process has finished, fire up the app from the Start menu.
  4. Enter your Amazon credentials.

Warning: The Dropbox link is not an official Amazon download. It was safe when we ran it, but it may or may not change in the future and that’s beyond our control. Run it at your own risk.

Only One Missing Feature: No Wake Words

Sideloading the Alexa app for Windows will give you all the functionality the app offers. That includes requesting music, listening to the weather forecast, managing shopping lists, setting an alarm, and the ability to use the best third-party skills.

But there is a caveat: Alexa will not respond to wake words.

Therefore, whenever you want to interact with the smart assistant, you will need to press the dedicated in-app button to force Alexa to start listening to your commands.

The best way to make the button easily accessible is to pin the Alexa app to your taskbar. You can do so by going to Settings > Personalization > Taskbar > Select which icons appear on the taskbar and flicking the toggle next to Alexa into the On position.

And remember, Windows laptops are not the only devices that will work with Alexa. There are lots of Amazon Alexa-compatible devices that can help you become more productive.

Read the full article: How to Install Amazon Alexa on Any Windows 10 PC


Read Full Article
How to See the Exact Strength of Your Wi-Fi Connection in Windows


While Wi-Fi networks have gotten much more powerful lately, they still have physical limitations. One of the biggest issues many people face with wireless networks is poor connection quality.

On Windows, you probably know that you can look at the network icon in the System Tray to get an idea of how strong your connection is. It shows up to three white bars, plus a dot, to illustrate the rough signal strength. But this isn’t very specific.

Here’s a way to see the strength of your wireless connection more concretely in Windows.

How to See Wi-Fi Signal’s Exact Strength in Windows

Signal-Strength-CMD-Windows

  1. Make sure you’re connected to the Wi-Fi network you want to test and have your computer in the desired spot.
  2. Type cmd into the Start Menu to open a Command Prompt window.
  3. Enter the following command:
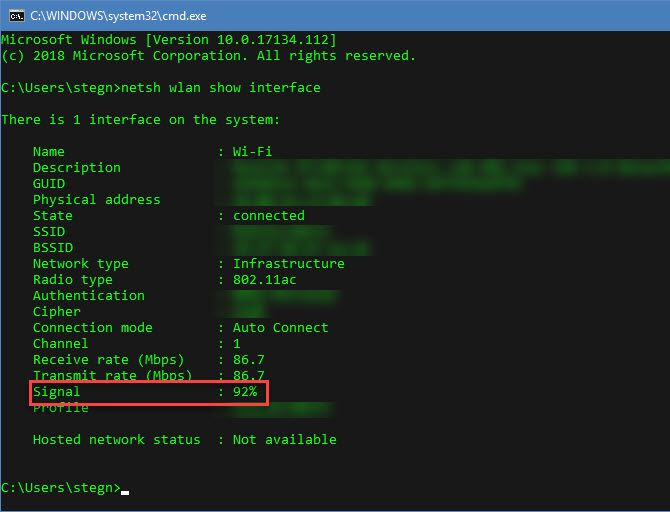
    netsh wlan show interface
    
  4. This will provide a large amount of information about your current wireless network. You’ll see its SSID, radio type, and connection mode.
  5. Look for the Signal field. Next to this, you’ll see a percentage between 1 and 100 that represents how strong your signal is.

That’s all it takes to check how strong your signal is. If you’re not happy with it, you can take some steps to improve your Wi-Fi connection.

First, try moving physically closer to the router. Concrete walls and other thick surfaces can impede a wireless signal, so the closer you are, the better. Running the above command again will give you an updated signal strength each time, so you can keep trying it as you move around. Press Up to quickly recall the last command.

If you can’t move your computer closer, you might consider investing in a Wi-Fi extender. These allow you to boost your Wi-Fi signal around the house in areas where it’s weak. If neither of these issues fix your problem, it’s likely time to replace your router. Older units can’t reach as far as new ones.

Read the full article: How to See the Exact Strength of Your Wi-Fi Connection in Windows


Read Full Article
This $15 Course Provides a Brilliant Introduction to Machine Learning


Machine learning is the technology that keeps self-driving cars on the road and allows Siri to answer your questions. An Introduction to Machine Learning and NLP in Python is a course that helps you to understand the technology and write your own intelligent software. You can get lifetime access now for $14.99 at MakeUseOf Deals.

Machine Learning and NLP

When a kid first tries to ride a bike, they make many mistakes. But with every ride, they slowly improve. Artificial intelligence has to navigate the exact same learning curve. As the software gathers data, it gradually becomes more efficient. In the tech world, this process is known as machine learning.

You can see machine learning at work multiple times every day, from Netflix recommendations to photo apps with facial recognition. This course helps you master the technology and even write your own apps using Python code.

Learning from tutors with decades of professional experience, you discover the world of AI through fun animations. These videos help to break down complex programming concepts into manageable chunks, so you don’t need any previous experience with code.

Along the way, you also learn about natural language processing. This is the technology that allows Siri to understand your ramblings.

You should come away with some valuable Python coding skills and a better appreciation for AI.

Lifetime Access for $14.99

The course is worth $99.99, but you can grab all 8.5 hours of instruction now for only $14.99.

Read the full article: This $15 Course Provides a Brilliant Introduction to Machine Learning


Read Full Article