
Starting out in crypto can feel daunting, but purchasing your first Bitcoin (or any other altcoin) is much easier than you think.
For most first-time buyers, Coinbase is pretty much the cryptocurrency exchange of choice to use because Coinbase is secure, easy to navigate, and packed with decent features that’ll make things easier. Here’s our guide to purchasing your first cryptocurrency using Coinbase.
What Is Coinbase?
Coinbase is a cryptocurrency broker. Coinbase trades several cryptocurrencies in exchange for regular fiat currency:
- Bitcoin
- Bitcoin Cash
- Ethereum
- Ethereum Classic
- Litecoin
Coinbase is definitely one of the easiest cryptocurrency brokers to use. It is also one of the most popular crypto-brokers. However, before other crypto-users jump on me: Coinbase is by no means the best crypto-broker.
The thing is, Coinbase has a number of stop-checks in place for new users, and that means it’s forgiving. You can use Coinbase as temporary storage for your cryptocurrency, but you shouldn’t use it for long-term storage. For that, you’d be better off with a cryptocurrency cold wallet instead.
Step 1: Create a Coinbase Account
Head over to Coinbase and hit the Sign-up button in the top-right corner.
Enter your details in the account creation panel. Use a strong single-use password. Then head to your email account and verify your email address.
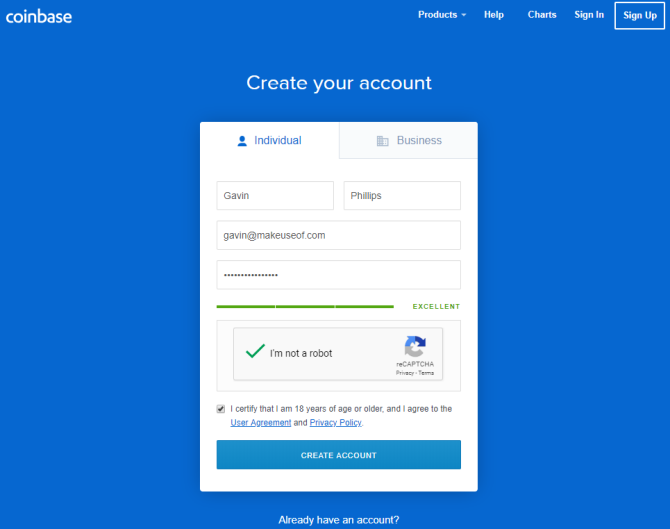
When you come back to the Coinbase site, you need to add a phone number to secure your account. Coinbase then sends you a verification code. Next up, add your personal information. The information Coinbase requires varies slightly by locale, but you will need to confirm your date of birth, an address, your source of funds, and so on.
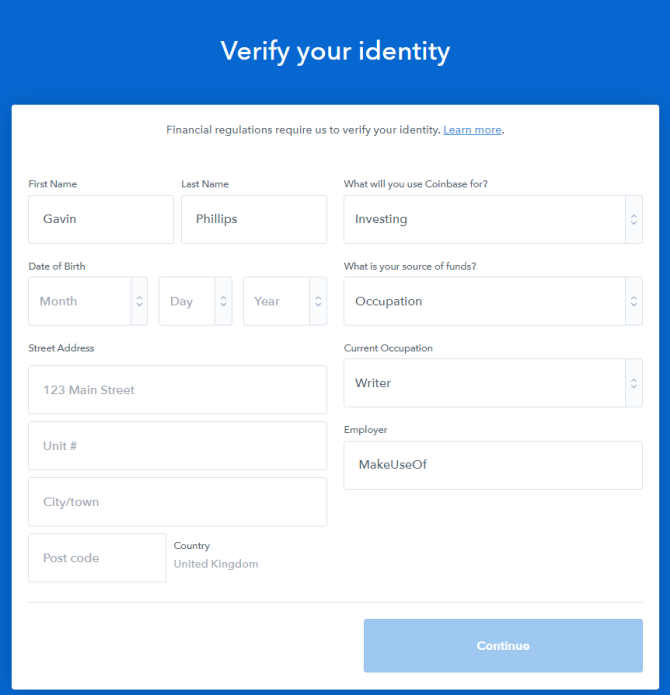
Finally, you need to use an official photocard document to complete your verification. In the US, Coinbase only accepts state-issued driving licenses or identification cards. A US passport is not acceptable. However, outside the US, Coinbase will accept your passport.
For more information, check out the official Coinbase documentation on identity verification.
Account verification time varies hugely. Coinbase verified the account I’m using for this tutorial within five minutes, but I have other Coinbase accounts that use the same verification image and phone number. Coinbase may request extra information from you, so be sure to check your email account frequently.
What Is Coinbase Pro?
Coinbase Pro is Coinbase’s crypto-exchange, formerly known as GDAX. You use Coinbase Pro for “advanced” cryptocurrency trading. In this case, advanced means more options than the regular Coinbase site. For instance, you can make a purchase order for a price above or below the current market rate for a cryptocurrency, or directly trade your Bitcoin for Litecoin (or the other cryptocurrencies Coinbase and Coinbase Pro support).
Step 2: Add a Payment Method
When your Coinbase account finally verifies, you arrive at the Coinbase dashboard. The dashboard displays the current price of the cryptocurrencies available for purchase through Coinbase, your current portfolio, and any information regarding account updates. For instance, you can see in the image below that Coinbase recently added support for several UK bank accounts.
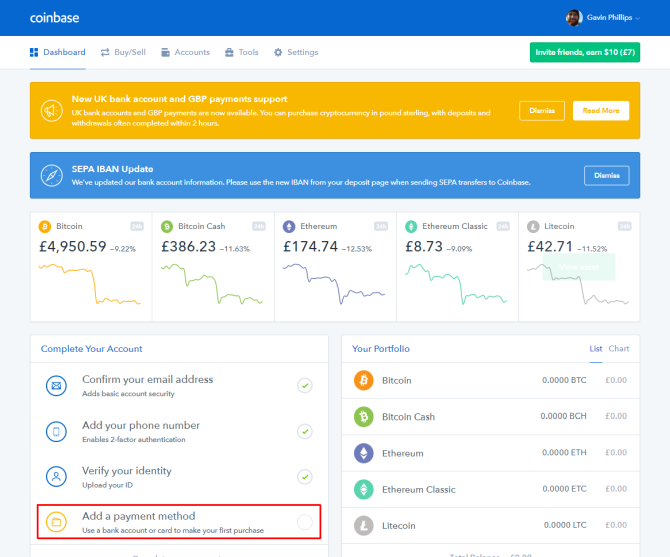
In the bottom-right corner, select Complete your account. Depending on your locale, you now have two or three options:
US residents can add: a bank account, their debit card, or add details for a wire transfer.
UK and EU residents can add: an EU bank account, a UK bank account, or a debit card. Furthermore, UK and EU residents can use SEPA payments or make instant crypto purchases using a 3D Secure debit or credit card.
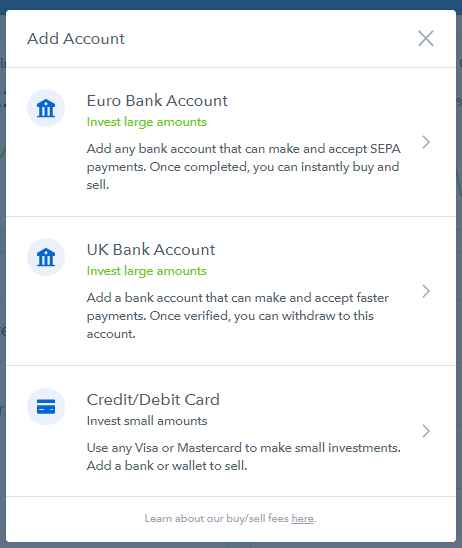
Note that Coinbase no longer supports the linking of new credit cards! Also, some credit card providers are refusing cryptocurrency purchases or adding additional charges to existing cards. Coinbase won’t remove existing credit cards but does suggest using a debit card or regular bank account instead.
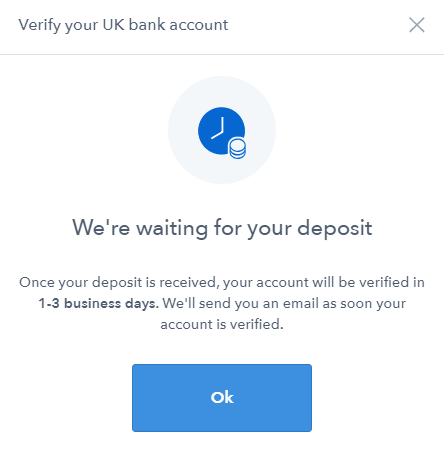
Debit cards and bank account come with a small verification charge. Unfortunately, the account verification process can also take up to three business days.
Step 3: Buy Cryptocurrency Using Coinbase
Once Coinbase verifies your bank account or debit card, and you have some funds available, you can purchase some cryptocurrency. Coinbase is a crypto-broker that exchanges Bitcoin, Bitcoin Cash, Ethereum, Ethereum Classic, and Litecoin.
Select Buy/Sell from the Coinbase dashboard. Select the cryptocurrency you want to purchase. Enter either the amount of cryptocurrency you want to buy in your local currency. Alternatively, if you have a specific amount of cryptocurrency you want to buy regardless of cost (for example, 1.2 BTC), enter that and then check the cost.
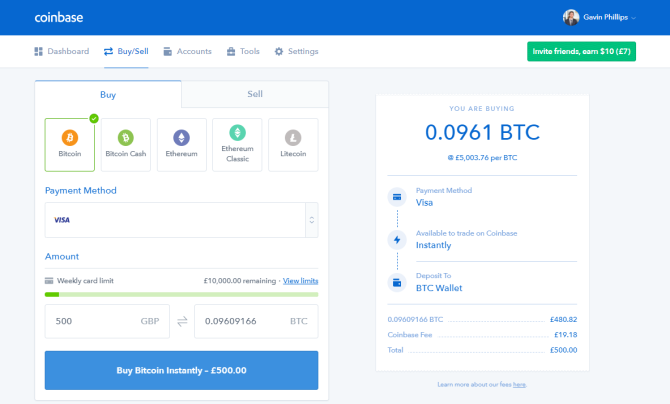
When satisfied, press the Buy Cryptocurrency button at the bottom of the panel. The description of this button changes depending on your payment method. I’m using my authorized debit card in the UK, meaning I can make an instant purchase of any of Coinbase’s cryptocurrencies. Payment methods have different delays.
When you head back to your Coinbase dashboard, your portfolio will show your new cryptocurrency, and your Recent Activity panel should show your purchase.
Step 4: Sell Cryptocurrency Using Coinbase
Want to sell the cryptocurrency you bought? Head back to the Buy/Sell tab.
Using the Sell From drop-down menu, select your cryptocurrency. Then, from the Deposit To drop-down menu select the currency wallet where you want to deposit your funds. Note that you have to deposit your funds to a currency account before withdrawing to your bank account.
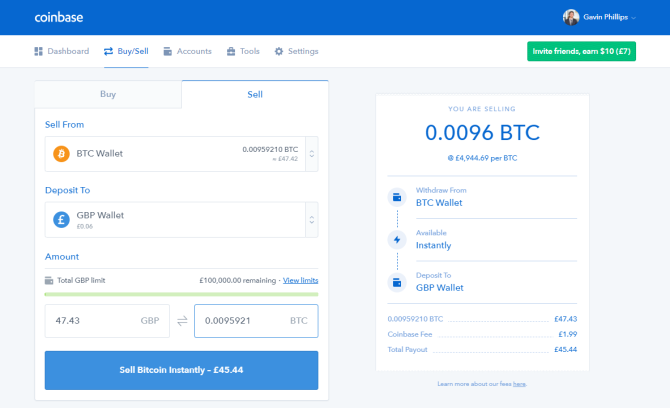
Just like the purchasing panel, you can enter either the amount of cryptocurrency you want to sell in your local currency or specify the amount of cryptocurrency. The cryptocurrency box also has a Sell Max button you can use to enter the maximum account of cryptocurrency while accounting for Coinbase’s transaction fee.
Step 5: Withdraw Funds From Coinbase
Once your funds clear into your Coinbase local current wallet, you can withdraw them from the site entirely, back into your bank account.
Select Accounts from the Coinbase dashboard. It will display your current holdings across all of your accounts. Find the local currency you want to withdraw and hit the Withdraw button. The withdraw panel pops up and asks for the amount you want to withdraw. It also has a Withdraw All option. Select the bank account you want to withdraw your Coinbase funds to and press Continue.
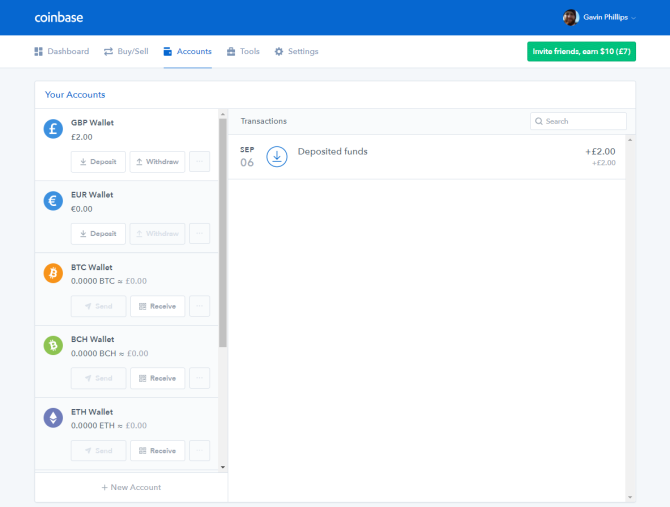
It can take up to five business days before your funds appear in your local currency account. In my experience, it is usually faster than that, but don’t depend on withdrawing funds to pay a pending bill on its due date.
Congrats, you’ve bought your first cryptocurrency!
Coinbase is a great place to start your cryptocurrency adventure, even if it does leave a little to be desired in some areas. Its interface is easy to use, it offers the core cryptocurrencies you need to get started, and it’s secure enough that you don’t have to worry.
Read the full article: How to Buy Your First Cryptocurrency: A Step-by-Step Guide
Read Full Article
No comments:
Post a Comment