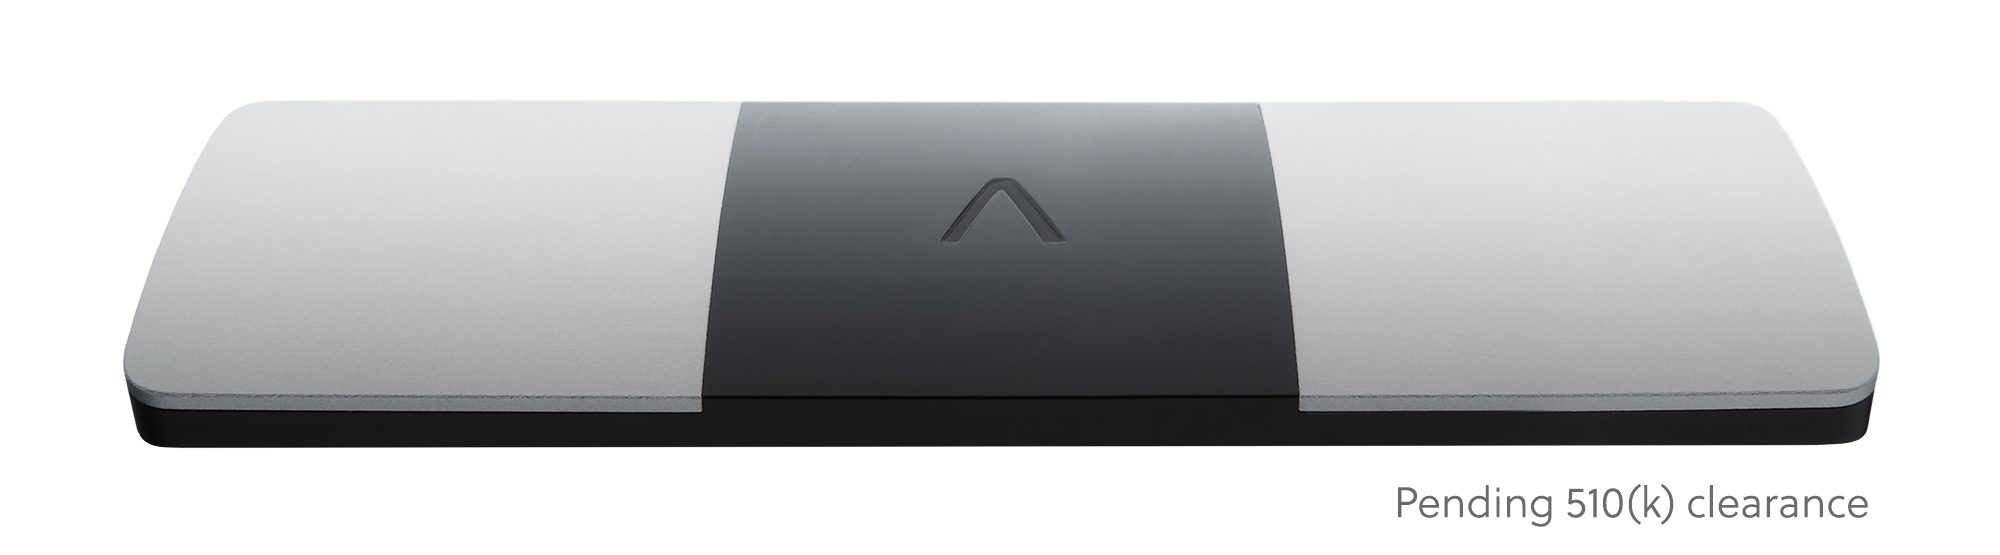
Apple’sannouncement last week of a Watch with an FDA-approved ECG reader to track heart health looked to be the undoing of original ECG reader company AliveCor. But, to prove it still has a hearty pulse, AliveCor tells TechCrunch it is coming out with a “never-before-seen” 6-lead electrocardiogram (ECG), pending FDA approval.
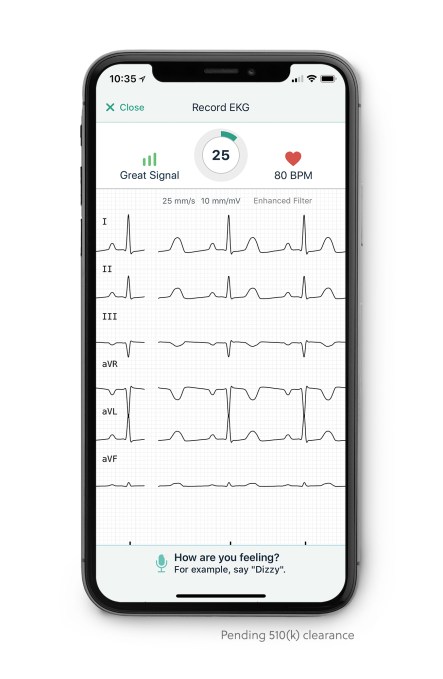
In a care clinic, a patient typically has 12 leads, or stickers placed across their chest to pick up data from their heart. However, other ECG readers typically have one or two leads. The Apple Watch places a single lead system on the wrist. The 6-lead ECG reader is, in theory, more accurate because there are more sensors picking up more information, which could be critical in saving lives.
AliveCor’s and the Apple Watch’s current function is to pick up AFib — or the detection of an irregular heart beat. AliveCor announced earlier this month it had received FDA-approval to use its ECG readers to detect a rare but dangerous blood condition called hyperkalemia.
With 6-lead ECG readers, the AliveCor device could also pick up about 100 different diseases, according to CEO Vic Gundotra, who rattled off a bunch of long-worded maladies I can’t even begin to pronounce but he’s hoping his reader will soon be able to detect.
However, one important detection would be ST elevation — one of the key factors associated with the onset of a heart attack and which could get a person on their way to the hospital before they start displaying other physical symptoms.
Of course, Apple — which already holds 17 percent of the wearables market — could easily decide it, too, needs to add a 6-lead ECG reader to the Watch and beat AliveCor’s market yet again. But Gundotra shrugs at that suggestion.
“They could but we have some pretty good patents in the space,” he told TechCrunch, adding “Apple has done me a great service, actually. We’re a small company but you are talking to me, calling about this [because of their announcement].”
No formal name has been announced yet for the 6-lead product, but AliveCor will be working with the FDA on the regulatory pathway for it and hopes to bring it to over-the-counter consumers by 2019.
If you’ve been using Spotify’s free plan to stream music, you know it carries a sleek interface, tons of music, great discovery features, and more.
You’ve probably wondered whether paying for Spotify Premium is worth a monthly subscription, or if you’re better off sticking to the free plan to save money. Let’s look at what each tier offers, and decide if Spotify Premium is worth the extra investment.
Spotify Free Benefits
Spotify Free is your ticket to Spotify’s massive collection of music without paying a dime. All you need is a Spotify account (you can log in with Facebook).
You can access it using the Spotify apps for Windows, Mac, and your iPhone or Android device, along with the Spotify web app available across all platforms.
On desktop, you won’t feel too limited by Spotify Free. Free lets you choose any artist, album, playlist, or song that you’d like to listen to. Aside from ads every few songs, Spotify doesn’t lock anything out of its free tier. If you’re into social features, you’ll have full access to song sharing and checking out what your friends are listening to.
On mobile, it gets a bit more restrictive. Using an iPhone or Android device, you’ll still have access to the Spotify catalog, but you’re forced to listen to everything in Shuffle mode. That means you can’t listen to an album straight through. However, some select Spotify playlists let you choose songs on-demand.
However, if you’re on an iPad or Android tablet, you’ll enjoy the same on-demand access to music as on desktop. Of course, it still has ads, but you’ll be able to listen to any playlist or album without shuffling.
Using Spotify Free, you must be online to listen to music. This means no listening in airplane mode to save data, though Spotify Free does have a Data Saver mode.
Spotify Free has a few other small restrictions on mobile. You can’t follow friends, access Spotify Radio, add local files, or watch videos. You’re also limited to six skips per hour when shuffling.
Spotify Premium Benefits
Upgrading to Spotify Premium is where Spotify really shines. Premium is the only paid tier that Spotify offers; it dropped the old Unlimited plan years ago. With Premium, you don’t see any ads (audio or visual) at all.
Spotify has ads about how great their service is without ads.
Aside from removing the ads, Premium also unlocks full access on your mobile devices. You can listen to any song anytime on your phone the same way that you listen on your desktop. Since you’re not limited to shuffling anymore, you can skip tracks, access Radio, and see everything the app has to offer.
You’ll also enjoy the high-quality streaming that Premium offers. By default, the player runs at 160kbps on desktop; Premium allows you to up this to 320kbps, which is about the best compression rate you’ll actually notice.
For mobile, Low quality is 24kbps, Normal quality is 96kbps, High quality is 160kbps, and Extreme quality is 320kbps. Free users can select Normal or High, but only Premium lets you select Extreme on mobile. You can adjust the settings for streaming and saving offline independently.
Speaking of which, Premium’s other huge benefit is offline listening. This allows you to save up to 3,333 songs each on three different devices. You can save any album or playlist for offline listening. The caveat is that you must go online once every 30 days to keep your offline music valid. This is just a check so that Spotify knows you’re still a Premium member.
Finally, Premium allows you to use Spotify Connect, which controls Spotify music across multiple devices. With Connect, you can control what’s playing on your laptop using your smartphone, or pair Spotify with dedicated hardware, such as speakers or your PS4. This is a great feature for controlling the tunes at a party and makes for seamless transitions between listening on your phone and computer.
The standard price for Spotify Premium is $10/month. While there’s no legitimate way to get Spotify Premium for free, you can get discounts in a few ways.
Spotify’s Family Plan
The most discounted Premium option is the Spotify Family plan. This shareable account lets you add up to six people for a grand total of $15/month. This means that the more people you add, the less the cost per person. Everyone maintains their own account, so there are no usage conflicts or having someone mess with your playlists.
Spotify states that everyone on a Family Plan must live at the same address. While it only uses the honor system to verify this, some have reported Spotify asking for proof of residence from those on a family plan. It’s up to you whether you’re OK with violating the rules to join up with a few buddies.
I'm such a clutch friend. I bought the Spotify family pack just so my friends could have premium
If you’re a student (at an eligible university, with proof), you can get Premium for just $5/month using Spotify Student. Spotify sweetens this deal by including subscriptions to Hulu and Showtime as well. Since Hulu’s Limited Commercials plan normally costs $8/month and Showtime is $11/month, you’re getting quite the deal.
If you like the idea of this bundle but aren’t a student, check out the Spotify Premium plus Hulu plan. For $13/month, you get access to Spotify Premium and Hulu Limited Commercials, which saves you $5/month compared to buying them separately.
Spotify Premium Trials and Promotions
If you want to try before you buy, there’s a 30-day free trial of Premium that you can check out anytime. Doing so requires entering payment information, and Spotify will automatically renew the subscription after your month is up. Head into your account settings to shut that off so you aren’t charged if you decide Spotify isn’t for you.
Keep an eye out for Spotify promotions, too. The company often offers three months of Premium for just $1, but these only apply for users who have never tried Premium before. Sometimes, other companies offer discounts on Spotify Premium. For instance, Sony offers 10% off Premium if you’re a PlayStation Plus member.
How to Upgrade to Spotify Premium
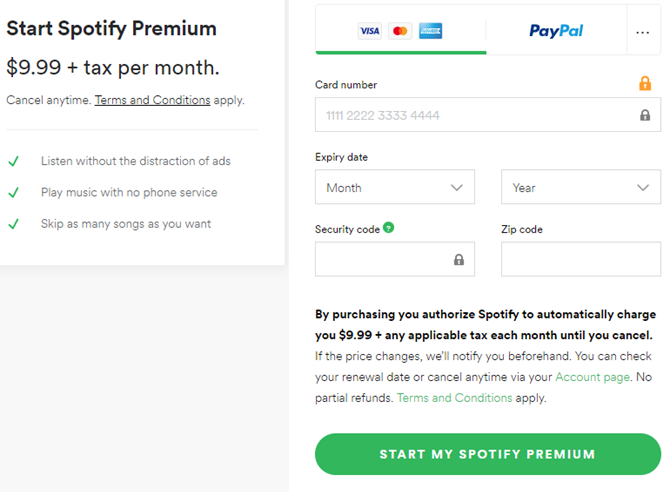
When you’re ready to make the jump to Premium, just head to the Spotify Premium page. Click Get Spotify Premium and you’ll need to sign into your account if you’re not already. Proceed through the payment with your credit card or PayPal, and you’ll become a Premium member.
You’ll then have access to Premium on all the devices you use your Spotify account on.
It’s important to note that if you’re an iPhone user, do not subscribe to Premium through the Spotify app on iOS. Apple takes a cut of every in-app purchase from the App Store, so if you sign up on your iPhone Spotify Premium is $13/month instead of the usual $10/month. Avoid this ridiculous charge and use Spotify’s website to upgrade if you choose to do so.
Is Spotify Premium Worth It?
If you use Spotify with any frequency during the month, Spotify Premium is a great investment. For the price of one digital album per month, you get high-quality music, the ability to save music to your phone (which could pay for itself in data charges), and no ads to interrupt.
With a Family Plan, it becomes an even more attractive deal. Even with just two or three people, paying $7.50/month or $5/month is an awesome deal for unlimited music streaming.
I'm mad at myself for waiting this long to sign up for Spotify premium. So worth it. @Spotify
It’s not odd at all to get your music almost exclusively from Spotify. It saves space on your computer because you don’t have to amass a huge collection of MP3s. You can check out a new artist and decide you don’t like it without wasting $10, plus it’s easy to share music with friends and access your collection across multiple devices.
There are only two scenarios in which Spotify Premium isn’t worth the cost: you already subscribe to another music streaming service, or you only use Spotify a little bit each month. If you already have a massive music collection and only use Spotify to check out a new artist here and there, you might not care about the ads or mobile access. In that case, Premium wouldn’t be worth the cost.
Spotify Premium Is a Great Deal
Stop spending $10 on every album you buy and get access to millions of songs that you can listen to anytime, anywhere, and as much as you want. Spotify Premium is the ultimate app for anyone who likes music, and is one premium app that’s worth paying for.
Daily Burn, the online fitness brand owned by IAC, launched a new iPhone app today devoted to the popular workout style known as HIIT (high-intensity interval training).
Daily Burn already offers a general training app, but the company says it’s planning a whole series of vertical workout apps, starting HIIT Workouts. The is “bringing personalized workout training to every member tailored to their interests.”
If you’re wondering exactly what HIIT is, the individual exercises may be familiar, but as a DailyBurn article puts it, it’s all combined into “quick, intense bursts of exercise, followed by short, sometimes active, recovery periods.”
There’s no shortage of HIIT workout apps, or HIIT workouts in broader fitness apps (for example, I’ve tried out several through my Fitbit Coach subscription). But Daily Burn points to the combination of guided video workouts (so you’re less likely to mess things up) with a specific focus on HIIT. Plus, the workouts are tailored to your goals and endurance levels.
“We spent months researching how people interact with their phones, and combined it with Daily Burn’s world-class fitness and streaming expertise to create a best in class HIIT app that is effective and fun,” said Daily Burn CEO Tricia Han in the announcement. “With personalized workouts led by expert trainers and optimized for mobile, members have access to top instructors, progress reports and a supportive community in the palm of their hand.”
Instagram is embracing its true identity as a mail-order catalog. The question will be how much power merchants will give Instagram after seeing what its parent Facebook did to news outlets that relied on it. In a move that could pit it against Pinterest and Wish, Instagram is launching Shopping features across its app to let people discover and consider possible purchases before clicking through to check out on the merchant’s website.
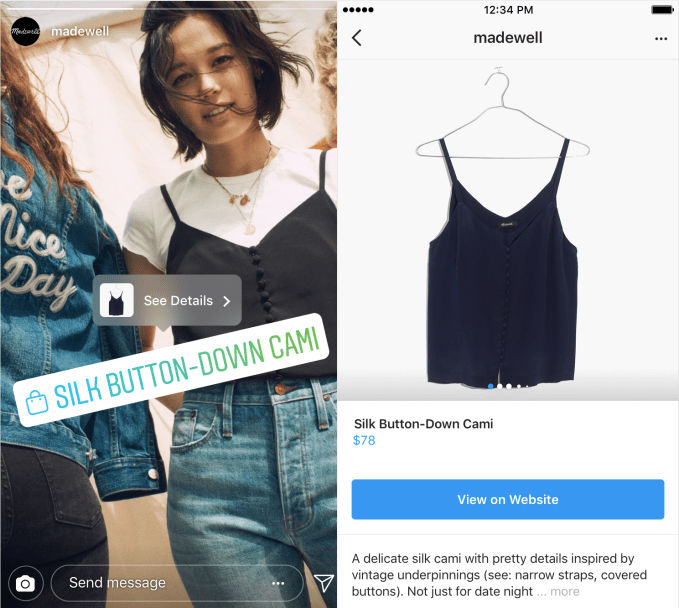
Today, Instagram Explore is getting a personalized Shopping channel of items it thinks you’ll want most. And it’s expanding its Shopping tags for Instagram Stories to all viewers worldwide after a limited test in June, and it’s allowing brands in 46 countries to add the shopping bag icon to Stories that users can click through to buy what they saw.
Instagram clearly wants to graduate from where people get ideas for things to purchase to being a measurable gateway to their spending. 90 million people already tap its Shopping tags each month, it announced today. The new features could soak up more user attention and lead them to see more ads. But perhaps more importantly, demonstrating that Instagram can boost retail business’ sales for free through Stories and Explore could whet their appetite to buy Instagram ads to amplify their reach and juice the conversion channel. With 25 million businesses on Instagram but only 2 million advertisers, the app has room to massively increase its revenue.
For now Instagram is maintaining its “no comment” regarding whether it’s working on a standalone Instagram Shopping app as per a report from The Verge last month. Instagram first launched its Shopping tags for feeds in 2016. It still points users out to merchant sites for the final payment step, though, in part because retailers want to control their relationships with customers. But long-term, allowing businesses to opt in to offering in-Instagram checkout could shorten the funnel and get more users actually buying.
Shopping joins the For You, Art, Beauty, Sports, Fashion and other topic channels that launched in Explore in June. The Explore algorithm will show you shopping-tagged posts from businesses you follow and ones you might like based on who you follow and what shopping content engages you. This marks the first time you can view a dedicated shopping space inside of Instagram, and it could become a bottomless well of browsing for those in need of some retail therapy.
With Shopping Stickers, brands can choose to add one per story and customize the color to match their photo or video. A tap opens the product details page, and another sends them to the merchant’s site. Businesses will be able to see the number of taps on their Shopping sticker, and how many people tapped through to their website. Partnerships with Shopify (500,000+ merchants) and BigCommerce (60,000+ merchants) will make it easy for retailers of all sizes to use Instagram’s Shopping Stickers.
What about bringing Shopping to IGTV? A company spokesperson tells me, “IGTV and live video present interesting opportunities for brands to connect more closely with their customers, but we have no plans to bring shopping tools to those surfaces right now.”
For now, the new shopping features feel like a gift to merchants hoping to boost sales. But so did the surge of referral traffic Facebook sent to news publishers a few years ago. Those outlets soon grew dependent on Facebook, changed their news room staffing and content strategies to chase this traffic, and now find themselves in dire straights after Facebook cut off the traffic fire hose as it refocuses on friends and family content.
Retail merchants shouldn’t take the same bait. Instagram Shopping might be a nice bonus, but just how much it prioritizes the feature and spotlights the Explore channel are entirely under its control. Merchants should still work to develop an unmediated relationship directly with their customers, encouraging them to bookmark their sites or sign up for newsletters. Instagram’s favor could disappear with a change to its algorithm, and retailers must always be ready to stand on their own two feet.
Instagram is embracing its true identity as a mail-order catalog. The question will be how much power merchants will give Instagram after seeing what its parent Facebook did to news outlets that relied on it. In a move that could pit it against Pinterest and Wish, Instagram is launching Shopping features across its app to let people discover and consider possible purchases before clicking through to check out on the merchant’s website.
Today, Instagram Explore is getting a personalized Shopping channel of items it thinks you’ll want most. And it’s expanding its Shopping tags for Instagram Stories to all viewers worldwide after a limited test in June, and it’s allowing brands in 46 countries to add the shopping bag icon to Stories that users can click through to buy what they saw.
Instagram clearly wants to graduate from where people get ideas for things to purchase to being a measurable gateway to their spending. The new features could soak up more user attention and lead them to see more ads. But perhaps more importantly, demonstrating that Instagram can earn retail businesses revenue for free through Stories and Explore could whet their appetite to buy Instagram ads to amplify their reach and juice the conversion channel.
For now Instagram is maintaining its “no comment” regarding whether it’s working on a standalone Instagram Shopping app as per a report from The Verge last month. Instagram first launched its Shopping tags for feeds in 2016. It still points users out to merchant sites for the final payment step, though, in part because retailers want to control their relationships with customers. But long-term, allowing businesses to opt in to offering in-Instagram checkout could shorten the funnel and get more users actually buying.
Shopping joins the For You, Art, Beauty, Sports, Fashion and other topic channels that launched in Explore in June. The Explore algorithm will show you shopping-tagged posts from businesses you follow and ones you might like based on who you follow and what shopping content engages you. This marks the first time you can view a dedicated shopping space inside of Instagram, and it could become a bottomless well of browsing for those in need of some retail therapy.
With Shopping Stickers, brands can choose to add one per story and customize the color to match their photo or video. A tap opens the product details page, and another sends them to the merchant’s site. Businesses will be able to see the number of taps on their Shopping sticker, and how many people tapped through to their website. Partnerships with Shopify (500,000+ merchants) and BigCommerce (60,000+ merchants) will make it easy for retailers of all sizes to use Instagram’s Shopping Stickers.
What about bringing Shopping to IGTV? A company spokesperson tells me, “IGTV and live video present interesting opportunities for brands to connect more closely with their customers, but we have no plans to bring shopping tools to those surfaces right now.”
For now, the new shopping features feel like a gift to merchants hoping to boost sales. But so did the surge of referral traffic Facebook sent to news publishers a few years ago. Those outlets soon grew dependent on Facebook, changed their news room staffing and content strategies to chase this traffic, and now find themselves in dire straights after Facebook cut off the traffic fire hose as it refocuses on friends and family content.
Retail merchants shouldn’t take the same bait. Instagram Shopping might be a nice bonus, but just how much it prioritizes the feature and spotlights the Explore channel are entirely under its control. Merchants should still work to develop an unmediated relationship directly with their customers, encouraging them to bookmark their sites or sign up for newsletters. Instagram’s favor could disappear with a change to its algorithm, and retailers must always be ready to stand on their own two feet.
Starting out in crypto can feel daunting, but purchasing your first Bitcoin (or any other altcoin) is much easier than you think.
For most first-time buyers, Coinbase is pretty much the cryptocurrency exchange of choice to use because Coinbase is secure, easy to navigate, and packed with decent features that’ll make things easier. Here’s our guide to purchasing your first cryptocurrency using Coinbase.
What Is Coinbase?
Coinbase is a cryptocurrency broker. Coinbase trades several cryptocurrencies in exchange for regular fiat currency:
Bitcoin
Bitcoin Cash
Ethereum
Ethereum Classic
Litecoin
Coinbase is definitely one of the easiest cryptocurrency brokers to use. It is also one of the most popular crypto-brokers. However, before other crypto-users jump on me: Coinbase is by no means the best crypto-broker.
The thing is, Coinbase has a number of stop-checks in place for new users, and that means it’s forgiving. You can use Coinbase as temporary storage for your cryptocurrency, but you shouldn’t use it for long-term storage. For that, you’d be better off with a cryptocurrency cold wallet instead.
Step 1: Create a Coinbase Account
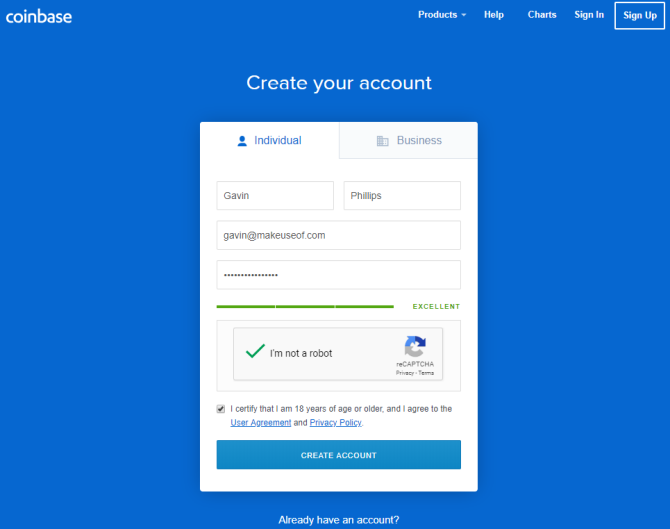
Head over to Coinbase and hit the Sign-up button in the top-right corner.
Enter your details in the account creation panel. Use a strong single-use password. Then head to your email account and verify your email address.
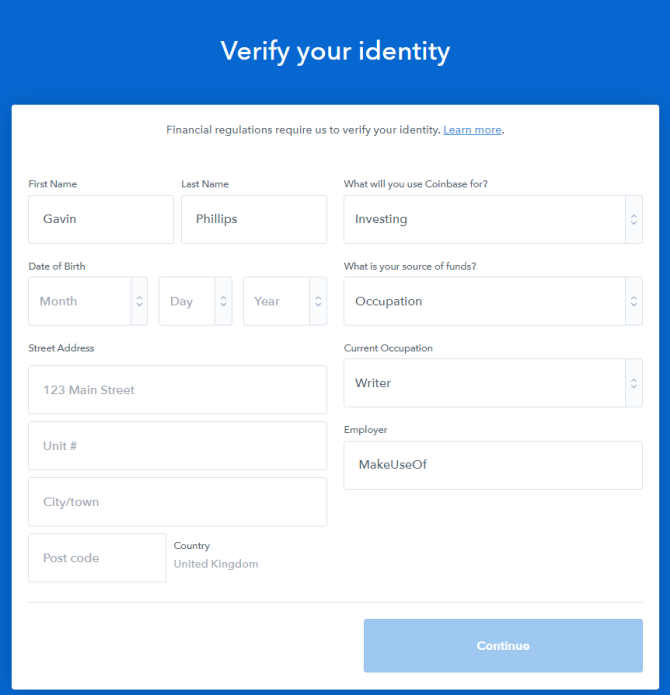
When you come back to the Coinbase site, you need to add a phone number to secure your account. Coinbase then sends you a verification code. Next up, add your personal information. The information Coinbase requires varies slightly by locale, but you will need to confirm your date of birth, an address, your source of funds, and so on.
Finally, you need to use an official photocard document to complete your verification. In the US, Coinbase only accepts state-issued driving licenses or identification cards. A US passport is not acceptable. However, outside the US, Coinbase will accept your passport.
Account verification time varies hugely. Coinbase verified the account I’m using for this tutorial within five minutes, but I have other Coinbase accounts that use the same verification image and phone number. Coinbase may request extra information from you, so be sure to check your email account frequently.
What Is Coinbase Pro?
Coinbase Pro is Coinbase’s crypto-exchange, formerly known as GDAX. You use Coinbase Pro for “advanced” cryptocurrency trading. In this case, advanced means more options than the regular Coinbase site. For instance, you can make a purchase order for a price above or below the current market rate for a cryptocurrency, or directly trade your Bitcoin for Litecoin (or the other cryptocurrencies Coinbase and Coinbase Pro support).
Step 2: Add a Payment Method
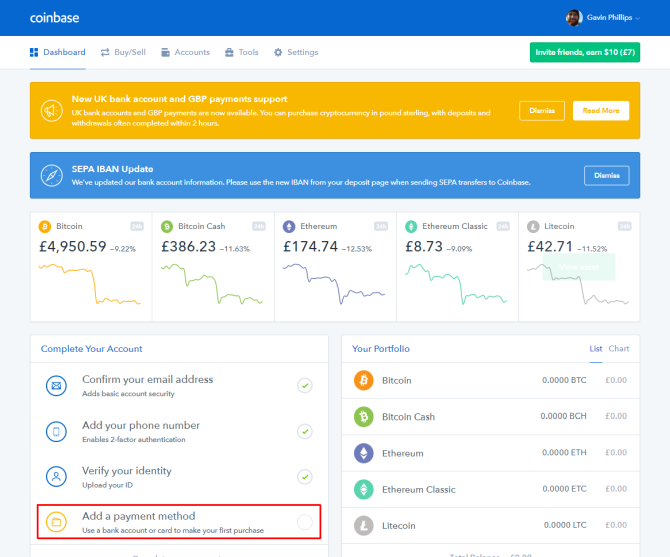
When your Coinbase account finally verifies, you arrive at the Coinbase dashboard. The dashboard displays the current price of the cryptocurrencies available for purchase through Coinbase, your current portfolio, and any information regarding account updates. For instance, you can see in the image below that Coinbase recently added support for several UK bank accounts.
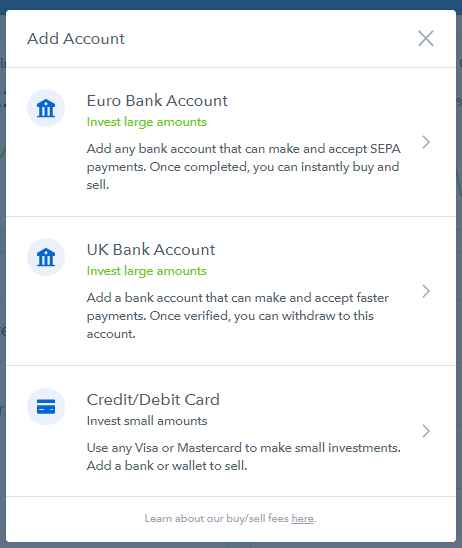
In the bottom-right corner, select Complete your account. Depending on your locale, you now have two or three options:
US residents can add: a bank account, their debit card, or add details for a wire transfer.
UK and EU residents can add: an EU bank account, a UK bank account, or a debit card. Furthermore, UK and EU residents can use SEPA payments or make instant crypto purchases using a 3D Secure debit or credit card.
Note that Coinbase no longer supports the linking of new credit cards! Also, some credit card providers are refusing cryptocurrency purchases or adding additional charges to existing cards. Coinbase won’t remove existing credit cards but does suggest using a debit card or regular bank account instead.
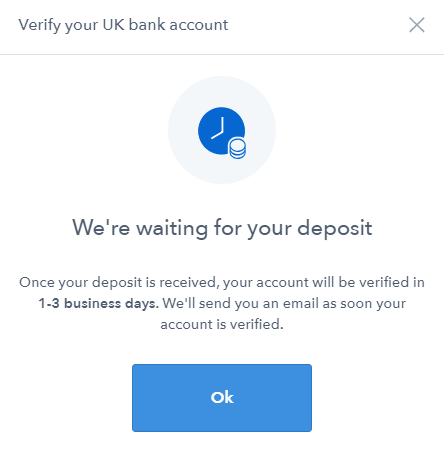
Debit cards and bank account come with a small verification charge. Unfortunately, the account verification process can also take up to three business days.
Step 3: Buy Cryptocurrency Using Coinbase
Once Coinbase verifies your bank account or debit card, and you have some funds available, you can purchase some cryptocurrency. Coinbase is a crypto-broker that exchanges Bitcoin, Bitcoin Cash, Ethereum, Ethereum Classic, and Litecoin.
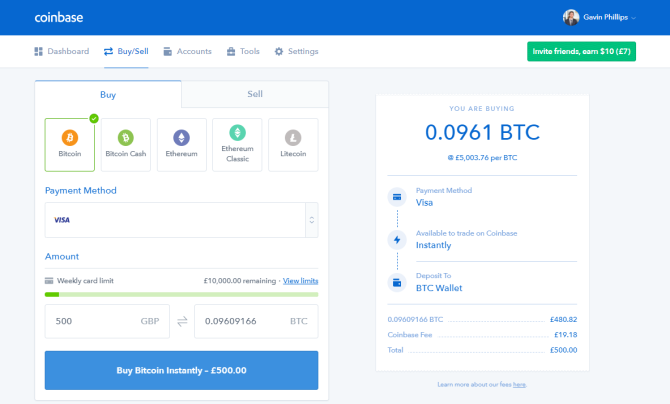
Select Buy/Sell from the Coinbase dashboard. Select the cryptocurrency you want to purchase. Enter either the amount of cryptocurrency you want to buy in your local currency. Alternatively, if you have a specific amount of cryptocurrency you want to buy regardless of cost (for example, 1.2 BTC), enter that and then check the cost.
When satisfied, press the Buy Cryptocurrency button at the bottom of the panel. The description of this button changes depending on your payment method. I’m using my authorized debit card in the UK, meaning I can make an instant purchase of any of Coinbase’s cryptocurrencies. Payment methods have different delays.
When you head back to your Coinbase dashboard, your portfolio will show your new cryptocurrency, and your Recent Activity panel should show your purchase.
Step 4: Sell Cryptocurrency Using Coinbase
Want to sell the cryptocurrency you bought? Head back to the Buy/Sell tab.
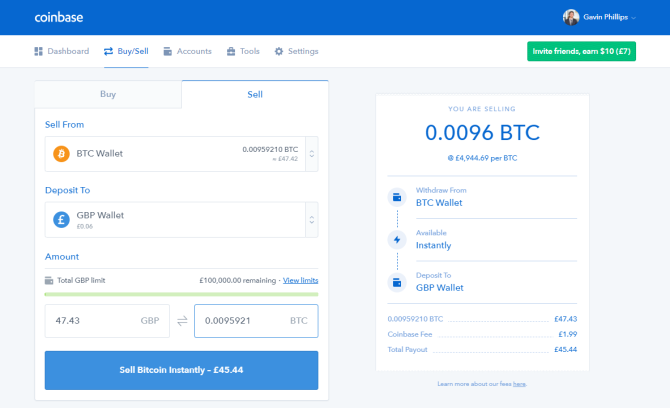
Using the Sell From drop-down menu, select your cryptocurrency. Then, from the Deposit To drop-down menu select the currency wallet where you want to deposit your funds. Note that you have to deposit your funds to a currency account before withdrawing to your bank account.
Just like the purchasing panel, you can enter either the amount of cryptocurrency you want to sell in your local currency or specify the amount of cryptocurrency. The cryptocurrency box also has a Sell Max button you can use to enter the maximum account of cryptocurrency while accounting for Coinbase’s transaction fee.
Step 5: Withdraw Funds From Coinbase
Once your funds clear into your Coinbase local current wallet, you can withdraw them from the site entirely, back into your bank account.
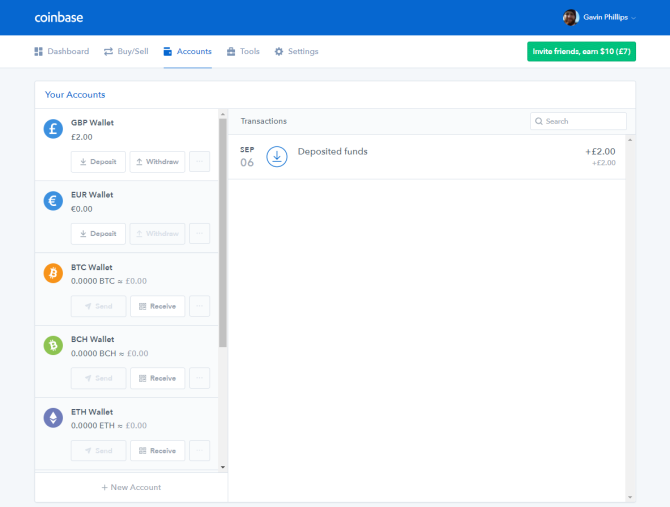
Select Accounts from the Coinbase dashboard. It will display your current holdings across all of your accounts. Find the local currency you want to withdraw and hit the Withdraw button. The withdraw panel pops up and asks for the amount you want to withdraw. It also has a Withdraw All option. Select the bank account you want to withdraw your Coinbase funds to and press Continue.
It can take up to five business days before your funds appear in your local currency account. In my experience, it is usually faster than that, but don’t depend on withdrawing funds to pay a pending bill on its due date.
Congrats, you’ve bought your first cryptocurrency!
Coinbase is a great place to start your cryptocurrency adventure, even if it does leave a little to be desired in some areas. Its interface is easy to use, it offers the core cryptocurrencies you need to get started, and it’s secure enough that you don’t have to worry.
In 2014, Google launched an app called Inbox by Gmail. This was designed to introduce new innovations to the way we manage emails, and lived alongside Gmail. Now, four years on, Google has decided to cull Inbox so that Gmail can flourish unopposed.
Inbox Secedes to Gmail
For those who use it on a daily basis Inbox is the app Gmail should have been. Inbox made the laborious task of managing emails easier, even on the go. It was easy on the eye, and offered innovative features to make emailless of a chore.
Over the past 4 years you’ve helped us make email better. We’ve brought popular Inbox features to @Gmail helping 1B+ people get more done. Thank you.
We’ll be focusing on Gmail & saying bye to Inbox at the end of March 2019. Here’s a transition guide ? https://t.co/6dOxgExpbm
Google rolled out a major update to Gmail in April 2018. And with most of the best features of Inbox now present and correct in Gmail, Google considers Inbox to be surplus to requirements. Google explains its reasons for killing Inbox in a post on The Keyword:
“As we look to the future, we want to take a more focused approach that will help us bring the best email experience to everyone. As a result, we’re planning to focus solely on Gmail and say goodbye to Inbox by Gmail at the end of March 2019.”
Realizing that this is going to upset Inbox users, Google has created a guide to moving from Inbox to Gmail. While it’s pretty short and sweet, it details the Inbox features now in Gmail and offers alternatives for those features which aren’t. Yet.
Reports suggest that no one from the Inbox team is being laid off, so the same people who built and managed Inbox will now be working on improving Gmail. Which hopefully means Google will continue to experiment with the business of email management.
Make Email Great Again
With almost all of the best features of Inbox now integrated into Gmail, this shouldn’t be too much of a wrench for Inbox users. After a period of adjustment they should find the new Gmail perfectly adequate for their email needs.
However, Inbox has proved to be a fertile testing ground for new features, and that’s where we’re likely to feel the loss. Unless Google is planning on experimenting with new email features directly in Gmail, email may be about to become boring again.
They are two of the largest web hosting providers in the world. Between them, they provide the backend to tens of millions of sites.
But which one should you use? A lot depends on the service you need. So, keep reading as we compare Bluehost and HostGator and establish a winner.
Bluehost vs. HostGator: Ease of Use
As more and more people attempt to create their own website, a service’s ease-of-use is an increasingly important feature to consider. Beginners need to be able to get their site online with the minimum of fuss.
Both Bluehost and HostGator use cPanel. cPanel is a widely-used Linux-based platform that offers a range of administrative tools through a graphical interface. While HostGator’s cPanel screen is fairly standard, Bluehost has shifted some menus around to customize its version.
The two hosting companies provide access to the MOJO Marketplace. You can use the marketplace to install WordPress, Weebly, Joomla, Drupal, and many more site-building tools.
Bluehost and HostGator also offer site migration services. Using their migration services means you don’t have to fiddle with FTP and other complicated web hosting practices, saving you both stress and time. HostGator is free if you migrate within the first 30 days, Bluehost charges a surprisingly high $149.
Bluehost vs. HostGator: Server Uptime
If you already run a successful site, one of the most important things to research about your new host is its uptime stats. Downtime leads to lost business opportunities and lost revenue.
Don’t believe us? To use an extreme example, for every five minutes that Amazon is offline, it loses $330,000. Your site might not be on the same scale as Amazon, but uptime definitely matters.
HostGator’s Service Level Agreement (SLA) says you’re entitled to 99.99 percent uptime per year. Bluehost has a projected uptime of 99.982 percent per year; that equates to 1.6 hours of downtime every 12 months.
At the time of writing, the most recent uptime reports (for July 2018) showed HostGator had an uptime of 99.98 percent (with a total downtime of eight minutes). Bluehost had 99.97 percent uptime and 13 minutes of downtime.
Remember, these are company-wide averages. The uptime will vary from plan to plan. The more expensive plans typically offer more reliable uptime.
Bluehost vs. HostGator: Website Speed
Closely tied to uptime is your website’s speed. Like with uptime, a slow site can cause visitors to hit the back button before they’ve had a chance to see what you’re offering.
A recent study showed HostGator had a maximum response time of 3.2 seconds and a minimum response time of 258.07 milliseconds. In contrast, Bluehost had a maximum response time of 2.6 seconds and a minimum time of 915.53 milliseconds.
Despite Bluehost’s lower maximum time, the results revealed Bluehost’s response time increased as traffic increased. HostGator had no such correlation. Worryingly, with just 10 concurrent users, the response time on Bluehost went as high as 3500ms. At 20 users, it jumped to 1060ms.
HostGator’s servers also returned the first byte of data faster than Bluehost, taking 0.377 seconds compared to Bluehost’s 0.401 seconds. The speed it takes to load the first byte of data is unaffected by other things that can cause a page to load slowly (like plugins and media files). This result is entirely determined by a company’s servers.
Bluehost vs. HostGator: Security Features
HostGator and Bluehost provide some basic security features to protect you against hackers and cybercriminals. The protections are very similar.
Regardless of which web hosting provider you choose, you will get a free SSL certificate. HostGator also offers free weekly offsite backups of all your content.
Both companies provide access to SiteLock. It will check for spam, validate your business information, monitor search engine blacklists to avoid an unexpected quarantining, and check for malware.
The two services also both have built-in DDoS protection. Bluehost doesn’t go into much detail about its protections, but HostGator uses a custom firewall and mod security rule sets to protect its users. Each individual datacenter can also enable flood protection on an individual basis if an attack is suspected.
Bluehost vs. HostGator: Plans and Costs
Okay, so how do the Bluehost and HostGator compare in terms of cost? As you would expect, both companies offer a diverse range of plans for everyone from hobbyists to large organizations.
If you’re looking for an entry-level shared web hosting plan, Bluehost and HostGator each provide three choices. The plans offer cheaper rates if you sign up for more months.
Without considering the sign-up discounts, which both companies frequently offer and can be worth 50 percent or more, the cheapest Bluehost plan is $7.99 per month, and the most affordable HostGator plan is $6.95 per month.
For that price, HostGator gives you unlimited storage and unlimited email space, while Bluehost only offers 50GB of SSD storage and 100MB per account of email space. Both entry-level plans only allow one domain.
Moving up, the mid-level shared hosting plans on Bluehost, and HostGator cost $10.99 and $9.95 per month respectively. The top shared hosting plans are $14.99 and $14.95.
At the other end of the scale, HostGator’s top-end dedicated server hosting plan costs $289.99 per month. The money will buy you 8GB of RAM, a four-core CPU, 240GB of disk space, and 3TB of bandwidth.
Bluehost’s competing product is $209.99 per month. You’ll get a four-core, eight thread, 3.3GHz CPU, 1TB of storage, and 15TB of bandwidth.
Bluehost vs. HostGator: Customer Support
Things will go wrong occasionally. It’s one of the inevitabilities of running a website. And when things do go wrong, you need someone to fix them ASAP.
Therefore, the level of support offered by your web hosting company is important.
We’re pleased to report that both Bluehost and HostGator offer excellent customer support. There’s little to choose between them. Each company provides 24/7 support in the form of live chat, email tickets, and telephone reps.
If anything, Bluehost’s support services are slightly more intuitive and thus easier to use.
Bluehost vs. HostGator: The Winner Is…
Look, there’s very little separating the two platforms. We can honestly recommend both Bluehost and HostGator as excellent options if you’re looking for a professional-quality web hosting provider.
But if we had to pick a winner of the Bluehost vs. HostGator faceoff?
HostGator. Its servers are a bit faster, it suffers slightly less downtime, and its plans—at least at the entry-level—are a fraction cheaper.
To Bluehost’s credit, we think it’s support services are more organized than HostGator’s. Bluehost’s user interface is also cleaner and more professional. WordPress also recommends Bluehost.
iOS 12, Apple’s latest mobile software for iPhone and iPad, is finally out. The new software packs in a bunch of new security and privacy features you’ve probably already heard about.
Here’s what you need to do to take advantage of the new settings and lock down your device.
1. Turn on USB Restricted Mode to make hacking more difficult
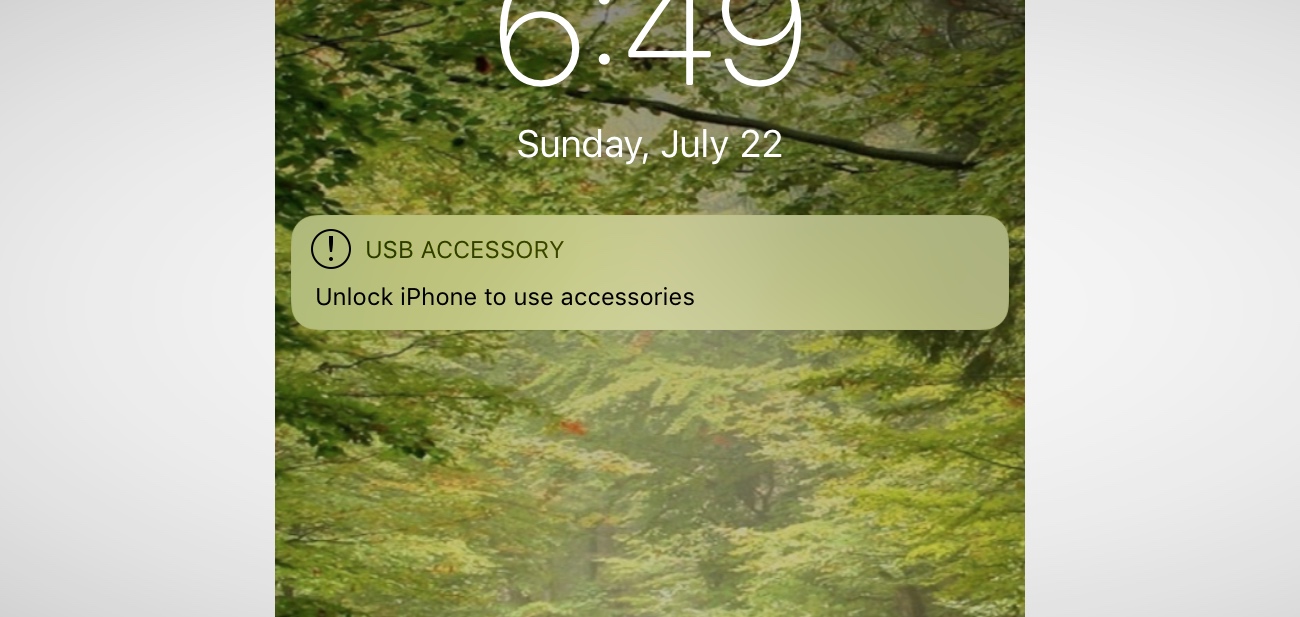
This difficult-to-find new feature prevents any accessories from connecting to your device — like USB cables and headphones — when your iPhone or iPad has been locked for more than an hour. That prevents police and hackers alike from using tools to bypass your lock screen passcode and get your data.
Go to Settings > Touch ID & Passcode and type in your passcode. Then, scroll down and ensure that USB Accessories are not permitted on the lock screen, so make sure the setting is Off.
2. Make sure automatic iOS updates are turned on
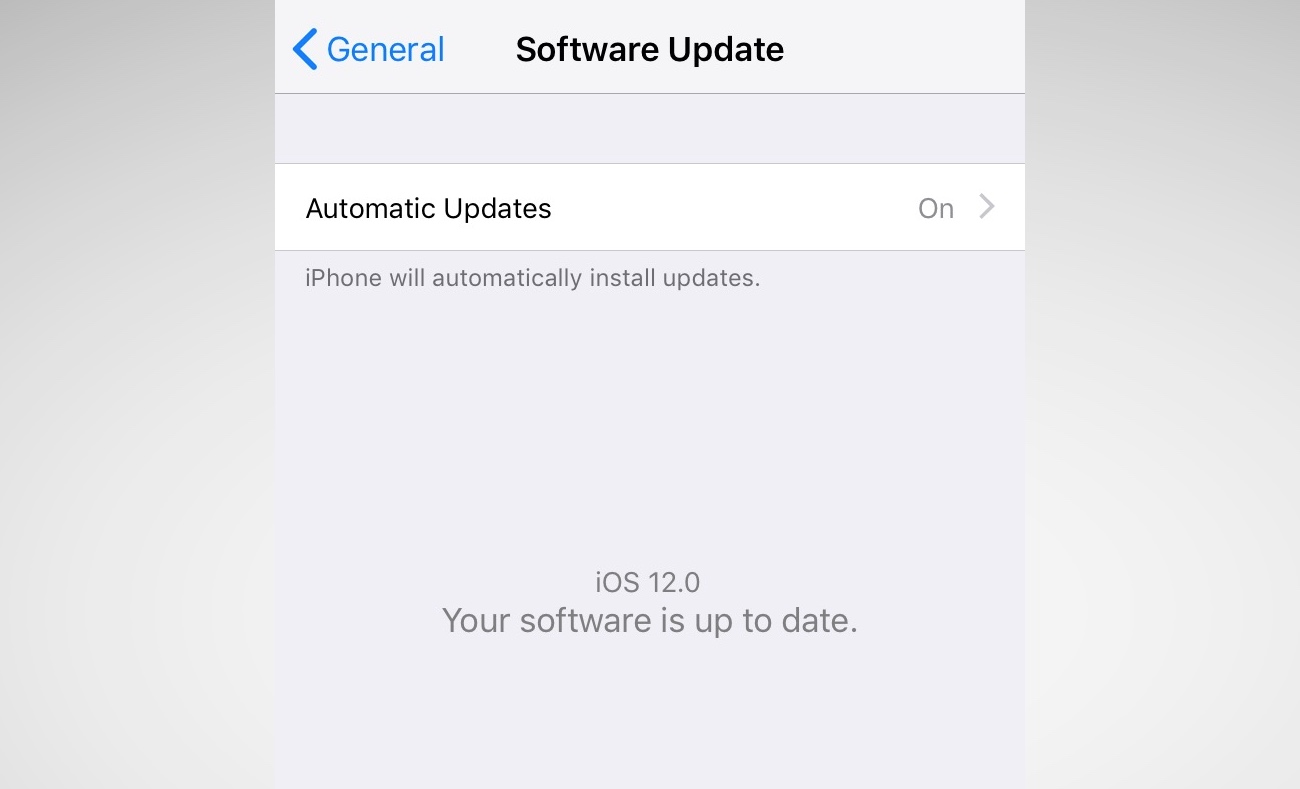
Every time your iPhone or iPad updates, it comes with a slew of security patches to prevent crashes or data theft. Yet, how often do you update your phone? Most don’t bother unless it’s a major update. Now, iOS 12 will update your device behind the scenes, saving you downtime. Just make sure you switch it on.
Go to Settings > General > Software Update and turn on automatic updates.
3. Set a stronger device passcode
iOS has gotten better in recent years with passcodes. For years, it was a four-digit code by default, and now it’s six-digits. That makes it far more difficult to run through every combination — known as brute-forcing.
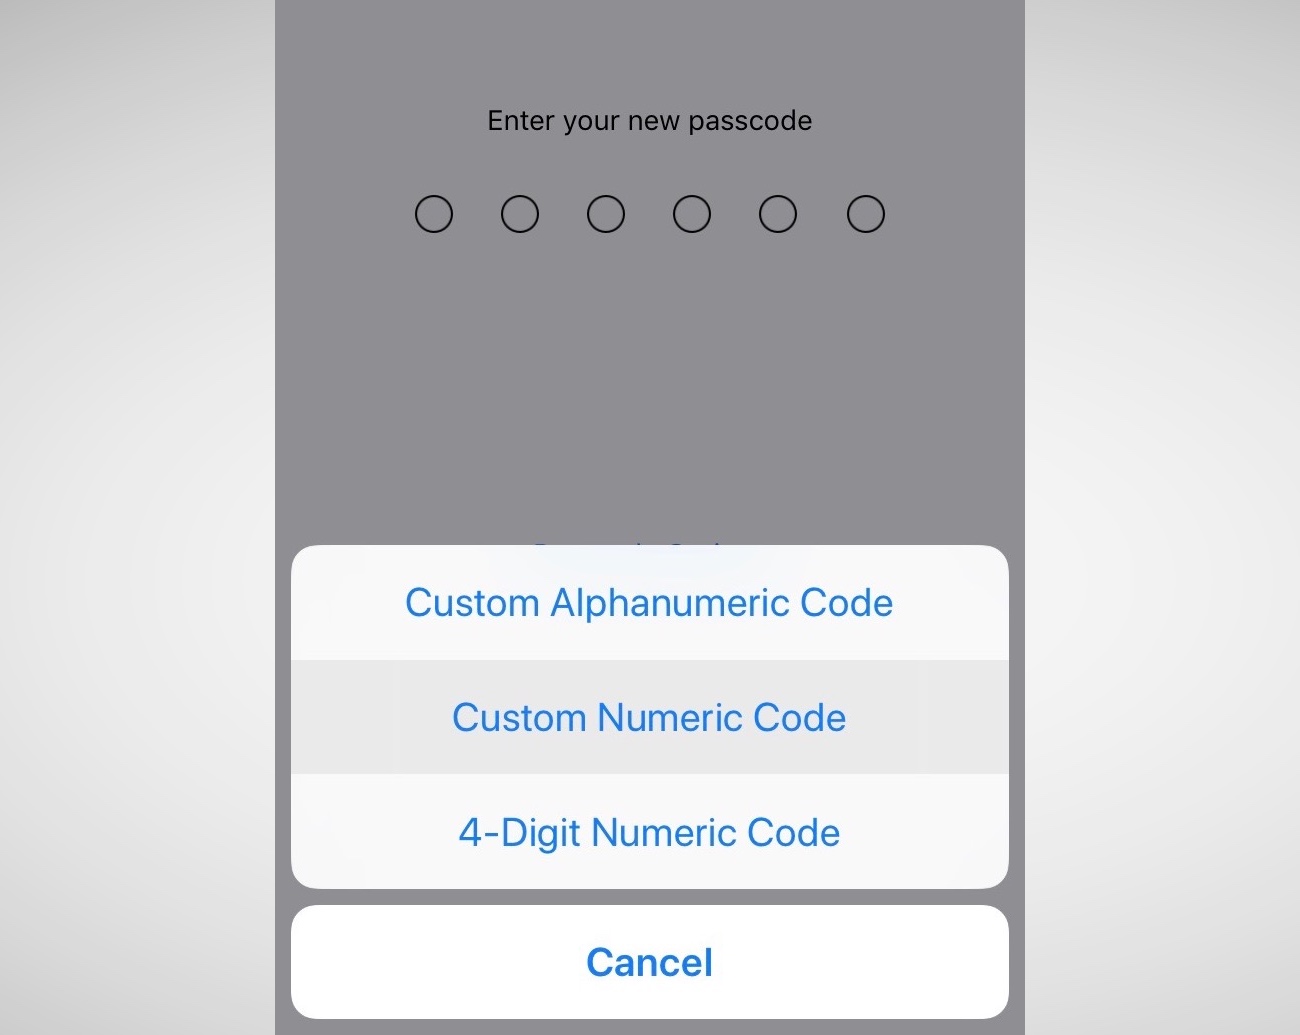
But did you know that you can set a number-only code of any length? Eight-digits, twelve — even more — and it keeps the number keypad on the lock screen so you don’t have to fiddle around with the keyboard.
Go to Settings > Touch ID & Passcode and enter your passcode. Then, go to Change password and, from the options, set a Custom Numeric Code.
4. Now, switch on two-factor authentication
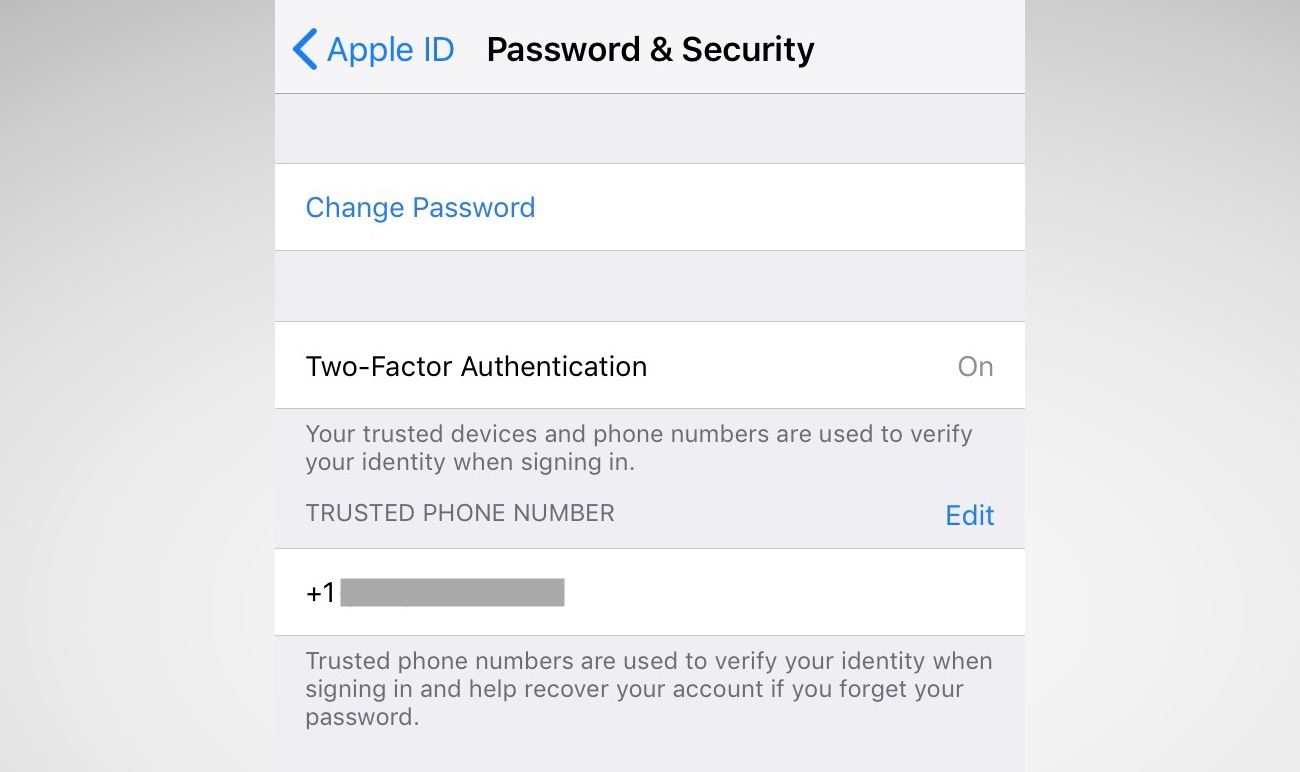
Two-factor is one of the best ways to keep your account safe. If someone steals your password, they still need your phone to break into your account. For years, two-factor has been cumbersome and annoying. Now, iOS 12 has a new feature that auto-fills the code, so it takes the frustration step out of the equation — so you have no excuse.
You may be asked to switch on two-factor when you set up your phone. You can also go to Settings and tap your name, then go to Password & Security. Just tap Turn on Two-Factor Authentication and follow the prompts.
5. While you’re here… change your reused passwords
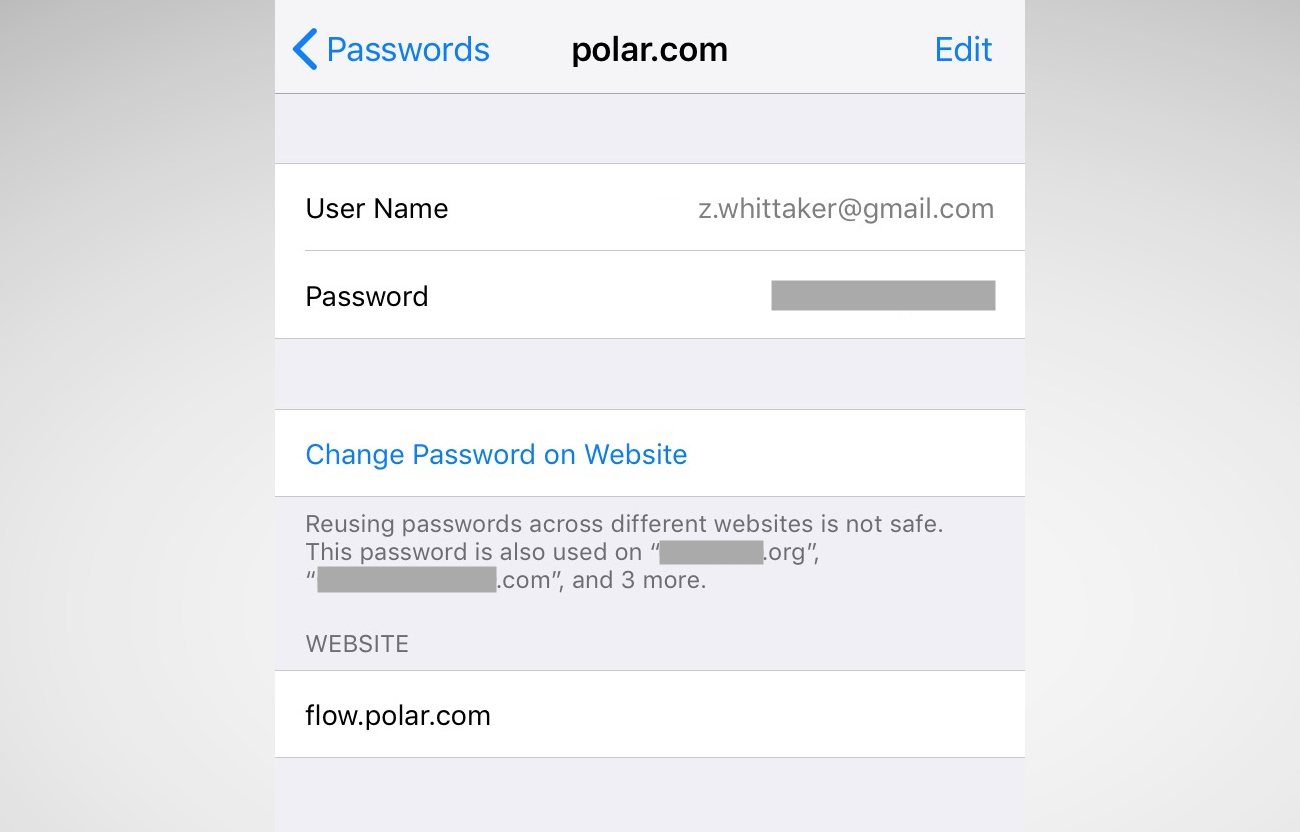
iOS 12’s password manager has a new feature: password auditing. If it finds you’ve used the same password on multiple sites, it will warn you and advise you to change those passwords. It prevents password reuse attacks (known as “credential stuffing“) that hackers use to break into multiple sites and services using the same username and password.
Go to Settings > Passwords & Accounts > Website & App Passwords and enter your passcode. You’ll see a small warning symbol next to each account that recognizes a reused password. One tap of the Change Password on Website button and you’re done.
With today’s release of iOS 12, Apple is also rolling out a new feature called Siri Shortcuts, which allows users to create their own voice commands to take actions in apps. For example, you could create a shortcuts for ordering your morning coffee, playing your favorite music, getting your daily schedule, and much more. In preparation for the iOS 12 launch, a number of app developers have already added support for Siri Shortcuts – sometimes even through a dedicated button in their app – in order to help nudge users towards adoption.
You can configure Siri Shortcuts in iOS Settings or create more complex voice commands using Apple’s new Shortcuts app, also out today. But these are things that will appeal more to power users – at least for the time being.
Mainstream users, meanwhile, will likely come across Siri Shortcuts for the first time when using their favorite iOS apps.
With iOS 12, app developers can integrate an “Add to Siri” button right in their app’s interface for common tasks that their app can perform – like playing a favorite playlist, for instance.
When a user taps this button, they’ll be directed to a screen where they can record their own custom voice command to launch whatever task or action the developer is suggesting.
In time, a number of apps will roll out this functionality.
But if you’re keen to play with it today, on day one, here are some of the early adopters of this feature.
A new playlist isn’t the only update Pandora is rolling out today – it’s also one of the first apps to launch a Siri Shortcuts button. With the app’s iOS 12-optimized update, users can head to the Settings in the Pandora app and tap “Add to Siri.” They can then choose a specific station, album, or playlist and record a custom phrase to say the next time they want to hear it.
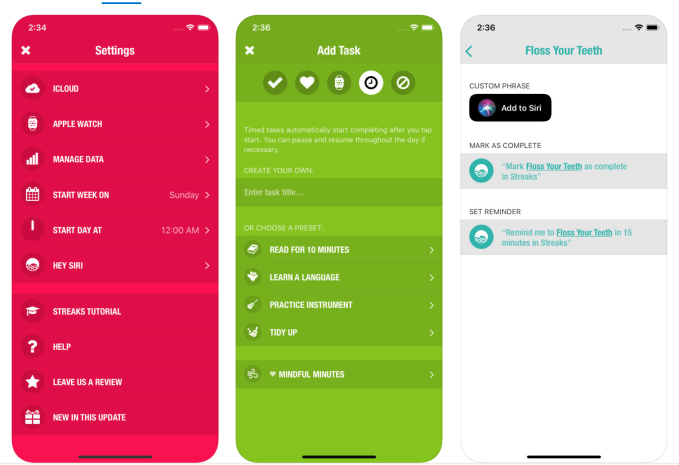
Habit-tracker Streaks is also among the first to include an “Add to Siri” button. When tapped, users can record custom phrases to complete their tasks. That way you can say things in a more natural style – like, “Hey Siri, I drank my water,” or “I ate healthy today.”
Always an early adopter, the popular calculator app has added a Siri Shortcut button that will let you record voice commands for any common activity in the app, like converting currencies, setting the clipboard, opening conversions, and more.
PCalc 3.8 is available on the store now! Full support for iOS 12 and Siri Shortcuts, plus all the new devices.
Also includes my whimsy for this year, a lovely set of animated iMessage stickers by @dlanham featuring Pascal, the PCalc panda.
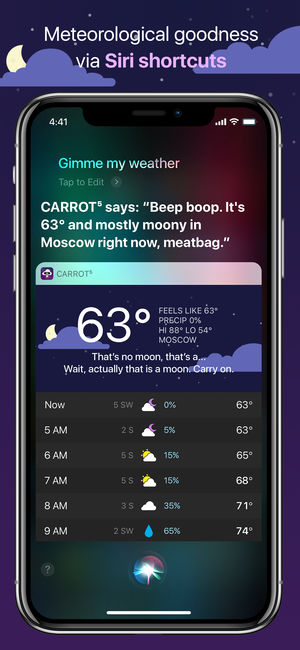
The funny and sarcastic weather application CARROT Weather added support for Siri Shortcuts so you can ask for a short-term or long-term forecast for your location or any other location you’ve saved in the app.
If you prefer a more traditional weather app, The Weather Channel is also out with Siri Shortcuts support today, too, so you can check your forecast with a voice command.
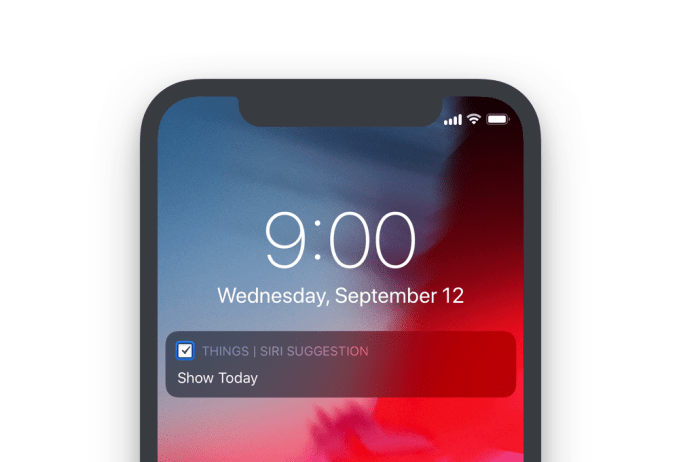
To do list app Things represents a good use case for Siri Shortcuts, as you can create voice commands for common actions you take in the app, then have them also appear on your Lock screen. For instance, you could ask Siri to “Show Today” or “Add To-Do.” You can even record shortcuts for things you add to your to-do list app a lot, like lists of movies you want to see or errands you need to run.
When you say “Hey Siri, add an errand,” Things will launch a new to-do with everything filled in, including the tags, so all you have to do is enter the title and save.
There are also ready-made to-do’s available for things that are always the same, like a packing list or a favorite recipe. And using the new Shortcuts app, you can combine multiple shortcuts from different apps into one workflow.
Longtime favorite app Sky Guide, a map to the night sky, now lets you ask questions about the stars using your voice. With Siri Shortcuts, you can say “Hey Siri, what start is that?” (or something else you choose) after pointing your phone at a bright star, planet, or satellite.
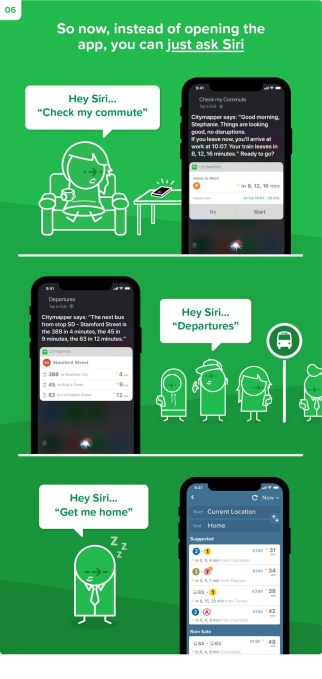
The handy transit navigation app has also just rolled out support for Siri Shortcuts with an option that will let you say things like “Hey Siri, check my commute,” to have Siri read out info on disruptions, departures and your expected ETA. You can also ask it to route your way home, check departures, and more.
An unexpected addition, all things considered – but this top news application is already live with Siri Shortcuts support, allowing readers to use voice command to navigate to their favorite news sources and other frequent destinations.
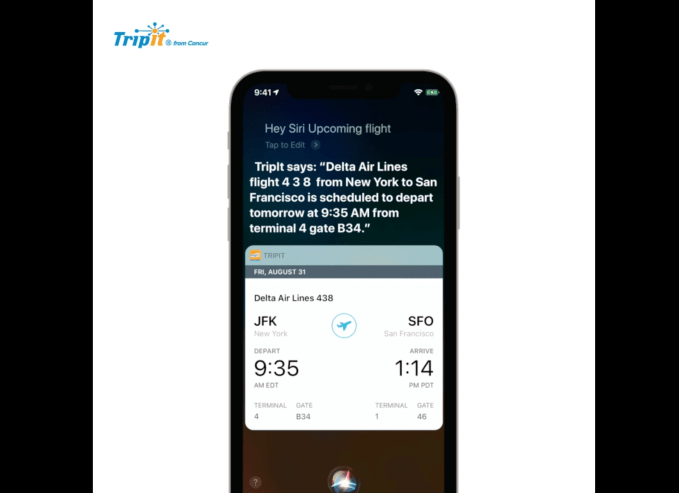
The top-rated travel planner is ready to support Siri Shortcuts today, allowing you to configure custom voice commands for common travel tasks like getting your flight details or asking about your other travel plans.
This top organizer app lets you use Siri Shortcuts to create custom phrases to open up specific cards or boards you’ve created, with its iOS 12-ready update.
This job search app will save you from repeatedly typing in the same queries, by allowing you to create a Siri Shortcut for your favorite searches instead.
This focused and elegant note-taking app will now let you create notes with the sound of your voice – just head to Settings, Siri & Search, All Shortcuts to start building your own custom commands.
iOS 12, Apple’s latest mobile software for iPhone and iPad, is finally out. The new software packs in a bunch of new security and privacy features you’ve probably already heard about.
Here’s what you need to do to take advantage of the new settings and lock down your device.
1. Turn on USB Restricted Mode to make hacking more difficult
This difficult-to-find new feature prevents any accessories from connecting to your device — like USB cables and headphones — when your iPhone or iPad has been locked for more than an hour. That prevents police and hackers alike from using tools to bypass your lock screen passcode and get your data.
Go to Settings > Touch ID & Passcode and type in your passcode. Then, scroll down and ensure that USB Accessories are not permitted on the lock screen, so make sure the setting is Off.
2. Make sure automatic iOS updates are turned on
Every time your iPhone or iPad updates, it comes with a slew of security patches to prevent crashes or data theft. Yet, how often do you update your phone? Most don’t bother unless it’s a major update. Now, iOS 12 will update your device behind the scenes, saving you downtime. Just make sure you switch it on.
Go to Settings > General > Software Update and turn on automatic updates.
3. Set a stronger device passcode
iOS has gotten better in recent years with passcodes. For years, it was a four-digit code by default, and now it’s six-digits. That makes it far more difficult to run through every combination — known as brute-forcing.
But did you know that you can set a number-only code of any length? Eight-digits, twelve — even more — and it keeps the number keypad on the lock screen so you don’t have to fiddle around with the keyboard.
Go to Settings > Touch ID & Passcode and enter your passcode. Then, go to Change password and, from the options, set a Custom Numeric Code.
4. Now, switch on two-factor authentication
Two-factor is one of the best ways to keep your account safe. If someone steals your password, they still need your phone to break into your account. For years, two-factor has been cumbersome and annoying. Now, iOS 12 has a new feature that auto-fills the code, so it takes the frustration step out of the equation — so you have no excuse.
You may be asked to switch on two-factor when you set up your phone. You can also go to Settings and tap your name, then go to Password & Security. Just tap Turn on Two-Factor Authentication and follow the prompts.
5. While you’re here… change your reused passwords
iOS 12’s password manager has a new feature: password auditing. If it finds you’ve used the same password on multiple sites, it will warn you and advise you to change those passwords. It prevents password reuse attacks (known as “credential stuffing“) that hackers use to break into multiple sites and services using the same username and password.
Go to Settings > Passwords & Accounts > Website & App Passwords and enter your passcode. You’ll see a small warning symbol next to each account that recognizes a reused password. One tap of the Change Password on Website button and you’re done.
 However, one important detection would be ST elevation — one of the key factors associated with the onset of a heart attack and which could get a person on their way to the hospital before they start displaying other physical symptoms.




 Today, Instagram Explore is getting a personalized Shopping channel of items it thinks you’ll want most. And it’s expanding its Shopping tags for Instagram Stories to all viewers worldwide after a