21 April 2020

10 Windows Task Manager Tricks You Probably Didn’t Know


windows-10-task-manager

Most Windows users only pull up the Task Manager when a program is frozen and they need to kill it. While it’s perfectly fine to use the Task Manager this way, you’re also overlooking some handy features if you never look deeper.

The Task Manager has seen some serious improvements since the days of Windows 7. Let’s look at the best Task Manager tricks for Windows 10 that you should know.

1. How to Bring Up the Task Manager Quickly

Even if you know how to get to the Task Manager, you might not be aware of the different methods for doing so. While you can press Ctrl + Alt + Del to open the security screen and launch the Task Manager that way, this is a slow method.

Here’s how to pull up the Task Manager quickly: use the Ctrl + Shift + Esc shortcut. This will instantly launch the app with no additional clicks needed. This is also how you bring the Task Manager to the front when it’s minimized.

If you want to use the mouse instead, you can right-click on an empty spot of your Taskbar and choose Task Manager.

Finally, you’ll find a shortcut to the Task Manager on the Power User menu. Right-click on the Start button or hit Win + X to open this. It’s a handy Windows Task Manager shortcut because it works well whether your hands are on the mouse or keyboard.

Once you’ve opened the Task Manager, be sure to click More details to show the full interface, if it’s not already active.

2. Find Out Why Apps Are Frozen

Task Manager Analyze Wait Chain

As mentioned before, the most common reason to open the Task Manager is to kill a frozen program (though you can force-close apps without the Task Manager). But the next time you’re in that situation, you can do more analysis first. It’s possible that the program isn’t frozen, but just taking a while to process a task.

Prematurely killing an active application could result in lost data, so it makes sense to wait and see if a frozen process resolves itself. This is where the Analyze Wait Chain feature in the Task Manager comes in handy. It can tell you when a process is stuck waiting on another process, which can help you identify why an app isn’t responding.

To see which process is the real culprit, switch to the Details tab and find the process you want to look into. Right-click on it and choose Analyze wait chain to see the details. If that app is waiting on any other processes, you’ll see them in the resulting window.

3. Restart Windows Explorer

Task Manager Restart File Explorer

The Windows Explorer process is responsible for many of the UI elements of Windows, such as the Taskbar, File Explorer, Start menu, and similar. If you have an issue with these elements, your first thought may be to restart your PC. While this will solve the issue, it’s more convenient to restart Windows Explorer instead.

To do this, find Windows Explorer on the Processes tab of the Task Manager. Right-click it and choose Restart to kill the task and run it again. You’ll see your Taskbar and other elements disappear for a moment, which is normal. After they come back, everything should be back to normal.

4. Monitor Performance and Resources

Task Manager Performance Tab

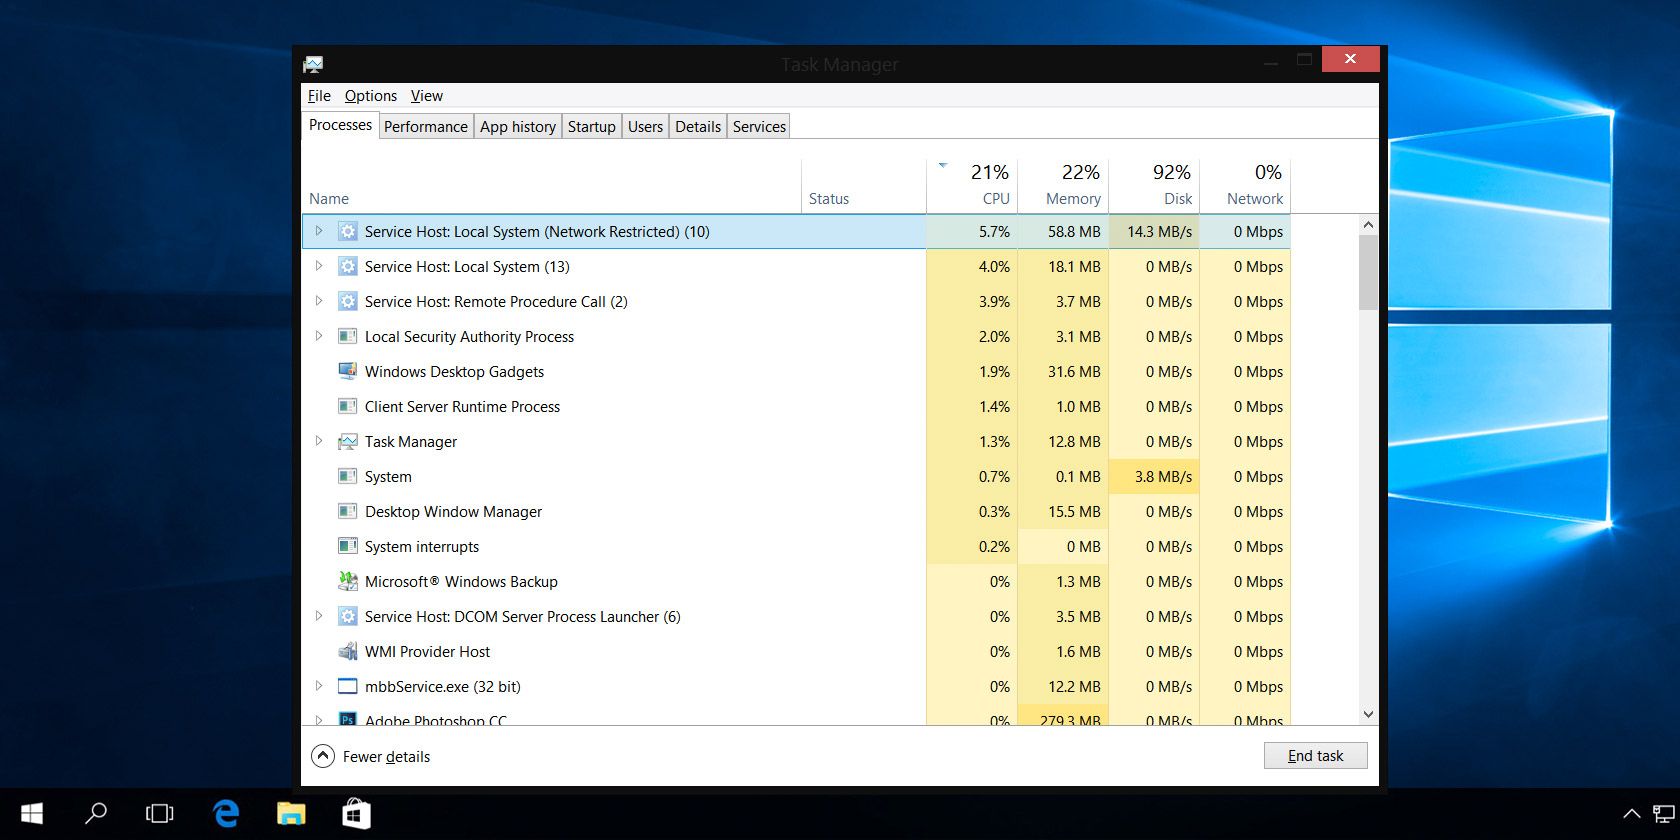
While the Task Manager provides an overview of all running processes and apps, it also has several tools for effectively monitoring the performance of your system and resource allocation.

Jump to the Performance tab to see these. Once you’re there, have a look at the following tips.

Viewing Graphs

Along the left sidebar, you’ll see fields for CPU, Memory, Disk, and other resources in your computer. Click one to view a real-time graph of its usage.

If you want to keep an eye on this information without keeping the full Task Manager open, right-click anywhere in the left sidebar and choose Summary View to display only that sidebar. You can instead right-click anywhere in the right panel and select Graph Summary View to display just the current graph.

Copy Diagnostic Info

Task Manager Copy Memory Info

With any resource type selected on the left, right-click anywhere and select Copy to place a diagnostic snapshot on your clipboard. You can then paste this into Notepad to save as a baseline or share it on a forum online to get troubleshooting help.

Access Useful Details

Each resource type has some interesting details that might come in handy. Under CPU, you’ll find Up time, which shows how long it’s been since the computer restarted.

In Memory, you can check the number of Slots used to figure out if you have room to add more. The Read speed and Write speed under Disk give you an idea of how fast your storage media performs, too.

Open Resource Monitor

If you want even more details that the Task Manager doesn’t show you, click Open Resource Monitor at the bottom of the window. This utility is an advanced way to view real-time data about your system, including threads used, disk response times, exact breakdowns of RAM used by processes, and more.

5. Search Online for Suspicious Processes

Task Manager Search Online

Sometimes, you might find suspicious-looking process names in Task Manager. Most of the time they’re legitimate, but it’s always wise to double-check on ones you’ve never seen or heard of before.

Windows can help with this: just right-click on any process and select the Search online action. This will launch a Bing search in your browser with the process and app names. The results should help you determine whether it’s safe or not. For more help, see our list of important processes you should never kill.

6. Add Extra Columns for More Details

By default, the Task Manager only shows a few columns in the Processes tab. While these cover the most important details, you can actually add several more columns just by right-clicking the header area.

These include:

  • Type, which tells you if the process is an App, Background process, or Windows process.
  • Publisher, which shows the developer of the program.
  • Process name, which is often the executable file. These will look familiar if you’ve used the Task Manager in Windows 7 or earlier.

Task Manager Add Columns

While you may find some or all of them useful at times, Process Name is particularly handy. It’s easier to spot suspicious applications by their process name than their application name, and they’re often easier to research too.

Note that you can also add extra columns on the Startup tab. Use these for troubleshooting purposes (like CPU at Startup to measure impact) or just to see which startup processes are still running (with the Running Now column).

7. Toggle Between Values and Percentages

Task Manager Change Values

When browsing the Processes list, the CPU column only shows in percentages. However, you can change the other three default columns between absolute values and percentages.

Percentages are better when you need a sense of how resource usage compares to the total amount available. It’s nice to know an app is using 50MB of RAM, but seeing this is only two percent of all the RAM in your system puts it into perspective.

To toggle these, just right-click on any process, navigate to the Resource values submenu, pick the resource type you want to change, and select either Values or Percents.

8. Manage App Windows

Task Manager Switch To

Task Manager is far from the best window management tool available, but it does have a few actions that you might find useful. To access them, you must click the arrow next to an item you want to manage in order to show all its processes. This only works for items listed under the Apps section of the Processes tab, and it didn’t work for all apps in our testing.

Once you’ve expanded an item to show all processes, right-click the indented entry and you’ll see these window actions for that app:

  • Switch to: Brings the app into focus and minimizes the Task Manager.
  • Bring to front: Puts the app in focus, but doesn’t minimize the Task Manager.
  • Minimize: Minimizes the program.
  • Maximize: Maximizes the application.
  • End Task: Kills the process.

9. Open App File Locations

Task Manager Open File Location

Do you often find yourself needing to navigate to the installed location of a certain program? Maybe you want to tweak some configuration files, or need to copy its file path for some reason.

Crawling through File Explorer is one way to do that, but it requires a lot of clicking. If the program is already running, Task Manager can help you get there a lot faster.

Just right-click on any process and select Open File Location. This will take you directly to the folder that contains the process’s executable file. It’s quite convenient, especially since software can live all across your file system.

This works for Apps, Background Processes, and Windows Processes, allowing you to quickly access pretty much anything that shows up under the Processes tab.

10. Adjust Task Manager Options

Task Manager Options

The Task Manager has a few preferences you can adjust to make the experience smoother. Under Options, you can enable Always on top to keep the Task Manager above other windows unless you manually minimize it. Also on this menu, select Set default tab to choose what the Task Manager should show when you open it.

Look under the View menu to make the Update speed faster or slower. You can even pause it if you need to examine a snapshot in time.

The Task Manager Is a Valuable Resource

For the average user, the Task Manager is more than enough to provide you with the system information you need to keep everything in check. Whether you want to keep an eye on resource usage or easily track down process locations, the Task Manager has you covered.

If you’re a power user, check out some Task Manager alternatives for something with more options.

Read the full article: 10 Windows Task Manager Tricks You Probably Didn’t Know


Read Full Article

The Top 8 Sites to Find Song Lyrics Online


Have you ever had the experience of hearing a new song on the radio, only to find that the radio host never states the name of the song? While this has become less of a problem thanks to music streaming services, it’s still an issue for those of us who still like to tune into the radio every once in a while.

When you hear an unidentified song on the radio or in a store, the only way to find the song’s name is to memorize a snippet of the lyrics and look it up online. Here are some of the top lyrics websites that can help you finally find the songs you’ve been searching for.

1. Lyrics

Lyrics.com Best Lyrics Websites

If you’re looking for a trustworthy lyrics site, Lyrics is a good choice. The homepage displays popular artists and lyrics on the left sidebar, while a handy search bar resides on the top of the page, allowing you to search by lyric, song, or artist.

As you type your search, relevant results appear under the bar, making it easy to hop directly to a song or artist page. When you find the song you’re looking for, Lyrics will present you with song lyrics, a music video, as well as some brief trivia about the song and the artist.

2. MetroLyrics

MetroLyrics lyric search

Upon visiting MetroLyrics, you’ll see the latest news in the world of music, and that includes the latest songs and music videos. On the top menu bar, you can browse through the top 100 lyrics, watch a variety of videos, find out more music news in Features, and check out popular artists.

The search bar on MetroLyrics doesn’t work all that great—typing the name of a song or artist in the bar will yield irrelevant Google results. However, you can get around that by using the search bar’s built-in alphabetical search feature, which isn’t very convenient.

3. LyricsMode

LyricsMode homepage

On LyricsMode’s homepage, you’ll find a feed of the hottest lyrics and newly-added song meanings. You can even check out the most popular lyrics in different languages.

Better yet, LyricsMode’s search feature is highly accurate, and won’t flood the page with unrelated results—you can opt to type an artist, song, or album into the search bar, or simply search by letter.

LyricsMode lets its community correct lyrics, as well as ascribe meanings to certain lyrics. Clicking on a highlighted lyric will show you the community’s interpretation of that line. These meanings aren’t always the most accurate, but some are pretty insightful.

4. AZLyrics

Search for lyrics on AZLyrics

Out of all the lyric sites on this list, AZLyrics is the most simple, but that’s not necessarily a bad thing. It’s been one of the best websites for song lyrics since 2000, and it still stays up-to-date.

The homepage greets you with a search bar, as well as links to the lyrics of the hottest songs. Scroll down the page, and you’ll see a list of newly-released albums.

When you perform a search, the site automatically displays any artists, songs, or albums related to your search. There are no distracting ads on AZLyrics. Instead of plastering ads all over your screen, they’re limited to the top and bottom banners of each page.

5. Genius

Genius Best Lyrics Sites

Genius offers a modern, clean-looking site filled with lyrics. Upon opening the homepage, you’ll see music news, trending songs, and videos from Genius’ own series.

Fortunately, Genius makes searching for a specific term very easy—type in your query, and Genius will display results categorized by artist, album, song, and lyric. You can even find related articles and videos in the search results as well.

Genius really shines when it comes to its lyric pages, and that’s what makes it one of the best lyrics websites around. Although the site lets you listen to the song while you read, you’ll have to sign in to Apple Music to listen to the full song. If you have an Apple Music account, you should learn how to get started with Apple Music playlists. Genius will introduce you to plenty of awesome songs.

Also, Genius provides you with a thorough analysis of a lyric’s meaning or reference. Simply clicking a highlighted chunk of text can provide you with newfound knowledge about the song’s meaning.

6. LetsSingIt

LetsSingIt Best Lyrics Sites

LetsSingIt helps you keep up with the latest trends while finding specific song lyrics. You can discover new music and artists on the homepage, as it displays a variety of trending songs, artists, and albums. When you search for a song or artist, you can sort the results by song, album, or artist, making it easier to find what you’re looking for.

Not only do song pages feature accurate lyrics, but some have embedded videos. At the bottom of the page, you can find even more songs under the “Songs you may also like” heading.

7. Lyrics Mania

Lyrics Mania Best Lyrics Sites

Lyrics Mania is jam-packed with lyrics. The site constantly gets updates, which you can tell by the list of popular artists and newly-added lyrics on the homepage. As for the song lyrics, you’ll find that they’re neatly presented on the page, without any intrusive ads in your way.

Searching for songs is also quite easy on Lyrics Mania—whether you search by lyric or artist, you’ll find organized and relevant results. If you’re still stumped on a song, you might want to try finding a song by humming its tune instead.

8. Musixmatch

Musixmatch Best Lyrics Sites

Need a translation of a song? Musixmatch has your back. Each song on the site has at least one translation, and that includes translations to English, Spanish, Italian, French, German, Korean, and much more.

This makes it possible to understand and listen to the same music as your far-away friends in different countries. Keep in mind that the number of translations varies by song—the more popular the song, the more translations it has.

Besides the helpful translation feature, Musixmatch has a solid library of lyrics. Like most other lyrics websites, the homepage has lists of the most popular lyrics, newest songs, and any recently-added lyrics. You can also find any new and trendy songs that have just been translated into English.

Lyrics Websites Enhance Your Listening Experience

These lyrics sites come in handy when you can’t figure out the name of a song. They’re also useful for deciphering the words you hear within a song. Reading written lyrics can help you confidently sing along to songs without awkwardly mumbling any lyrics you don’t know.

Don’t forget to take advantage of your smartphone when you hear an unknown song. These music recognition apps can help you find songs by their tune.

Read the full article: The Top 8 Sites to Find Song Lyrics Online


Read Full Article
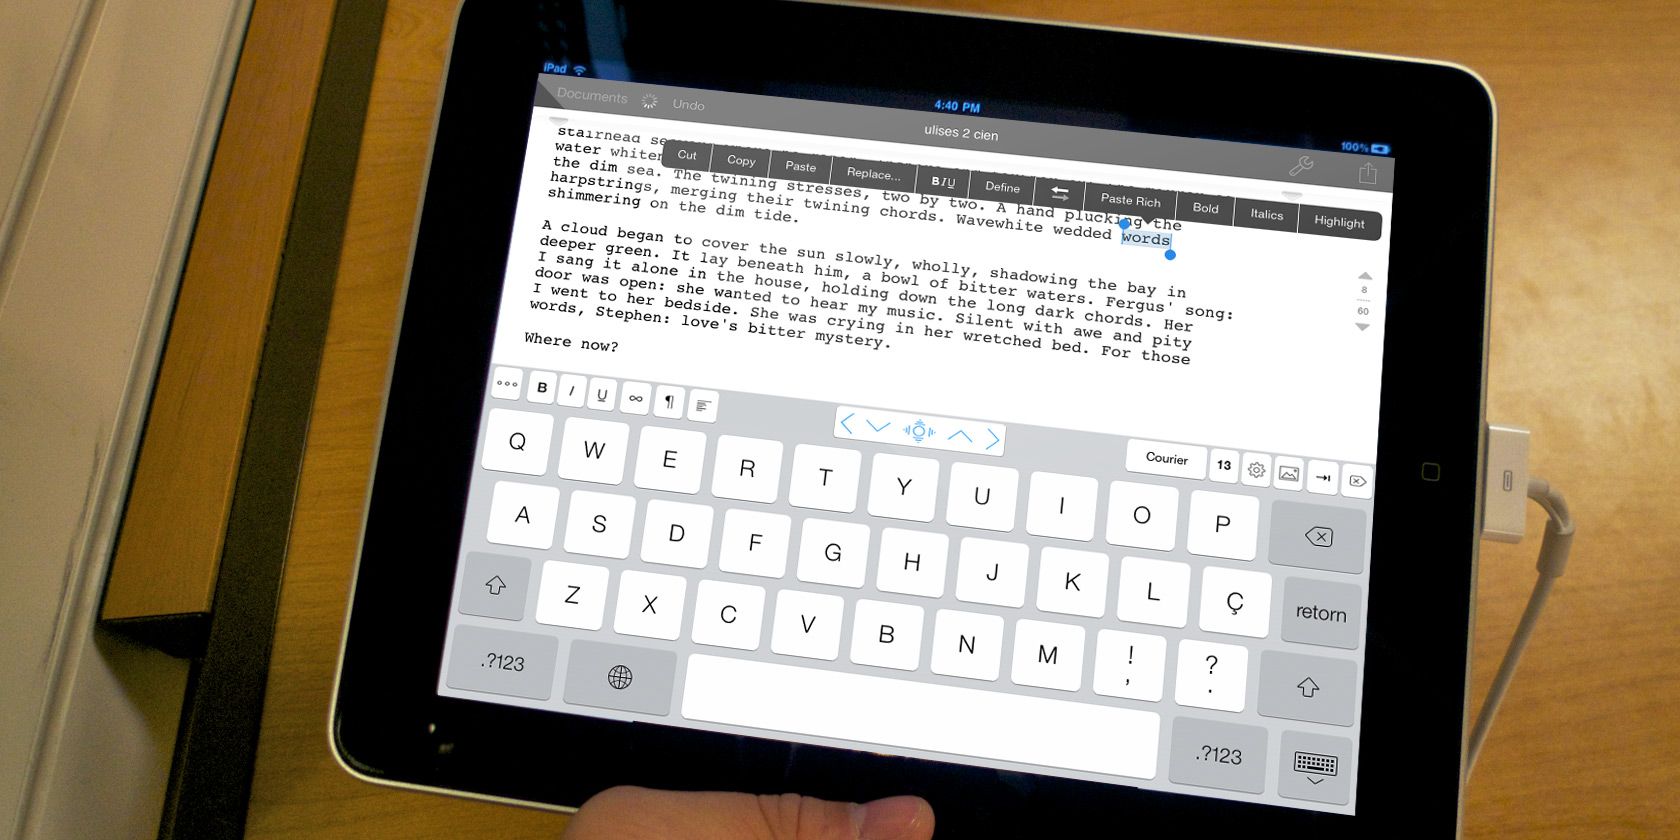
The 10 Best Word Processing Apps for Your iPad


textilus-ipad

If you plan to use your iPad to replace a computer, you will want to use the best word processing app on it. There are plenty of options available, including both free and premium apps. We’ve compared all the worthy choices below.

You can use any of these iPad word processors to edit documents, compile notes, or even crack out a novel. Many of them offer wide file compatibility so you can keep working with other people no matter what device or app they use.

1. Pages

Pages app on iPhone, iPad, and Mac

Available for free from the App Store, Pages is Apple’s very own word processor for iPhone, Mac, and iPad. In case you didn’t know, you can also download Numbers and Keynote for free and use the entire Apple iWork suite.

With full iCloud support, Pages syncs documents across all your Apple devices. You can even sign in to iCloud.com to work on documents through a web browser.

Pages makes it easy to create beautiful documents. It gives you full control over the layout of text boxes, images, and shapes. You can even use free templates to create digital books, newsletters, reports, and more.

The range of word processing tools you can use from your iPad is powerful: footnotes, lists, word count, charts, images, and other formatting tools. It also supports collaboration. So you can work with other people on the same document, tracking whatever changes they make.

Pages might be the best free word processor to use on your iPad, but it is let down by a lack of third-party cloud storage support for collaborative work. You can only collaborate via iCloud from your iPad, but not on Dropbox, Google Drive or other cloud storage services.

Download: Pages for iPadOS (Free)

2. Microsoft Word

Microsoft Word app on iPad with template document

Microsoft Word is the default word processor for many people, and there’s nothing to stop you using it with your iPad. It’s free to use on any iPad with a 10.1-inch screen or smaller. Unfortunately, for larger iPads you need an Office 365 subscription.

As you’d expect, Microsoft Word for the iPad is a mobile-friendly version of the desktop app. It supports images, tables, charts, footnotes, equations, and more.

You can access documents through OneDrive, iCloud Drive, Google Drive, Dropbox, and other cloud storage services as well.

You can also collaborate with others, and track the changes they make, just like Pages lets you do. A big difference is that more of your colleagues are likely to use Microsoft Word than Pages. So you have a larger pool of people to collaborate with.

If you have a smaller iPad or you already have an Office 365 subscription, Microsoft Word is one of the best word processing apps to use. Since it is the go-to app for so many people, Microsoft Word is the best option for sharing work with others.

Download: Microsoft Word for iPadOS (Free, premium subscription available)

3. Google Docs

Google Docs word processor template on iPad

Google Docs makes it easy to write, edit, share, and collaborate on important documents. Use it wherever you are, on any device. Like other Google products, it’s completely free—if you don’t mind sharing your data.

Download Google Docs on your iPad, iPhone, Mac, PC, or Android device so you can use this word processor wherever you are.

Work with in-line images and a range of formatting options to create your resume, report, letter, or other important documents. You can even take advantage of Google’s range of stylish templates to speed up the process.

Collaboration is at the heart of Google Docs. As your collaborators make changes to a shared document, their names appear onscreen. Choose to make documents public to everyone or private to a select group, and even choose editing privileges for your team members.

Google Docs is compatible with DOC and DOCX files so you can open Word files or export Word files for other people to use. This makes Google Docs one of the better free word processors for your iPad when not everyone uses Word.

Download: Google Docs for iPadOS (Free)

4. WPS Office

WPS Office word processor on iPad showing format and color options

WPS Office includes a suite of free business-oriented apps for iPhone or iPad. According to the app description, millions of users voted WPS Office as the “best office app for mobile” and the “easiest word processor for iPhone.”

The package lets you create documents, presentations, spreadsheets, memos, and PDFs. You can share documents in a variety of formats, including DOC and DOCX, so other people can open your reports in whatever app they choose to use.

WPS Office values simplicity across everything from the design to the user interface. This makes it a snappy word processor that’s a breeze to start using on your iPad.

A premium subscription is available for $3.99 per month. This removes ads and unlocks the ability to convert PDFs, add signatures to images, merge files, and more.

Download: WPS Office for iPadOS (Free, premium subscription available)

5. Notes Writer

Notes Writer on iPad showing formatting window

As you may have guessed from the name, Notes Writer is primarily aimed at taking notes, rather than producing polished documents. It’s perfect for capturing your thoughts during a lecture, meeting, or brainstorming session. You can type out your ideas, or use an Apple Pencil to write them by hand instead.

Notes Writer gives you the ability to draw pictures, annotate PDFs, fill in forms, sign documents, insert clipart, and more. Once you complete your notes, you can share them across a range of cloud storage services.

There are plenty of other bells and whistles as well. These include distraction-free mode, live counters for tracking document length, find and replace, and dark mode.

You can download and use Notes Writer for free, but a Pro word processing app is also available for the iPad, which removes adverts, gives you an unlimited number of notebooks, and adds password protection.

Despite designed for notes, this app still lets you format text and export a range of files. However, there’s no support for DOC or DOCX files. But at least you can sync to a wide range of cloud storage services.

Download: Notes Writer for iPadOS (Free)
Download: Notes Writer Pro for iPadOS ($8.99)

6. Bear

Bear Welcome notes on iPad

Much like Notes Writer, Bear is designed around keeping organized notes. But its simplistic design and easy organization make it one of the best word processors to use on your iPad as well.

Bear is ideal for everything from short notes to long essays. It offers a variety of formatting tools, in-line image support, links, checklists, and more. Keep your writing organized using the folders in the sidebar, which you can customize with different icons for quick navigation.

Best of all, Bear is completely free to use on your iPhone, iPad, and Mac. However, to sync your notes across other devices you need to sign up to Bear Pro for $1.49 per month. This premium subscription also unlocks beautiful themes and powerful exporting options.

If you’re looking for the best looking word processor to use for notetaking on your iPad, Bear is probably it.

Download: Bear for iPadOS (Free, premium subscription available)

7. Werdsmith

Werdsmith app on iPad showing clean interface

To fit its description as a “portable writing studio,” Werdsmith is a word processing app for your iPad, iPhone, and even your Apple Watch. The app is almost free, but there’s a limit on how many documents you can work on at the same time. To bypass this restriction, you need to pay $4.99 per month.

Aimed at fiction writers, Werdsmith comes with templates for writing stories, blogs, poems, and screenplays. It’s a great place to keep notes, organize ideas, or work towards your final draft of a big project.

Werdsmith lacks the rich editing features of other apps on this list, such as image or table support. Instead, it opts for motivation-based features like writing rituals and word goals to help keep you working on your stories every day.

If you want a customizable word processor that focuses on content above all else, give Werdsmith a shot. You can even use the dedicated cloud service to back up your work and protect everything with Face or Touch ID.

Download: Werdsmith for iPadOS (Free, premium subscription available)

8. iA Writer

Apple featured iA Writer as one of the best apps in the App Store four years running, and it’s easy to see why. Behind the modest entry fee is a powerful word processor with an elegant environment in which to get serious work done.

This app uses markdown language to format text, which is worth learning for any serious writer. It also places your document library a swipe away to the right, with a document preview tucked away to the left.

Rearrange the keyboard to personalize your writing experience, then use Focus Mode to keep your concentration on the words. When you’re finished, back everything up to Dropbox or iCloud for safekeeping. You can even publish straight to WordPress.

iA Writer is a word processor for iPad that focuses on the words above all else. But it still offers a shedload of features with full-on markdown support.

Download: iA Writer for iPadOS ($8.99)

9. Ulysses

Ulysses banner from website showing iPhone and iPad app

Ulysses is another mainstay of the word processing world, and can easily slot into your workflow with apps for iPad, Mac, and iPhone. This app is for students, novelists, bloggers, and every other writing fanatic. It’s not cheap, but it’s rammed with features.

At the heart of Ulysses is a simple, yet powerful, markup-based text editor with a wide toolset. Enable distraction-free mode and the user interface melts away, allowing you to focus on just the words.

Store all your writing within the library, which syncs via iCloud to your other Apple devices.

Drop into typewriter mode to focus on one line at a time. Add attachments for research notes, images, keywords, and PDFs. You can export to PDF, WEB, EPUB, DOC, RTF, and plain text files. You can even publish your work straight to WordPress and Medium.

Try out Ulysses for free with a 14-day free trial or get a premium subscription for $4.99 per month. It might be one of the most expensive iPad word processing apps available, but it’s also one of the best.

Download: Ulysses for iPadOS (Premium subscription required, free trial available)

10. Scrivener

Scrivener is a writing tool for larger writing projects. If you’re working on a screenplay, film, or stage production, then Scrivener is one of the best iPad word processors for the job.

Scrivener puts an emphasis on organization, letting you group documents together, store images and PDFs as research material, rearrange your content with ease and search across the entire project. All of this makes it a must-have app for those undertaking larger writing projects.

A huge range of features is on offer with this premium app. Export a variety of formats for Word, PDF, Final Draft, or plain text apps. Convert your work to markdown. Zip your project into a compressed folder.

Take snapshots to save previous versions of your draft. And write anywhere with iOS, macOS, and Windows apps.

Scrivener isn’t cheap, but it’s the best iPad word processor for any budding novelist.

Download: Scrivener for iPadOS ($19.99)

Pick the Right Writing App for the Job

These are all the best word processor apps to use on your iPad. They all offer something different, which makes it important to pick the right tool for you. Whether you’re looking for a powerful scratchpad like iA Writer or a capable editor like Ulysses, you should find what you need above.

Of course, you won’t always have your iPad on you when you need to work on new documents. If you want to prepare yourself for that situation, look into the best online word processors to start using as well.

Read the full article: The 10 Best Word Processing Apps for Your iPad


Read Full Article
How to Trace Emails Back to Their Source IP Address


The first thing you do when you hear that email notification is check the sender, right? It is the quickest way to figure out who the email is from, as well as the likely content.

But did you know each email comes with a lot more information than what appears in most email clients? There’s a host of information about the sender included in the email header—information you can use to trace the email back to the source.

Here’s how to trace that email back to where it came from, and why you might want to.

Why Trace an Email Address?

Before learning how to trace an email address, let’s consider why you would do it in the first place.

In this day and age, malicious emails are all too frequent. Scams, spam, malware, and phishing emails are a common inbox sight. If you trace an email back to its source, you have a slight chance of discovering who (or where!) the email comes from.

In other cases, you can trace the origin of an email to block a persistent source of spam or abusive content, permanently removing it from your inbox; server administrators trace emails for the same reason.

(If you want to prevent your own email identity from being revealed, learn to send completely anonymous emails.)

How to Trace an Email Address

You can trace an email address to its sender by looking at the full email header. The email header contains routing information and email metadata—information you don’t normally care about. But that information is vital to tracing the source of the email.

Most email clients don’t display the full email header as standard because it is full of technical data and somewhat useless to an untrained eye. However, most email clients do offer a way of checking out the full email header. You just need to know where to look, as well as what you’re looking at.

  • Gmail Full Email Header: Open your Gmail account, then open the email you want to trace. Select the drop-down menu in the top-right corner, then Show original from the menu.
  • Outlook Full Email Header: Double-click the email you want to trace, the head to File > Properties. The information appears in the internet headers
  • Apple Mail Full Email Header: Open the email you wish to trace, then head to View > Message > Raw Source.

Of course, there are countless email clients. A quick internet search will reveal how to find your full email header in your client of choice. Once you have the full email header open, you’ll understand what I meant by “full of technical data.”

Understanding the Data in a Full Email Header

It looks like a lot of information. However, consider the following: you read the email header chronologically, from bottom to top (i.e., oldest information at the bottom), and that each new server the email travels through adds Received to the header.

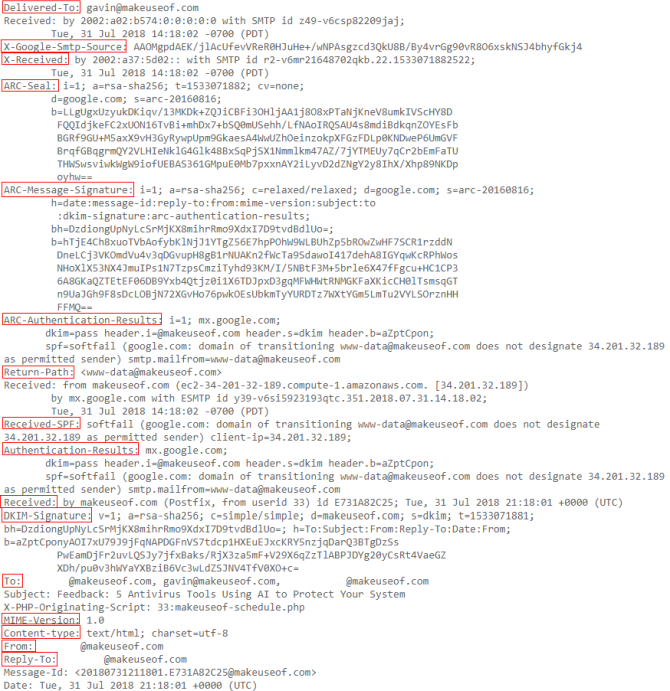
Check out this sample email header taken from my MakeUseOf Gmail account:

gmail full email header

Gmail Email Header Lines

There’s a lot of information. Let’s break it down. First, understand what each line means (reading from bottom to top).

  • Reply-To: The email address you send your response too.
  • From: Displays the message sender; it is easy to forge.
  • Content-type: Tells your browser or email client how to interpret the content of the email. The most common character sets are UTF-8 (seen in the example) and ISO-8859-1.
  • MIME-Version: Declares the email format standard in use. The MIME-Version is typically “1.0.”
  • Subject: The subject of the email contents.
  • To: The intended recipients of the email; may show other addresses.
  • DKIM-Signature: DomainKeys Identified Mail authenticates the domain the email was sent from and should protect against email spoofing and sender fraud.
  • Received: The “Received” line lists each server that the email travels through before hitting your inbox. You read “Received” lines from bottom to top; the bottom-most line is the originator.
  • Authentication-Results: Contains a record of the authentication checks carried out; can contain more than one authentication method.
  • Received-SPF: The Sender Policy Framework (SPF) forms part of the email authentication process that stops sender address forgery.
  • Return-Path: The location where non-send or bounce messages end up.
  • ARC-Authentication-Results: The Authenticated Receive Chain is another authentication standard; ARC verifies the identities of the email intermediaries and servers that forward your message to its final destination.
  • ARC-Message-Signature: The signature takes a snapshot of the message header information for validation; similar to DKIM.
  • ARC-Seal: “Seals” the ARC authentication results and the message signature, verifying their contents; similar to DKIM.
  • X-Received: Differs to “Received” in that it is considered non-standard; that is to say, it might not be a permanent address, such as a mail transfer agent or Gmail SMTP server. (See below.)
  • X-Google-Smtp-Source: Shows the email transferring using a Gmail SMTP server.
  • Delivered-To: The final recipient of the email in this header.

You don’t have to understand what all of these things mean to trace an email. But if you learn to look through the email header, you can quickly begin to trace the email sender.

Tracing the Original Sender of an Email

To trace the IP address of the original email sender, head to the first Received in the full email header. Alongside the first Received line is the IP address of the server that sent the email. Sometimes, this appears as X-Originating-IP or Original-IP.

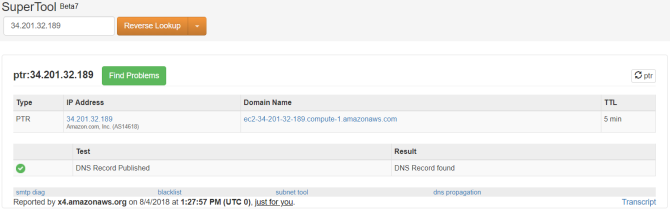
Find the IP address, then head to MX Toolbox. Enter the IP address in the box, change the search type to Reverse Lookup using the drop-down menu, then hit Enter. The search results will display a variety of information relating to the sending server.

mx toolbox reverse lookup

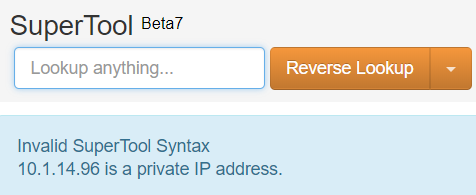
Unless the originating IP address is one of the millions of private IP addresses. In that case, you will meet the following message:

mx toolbox ip search

The following IP ranges are private:

  • 0.0.0-10.255.255.255
  • 16.00-172.31.255.255
  • 168.0.0-192.168.255.255
  • 0.0.0-239.255.255.255

IP address lookups for those ranges will not return any results.

3 Free Tools to Trace Emails and IP Addresses

Of course, there are some handy tools out there that automate this process for you. It is handy to learn about full email headers and their contents, but sometimes you need quick information.

Check out the following header analyzers:

The results don’t always match up though.

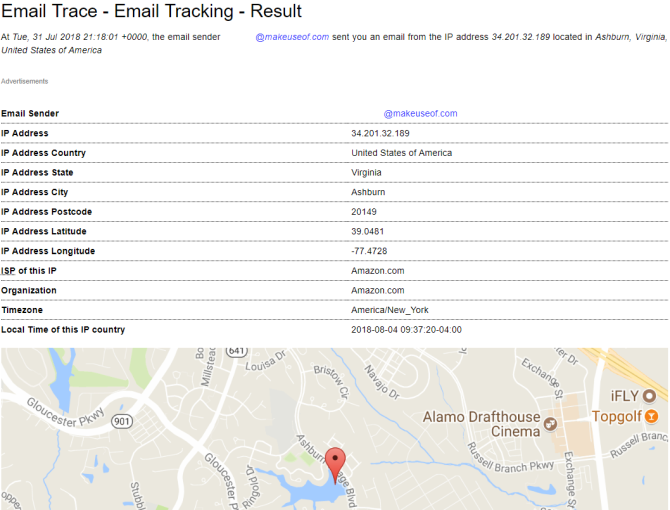
The results don’t always match up though. In the below example, I know that the sender is nowhere near the alleged location stated as Ashburn, Virginia:

ip tracer email header analysis

In that, your success with tracing an email will vary depending on the email provider of the sender. If you’re trying to trace an email sent from a Gmail account, you’ll only find out the location of the last Google server that processed your email—not the IP address of the original sender.

Can You Really Trace an IP Address from an Email?

There are instances where tracing an IP address through the email header is useful. A particularly irritating spammer perhaps, or the source of regular phishing emails. Certain emails will only come from certain locations; your PayPal emails won’t originate in China, for instance.

However, as it is trivially easy to spoof email headers, take all the results you find with a pinch of salt. Finally, are you interested in learning more about email spoofing? Take a look at our guide to email security protocols for a great starting point.

Read the full article: How to Trace Emails Back to Their Source IP Address


Read Full Article
How to Stop Other People Posting on Your Facebook Timeline


facebook-tips-tricks

Your Facebook timeline is likely to be inundated with posts that are not of your own making. That’s not necessarily a good thing; you don’t want your boss seeing a picture of your night out at the weekend, or your mum tagging you in an embarrassing photo.

If you want to keep some control over your Facebook wall, it’s important to know how to stop people posting on your timeline. In this article, we show you how to block a person from posting on your Facebook wall without unfriending them, and more besides.

How to Stop People Posting on Your Timeline

timeline and tagging settings facebook

If you want to prevent other Facebook users from posting on your Timeline, you need to enter your account settings and tweak a few things. Just follow the instructions below:

  1. Click on the arrow in the upper right-hand corner of the Facebook homepage.
  2. In the dropdown menu, click on Settings.
  3. Using the panel on the left-hand side of the screen, navigate to the Timeline and Tagging section.
  4. Scroll down and locate Timeline > Who can post on your timeline.
  5. Click on Edit.
  6. To lock down your timeline, choose Only Me. Doing so will not affect your friend status with any other users.

The same section also lets you adjust who can see your timeline, edit who can share your timeline posts, and block certain offensive words from your timeline.

Finally, in the Review section, it’s worth checking the following settings:

  • Review posts that you’re tagged in before the posts appear on your timeline.
  • Review what other people see on your timeline.
  • Review tags that people add to your posts before the tags appear on Facebook.

Turning on the three options will give you even more control over what content appears on your Facebook timeline. And if you want to go a step further, here’s how to disable algorithmic feeds on social media accounts for an even more clutter-free Facebook experience.

Read the full article: How to Stop Other People Posting on Your Facebook Timeline


Read Full Article

What to Do When Windows Software Won’t Install


Applications won’t install on Windows 10? It’s frustrating when app installers won’t run, throw an error code, or seem to work properly but then fail.

We’ll show you why some software won’t install in Windows, and look at how to fix it.

1. Reboot Your Computer

This is a common troubleshooting step, but important for a reason. The reason that software is not installing on your computer could be a temporary glitch. Before you jump into more focused fixes, you should reboot to get back to a clean state.

If you still can’t install software after a reboot, continue troubleshooting further.

2. Check App Installer Settings

Windows 10 allows you to install both traditional desktop apps and apps from the Microsoft Store. Certain settings will restrict you to only installing Store apps, so you should check those before proceeding.

To do this, head to Settings > Apps > Apps & features. At the top, you’ll see a Choose where to get apps section. If the dropdown is set to The Microsoft Store only (recommended) then you won’t be able to install apps from anywhere else.

Change this to Anywhere or Anywhere, but let me know . . . and you’re free to install what you like.

Windows 10 Apps Install Location

You should also check a similar setting in Settings > Update & Security > For developers. Here, make sure that you have Sideload apps selected under Use developer features. Choosing Microsoft Store apps will prevent you from installing regular software.

Windows 10 Developer App Setting

Finally, if you’re in Windows 10 S Mode, you can only install apps from the Microsoft Store. Thankfully, it’s easy to switch out of S Mode in Windows 10 at no charge.

3. Free Up Disk Space

If you’re extremely low on disk space, you may not be able to install new software. While this is rarely an issue for small apps, heavy-duty tools, such as Microsoft Office or Adobe products, take several gigabytes to install.

Follow our guide to freeing up space in Windows 10, then try installing again.

4. Run the Installer as an Administrator

Thanks to User Account Control (UAC) in Windows, your account only runs with Administrator privileges when necessary. Since most software requires admin rights to install, you’ll usually see a UAC prompt when you try to install a new app.

However, this can occasionally fail. You might see an error that the installer can’t write to a certain folder, or it might refuse to run at all. In these cases, you should run the installer as an admin manually.

To do this, close the installer dialog if it’s open, then right-click on the installer file and choose Run as administrator. After granting admin rights, try the installer again and see if it succeeds.

Windows Run as Admin

In case you don’t have admin rights, ask someone who manages the computer or check our guide to running programs as an administrator for more help.

5. Check 64-Bit Compatibility

A lot of software offers both 32-bit and 64-bit flavors. 64-bit software is only compatible with 64-bit versions of Windows. However, 32-bit apps will run on both 32-bit Windows and 64-bit Windows, since 64-bit Windows is backwards compatible.

Most of the time, software will automatically pick the right version to install on your system, or will just install as 32-bit. If you have a modern computer, it’s likely 64-bit, meaning this isn’t a problem. But if you’re not sure, you should find out if you have 64-bit Windows.

From there, keep an eye out on software download pages and make sure to download the version that’s compatible with your system. x86 refers to 32-bit, while x64 is synonymous with 64-bit.

7-Zip Bit Editions

6. Run Program Troubleshooters

Windows 10 includes several built-in troubleshooting tools that try to detect and fix common problems. They don’t always work well, but they’re worth a try when Windows won’t install programs for some reason.

To access the troubleshooter, head to Settings > Update & Security > Troubleshoot. Here, run the Program Compatibility Troubleshooter and see if it fixes any problems. You can also run the Windows Store Apps tool if you’re having trouble with a Store app.

Windows Program Troubleshooter

If this doesn’t work, you should try the Program Install and Uninstall troubleshooter, available to download from Microsoft.

7. Uninstall Previous Software Versions

Most of the time, installing an app update (even if it’s a new major version) goes smoothly. But sometimes, having an old version of the program installed can cause issues when you try to install the latest release.

If you still can’t install software properly, go to Settings > Apps > Apps & features and uninstall the current version of the software. This shouldn’t erase any of the data you had saved in the app, but you may want to back up any settings or other important info first, just in case.

Uninstall Chrome Windows 10

In some cases, you’ll need to uninstall other components to fully remove a program. For instance, Apple’s instructions on how to completely uninstall iTunes guide you through removing Bonjour and other bits of software.

8. Review Antivirus Settings

Sometimes, your antivirus or anti-malware software can prevent software from installing. This can be helpful or a pain, depending on the circumstance.

In one case, you may be trying to install a program that’s actually malware. When your antivirus detects this, it will hopefully block you from installing that app. But if you’ve disabled notifications from your antivirus, you might not see this. Try opening your security tool and checking for recent alerts to find out.

If you suspect that a program you want to install contains malware, you should scan it with an online virus scanner. Avoid anything that’s infected, of course.

However, your antivirus can also become overzealous. It may prevent legitimate programs from accessing necessary folders when they try to install (Malwarebytes Premium has been known to do this). If this is the case, you’ll need to temporarily disable your antivirus to let the installation complete.

Malwarebytes Windows

How to do this depends on your installed antivirus. Most have an option to temporarily suspend protections for a few minutes so you can install as necessary. Just make sure you trust the software before doing this!

9. Make Sure the Program Is Compatible With Your Windows Version

Some programs simply aren’t compatible with modern versions of Windows. Apps abandoned years ago, for example, were probably never updated to support Windows 10. When this is the case, Windows has some compatibility tools to help you get it running, but it still might not work properly afterward.

First, you should check the provider’s website to see the software supports your version of Windows. Even if it’s not compatible, you can download the installer file and try to get it installed anyway, but knowing the developer’s official stance is useful.

If the app installs properly, perform the below steps on the executable file. If the installer won’t run, try the same procedure on the installer executable.

Right-click on the app’s executable file and choose Properties. In the resulting window, swap to the Compatibility tab. Here, you can choose to Run this program in compatibility mode for an earlier version of Windows.

This can help if you know the app ran on an older version. Otherwise, there are more display options under Settings, but these shouldn’t be necessary in most cases.

Windows Program Compatibility

If the software still doesn’t run with compatibility mode enabled, see more tips for getting old software to work in Windows 10. Failing that, you’ll need to pursue other methods to use that software, such as creating a virtual machine.

Fix Software Install Errors Today

Hopefully, one of these troubleshooting steps helps when you’re unable to install software on Windows. Most of the time, this comes down to a Windows compatibility issue or a security tool interfering.

We’ve looked at traditional desktop software here. If you have issues with Modern apps on Windows 10 too, see how to fix common Microsoft Store errors.

Image Credit: Sigurd Gartmann/Flickr

Read the full article: What to Do When Windows Software Won’t Install


Read Full Article

3D-printed glasses startup Fitz is making custom protective eyewear for healthcare workers


A lot of startups have answered the call for more personal protective equipment (PPE) and other essentials to support healthcare workers in their efforts to curb the spread and impact of COVID-19. One of those is direct-to-consumer 3D-printed eyewear brand Fitz, which is employing its custom-fit glasses technology to build protective, prescription specs for front-line healthcare workers in need of the best protection they can get.

Fitz Protect is a version of Fitz’s eyewear that uses the same custom measurement tool Fitz created for use via its iOS app, made possible by Apple’s depth-sensing Face ID camera on newer iPhones and all iPad Pro models. The app allows virtual try-on, and provides millimeter-level accurate measurements for a custom fit. Protect is a version of the glasses that still supports a wide range of prescriptions, but that also extends further like safety glasses to provide more coverage and guard against errant entry of any fluids through the eyes.

Healthcare professionals are doing what they can to ensure their face, mouth, nose and eyes are protected from any coughs, sneezes or other droplet-spreading activity from COVID-19 patients that could pass on the infection. These measures have more broadly focused on face shields that feature a single transparent plastic sheet, and N95  masks (and alternatives when not available) to protect the mouth and nose.

Fitz CEO Gabriel Schlumberger explained via email that the design for Fitz Protect came from working front-line doctors and nurses from New York, LA and Texas who were all looking for something to source prescription protective eyewear.

“More than 60% of doctors are glasses wearers, and current guidance is for them to stop wearing contact lenses,” Schlumberger explained, adding that Fitz Protect is also designed to be worn in conjunction with a face shield, when that’s an available option, to provide yet another layer of defense.

“We heard from prescription glasses wearers that their standard glasses didn’t provide anywhere near adequate coverage, especially over the eyebrows, and in some cases they were adding cardboard cut-outs,” he said. “We leveraged our existing system to create something much better. ”

Fitz’s model also helps on the pricing side because it’s already designed to be an aggressively cost-competitive offering when compared to traditional prescription eyewear. Their glasses typically retail for just $95 including frames, lenses and shipping, and are also offered in a $185 per year unlimited frame membership plan. For doctors, nurses and hospital staff, the entire cost of Fitz Protect is being waived, and the company is seeking donations to help offset its own manufacturing costs, which currently stand at around $100 per set, though process improvements should bring that down, according to Schlumberger, as they expand availability.

Already, he said that nearly 3,000 healthcare professionals have signed up to receive a pair in their first week of availability, so they’re working on adding scale to keep up with the unexpected demand.


Read Full Article

Levi’s partnered with TikTok on social commerce and doubled its product views


Levi’s is leveraging its advertising partnership with TikTok to connect online shoppers with the denim brand amid the COVID-19 pandemic, which has forced retailers to close their doors — including most of Levi’s own stores. The company announced today its success as one of the first retailers to use TikTok’s “Shop Now” buttons that allow consumers to make purchases through links posted to TikTok. Though the implementation is still in the early stages, Levi’s says it has already seen high engagement and increased traffic to its website, as a result of initial tests.

To send traffic to its e-commerce site, Levi’s recently partnered with TikTok influencers Callen Schaub, Cosette RinabGabby Morrison and Everett Williams, who used Levis’ laser-powered Future Finish 3-D denim customization technology to create their own customized denim. While the collaboration itself began before the shelter-in-place orders rolled out across the U.S., the resulting videos were only posted last week.

TikTok users viewing the influencers’ videos, which appeared on TikTok as in-feed ads, could then click to buy the same design on Levi.com up until the experiment wrapped on April 19.

Levi’s reports that watch time for these videos were twice as long as the TikTok platform average:

@callenschaubIn my Montreal studio putting my spin on the Levi’s® Future Finish jeans – Shop online from home! ##stayhome ##oddlysatisfying ##levishausmiami ##ad♬ original sound – callenschaub

In addition, Levi’s notes that product views to Levi.com’s “Future Finish” pages more than doubled for every product included in the experience.

Though these are not hard numbers, few retailers have yet to share the results of their TikTok-powered social commerce efforts. In fact, the “Shop Now” call-to-action button itself is fairly new, so only a handful of advertisers have used the option to date.

TikTok is not the first social network the Levi’s brand has worked with — it also has similar partnerships with top social platforms like Snap, Instagram and Pinterest. However, the company said it was drawn to TikTok due the size of its audience, noting that in November 2018 TikTok was then seeing 680 million monthly active users worldwide, and is now estimated to have as high as 800 million. Levi’s also noted that nearly 60% of that user base is in between the ages of 16 to 24.

TikTok, meanwhile, has been dabbling in social commerce for over a year through a variety of efforts.

For example, AdWeek in April 2019 reported on Hollister’s participation in a program that allowed retailers to run in-feed ads that directed customers to its e-commerce site by a “Shop Now” button. And Digiday last July noted Poshmark had done the same. In August 2019, Kroger became the first brand to try a new Hashtag Challenge Plus feature, which added a shoppable component to a TikTok hashtag.

Last November, TikTok also began to allow some TikTok users to add e-commerce links to their posts and their bios. Many of the beta participants testing this feature began linking from their video directly to Amazon, The WSJ reported at the time.

In the case of the Levi’s influencer program, the videos from the creators ran as in-feed ads, linked to the retailer’s website. Some influencers also included a Levi’s website link in their bio, but this is separate from the advertiser-facing feature (see photo on right).

“TikTok was the perfect platform for us to expand our efforts in social commerce. Over the last decade, we’ve been on a journey to not only grow our digital footprint, but also help our fans buy our products at the point of inspiration, when they see something they love,” said Brady Stewart, managing director, U.S. Direct to Consumer, in a statement about the TikTok partnership. “As consumer behavior shifts over the coming months and people explore different online channels for shopping and engaging with brands, we are here to connect with consumers, wherever they are,” he added.

The line between social media and commerce has been blurring for years, thanks to influencer-fueled advertising, in-feed ad units, shoppable media and more. Instagram today even lets you shop from some retailers without leaving its app. Meanwhile, Facebook’s Marketplace has turned into an eBay and Craigslist-sized rival and its business Pages help customers and brands connect in a number of ways.

TikTok, however, has only dipped a toe in the water of social commerce as of yet. But given its app’s sizable reach, particularly among Gen Z, it’s an area to watch. And as the pandemic forces more retailers to remain closed to foot traffic in stores, being able to attract young shoppers to their online shops will be more valuable than ever.


Read Full Article

Uber argues ‘fraud’ absolves it from paying star engineer’s $179M fine to Google


Uber argued in a recent court filing that former employee Anthony Levandowski committed fraud, an action that frees the company from any obligation to pay his legal bills, including a judgment ordering the star engineer to pay Google $179 million.

The court filing was first reported by Bloomberg.

Uber’s fraud claim was part of its response to Levandowski’s motion to compel the ride-hailing company into arbitration in the hopes that his former employee will have to shoulder the cost of the $179 million judgment against him. The motion to compel arbitration, and now Uber’s response, is part of Levandowski’s bankruptcy proceedings. It’s the latest chapter in a legal saga that has entangled Uber and Waymo, the former Google self-driving project that is now a business under Alphabet.

In this latest court filing, Uber has agreed to arbitration. However, Uber also pushed back against Levandowski’s primary aim to force the company to stand by an indemnity agreement. Uber signed an indemnity agreement in 2016 when it acquired Levandowski’s self-driving truck startup Otto. Under the agreement, Uber said it would indemnify — or compensate — Levandowski against claims brought by his former employer, Google.

Uber said it rescinded the indemnification agreement several months prior to the inception of Levandowski’s bankruptcy case “because it was procured by his fraud,” according to the court filing. Uber revoked the indemnification agreement after Levandowski was indicted by a federal grand jury with 33 counts of theft and attempted theft of trade secrets, while working at Google, where he was an engineer and one of the founding members of the group that worked on Google’s self-driving car project.

Uber notified Levandowski’s counsel on August 30, three days after the indictment, explaining that the indemnification agreement was rescinded “because it had been procured by Levandowski’s fraud, including his fraudulent concealment of the facts alleged in the indictment.”

Levandowski reached a plea deal in March 2020 with the U.S. District Attorney to one count of stealing trade secrets while working at Google.

Uber said it never received any benefits from Levandowski under the indemnification agreement, and had nothing to return to him as a result of the rescission, the company said in the court filing.

Levandowski’s attorney pushed back at Uber’s argument.

“Uber’s assertion that Anthony did not disclose material information to Uber is false,” Levandowski’s attorney Neel Chatterjee said in an emailed statement sent to TechCrunch. “The accusations Uber makes is premised on information they obtained as part of the due diligence process. This is the latest in a string of meritless theories Uber has set forth to try to get out of the deal it struck because it did not like the outcome.”


Read Full Article

Sourdough Starter


Sourdough Starter

Facebook is pulling some protest events over stay-at-home violations


Facebook confirmed this week that it will be pulling down a number of posts promoting stay-at-home protests. CNN was the first to report the news, which finds the social media giant pulling down events in a variety of different states, including California, Nebraska and New Jersey.

The news follows a spike in events across the country, as people have gathered to protest stay-at-home orders issued to combat the spread of COVID-19. Facebook confirmed that it has begun pulling some protests, citing defiance of state guidelines.

A spokesperson for the site told TechCrunch, “Unless government prohibits the event during this time, we allow it to be organized on Facebook. For this same reason, events that defy government’s guidance on social distancing aren’t allowed on Facebook.”

The company’s actions will vary from location to location and event to event, determining whether they are in violation of specific guidance. A spokesperson told CNN they are working with state governments in New York, Ohio, Pennsylvania and Wisconsin to determine whether to pull events. Among other determinations are whether protests call for social distancing among attendees where required. 

Pictures from protests have become some of the most defining imagery over the past week, as attendees risk their health and the health of others in hopes of returning to some sense of normalcy a month in. Kentucky, notably, has seen a record number of COVID-19 cases following local protests.

“They seem to be very responsible people to me,” President Trump said of protesters during a press conference Friday, “but they’ve been treated a little bit rough.”


Read Full Article