22 October 2018

How to Factory Reset Windows 10 or Use System Restore


windows-10-restore

Running Windows 10 and hit a problem? Perhaps malware has disrupted your system, or things are generally running slowly. You might even be planning to sell your computer.

Fortunately, Windows 10 has the tools to help: System Restore and Factory Reset, utilities that enable you to easily reset and refresh your PC.

Here’s how to restore and reset Windows 10.

Windows 10 Has a Hidden Recovery Partition

When you open File Explorer, you should see all the disk partitions.

However, some are hidden. One of these is the recovery partition, which Windows 10 uses to reset and restore itself.

Although it takes up some space, and you can delete this partition, it isn’t advisable.

Sure, deletion, in conjunction with file compression, can save over 6GB on 64-bit systems running Windows 10, but the recovery partition is pretty vital for getting your PC back up and running following a serious crash.

Meanwhile, if you’re using a small capacity Windows 10 device, it’s recommended that you use an SD card or an external storage device. Keep the recovery partition and store personal data, and apps on the secondary storage.

At some point, you’ll probably need the recovery partition, especially if you haven’t downloaded the installation media. However, the refresh and reset tools should be sufficient to deal with the vast majority of issues, as long as you make the right decision between a system restore and refreshing Windows.

How to Do a System Restore in Windows 10

If you’re having problems with Windows 10’s performance, the first thing you should look at is your list of restore points. If one of these coincides with when Windows started to misbehave, then you can use the System Restore tool to reinstate the settings and software that were in place at that time.
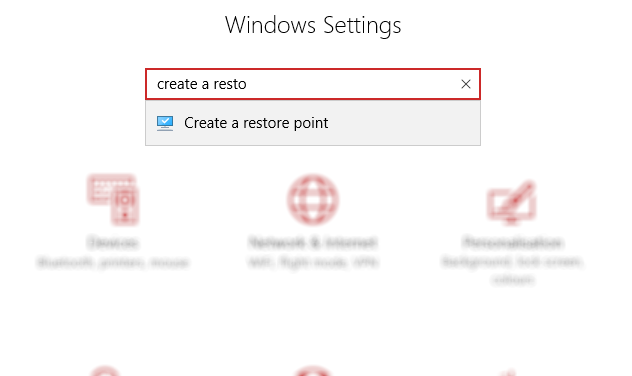
Search the Windows 10 Settings menu

Open Start (or press Windows key + I to open Settings) and in the search box type create a restore point.

Click the matching result, select the drive you want to use to store your restore point (typically the system drive) and click Configure > Turn on system protection. This action activates the system restore functionality.
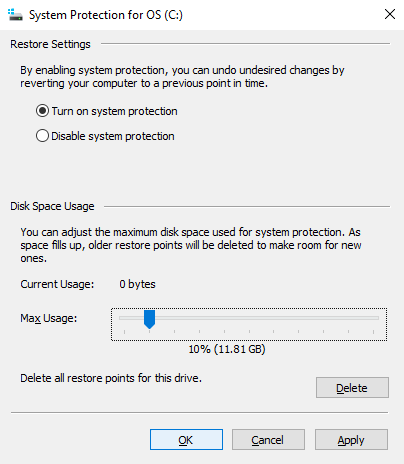
Set the disk space allocated to System Restore

You also need to specify the maximum disk usage dedicated to Disk Space Usage. Drag the slider to determine how much space to allocate. Click OK to confirm.
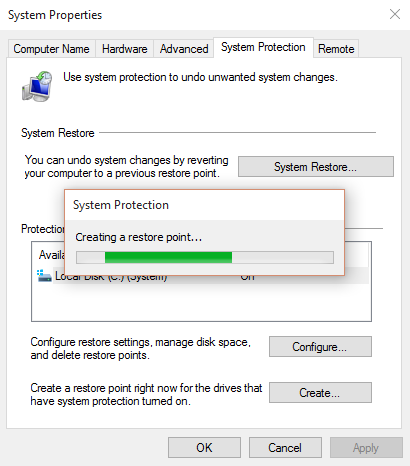
You’re now ready to create a restore point, so click Create, give it a name, then OK.

The system protection software will create the restore point, which you can revert to later using the System Restore button. Working through the wizard will restore your previous state.

You may need to spend a few moments checking through what will be affected so that you can reinstall software and—hopefully—avoid any apps that caused the problem that prompted you to use System Restore.

Note that System Restore is not perfect. Winding back to a restore point may not work, so refer to our list of things to check when System Restore won’t work.

Accessing Advanced Startup

What if you need to roll back to a saved restore point, but cannot boot into Windows 10? The answer comes through Advanced Startup (accessible on a working system through Settings > Recovery).

If your PC isn’t booting, you’ll need to access Advanced Startup via your PC manufacturer’s instruction. For instance, on HP computers, this would be by pressing F11 to prompt the System Recovery mode as your computer boots. Choose Repair your computer when Windows Setup launches.

In Advanced Startup, select Troubleshoot > Advanced Options > System Restore, and then work through the wizard to find and apply the restore point.

This makes System Restore the fastest solution; at the same time, however, it is also the least reliable. Unfortunately, System Restore is unable to cope with a Windows installation that has been compromised by malware.

How to Refresh Windows 10

Was reverting to a restore point not enough to resolve problems with your computer? You may need to refresh your settings. Remember how your computer was when you bought it, or first installed Windows 10?

That’s what you’re going to get.

Unlike a full Windows 10 system reset, however, you will be able to retain your personal data and settings. However, it’s a good idea to sync these to the cloud regardless.

Open Start > Settings > Update & Security to begin, selecting Recovery in the left-hand menu.
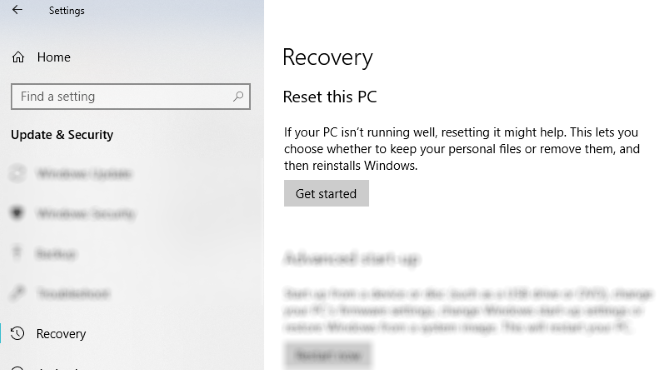
Reset your Windows PC

Under Reset this PC, click or tap Get Started, and use the Keep my files option.
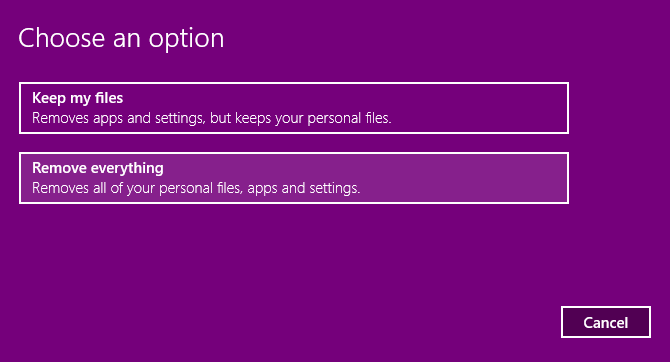
Choose how to reset Windows 10

A warning will be displayed; a second may appear if you have upgraded to Windows 10 from a previous version and informs you that resetting will prevent you from undoing the upgrade.

If you’re happy, proceed with the Reset.

You’ll need to wait for the process to complete. How long this takes will depend on how many apps you’ve installed.

Consider refreshing Windows 10 the second string to your bow. If your computer is running slow, and crashes or freezes regularly, this is the option to take. It’s ideal if you don’t have the time to back up your settings and personal folders first.

How to Reset Windows 10 to Factory Settings

The “nuclear option” when it comes to getting Windows 10 back to its best is to reset it, much as you would a smartphone or tablet. This action restores the operating system to the “factory settings,” leaving it seemingly as new.

As such, you will need to back up your personal data beforehand. Unfortunately, any bloatware you have removed will be reinstated. This is a strong argument against using the factory reset option.

To factory reset Windows 10, go to Start > Settings > Update & Security > Recovery and again click the Get started button under Reset this PC. This time, however, select Remove everything.
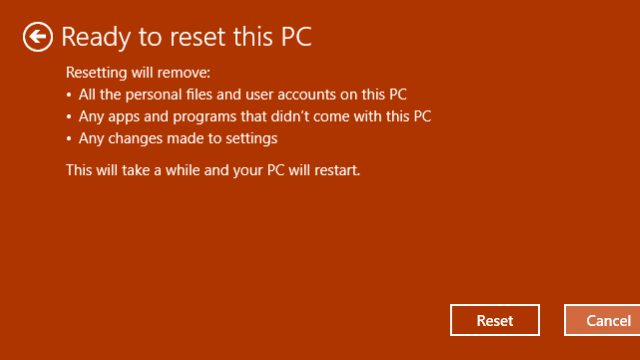
Reset Windows 10

This results in two options:

  • Just remove my files for a quick reset.
  • Remove files and clean the drive, a slower, more secure option.

With your choice made, wait for completion. Note that you’ll need a new account to begin using your computer again. If you have a Windows account, use this; your desktop theme, shortcuts, browser favorites (if you use Edge) and some other settings will be synced back to the computer. Otherwise, create a new local profile.

You’ll then be ready to restore any data backups you made before you performed the Windows 10 factory reset.

As before, if Windows 10 won’t boot and you want to perform a factory reset, the option is available from the Advanced Mode screen. After booting into Advanced Options, go to Troubleshoot > Reset this PC and you’ll find the options as discussed above.

Factory Reset and System Restore Made Easy

Whether you need to create or restore a System Restore point, the process should by now be straightforward. Similarly, you should be able to refresh Windows 10 in order to speed things up a bit, and use the reset option to create a freshened-up, good as new operating system.

Regardless of whether you can use System Restore, or refresh and reset your PC, however, it’s a good idea to make regular data backups. Our guide to making data backups in Windows will help you out here.

Read the full article: How to Factory Reset Windows 10 or Use System Restore


Read Full Article

The 5 Best Desktop Email Clients That Don’t Cost a Dime


Some people say you should stop using desktop email clients. I get where they’re coming from. Web-based email services have come a long way over the past decade, and many of them are feature-rich enough to be on par with desktop-based alternatives.

But there are several valid reasons to keep using desktop email software, and I believe desktop email clients will never be obsolete.

Postbox and Microsoft Outlook are the two main options, but they’re pricey. If you only need an email client to handle one or two personal accounts, then a free email client will likely serve you just fine. Here are the best free desktop email clients we’ve found.

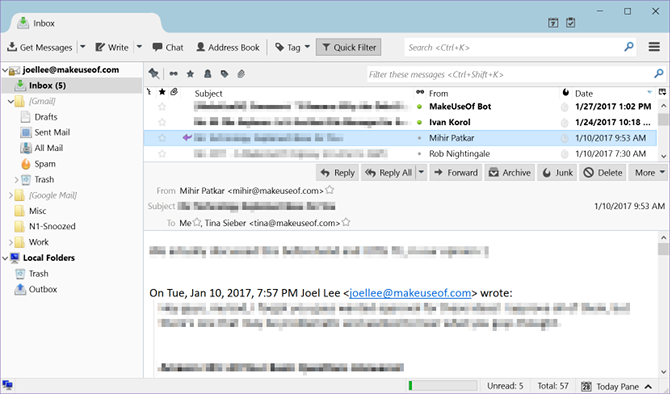
1. Thunderbird

Available for Windows, Mac, Linux.

Although Thunderbird development was “discontinued” back in 2012, it still receives maintenance updates so don’t write it off as dead. In fact, as of this writing, the latest release (version 60.2.1) came out in October 2018. Sure, Thunderbird may not be getting new features going forward, but it’s absolutely still viable for everyday personal use.

And, as sad as it is to say, Thunderbird is the only free and open-source desktop email client that’s actually worth using. Other open-source clients exist, but they’re riddled with issues like clunky interfaces, glitchy performance, and a lack of advanced features.

If you’re adamant about never spending a penny and never switching to a web-based email client, then Thunderbird is your best option. It can do pretty much anything you need, including setting up message filtersautoresponding to emails, and several other nifty Thunderbird tips and tweaks.

Download: Thunderbird (Free)

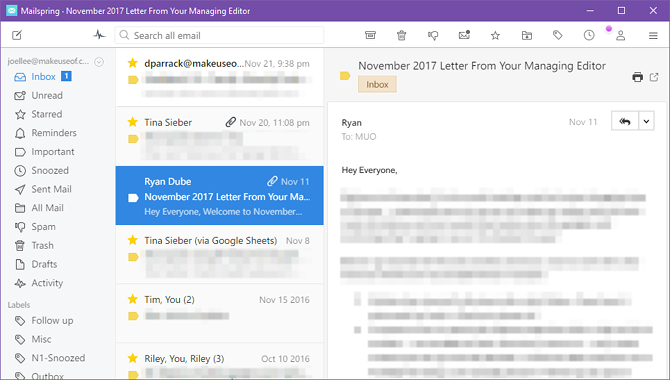
2. Mailspring

Available for Windows, Mac, Linux.

Back in 2016, Nylas Mail hit the scene and looked as if it’d be the desktop email client to put all other desktop email clients to shame. But then in August 2017, the team announced that they’d no longer be working on Nylas Mail and opened up the source to the public.

One of the original authors then forked the project and relaunched Nylas Mail as Mailspring. He optimized and improved many of the internal components, resulting in quicker syncing, less RAM usage, faster launch times, and more.

Thunderbird may be the client of choice for those who want reliability and time-tested staying power, but Mailspring is the client to use if you want something fresh, new, exciting, and full of future potential. It’s free to use indefinitely with some advanced features locked behind a subscription.

Notable Free Version Features

  • Syncs with Gmail, Office 365, Yahoo, iCloud, FastMail, and IMAP.
  • Unlimited email accounts and unified inbox.
  • Undo sent emails within a given period of time.
  • Support for pre-built themes, layouts, and emojis.

Notable Pro Version Features

  • Powerful template support for productivity.
  • Track whether emails are opened and links are clicked.
  • Schedule emails to be sent at a future time.
  • Snooze emails and create follow-up reminders.
  • Share email threads with others using a web link.

Download: Mailspring (Free, Pro for $8/mo)

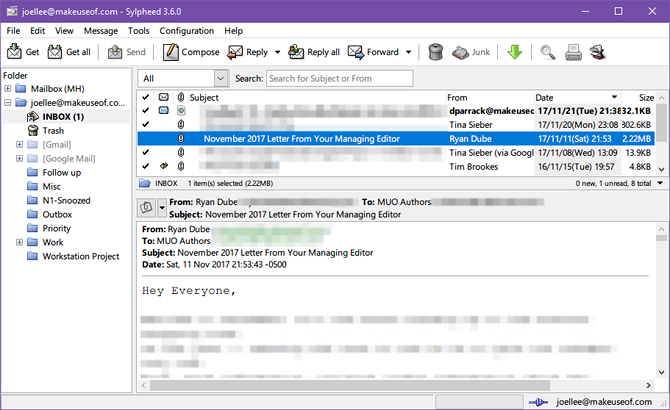
3. Sylpheed

Available for Windows, Mac, Linux.

Sylpheed is a desktop email client that’s been around since 2001. While it does feel dated compared to modern email clients, it’s not bad by any stretch. In fact, its old-school interface and approach to email management may actually prove helpful if your email habits are causing undue stress.

The best thing about Sylpheed is that it knows what it is: an email client. It doesn’t concern itself with tons of extraneous features that bloat the installation and clutter the interface. Sylpheed is simple, lightweight, and full-featured.

Notable features include fast launch and overall performance, advanced email search and filters, effective junk mail control, encryption, and extensibility through plugins.

Download: Sylpheed (Free)

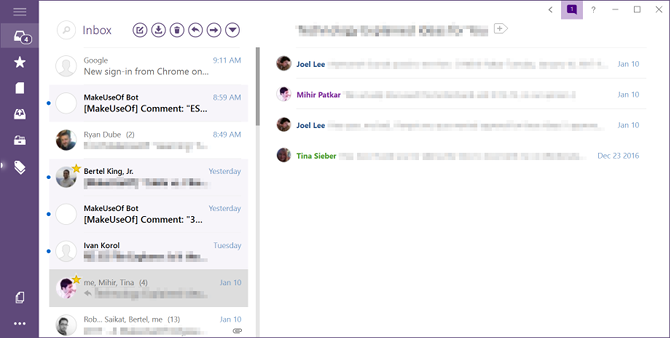
4. Mailbird

Available for Windows.

Mailbird is an attempt to optimize the desktop email client experience.

If you’ve never used desktop email before, then you’ll probably love Mailbird. If you’re migrating from another client, it will be hit or miss—some parts will feel familiar, other bits will impress you, but you’ll undoubtedly find aspects that you hate as well.

All we can recommend is giving it a try. It’s definitely slick and modern, and there’s a lot to like about it. Note that it’s a freemium app so the free version is restricted in some ways.

Notable Free Version Features

  • Beautifully sleek and minimal interface.
  • Syncs with any IMAP or POP email service.
  • Lightning fast search and indexing.
  • Integration with Dropbox, Evernote, Google Docs, and more.
  • Supports up to 3 email accounts.

Notable Pro Version Features

  • Unlimited email accounts and unified inbox.
  • Snooze emails and set up reminders.
  • Speed reader for emails.
  • Quick preview for email attachments.

Download: Mailbird (Free, Pro for $18/year or $59 one-time purchase)

5. eM Client

Available for Windows.

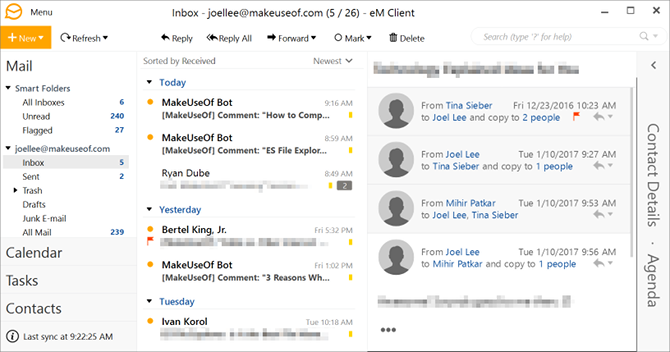
eM Client aims to be an all-in-one solution for dealing with office tasks and communications. It’s primarily designed for email, but also has nifty calendar integration, task management, contacts organization, and even chat support—and the free version only has one (albeit major) limitation, as you can see below.

Notable Free Version Features

  • Slick Modern UI interface that fits well with Microsoft apps.
  • Syncs with Gmail, Exchange, iCloud, Office 365, and Outlook.com.
  • Conversational view for email threads.
  • Integration with all common chat services, including Jabber.
  • Supports up to 2 email accounts.

Notable Pro Version Features

  • Supports an unlimited number of email accounts.
  • Can be used for commercial purposes (e.g. business office use).
  • VIP support and troubleshooting.

Download: eM Client (Free, $50 one-time purchase)

Windows and Mac Have Built-In Email Apps

All of these desktop email clients are fantastic so don’t fret too much. They can all get the job done, so give each one a try and stick to the one you like best. As for me? I’ve been using the free version of Mailspring for months and I’m quite happy with it.

If the above apps seem too complex for your email needs, then you can always resort to the Mail app that comes pre-installed on Windows 10 (some consider it bloatware while others think Windows 10 Mail is worth using). If you’re on Mac, Apple Mail is more than adequate (especially with these tips and tweaks).

Read the full article: The 5 Best Desktop Email Clients That Don’t Cost a Dime


Read Full Article

7 Amazing Google Dataset Search Results You Can Use Now


google-dataset

In September of 2018, Google launched a new dataset search engine intended to help researchers pour through large datasets from public sources. These include everything from census data, demographics surveys, medical studies, and much more.

The datasets are primarily for academic researchers to crunch numbers and extract patterns. But even for the regular layperson, some of the datasets are just fascinating to explore.

How Google Dataset Searches Work

For many years, one of the greatest weaknesses of Google’s search engine was that entire segments of an underground internet remained invisible.

This internet remained “underground” because the information itself is unsearchable by Google’s web crawler. This is because the data is stored in databases that require special search queries, or as a data file that you can only download and analyze.

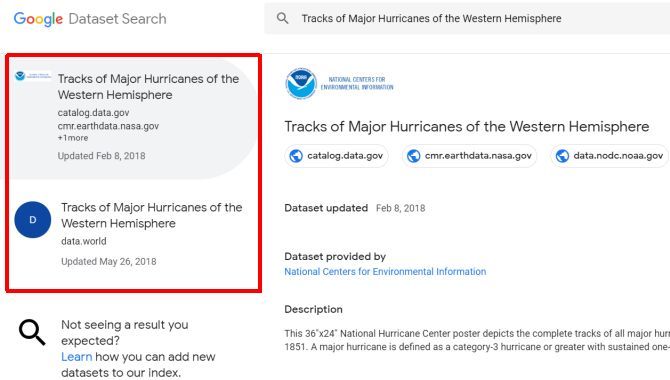
However, when you use the Google Dataset search to find information, instead of returning websites, it returns a list of databases.

dataset results

You can click on any of those databases to see links to the source data.

The source data could include a searchable database, a downloadable file, or even a online visualization tool that helps you analyze and visualize the large volume of information contained in the database.

What kind of information can you find?

Here are some of the most interesting datasets linked from Google’s dataset search engine for you to browse through.

1. National Oceanic and Atmospheric Administration

noaa historical climate data

Through the Google Dataset, you’ll find links to the NOAA EV2 Image Access System.

This is an impressive archival of old climate data from microfiche to digital format, provided for free to the general public.

Some of the impressive records you can pull out of this database include:

  • Airport weather station recordings of temperature, precipitation, and wind data going back decades
  • Weather station readings of daily temperatures and precipitation amounts going back to the late 1800s in some cases
  • Precipitation data recorded at the National Weather Service and Federal Aviation Administration going back many years

In each case, you’ll need to choose the state that you want data for. The number of years you can go back and pull data depends on the state.

For armchair climatologists, or anyone simply interested in global climate change, this is a remarkable resource.

2. NOAA Interactive Maps

noaa interactive maps

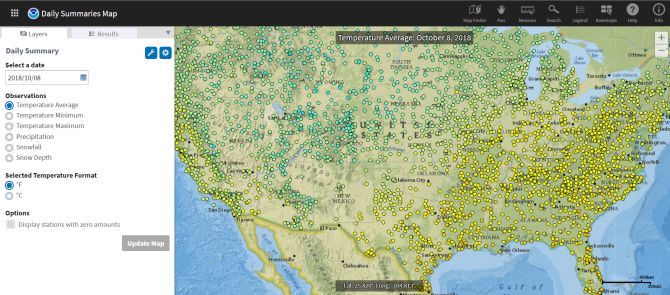
In addition to the downloadable datasets, on Google Datasets you’ll also come across links to the NOAA’s interactive maps.

These maps are unbelievable resources that let you tailor a view of climate data based on date and measurement.

NOAA interactive maps include a visual representation of each of the following data trends.

  • Daily or monthly observations of all data
  • Only snowfall levels
  • Historical global marine shipping tracks
  • Weather radar images from 1995 to 2010
  • Climate normals (the average of climate variables over three decades) from 1981 to 2010

These maps are fascinating to explore, looking through the years and watching how the climate of the Earth slowly changed. Even for anyone who isn’t a climatologist, these interactive maps are an amazing resource.

3. NASA Storm Tracks

extratropical storm tracks

The NASA website has always been a warehouse of useful information. What many people may not realize is they also collect and share satellite data about weather patterns from around the world.

One of the most extensive datasets is NASA’s Atlas of Extratropical Storms. It covers storm data from 1961 to 1998. From the dataset page, you can choose month or season and year, and request a download for any of the following aspects of major storms that took place that year.

  • Frequency
  • Intensity
  • Frequency, Polar Projection
  • Intensity, Polar Projection
  • Tracks

It’s impressive to review storm patterns going back for several decades. It’s an invaluable library of data for any researchers looking for climate patterns.

4. WHISPers

wildlife diseases

WHISPers is the Wildlife Health Information Sharing Partnership event reporting system. It’s an interactive map that shows you the 20 most recent wildlife health events that have taken place in the United States.

You might occasionally hear of mass bird deaths, illnesses killing off populations of bats, or cases of a chronic wasting disease in the news. But if you were to monitor this map, you’d see clusters of such cases showing up long before they ever show up in the media.

5. Human Ebola Outbreak

ebola outbreaks

The spread of human disease is a fascinating field to follow. There is no human illness outbreak in modern times quite as terrifying as Ebola outbreaks. West Africa made the news in 2014 when the region saw one of the worse Ebola outbreaks in human history.

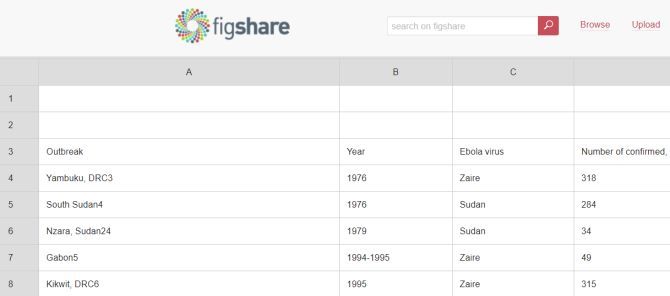
However, there have been other Ebola outbreaks in the past. Those are logged and shared at this online database provided by Figshare.

The dataset starts at 1976 and continues to the present. It’s interesting to follow the ebb and flow of outbreaks, how long there appear to be no outbreaks, and then how aggressively they seem to start again.

You can download the detailed dataset under the online web version of the general data.

6. Global Population Estimates and Projections

global projections

If you search the Google Dataset for “global population estimates”, you’ll come across a link for the World Bank’s interactive “population estimates and projections” tool.

This is an impressive tool that lets you choose from what country and series of data to plot. On the right you can see the data results in the form of a table, chart, or map.

Reviewing the trend of population projections across factors like demographics and country is very revealing. The tool saves you a great deal of time. Instead of digging through the metadata yourself and developing these charts, the World Bank tool does it all for you.

Even more impressive is that you’re not limited to the population database. You can switch the main database from population to poverty, universal health coverage, jobs, educational statistics, and many others.

Of any dataset link provided by Google, this is one of the most useful.

7. National UFO Reporting Center

ufo sightings

The more you dig into Google Datasets, the more it’ll surprise you just what kind of information you can uncover.

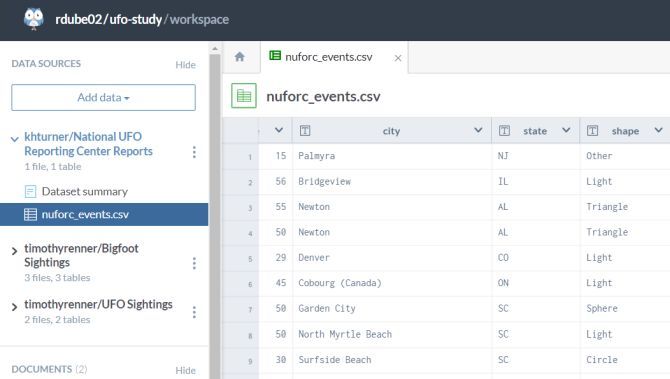
For example, there’s a link to download all of last year’s UFO reports from the National UFO Reporting Center. The data includes the location of the incident, what kind of object was spotted, how long the sighting lasted, the witness’s summary, and more.

Think you can spot patterns based on time and location of clustered sightings? Give it a shot by downloading the entire dataset and looking for correlations.

Searching Google Datasets

The volume of information you’ll find using the Google Datasets search is impressive. The examples above are only just the tip of the iceberg. Try typing in a few keywords of your own and see what you can discover yourself.

And if you aren’t sure how to analyze the large volumes of data you find, load them into Excel. Excel is a powerful tool for analyzing large sets of data. If you’ve never done this before, you can learn more about Excel’s data analysis capabilities before you start digging through all of the information you’ll uncover.

Read the full article: 7 Amazing Google Dataset Search Results You Can Use Now


Read Full Article
How to Build a DIY Google Home Assistant With Raspberry Pi


diy-home-assistant-raspi

Voice controlled assistants have quickly become commonplace. Many homes have an Alexa or Google Home controlling everything from lighting to media, and even timekeeping.

The technology these devices run on is available—at least in part—to everyone. Google’s Assistant SDK allows you to use the service on your own devices. This tutorial covers how to set up the Google Assistant on your Raspberry Pi, and voice activate an LED via GPIO pins.

Hardware Required for a Raspberry Pi Home Assistant

Raspberry Pi Google Assistant Required Equipment

You Will Need:

  1. Raspberry Pi with a fresh Raspbian install on the SD card.
  2. USB webcam or microphone.
  3. External speaker.
  4. Circuit from the Pi LED tutorial (optional)
  5. A browser signed into your Google account.

Note: The equipment for this tutorial can vary somewhat. I used a spare USB webcam purely for its microphone. Any compatible webcam or microphone should do fine, and there are extensive lists of Pi-compatible devices to help.

Also, I am using the 3.5mm output for audio. HDMI and other output sources will also work, though it will require modifications to the sound setup below.

Plug in the USB webcam and speaker, and set up the LED circuit if you are using it.

Setting Up the Sound

This tutorial can be followed directly on the Pi or via an SSH connection into the Pi.

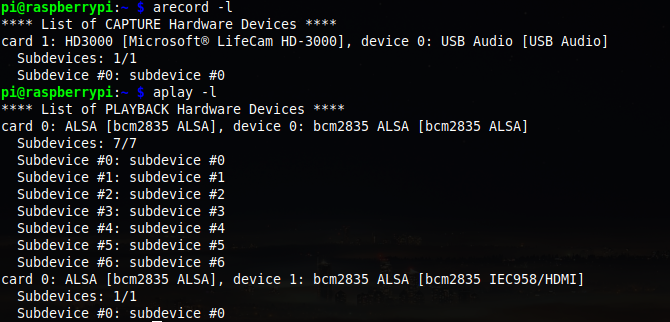
Both ways begin in the terminal, to check the sound settings. Use the commands arecord -l and aplay -l to list available devices.

Check the Playback and Recording devices

The image above shows the USB webcam as card 1 and device 0. Take note of the card and device numbers for both microphone and speaker output.

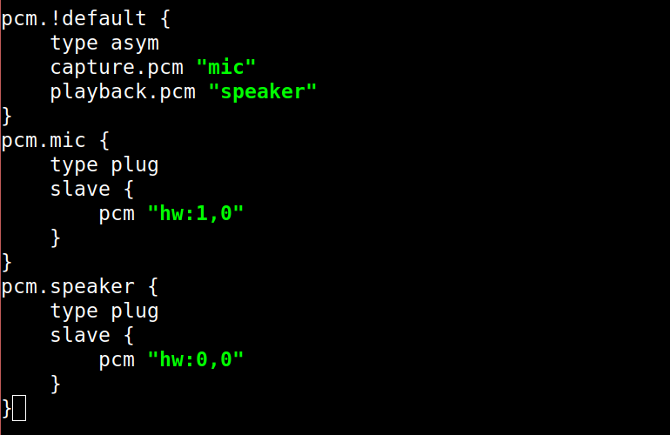
Now, making sure you are in the /home/pi directory, create a new file and open it in nano:

sudo nano .asoundrc

The contents of this directory will differ depending on what card and device numbers you are using. This is where you can choose to favor HDMI output rather than 3.5mm if you wish.

asoundrec config file for microphone and speaker

When you’ve entered your version of the above code, press Ctrl + X to save and exit.

Test your setup by recording and playing back a short clip:

Make a test recording to check your setup

Optional Step: If you want to change the input volume of your microphone, open alsamixer and press F6 to cycle between devices.

That’s it! The sound is set up.

Creating the Google Project

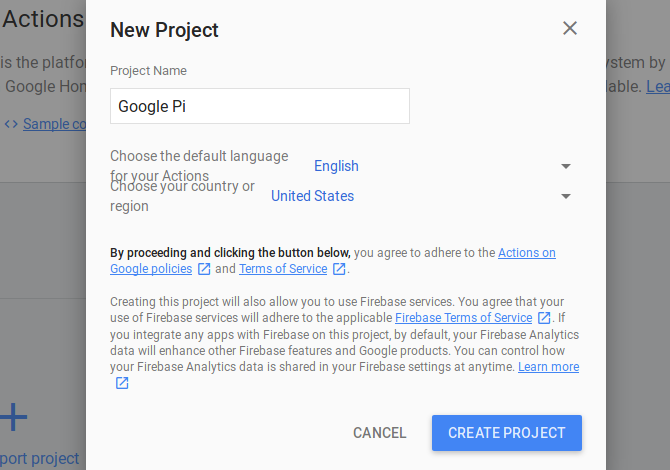
Open the Pi’s browser, alternatively, if you are connected via SSH open a browser locally. Navigate to the Google Action Console and click New Project.

Create a new Google Project

This may take a few moments. When finished, leave the window active and open a new tab—we’ll be coming to this in a moment.

Enabling the Google Assistant API

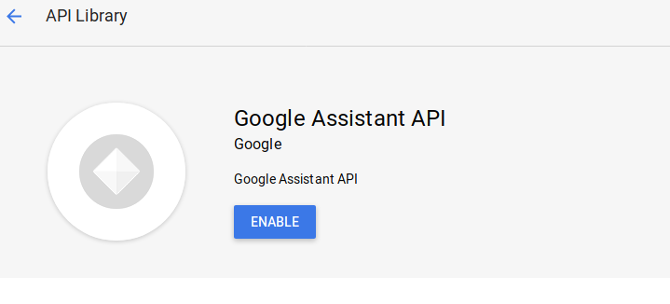
There are a few online adjustments you’ll need to make to continue. Navigate to the Google Assistant API website and click Enable.

Enable the Google Assistant API

The project also requires activity permissions. Head to your Activity Control panel and make sure the following activities are turned on:

  • Web & App Activity (including Chrome History checkbox)
  • Device Information
  • Voice and Audio Activity

Changing Google Activity settings

Now you can move on to registering the device.

Registering Your Raspberry Pi

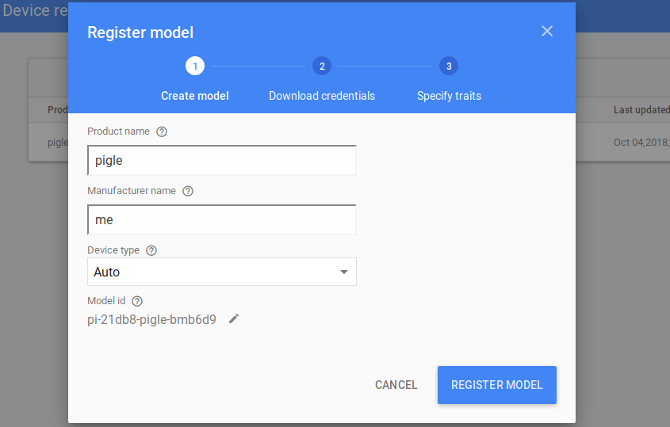
Back in the Action Console, select Device registration from the left panel. Under Product create an easy to remember name for your device. The manufacturer name isn’t important (but must be there), and select Auto for the device type.

Register your Pi as a Model

Click Register Model, and on the next screen click Download OAuth 2.0 Credentials. This downloads a JSON file to your computer. If you aren’t familiar with JSON files, don’t worry, but learning how to use JSON is worth doing for the future!

The official Google guide recommends moving the file to /home/pi, so open the file manager and do this now.

Extra step for SSH users:

If you are using SSH you will have downloaded the JSON file to your local machine instead of the Pi. To transfer it, open a separate terminal window with no SSH connection. From this window, copy over the client secret JSON file using this command:

scp ~/Downloads/client_secret_client-id.json pi@raspberry-pi-ip-address:/home/pi/

Replace “raspberry-pi-ip-address” with your Pi’s ip address, and don’t forget the colon before the path. If you downloaded the JSON file to another location modify your local path to reflect this. Enter your password when prompted, and the file will copy to the Pi’s home directory.

Copy the Secret Cient ID to the PI

Switch back to the SSH terminal, and navigate to /home/pi. Enter ls -l to list the files in the directory. You should see the transferred client secret JSON file.

Installing the SDK

Google recommends working in a Python virtual environment. Create a new virtual environment called env.

If you’ve never done this before, this tutorial will help you learn how to use Python virtual environments.

Install the latest versions of Pip, Setuptools and Wheel and activate your virtual environment:

env/bin/python -m pip install --upgrade pip setuptools wheel
source env/bin/activate

Google Assistant has some dependencies which you should install into the virtual environment now.

sudo apt-get install portaudio19-dev libffi-dev libssl-dev libmpg123-dev

Finally, install the Google Assistant SDK, Samples, and OAuth tool.

python -m pip install --upgrade google-assistant-library
python -m pip install --upgrade google-assistant-sdk[samples]
python -m pip install --upgrade google-auth-oauthlib[tool]

That is everything needed to get up and running. If any of the installations fail, check the spelling and spacing thoroughly.

Authenticating the Raspberry Pi

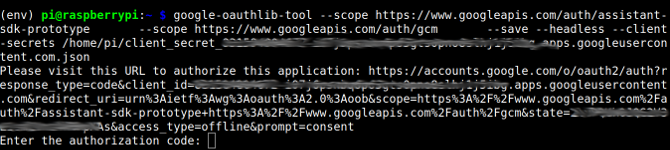
Use the google-auth-oauthlib[tool] with the credential JSON file downloaded earlier to authenticate your Raspberry Pi.

google-oauthlib-tool --scope https://www.googleapis.com/auth/assistant-sdk-prototype \
      --scope https://www.googleapis.com/auth/gcm \
      --save --headless --client-secrets /home/pi/YOUR_CLIENT_SECRET_ID.json

You’ll need to replace YOUR_CLIENT_SECRET_ID with the downloaded file, so it is worth copying the filename first. This client ID must be correct. Do not change the filename!

You should get a message with a link, asking you to paste in an authorization code.

Generating the Authorization link from the command line.

Clicking the link opens the browser. You’ll be prompted to enable the device on your Google account. Copy the authorization code which follows, and paste it back into your terminal window.

You should receive a confirmation reading Credentials Saved: /home/pi…, meaning the Pi has been authorized successfully with your Google account.

Testing It Out

Now that everything is in place, it’s time to test your Pi Google Assistant. Run the assistant with this command:

googlesamples-assistant-hotword --project-id my-dev-project --device-model-id my-model

You will need to replace my-dev-project with your Project ID (found under the Settings cogwheel of the Action Console). Your device-model-id is listed under the Device registration section of the Action Console.

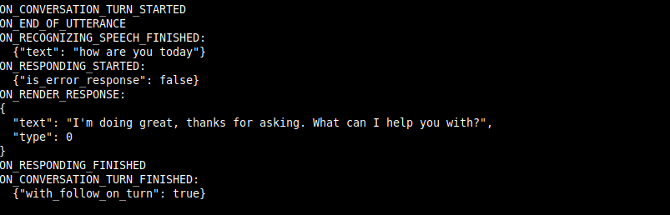
Try it out! Say “OK Google” and ask a question. You can see the program output in the terminal as you hear the response:

Terminal output for Google Assistant

That’s it! Google Assistant is now running on your Raspberry Pi. Note that if the output volume is a little low, you can change it by saying “Hey Google, turn your volume up to 80%.”

Bonus: Voice Activated GPIO

It is possible to control lights with an Arduino and Siri, but there is a simpler method. If you set up an LED, you can use the Google Assistant to control it with your voice.

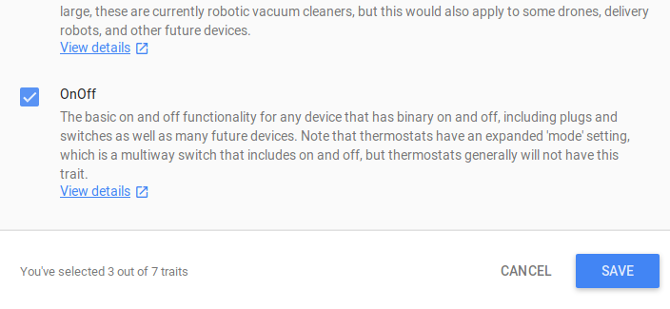
Setting up Google Assistant to work with the GPIO pins is relatively simple, but requires some extra steps. Head to the Google Action Console, and find your device under Device registration. Click on it, and open the traits menu:

Activating the OnOff Assistant trait

Turn the OnOff trait on, and click Save.

Now making sure you are inside the env virtual environment, clone a version of the SDK to your Pi using git:

git clone https://github.com/googlesamples/assistant-sdk-python

Since this is a virtual environment, you’ll need to install RPi.GPIO before moving forward.

pip install rpi.gpio

Now, navigate to the folder containing the hotword.py script.

cd assistant-sdk-python/google-assistant-sdk/googlesamples/assistant/library

Modifying the Script

You’ll need to add a few lines to the hotword.py script, so open it in the nano editor:

nano hotword.py

Under the import statements, add your own for RPi.GPIO.

import RPi.GPIO as GPIO

Look for the process_event method. At line 66, remove or comment out the print statement, and add an if statement to control the LED.

#print('Do command', command, 'with params', str(params))
if command == "action.devices.commands.OnOff":
    if params['on']:
        print('---------------')
            print('Led turned on')
        print('---------------')

            GPIO.output(18, GPIO.HIGH)
    else:
            print('---------------')
                print('Led turned off')
            print('---------------')

                GPIO.output(18, GPIO.LOW)

This logic controls the LED, but so far it isn’t configured to output. Set it up in the main() function before the process_event method gets called.

GPIO.setmode(GPIO.BCM)
GPIO.setup(18, GPIO.OUT, initial=GPIO.LOW)

Now the GPIO pin is set to output and initializes in a low state. Save and quit. You can run your modified script passing your model-id number (found in the Action Console) as an argument.

python hotword.py --device-model-id YOUR-MODEL-ID-HERE

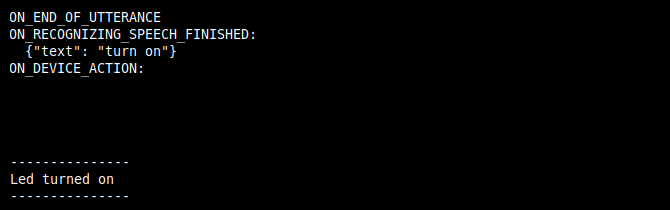
The terminal output is the same as before, and the assistant will work as standard. Now however, when you say “OK Google, turn on” you will see a new output:

Terminal Message showing "LED turning on" print statement

Note: The above image has been cropped, showing only the assistant hearing the request, and the print statement added to the script.

You should see your LED light up too!

Voice activated LED.

Your Own DIY Raspberry Pi Google Home Assistant

This project is a good introduction to using Google API services. Modifying Google’s example code also helps with learning the basics of Python.

With this tutorial as a basis, you can link the PI Assistant to other DIY Raspberry Pi projects and build yourself a voice-activated smart home!

Read the full article: How to Build a DIY Google Home Assistant With Raspberry Pi


Read Full Article
Is Linux Eating Your RAM? How to Manage Your Memory


linux-eating-ram

So you’ve installed Linux on the promise that it requires fewer system resources than Windows. Why, then, is your system suddenly low on RAM?

Don’t panic! Linux isn’t eating your RAM. To understand just what’s going on, we’ll have to take a look at how Linux manages memory.

How to View Free RAM on Linux

As with anything on Linux, there are multiple ways to check how much RAM is in use. If you’re coming from a commercial operating system, you may find it easier to open an app similar to the Windows Task Manager or the macOS Activity Monitor. This program’s name depends on which Linux desktop environment you use.

On GNOME, the most widely-used option, open a program called the System Monitor. On KDE, a similarly feature-complete alternative, use Konsole instead. Other desktop environments have similar tools under various names.

For an approach that works regardless of your desktop environment, you can turn to the command line. Open up the Terminal application and type in the following command.

free

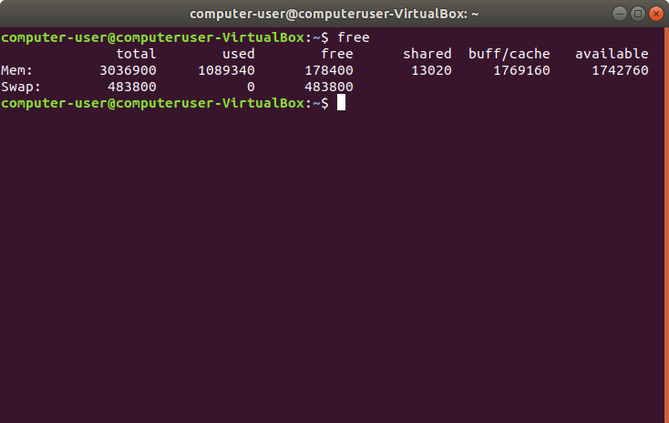
You will see results that look something like this. The numbers will change depending on how much RAM your machine has and the number of active programs.

A Linux terminal displaying the free command

For a more thorough look at your RAM, try this:

cat /proc/meminfo

The above command loads the same file that the free command uses to see how much memory is available on your PC.

If your numbers seem stark, it may seem that Linux has eaten your RAM. Let’s say you have 4GB of RAM, and 3.9GB is in use. Only 0.1GB appears to be free for additional apps! It seems you’re one program away from bringing your PC to a screeching halt.

Look again. This time turn your eyes to the “available” column. There you may find that you actually have 1GB of data open to apps. But how? It all comes down to how Linux manages and uses RAM.

How Linux Uses RAM

How Linux uses RAM isn’t much different from Windows and other operating systems. But different systems present what’s going on in different ways.

When your PC sees that there is RAM not currently in use, it dedicates some of this space to disk caching. In this way, apps store data in a location that’s quicker to access, making the system run faster and more smoothly. When other apps need more memory, they take the amount they need from this disk cache as though it were sitting around unused.

In other words, Linux puts that empty space to good use during its time off. Why let all that free memory go to waste?

To know how much space is in use this way, look at the “buff/cache” column. This is the amount of RAM dedicated to buffers and cache at the time you ran the command. The idea that clearing this space might help performance is a common misconception about RAM.

The Difference Between Free and Available RAM

Now that you’re all caught up, it’s still easy to get confused. I understand. Here’s how Linux views your RAM.

  • Used: RAM that is currently in use by an application.
  • Available: RAM that may be in use for disk caching but can be freed up for applications.
  • Free: RAM that is not in use by an application or disk caching.

Free and available may seem like synonyms, but there’s a technical difference. The former is memory that isn’t in use at all. The latter is memory that is currently in use but can easily open up if needed. For everyday use, it’s the latter that really matters.

How to Clear RAM Memory Cache and Buffer

Let’s say, for whatever reason, you still want to clear up RAM that the Linux kernel is using for its buffers and cache. To be clear, doing this will negatively impact performance. If you want your system to run optimally, leave things be.

You’re going to run these commands as a system administrator.

To clear pagecache, enter the following command:

echo 1 > /proc/sys/vm/drop_caches

To clear dentries and inodes, change the number to 2:

echo 2 > /proc/sys/vm/drop_caches

To clear pagecache, dentries, and inodes all together, change the number to 3:

echo 3 > /proc/sys/vm/drop_caches

If these commands don’t improve how smoothly your PC runs, why run them? Doing so is a way to compare your computer’s performance after making a change without needing to restart. If you’re not benchmarking or testing your PC, there’s little reason to bother.

How to View and Close Programs

Does all of this mean that you don’t need to check RAM and manage memory on Linux? Not quite.

While Linux knows how to optimize RAM, that doesn’t mean your apps do. Sometimes your browser will hog all your memory. A game might freeze without freeing up any system resources.  An image viewer might hang up when trying to load an extremely large picture.

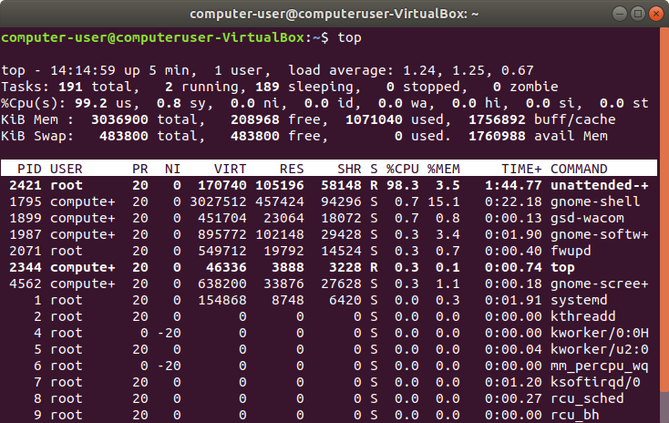
To see which programs are giving your computer a hard time, try out the top command:

top

The results will look something like this.

A Linux terminal displaying the top command

Now that you’ve spotted a problematic program, what can you do about it? One option is to use the kill command. To do so, note the PID number that appeared next to the program when you enter top. You’re going to need it.

kill -9 2470

Alternatively, you can use the killall command to close a program using its name.

killall firefox

Boosting Linux System Performance Even Further

Unlike many things in life, your PC’s memory more or less manages itself. Here we’ve looked at ways to see what’s going on and, when action is needed, step in. You now know how to see how much memory is in use and what programs are using it. You can also take a few steps to stop activities that are hogging space.

But the tools above are hardly the extent of what’s available in the Linux toolbox. See our articles on speeding up a slow Linux computer and updating the Linux kernel for better performance.

Read the full article: Is Linux Eating Your RAM? How to Manage Your Memory


Read Full Article

4 Utilities for Tweaking Your Mac Without the Terminal


mac-tweak-utils

The System Preferences app in macOS offers quite a few settings to customize your Mac. When those are not enough, you’d normally have to rustle up a few Terminal commands to make visual as well as functional changes.

But what if you aren’t keen on fiddling with the Terminal app? You can still make the required changes with the following point-and-click tools. These tools make many built-in macOS features easily accessible without text commands.

1. TinkerTool

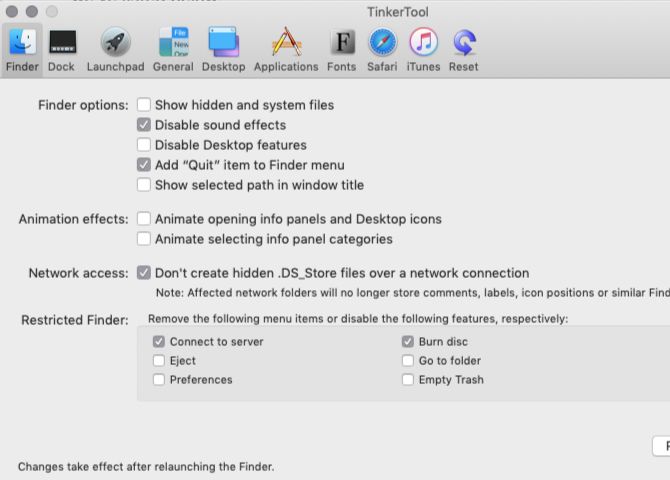
finder-panel-in-tinkertool-on-mac

TinkerTool enables a few macOS features by default. For example, it adds a Quit Finder option to the Finder menu and programs the Backspace key to go back one page in Safari.

You’ll find the settings organized in logical panes such as Dock, Safari, Desktop, iTunes, etc. It’s best to tackle these panes one at a time to keep track of the tweaks that you’re making.

Any changes you make with the app stay restricted to your user account. Unlike the other apps on this list, TinkerTool doesn’t ask you for admin credentials to modify settings.

Here’s a short list of some of the useful changes you can make with TinkerTool:

  • Insert separators in the Dock
  • Change the default save location of Mac screenshots and their format too
  • Enable single application mode, which hides all background apps when you switch to a new app
  • Change the number of entries that show up in Recent Items menus

Worried about messing up crucial macOS settings with TinkerTool and having no way of going back? Rest assured that you can revert all the changes you make with the app and restore settings to their original state. All it takes is a click of the Reset to pre-TinkerTool state button on the Reset pane of the app.

Here, you’ll also find a Reset to defaults button in case you want to start using TinkerTool with a clean slate.

Download: TinkerTool (Free)

2. Onyx

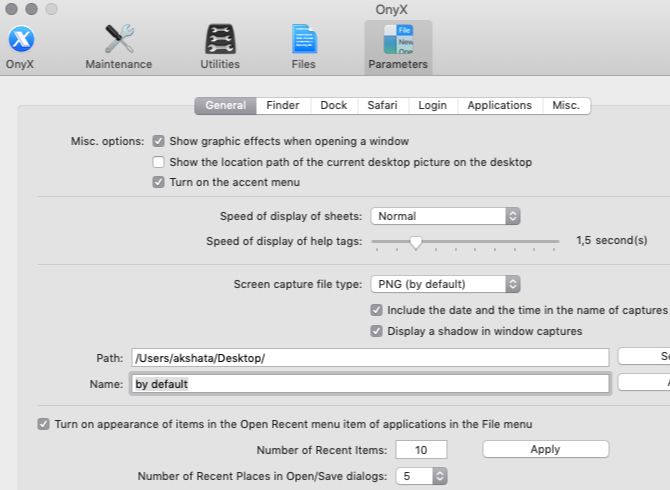
general-cateogry-of-parameters-pane-in-onyx-on-mac

Onyx is part maintenance app and part tinkering tool. It can help you detect and fix common macOS problems and improve macOS with visual and functional changes. Let’s focus on the tinkering part for now.

Accordingly, the Parameters pane of Onyx is all that concerns us. Here, you’ll find quite a few settings listed under various categories like Finder, Dock, Login, and Safari.

Using these settings, you can, for example:

  • Hide or display various Finder menu items
  • Enable half-star ratings in iTunes
  • Add a System Preferences pane for the built-in Archive Utility
  • Configure screen capture functions

The developers of Onyx have a couple of other apps to handle the maintenance and personalization features of Onyx. They’re called Maintenance and Deeper respectively.

Maintenance gives you tools for tasks like cleaning system caches and running scripts. Deeper lets you customize hidden macOS functions, much like the Parameters pane of Onyx does.

However, Maintenance and Deeper haven’t been updated to work on macOS Mojave yet. The developers strictly advise against using non-compatible versions of these apps. So be sure to keep an eye out for their Mojave-compatible versions.

Download: Onyx (Free)

3. MacPilot

finder-category-of-apps-pane-in-macpilot

If you want granular control over your Mac’s features, MacPilot can hand it over to you. You can do a lot with this app!

For starters, you can:

  • Add spacers to the Dock
  • Configure Dock auto-hide delay
  • Disable Notification Center and Mission Control
  • Disable all animations
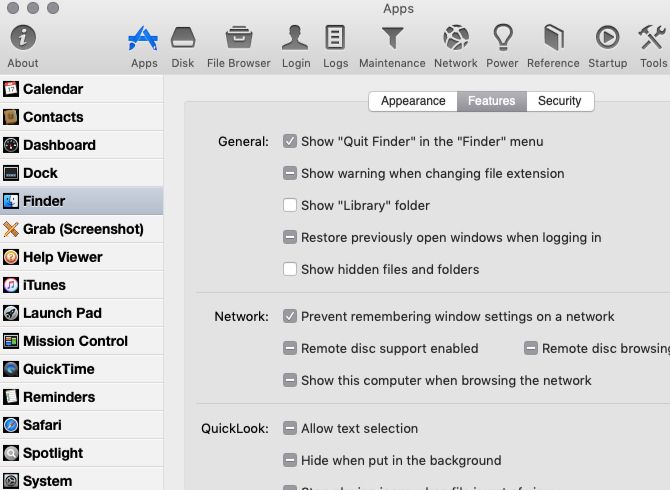
  • Add a Quit Finder option to the Finder menu
  • Change the format and location of macOS screenshots
  • Erase files securely
  • Force a specific display resolution

That’s a fraction of what you can do with MacPilot. No wonder the app comes across as a bit overwhelming—it lists so many settings.

It’s useful that MacPilot is well organized. You’ll find the major categories divided into panes; each pane further has nested categories that appear as a sidebar menu.

We recommend that you take your time going through each settings pane instead of making changes at random. It’ll help you avoid unnecessary confusion. Also, when in doubt about a setting, leave it alone until you research it well and know what you’re doing.

Even without its system maintenance features, MacPilot is worth paying for. Since it comes with a “try before you buy” policy, why not give it a shot?

Download: MacPilot ($30, free trial available)

4. Cocktail

general-category-of-interface-pane-in-cocktail-on-mac

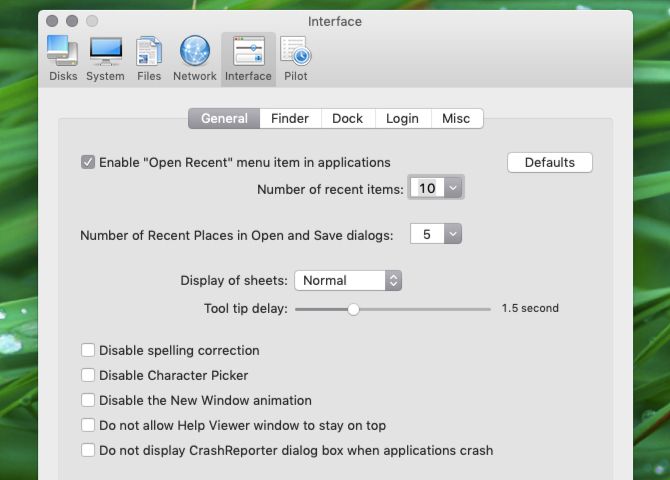
Like Onyx and MacPilot above, Cocktail has maintenance and personalization tools bundled into one app. Its Interface pane holds the settings you need to tweak elements in Finder, Dock, the login screen, and more.

Cocktail lets you disable window zooming, display the full folder path in the window title, and lock Dock icons and their sizes. Plus, you can configure Finder menu items, disable various animations, and enable half-star ratings in iTunes.

The app also allows you to prevent the Photos app from opening automatically when you connect a device. By the way, you can also do this using your Mac’s Image Capture app.

Pick Cocktail only if you’re planning to use its system maintenance features also. Otherwise, it’ll prove to be a costly purchase.

Download: Cocktail ($30, demo mode available)

Don’t Want to Use the Terminal? Ignore It

The apps above allow you to make many useful changes without disabling SIP (System Integrity Protection). Of course, with SIP enabled, you lose the ability to make certain advanced tweaks. You can still go ahead with them by disabling SIP (but we don’t recommend it).

Read the full article: 4 Utilities for Tweaking Your Mac Without the Terminal


Read Full Article
YouTube CEO says EU’s new copyright legislation threatens jobs, smaller creators


YouTube CEO Susan Wojcicki published her quarterly letter to creators today, which included very strong language regarding the EU’s controversial copyright reform directive. Specifically, her letter focused on Article 13, the so-called “meme ban” that states that any site with a large amount of user-generated content – like Facebook or YouTube, for example – will be responsible for taking down content that infringes on copyright. Wojcicki says the way this legislation is written could “shut down the ability” of millions of people to upload to YouTube.

The legislation she’s referring to is Article 13 of the European Union Directive on Copyright in the Digital Single Market, which the EU Parliament just recently voted to back. The Directive contains several parts, including another concerning “link tax,” which gives publishers the right to ask for paid licenses when online platforms share their articles and stories.

But YouTube is most concerned with Article 13, which impacts sites with user-generated content. In order to comply with the law, sites like YouTube would have to automatically scan and filter user uploads to ensure they aren’t in violation of copyright.

But today, users often express themselves by sampling, remixing, and creating content using music, pictures and videos that would otherwise be considered copyrighted material. However, even though memes and parodies are protected by previous laws (in some countries), these upload filters wouldn’t be able to tell the difference between a copyright violation and a meme – and they’d block content that should be allowed. This is how Article 13 became to be known as the “meme ban.”

However, the language in legislation isn’t clear on how enforcement should take place – it doesn’t say, for example, that sites have to use upload filters. Others believe that YouTube’s existing Content ID system, which scans videos after upload, would be sufficient.

YouTube, for its part, seems to be believe that Article 13 will require more than the existing Content ID system to be compliant.

Writes Wojcicki, “Article 13 as written threatens to shut down the ability of millions of people — from creators like you to everyday users — to upload content to platforms like YouTube. It threatens to block users in the EU from viewing content that is already live on the channels of creators everywhere. This includes YouTube’s incredible video library of educational content, such as language classes, physics tutorials and other how-to’s,” she says.

The CEO also says Article 13 will threaten “thousands of jobs” – meaning those of EU-based content creators, businesses, and artists.

And she warns that YouTube may have to take down content from smaller, original video creators, as it would be liable for that content, saying:

The proposal could force platforms, like YouTube, to allow only content from a small number of large companies. It would be too risky for platforms to host content from smaller original content creators, because the platforms would now be directly liable for that content. We realize the importance of all rights holders being fairly compensated, which is why we built Content ID, and a platform to pay out all types of content owners. But the unintended consequences of article 13 will put this ecosystem at risk.

The company wants to weigh in on how the legislation is worded to protect its interests, and those of the larger creator community. Wojcicki said YouTube is committed to working with the industry to find a better way respect the rights of copyright holders, before the language in the EU legislation is finalized by year-end.


Other changes include expansion of memberships, premieres

While YouTube’s comments on Article 13 were the key part of today’s letter, Wojcicki also updated the community on its priorities for 2018.

This included an update on its plans to better communicate with creators, which it says it accomplished by increasing the number of product updates and “heads up” messages regarding changes to YouTube, including smaller tests or experiments, on its @TeamYouTube handle and the Creator Insider channel, in addition to its launch of YouTube Studio, where creators can read all the news and product updates.

The company also said that its new “self certification” video upload flow, where creators self-describe the content in their videos for advertisers, will roll out more broadly in 2019.

Newly launched channel memberships are also expanding their rollout, with the threshold now being lowered from 100,000 to 50,000 subscribers. Meanwhile, the new Premieres feature is now publicly available to all creators.

Other updates focused on what YouTube is doing across education, news and journalism, YouTube Giving charity work, gaming, and more. The full letter is on YouTube’s blog here.


Read Full Article

Barnard's Star


Barnard's Star

The White House hopes tech employees will drive government innovation


The Trump administration has a major ask to make of big tech companies. In a meeting at the White House today, officials will ask Amazon, Microsoft, Google and IBM, among others, to make it easier for employees to do stints in the government.

It’s a heavy lift, of course, asking well-compensated workers to take time out from demanding gigs for the betterment of federal and state governments. A number of companies, including Facebook and Google, already allow employees to take time off for this exact reason. However, the particularly polarizing nature of politics in 2018 and all of the ill-will surrounding the current administration, have further complicated the ask.

The Washington Post quotes an anonymous official, who stressed the importance of “put[ting] politics aside” for the greater good. “This event on Monday is not just about our efforts, it’s about our successor, and their successor after that,” the person told the paper. “It’s good for the country in the long term for technology professionals to have civil service in their career at some point.”

The notoriously slow pace of government innovation was something the Obama administration looked to address during its eight years in power, and Trump’s White House appears to be interested in continuing that trend. Ahead of his inauguration, Trump met with tech leaders, including Tim Cook, Jeff Bezos and Satya Nadella, though the administration’s policies have been an on-going source of friction with Silicon Valley


Read Full Article
Gjemeni puts your couch in a box


Gjemeni, pronounced Gemini, is a new furniture-on-demand service from founder Sean Pathiratne. The company offers decidedly tech-forward furniture that comes in a single box and can be assembled by anyone in a few minutes.

Pathiratne sees his company as a fashionable and agile furniture company that brings stylish stuff to your living room in the vein of Zara or H&M.

“We can create and deliver on trends through our technology-led global supply chain with the agility and speed of ‘fast fashion.’ We are ‘fast furniture,'” said Pathiratne.

[gallery ids="1735487,1735486"]

“I live and work in Silicon Valley. I spend a lot of time in WeWork and other co-working places, in the offices of start-ups, and with tech friends,” said Pathiratne . “I observed how millennials live and work. They are a restless bunch physically – which mirrors their restlessness overall. They don’t like the status quo in business or with the objects in their lives. They are constantly shifting and fidgeting on their sofas. They just couldn’t find the right positions. After all, today we are checking our smart phones one minute, leaning back and contemplating the world another minute.”

The result? A plugged-in couch for the plugged-in generation.

“So the implications were obvious: create a multi-position couch for our multi-tasking world. A couch that meets people where they are, rather than the other way around. And also make sure that the next- gen couch had connectivity for the generation that is always plugged in,” he said.

The Gjemeni flagship is a convertible couch that turns from stark seating system into a lie-flat futon. Both sides of the couch have power and USB ports and it has three resting positions.

The company also sells a chair and an ottoman. Each product, from the $999 couch to the $299 leg rest, comes in a massive box that opens to reveal the furniture and a set of legs. To build the stuff you simply snap the legs into the holes on the bottom and flip the couch upright.

I tested one of the couches and can report that it would make a great startup-office seat. The styling, the firmness, and the clever charging ports mean that you can easily make your visitors feel powered-up and comfortable. As a home couch, however, I would recommend trying before you buy. First, at 6.5 feet long, there isn’t much room on the couch for more than two people let alone a small family. Further, the two reclining options are not conducive to many traditional couch activities except, perhaps, for the aftermath of Netflix and chill. The two sides of the back of the couch move from upright to reclined. When upright it is set at almost at 90 degrees – a TV lounging nightmare – and when slightly reclined you fall into a napping position. There is no “just right” with this couch for the home user.

That said this is furniture and your experience may differ. The company offers a 60-day money back guarantee as long as you keep the massive box and at $999 it makes perfect sense to take a flyer on this one. In fact, that’s the point. Like other furniture services, Gjemeni plans to disrupt the visit to Ikea or the furniture store. Because setup is so simple there is little harm in giving it a go and sending it back if you don’t like the size, the firmness, or the fit.

After all, said Pathiratne, the company is all about self-awareness.

“We are built to harness technology in pursuit of wellness. Gjemeni meets our ergonomic needs to relieve pressure on the back and spine, and to adjust so that we can take a power nap (we all know how important sleep is to wellness) or simply meditate and ground ourselves,” said Pathiratne.


Read Full Article
Minds, the blockchain-based social network, grabs a $6M Series A


Minds, a decentralized social network, has raised $6 million in Series A funding from Medici Ventures, Overstock.com’s venture arm. Overstock CEO Patrick Byrne will join the Minds Board of Directors.

What is a decentralized social network? The creators, who originally crowdfunded their product, see it as an anti-surveillance, anti-censorship, and anti-“big tech” platform that ensures that no one party controls your online presence. And Minds is already seeing solid movement.

“In June 2018, Minds saw an enormous uptick in new Vietnamese of hundreds of thousands users as a direct response to new laws in the country implementing an invasive ‘cybersecurity’ law which included uninhibited access to user data on social networks like Facebook and Google (who are complying so far) and the ability to censor user content,” said Minds founder Bill Ottman.
“There has been increasing excitement in recent years over the power of blockchain technology to liberate individuals and organizations,” said Byrne. “Minds’ work employing blockchain technology as a social media application is the next great innovation toward the mainstream use of this world-changing technology.”

Interestingly, Minds is a model for the future of hybrid investing, a process of raising some cash via token and raising further cash via VC. This model ensures a level of independence from investors but also allows expertise and experience to presumably flow into the company.

Ottman, for his part, just wants to build something revolutionary.

“The rise of an open source, encrypted and decentralized social network is crucial to combat the big-tech monopolies that have abused and ignored users for years. With systemic data breaches, shadow-banning and censorship, people over the world are demanding a digital revolution. User-safety, fair economies, and global freedom of expression depend on it – we are all in this battle together,” said Ottman.


Read Full Article