11 September 2018

Google back in court arguing against a global ‘right to be forgotten’


Google’s lawyers are in Europe’s top court today arguing against applying the region’s so-called ‘right to be forgotten’ ruling globally domains, rather only geo-limiting delistings to European sub-domains (as it does now).

The original rtbf ruling was also a European Court of Justice (ECJ) decision.

Back in 2014 the court ruled search engines must respect Europeans’ privacy rights, and — on request — remove erroneous, irrelevant and/or outdated information about a private citizen.

Google was not at all happy with the judgement, and kicked off a major lobbying effort against it — enlisting help from free speech champions like Wikipedia’s Jimmy Wales.

But it also complied with the ruling, after a fashion (after all, it is EU law) — applying delistings on local domains but not across Google.com. Which means there’s a trivial workaround for circumventing EU law.

That has displeased European data protection agencies — who say Google is flouting the law and EU citizens fundamental rights are not being respected. France’s data protection agency challenged Google’s approach. In May 2016 it ordered the company to make delistings global, and fined it €100,000 for non-compliance.

Google appealed and last year the French court decided to refer questions to the ECJ for a ruling on the scope of the delisting — saying it “poses a serious difficulty in interpreting the Law of the European Union”.

And so now we’re back in Europe’s top court with Google’s lawyers arguing against making delistings global — contending it would damage free speech, and enable authoritarian regimes to get stuff they don’t like scrubbed off the Internet.

“We — and a wide range of human rights and media organizations, and others, like Wikimedia — believe that this runs contrary to the basic principles of international law: No one country should be able to impose its rules on the citizens of another country, especially when it comes to linking to lawful content,” wrote Google’s Kent Walker, in 2015. “Adopting such a rule would encourage other countries, including less democratic regimes, to try to impose their values on citizens in the rest of the world.”

The extraterritoriality problem was also chewed over by Google’s self-appointed ‘advisory council’ on the rtbf issue at that time.

And while the majority of this Google-appointed body aligned with Google’s view that there should not be global delistings, there was one dissenting voice: German MP, Sabine Leutheusser-Schnarrenberger, who wrote then:  “The internet is global, the protection of the user’s rights must also be global. Any circumvention of these rights must be prevented.”

Google and CNIL declined to comment on today’s hearing.

A second (separate) rtbf case also being heard by the ECJ today concerns whether search engines should have to remove reference to any sensitive personal information about individuals. Which would represent a significant expansion if granted.

However the case is not supported by EU data protection agencies. The individuals bringing the case had their application rejected by CNIL, leading them to pursue a legal appeal.

The key point on this case is that the current right to delist is not absolute; the rtbf only applies to private individuals, not to public figures (e.g. politicians and journalists); and also only applies where the information in question is outdated or irrelevant. So it is bounded and balanced, and absolutely does not apply to every individual and every piece of sensitive personal data.

The current implementation of the rtbf also means Google must review requests, to balance the public right to know against individual privacy rights.

The company actually denies the majority of requests — i.e. when it does not believe a request falls under the scope of the law (Google publishes a Transparency Report on delisting, showing it has, to-date, agreed to delist less than half of requests).

Individuals denied delisting can appeal to a national data protection agency, and indeed challenge a DPA decision in court — as in this case.

But Google’s lawyers said today that only a tiny fraction of rtbf request decisions are every appealed, and further claimed its decisions largely align with DPAs… 

There’s no fixed timeline for the ECJ to hand down a ruling on the two cases but a spokeswoman for the court told us that on average the opinion of the Advocate General comes 2 to 4 months after the hearing, and the Court’s judgment around 3 to 6 months after that. So a court verdict does not look likely before 2019.

Since the 2014 judgement, the EU has doubled down on the rtbf — extending the principle by baking it into its recently updated data protection framework, the GDPR, which gives EU citizens rights to ask data controllers to rectify or delete their personal information, for example.


Read Full Article

How to Add Hyperlinks in Adobe Illustrator or Photoshop


learn-illustrator

Adding hyperlinks in Adobe Photoshop or Illustrator isn’t as simple as selecting text or right clicking an image and finding the option easily available. That doesn’t mean there aren’t work arounds available in both programs to add links to text, images, and objects.

How to Add Hyperlinks in Adobe Photoshop

The easiest option for adding links to Photoshop is to use the Slice feature. The catch here is that you will have to save and share your document as an HTML file.

  1. After you’ve inserted the image or text you want to add a hyperlink to, in Photoshop select the Slice tool, which you’ll find by clicking the Crop tool in the tools menu and holding down until you see the list with the knife icon (keyboard shortcut C.) 
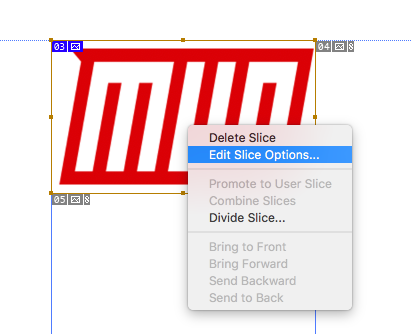
  2. Right-click your newly inserted slice and click Edit slice options
  3. In the dialog box that opens, insert your link in the URL field and click ok. If you want the link to open in a new window, select “_blank” from the dropdown menu for Target. Click OK
  4. Once you’re ready to save your file, click File > Export > Save for Web (Legacy)
  5. In the dialog box that opens, the only thing you need to select is the Preset. You can select any of the JPG or PNG options and click Save
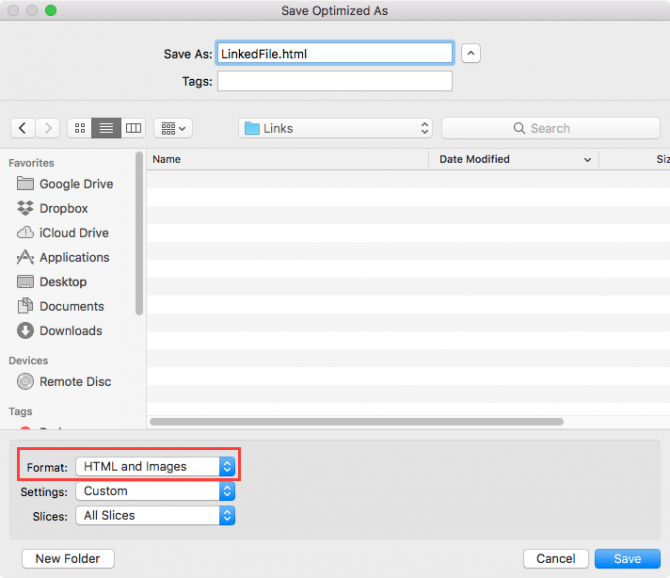
  6. In the dialog box that opens, type in your file name and click the File Format dropdown and select HTML and Images. Click Save

How to Add Hyperlinks in Adobe Illustrator

It’s a little simpler to add a link to an image in Illustrator, but there’s also a catch: you’ll have to save the file as a PDF.

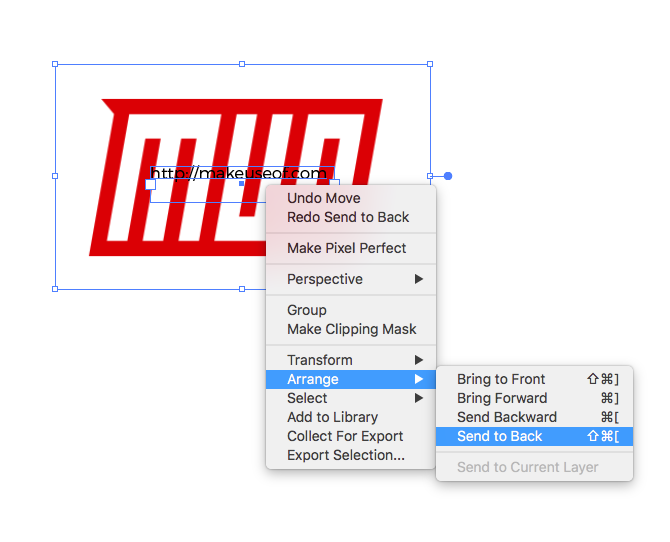
  1. Select the Text tool (keyboard shortcut T) and insert your link on top of the image or object you want to add the link to. Make sure when you insert the link to insert http://.
  2. You’re going to need to find a way to hide the text of the link. You can place it behind the object by right-clicking and selecting Arrange > Send to Back. You can also change the color to the same color as your background or the object you’re linking if it’s a solid color.  
  3. Click File > Save as.
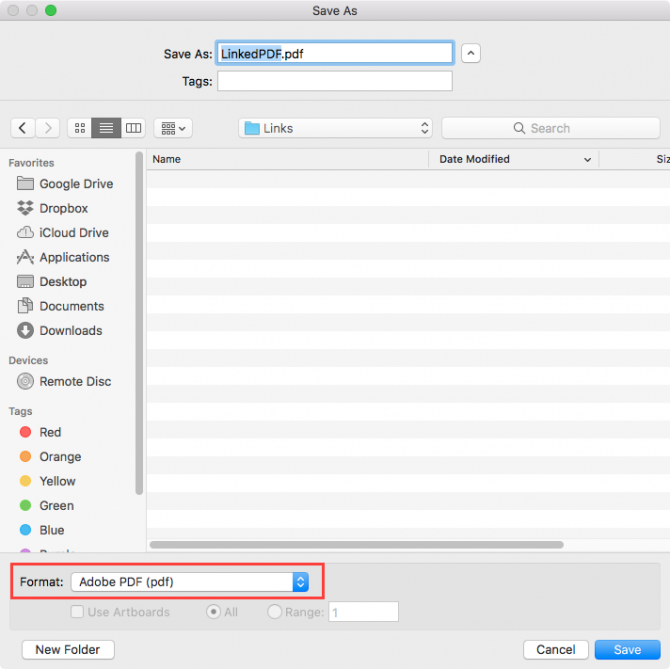
  4. In the dialog box that opens up, enter your file name and for the format select PDF

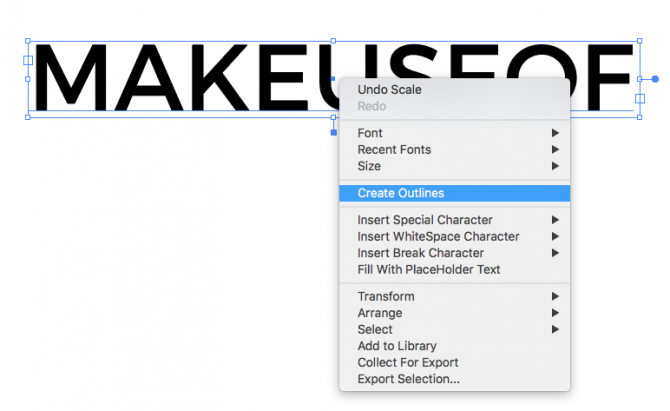
This method doesn’t work with text boxes. If you want to add a link to text, you can follow the steps above, but you’ll have to convert your text to outlines first. To do this, right-click the text box and select Create Outlines. But be warned, once you’ve done this, you can’t edit the text.

If you’re an Adobe Creative Cloud member, you can instead use Adobe Acrobat insert links to your text in a PDF file.

Read the full article: How to Add Hyperlinks in Adobe Illustrator or Photoshop


Read Full Article

How to Find Duplicate Photos in Adobe Lightroom


bach-edit-photos-lightroom

There are quite a few utilities which can help you find duplicate photos. Adobe Lightroom Classic CC isn’t one of them. This is a surprising missing feature for photographers who have large catalogs. Duplicate RAW photos is a common byproduct when you merge two or more catalogs.

It can be a minor irritant but a major space guzzler if those duplicates add up. So, what is the solution until Adobe Lightroom comes up with a fix?

Step 1: Prevent Duplicates When You Import Photos

The first step is to check the Lightroom setting which acts as a gatekeeper when you begin to import your catalog.

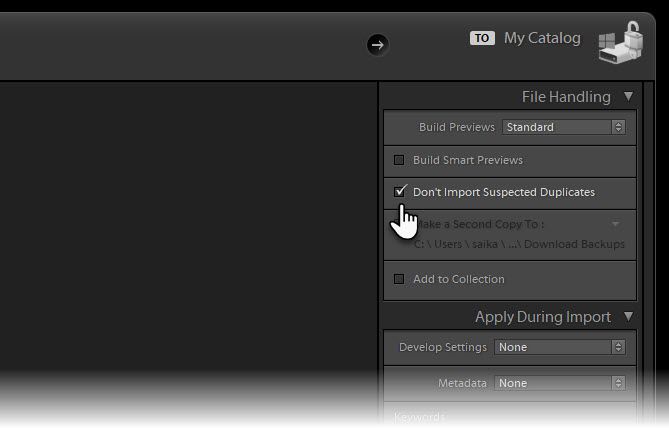
Select the Don’t Import Suspected Duplicates box in the Import Dialog. Click the Import button in the Library module and select the source for the catalog. Select the setting under File Handling panel on the right.

Adobe Lightroom Duplicate Photos

Lightroom Classic CC decides a photo is a duplicate of another file in the catalog if it has the same, original filename; the same EXIF capture date and time; and the same file size.

Step 2: Find Duplicates With a Free Plugin

The tongue-twisting name aside, the free Lightroom plugin does exactly what it advertises. It is available for Windows and macOS. Teekesselchen is donationware. So, support the developer if you like this plugin!

  1. Install the plugin with a click on the downloaded Setup.exe file.
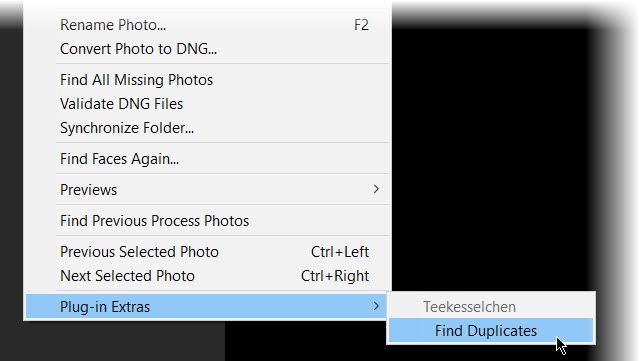
  2. Then go to Library > Plug-in Extras > Find Duplicates (under Teekesselchen) to run the plugin.
    Access the Adobe Lightroom Plugin
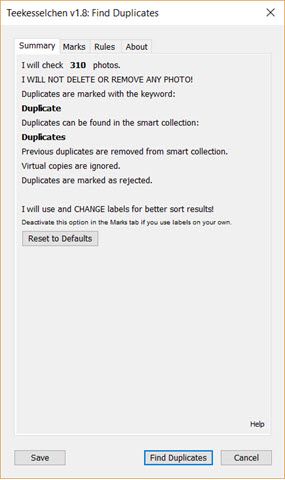
  3. A Summary dialog is displayed with a few tabs that give you the settings (Marks) to configure. For instance, you can tell the plugin to create a smart folder with the name “Duplicates” under your Collections.
    Run Teekesselchen
  4. Click the Find Duplicates button and the search process starts. My collection was a small one and it took just a few seconds to finish.
  5. Go to the Duplicates folder and check if the plugin has sorted genuine duplicates before deleting them. Here’s the complete tutorial that explains the process in detail.

One of the best ways to deal with duplicates is before you import them into Lightroom. So, do spend some time to understand how Lightroom imports photos. But it’s always good to know that you have an option if duplicates do sneak in.

Read the full article: How to Find Duplicate Photos in Adobe Lightroom


Read Full Article

Make your own Saregama Carvaan with YouTube and Google Sheets


Saregama Carvaan, a digital music player that looks like an old-fashioned transistor radio and targets the non-millennial generation, has become a huge hit in India. The company analysed data from online music streaming sites like Saavn, Gaana and YouTube, came up with a catalogue of 5000+ “greatest” Hindi movie songs and pre-loaded them into Carvaan, classified by artists and moods.

Like a radio station, Saregama Carvaan mixes nostalgia with an element of surprise – the player’s algorithm plays music in a random sequence so the listener would never know which song is coming up next. Can the Carvaan experience be recreated with YouTube? Let’s find out.

1. The Songs List

A quick Google search on the Saregama website led me to this PDF document – it contains a complete list of every song that’s bundled into the Carvaan player. I imported the songs PDF into a Google Spreadsheet so the data could be easily filtered by movie names or artistes.

saregama-carvaan.png

2. The YouTube Database

The YouTube API lets you query the video database by keywords. I wrote a simple Google Script that reads the song titles from the Google Spreadsheet and finds the corresponding video on YouTube. The YouTube API returns the video link, the description, the channel of the video uploader and the thumbnail image (source code).

youtube-api-video.png

3. The Spreadsheet Formulae

Google Spreadsheet provides the IMAGE formula that helped me embed the YouTube thumbnail URLs as images into the spreadsheet cells. I used Array Formulas to apply the same formula to the entire column in the spreadsheet.

The YouTube video IDs were converted to the YouTube URLs again with the help of a simple array formula.

=ArrayFormula(CONCAT("https://youtu.be/",D2:D))

4. The YouTube Playlist

Now the spreadsheet was populated with a list of songs that are preloaded into Carvaan and their corresponding YouTube videos.

The next task was to create a YouTube playlist with all the videos. I had earlier built a tool for copying YouTube playlists and the same API was used here for building the playlist inside the spreadsheet (source code).

youtube-playlist.png

The Final Result

And here’s the final result – a YouTube playlist with 5000 songs that come bundled with Carvaan. Press the “Shuffle” icon and the songs would play in random sequence continuously.

saregama-carvaan-youtube-playlist.jpg

Useful Links

The post Make your own Saregama Carvaan with YouTube and Google Sheets appeared first on Digital Inspiration.


5 Little-Known Apps and Sites Every Instagram User Needs to Know

Microsoft Extends Windows 7 Support… for a Price


In Microsoft’s ideal world, everyone will have upgraded to Windows 10 by now, but that hasn’t yet happened. So, Microsoft is offering to keep supporting Windows 7 for a little while longer… if you’re willing to pay for the privilege.

Windows 7 Extended Security Updates

In a blog post detailing how Microsoft is “helping customers shift to a modern desktop,” Microsoft has announced extended security updates for Windows 7. These will extend support for Windows 7 beyond January 14, 2020, when mainstream support is ending.

Microsoft states that it will “offer paid Windows 7 Extended Security Updates (ESU) through January 2023. The Windows 7 ESU will be sold on a per-device basis and the price will increase each year.” However, this price hasn’t yet been announced.

Extended security updates will be available to “all Windows 7 Professional and Windows 7 Enterprise customers in Volume Licensing, with a discount to customers with Windows software assurance, Windows 10 Enterprise or Windows 10 Education subscriptions.”

Unfortunately for IT departments looking for solutions, Microsoft no longer sells Windows 8, and Windows 10 is no longer available for free. So, one way or another, companies need to spend money to keep their systems safe and secure beyond 2019.

Windows 7 Is No Spring Chicken

This may sounds harsh, but it should be noted that Microsoft launched Windows 7 in 2009. So even in 2020 it will be more than a decade old. And in 2023, when Microsoft is pulling support for good, Windows 7 will be a veritable teenager.

Regardless, despite the age of this revered operating system it’s worth remembering that millions of PCs around the world are still being powered by Windows 7. If that’s still the case past 2020, or even 2023, then millions more PCs will be vulnerable.

Is It Time to Upgrade to Windows 10?

Perhaps now is the time for businesses to seriously consider upgrading their systems to Windows 10 lock, stock, and barrel. After all, this is the last version of Windows ever, and Windows 10 does have some amazing features you may have overlooked until now.

Image Credit: Imilyas/Flickr

Read the full article: Microsoft Extends Windows 7 Support… for a Price


Read Full Article

What Is Blockchain? A Simple Explanation in Simple Terms


whats-blockchain

At its core, blockchain is a distributed ledger. But what does that mean? And how is it different to a centralized ledger? What exactly is a blockchain?

Let’s illustrate by contrasting a blockchain to a bank.

Your bank maintains a central database (a “ledger”) of all their customer details. This may store account numbers, balances, transactions, and more. Whenever you interact with your account (such as by withdrawing money or making a transfer), your bank updates its records.

Only the bank has access to the ledger, so if they decide to make a change, there’s not much you can do about it.

Now imagine if a hacker gained access to this database. They could change balances, delete transactions, and more. Your bank may be able to restore the data from backups, and there may be many databases serving this data, but it’s ultimately controlled by one central entity.

Distributed ledgers are much smarter. Rather than one person or company having sole responsibility of the ledger, many people have copies of a distributed ledger, and there are often few restrictions on who can join.

Each user (known as a “node”) stores a copy of the data—all the way from the beginning of the ledger until now. The whole lot. For every transaction, several nodes verify it, and then all nodes update their records so that everything stays up to date and in sync.

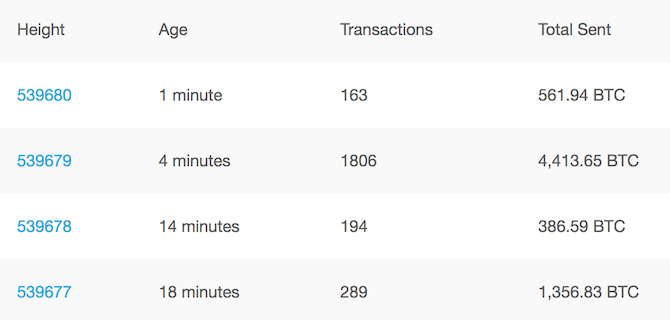
Bitcoin block explorer

Each new transaction gets bundled up with many other transactions into a “block”.

These blocks provide some serious benefits. There’s no centralized authority that can manipulate the record. If a hacker or nefarious node started changing records in one ledger, all the other nodes would reject it since the new records would not match the data stored by everyone else.

The only way to manipulate data is for every single node to collude together, which is highly unlikely. In the case of Bitcoin, there are roughly 10,000 different Bitcoin nodes spread out across the whole world as of this writing.

Blockchain Validation: Public and Private Keys

As you saw above, a blockchain is a decentralized store of data, and the most common type of data stored is transactions.

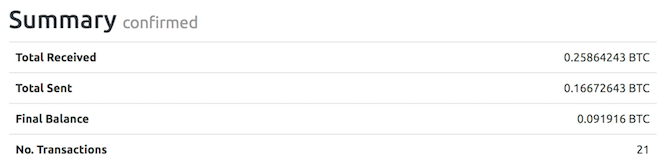
If I send Gavin one BTC, I’m telling every node that’s what I’m doing, and they all record the transaction if it’s allowed. By checking the ledgers, nodes may refuse the transaction if I don’t have enough Bitcoin to send, or if I’m not the account holder.

Bitcoin transaction details

Each transaction must pass validation, and that’s where blockchain technology becomes a bit more complicated. Every blockchain “wallet” (think of this like a blockchain bank account) has a public key and a private key.

The public key isn’t sensitive, but the private key is. Only the true account holder should have access to the private key (and if anyone gets hold of it, your account could be taken over). If you want to keep your coins super safe, then you should look into cold cryptocurrency wallets.

When sending Gavin the one BTC mentioned above, my wallet presents the public key along with a digital signature. This digital signature is unique and is only generated with the private key. By using the signature and public key, other nodes can verify that this is a legitimate transaction, all without ever revealing the private key.

This is a simplified example—the cryptography behind the public/private key system is much more complex. Public and private keys aren’t numbers like bank accounts. Rather, they use Secure Hash Algorithm 256 (SHA-256) and RACE Integrity Primitives Evaluation Message Digest 160 (RIPEMD-160).

Never heard of these algorithms? No worries. You don’t need to understand them in-depth to use cryptocurrencies. Just know that these algorithms run the internet as we know it, encrypting web pages through SSL and TLS and more. In the future, other encryption algorithms may be used for blockchains.

Just know that all this encryption and verification comes at a cost. Every node needs a lot of computing power to verify all the transactions that ever happen and update its ledger accordingly.

This is where mining comes into play: users can earn small transaction fees as payment for verification.

Bitcoin confirmations

By running the ledger this way, miners running nodes get paid, and every transaction gets verified. It’s an elegant system.

But it’s not all perfect.

During periods of high transaction demand, the fees can go up. If there aren’t enough nodes to go around, users can actually pay more to get their transactions processed sooner than others, and miners end up favoring the higher-paying transactions. Those who pay lower fees will still get processed, but at a much slower rate—unless the fee is too low, in which case nobody will bother verifying the transaction.

Aside from transaction fees, miners can also get paid in shiny new Bitcoins. By paying miners a fraction of a BTC on top of the transaction fee, new Bitcoins are drip-fed into the market. These unmined Bitcoins get more difficult to mine as time goes on, until one day there won’t be any unmined coins left, and miners will only get paid in transaction fees.

When a Blockchain Isn’t a Blockchain?

While many blockchains only store transaction details, it’s possible to store all kinds of data on a blockchain: medical records, secure messages, smart contracts, and more.

It’s also possible to build your own blockchain, even one that’s private—provided you have enough nodes to run it. You could remove encryption, changes the rules, or decentralize it.

Many would argue that these changes would mean the system is no longer blockchain, but therein lies the problem: with no formal specification or definition of “blockchain,” there’s no governance of the word. Many blockchain projects exist solely to scam people. Other blockchain projects piggyback off the blockchain name, using it to boost their bottom line with no real innovation.

There’s no agreement on these matters. We would argue that the traditional Bitcoin model is the best way forwards: a public blockchain, accessible by all, and not centralized. What do you think?

Read the full article: What Is Blockchain? A Simple Explanation in Simple Terms


Read Full Article

Joe Biden is headed to IGTV

The iPhone Cheat Sheet: Every iOS Shortcut You Should Know About


minimalist-iphone

The more you use iOS, the more you get used to its time-saving tricks—and the more you take them for granted. That’s why we’ve produced a cheat sheet that will help you get acquainted with both touch-based and keyboard-based shortcuts for iPhone and iPad.

Unlock the free "iPhone and iPad cheat sheet" now!

This will sign you up to our newsletter

Enter your Email

You don’t need an iPad Pro with a Smart Keyboard to make use of keyboard shortcuts on iOS. Both the regular iPad and iPhone models also support shortcuts, though you’ll need to find a Bluetooth keyboard first.

iOS and Keyboard Shortcuts

Most of the keyboard shortcuts you’re used to using on your Mac will work on your iPad Pro, iPad, and iPhone. Some apps have specific keyboard shortcuts. You might want to check any official manuals for third-party apps not mentioned here to further speed up your workflow.

If you’re using the iPad Pro with Smart Keyboard, or an iPad and wireless Apple keyboard, you’re all set to go. If your Bluetooth keyboard is aimed at Windows use, you’ll need to get used to substituting particular keys.

The two most common substitutions are Ctrl in place of Apple’s Cmd, and Alt in place of Option. The layout may also be different, depending on your localization. Apple keyboards place the @ symbol on Shift + 2, for example. This is different than the standard UK layout.

Some of these shortcuts may not work, or may only work on the iPad Pro. In particular, the iPad Pro has a useful shortcut where holding down the Cmd key shows all available shortcuts for a given app. Try it in Safari, on the Home screen, or even in a third-party app like Slack.

Touch-Based iOS Shortcuts

Touch Shortcut Description
Navigation Shortcuts
Tap time/status bar Quickly scroll to the top of the page or list
Swipe from top of screen Access Today screen/Notification Center
Swipe from bottom of screen (not iPhone X) Access Control Center
3D Touch and swipe from left Access the app switcher
 
Typing Shortcuts
Double-tap Space Insert space with period
3D Touch and scroll keyboard Move cursor with precision
Tap and hold key Access alternate symbols or characters
Double-tap Shift Enable caps lock
Tap and hold emoji/language key Access keyboard settings, orientation, and languages
3D Touch "Send" button Access "Send with effect" menu (iMessage only)
 
Browsing Shortcuts
3D Touch link/image Open link or image to preview
Tap and hold link/image Access context menu
Tap and hold Refresh Quickly access Request Desktop Site option
Tap and hold Tabs button Access tab context menu to close or open tabs
Tap and hold Bookmarks button Quickly add item to Reading List or Bookmarks
Tap and hold Reader Mode button Enable Automatic Reader View for specific websites
 
Home Screen Shortcuts
Swipe down on home screen Search iPhone
Swipe right on home screen Access Today screen and widgets
Tap and hold app Move or delete apps
3D Touch app Jump to app function or share App Store link
3D Touch folder Rename folder
 
iPhone X Shortcuts
Swipe up from bottom of the screen Go to Home screen
Swipe up from bottom and flick right Access App Switcher
Pull down from top-right corner of screen Access Control Center
Pull down from top-left of screen Access Today/Notification Center
 
iPad Shortcuts
Four finger swipe right/left Switch apps right/left
Five finger pinch Access Home screen
Four finger swipe up Access app switcher
Pull keyboard apart to left and right Use split keyboard mode

Keyboard Shortcuts for iOS

Keyboard Shortcut Description
Global iOS Shortcuts
Alt + Tab Switch apps using the App Switcher
Cmd + H Go to the Home screen
Cmd + Space Search for something
Cmd (Hold) Display list of available shortcuts (iPad and iPad Pro only)
 
Text Shortcuts
Cmd + C Copy
Cmd + V Paste
Cmd + X Cut
Cmd + Z Undo
Cmd + Shift + Z Redo
Cmd + A Select all
Shift + Left/Right Select with cursor
Option + Left/Right Move cursor to previous/next word
Option + Shift + Left/Right Select previous/next word
 
General Shortcuts
Cmd + N Create new (e.g. Contact, Reminder)
Cmd + F Search within app
Cmd + I Show information
Cmd + B/I/U Bold/Italics/Underline formatting
 
Safari Shortcuts
Cmd + T Open new tab
Cmd + Shift + T Reopen previously closed tab
Cmd + W Close current tab
Cmd + Shift + \ Show tab overview
Cmd + L Open location/search bar
Cmd + R Reload current tab
Cmd + F Find on page
Ctrl + Tab Next tab
Ctrl + Shift + Tab Previous tab
Cmd + ] Forward
Cmd + [ Backward
Cmd + Shift + D Add to Reading List
Cmd + Shift + L Show sidebar
 
Mail Shortcuts
Cmd + N New message
Backspace Delete message
Ctrl + Cmd + A Archive message
Cmd + R Reply
Cmd + Shift + R Reply to all
Cmd + Shift + F Forward message
Cmd + Shift + J Mark as junk
Cmd + Shift + L Flag message
Cmd + Shift + U Mark as read/unread
Cmd + Shift + N Get new mail
Option + Cmd + F Search mailbox
Cmd + L Filter mail
 
Calendar Shortcuts
Cmd + N New event
Cmd + F Search events
Cmd + T Show today's events
Cmd + R Refresh
Cmd + Left/Right Go to previous/next day, week, month, year
Tab Go to next event
Shift + Tab Go to previous event
Cmd + 1/2/3/4 Go to day/week/month/year view
 
Notes Shortcuts
Cmd + N New note
Enter Edit note
Cmd + Enter Finish editing
Cmd + F Find in note
Option + Cmd + F Search list of notes
Cmd + B/I/U Bold/Italics/Underline formatting
Cmd + Shift T/H/B/L Title/Heading/Body/Checklist formatting
Option + Cmd + T Create table
Cmd + ] Indent text right
Cmd + [ Indent text left
 
News Shortcuts
Cmd + R Refresh news
Cmd + F Search
Cmd + Up Go to top of page
Cmd + 1/2/3/4/5 For You/Spotlight/Following/Search/Saved tabs
Tab Next story

Once you’ve mastered these tricks, take a look at our ultimate iOS beginner’s guide for an in-depth look at your device’s various functions. You’ll learn how to back up your device, privacy essentials, and making the most of Apple mainstays like iCloud and Siri.

Read the full article: The iPhone Cheat Sheet: Every iOS Shortcut You Should Know About


Read Full Article

How to Mirror Your Android Screen to a PC or Mac Without Root


android-mirror-pc-mac

Sometimes, you might want to see your Android phone’s screen on your PC. How do you do that?

If you have rooted your Android device, it’s easy. But if you haven’t rooted, there are still some simple ways to get your phone or tablet’s screen to show on your PC or Mac.

Why Mirror Android to Your PC?

Why would you mirror your screen? There are plenty of reasons. You might be a developer in the middle of coding and want to check your app without having to constantly reach for your phone. You might want to share your pictures on a big screen without uploading them. Or you might need to give a presentation quickly while the projector is connected to a PC.

The quickest and easiest way, as you will find out, requires no installation on your phone, and a simple app for your computer.

What You’ll Need

Vysor, made by prolific Android developer Koushik Dutta, is the simplest way to get your Android screen onto your PC or Mac’s screen. Here’s what you need to get started:

  1. Download Vysor for Windows | macOS | Linux | Google Chrome (Free)
  2. A USB cable to connect your phone to your PC.
  3. An Android smartphone or tablet with USB debugging enabled.

As always, if your phone or PC has a USB-C port, then we recommend using a trusted USB-C cable that won’t destroy your devices.

Enable USB Debugging Mode on Android

enable usb debugging on android

We have a full explanation of what USB debugging mode is, but you don’t need to concern yourself with that here. All you need to know is how to enable it:

  1. Go to Settings > About phone (Settings > System > About phone on Android 8 Oreo and newer).
  2. Scroll down and tap Build Number seven times.
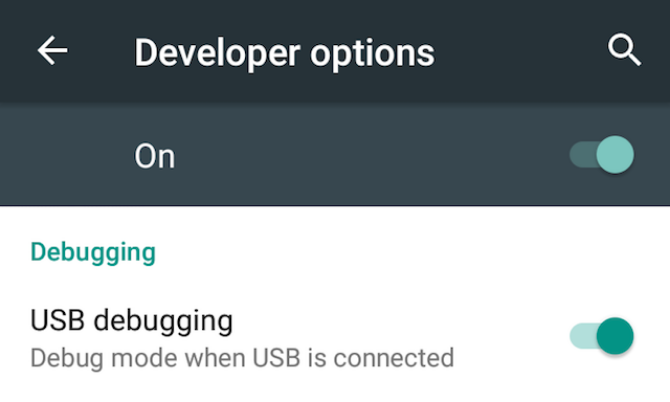
  3. Go back to Settings (Settings > System on Oreo and later) and enter the new Developer Options menu.
  4. Scroll down and enable USB debugging.
  5. Confirm the action when prompted.

Share Your Screen to Your PC or Mac via USB

Mirror android phone screen to PC with vysor

Now that you have USB debugging mode activated, the rest is simple.

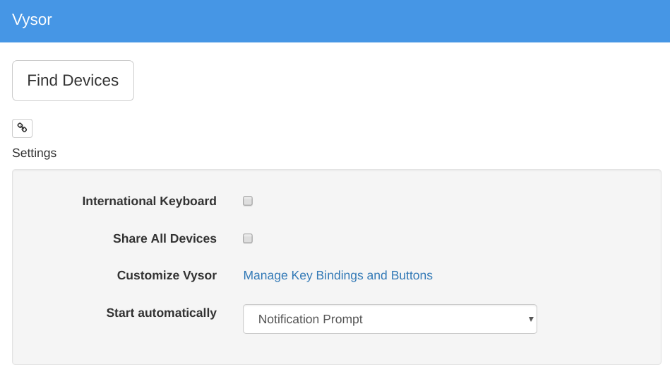
  1. Start Vysor by searching for it on your computer (or via the Chrome App Launcher if you installed there).
  2. Click Find Devices and select your phone.
  3. Vysor will start up, and you’ll see your Android screen on your computer.
  4. Optional: You can set your phone to connect automatically every time you plug in the USB cable.

With this, you are ready to go. Your mouse and keyboard work within Vysor, so you can start any app you want and type in it too. There are plenty of apps that don’t have a web client, so this is a good way of using your physical keyboard for your phone’s apps.

Vysor’s Appeal Lies in Four Aspects

  1. You don’t need anything installed on your Android phone.
  2. It works on Windows, Mac, and Linux.
  3. The USB cable makes your screen reflect in almost real-time, as opposed to wireless solutions where there is distinct lag.
  4. You can interact with your phone’s screen through your computer.

Try it out and see how you like it. If it’s useful to you, you can pay ($2.50/month or $10/year) for Vysor Pro, which enables high-quality mirroring, wireless mirroring, and drag-and-drop file sharing.

How to Share Your Screen Wirelessly

If your phone runs on Android 5 Lollipop or later, Google has made it easier to mirror the screen of any device. For a wireless, cross-platform solution, Koushik Dutta has another app.

How to set up Android Mirroring with AllCast:

  1. Download: AllCast Receiver for Chrome (Free)
  2. Download: Screen Recording and Mirror for Android (Free)
  3. Make sure your computer and smartphone are on the same Wi-Fi network.
  4. Start AllCast Receiver through the Chrome App Launcher.
  5. Start Screen Recording and Mirror on your Android phone.
  6. In Screen Recording and Mirror, choose the Network Device that matches your PC. It will still start with Chrome @ followed by an IP address.

Just like that, your screen will be wirelessly mirrored on your computer. This is the easiest way to share your Android screen without the hassle of a cable, and it supports other devices on the same network too, including Fire TV, Apple TV, Roku, and more.

This method has a few disadvantages:

  1. You cannot interact with your screen through your PC. The interaction is limited to your phone itself, but you will see what’s happening on the big screen. Unfortunately, that means no typing with your computer’s keyboard on your phone.
  2. Unfortunately, there’s no way to remove annoying Mirror floating watermark. This can be a dampener for presentations and slideshows.

Rooted Is Still the Best Option

As Android has grown, it’s added so many features that only power users really need to root. But if screen mirroring is important to you, then I would still recommend you root because it gives you access to the best way to mirror Android to a PC.

The Android management client Airdroid offers a built-in protocol to wirelessly mirror a rooted Android phone to a Windows or macOS computer. It works for non-rooted phones too, but this requires a cable and works much like the aforementioned Vysor.

But with a rooted phone, you only need to be on the same Wi-Fi network to start mirroring immediately, without watermarks. And you can control the phone too, unlike the AllCast option above.

Don’t forget about the other ways to cast your screen, too.

Read the full article: How to Mirror Your Android Screen to a PC or Mac Without Root


Read Full Article

Blockchain Security: How Safe Is a Bitcoin Transaction Really?


blockchain-security

Thanks to blockchain technology, cryptocurrencies are often seen as more secure than existing currencies, banks, and financial institutions. Transactions recorded in a public, distributed ledger are more transparent and harder to tamper with.

However, there are two sides to the coin.

Cryptocurrency transactions and blockchain ledgers do have some security weaknesses, but they aren’t necessarily the fault of the underlying technology. Actually, the structure of Bitcoin and its blockchain means there are aspects to every transaction that are virtually bulletproof from a security standpoint.

Bitcoin Transactions: Decentralized and Transparent

All financial transactions are recorded on a ledger. It’s a massive database of movement, details, and records. It’s how your bank knows how much money you have in your account. But whereas banks use a centralized ledger, Bitcoin and other cryptocurrencies use a distributed ledger. A distributed ledger is more secure than a centralized ledger. In the case of a centralized ledger, one company has complete control over it—no outsiders can see or edit its contents.

But what if someone hacks the ledger? Can we verify transactions? How can we be sure that banks are operating their ledgers honestly? When banks are audited, can we trust those third-party auditors?

In contrast, a distributed ledger (i.e. a blockchain) is decentralized. Not one person controls it, making it much more tamper-proof. The ledger is duplicated many times across several computers (or nodes) in a network, all of which are kept in sync. In the case of Bitcoin, there are more than 10,000 nodes, each tracking the ledger of Bitcoin transactions.

If someone tries to tamper with one of your Bitcoin transactions on a single node—for example, by increasing its value—the other nodes will reject the changes. Joe explained the blockchain ledger in more detail if you’d like to learn more about how it works.

What Is a 51 Percent Attack?

While the underlying blockchain technology will keep your Bitcoin transactions secure in theory, things are a little different in practice.

For example, proponents will point to the blockchain as Bitcoin’s biggest security asset. However, consider this: the nature of Bitcoin’s blockchain means anyone can join it and become a node on the network. But if anyone can join it, how can you be sure that a hacker conglomerate won’t add enough nodes to the network to wrest control of it?

After all, “only” half of the nodes in the Bitcoin network need to agree on a change for it to be rolled out across all the synced computers. Someone with that level of control could reverse transactions, spend the same coin twice, stop other miners from creating valid blocks, or block legitimate transaction confirmations.

In other words, any entity who controls at least 51 percent of the nodes on Bitcoin’s network can control the whole blockchain.

And worryingly, it’s not as far-fetched as it might sound. Indeed, it almost happened with the Ghash.io pool in 2014, and the near-miss called the entire integrity of blockchain security into question.

The community’s response was to immediately add more hashing power if any single entity gets near 40 percent. For large currencies—like Bitcoin—that should be enough protection (though some experts believe think someone with 40 percent control could still overcome the need for six-deep transaction confirmations).

However, smaller currencies are still at risk. As recently as June 2018, ZenCash suffered a 51 percent attack and more than $550,000 ZenCash was double-spent. In 2018, criminals also targeted Bitcoin Cash and Verge. Evidently, 51 percent attacks are becoming more common.

The Risks in Bitcoin Wallets

The wallets where you store your Bitcoins also have their own transaction risks and security issues. The weaknesses fall into two categories: private keys and hot wallets.

Private Keys: Every Bitcoin wallet has two keys, a public key and a private key. The public key is kind of like a digital address and is what people use to send you funds. The private key is how you authenticate your transactions when you want to send funds. Quite simply, if you don’t have control of your private key, you don’t have control of your Bitcoin transaction.

We can illustrate this using email. For people to be able to send you messages, you need to share your email address with them (public key). But to access, view, and send messages from your account, you need your password (private key). If someone has your password, they can send emails without your knowledge. Similarly, if someone has your private key, they can send Bitcoin transactions from your wallet without your knowledge.

Hot Wallets: Bitcoin wallets come in two forms, hot wallets and cold wallets. Hot wallets are connected to the web and accessible online while cold wallets refer to offline storage.

If you use a hot wallet, any flaws in the app or exchange that hosts your wallet will leave you exposed and the blockchain won’t help you. If the wallet host is hacked, criminals can make unchecked Bitcoin transactions on your behalf and drain you of all your Bitcoins with no way to recover them. Remember, there’s no bank or centralized organization that’s looking out for suspicious activity on your account!

Smart Contracts: It’s also worth mentioning smart contracts, which aren’t available in Bitcoin but are available in the world’s second-largest blockchain, Ethereum. (It’s one of many differences between Bitcoin and Ethereum.) Smart contracts add additional functionality to the blockchain by letting users transfer assets between each other without the need for a middleman.

Here’s how Ethereum creator, Vitalik Buterin, describes smart contracts:

“An asset or currency is transferred into a program, and the program runs the smart contract code. At some point, it automatically validates a condition and determines whether the asset should go to one person, back to the other person, whether it should be immediately refunded to the person who sent it, or some combination thereof.”

But anyone with enough knowledge can write smart contracts, and thus they’re prone to human error.

The greatest example of this was with DAO, the largest crowdfunding project in history. Hackers spotted a flaw and were able to steal more than $3.5 million of Ether. The Ethereum community’s solution was to rollback the blockchain to its pre-attack state, but this is not a viable long-term solution.

If we are to believe crypto advocates when they say that smart contracts will revolutionize the way we do business, issues like this need a long-lasting resolution. Failure to do so will lead to the integrity of all crypto transactions being called into question, which is the one thing a distributed ledger was supposed to help with in the first place.

And so, back to the original question: How safe are your Bitcoin transactions? As long as you follow basic crypto security principles, you should be fine. Don’t store money in hot wallets, don’t share your private keys, and don’t assume every single blockchain is immutable. That’s about the most you can do.

Read the full article: Blockchain Security: How Safe Is a Bitcoin Transaction Really?


Read Full Article

Meet SelfieCircus and 8 more in Snapchat’s new startup accelerator


Snapchat is hedging its bets as its social network shrinks. Today Snap Inc revealed the first class of its startup accelerator called Yellow that offers $150,000 in funding and creativity-centric business education in exchange for what a source says is a seven to ten percent equity stake — in line with other accelerators like Y Combinator. The nine companies will take up a three-month residency in one of Snap’s buildings in Venice, Los Angeles.

The accelerator class ranges from augmented reality and journalism studios to lifystyle brands around weddings and fashion to aesthetic-focused marketplaces like ConBody that pairs you with a muscular ex-convict for workouts.

Yellow calls itself “A launchpad for creative minds and entrepreneurs who are looking to build the next generation of great media companies.” Yellow could become a content provider and potential acquisition feeder for the company. ANRK and Space Oddity Films could boost Snapchat’s AR gaming effort, Hashtag Our Stories could fill Snap Map with citizen news broadcasts, Toonstar could bring animation to Discover, and SelfieCircus could power marketing pop-ups like the Snapbots that sold the company’s Spectacles.

But at the same time, it’s hard not to see Yellow as a potential escape route for Snap’s business if Instagram’s competition does end up stealing all its users. Snapchat lost three million last quarter, contributed to a massive share price downslide. Following today’s departure of COO Imran Khan, it’s trading at $9.66, just a few cents above its all-time low.

If a few of Yellow’s investments blow up and Snap makes capital available for follow-on rounds, the returns could supplement its ad revenue. But none of this first batch of startups looks poised to be gamechangers the way Snap’s acquisitions of Bitmoji and Looksery’s early AR filters were.

Yellow’s Inaugural Class

Here’s a look at the first nine companies in Snapchat Yellow, courtesy of write-ups provided by Snap.

ANRK (London, UK) – a new realities studio, exploring immersive storytelling through AR, VR, games and beyond.

  • We are passionate about human-centered narratives, and use playful interaction and new technologies to create powerful experiences that connect the digital and physical.

ConBody (New York, NY) – a prison-style fitness bootcamp that hires formerly incarcerated individuals to teach fitness classes.

  • ConBody is facilitating an opportunity-filled lifestyle by empowering our community to realize success lies within. We hire formerly incarcerated individuals to build personal discipline through a unique blend of cardiovascular training and bodyweight exercises that take advantage of the resistance properties of everyday objects. We apply military techniques to space constraints intimately familiar to city-dwellers and individuals who reside in small, constrained spaces. In addition, we’re changing the views of formerly incarcerated individuals to be changed by allowing professionals to interact with formerly incarcerated individuals, which allows to give professionals a different perspective on them.

Hashtag Our Stories (Durban, South Africa) – an international mobile journalism (MOJO) network, publishing vertical video stories on social media. Created by citizens, curated by journalists.

  • Since September 2017, we’ve empowered 200 citizen storytellers in over 40 countries to produce videos with their phones. We focus on constructive, solutions-based stories and provide more diverse news coverage. Because more cameras and more perspectives means more truth.

IDK (Los Angeles, CA) – the ID for Korean music. We are a digital media company expanding in-depth on the music of Korea and K-Pop as a globally recognized genre; showcasing the Identity of the artists that shape the culture. We provide insightful and rich coverage and content for the global Korean Pop audience.

  • We are creating a Global Brand and Destination for an English-Speaking Korean Pop Audience. Our mission is to create rich and stylized content about the Korean Music Genre; less gossip, more news & features. We want to provide a legitimate outlet for Korean Pop Culture; to create emotive, aspirational stories that are visually chic to a young, hyper-aware, and digitally engaged audience.

  • As the company begins we will focus on publishing the best in engaging social video content. We will translate this content across platforms, ultimately building brands, shows, and stories that feed the insatiable audience appetite for Korean Pop. From there we will build towards live events, merchandise, and much more.

Love Stories TV (New York, NY) – a video platform for wedding planning and inspiration, bringing engaged couples and event professionals together in a uniquely visual community. Think of us like ‘Houzz’ for weddings: We connect brides and grooms with the ideas, inspiration, products, and services they need for their weddings in a uniquely visual community.

  • On lovestoriestv.com filmmakers and newlyweds from all over the world share their professionally produced videos along with the data and details about the wedding. Brides and grooms watch the videos to find ideas, inspiration, products, and services for their wedding. We also have an active community of pre-engaged-brides under the age of 24 who watch the videos on our site, social, and Amazon Prime channel for entertainment. We partner with brands and wedding pros to help them reach brides and grooms on our site and channels via the real wedding films that feature them and original content.

Premme (Los Angeles, CA) – a fashion-first, body-positive lifestyle brand for the plus-size It-Girl.

  • Today, 67% of women in America wear plus-sizes – yet plus-size fashion only accounts for 17% of the women’s apparel market. When it comes to media representation, plus-sizes are similarly lacking in positive, aspirational visibility. Premme empowers women who have been historically marginalized through fashion-forward, statement making clothing and visionary, contemporary editorial content and imagery. By creating a relatable, yet aspirational, brand that centers plus-size women, we aim to flip the script on what it means to look and be stylish, while leading the conversation and movement towards truly diverse and inclusive fashion.

SelfieCircus (Los Angeles, CA) – a new kind of circus.

  • SelfieCircus creates popup experiences designed to be documented and shared on social media. The company is building a platform to connect artists, brands, and consumers. The first SelfieCircus will open in Los Angeles in late 2018.

Space Oddity Films (Los Angeles, CA) – a content studio exploring tech and culture that creates innovative content for every platform – mobile, digital, AR/VR, video games, feature film and television.

  • We tell stories about the convergence of humanity and technology. Our original viral tech horror thriller shorts are the foundation of our brand. Our goal is to make the future now.

Toonstar (Los Angeles, CA) – a digital animation network that creates and distributes daily pop culture cartoons for an “always on” world. Powered by proprietary animation tech, we produce daily, snackable, interactive animated content at unprecedented speed and cost.

  • We have a large and highly engaged audience of teens and young adults generating millions of views per week because our content is sticky, shareable, relatable and engineered specifically for social.  We’re a team of studio alumni and media tech innovators who have produced hit digital animated series, built groundbreaking interactive media technologies and launched mega entertainment franchises. Now we’re on a mission to build a nextgen animation network that delivers greater reach + engagement at a fraction of the operating cost.


Read Full Article

How to Host a WordPress Site on Raspberry Pi


wordpress-host-raspberry-pi

Want a web server to host your WordPress site, but don’t have the funds? Perhaps you simply need to test some plugins or themes before rolling them out on the live site? Whatever the case, you can use a Raspberry Pi!

Here’s how to set up Apache, MySQL and PHP on your Raspberry Pi and host websites locally (on your own network) or on the web.

Why Use WordPress?

If you’re looking for a way to host a website with the minimum of fuss, WordPress isn’t the obvious solution. We’ve already looked at how to configure the Pi to host a static or dynamic website (that is, one that relies on standard, prewritten pages, or a site that uses a database to populate pages).

Indeed, you might not even need a web server at all. The Itty Bitty project lets you create a web page that is contained within its own URL.

But if you really need to use WordPress, or you’re developing a theme or plugins for a WordPress site, then having a Raspberry Pi with the web application installed and ready to use is a great option.

Which Raspberry Pi Should You Use?

To install WordPress on a Raspberry Pi, you’ll need to set it up as a LAMP server. With Linux, Apache, MySQL, and PHP installed, your Pi will then be able to handle WordPress (and other website software).

Raspberry Pi 3 and Raspberry Pi 3B+

Several models of Raspberry Pi are available. You might have one, several, or none. But which one is the most suitable for running WordPress?

Happily, any version of the Raspberry Pi can be used to host a WordPress site. However, for the best results, we recommend you use a Raspberry Pi 2 or later. Additionally, ensure you’re using a larger SD card—at least 16GB—as storage space is a key requirement for web servers. (Also consider some external storage for the Pi!)

The rest of this tutorial assumes that your Raspberry Pi is powered on and connected to your local network. You should also have SSH configured, for remote command line access.

Step 1: Set Up Apache Web Server

Start off by installing the Apache web server. This is software that lets you serve any type of webpage to any browser. It’s all you need to serve a HTML page, static or dynamically created with PHP.

sudo apt install apache2 -y

Once installed, Apache will drop a test HTML file into the web folder on your Pi. You should test this from another computer (or smartphone) on your network. You’ll need to enter the IP address of the Pi in the address bar of your browser. If you’re using SSH, you’ll know this already; otherwise, enter

hostname -I

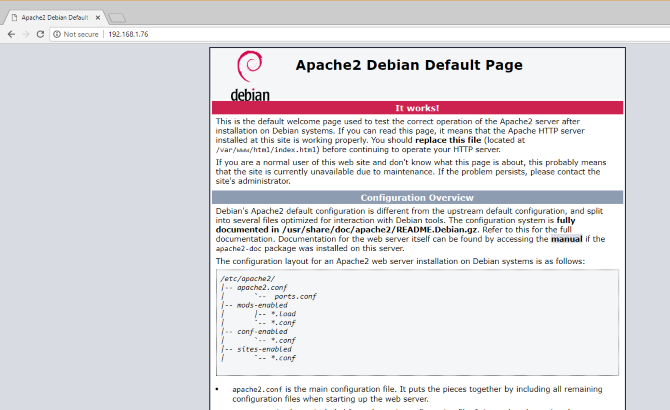
This displays the IP address of your Raspberry Pi. The page you see should be something like this:

Apache server installed on Raspberry Pi

You can also check the web page works from your Raspberry Pi using the http://localhost address.

Step 2: Install PHP on Raspberry Pi

Next, it’s time to install PHP. This is a software pre-processor that enables the serving of server-generated web pages rather than static HTML pages. While an HTML page might be written in its entirety, a PHP page will feature calls to other pages, and the database, to populate it with content.

While other server-side platforms are available (such as ASP), PHP is vital here as it is required for WordPress because WordPress itself is written in PHP.

Install with:

sudo apt install php -y

Once this is done, you should test that PHP works. Change directory to /var/www/html/:

cd /var/www/html/

Here, delete the index.html file (the web page you viewed earlier):

sudo rm index.html

Next, create a new file, index.php with your text editor (nano is installed by default).

sudo nano index.php

Here, add any (or all) of the following code:

<?php echo "hello world"; ?>

<?php echo date('Y-m-d H:i:s'); ?>

<?php phpinfo(); ?>

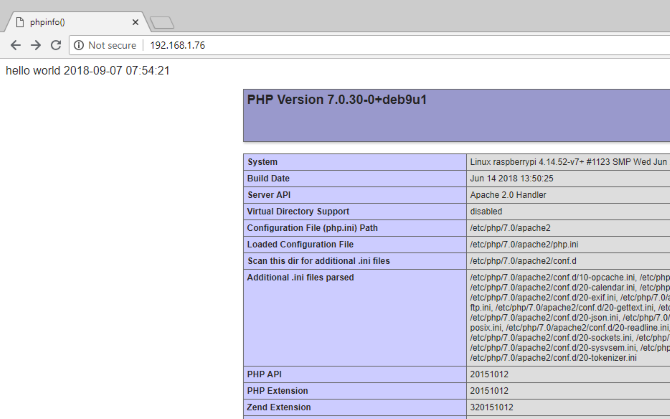
In order, these commands display:

  • The phrase “hello world”
  • The current date and time
  • PHP info for the installation

Save the file, then restart Apache:

sudo service apache2 restart

Refresh the page to see the results.

PHP installed and working on Raspberry Pi

PHP and Apache are both working. Now it’s time to install the database software, MySQL.

Step 3: Install MySQL on Raspberry Pi

WordPress (and other dynamically generated website software) requires a database in order to store the content, links to images, and manage user access (among many other things). This project uses a fork of MySQL, called MariaDB:

sudo apt install mysql-server php-mysql -y

Once this is installed, you will once again need to restart Apache:

sudo service apache2 restart

As noted, other database options are available for this type of project. However, for the best results, especially if this is your first time configuring a web server, stick with MySQL.

Step 4: Install WordPress on Raspberry Pi

To install WordPress, you’ll first need to install it. Before doing this, however, delete the contents of the /html/ directory:

cd /var/www/html/
sudo rm *

The asterisk wildcard (*) deletes everything in the directory thanks to the rm (remove) command.

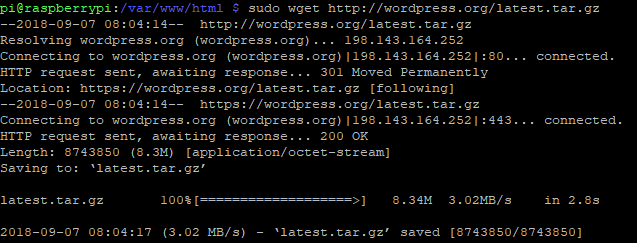
Download WordPress with wget

Next, use wget to download the latest version of WordPress:

sudo wget http://wordpress.org/latest.tar.gz

Once downloaded, extract the contents:

sudo tar xzf latest.tar.gz

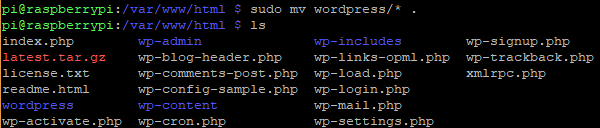
The wordpress directory should be created, but you want the contents of it in html. While you might move these manually using the desktop user interface, it’s simple to do this from the command line:

sudo mv wordpress/* .

Be sure to include the space and period at the end, which refer to the current directory!

Enter ls to confirm the directory is full of WordPress folders and PHP files:

Move the contents of the WordPress directory

Before proceeding, tidy things up a bit, discarding the downloaded file and the wordpress directory:

sudo rm -rf wordpress latest.tar.gz

Next, set the Apache user as the owner of the directory:

sudo chown -R www-data: .

Step 5: Configure MySQL

To set up the database, you’ll first need to run the installation command:

sudo mysql_secure_installation

You’ll shortly be prompted to set a root password. Follow the onscreen instructions, making sure you keep a note of the password, as it will be required later.

Once this is one, the following prompts will appear:

  • Remove anonymous users
  • Disallow root login remotely
  • Remove test database and access to it
  • Reload privilege tables now

For each of these, tap Y to confirm. When done, the “All done!” message will be displayed.

Step 6: Create the WordPress Database

To install WordPress, you’ll first need to configure the database. Begin by running the mysql command, entering the password from earlier.

sudo mysql -uroot -p

This opens the MariaDB monitor. At the prompt, create the database:

create database wordpress;

Note how all commands within the MariaDB monitor end with a “;”. Next, the root user needs database privileges. Use your own password in place of PASSWORD.

GRANT ALL PRIVILEGES ON wordpress.* TO 'root'@'localhost' IDENTIFIED BY 'PASSWORD';

Follow this by flushing previous database privileges:

FLUSH PRIVILEGES;

Exit the MariaDB database management tool with Ctrl + D.

Step 7: Install and Configure WordPress

Installing WordPress is simple; if you’ve already done it on an existing website, you should know what to do.

Open the website in your browser (as described above). You should see the WordPress Setup screen. Select your language, then Continue, and make a note of what is required: the database name, username, password, host, and the table prefix (this is for the database tables).

If you made it this far, you should have named the database “wordpress”, and have a note of the password. The Username is root, and the host localhost. The Table Prefix is wp_.

Click Submit, then Run the install, and input the Site Title, along with the Username, and Password for your administrator account. Click Install WordPress, and wait as WordPress is (quickly) set up.

To login to your WordPress installation, go to http://localhost/wp-admin.

Installed WordPress site on a Raspberry Pi

At this stage, you have a site you can start using. Blog, or use as a more static website, using the options you’ll find in the settings screen. Our guide to getting started with WordPress will help here. Don’t forget to choose a theme, and a few useful plugins. You’ll also need a method to access the site from the internet.

Access Your WordPress Site From the Internet

As things stand, you’ll probably only be able to access the site from within your home network. To change this, you’ll need a static IP address, and manage port forwarding from your router to your Raspberry Pi.

Static IP addresses are expensive, however, but you can use a dynamic DNS provider instead. This basically links a custom URL to your Raspberry Pi, although such services are often paid. Check our list of the best dynamic DNS providers for full details.

Host a WordPress Site on Raspberry Pi: Success!

You’re all done now, and a WordPress site is running on your Raspberry Pi. As long as the computer remains powered up, the site will continue to be accessible. The process is straightforward too, requiring you to simply:

  • Install Apache, PHP, and MySQL
  • Download and install WordPress
  • Configure the MySQL database
  • Create your WordPress database
  • Configure WordPress
  • Launch the site and access it locally or via the web

Of course, you don’t have to use a Raspberry Pi for this. You might have a spare PC or laptop you can use to host a website. Meanwhile, if it’s simply for test services, you can install WordPress on your PC with Bitnami.

Read the full article: How to Host a WordPress Site on Raspberry Pi


Read Full Article

Pinterest reports 25% increase in monthly active users


Two hundred and fifty million people are using Pinterest every month, up from 200 million last September, according to new numbers the company shared this morning. The visual search giant is also reporting that more than half of its users and 80 percent of new sign-ups come from outside the U.S.

Pins,” or items saved to the site, are growing, too. There are now 175 billion of them, a 75 percent increase YoY.

To facilitate that growth, Pinterest has been on a hiring spree. It now has more than 1,500 employees, a 32 percent increase from last year.

The company has secured more than $1 billion in venture capital funding, most recently raising $150 million at a $12.3 billion valuation. Many expected it would make its highly anticipated public debut in early 2018, but that ship has sailed at this point. Now, reports indicate Pinterest is looking at a mid-2019 IPO and expects to reach $1 billion in annual revenue for the first time.

Those numbers should help it garner support on Wall Street, as will this nugget: The part of Pinterest that includes items for purchase on retailer sites is the fastest growing part of the platform, up 115 percent in the last year. The company’s key sell to VCs has been that its visual search tool converts users to buyers, but with Instagram going full speed ahead as an e-commerce platform, it will take data points like that one to convince investors it’s worthy of that $12.3 billion valuation.

Pinterest has been busy expanding as it presumably gears up for an IPO. In March, it introduced the following tab, where users could view only the content from brands and people they follow. It also added the Pinterest Propel program as part of an effort to create more local content for its users. And it implemented full-screen video ads to beef up its advertising options — an area where it competes directly with Facebook and Google.


Read Full Article

10 September 2018

Instagram confirms it’s testing video tagging with a percentage of users


Instagram is testing a way to allow users to tag their friends in their video posts, not just in photos, TechCrunch has learned and the company confirmed. The option works similarly to tagging photos, but instead of pressing the small icon at the bottom left to see the list of tagged names appear over top of the content – something that would be more difficult with videos – the button links to a list of tagged people.

When you tap this button, you’re directed to a new page titled “People in this Video” with all the Instagram users who have either appeared in the video, or who the original poster wants to alert in some way.

As far as we can tell, these videos don’t also copy over to the tagged users’ profiles, where tagged photos typically appear today. But that could come further down the road.

Video tagging is also not appearing on the web version of Instagram at present, only on mobile.

Instagram didn’t want to share much information about the test, nor discuss its plans for a larger rollout of the feature – which is currently unsupported for anyone who hasn’t been opted in to the test by the company.

However, it would say that the experiment is underway right now with a “small percentage” of Instagram’s users.

“We’re always testing ways to improve the experience on Instagram and bring you closer to the people and things you love,” a spokesperson confirmed, in a statement.

Above: video tagging spotted on Instagram account @cablegirlsrd

Instagram has offered photo tagging since 2013, and later rolled out support for things like tagging products and tagging friends in Stories. But although video sharing arrived on the platform in June 2013, Instagram has yet to introduce a way for users to properly tag their friends. Rather, its FAQ suggests that users should mention friends in a comment so they’ll get a notification.

That may have been sufficient for some time, but video is a more critical aspect to Instagram’s platform these days, especially as it explores how to enable better video discovery through its user interface, direct people to its newest product, IGTV, and connect larger groups together in video chat sessions.

Tagging videos, then is an obvious, if long past due, next step – and one that can drive increased engagement as the tagged users relaunch the app following their notifications.

The feature could also make way for shoppable videos, not just photos, and allow Instagram influencers to post videos of their favorite products and places, while pointing fans to those brands’ own Instagram accounts in a more structured fashion than is possible today.


Read Full Article