15 May 2018

CleanMyPC Covers All Your PC Maintenance Needs


Every Windows user knows that the operating system builds up junk over time. Windows includes some utilities for PC maintenance, but they don’t offer as much as a dedicated tool can.

CleanMyPC is an app that offers to keep your PC running at its best. Let’s see what this tool has to offer.

Getting Started With CleanMyPC

Head to CleanMyPC’s download page and download it to get up and running. Proceed through the installer as usual; there aren’t any special options to choose from or bloatware to worry about bypassing.

Once you install the PC maintenance software, you’ll see CleanMyPC’s homepage. We’ll walk through each of the app’s tabs to examine its features.
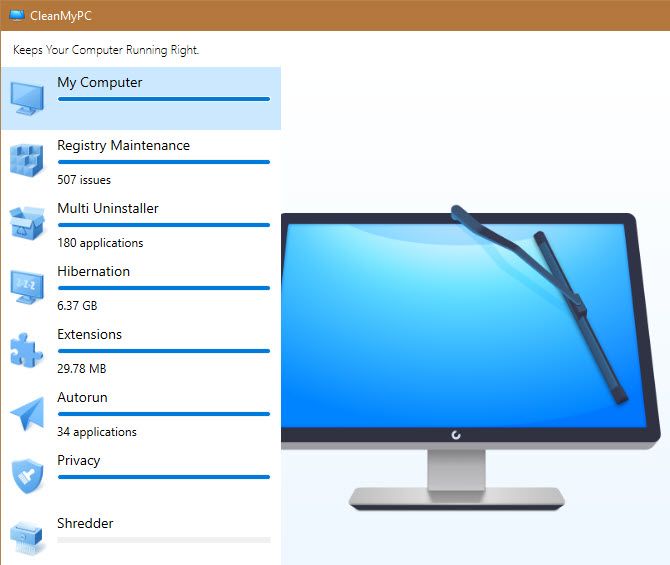
CleanMyPC-Home

My Computer

CleanMyPC-My-Computer

On the My Computer module, you can scan your computer for junk files that are wasting space. Click to run the scan, then wait a bit while it looks over your system.

Once it’s done, you can click Clean to remove the junk files, or choose Show details to see more information about what the scanner found. Here, feel free to uncheck anything you don’t want to remove before you run the cleaning operation.

Registry Maintenance
CleanMyPC-Registry

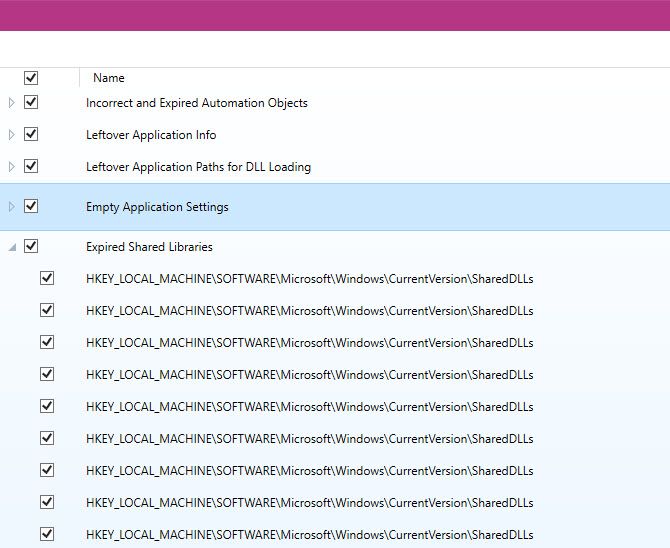
Over time, the Windows Registry gets filled up with entries from old programs and similar leftover data. While you really don’t need to clean this, CleanMyPC includes a Registry cleaner if you want to do some serious PC maintenance.

Click the Scan Registry button, and give it some time to run through the process. Click Fix Registry to apply the changes, but beware this can introduce issues.

Multi Uninstaller
CleanMyPC-Multi-Uninstall

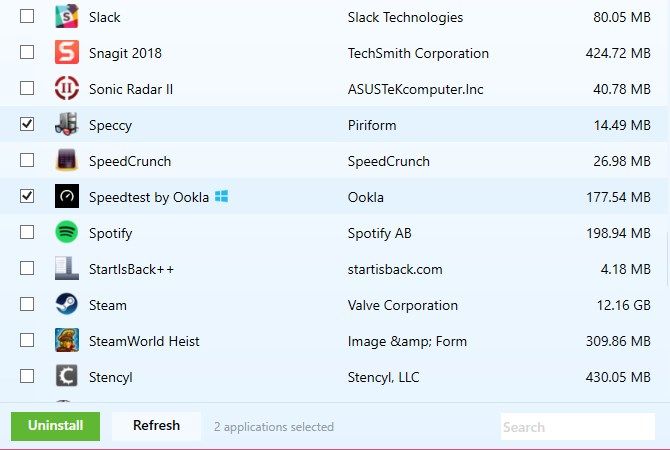
An exciting new feature of CleanMyPC, the multi uninstaller lets you remove several apps from your PC at once. What’s more, it removes all the files associated with these programs, so they don’t leave any traces behind.

Simply check the boxes next to every program you’d like to remove, and choose Uninstall at the bottom when you’re ready to remove them all.

As you go through the list, you’ll notice a red Broken icon if that app contains leftovers. Apps obtained from the Microsoft Store show a blue Windows logo next to them. And if you can’t find the program you want to remove, try the search bar in the bottom-right.

Hibernation

CleanMyPC-Hibernation

Hibernation is one of the power options in Windows. It saves your current session to your hard drive, then shuts down your PC. It doesn’t really qualify as PC maintenance, but it does make it easy to pick up where you left off even after a long period.

While hibernation is useful for some people, it takes up a decent chunk of space. If you never use it, you can reclaim this space for other purposes. Just click the Turn off option to disable hibernation and you’ll gain likely several gigabytes. You can always return to this menu to enable it again if needed.

Extensions
CleanMyPC-Extensions

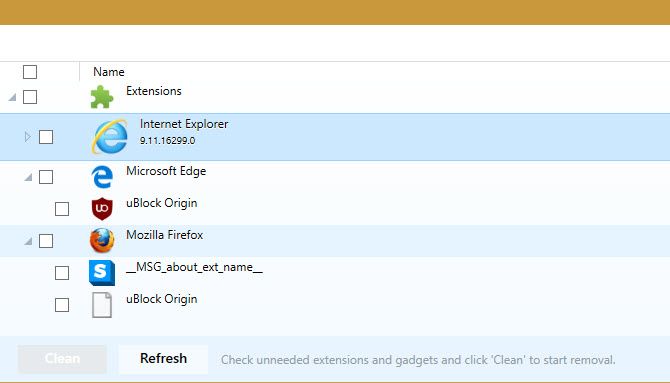
This tab will check for extensions in each browser you use. It’s an easy way to make sure you don’t have too many add-ons installed, and to remove any junk ones that may have found their way onto your system.

During our testing, this didn’t pick up extensions for Chrome, so you’ll have to look into those extensions manually. You’ll probably see a lot of entries for Internet Explorer, which you can ignore since you probably never use it.

Autorun
CleanMyPC-Autoruns

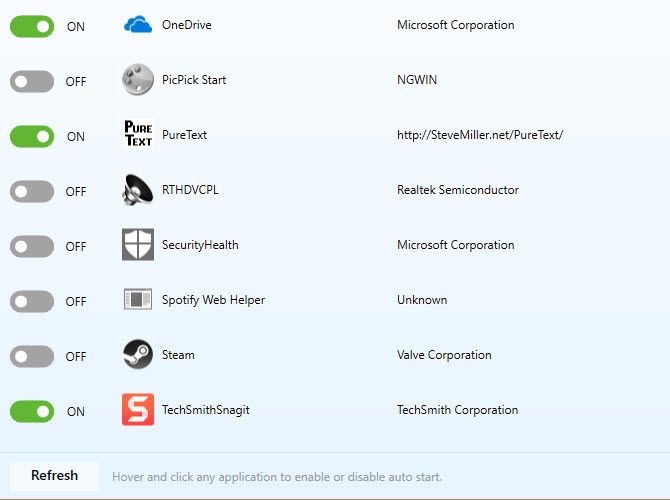
Programs running at startup are convenient, but having too many of them can slow down your computer. Since most programs automatically set themselves to run at startup, it’s worth going through the list and making sure only apps you actually use start right away.

On the Autorun tab, you can see all the programs set to run at startup on your PC. Each one includes a publisher and location to help you identify it. Just slide the switch to Off to disable a startup program. Keep an eye out for programs that slow down your boot.

Privacy
CleanMyPC-Privacy

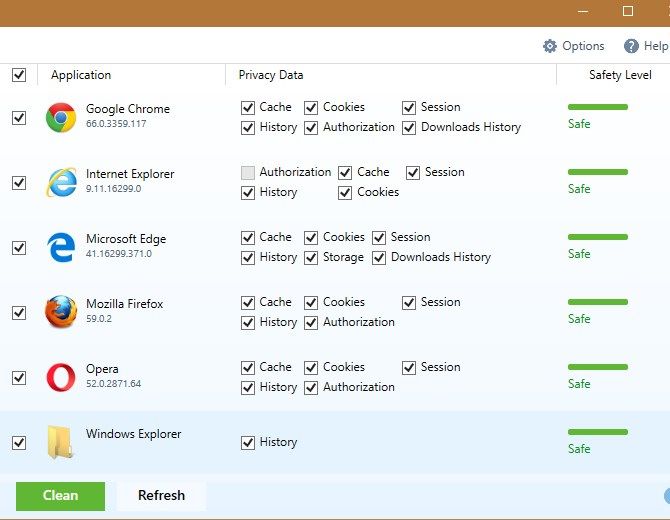
The Privacy tab searches your installed browsers, as well as the File Explorer, for history, cache, and similar entries that could potentially compromise your privacy. With this information, someone could know where you’ve visited on the web, which you may prefer to keep private.

Check the information you want to remove, and click the Clean button to purge it.

Shredder
CleanMyPC-Shredder

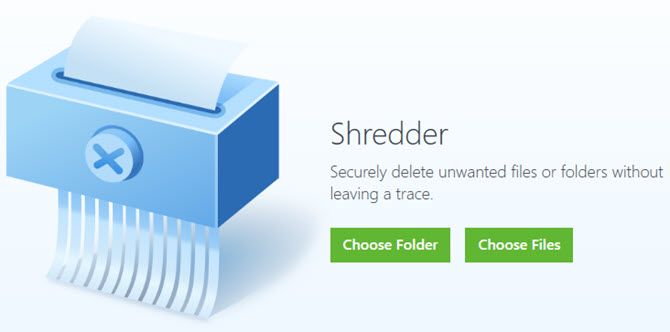
The final feature of CleanMyPC is the Shredder, which helps you securely erase sensitive files so nobody can recover them (a PC maintenance ask you should do regularly).

As you might know, clicking Delete and removing a file from the Recycle Bin doesn’t completely erase it. If done right away, you could restore that file with recovery software.

Click Choose Folder or Choose Files and browse to the data you’d like to securely erase. Once you confirm, the app will destroy this file and render it irrecoverable. Click Adjust security level in the bottom-right and you can choose if the shredder overwrites the file with garbage data one, two, or three times.

Options and Pro Version

Click the Options tab at the top of CleanMyPC to configure a few settings.

On the General tab, use the Manage Ignore List option to specify items you want the software to ignore. Under Automatic Agents, you can configure a few automated options like drag and drop support for the Shredder.

If you’d prefer to receive fewer alerts, check the Notifications tab and disable any alerts you aren’t interested in.

To gain access to all features in CleanMyPC, you’ll need to purchase an activation license. Click the Activate button in the upper-right to jump to the purchase page or enter a license key if you already have one. A single license for CleanMyPC costs $39.95.
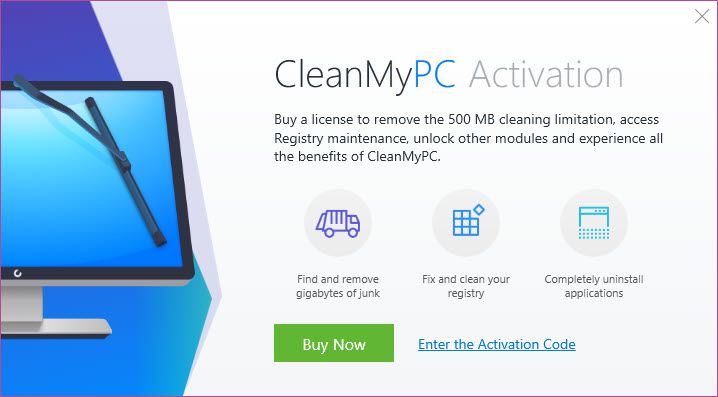
CleanMyPC-Activation

With the premium version, you can clean more than 500MB of files, access the Registry cleaner, and completely remove apps when using the uninstaller.

Start Your PC Maintenance Today

CleanMyPC provides a handy suite of tools for keeping your PC running at its best. While the Registry cleaner isn’t necessary, it provides easy ways to manage several important aspects of your computer. Disabling startup programs, cleaning junk files, and uninstalling software you never use will improve your computer’s performance.

Give the free version a try to see if it’s for you.


Read Full Article

Microsoft announces the Surface Hub 2


Do you remember the Surface Hub? Chances are you forgot it even existed. And yet, Microsoft just announced a second version of the Surface Hub. The company hasn’t shared any specifications or price, but it won’t be available before 2019 — selected customers will test the Surface Hub 2 starting this year.

The Surface Hub was a crazy expensive digital whiteboard that could handle anything from video conferences to document collaboration. Microsoft says that there are 5,000 companies using Surface Hubs, including half of Fortune 100 companies.

It’s unclear if each company has bought one Surface Hub or a thousand. But it seems like there was enough interest to work on a second version. At heart, it’s still a gigantic touchscreen-enabled display. It runs Windows 10 and supports the Surface Pen.

Compared to the previous version, Microsoft has drastically reduced the bezels. It looks like a modern TV now, but with a 3:2 aspect ratio. Surprisingly, the video camera is now gone from the main device. You’ll need to plug a webcam above the display to start video conferences.

The most interesting part is the concept video. You can see a device with fluid use cases. You can hook it to a wall, you can put it on a rolling case, you can create a wall of Surface Hubs.

Users log in by putting their finger on the fingerprint sensor. This way, you can find all your documents and data and accept calls from your account.

Microsoft is trying to push the needle when it comes to computers. This is an innovative form factor that could fit well in your company’s workflow. It’s interesting to see that the company isn’t standing still. The Mac hasn’t drastically evolved while Microsoft still has bold ideas to share.


Read Full Article

Instagram has an unlaunched “time spent” Usage Insights dashboard


Instagram may be jumping into the time well spent movement, following the unveiling of Google’s new time management controls last week. Code buried in Instagram’s Android app reveals a “Usage Insights” feature that will show users their “time spent”. It’s not exactly clear whether that will be your total time spent in Instagram ever, which could be a pretty scary number to some users, or within some shorter time frame like a day, week, or month.

By being upfront with users about how much of their lives they’re investing in their favorite apps, tech giants could encourage people to adopt healthier habits and avoid the long, passive, anti-social browsing sessions that can harm their well-being. These features could also help parents keep track of what their kids are doing online. Both might lead people to spend less time on apps like Instagram, but they could be happier with companies like Instagram.

The Usage Insights screenshot and “time spent” code were discovered by prolific app investigator Jane Manchun Wong inside the Instagram for Android application package, or “APK”. When asked by TechCrunch for more evidence about how the feature worked, she tweeted screenshot below of Instagram’s code. Several of Wong’s other recent discoveries of unlaunched features like Facebook Avatars and Twitter encrypted DMs were subsequently confirmed by the companies as being in testing.

An Instagram spokesperson told TechCrunch the company has no comment on this discovery for now, but may return with more info later. We’ll update when we hear back. Until then we’ll have to wait and see what exactly the time spent dashboard will show. For comparison, the new Android time management tool shows a daily look at how much time you spent on different apps, and lets you set time limits. But since most of Google’s apps outside of YouTube are utilities designed to be used as quickly as possible, it might have less to lose by revealing how users spend time on their phones than Facebook.

Google’s new Android time management features. Image via The Verge.

Offering “Usage Insights” aligns with Facebook’s recent discussion of research that shows active social networking, like messaging, posting, or commenting can be positive for people’s well-being, but endless zombie scrolling can make people feel worse. While Facebook hasn’t created anything like this feature in its own apps, it’s started to change its algorithm to promote active interactions while downranking viral videos that people consume passively. That led to Facebook’s first ever decline in its North American daily user count in Q4 2017, though it was growing again in the region by Q1 2018.

Instagram’s photo and video-heavy feed especially lends itself to the negative social networking behaviors like envy spiraling, where users constantly compare themselves against the glamorous highlights posted by their friends. Letting users know how long they’re Instagramming, or even let them set time limits, could push people to go out and live life instead of watching through a screen as others live it.


Read Full Article
Genoox raises $6M to help physicians better diagnose patients with genomic data


23andMe, Color, and other genomic sequencing startups have exposed demand from consumers for cheap ways to test for potential problems they may have — and Amir Trabelsi hopes to bring that mentality to medical institutions around the world.

That’s the hope for Genoox, a genomic analysis startup that’s geared toward doctors, clinicians and researchers that hopes to lower the cost of getting data from gene sequencing, and speed that process up, in the same ways that 23andMe and Color have done for consumers. Genoox at its heart is a data science company, taking the raw data from a genome sequencing and figuring out how to convey actionable information to medical professionals — and, hopefully, on a more complete scale than just consumer startups targeting specific health problems. The company said it has raised a $6 million funding round led by Triventures, a healthcare-focused venture firm.

“We want to bring [medical institutions] the ability to run clinical applications and use genomic data part of the clinical routine,” Genoox co-founder Trabelsi said. “We understand the direct-to-consumer market is growing and the demand is growing, but there is a gap in clinical applications. Genomic data is complicated especially when it comes to clinical outcomes — how can you make things more actionable for [professionals], how can you reduce the cost and overhead, and how can you filter out what is relevant and not relevant.”

Trabelsi said the goal is not to just hand a patient information based on their genome, but rather target clinical experts that might be able to use that data and better determine diagnoses for patients. The physician is the one that will have the final say in the decision or diagnosis, and the whole point here is to just take massive amounts of data and figure out a few points that a physician can use in order to make a better judgment call. And beyond that, Genoox can update those doctors as more and more research comes out regarding the potential health complications a patient may have.

Right now Genoox is targeting rare diseases — starting from one launching point, much like Color or 23andMe — but hopes to expand beyond that into other processes like carrier screening or hereditary cancer. This is a strategy that those direct-to-consumer companies are also employing, with Color recently rolling out a test that tries to search for hereditary risk for heart conditions like arrhythmia. As companies get more and more data, they’re able to better sift through a person’s genomic information and flag potential aberrations that could signal increased risk for various conditions.

“We see the growing demand for direct-to-consumer, but we’re also seeing more and more clinical practices using genetic data,” Tabelsi said. “It’s still not efficient or 100% there, but I think the next two years we’re going to see dramatically increased use of genetic data of clinical applications or clinical use. It’s not about the tech, which was proven to be powerful by some cases we were able to solve. I think the technology was kind of proven, along the years, and through some papers we published the question was not about the tech but whether the market is here or where are we in using genetic data.”

Genoox, however, is not the only one targeting clinicians with a data-oriented approach to understanding a patient’s genome. Sophia Genetics is also looking to use genomic data and physician input to better diagnose patients, and also raised an additional $30 million in September last year. As the cost of gene sequencing continues to decline, more and more companies will be going after it as a data play — whether that’s in the consumer or clinician-focused space — and that means Genoox will likely not be alone as it looks to snap up the attention of clinicians and professionals.


Read Full Article
Why Did Russia Ban Telegram? (And What That Means for You)

Nintendo Brings the NES Classic Edition Back


Nintendo has decided to bring the NES Classic Edition back from the dead. The NES Classic Edition will be available in stores in the U.S. again from June 29, so if you know anyone who works in retail you should probably ask them to put one aside for you.

The Return of the Nintendo Entertainment System

In 2016, Nintendo surprised everyone by launching the NES Classic Edition. This was a Nintendo Entertainment System in miniature, with 30 games built-in. And the NES Classic Edition flew off shelves at such a rate of knots that demand outstripped supply.

The NES Classic Edition was a massive hit, and parents tried desperately to get hold of one in time for Christmas 2016. However, despite this incredible demand, Nintendo shopped shipping the retro console to the United States in April 2017.

We soon discovered why, as later that year Nintendo launched the Super NES Classic Edition. However, that still meant lots of people were never able to get hold of a NES Classic. Perhaps those unfortunate nostalgia nerds will have better luck this time…

The Return of the NES Classic Edition

Nintendo has announced that it’s bringing the NES Classic Edition back. It will arrive in stores on June 29, and Nintendo expects it to be available until the end of 2018. That still doesn’t mean it will be easy to find, but it does you six months to find one.

For those who missed the NES Classic Edition completely the first time around, it’s a miniature version of the classic console with 30 games built-in. Titles include Castlevania, Donkey Kong, Excitebike, Super Mario Bros., and The Legend of Zelda. All for $60.

The Return of the Nintendo 64?!

Nintendo has done wonders for its bank balance by dipping into its past. The company sold millions of both the NES Classic Edition and Super NES Classic Edition. And the next six months will only add to those totals. And that’s without mentioning the Switch.

With Nintendo making it clear this is only a limited release, it begs the question of what’s next? I have my heart set on a Nintendo 64 Classic Edition, but I think it’s more likely that a host of classic Nintendo games will be coming to a Switch near you soon.


Read Full Article
How to Post Images to Instagram Directly From Lightroom


Adobe Lightroom is the preferred photo enhancement tool for photographers. Instagram is the social media where most of the tribe flocks. But still there is no way to directly post a photo to Instagram from Lightroom—unless you use a third-party shareware Lightroom plug-in that bridges the two tools.

How to Post Images to Instagram From Lightroom

LR/Instagram helps you work on Lightroom and then post the photo directly to your Instagram account. Remember, Adobe Lightroom is now Adobe Lightroom Classic CC. The process to install a plug-in is still the same: use the Lightroom Extensions Manager.

  1. Download the LR/Instagram plug-in to your desktop.
  2. Unzip the download and then launch Adobe Lightroom Classic CC > File > Plug-in Manager.
  3. Click on Add and browse to the plug-in file on your desktop to select it. The installation appears on the list of plug-ins and add-ons.
  4. After you have imported your photo, go to Publish Services which now includes LR/Instagram.
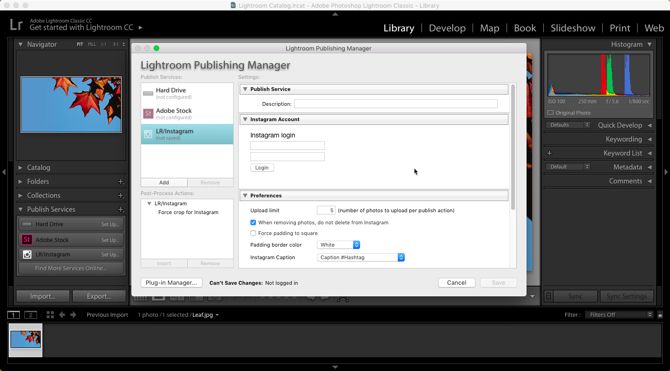
  5. Click on Set up to launch the Lightroom Publishing Manager and the Settings panel for the plug-in.
    Lightroom Publishing Manager
  6. Connect to Instagram with your log-in ID and password. Tweak the behavior of the plug-in from Preferences.

For instance, you can upload a maximum of five photos in one go. Keep the When removing photos, do not delete from Instagram checkbox selected to preserve the uploads when you delete the originals from the Publish section of Lightroom.

Force padding to square makes the thumbnails in the Instagram grid appear with the default square crop that is applied. You can add a post-process action to crop photos according to the aspect rations supported on Instagram.

LR/Instagram has metadata panel, where you can add hashtags and a caption before you publish on Instagram. By selecting a custom template in Lightroom, you can also specify a format using the {template} tags.

After you prep the photo in Lightroom, you just have to add the photo to the publish collection. From the Grid view, drag and drop the photo thumbnail on LR/Instagram under Publish Services. Click the Publish button in the upper right above the center section of the interface and your photo is now uploaded on Instagram.

This plugin gives you the freedom to batch edit photos in Lightroom and apply them to your Instagram photos.


Read Full Article
How to Prevent Your Emails Being Forwarded in Outlook and Gmail


As Gmail and Outlook are rolling out new features to their users, they are both offering a way to prevent your emails from being forwarded. If this is a feature you’ve been waiting for, read on to find out how to use it with either email provider.

How to Prevent Emails Being Forwarded in Gmail

One of Gmail’s newest features is the ability to prevent recipients from forwarding emails by turning on Confidential Mode. Here’s how to do that:

  1. Open a compose window in Gmail.
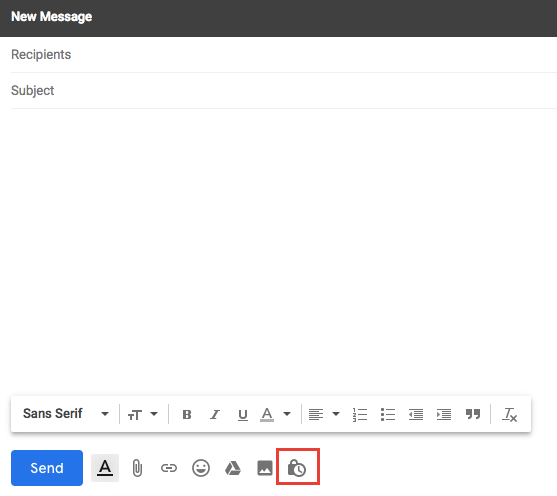
  2. Click the Confidential Mode button. 
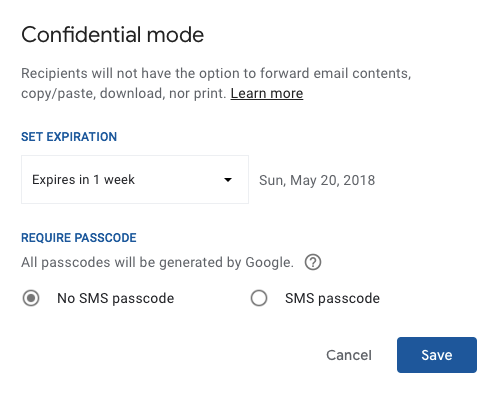
  3. In the window that opens, you can choose an expiration date for the email. If you are not concerned about the email remaining in their inbox, you can set the expiration date for the maximum of five years. No expiration date is not an option.  
  4. You can also enter an optional passcode to require them to open the email.
  5. Click Save.
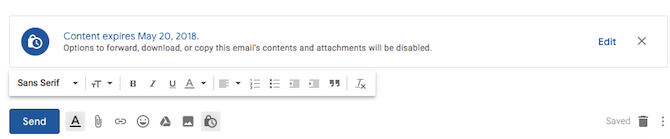
  6. You should see a message at the bottom of the email that indicates that you are sending a confidential email. 
  7. You can make changes to these settings before sending by clicking Edit or removing confidential mode by clicking the X.

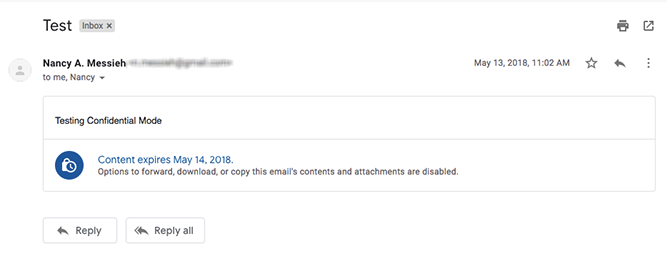
In addition to not being able to forward your message, recipients will also be unable to to copy, paste, download, or print your message.

If the email is sent to a Gmail recipient, there will be no forward button and you can’t right-click or copy the content with your mouse.

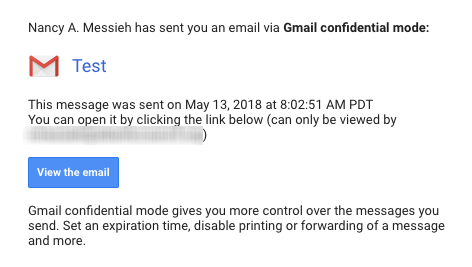
Non-Gmail recipients will receive an email with a link they can click.

And of course as the screenshots above demonstrate, Gmail can’t stop recipients from taking screenshots of the emails.

How to Prevent Emails Being Forwarded in Outlook

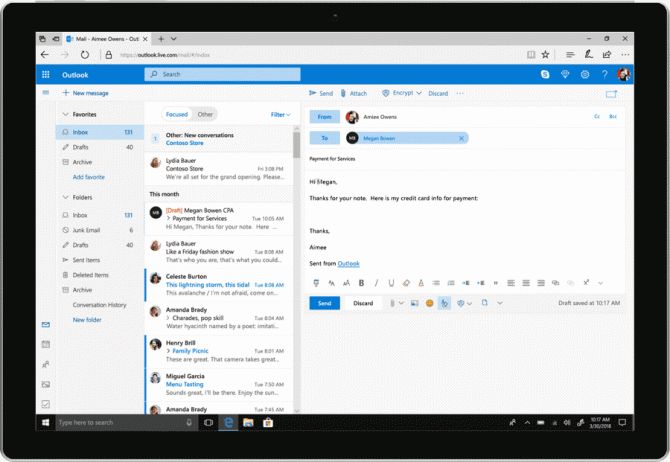
Outlook.com users are getting a similar feature rolled out to them as well. In addition to preventing the email from being forwarded, Outlook will encrypt it as well. To prevent users from forwarding your emails, do the following:

  1. Create a new message.
  2. Click the Encrypt button, next to the Attach button.
  3. In the dropdown menu, click Encrypt and prevent forwarding.
  4. If you change your mind before sending the email, click Remove encryption.

Microsoft Office documents you attach to will also be encrypted and if the attachment is forwarded, the recipient will be unable to open it.

If you feel that Gmail and Outlook are not offering enough security features, there are several secure and encrypted email providers to choose from.


Read Full Article
How to Hide Your Online Status in WhatsApp


If you’re old enough, you might remember the time when SMS messages burst onto the scene. We all thought that we’d reached the zenith of communications; being able to drop notes to other people instantly and from anywhere was revolutionary.

How wrong we were. WhatsApp has revolutionized the communications world for a second time. But the app has not necessarily revolutionized it for the better.

Is it really a good thing that people can see when you were last online? Is it not a gross invasion of privacy to display that information to everyone all the time? Perhaps you should turn the feature off.

How to Hide Your Online Status in WhatsApp

Hiding your online status in WhatsApp is easy. You just need to follow the step-by-step instructions below:

  1. Open the WhatsApp app.
  2. Click on the three vertical dots in the upper right-hand corner.
  3. Tap on Settings.
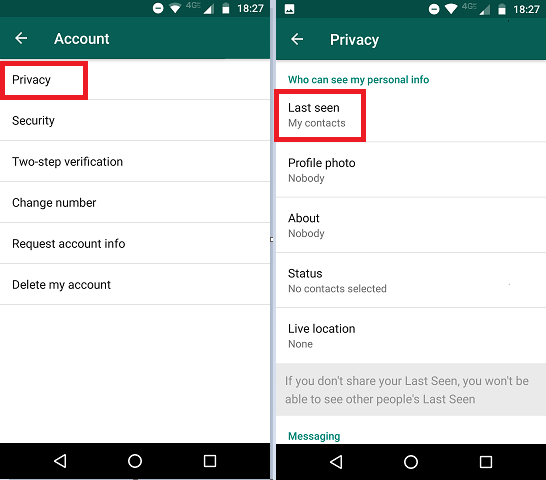
  4. From the Settings menu, select Account.
  5. Next, tap on Privacy.
  6. Choose Last Seen from the list of options.
  7. In the popup window, choose Nobody.

Note: Unfortunately, it is not possible to set the availability of your online status on a user-by-user basis.

While you’re on the menu, it’s worth spending a few moments checking out the other privacy options you can tweak. They include the visibility of your profile photo, bio, status, and location.

Perhaps most importantly, the Privacy menu is also where you can disable the infamous blue ticks (aka Read Receipts). They’re a sure-fire giveaway that you’ve been online, even if you disable your online status. To turn off the blue ticks, scroll down to Messaging > Read Receipts and unmark the checkbox.

This is just one of many useful hidden tricks in WhatsApp.


Read Full Article
No Gym Membership? 5 Workout Apps to Get Fit for Free Anywhere


The gym is made to help you get in shape, but that membership can be quite costly at times. Some of us are even notorious for practically “donating” our money to the gym without ever making use of that membership. So forget about it and start getting fit for free.

We have already talked about how to workout without going to the gym, but let’s take it a step further. By using the right apps and websites, you can exercise regularly without spending a dime.

1. Plank Timer (Android) and Plank (iOS): The Trendy No-Equipment Exercise

Doing planks is the new trend among the no-equipment exercise crowd. It’s also actually one of the easiest workouts to start for anyone who is out of shape and wants to get fit again.

Planks exercise your core strength by making you hold a position similar to doing push-ups. Start with a small number (30 seconds) and gradually move up to longer durations of planks (3-5 minutes).

On Android, Plank Timer is a fantastic app to start doing planks, and then add its variations. Go with the simple plank first, as the app counts down the seconds of a full minute. Feel free to pause at any point, or finish too. The 5-minute plank exercise offers variations like leg lifts, which you will move up to.

On iPhones, Plank is a more detailed app that explains all the different types of planks and even includes short video demonstrations. The app breaks down your plank workouts into weeks so that you know how to slowly upgrade your planking abilities.

Download: Plank Timer for Android | iOS (Free)

2. Outdoor Gyms (Web): Public Edited Map of Free Gyms in Open Spaces

apps workout free without gym

Who says you need to pay a hefty gym membership to get fit? There are bound to be public places near you that freely offer the basic tools for calisthenics or bodyweight fitness exercises.

Outdoor Gyms is a map of such free gyms in open spaces, added and verified by the community of users. Give it access to your location or move the map to the desired spot. Every green pin is an outdoor gym, and hovering over the pin will reveal notes about it, like the equipment available at that spot.

Outdoor Gyms is one of those cool internet products that is made purely out of people wanting to help each other be the best version of themselves.

3. NamaSketch (Web): Mini Yoga Sessions for Beginners

apps workout free without gym

NamaSketch is a free web app that teaches yoga to someone who hasn’t tried it before. It’s a novel teaching mechanism too, as the site shows you ten different poses in easy-to-understand doodles.

Follow along by looking at the cute doodles and listening to the audio instructions. The yoga poses include downward dog, cat, bridge, cobra, and even the warrior pose. Don’t worry, none of these are too complex or overwhelming, so any beginner can start with them.

NamaSketch is an excellent way to learn the basics of yoga. After you’ve used the app a few times and want to continue with this exercise, try the more advanced yoga apps to help you workout anywhere.

4. Perfect Workout (Android, iOS, Windows): Free Trainer App With Instructions

Perfect Thumb’s Workout app hands you a full-body workout with 12 exercises for free. But it can actually give you its entire huge workout collection for free if you want to, thanks to its built-in “Rubies” coin system. Given how good the app is, that’s a steal.

Perfect Workout lets you earn free rubies for different activities, like watching a video ad, sharing the app sharing exercises, inviting friends to do workouts, completing a workout daily, and opening the app daily. These rubies can then be used to buy different types of workouts. Or well, you could spend actual money to unlock the workouts individually or all at once. It’s still cheaper than a gym membership.

The app itself is fantastic. Perfect Workout shows cartoon animations of each exercise so you can follow along, and there are audio instructions and prompts too. You can also set a reminder so you don’t miss your exercise, and the app automatically tracks statistics of all your calorie-burning activities.

Download: Perfect Workout for Android | iOS | Windows (Free)

5. A Few Common Exercises From The Guardian

This is an oldie but a goodie. Back in 2011, The Guardian put together a special issue on how to get fit for free, part of which was a video. Well, the video is still available for anyone on YouTube.

The video is less than five minutes long, but it shows you different exercise opportunities in your life that you never considered before. It’s a mix of bodyweight exercises, stretches, aerobic activities, and tips to use in your daily routine. Check it out, this might be the best five minutes you spent to get fitter.

Level Up With Free Workout Generators

One of the benefits of a gym membership is that local trainers will happily recommend a workout for you. Since you don’t have a trainer to rely on, turn to these free exercise and workout generators. They will ensure your fitness routine never gets boring, and challenges you to achieve more.

Image Credit: Syda_Productions/Depositphotos


Read Full Article
The Best VPN for iPhone Users

The 15 Best Shows on Amazon Prime You Need to Watch


In a straight fight between Netflix, Hulu, and Amazon Prime, most people would rank Amazon Prime last. Several years ago, I would have agreed. But now? Amazon Prime has some of the best shows on the planet available to stream, and not just for U.S. viewers either.

Go ahead and check out the best shows to binge on Netflix and some unmissable TV shows to watch on Hulu. But don’t forget that the best shows on Amazon Prime are on par with the best of them…

1. Band of Brothers (2001)

IMDb: 9.5

Easily one of the best miniseries ever produced, Band of Brothers is a historical dramatization of the journeys taken by the soldiers of “Easy” Company during World War II. It starts with their training, then follows them through various missions over the course of the war, with particular focus on the impact that war has on them.

Perhaps the most moving aspect of Band of Brothers is how it interweaves present-day interviews of the actual soldiers of “Easy” Company throughout the series. This documentary-esque approach is what elevates this miniseries above conventional television. Even if you aren’t a military or history buff, you need to watch it.

Watch Band of Brothers on Amazon Prime

2. The Wire (2002)

IMDb: 9.3

The Wire isn’t just a television show; it’s an experience that transcends mere drama and entertainment. All five seasons are intricately interwoven to tell a grand story that’s greater than the sum of its parts. The Wire is one of only a few shows where it feels like real life is playing out before you. It’s impossible not to get swept up in it.

On the surface, The Wire is about cops and robbers. But as the seasons progress, you’ll realize that this is really a show about Baltimore, and more than that, a show about societal institutions and how they fail individual people. The Wire will change your outlook on life, or at least make you rethink a lot of what you’ve always held as true.

Watch The Wire on Amazon Prime

3. The Marvelous Mrs. Maisel (2017)

IMDb: 8.8

Without a doubt, The Marvelous Mrs. Maisel is the best new show of 2017. Not just one of the best original shows on Amazon Prime, mind you—I’m talking about the best new show of any TV network ever, cable or not. Yes, it’s that good. It even won two Golden Globes!

The Marvelous Mrs. Maisel follows a Jewish housewife in 1950s New York whose perfect life comes crashing down around her, causing her to find refuge and creative expression in stand-up comedy. The show is hilarious, witty, respectful of its characters, with top-quality acting and production, and extremely binge-worthy.

Watch The Marvelous Mrs. Maisel on Amazon Prime

4. Deadwood (2004)

IMDb: 8.7

Imagine the kind of television show Shakespeare would write if he was alive today, and imagine if that television show took place in the 1870s during the height of the American Wild West. That’s Deadwood in a nutshell.

Deadwood centers on a frontier camp and its growth into a full-fledged town. It’s about life in a lawless territory and what it really takes for civilization to prosper. This show has a massive ensemble cast with fully realized characters inspired by actual, historical people. It’s insanely well-acted and not just one of the best shows on Amazon Prime, but one of the greatest dramas of all time.

Watch Deadwood on Amazon Prime

5. Six Feet Under (2001)

IMDb: 8.7

Six Feet Under is a dark comedy-drama that centers on a family-operated funeral home and how the family copes when the father dies in a sudden and tragic accident. Few shows ever dare to tackle death and mortality and all the themes that arise from it, but Six Feet Under handles it with aplomb, resulting in one of the most moving shows ever made.

Watch Six Feet Under on Amazon Prime

6. Curb Your Enthusiasm (2000)

IMDb: 8.7

Curb Your Enthusiasm is a down-to-earth sitcom that follows the misadventures of a satirized Larry David, the creator of Seinfeld. Episodes often feature guest stars who also play satirized versions of themselves, and most of its humor comes from the awkward situations Larry finds himself in. If you love cringe comedy, this is the epitome of the genre.

Watch Curb Your Enthusiasm on Amazon Prime

7. Friday Night Lights (2006)

IMDb: 8.6

Friday Night Lights is NOT a show about football. Well, it is, but you don’t have to know a single thing about football to enjoy one of the best shows on Amazon Prime. This is a show about family, integrity, glory, perseverance, and how to stand tall in the face of difficulties. Containing some of the best and deepest characters ever to grace television, Friday Night Lights is one of the most heartwarming and heartwrenching shows ever written.

Watch Friday Night Lights on Amazon Prime

8. Justified (2010)

IMDb: 8.6

What happens when a law enforcement officer grows tired of being hampered by bureaucracy and protocol and begins to do whatever it takes to deliver justice to criminals? You get Justified, a stylized cop show that’s unlike any other.

Give it time to grow on you. The first season is mostly standalone episodes, but the show begins to embrace season-long arcs with the second season, and that’s when the characters and stories really begin popping off the screen.

Watch Justified on Amazon Prime

9. Parks and Recreation (2009)

IMDb: 8.6

Parks and Recreation is one of the brightest and most uplifting sitcoms ever made. It’s full of characters that are oblivious or outwardly mean, but deep inside each of them is a warm heart that genuinely cares for the others.

Filmed in the same mockumentary style that made The Office famous, Parks and Recreation is the perfect show to watch when you want to be among cheerful company. But whatever you do, I recommend skipping the cringe-filled first season. The writers didn’t quite find their footing until the second season.

Watch Parks and Recreation on Amazon Prime

10. Hannibal (2013)

IMDb: 8.6

Hannibal is definitely one of the best shows on Amazon Prime, but it’s also not for the faint of heart. This cop drama isn’t just extremely gruesome and dripping with blood, but weighs heavy on the soul with its dark subject matter and unbearable psychological tension. It’s an amazing show—that fact is not up for debate—but probably not one you should watch if you aren’t in a good state of mind.

Watch Hannibal on Amazon Prime

11. Poldark (2015)

IMDb: 8.4

Based on a historical novel series of the same name, Poldark follows the life of a British soldier who returns home after fighting in the American War of Independence and learns that his father has passed away. Life isn’t so familiar after all the years he’s been gone, and the struggles keep piling on as he learns to run the mine inherited from his father.

Poldark is an incredibly well-made period drama, comparable to Downton Abbey but with a much smaller cast. Though a bit slow in the first two episodes, it builds into something great that grabs hold of you and refuses to let go.

Watch Poldark on Amazon Prime

12. In Treatment (2008)

IMDb: 8.3

In Treatment ambitiously aired as a five-episodes-per-week show, centering on a therapist and each day dedicated to a session with one of his patients. Over the course of eight weeks, you learn more about each patient and how they progress in their therapy, plus the effects they have on the therapist himself.

The show is nothing more than two or three characters sitting down and talking, but the dialogue is so rich and well-written, and the performances are so strong, that you can’t help but want to keep watching and know more. I consider it a privilege to be able to watch a show that’s as unconventional as this one.

Watch In Treatment on Amazon Prime

13. The Expanse (2015)

IMDb: 8.3

The Expanse is to science fiction what Game of Thrones is to fantasy: a sprawling, gritty, character-driven epic that’s wholly unlike anything that’s come before. Most science fiction shows suffer from low budgets and cheesy writing—even the great Battlestar Galactica, which is another of the best shows on Amazon Prime—but The Expanse spares no expense in portraying the world it wants portray.

Set 200 years in the future, the show follows multiple storylines across a dying Earth, a settled Asteroid Belt, and a newly colonized Mars. Oozing with political intrigue and interpersonal drama, The Expanse is the best of what modern science fiction offers.

Watch The Expanse on Amazon Prime

14. Sneaky Pete (2015)

IMDb: 8.3

Sneaky Pete is a crime drama about a recently released con artist who takes on the identity of his former cellmate to avoid being tracked down by nefarious gangsters from his past. But as skilled as he is at conning people, when people around him begin to grow suspicious, the facade risks being shattered.

Laced with dark humor and wonderful character work, Sneaky Pete is a surprisingly strong Amazon Original and sits up there with The Marvelous Mrs. Maisel as one of the best shows Amazon has ever produced.

Watch Sneaky Pete on Amazon Prime

15. The Americans (2013)

IMDb: 8.3

This period piece takes us back to the 1980s during the height of the Cold War and follows two KGB spies who have been living as a married couple in suburban America for nearly two decades. They now have two children who have no idea who they really are, and they live next door to an FBI agent who could uncover the truth at any moment.

But beneath all the high-concept espionage, The Americans is really about marriage, identity, and loyalty. When everything in your life is built on deception, it’s easy to lose your way—and The Americans explores that to the fullest through highly suspenseful story arcs dripping with tension and suspense.

Watch The Americans on Amazon Prime

Get More Out of Your Amazon Prime Membership

As an Amazon Prime member, there are all kinds of Prime benefits you may not be aware of. And on top of those, Amazon is always adding new benefits for Prime members. If you aren’t taking advantage of them yet, why not? You’re fully entitled to them, and it won’t cost you any extra money, so you might as well.

You can also expand what you can watch with Amazon Prime by adding some Prime TV channels to your account. These aren’t free but they’re definitely cheaper than buying cable TV packages, so we recommend checking them out.


Read Full Article
17 Basic macOS Terms Every Mac User Needs to Know and Master


Are you a Mac user? Whether a newbie or veteran, you have a whole lot of Apple-specific glossary to pick up and master. But don’t worry, it’s not all that difficult. (If you have an iPhone, you’re already halfway there!)

Our roundup of common macOS terms will help you get familiar with Apple speak. To avoid repetition, we have left out:

Let’s get started!

1. Finder

finder-mac

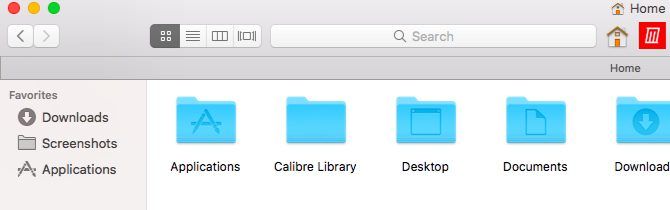
Finder is Apple’s version of a file manager or file explorer. You can open it by clicking on that (immovable) blue icon at the extreme left of the Dock.

To make Finder more comfortable to use, customize it with our Finder tips for beginners.

2. Quick Look

This time-saving Finder feature is a hit with Mac users. It allows you to preview files without opening them.

How do you get the Quick Look feature to work? Simply select a file in Finder and hit Space. The preview pops up instantly. Hitting Space again closes the preview.

To toggle full-screen previews, you can use the shortcut Option + Space. Quick Look works with images, PDFs, media files, spreadsheets, etc.

3. Spotlight

Spotlight is the system-wide search mechanism on macOS. Launch it from anywhere on your Mac with the shortcut Cmd + Space.

You can use Spotlight to bring up apps, files, and folders. It’s also great for retrieving information from the web, performing conversions, opening system settings, and more. Our best Spotlight tips will show you how to make the best of this vital macOS feature.

4. Notification Center

notification-center-mac

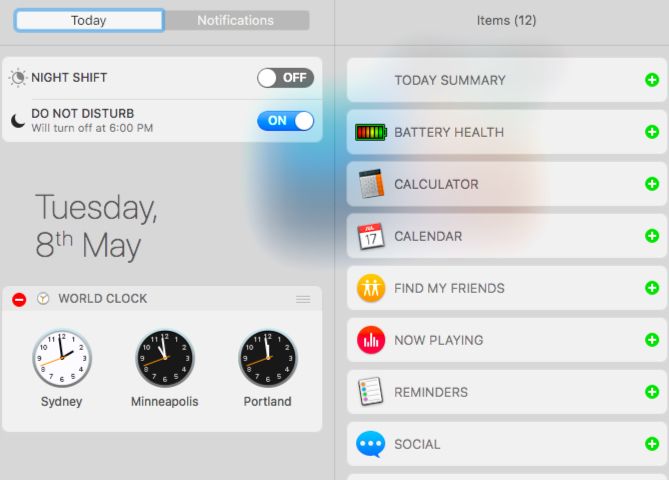
This slide-out sidebar feature on your Mac desktop displays app and system notifications. You can click on the menu bar icon at the extreme right to reveal it.

The Notification Center also has a few widgets to display extra pieces of information such as stock prices, reminders, and upcoming events. They show up in the Today tab.

5. FileVault

FileVault is your Mac’s hard disk encryption utility. You can set it up under System Preferences > Security & Privacy > FileVault. To learn more about keeping your files safe with encryption on Mac, read our in-depth guide to FileVault.

6. Gatekeeper

gatekeeper-warning-mac

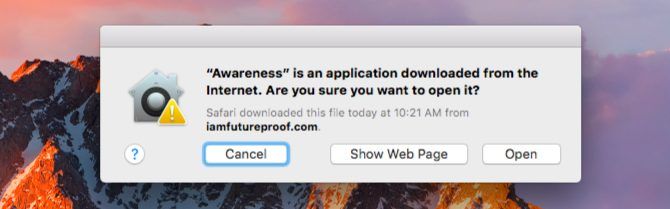
This one’s another macOS security feature. It protects your Mac from malware by preventing unauthorized apps from running on it.

When you open apps that haven’t come from the Mac App Store or a verified developer, Gatekeeper will block your attempt and ask you to confirm if you want to open the application. You should take care to only run apps you trust.

7. iWork

iWork is Apple’s native office suite. It comes with the Pages app for word processing, Numbers for spreadsheets, and Keynote for presentations.

If you want to start using these apps on your Mac, check out our beginner’s guide to iWork.

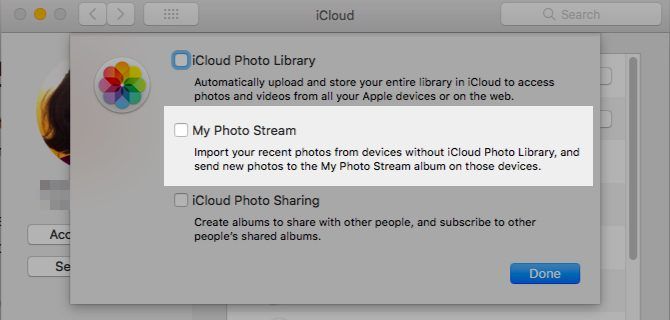
8. My Photo Stream

my-photo-stream-mac

My Photo Stream is Apple’s strategy for keeping your photos synced between your Apple devices without backing them up the cloud. It’s different from iCloud Photo Library.

You can enable My Photo Stream from System Preferences > iCloud. Click on the Options button next to Photos. You’ll then find the requisite option in the window that shows up.

9. Smart Groups

Smart groups are special views that allow you to filter data based on one or more conditions. For example, with a smart group you can bring up a list of contacts living in a certain locale or a set of photos featuring only you.

You’ll find smart groups in certain Mac apps like Finder, Mail, Photos, and Contacts. Their names vary accordingly, so you have smart folders, smart mailboxes, smart albums, smart contact groups, and so on.

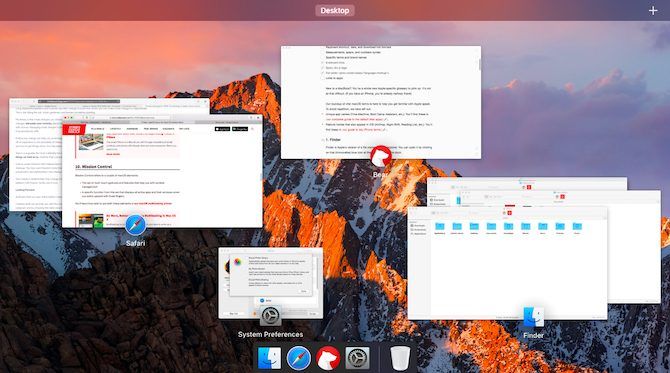
10. Mission Control

mission-control-mac

Mission Control refers to a couple of macOS elements:

  • The set of multi-touch gestures and features that help you with window management
  • A specific function from this set that displays all active apps and their windows when you swipe up with three fingers.

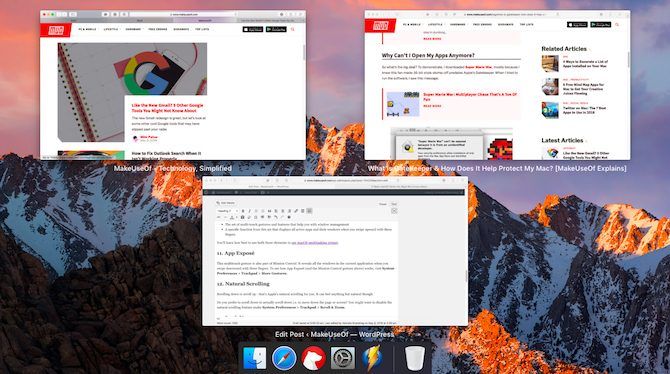
11. App Exposé

app-exposé-mac

This multitouch gesture is also part of Mission Control. It reveals all the windows in the current application when you swipe downward with three fingers.

To see how App Exposé (and the Mission Control gesture above) works, visit System Preferences > Trackpad > More Gestures.

12. Natural Scrolling

Scrolling down to scroll up—that’s Apple’s natural scrolling for you. While this is standard on mobile devices, it can feel anything but natural on a trackpad.

Do you prefer to scroll down to actually move down the page or screen? Then you might want to disable the natural scrolling feature under System Preferences > Trackpad > Scroll & Zoom.

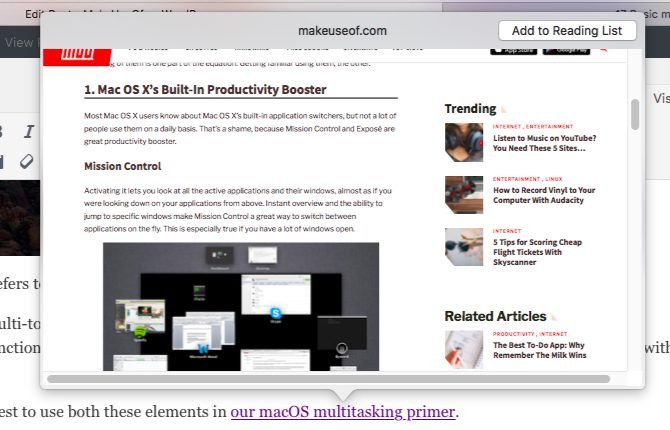
13. Look Up

link-look-up-mac

This lesser-known macOS feature is quite the time saver. It allows you to look up words in the dictionary from anywhere on your Mac without having to search in Spotlight or open the Dictionary app.

The Look Up gesture, a three-finger tap on any word, gives you a condensed version of the dictionary results in a popup. If you use this gesture on a link, you can preview the contents of the corresponding web page, also in a popup box.

14. Hot Corners

Hot corners are hotspots on your Mac’s screen that trigger certain functions when you move your mouse to them.

You get to decide which of the four screen corners links to which custom action. For example, you can program one corner to open Notification Center and another one to show the desktop.

To start setting up hot corners, click on the Hot Corners button under System Preferences > Mission Control.

15. Share Sheet

share-sheet-mac

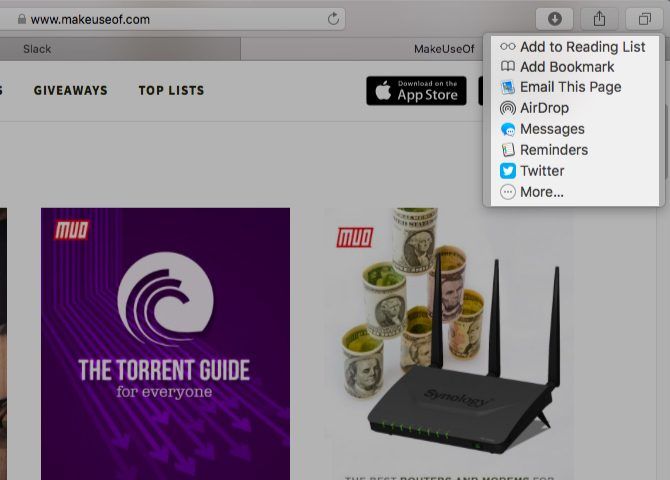
This is the list of apps/functions you see when you click on the Share toolbar button in any Mac app. Its contents vary based on the app you’re in, of course.

To toggle the visibility of the extensions that appear in the share sheet, head to System Preferences > Extensions > Share Menu.

16. Library Folders

user-library-mac

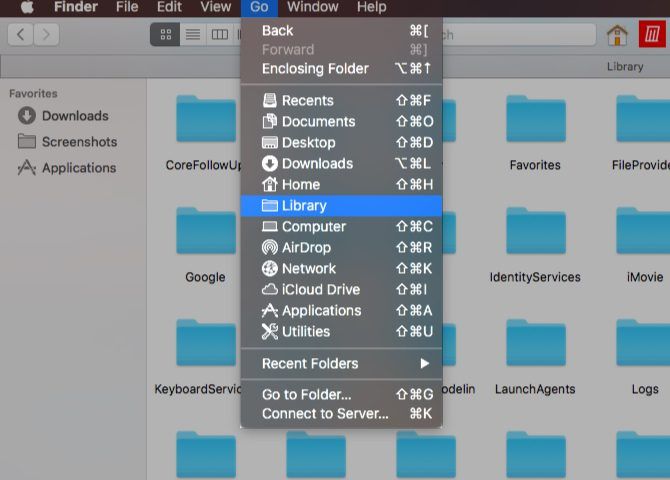
These are a couple of special Finder folders that store data (and preferences) used by various apps and system processes.

The first of these Library folders is the System Library, which contains data shared by all user accounts on your Mac. This includes default wallpapers, plugins, fonts, and similar. The System Library lives at /Library, which is at the root of your hard disk.

Next comes the User Library, which is specific to each user account. Custom fonts, email caches, installed extensions, etc. go into this folder or one of its subfolders. The User Library lives in your Home folder.

While you can access the Library folders, it’s best to leave their contents alone to avoid data and application mishaps.

17. Continuity

continuity-mac

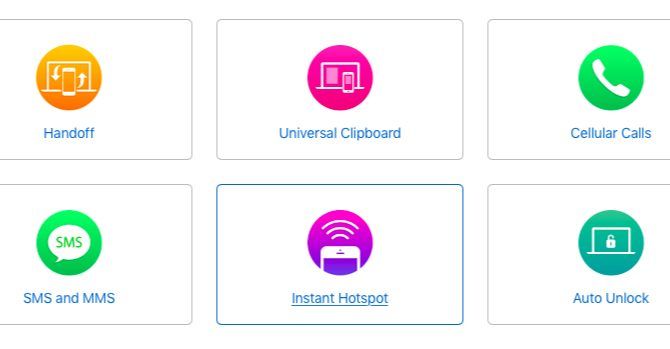
Continuity is Apple’s effort to make the transition between all your Apple devices as good as seamless. It’s a mix of features like:

  • Handoff: Continue with tasks across devices in apps like Safari, Mail, and Pages.
  • Universal Clipboard: Use a common clipboard between, say, your Mac and iPhone.
  • iPhone SMS and Calls: Respond to SMS and receive phone calls from your Mac.
  • Instant Hotspot: Use your iPhone as a personal hotspot from your Mac.

One Step Closer to Becoming a Master of Your Mac

Did you know that macOS has a dedicated tab for Apple-related terms in its Dictionary app? It’s another one of those tiny but useful Mac features you’ll find delightful as a Mac user.


Read Full Article
How to Change the Windows User Password via Command Line


Changing your password is simple in Windows. While you can jump through a few menus to change the password for your own account (or someone else’s if you’re an administrator), if ever you can’t do it that way, you can always use the Command Prompt instead.

It might scare new users, but the Command Prompt is great for quickly doing common tasks. Next time you want to change a password on your PC, try this method.

How to Change the Windows User Password via Command Line

  1. First, open an administrator Command Prompt (assuming you have administrator privileges). To do this, type cmd into the Start Menu. Right-click on the Command Prompt entry and choose Run as administrator.
  2. Type the following command and press Enter to list all the users on your system:
    net user
    
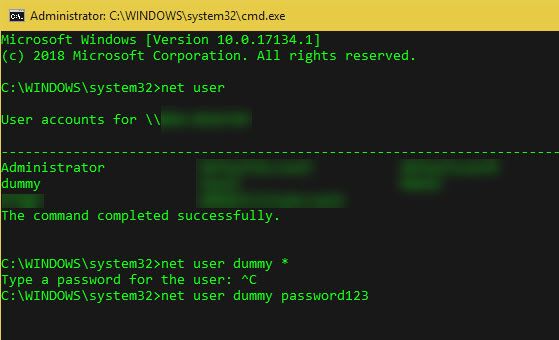
  3. Take note of the account name you want to change the password for, then use this command. Replace USERNAME and NEWPASS with the actual username and new password for the account. Further, if the username is more than one word, you’ll need to place it inside quotes:
    net user USERNAME NEWPASS
    
    net user "USER NAME" NEWPASS
    
  4. After you press Enter to run this command, you’ll see a message that it completed successfully. Now you can use the new password to log into this account.

Windows-Change-Password-Command-Line

For extra security, you can use a slightly different command to prevent the new password from appearing on-screen. Type net user USERNAME * and Windows will ask you to type a new password twice. However, it doesn’t appear as you type, making sure anybody nearby cannot see it.

If you see an Access denied message, make sure that you started the Command Prompt as an Administrator. Standard users can’t change the password for other users.

And if you’ve lost the administrator password, follow our tips for resetting your forgotten Windows password.


Read Full Article
The Mac Equivalents to Default Windows Software


Switching from Windows to Mac means leaving behind default Windows apps for macOS alternatives. Some of these are intuitive, while others will take some getting used to.

Here are the default Mac apps equivalents to Windows software to help you settle into your new environment.

Browse Files With Finder Instead of File Explorer

Finder on Mac

The iconic smiley face is always the first icon on your dock. Opening it shows you a straightforward interface for deciding where your files will spend the rest of their lives. Finder is also your new method for navigating through your hard drive and storage media.

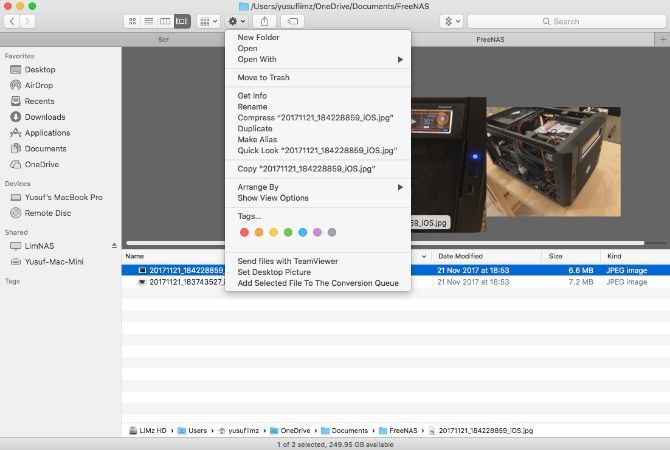
At the top of the Finder window, you have some buttons for quickly changing your view, adjusting the sort order, sharing, and tagging files or folders. Under that, you’ll find multiple tabs (something that Windows has yet to implement). Similar to Windows, the sidebar on the left will display both local and network locations that you can quickly access.

Finder newcomers should know about the somewhat confusing way of cutting and pasting. First, you need to copy the file with Cmd + C, then use the Move operation. The keyboard shortcut for moving is Cmd + Shift + V. You can also access it by holding down Option after you right-click, and the Paste option in the context menu will change to Move.

Another pro tip for Finder is selecting any file and tapping the spacebar. macOS will open Quick Look for the file you selected, whether it’s a photo, document, or any media file. You can use your arrow keys to navigate to other files in the same folder, and have Quick Look preview them without having to open the files.

Download Apps From the App Store Instead of Microsoft Store

Mac App Store

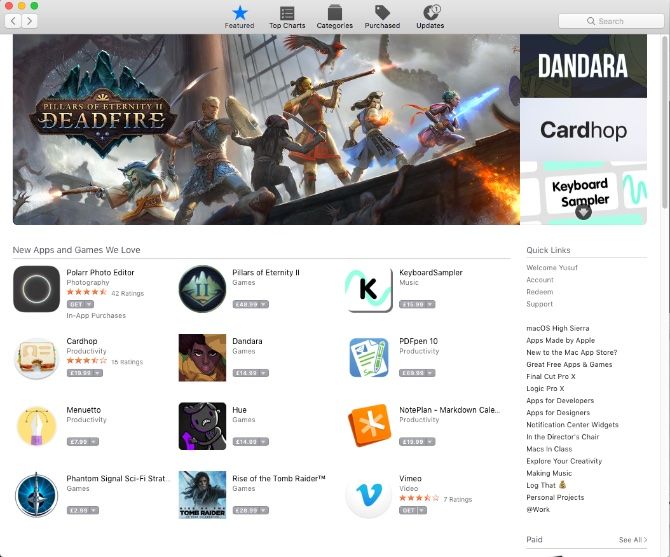
Comparing the Windows Store to the App Store is like comparing a paper plane to a fighter jet. Aside from the sheer volume of apps, the App store is refined, easier to use, and looks prettier.

On the right-hand sidebar, you have some quick links to features such as getting support and a list of the top apps in both the paid and free categories. The Categories tab allows you to easily jump to a particular app category such as Games or Utilities.

Tabs along the top include the Purchased and Updates. The Purchased tab shows any apps you’ve downloaded previously, on any of your devices. Visit the Applications folder from your Dock or Finder to see your installed apps.

The App Store also manages app updates automatically. Updates for any apps you’ve downloaded from the App Store will display in this tab when available. You can either click on Update All or update each app individually.

Browse Images With Preview Instead of Photos

Mac Preview Pictures

Preview serves as the default image and PDF viewer in macOS. It has the capability to convert files, sign documents, quickly mark up images, and even make color or level changes.

In Windows, double-clicking on a picture to open it then using the arrow keys to view other pictures in that folder comes naturally. Trying to do this in Preview is a little different. To accomplish this, first select your desired pictures, then right-click and select Open With > Preview.

When opening a GIF or PDF in Preview, you can export individual frames or pages from the sidebar. The Quick Look feature covered earlier is the fastest way to preview GIFs, though.

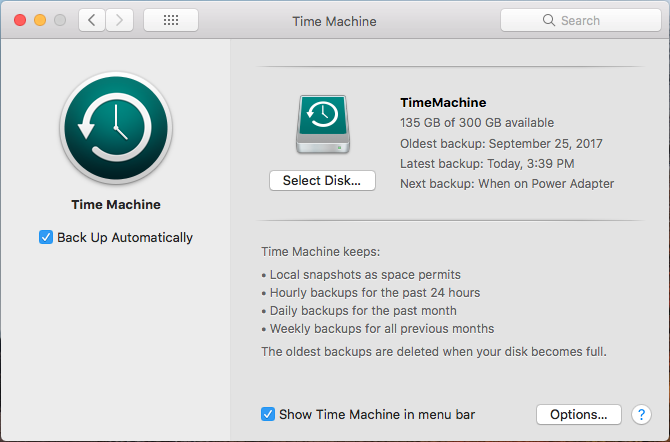
Back Up With Time Machine Instead of File History

Mac Time Machine

You can’t really compare Time Machine with File History as the former’s functionality is unquestionably superior.

If you’ve made unwanted changes to a file, accidentally deleted something, left your Mac on a train, or even dropped your Mac under a train, as long as you have a recent Time Machine backup, your life won’t be over. You can go back in time and restore specific files or even completely restore your Mac.

With Time Machine, you simply choose a location, such as an external drive or a network share, and let it do its business. The initial backup may take some time, as it backs up everything on your system. After that, any backups it makes are incremental, meaning only files that change are sent to Time Machine.

When you run out of space, Time Machine will overwrite the oldest backups with newer ones. So if you’d like to keep a long history of your backups, ensure your backup destination is large enough. Many NAS devices also support Time Machine natively.

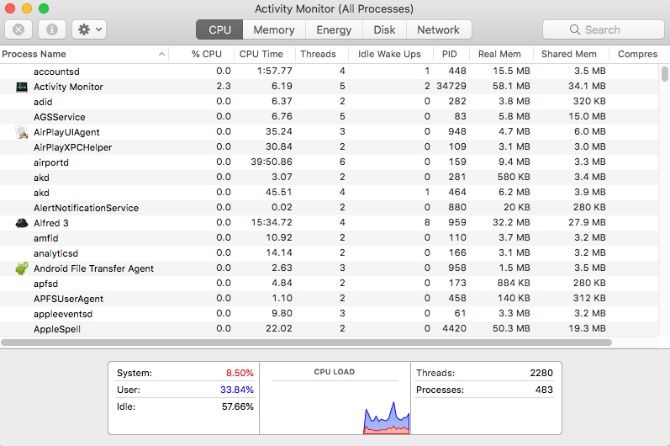
Manage Processes With Activity Monitor Instead of Task Manager

Mac Activity Monitor

The most basic step in troubleshooting any Windows issue is to open the Task Manager. The app allows you to look at running process and what resources they are using. You access it using the Ctrl + Shift + Esc shortcut or by right-clicking the Taskbar. It might not be as obvious to new Mac users how to get this information.

In the Applications folder, there is a subfolder named Utilities that contains an app called Activity Monitor. (Keep this folder handy as there are many useful items inside.)

After you open Activity Monitor there are different panels for each type of resource: CPU, Memory, Energy, Disk, and Network. Energy even includes the details about closed apps that chewed up your battery.

To quickly access Activity Monitor, pin it to your Dock (right-click the icon and choose Keep in Dock) or search for it using Spotlight (Command + Space).

Enter Text Commands With Terminal Instead of Command Prompt

Mac Terminal

The classic Command Prompt and modern PowerShell utility for Windows both serve as its command line tools. If you want a quick way to find your IP, or scan through a bunch of folders—the command line is much faster than clicking through menus.

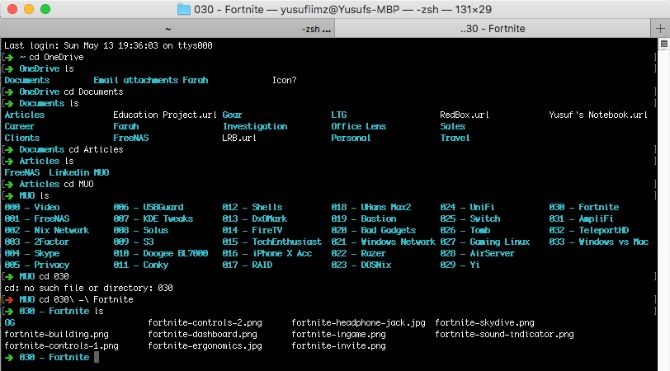
On macOS, you have Terminal. This app also lives in the Utilities folder under Applications. It’s a Bash shell, something you may be familiar with if you’ve used Linux before. It offers a ton of powerful tools, but is an entirely different syntax from the Windows shells.

If you miss PowerShell, you can install it on your Mac.

Search With Siri and Spotlight Instead of Cortana

macOS Siri Search

Those moving over from Windows 10 should be familiar with Cortana. Though its primary use is a voice assistant, it’s also how you search the web and your local computer.

On a Mac, you have Siri, which performs a similar role. Hold down Cmd + Space to get a Siri prompt. You can ask Siri to search files, create Reminders and Calendar events, and much more.

If you prefer to search the old-fashioned way, you can press Cmd + Space to bring up Spotlight. It’s not as powerful as Siri for certain tasks, but you can quickly search your Mac for applications, files, and more. You can also solve simple math problems and search the web without opening other apps.

Edit Text With TextEdit Instead of Notepad/WordPad

Mac TextEdit

On Windows, your basic text editor and rich text editor are different programs: Notepad and WordPad. On Mac, these combine into a single program called TextEdit. By default, TextEdit uses rich text, so you can make documents with basic formatting.

However, if you want a barebones text editor, you can simply press Shift + Cmd + T to switch to plain text. This switch removes the alignment options and the ruler. Then you can create your code or text files. The UI is expectedly simple, and like Notepad it is dead-simple to use. It’s not for complex projects, though.

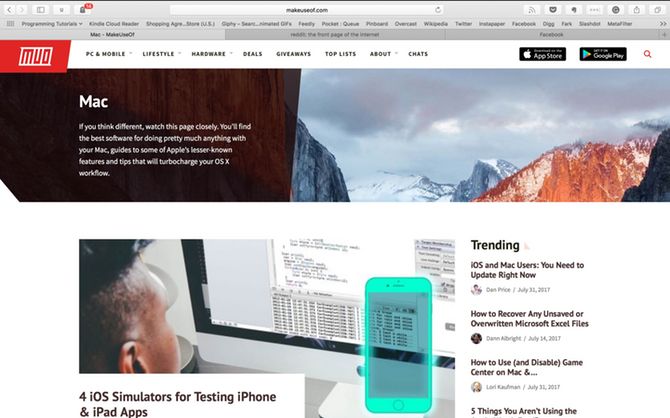
Browse With Safari Instead of Edge

safari mac

Windows 10 replaced the widely-hated internet Explorer with Edge. Using Windows for a long time may have thus soured you on using any default browser.

Thankfully, Safari on Mac is not such a grim affair. Safari has a decent extension collection, though nothing close to Firefox or Chrome’s offerings. But you do get Apple’s features to save on both resources and battery life. Both Chrome and Firefox are resource-hungry, and a few too many open tabs can lead to a significant change in battery life.

Safari integrates with other native Mac services like iCloud, Handoff, and Keychain. Along with some of the other tricks up its sleeve, Safari makes for a worthy contender to use as your main browser.

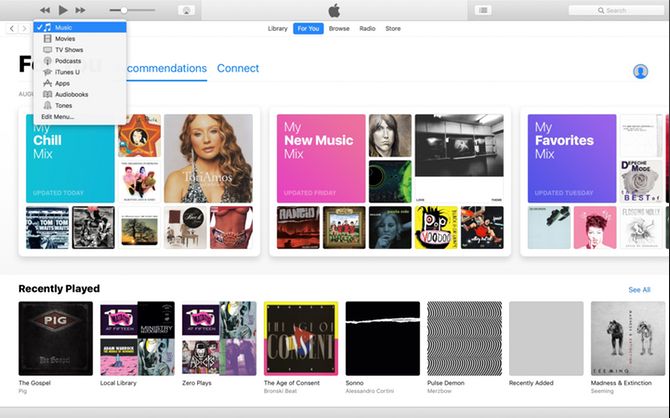
Enjoy Media With iTunes Instead of Windows Media Player

itunes mac

Windows Media Player is the bland default music and video player for Windows. If you have an iOS device, you probably already replaced it long before you got your Mac. Since iTunes is required for managing your iPhone/iPod/iPad on Windows, you might already be familiar with the app.

Most Mac users do not harbor much love for iTunes. It is, however, the default way to handle your music, movies, and iOS apps. More recently, Apple expanded it to include support for its streaming music service, Apple Music.

If you don’t care for iTunes, you can try our tips for making iTunes better.

Automate Work With Automator Instead of Task Scheduler

Mac Automator

The Task Scheduler is a powerful way to control your Windows machine. If you rely on scripts running at certain times, you may wonder what macOS has to match that kind of power.

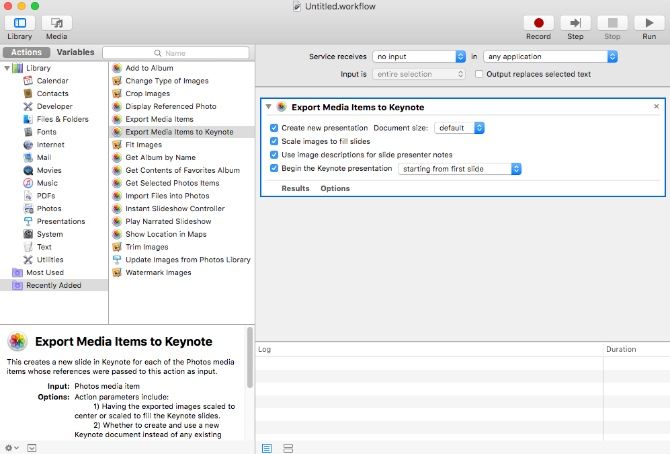
Automator has you covered. It has a Calendar Event option that allows you to schedule your workflows to run via the built-in Mac calendar. Automator is even more powerful, allowing you to create Services and Applications. Follow our tutorial on using Automator to get started.

Switching From Windows to Mac?

macOS definitely has an impressive set of default apps. After doing something for years in another OS, finding a new way will come with a slight learning curve. Fortunately, many of the default Mac apps are equivalent if not better compared to their Windows counterparts. After working with your new computer for a while, you’ll be macOS pro in no time!


Read Full Article